Pro2 DT-201 User manual

7.
DT-201
Digital
wireless
Stereo
Headphones
=
Operating
Instructions
English
=
Instructions
pour
l'utilisation
Français
=
Modo
de
empleo
Español
=
Bedienungsanleitung
Deutsch
“
使
用
说
明 书
繁体
中 文
“使
用 说
明
书
简体
中
文
Printed
in
China
Product
Main
Features
e
2.4GHz,
wireless
digital
transmission
:
it
allows
freer,
more
personalized
music
listening
and
movie
watching
without
interfering
with
others.
e
USB
/
Analog
(3.5mm
&
6.3mm
pins):
double
audio
input,
it
facilitates
bundled
applications
of
all
kinds
of
players.
e
Low
Power
Consumption
Headphone:
regular
alkaline
battery
(1.5V
AAA
x2)
may
sustain
more
than
20
hours.
e
Large
Size
Headphone
of
40mm
Speaker
Unit
:
heavy
and
distinct
bass
sound,
clear
and
bright
mediant
and
treble,
it
reproduces
hi-fidelity
of
the
mediant-bass
effects
and
the
original
audio
sound.
€
Automatic
Sleeping
Device:
after
the
audio
source
terminates
for
about
10
minutes,
the
headphones
and
transmitter
will
be
shut
off
automatically.
@
Applicable
to
any
type
of
player
with
USB
connection
port
and
audio
source
output
port
with
&
3.5mm
plug
pin
or
¢
6.3mm
plug
pin
such
as
TV
set,
Audio
Equipment,
DVD/CD
Player,
Desktop
Computer,
Handheld
Computer,
PDA,
iPod,
iPhone,
MP3
and
Cellular
Phones,
etc.
Components
and
Accessories
SES
DT-201
Digital
Wireless
Headphone
Alkaline
Battery
1.5V
AAA
x
2
Parts
Location
and
Function
Ear
Pad
(Left)
=
:
Power
Switch,
press
and
hold
lightly
for
3
seconds
to
turn
on
or
shut
off.
Battery
Cover:
please
use
AAA
1.5V
2
xalkaline
batteries
Ear
Pad
(Right)
Power
and
Frequency
Verification
Indicator
(Green):
it
blinks
in
slow
pace
after
turning
on
the
power,
it
keeps
on
lighting
up
after
frequency
verification
completes.
6.
PAIR:
Frequency
Verification
Push
Button,
it
is
used
for
frequency
verifying
with
the
transmitter.
7.
VOL:
Volume
Adjust
Button
to
adjust
the
volume
level.
A
PYON>
Battery
Inserting
(Installation)
E
1.
Pressing
down
lightly
the
battery
cover
and
opening
the
cover.
2.
Inserting
the
batteries
(AAA
1.5V
x
2
Alkaline
Batteries)
3.
Restoring
the
battery
cover
and
pushing
up
lightly
and
close
up
the
battery
cover.
Transmitter
and
Headphone
Frequency
Verification
as
well
as
Usage
a.
Connecting
the
transmitter
with
connection
cable
to
the
player
device
(iPod,
iPhone,
MP3,
PC, NB,
etc.,),
proceed
to
input
audio
source
and
confirm
that
the
player
has
been
turned
on
for
music
playing.
.
Pressing
lightly
on
the
transmitter
power
switch
(.*)
for
3
seconds
to
turn
on
the
transmitter
power,
now,
the
power
and
frequency
verification
indicator
(Blue)
will
be
kept
constant
on.
Using
pen
tip
to
press
lightly
on
the
transmitter
frequency
verification
button
(1D)
for
3
seconds,
now,
the
power
and
frequency
verification
indicator
(Blue)
will
blink
in
quick
pace.
.
Press
lightly
on
the
headphones
power
switch
for
3
seconds
to
turn
on
headphones
power,
now,
the
power
and
frequency
verification
indicator
(Green)
will
blink
in
slow
pace.
.
Hand-pressing
on
the
headphones
frequency
verification
push
button
(PAIR)
to
proceed
the
frequency
verification
(pairing)
operation
with
the
transmitter
(for
about
more
than
3
seconds),
until
one
hears
the
“bi”
sound
in
the
headphones
and
the
transmitter
frequency
verification
indicator
has
been
kept
constant
on,
it
indicates
that
frequency
verification
(pairing)
has
been
completed.
When
it
has
been
connected
for
frequency
verification,
if
the
frequency
verification
indicator
blinks
in
slow
pace,
it
indicates
it
is
in
the
progress
of
channel
searching,
quick
blinking
means
in
the
progress
of
frequency
verifying,
if
itis
constant
on,
it
represents
the
frequency
verification
has
been
completed
and
the
device
is
ready
for
use.
Other
Instructions:
After
completing
the
frequency
verification
and
the
product
is
set
to
normal
use,
when
the
audio
source
stops
playing,
the
power
and
pairing
indicator
will
blink
in
slow
pace;
if
the
audio
source
turns
to
normal
playing,
the
indicator
will
be
reset
to
constant
on.
.
After
completing
the
frequency
verification,
if
the
device
is
enabled
for
re-operation
after
being
turned
off,
it
is
not
necessary
to
perform
the
frequency
verification
and
the
device
is
ready
for
direct
use
by
turning
it
on.
When
stop
using,
please
turn
off
both
the
power
switches
of
the
transmitter
and
headphones
to
avoid
unnecessary
power
consumption.
.
When
the
transmitter
is
connected
at
the
same
time
to
USB
connection
cable
and
¢3.5mm
plug
pin
double
head
connection
cable,
the
4
3.5mm
IN
connection
cable
will
be
selected
with
priority
for
audio
input;the
USB
connection
cable
input
will
then
be
automatically
transferred
into
charging
function.
When
using
on
TV,
DVD
player,
please
use
RCA
audio
adaptor
connection
cable
to
connect
to
4
3.5mm
plug-pin
double-head
connection
cable
for
connecting
the
transmitter
to
proceed
with
audio
input.
Troubleshooting
apopo
ve
»
Weak
headphones
volume
or
no
sound
at
all
Adjusting
headphones
volume
switch
Checking
whether
the
audio
source
playing
is
stopped
or
the
volume
is
too
low
Moving
the
headphones
near
to
the
wireless
transmitter
Performing
the
frequency
verification
between
the
headphones
and
transmitter
once
again
Headphones
indicator
(Green)
is
not
on
Shutting
off
the
headphones
power
and
restart
it
Replacing
batteries
(AAA
1.5V
x
2
Alkaline
Batteries)
Headphone
connection
can
not
be
set
up
(Indicator
blinks)
Moving
the
headphones
near
to
the
wireless
transmitter
Making
sure
whether
the
connection
of
the
wireless
transmitter
and
the
audio
source
player
are
properly
connected
and
whether
the
audio
source
is
playing
normally
Shutting
off
the
headphones
power
and
restart
it
Transmitter
indicator
(Blue)
is
not
on
Confirming
that
the
wireless
transmitter
has
been
properly
connected
to
PC
or
NB
via
the
USB
transmission
When
using
¢
3.5mm
plug
pin
double
head
connection
cable
to
perform
the
audio
source
input,
the
indicator
is
still
not
on
Using
USB
connection
cable
to
perform
the
charging
by
connecting
to
PC
or
NB
or
plugging
the
USB
power
adaptor
in
the
AC
socket
for
charging
Precautions
It
may
impact
your
hearing
when
wearing
the
headphones
with
high
volume
or
for
long-time
usage
Do
not
use
and
store
the
device
in
high
temperature,
high
humidity
and
dusty
places
and
keep
the
device
at
a
place
not
reachable
by
children
under
three.
Do
not
drop
off
or
hit
with
force
to
prevent
from
the
damage
of
the
internal
circuit
board
Do
not
place
heavy
object
or
apply
pressure
on
the
headphones,
otherwise,
it
may
be
deformed
in
shape
after
long-time
storage.
Using
soft
cloth
for
wiping
when
it
gets
dirty,
do
not
wipe
with
chemical
organic
solvent
Dirtiness
or
dust
on
all
kinds
of
plugs
will
impact
the
transmission
quality
of
the
audio
source,
please
use
soft
cloth
for
clean
wiping.
Do
not
use
when
it
is
stained
by
water,
it
could
only
be
reused
after
it
has
been
completely
dried.
Aging
may
occur
if
the
ear
pad
has
been
stored
for
long
time
or
because
of
wearing.
Presentation
du
produit
ransmission
numérique
sans-fil
radio
2.4GHz,
pour
écouter
la
musique
ou
regarder
un
film
avec
plus
de
liberté
et
sans
déranger
les
autres.
Deux
technologies
d’entr&e
audio
USB
/
Analogique
(prise
3.5mm
&
6.3mm)
pour
une
compatibilité
maximale
avec
tous
types
d'équipement
audio.
Consommation
en
électricité
faible
»
au
moins
20h
d'écoute
par
pile
alkaline
(1.5V
AAAx2).
Ecouteur
comprenant
un
haut-parleur
40mm,
pour
une
sonorité
profonde
et
propre
dans
les
basses,
et
plus
de
clareté
et
de
netteté
dans
les
sonorités
médium
et
hautes,
afin
de
restituer
avec
fidélité
les
sons
d'origine.
Système
de
mise
en
veille
automatique,
10min
après
la
fin
du
dernier
morceau
de
musique,
l’ecouteur
et
le
transmetteur
se
mettent
en
veille.
Compatible
avec
la
télévision,
la
radio,
les
lecteurs
DVD/CD,
les
ordinateurs
de
bureau
ou
portables,
l'iPod,
l'iPhone,
les
lecteurs
MP3,
les
téléphones
portables,
et
tout
autres
équipements
audio
ayant
une
prise
USB,
une
prise
d'entrée
audio
4
3.5mm
ou
¢
6.3mm.
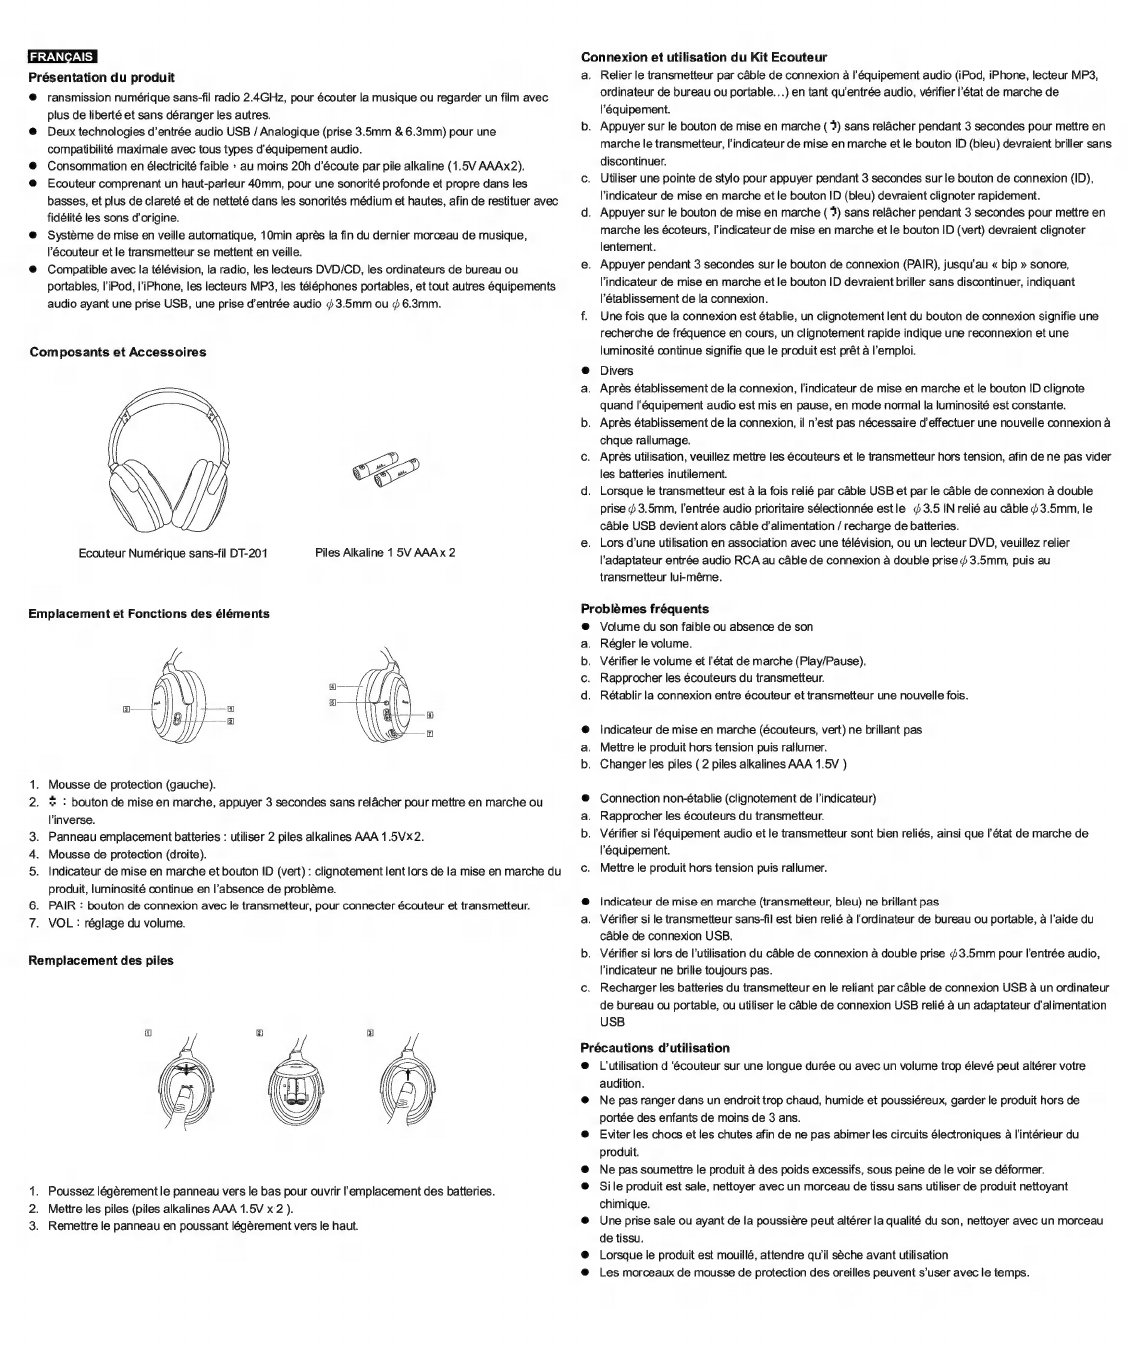
Composants
et
Accessoires
CEP
Ecouteur
Numérique
sans-fil
DT-201
Piles
Alkaline
15V
AAAx
2
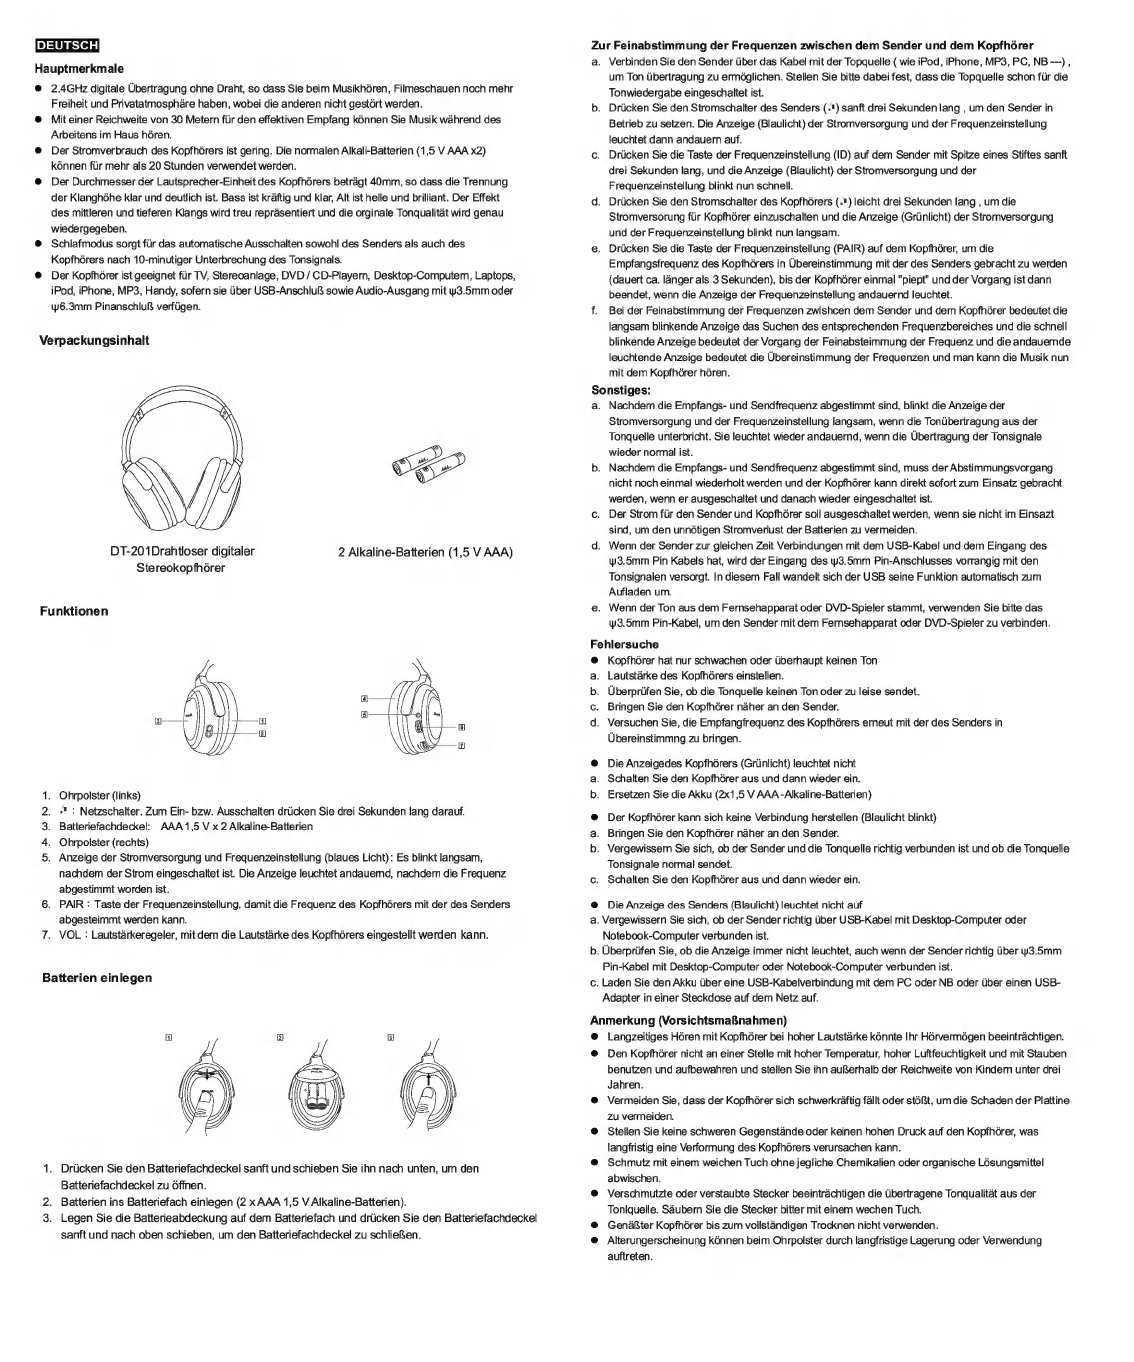
Emplacement
et
Fonctions
des
éléments
=
N.
.
Mousse
de
protection
(gauche).
+
:
bouton
de
mise
en
marche,
appuyer
3
secondes
sans
relâcher
pour
mettre
en
marche
ou
l’inverse.
.
Panneau
emplacement
batteries
:
utiliser
2
piles
alkalines
AAA
1.5Vx2.
.
Mousse
de
protection
(droite).
5.
Indicateur
de
mise
en
marche
et
bouton
ID
(vert)
:
clignotement
lent
lors
de
la
mise
en
marche
du
produit,
luminosité
continue
en
l'absence
de
problème.
PAIR
:
bouton
de
connexion
avec
le
transmetteur,
pour
connecter
écouteur
et
transmetteur.
VOL
:
réglage
du
volume.
Remplacement
des
piles
1.
2.
3.
N)
Poussez
légèrement
le
panneau
vers
le
bas
pour
ouvrir
l'emplacement
des
batteries.
Mettre
les
piles
(piles
alkalines
AAA
1.5V
x
2
).
Remettre
le
panneau
en
poussant
légèrement
vers
le
haut.
Connexion
et
utilisation
du
Kit
Ecouteur
a.
Relier
le
transmetteur
par
câble
de
connexion
à
l'équipement
audio
(iPod,
iPhone,
lecteur
MP3,
ordinateur
de
bureau
ou
portable...)
en
tant
qu'entrée
audio,
vérifier
l’état
de
marche
de
l'équipement.
Appuyer
sur
le
bouton
de
mise
en
marche
(9)
sans
relâcher
pendant
3
secondes
pour
mettre
en
marche
le
transmetteur,
l'indicateur
de
mise
en
marche
et
le
bouton
ID
(bleu)
devraient
briller
sans
discontinuer.
Utiliser
une
pointe
de
stylo
pour
appuyer
pendant
3
secondes
sur
le
bouton
de
connexion
(ID),
l'indicateur
de
mise
en
marche
et
le
bouton
ID
(bleu)
devraient
clignoter
rapidement.
Appuyer
sur
le
bouton
de
mise
en
marche
(4)
sans
relâcher
pendant
3
secondes
pour
mettre
en
marche
les
écoteurs,
l'indicateur
de
mise
en
marche
et
le
bouton
ID
(vert)
devraient
clignoter
lentement.
Appuyer
pendant
3
secondes
sur
le
bouton
de
connexion
(PAIR),
jusqu'au
«
bip
»
sonore,
l'indicateur
de
mise
en
marche
et
le
bouton
ID
devraient
briller
sans
discontinuer,
indiquant
l'établissement
de
la
connexion.
Une
fois
que
la
connexion
est
établie,
un
clignotement
lent
du
bouton
de
connexion
signifie
une
recherche
de
fréquence
en
cours,
un
clignotement
rapide
indique
une
reconnexion
et
une
luminosité
continue
signifie
que
le
produit
est
prêt
à
l'emploi.
Divers
Après
établissement
de
la
connexion,
l'indicateur
de
mise
en
marche
et
le
bouton
ID
clignote
quand
l'équipement
audio
est
mis
en
pause,
en
mode
normal
la
luminosité
est
constante.
Après
établissement
de
la
connexion,
il
n'est
pas
nécessaire
d'effectuer
une
nouvelle
connexion
à
chque
rallumage.
Après
utilisation,
veuillez
mettre
les
écouteurs
et
le
transmetteur
hors
tension,
afin
de
ne
pas
vider
les
batteries
inutilement.
Lorsque
le
transmetteur
est
à
la
fois
relié
par
câble
USB
et
par
le
câble
de
connexion
à
double
prise
¢
3.5mm,
l'entrée
audio
prioritaire
sélectionnée
est
le
¢3.5
IN
relié
au
câble
4
3.5mm,
le
câble
USB
devient
alors
câble
d'alimentation
/
recharge
de
batteries.
Lors
d’une
utilisation
en
association
avec
une
télévision,
ou
un
lecteur
DVD,
veuillez
relier
l'adaptateur
entrée
audio
RCA
au
cable
de
connexion
a
double
prise
¢
3.5mm,
puis
au
transmetteur
lui-méme.
Problémes
fréquents
ao
7
@
se
Volume
du
son
faible
ou
absence
de
son
Régler
le
volume.
Vérifier
le
volume
et
l'état
de
marche
(Play/Pause).
Rapprocher
les
écouteurs
du
transmetteur.
Rétablir
la
connexion
entre
écouteur
et
transmetteur
une
nouvelle
fois.
Indicateur
de
mise
en
marche
(écouteurs,
vert)
ne
brillant
pas
Mettre
le
produit
hors
tension
puis
rallumer.
Changer
les
piles
(
2
piles
alkalines
AAA
1.5V
)
e
Connection
non-établie
(clignotement
de
l'indicateur)
»
Rapprocher
les
écouteurs
du
transmetteur.
Vérifier
si
l'équipement
audio
et
le
transmetteur
sont
bien
reliés,
ainsi
que
l'état
de
marche
de
l'équipement.
Mettre
le
produit
hors
tension
puis
rallumer.
Indicateur
de mise
en
marche
(transmetteur,
bleu)
ne
brillant
pas
Vérifier
si
le
transmetteur
sans-fil
est
bien
relié
à
l'ordinateur
de
bureau
ou
portable,
à
l’aide
du
câble
de
connexion
USB.
.
Vérifier
si
lors
de
l’utilisation
du
câble
de
connexion
à
double
prise
J
3.5mm
pour
l'entrée
audio,
l'indicateur
ne
brille
toujours
pas.
Recharger
les
batteries
du
transmetteur
en
le
reliant
par
câble
de
connexion
USB
à
un
ordinateur
de
bureau
ou
portable,
ou
utiliser
le
câble
de
connexion
USB
relié
à
un
adaptateur
d'alimentation
USB
Précautions
d'utilisation
L'utilisation
d
'écouteur
sur
une
longue
durée
ou
avec
un
volume
trop
élevé
peut
altérer
votre
audition.
Ne
pas
ranger
dans
un
endroit
trop
chaud,
humide
et
poussiéreux,
garder
le
produit
hors
de
portée
des
enfants
de
moins
de
3
ans.
Eviter
les
chocs
et
les
chutes
afin
de
ne
pas
abimer
les
circuits
électroniques
à
l’intérieur
du
produit.
Ne
pas
soumettre
le
produit
à
des
poids
excessifs,
sous
peine
de
le
voir
se
déformer.
Sile
produit
est
sale,
nettoyer
avec
un
morceau
de
tissu
sans
utiliser
de
produit
nettoyant
chimique.
Une
prise
sale
ou
ayant
de
la
poussière
peut
altérer
la
qualité
du
son,
nettoyer
avec
un
morceau
de
tissu.
Lorsque
le
produit
est
mouillé,
attendre
qu'il
sèche
avant
utilisation
Les
morceaux
de
mousse
de
protection
des
oreilles
peuvent
s’user
avec
le
temps.

Caracteristicas
principales
e
Transmisión
inalámbrico
digital
2.4GHz,
permite
escuchar
músicas,
ver
películas
con
mas
libertad
y
personalizado,
sin
molestar
a
otro
e
USB
/Análogo
(3.5mm
&
6.3mm
Pin)
dos
modos
de
entrada
de
audio,
permite
la
operación
de
varios
reproductores
e
Bajo
consumo
de
energía
del
auricular
>
Batería
alcalina
común
(1.5V
AAA
x2)
se
puede
dar
uso
a
mas
de
20
horas
e
Auricular
usa
unidad
de
parlante
de
gran
diámetro
de
40
mm,
Bajo
vigorosa
claro,
alto
clara,
brillante,
ofreciendo
lealmente
el
resurgimiento
de
efecto
bajo,
acústico
y
original
e
Dispositivo
de
apagado
automático,
después
de
interrumpir
el
audio
durante
10
minutos,
el
auricular
y
transmisor
se
apagan
automáticamente
O
Adapta
para
uso
del
TV,
componente
de
audio,
reproductor
de
DVD/CD,
computadora
del
escritorio,
notebook,
iPOD,
iPhone,
MP3,
celular,
y
para
cualquier
reproductor
que
tenga
puerto
USB
y
salida
de
audio
con
pin
de
y3.5mm
o
y6.3mm
Componentes
y
accesorios
CEP
DT-201
Auricular
inalambrico
digital
Bateria
Alcalina1.5V
AAA
x
2
unidades
Ubicaciön
y
funciones
de
las
partes
Almohadilla
(izquierda)
=
:
Interruptor
del
poder,
apretar
suavemente
durante
3
segundos
para
encendido
y
apagado
Tapa
de
la
batería
:
usar
batería
alcalina
AAA
1.5Vx2
Almohadilla
(derecha)
La
luz
indicadora
de
la
sintonizador
de
la
frecuencia
y
poder
(Verde)
:
Encendido
del
poder,
se
parpadea
lento,
finalizado
la
sintonización
la
luz
se
mantiene
encendida.
PAIR
:
botón
para
sintonizar,
se
usa
para
sintonizar
con
la
transmisora.
VOL
:
Botón
de
ajuste
del
audio,
ajustar
el
volumen
del
auricular.
OF
BON
no
Instalación
de
la
batería
1.
Presionar
y
empuje
suavemente
la
tapa
de
la
batería,
ábrelo
2.
Colocar
baterías
(AAA
1.5V
x
2
Baterías
alcalinas)
3.
Colocar
la
tapa
y
empujar
hacia
arriba
para
cerrar
la
tapa
de
la
batería
Uso
para
sintonizar
la
transmisora
y
el
auricular
a.
Los
reproductores
ya
esta
conectado
al
transmisor
a
través
del
cable
(iPod
+iPhone-MP3+PC+NB
---)
»
permitiendo
ingreso
del
audio
y
asegurar
que
el
reproductor
ya
esta
reproduciendo
el
audio.
Presionar
suavemente
el
interruptor
de
poder
del
transmisor,
durante
3
segundos,
activando
el
poder
de
la
transmisora,
en
este
momento
la
luz
indicador
del
poder
y
la
sintonización
(azul)
se
mantiene
encendido.
Presionar
suavemente
el
botón
de
la
sintonización
(PAIR)
con
la
punta
de
la
lapicera
durante
3
segundos,
ahora
la
luz
indicadora
(
azul
)
de
poder
y
de
la
sintonización
se
parpadeando
rápidamente.
Presionar
suavemente
el
interruptor
de
poder
del
auricular
durante3
segundos,
activando
el
poder
del
auricular,
ahora
la
luz
indicadora
(verde)
del
poder
y
de
la
sintonización
se
parpadea
lenta.
Mantener
apretado
el
botón
sintonizador
del
auricular
(pair)
para
operar
la
sintonización
con
el
transmisor
(durante
3segundos),
hasta
escuchar
“Beep”
en
el
auricular,
y
las
luces
indicadora
del
transmisor
se
mantiene
encendida.
Significa
que
se
completo
el
proceso
de
la
sintonización.
En
el
momento
de
la
sintonización,
cuando
la
luz
indicadora
parpadea
lento
significa
que
esta
buscando
la
frecuencia,
parpadea
rápida
significa
que
esta
sintonizando,
cuando
las
luces
se
mantiene
encendida
significa
que
termino
la
sintonización.
e
Otras
explicaciones
Después
de
la
sintonización,
durante
el
uso
del
producto,
cuando
deja
de
reproducir
audio,
la
luz
indicadora
de
poder
y
sintonización
parpadea
lento,
normalizado
la
reproducción
del
audio,
la
luz
se
mantiene
encendida.
b.
Después
de
la
sintonización,
volver
a
usar
después
del
apagado,
no
necesita
volver
a
sintonizar
Cuando
deja
de
usar,
favor
apagar
el
poder
del
transmisor
y
auricular
para
evitar
el
consumo
innecesaria
de
la
batería.
Cuando
el
transmisor
esta
siendo
conectado
por
cable
USB
y
conectores
de
PIN
w3.5mm
simultáneamente
»toma
como
prioridad
conectores
de
PIN
w3.5mm>
la
conexión
del
cable
USB
se
convierte
en
función
de
la
recarga
de
la
batería.
Cuando
esta
usando
TV
o
reproductor
de
DVD
favor
conectar
adaptador
de
cable
RCA
a
los
pin
w3.5
mm
de
doble
cabezal,
después
conectar
al
transmisor
para
entrada
de
audio.
Preguntas
frecuencuentes
y
respuestas
corve
=
人
cre
Volumen
bajo
o
sin
audio
en
el
auricular
Ajustar
el
volumen
en
el
interruptor
del
auricular
Chequear
si
la
reproducción
del
audio
se
ha
detenido
o
demasiado
bajo
el
volumen
Acercar
el
auricular
hacia
el
transmisor
Volver
a
sintonizar
el
auricular
y
el
transmisor
La
luz
indicadora
de
auricular
(
verde
)
no
enciende
Apagar
el
poder
del
auricular
y
volver
a
encenderlo
Reemplazar
la
batería
(AAA
1.5Vx2
baterías
alcalinas)
No
se
puede
establecer
la
conexión
con
el
auricular
(la
luz
indicadora
se
mantiene
parpadeando)
Acercar
el
auricular
hacia
la
transmisora
Asegurar
que
el
transmisor
y
reproductor
estén
bien
conectado,
y
reproduce
con
normalidad
Apagar
el
poder
del
auricular
y
volver
a
encenderlo
La
luz
indicadora
del
transmisor
no
enciende
(
azul
)
Asegurar
que
el
transmisor
a
través
del
cable
USB
ya
se
estableció
correctamente
la
conexión
con
PC
o
NB
Conexión
a
través
de
los
pines
w3.5mmde
doble
cabezal
para
entrada
de
audio,
la
luz
indicadora
se
mantiene
apagado
Conectar
al
PC
y
NB
a
través
del
cable
USB
para
la
recarga,
o
usar
transformador
de
USB
para
conectar
a
la
toma
corriente
DC
para
la
recarga
de
la
batería
Precauciones
Usan
auricular
con
volumen
alto
y
largo
tiempo,
puede
afectar
su
capacidad
de
la
audición.
No
guardar
en
lugares
de
alta
temperatura,
húmeda
y
polvoriento,
tampoco
colocar
en
los
lugares
alcanzable
por
niño
de
tres
años.
No
deje
caer
brutalmente,
impacto
para
evitar
daño
de
la
placa
de
IC.
No
colocar
cosa
pesado
ni
presión
arriba
del
auricular,
sino
a
largo
plazo
se
desformara
el
auricular.
Limpiar
con
trapo
suave,
no
usar
productos
químicos
para
su
limpieza
Todos
conectores
sucios
o
con
polvo
puede
afectar
la
calidad
de
la
transmisión,
favor
de
limpiar
con
trapo
suave.
No
usar
el
auricular
si
esta
mojado
con
agua,
espere
hasta
que
se
seque
totalmente
ante
de
usarlo.
La
almohadilla
puede
volverse
desgastado
durante
largo
plazo
o
por
uso.
Hauptmerkmale
@
2.4GHz
digitale
Übertragung
ohne
Draht,
so
dass
Sie
beim
Musikhören,
Filmeschauen
noch
mehr
Freiheit
und
Privatatmosphäre
haben,
wobei
die
anderen
nicht
gestört
werden.
Mit
einer
Reichweite
von
30
Metern
für
den
effektiven
Empfang
können
Sie
Musik
während
des
Arbeitens
im
Haus
hören.
Der
Stromverbrauch
des
Kopfhörers
ist
gering.
Die
normalen
Alkali-Batterien
(1,5
V
AAA
x2)
können
für
mehr
als
20
Stunden
verwendet
werden.
Der
Durchmesser
der
Lautsprecher-Einheit
des
Kopfhörers
beträgt
40mm,
so
dass
die
Trennung
der
Klanghöhe
klar
und
deutlich
ist.
Bass
ist
kräftig
und
klar,
Alt
ist
helle
und
brilliant.
Der
Effekt
des
mittleren
und
tieferen
Klangs
wird
treu
repräsentiert
und
die
orginale
Tonqualität
wird
genau
wiedergegeben.
Schlafmodus
sorgt
für
das
automatische
Ausschalten
sowohl
des
Senders
als
auch
des
Kopfhörers
nach
10-minutiger
Unterbrechung
des
Tonsignals.
Der
Kopfhörer
ist
geeignet
für
TV,
Stereoanlage,
DVD
/
CD-Playern,
Desktop-Computern,
Laptops,
iPod,
iPhone,
MP3,
Handy,
sofern
sie
über
USB-Anschluß
sowie
Audio-Ausgang
mit
yw3.5mm
oder
y6.3mm
Pinanschluß
verfügen.
Verpackungsinhalt
CEP
DT-201Drahtloser
digitaler
Stereokopfhörer
2
Alkaline-Batterien
(1,5
V
AAA)
Funktionen
MEAN
Ohrpolster
(links)
»"
:
Netzschalter.
Zum
Ein-
bzw.
Ausschalten
drücken
Sie
drei
Sekunden
lang
darauf.
Batteriefachdeckel:
AAA
1,5
V
x
2
Alkaline-Batterien
Ohrpolster
(rechts)
Anzeige
der
Stromversorgung
und
Frequenzeinstellung
(blaues
Licht):
Es
blinkt
langsam,
nachdem
der
Strom
eingeschaltet
ist.
Die
Anzeige
leuchtet
andauernd,
nachdem
die
Frequenz
abgestimmt
worden
ist.
PAIR
:
Taste
der
Frequenzeinstellung,
damit
die
Frequenz
des
Kopfhörers
mit
der
des
Senders
abgesteimmt
werden
kann.
.
VOL
:
Lautstärkeregeler,
mit
dem
die
Lautstärke
des
Kopfhörers
eingestellt
werden
kann.
Batterien
einlegen
.
Drücken
Sie
den
Batteriefachdeckel
sanft
und
schieben
Sie
ihn
nach
unten,
um
den
Batteriefachdeckel
zu
öffnen.
Batterien
ins
Batteriefach
einlegen
(2
x
AAA
1,5
V
Alkaline-Batterien).
Legen
Sie
die
Batterieabdeckung
auf
dem
Batteriefach
und
drücken
Sie
den
Batteriefachdeckel
sanft
und
nach oben
schieben,
um
den
Batteriefachdeckel
zu
schließen.
Zur
Feinabstimmung
der
Frequenzen
zwischen
dem
Sender
und
dem
Kopfhörer
a.
Verbinden
Sie
den
Sender
über
das
Kabel
mit
der
Topquelle
(
wie
iPod,
iPhone,
MP3,
PC,
NB
---),
um
Ton
übertragung
zu
ermöglichen.
Stellen
Sie
bitte
dabei
fest,
dass
die
Topquelle
schon
für
die
Tonwiedergabe
eingeschaltet
ist.
b.
Drücken
Sie
den
Stromschalter
des
Senders
(.")
sanft
drei
Sekunden
lang
,
um
den
Sender
in
Betrieb
zu
setzen.
Die
Anzeige
(Blaulicht)
der
Stromversorgung
und
der
Frequenzeinstellung
leuchtet
dann
andauern
auf.
c.
Drücken
Sie
die
Taste
der
Frequenzeinstellung
(ID)
auf
dem
Sender
mit
Spitze
eines
Stiftes
sanft
drei
Sekunden
lang,
und
die
Anzeige
(Blaulicht)
der
Stromversorgung
und
der
Frequenzeinstellung
blinkt
nun
schnell.
d.
Drücken
Sie
den
Stromschalter
des
Kopfhörers
(.")
leicht
drei
Sekunden
lang
,
um
die
Stromversorung
für
Kopfhörer
einzuschalten
und
die
Anzeige
(Grünlicht)
der
Stromversorgung
und
der
Frequenzeinstellung
blinkt
nun
langsam.
e.
Drücken
Sie
die
Taste
der
Frequenzeinstellung
(PAIR)
auf
dem
Kopfhörer,
um
die
Empfangsfrequenz
des
Kopfhörers
in
Übereinstimmung
mit
der
des
Senders
gebracht
zu
werden
(dauert
ca.
länger
als
3
Sekunden),
bis
der
Kopfhörer
einmal
"piept"
und
der
Vorgang
ist
dann
beendet,
wenn
die
Anzeige
der
Frequenzeinstellung
andauernd
leuchtet.
f.
Bei
der
Feinabstimmung
der
Frequenzen
zwishcen
dem
Sender
und
dem
Kopfhörer
bedeutet
die
langsam
blinkende
Anzeige
das
Suchen
des
entsprechenden
Frequenzbereiches
und
die
schnell
blinkende
Anzeige
bedeutet
der
Vorgang
der
Feinabsteimmung
der
Frequenz
und
die
andauernde
leuchtende
Anzeige
bedeutet
die
Übereinstimmung
der
Frequenzen
und
man
kann
die
Musik
nun
mit
dem
Kopfhörer
hören.
Sonstiges:
a.
Nachdem
die
Empfangs-
und
Sendfrequenz
abgestimmt
sind,
blinkt
die
Anzeige
der
Stromversorgung
und
der
Frequenzeinstellung
langsam,
wenn
die
Tonübertragung
aus
der
Tonquelle
unterbricht.
Sie
leuchtet
wieder
andauernd,
wenn
die
Übertragung
der
Tonsignale
wieder
normal
ist.
b.
Nachdem
die
Empfangs-
und
Sendfrequenz
abgestimmt
sind,
muss
der
Abstimmungsvorgang
nicht
noch
einmal
wiederholt
werden
und
der
Kopfhörer
kann
direkt
sofort
zum
Einsatz
gebracht
werden,
wenn
er
ausgeschaltet
und
danach
wieder
eingeschaltet
ist.
c.
Der
Strom
für
den
Sender
und
Kopfhörer
soll
ausgeschaltet
werden,
wenn
sie
nicht
im
Einsazt
sind,
um
den
unnötigen
Stromverlust
der
Batterien
zu
vermeiden.
d.
Wenn
der
Sender
zur
gleichen
Zeit
Verbindungen
mit
dem
USB-Kabel
und
dem
Eingang
des
y3.5mm
Pin
Kabels
hat,
wird
der
Eingang
des
y3.5mm
Pin-Anschlusses
vorrangig
mit
den
Tonsignalen
versorgt.
In
diesem
Fall
wandelt
sich
der
USB
seine
Funktion
automatisch
zum
Aufladen
um.
e.
Wenn
der
Ton
aus
dem
Fernsehapparat
oder
DVD-Spieler
stammt,
verwenden
Sie
bitte
das
3.5mm
Pin-Kabel,
um
den
Sender
mit
dem
Fernsehapparat
oder
DVD-Spieler
zu
verbinden.
Fehlersuche
Kopfhörer
hat
nur
schwachen
oder
überhaupt
keinen
Ton
Lautstärke
des
Kopfhörers
einstellen.
Überprüfen
Sie,
ob
die
Tonquelle
keinen
Ton
oder
zu
leise
sendet.
Bringen
Sie
den
Kopfhörer
näher
an
den
Sender.
Versuchen
Sie,
die
Empfangfrequenz
des
Kopfhörers
erneut
mit
der
des
Senders
in
Übereinstimmng
zu
bringen.
ase
Die
Anzeigedes
Kopfhörers
(Grünlicht)
leuchtet
nicht
Schalten
Sie
den
Kopfhórer
aus
und
dann
wieder
ein.
Ersetzen
Sie
die
Akku
(2x1,5
V
AAA
-Alkaline-Batterien)
Der
Kopfhórer
kann
sich
keine
Verbindung
herstellen
(Blaulicht
blinkt)
Bringen
Sie
den
Kopfhórer
náher
an
den
Sender.
Vergewissern
Sie
sich,
ob
der
Sender
und
die
Tonquelle
richtig
verbunden
ist
und
ob
die
Tonquelle
Tonsignale
normal
sendet.
c.
Schalten
Sie
den
Kopfhörer
aus
und
dann
wieder
ein.
7v
e
oye
e
Die
Anzeige
des
Senders
(Blaulicht)
leuchtet
nicht
auf
a.
Vergewissern
Sie
sich,
ob
der
Sender
richtig
über
USB-Kabel
mit
Desktop-Computer
oder
Notebook-Computer
verbunden
ist.
b.
Überprüfen
Sie,
ob
die
Anzeige
immer
nicht
leuchtet,
auch
wenn
der
Sender
richtig
über
y3.5mm
Pin-Kabel
mit
Desktop-Computer
oder
Notebook-Computer
verbunden
ist.
c.
Laden
Sie
den
Akku
über
eine
USB-Kabelverbindung
mit
dem
PC
oder
NB
oder
über
einen
USB-
Adapter
in
einer
Steckdose
auf
dem
Netz
auf.
Anmerkung
(Vorsichtsmaßnahmen)
e
Langzeitiges
Hören
mit
Kopfhörer
bei
hoher
Lautstärke
könnte
Ihr
Hörvermögen
beeinträchtigen.
e
Den
Kopfhörer
nicht
an
einer
Stelle
mit
hoher
Temperatur,
hoher
Luftfeuchtigkeit
und
mit
Stauben
benutzen
und
aufbewahren
und
stellen
Sie
ihn
außerhalb
der
Reichweite
von
Kindern
unter
drei
Jahren.
@
Vermeiden
Sie,
dass
der
Kopfhörer
sich
schwerkräftig
fällt
oder
stößt,
um
die
Schaden
der
Plattine
zu
vermeiden.
e
Stellen
Sie
keine
schweren
Gegenstände
oder
keinen
hohen
Druck
auf
den
Kopfhörer,
was
langfristig
eine
Verformung
des
Kopfhörers
verursachen
kann.
@
Schmutz
mit
einem
weichen
Tuch
ohne
jegliche
Chemikalien
oder
organische
Lösungsmittel
abwischen.
e
Verschmutzte
oder
verstaubte
Stecker
beeinträchtigen
die
übertragene
Tonqualität
aus
der
Tonlquelle.
Säubern
Sie
die
Stecker
bitter
mit
einem
wechen
Tuch.
Genäßter
Kopfhörer
bis
zum
vollständigen
Trocknen
nicht
verwenden.
e
Alterungerscheinung
können
beim
Ohrpolster
durch
langfristige
Lagerung
oder
Verwendung
auftreten.

商品
介绍
©
2.4GHz
BUTS,
尽
匠
音乐
、
看
电影
更
自由
与
个
人
化
,
不
干
摄
到
别人
。
o
”有
效
接收
距离
30
公
斥
,
你
可
以
在
室内
泪
匠
音乐
泪
做
你
想 做
的
事情
。
©
”耳机
耗
电量
低
,
一
般
龄
性
电池
(1.5V
AAA
x2)
可
以
使
用
20
小
时
以
上
。
o
耳机
探
用
大
口径
40mm
喇叭
单元
,低音
漂
厚
分
明
,
中
高
音
清澈
、
明
亮
,
忠
实
呈
现
出
中
低音
效果
及
原音
的
重
现
。
©
”自动
睡眠
装置
,
音
源
中
断绝
10
分
镍
和
后
,
耳
机
及
发
射
器
将
自动
天
机
。
©
HARER
+
BS
DVD/CD
播放
机
>
桌
上
电脑
、
手
提
电
脑
'iPod、iPhone、MP3、
手
机
等
有
USB
BUR
>
DUZy3.5mm
插
人
针
或
山
6.3mm
插
针
的
音源
输出
孔
的
任何
播放
器
。
商品
内
容
E
DT-201
Sit
RARE
龄
性
电池
1.5V
AAA
x
2
商品
名
部
位
名 称
介
绍
H4
…
:
电源
开关
,
轻
按
三
秒
启
动
或
关闭
。
EE:
使
用
AAA
1.5Vx2
龄
性
电池
。
HAA)
°
TARSAR
TIS
GRD
:
TAREHE
»
ASE
©
PAIR
:
对
频
按键
,
与
发
射
器
对
频
时
使
用
。
VOL
:
音量
调整
钮
,
调整
耳机
音量
的 大
小
。
Pe
OL
eB
Oe
IN:
Ss
电池
安装
1)
1.
BBP
HG
HRS:
>
2,
放
入
电池
(AAA
1.5V
x
2
龄
性
电池
)
o
3.
BLES
RMB
L
HARDEE
°
发
射
器
与
耳机
对
频
与
使
用
w
©
€.
$
E
+
HACE
a
es
(Pod
,
iPhone,
MP3,
PC,
NB
—)
»
ETE
RÉUÉS
À
>
MARES
音
器
已
经
开启
播放
音源
。
,
轻
压
发
射
器
的
电源
开
天
'
*)
三
秒
独
,
刻
动
发
射
器
电源
,
EEE
TE
ECO
ME
e
,
以
笔尖
轻
压
发
射
器
对
频
按键
(ID)
EWE
SERRATE
ED
R
,
轻
压
耳
机 的
电源
开关
(
.三
秒
锌
,
刻
动
耳机
电源
,
此
时
电源
与
对
频
指示
粒
(
比
烛
)
为
慢
队
。
.
手
按
住
耳机
对
频
按键
(PAIR)
进行
与
发
射
器
的
对
频
作业
(
约
3
秒
以
上
),
直
到
耳机
”
IR”
一
声
及
发
射
器
的
对
频
指示
粒
都
恒
况
为止,
此
时
表示
对 频
完成
。
DÉBATS
,
对
频
指示
烂
慢
并
表示
搜
二
频道
中
,
快
内
表示
对
频
中
、
恒
亮
表
示
对
频
完成
可
以
使
用
。
其
他 褒
明
对
频
完
成
和
后,
产品
在
正常
使
用
中
,
当
音源
停止
播放
时
,
电
源
与
对
频
指示
灯 将
显示
慢
内
,
音
源
正常
播
放
和
后
恢复
恒
亮
。
”完成
对
频
之
后
,
关机
之
后
的
再 使
用
不
需
再
进行
对
频
就
可
以
直接
开机
使
用
停止
使
用
时
,
请
将
发
射
器
与
耳机
电源
开关
关闭
避免
电池
不
必要
的
电力
损耗
。
.
当
发
射
器
同时
连结
USB
ERAS
Sm
AR
EEE
由
3.51N
之
Y
3.5mm
EHER
>
LR
USB
连接
稼
输入
自动
转
成
充电
功能
©
当
使
用
於
电视
、DVD
播放
机
时
,
请
以
RCA
音源
转
接 线 连
千
册
3.5mm
ESA
连接
发
射
器
进行
音源
的
输入
。
疑难
排解
ano
© ©
o
ee:
9
code
9
5
©
o
耳机
声音
微弱
或
没
声音
.调整
耳机
音量
开关
>
.检查
音源
播放
是
否
停止
或
音量
过
小
。
-
HERAS
ae
°
将
耳机
与
发
射
器
重新
对
频
一
次
。
BREN
RID)
RS
关闭
耳机
电源
站
重新
启动
。
更
换
电
池
(AAA
1.5Vx2
龄 性
电池
)
FA
NEGT
EN
-
WEES
RAREST
es
°
.确认
无
编发
射
器 与
音源 播放
器
的
联接
是
否
正常
?
而
且
音
源
正
常
播放
中
。
RAPA
EE
ee
eT
ED
o
BARNS
ES)
RE
.
FR
ER
AUSB
传输
各
>
SEMBRPO
或
NB
的
正确
连
千
。
,
以
W3.5mm
Hg
SEE
ARE
IID
ATS
»
IRTP
©
_
ZA
USB
SR
PC
或
NB
BRENT
>
或
是
以
USB
电源
转换
器
插
在
AC
插座
进行
充电
。
意
事项
佩戴
耳机
以
高
音量
、
过
长
使
问
使
用
,
可
能
会
影响
你
的
贡 力
。
不
要
在
高
温
、
高
湿
、
多
灰
雇
的
地
方
使
用
与
保存
,
兹
放置
三
蕨
以
下
幼儿
拿
不
到
的
地
方
。
不
可
重力
摔
落
、
撞
击
,
以
免
伤害
内
部
的
电路
板
。
请
勿 在
耳机
上
放置
重
物
或
施加
压力
,
否
则
在
长 期
存放
中
会
造成
耳机
变形
。
侠
污
时
以
柔软
的
布
擦拭
,
不
可
以
用
化
学
品类
的
有
机
溶剂
擦拭
。
各
种
插头
髓
污
或
有
灰 雇
会
影响
音源
的
传输
品质
,
请
用
柔软
的 布
擦拭
。
沾
到
水
时
不
可
使
用
,
需
待
完全
乾燥
之
后 才
可
以
使
用
。
耳
热
可
能
会
由
於
长
期
存放
或
使
用
而
老化
。
简体
中
文
商品
介绍
o
2.4GHz
无
线
数位
传输
,
让
听
音
乐
、
看
电影
更
自由
与
个
人
化
,
不
干扰
到
别人
。
©
有
效
接收
距离
30
公
尺
,
你
可
以
在
室内
边
听
音乐
边
做
你
想
做 的
事情
。
e
耳机
耗
电量
低
,
一般
奏
性
电池
(1.5V
AAA
x2)
可
以
使
用
20
小
时
以
上
。
@
耳机
采用
大
口径
40mm
同
叭
单元,
低音
浑厚
分
明
,
中
高 音
清澈
、
上
明亮
,
忠
实
呈
现
出
中
低音 效果
商
及
原音
的
重
现
。
自动
有
睡眠
装置
,
音源
中
断
约
10
分
钟
后
,
耳
机
及
发
射
器
将
自动
关机
。
适用
於
电
视
、
音
响
、DVD/CD
播
放 机
,
桌
上
电脑
、
手
提
电
脑
,
¡Pod
>
iPhone
`
MP3
-
FIMA
USB
连
接
坊
,
以
及
3.5mm
插 针
或
6.3mm
插
针
的
音源
输出
孔
的
任何
播放
器
品
内
容
EF
DT-201
数位
无
线
耳
机
奏
性
电池
1.5V
AAA
x
2
商品
各
部
位
名
称
介绍
1
noarwnm
加
日
.
耳
垫
( 左
)
1:
电源
开关
,
轻
按
三
秒
启动
或
关闭
。
.
电池
盖
:
使
用
AAA
1.5Vx2
奏
性
电池
。
-
耳
垫
( 右
)。
电源
与
对
频
指
示
灯
(绿灯
)
:
电源
开启
时
慢
闪
,
对
频
完成
恒
亮
。
.
PAIR
:
对
频
按键
,
与
发
射
器
对
频
时
使
用
。
.
VOL
:
音量
调整
钮
,
调
整
耳机
音量
的
大
小
。
电池
安装
=
2
3
.
轻
压
下
推
电池
盖
,
打
开
电
池
盖
。
-
放
入
电池
(AAA
1.5V
x
2
奏
性
电池
)。
-
盖
上
电池
盖
及
轻
压
上
推
关闭
电池
盖
。
发
射
器
与
耳机
对
频
与
使
用
a.
发
射
器
已
经
连接
线
连接
好
播音
器
(iPod,iPhone,MP3,
PC,
NB
---)
>
进行
音源
的
输入
,
并
oa
ep
5
且
确
认
播
音
器
已
经
开启
播放
音源
。
轻
压
发
射
器
的
电源
开关
(
0
三
秒
钟
,
启
动
发
射
器
电源
,
此
时
电源
与
对
频
指示
灯
(
蓝
灯
)
亮
。
以
笔尖
轻
压
发
射
器
对
频
按键
(ID
)
三
秒
钟
,
此
时
电源
与
对
频
指
示
灯
(
蓝
灯
)
快
闪
。
轻
压
耳机
的
电源
开关
(.)
三
秒
钟
,
启
动
耳机
电源
,
此
时
电源
与
对
频
指示
灯
(
绿
灯
)
为
慢
闪
。
手
按
住
耳机
对
频
按键
(PAIR
)
进
行
与
发
射
器
的
对
频
作
业
(
约
3
秒
以
上
),
直到
耳机
”
WE”
—
声
及
发
射
器
的
对
频
指
示
灯
都
恒
亮
为
止
,
此
时
表示
对
频
完成
。
.
已
经
连
线
进行
对
频
时
,
对
频
指
示
灯
慢 闪
表示 搜寻
频道
中
,
快
闪
表
示
对
频
中
、
恒
亮
表
示
对
频
完成
可
以
使
用
。
o
其
他
说
明
a.
对 频
完
成
后
,
产
品
在
正常
使 有
中
,
当
音源
停止 播放
时
,
电
源
与
对
频
指示
灯
将
显示
慢
闪
,
音
源
正常
播放
后
恢复
恒
亮
。
b.
完成
对
频
之
后
,
关 机
之
后
的
再
使
用
不
需
再
进行
对
频
就
可
以
直接
开机
使
用
。
c.
停止
使
用 时
,
请
将
发
射
器
与
耳机
电源
开关
关闭
,
避免
电池
不
必要
的
电力
损耗
。
d.
当
发
射
器
同时
连结
USB
连
接线
与
3.5mm
插
针
双
头
连接
线
时
,
音
源
输入
将
优先
选择
3.5
IN
之
$3.5mm
连
接线
,
此
时
USB
连
接线
输入
自动
转
成
充电
功能
。
e.
当
使
用
於
电视
、DVD
播
放
机
时
,
请
以
RCA
音
源
转
接线
连结
3.5mm
插
针
双
头
连接
线
,
连
接
发
射
器
进行
音源
的
输入
。
疑难
排解
。
耳机
声音
微弱
或
没
声音
。
耳
机
指示
灯
(绿灯
)
没
训
a
调整
耳机
音量
开关
。
a
关闭
耳机
电源
并
重新
启动
。
b.
检
查
音源
播放
是
否
停止
或
音量
过
小
D
更
换
电池
(AAA
1.5Vx2
EERI)
c
将
耳机
移
近
无
线
发
射
器
。
NANA
o
发
射
器
指示
灯
(
蓝
灯
)
没
训
a
确认
无
线
发
射
器
已
透
过
USB
传
输
线
,
完
成
与
®
耳机
无
法
建立
连接
(指示
灯
闪
证
)
PC
或
NB
的
正确
连结
。
a.
将
耳机
移
近
无
线
发
射
器
。
b.
以
乡
3.5mm
插
针
双
头
连接
线
进行
音源
输入
时
b.
确认
无
线
发
射
器
与
音源
播放
器
的
联接
是
,
指示
灯
仍
然
没
亮
。
否
正常
?而
且
音
源
正
常
播放
中
。
c.
透
过
USB
连
接线
与
PC
或
NB
连结
进行
充电
,
c.
关闭
耳机
电源
并
重新
启动
。
或
是
以
USB
电
源
转换
器
插
在
AC
插
座
进行
充电
。
注意
事项
@
佩戴
耳机
以 高
音量
、
过
长
使
间
使
用
'
可
能
会
影响
你
的
听力
。
o
不
要
在
高
温
、
高
湿
、
多
灰尘
的
地
方
使
用
与
保存
,
并
放置
三
岁
以
下
幼儿
拿
不
到
的
地
方
。
@
不
可
重力
摔
落
、
撞
击
,
以
免
伤害
内
部
的
电路
板
。
©
请
勿
在
耳机
上
放置
重
物
或
施加
压力
,
否则
在
长
期
存放
中
会
造成
耳机
变形
。
o
购
污
时
以
柔软
的
布
擦拭
,
不
可
以
用
化
学
品类
的
有
机
溶剂
擦拭
。
@
各
种
插头
位
污
或
有
灰尘
会
影响
音源
的
传输
品质
,
请
用
柔软
的 布
擦拭
。
o
沾 到
水
时
不
可
使
用
,
需
待
完
全
乾燥
之
后
才
可
以
使
用
。
@
耳
垫
可
能
会
由
於
长
期
存放
或
使
用
而
老化
。
Federal
Communication
Commission
Interference
Statement
This
equipment
has
been
tested
and
found
to
comply
with
the
limits
for
a
Class
B
digital
device,
pursuant
to
Part
15
of
the
FCC
Rules.
These
limits
are
designed
to
provide
reasonable
protection
against
harmful
interference
in
a
residential
installation.
This
equipment
generates
uses
and
can
radiate
radio
frequency
energy
and,
if
not
installed
and
used
in
accordance
with
the
instructions,
may
cause
harmful
interference
to
radio
communications.
However,
there
is
no
guarantee
that
interference
will
not
occur
in
a
particular
installation.
If
this
equipment
does
cause
harmful
interference
to
radio
or
television
reception,
which
can
be
determined
by
turning
the
equipment
off
and
on,
the
user
is
encouraged
to
try
to
correct
the
interference
by
one
of
the
following
measures:
Reorient
or
relocate
the
receiving
antenna.
Increase
the
separation
between
the
equipment
and
receiver.
Connect
the
equipment
into
an
outlet
on
a
circuit
different
from
that
to
which
the
receiver
is
connected.
Consult
the
dealer
or
an
experienced
radio/TV
technician
for
help.
FCC
Caution
To
assure
continued
compliance,
any
changes
or
modifications
not
expressly
approved
by
the
party
responsible
for
compliance
could
void
the
user's
authority
to
operate
this
equipment.
(Example
-
use
only
shielded
interface
cables
when
connecting
to
computer
or
peripheral
devices).
This
device
complies
with
Part
15
ofthe
FCC
Rules.
Operation
is
subject
to
the
following
two
conditions:
(1)
This
device
may
not
cause
harmful
interference,
and
(2)
This
device
must
accept
any
interference
received,
including
interference
that
may
cause
undesired
operation.
FCC
Radiation
Exposure
Statement
This
equipment
complies
with
FCC
RF
radiation
exposure
limits
set
forth
for
an
uncontrolled
environment.
This
equipment
should
be
installed
and
operated
with
a
minimum
distance
of
20
centimeters
between
the
radiator
and
your
body.
This
transmitter
must
not
be
co-located
or
operating
in
conjunction
with
any
other
antenna
or
transmitter.
The
antennas
used
for
this
transmitter
must
be
installed
to
provide
a
separation
distance
of
at
least
20
cm
from
all
persons
and
must
not
be
co-located
or
operating
in
conjunction
with
any
other
antenna
or
transmitter.
Table of contents
Languages:


