Professional Series PS-DF449 User manual

XL Air Fryer
UserManual
Model: PS-DF449

Introduction
Thank you for buying this top quality air fryer. You will now be able to cook a wide
assortment of food in a healthier manner – with little or no oil!
The air fryer uses hot air, in combination with high-speed air circulation, and a top grill to
prepare your dishes quickly and easily. The ingredients are heated from all sides, at once,
and there is no need to add oil in most cases.
General description
1

Important
Read this user manual carefully, before you use the appliance, and keep it safely for
future reference.
Danger
- Never immerse the housing, which contains electrical components and the heating
elements, in water nor rinse it under the tap.
- Do not let any water or other liquid enter the appliance – to prevent electric shock.
- Always put the ingredients to be fried in the basket, to prevent it from coming into
contact with the heating elements.
- Do not cover the air inlet and the air exhaust openings while the appliance is operating.
- Do not fill the frying tray with oil as this may cause a fire hazard.
- Never touch the inside of the appliance while it is operating.
- Check whether the voltage indicated on the appliance corresponds to the local mains
voltage in your country before you connect the appliance.
- Do not use the appliance if the plug, the power cord or the appliance itself is damaged.
- If the power cord is damaged, you must have it replaced at a service center authorized
by similarly qualified persons in order to avoid a hazard.
- This appliance is not suitable for children or for people who are either physically or
mentally handicapped or who lack experience and knowledge. Should you want anyone
else to use the appliance, that person should be properly guided on its use.
- Keep the appliance and its mains cord out of the reach of children when the appliance
is switched on or is cooling down.
- Keep the mains cord away from hot surfaces.
- Do not plug in the appliance or operate the control panel with wet hands.
- Only connect the appliance to an earthed wall socket. Always make sure that the plug
is inserted into the wall socket properly.
- Never connect this appliance to an external timer switch.
- Do not place the appliance on or near combustible materials such as a tablecloth or
curtains.
- Do not place the appliance against a wall or against other appliances. Leave at least
10cm free space at the back and sides and 10cm free space above the appliance. Do
not place anything on top of the appliance.
- Do not use the appliance for any purpose other than described in this manual.
- Do not let the appliance operate unattended.
- During hot air frying, hot steam is released through the air exhaust openings. Keep your
hands and face at a safe distance from the steam and from the air exhaust openings.
Also be careful of hot steam and hot air when you remove the frying tray from the
apppliance.
2

3
- The surface below the appliance may become hot during use.
- Immediately unplug the appliance if you see dark smoke coming out of the appliance.
Wait for the smoke emission to stop before you remove the frying tray from the
appliance.
Caution
- Place the appliance on a horizontal, level and stable surface.
- This appliance is intended for normal household use only. It is not intended for use in
environments such as staff kitchens, offices, farms or other work environments.
Nor is it intended to be used by clients in hotels or other similar environments.
- If the appliance is used improperly or if it is not used according to the instructions in
the user manual, the warranty becomes invalid and seller refuses any liability for any
damage that may be caused.
-Always unplug the appliance aer use.
- Let the appliance cool down for approx. 30 minutes before you handle or clean it.
- Remove burnt remnants.
Before first use
1. Remove all packing material.
2. Remove any stickers or labels from the appliance – other than the rating label.
3. Thoroughly clean the basket, and frying tray, with hot water and some liquid washing
soap using a non-abrasive sponge.
Note: You can also clean these parts in the dishwasher.
4. Wipe the inside and outside of the appliance with a moist cloth.
Preparing for use
1. Place the appliance on a stable, horizontal and level surface that is also heat resistant.
2. Place the basket in the frying tray properly.
Do not fill the frying tray with oil or any other liquid.
Do not put anything on top of the appliance. This disrupts the airflow and affects
the air-frying result.

Using the appliance
1.Power on
Plug in, there is BEEPS sounds. Light up. 1 seconds will be back to standby mode: All
light will be off expect .
2. Menu selection/Temperature/Time
Plug in, it is at the standby mode. press , Default temperature and Default time of
the Program are 360 °F, 15 min respectively, at that time you can adjust the time and
temperature freely by using Time +/- and Temperature +/- button.
3. Start/pause
After selection function, set the right time and right temperature, press , the
machine start to work. Fan light (blue light flashing) and heat lamps (red light) will be
lighted at the same time. During the machine is working, press , the
machine stop working, and machine back to standby mode. Press will be invalid
during working.
Press to choose function. Press it one time the menu will change one to another.
And the related picture will light up. The menu is circulation. Every function has its own
default time and temperature (As shown in the table). But customer can adjust the time
and temperature freely by using Time +/- and Temperature +/- button.
1) The temperature control range is 180-400 °F, every click on the + / - temperature will,
increase or reduce 10 °F. At 400 °F, press the "+", will loop back to a temperature of
180°F, press the "-" at 180 °F temperature will cycle back to 400 °F,. In the process of
temperature control, temperature digital display will flash on the screen (not flashing
during working), after flashing 3 times, the temperature has been done of setting;
2) The adjusting time range is 1 to 60 mins. every click on the + / - time will increase or
reduce 1 min. At 60 min if you press "+", the time will cycle back to 01 min,. At 01 min, if
you press "-", the temperature will cycle back to 60 min. In the process of time control,
time digital display will flash on the screen (not flashing during working), after flashing 3
times, the time has been done of setting;
Note:
1. During working, you can take frying tray out, stop working, and you can check cooking
result or add more food, machine continue to work on the program if pull in the frying
tray.
2. Power cut or unplug during working, machine stop working, all light off, machine
continue to work on the program when power on or plug in again.
4
4. End of program
Heating element stop working when working time is done, show 00 min, motor continues
to work, buzzer warning. Motor continues to work 1 min, cooling machine, then machine
enter the standby mode.
5
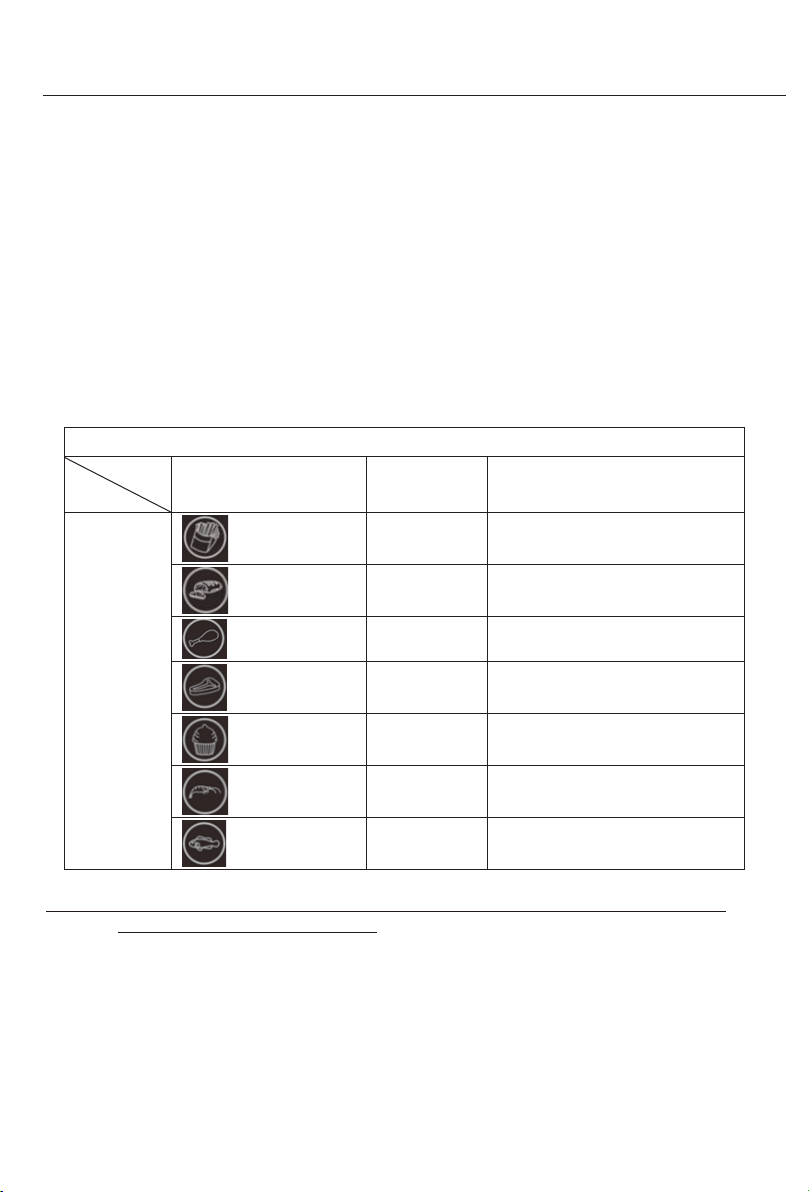
Menu table
Program Logistics
Menu
Default
time(min)
Default
temperature(F)
Function
potato chips
18
400
meat
12
400
chicken
20
400
steak
12
360
cake
25
320
shrimp
8
360
fish
10
360
Caution: Do not touch the pan during and about 30mins after use, as it gets very hot.
Only hold the pan by the handle.

6
Operation step
1. Put the mains plug in an earthed wall socket.
2. Put the ingredients into the basket and put basket in frying tray
3. Put the frying tray in the right position. Choose function from menu and press
START/PAUSE to start cooking.
4.
5.
Screen Display
It will show temperature and time. Temperature is the setting temperature and time is
remain working time. The function we have selected is flicker.
Some ingredients require shaking halfway through the preparation time (see section
'Settings' in this chapter). To shake the ingredients, pull the frying tray out of the
appliance by the handle and shake it. Then slide the frying tray back into the air fryer.
Caution: Do not press the basket release button during shaking.
6. When you hear the timer bell, the set preparation time has elapsed. Pull the pan out of
the appliance and place it on a heat-resistant surface.
7. Check if the ingredients are ready.
If the ingredients are not ready yet, simply slide the frying tray back into the appliance
and cook it extra minutes
8. To remove small ingredients, press the basket release button and lift the basket out of
the frying tray.
10. When a batch of ingredients is ready, the air fryer is instantly ready for preparing another
batch.
Tip: To reduce the weight, you can remove the basket from the pan and shake the basket
only. To do so, pull the pan out of the appliance, place it on a heat-resistant surface and
press the basket release button.
9. Empty the basket into a bowl or onto a plate.
Tip: To remove large or fragile ingredients, use a pair of tongs to lift the ingredients out of
the basket.
Note: When using the Health Fryer for the first time, a slight smoke or odour may
be emitted. This is normal and will soon subside. Ensure that there is sufficient
ventilation around the Health Fryer.
Do not turn the basket upside down with the frying tray still attached to it, as any excess oil
that has collected on the bottom of the frying tray will spill out and leak onto the ingredients.
After hot air frying, the frying tray and the ingredients are hot. Depending on the type of
ingredients in the air fryer, steam may escape form the frying tray.

Except the preset menu, you also can use this air fryer to make other foods by setting the
time and temperature. This table below helps you to select the basic settings for the
ingredients you want to prepare.
Smaller ingredients usually require a slightly shorter preparation time than larger
ingredients.
A larger amount of ingredients only requires a slightly longer preparation time; a
smaller amount of ingredients only requires a slightly shorter preparation time.
Shaking smaller ingredients halfway through the preparation time optimized the end
result and can help prevent unevenly fried ingredients.
You can coat fresh potatoes with a little oil for a crispy result. Fry your ingredients in the
air fryer within a few minutes after you have added the oil.
Use pre-made dough to prepare filled snacks quickly and easily. Pre-made dough also
requires a shorter preparation time than home-made dough.
You can also use the air fryer to reheat ingredients by setting the temperature to 150°C
and the timer to about 10 minutes.
7
Do not prepare extremely greasy ingredients such as sausages in the air fryer.
Snacks that can be prepared in an oven can also be prepared in the air fryer.
The optimal amount for preparing crispy fries is 500 grams.
Note: Keep in mind that these settings are only for reference. As ingredients differ in
origin, size, shape as well as brand, we cannot guarantee the best setting for your
ingredients.
Because the Rapid Air Technology instantly reheats the air inside the appliance, pulling
the frying tray briefly out of the appliance during hot air frying barely disturbs process.
Settings
Tips:
-
-
-
-
-
-
-
-
-
Note: Add 3 minutes to the preparation time before you start frying if the appliance is
cold.
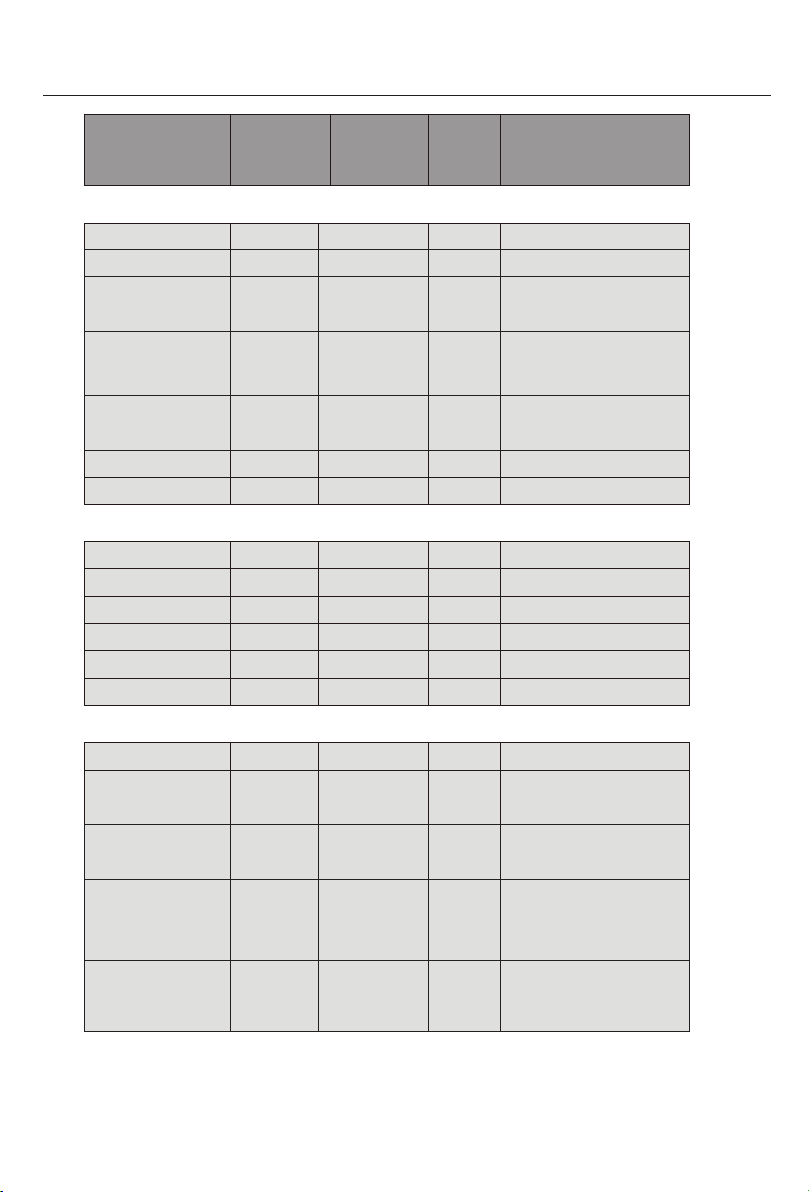
Time
(min.)
Temper-
ature(°F)
Shake Extra information
Potatoes & fries
Thin frozen fries
12-16
400
Shake
Thick frozen fries
12-20
400
Shake
Home-made fries
(8x8mm)
18-25
360
Shake
add1/2 tbsp of oil
Home-made
potato wedges
18-22 360 Shake add1/2 tbsp of oil
Home-made
potato cubes
12-18 400 Shake add1/2 tbsp of oil
Rösti
15-18
360
Potato gratin
18-22
360
Meat & Poultry
Steak
8-22
360
Pork chops
10-14
360
Hamburger 7-14 360
Sausage roll
13-15
400
Drumsticks
18-22
360
Chicken breast
10-15
360
Snacks
Spring rolls
8-10
400
Shake
Use oven-ready
Frozen chicken
nuggets 6-10 400 Shake Use oven-ready
Frozen fish
fingers 6-10 400 Use oven-ready
Frozen bread-
crumbed cheese
snacks
8
10 400 Use oven-ready
Stuffed
vegetables 10 320 Use oven-ready

Making home-made fries.
Cleaning
Clean the appliance after every use.
Storage
9
For the best results, we advise to use pre-baked fries. If you want to make home-made
fries, follow the steps below:
1. Peel the potatoes and cut them into sticks.
2. Soak the potato sticks in a bowl of water for at least 30 minutes, take them out and dry
them with kitchen paper.
3. Pour 1/2 tablespoon of olive oil in a bowl, put the sticks on top and mix until the sticks
are coated with oil.
4. Remove the sticks from the bowl with your fingers or a kitchen utensil so that excess
oil stays behind in the bowl. Put the sticks in the basket.
1. Remove the mains plug from the wall socket and let the appliance cool down.
Note: Remove the frying tray to let the air fryer cool down more quickly.
3. Clean the frying tray and basket with hot water, some washing liquid soap and a
non-abrasive sponge.
You can use a washing liquid to remove any remaining dirt.
Note: The frying tray and basket are dishwasher-proof.
Tips: If dirt is stuck to the basket, or at the bottom of the frying tray, fill the frying tray
with hot water and with some washing liquid soap. Put the basket in the frying tray
and let the frying tray and the basket soak for approximately 10 minutes.
2. Wipe the outside of the appliance with a moist cloth.
1. Clean the inside of the appliance with hot water and a non-abrasive sponge.
2. Clean the heating element with a cleaning brush to remove any food residues.
1. Unplug the appliance and let it cool down.
2. Make sure all parts are clean and dry.
5. Fry the potato sticks according to the instructions in this chapter.
Note: Do not tilt the bowl to put all the sticks in the basket in one go, to prevent excess
oil from collecting at the bottom of the frying tray.
The frying tray, basket and the inside of the appliance have a non-stick coating. Do not
use metal kitchen utensils or abrasive cleaning materials to clean them, as this may
damage the non-stick coating.

Troubleshooting
Problem
Possible cause
Solution
The air fryer
does not work
The appliance is not
plugged into the mains
Put the mains plug in an earthed
wall socket.
You have not set the timer.
Turn the timer knob to the required
preparation time to switch on the
appliance.
The ingredients
fried with theair
fryer are not
done.
The amount of the
ingredients in the basket is
too much.
Put smaller batches of ingredients
in the basket. Smaller batches are
fried more evenly.
The set temperature is too
low.
Turn the temperature control knob
to the required temperature setting
(see section 'Settings').
The preparation time is too
short.
Turn the timer knob to the required
preparation time
(see section 'Settings').
The ingredients
are fried
unevenly in the
air fryer.
Certain types of the
ingredients need to be
shaken halfway through the
preparation time.
Ingredients that lie on top of or
across each other (e.g. fries) need
to be shaken halfway through the
preparation time
(see section 'Settings').
Fried snacks are
not crispy when
they come out of
the air fryer
You used a type of snacks
meant to be prepared in a
traditional deep fryer.
Use oven snacks or lightly brush
some oil onto the snacks for a
crispier result.
I cannot slide
the pan into the
appliance
properly.
There is too much food
in the basket.
Do not fill the basket beyond
the Max amount indicated in the
table on the earlier page.
The basket is not placed in
the pancorrectly.
Push the basket down into the pan
until you hear a click.
White smoke
comes out of
the appliance
You are preparing
greasy ingredients.
Pay attention that the temperature
is well-controlled to be under
180˚C, when you fry greasy
ingredients in the air fryer.
10

Problem
Possible cause
Solution
The pan still contains
greasy residues from
previous use.
White smoke is caused by grease
heating up in the pan. Make sure
you clean the pan properly after
each use.
Fresh potato
fries are fried
unevenly in the
air fryer.
You did not soak the potato
sticks properly before you
fried them.
Soak the potato sticks in a bowl of
water for at least 30 minutes; take
them out and dry them with
kitchen paper.
You did not use the right
potato type.
Use fresh potatoes and make sure
they stay firm during frying.
Fresh potato
fries are not
crispy when
they come out
of the air fryer.
The crispiness of the fries
depends on the amount of
oil and water in the fries.
Make sure you dry the potato
sticks properly before you coat
them with oil.
Cut the potato into thinner sticks
for a crispier result.
Add slightly more oil for a crispier
result.
11
Freidora de
Aire XL
Manual de Usuario
Modelo: PS-DF449

Introducción
Gracias por comprar esta freidora de alta calidad. Ahora podrá cocinar una amplia
surtido de comida de manera saludable, con poco o nada de aceite.
La freidora de aire utiliza aire caliente, en combinación con la circulación de aire a alta
velocidad, y una rejilla superior paraprepara tus platos de forma rápida y fácil. Los
ingredientes se calientan desde todos los lados, a la vez,
y no hay necesidad de agregar aceite en la mayoría de los casos.
Descripción general
1

Importante
Lea este manual de usuario detenidamente antes de usar el aparato y consérvelo de
forma segura.referencia futura.
Peligro
- Nunca sumerja la carcasa, que contiene componentes eléctricos y la calefacción
elementos, en agua o enjuague debajo del grifo.
- No permita que ingrese agua u otros líquidos en el artefacto, para evitar
descargas eléctricas.
- Siempre coloque los ingredientes para freír en la canasta, para evitar que entren
contacto con los elementos de calentamiento
- No cubra la entrada de aire y las aberturas de salida de aire mientras el
electrodoméstico está funcionando.
- No llene la bandeja de freír con aceite, ya que puede provocar un incendio.
- Nunca toque el interior del aparato mientras está en funcionamiento
- Compruebe si la tensión indicada en el aparato corresponde a la red local
voltaje en su país antes de conectar el dispositivo.
- No use el aparato si el enchufe, el cable de alimentación o el aparato están dañados.
- Si el cable de alimentación está dañado, debe reemplazarlo en un centro de servicio
autorizado por personas igualmente calificadas para evitar un peligro.
- Este aparato no es adecuado para niños o para personas que están físicamente o
discapacitados mentales o que carecen de experiencia y conocimiento. Si quieres a
alguien De lo contrario, para usar el dispositivo, esa persona debe ser guiada
correctamente en su uso.
- Mantenga el aparato y su cable de red fuera del alcance de los niños cuando el aparato
está encendido o se está enfriando.
- Mantenga el cable de alimentación alejado de superficies calientes.
- No enchufe el aparato ni opere el panel de control con las manos mojadas.
- Conecte el aparato únicamente a una toma de corriente con conexión a tierra.
Siempre asegúrese de que el enchufeestá insertado en el enchufe de pared correctamente.
- Nunca conecte este aparato a un interruptor temporizador externo.
- No coloque el aparato sobre o cerca de materiales combustibles como un mantel o
cortinas
- No coloque el aparato contra la pared o contra otros dispositivos. Dejar al menos
10 cm de espacio libre en la parte posterior y los lados y 10 cm de espacio libre encima
del aparato. Hacer no coloque nada encima del aparato.
- No use el aparato para ningún otro fin que no sea el descrito en este manual.
- No permita que el electrodoméstico funcione sin supervisión.
- Durante la fritura con aire caliente, se libera vapor caliente a través de las aberturas
de escape de aire. Mantener sumanos y cara a una distancia segura del vapor y de las
aberturas de escape de aire.También tenga cuidado con el vapor caliente y el aire
caliente cuando retire la bandeja de freír del aplicación.
-
2

3
- La superficie debajo del aparato puede calentarse durante el uso.
-Desconecte inmediatamente el aparato si ve salir humo oscuro del aparato.
Espere a que la emisión de humo se detenga antes de retirar la bandeja de freír de la
aparato.
Caution
- Coloque el aparato sobre una superficie horizontal, nivelada y estable.
- Este aparato está diseñado solo para uso doméstico normal. No está destinado para
su uso en entornos tales como cocinas de personal, oficinas, granjas u otros entornos
de trabajo.Tampoco está destinado a ser utilizado por clientes en hoteles u otros
entornos similares
- Si el electrodoméstico se usa incorrectamente o si no se usa de acuerdo con las
instrucciones deel manual del usuario, la garantía deja de ser válida y el vendedor
rechaza cualquier responsabilidad por cualquier daño que puede ser causado.
- Desconecte siempre el aparato después de su uso.
- Deje que el aparato se enfríe durante aprox. 30 minutos antes de manejarlo o limpiarlo.
- Retire los restos quemados.
Antes del primer uso
1. Retire todo el material de embalaje.
2. Retire cualquier etiqueta o adhesivo del electrodoméstico, que no sea la etiqueta
de clasificación.
3. Limpie a fondo la cesta y la bandeja de freír, con agua caliente y un poco de líquido
de lavado jabón usando una esponja no abrasiva.
Nota: También puede limpiar estas piezas en el lavavajillas.
4. Limpie el interior y el exterior del aparato con un paño húmedo.
Preparación para el uso
1. Coloque el aparato en una superficie estable, horizontal y nivelada que también sea
resistente al calor.
2. Coloque la cesta en la bandeja de freír correctamente.
No llene la bandeja de freír con aceite o cualquier otro líquido.
No coloque nada sobre el aparato. Eso interrumpe el flujo de aire y afecta
el resultado de la fritura al aire.
Usando el aparato
1.Encendido
Enchúfelo, hay sonidos BEEPS. Encender. 1 segundo volverá al modo de espera: Todo
la luz se apagará .
2. Selección de menú / temperatura / tiempo
Enchufe, está en el modo de espera. presione la temperatura predeterminada y el
tiempo predeterminado del programa son 360 ° F, 15 min respectivamente, en ese
momento puede ajustar el tiempo y la temperatura libremente usando los botones Time
+/- y Temperature +/-.
3. Inicio / pausa
Después de la función de selección, configure la hora correcta y la temperatura correcta,
presione , la máquina comenzará a funcionar. La luz del ventilador (luz azul
intermitente) y las lámparas de calor (luz roja) se encenderán al mismo tiempo. Durante
el funcionamiento de la máquina, presione,
la máquina deja de funcionar y la máquina regresa al modo de espera. no será
válida durante el trabajo.
Presione para elegir la función. Presiónelo una vez, el menú cambiará de uno a otro. Y
la imagen relacionada se iluminará. El menú es circulación. Cada función tiene su propio
tiempo y temperatura predeterminados (como se muestra en la tabla). Pero el cliente
puede ajustar el tiempo y la temperatura libremente utilizando el botón Time +/- y
Temperature +/-.
1) El rango de control de temperatura es 180-400 ° F, cada clic en la temperatura + / -
aumentará o reducirá 10 ° F. A 400 ° F, presione el "+", regresará a una temperatura de
180 ° F, presione el "-" a una temperatura de 180 ° F que volverá a los 400 ° F. En el
proceso de control de la temperatura, la pantalla digital de temperatura parpadeará en la
pantalla (no parpadeará durante el trabajo), después de parpadear 3 veces, la tempera-
tura ha sido ajustada;
2) El rango de tiempo de ajuste es de 1 a 60 minutos. cada clic en el tiempo + / - aumen-
tará o reducirá 1 min. A los 60 minutos si presiona "+", el tiempo volverá a los 01 min. En
01 min, si presiona "-", la temperatura volverá a los 60 min. En el proceso de control de
tiempo, la pantalla digital de tiempo parpadeará en la pantalla (no parpadeará durante el
trabajo), después de parpadear 3 veces, el tiempo ha pasado de configuración;
Nota:
1. Durante el trabajo, puede sacar la bandeja de freír, dejar de trabajar, y puede verificar
el resultado de la cocción o agregar más alimentos, la máquina continuará trabajando en
el programa si tira de la bandeja de freír.
2. Corte o desconecte la alimentación durante el trabajo, la máquina deje de funcionar,
toda la luz apagada, la máquina continúe trabajando en el programa cuando se encien-
da o vuelva a enchufar.
4

4. Fin del programa
El elemento de calefacción deja de funcionar cuando se termina el tiempo de trabajo,
muestra 00 min, el motor continúa funcionando, advertencia de zumbador. El motor
continúa funcionando durante 1 minuto, la máquina de enfriamiento, luego la máquina
ingresa al modo de espera.
5
Tabla de menús
Logística del programa
Menu
Tiempo
predeterminado
(min)
Temperatura
predeterminada (F)
Function
patatas fritas
18
400
carne
12
400
pollo
20
400
filete
12
360
torta
25
320
camarón
8
360
pescado
10
360
Precaución:
No toque la sartén durante aproximadamente 30 minutos después del uso, ya que
hace mucho calor. Solo sostenga la bandeja por el mango.

6
Paso de operación
1. Coloque el enchufe de red en una toma de corriente con conexión a tierra.
2. Ponga los ingredientes en la canasta y coloca la canasta en la bandeja de freír
3. Coloque la bandeja de freír en la posición correcta. Elija la función del menú y presione
START / PAUSE para comenzar a cocinar.
4.
5.
Visualización de la pantalla
Mostrará la temperatura y el tiempo. La temperatura es la temperatura de ajuste y el
tiempo es el tiempo de trabajo restante. La función que hemos seleccionado es parpadeo.
Algunos ingredientes requieren agitación a la mitad del tiempo de preparación (consulte
la sección "Configuración" en este capítulo). Para agitar los ingredientes, saque la
bandeja de freír del electrodoméstico por el asa y sacúdala. Luego deslice la bandeja de
freír nuevamente dentro de la freidora de aire.
Precaución: no presione el botón de liberación de la cesta durante el movimiento.
6. Cuando escuche la campana del temporizador, ha transcurrido el tiempo de preparación
establecido. Saque la bandeja del aparato y colóquela sobre una superficie resistente al
calor.
7. Verifica si los ingredientes están listos.
Si los ingredientes aún no están listos, simplemente vuelva a colocar la bandeja de freír
en el aparato y cocínela durante más minutos.
8. Para eliminar los ingredientes pequeños, presione el botón de liberación de la cesta y
levante la cesta de la bandeja de freír.
10. Cuando un lote de ingredientes está listo, la freidora está instantáneamente lista para
preparar otro lote.
Consejo: Para reducir el peso, puede sacar la canasta de la sartén y agitarla solo. Para
hacerlo, saque la bandeja del aparato, colóquela sobre una superficie resistente al calor y
presione el botón de liberación de la cesta.
9. Vacíe la canasta en un tazón o en un plato.
Consejo: Para eliminar los ingredientes grandes o frágiles, use un par de tenazas para
levantar los ingredientes de la canasta.
Nota: Cuando use la freidora de salud por primera vez, un ligero humo u olor puede
ser emitido Esto es normal y pronto desaparecerá. Asegúrese de que haya suficiente
ventilación alrededor de la freidora de salud.
No voltee la canasta boca abajo con la bandeja de freír todavía unida, ya que cualquier
exceso de aceite que se haya acumulado en el fondo de la bandeja de freír se derramará y
se filtrará a los ingredientes.
Después de freír con aire caliente, la bandeja de freír y los ingredientes están calientes.
Dependiendo del tipo de ingredientes en la freidora, el vapor puede escapar de la bandeja
de freír.

Except the preset menu, you also can use this air fryer to make other foods by setting the
time and temperature. This table below helps you to select the basic settings for the
ingredients you want to prepare.
Los ingredientes más pequeños generalmente requieren un tiempo de preparación
ligeramente más corto que los ingredientes más grandes.
Una mayor cantidad de ingredientes solo requiere un tiempo de preparación ligera-
mente mayor; una cantidad más pequeña de ingredientes solo requiere un tiempo de
preparación ligeramente más corto.
Agitar los ingredientes más pequeños a la mitad del tiempo de preparación optimizó el
resultado final y puede ayudar a evitar ingredientes desparejos fritos.
Puede cubrir las papas frescas con un poco de aceite para obtener un resultado
crujiente. Freír los ingredientes en la freidora dentro de unos minutos después de
haber agregado el aceite.
Use masa prefabricada para preparar bocaditos rellenos de manera rápida y fácil. La
masa pre hecha también requiere un tiempo de preparación más corto que la masa
casera.
También puede usar la freidora de aire para recalentar los ingredientes ajustando la
temperatura a 150 ° C y el temporizador a aproximadamente 10 minutos.
7
No prepare ingredientes extremadamente grasosos como salchichas en la freidora de
aire.
Los bocadillos que se pueden preparar en un horno también se pueden preparar en la
freidora.
La cantidad óptima para preparar papas crujientes es de 500 gramos.
Nota: Tenga en cuenta que estas configuraciones son solo para referencia. Como los
ingredientes difieren en origen, tamaño, forma y marca, no podemos garantizar la mejor
configuración para sus ingredientes.
Debido a que la tecnología Rapid Air Technology recalenta instantáneamente el aire
dentro del aparato, sacar la bandeja de freír brevemente del aparato durante la freidura
con aire caliente apenas perturba el proceso.
Mostrará la temperatura y el tiempo. La temperatura es la temperatura de ajuste y el
tiempo es el tiempo de trabajo restante. La función que hemos seleccionado es parpadeo.
Configuraciones
Consejo:
-
-
-
-
-
-
-
-
-
Table of contents
Languages:
Other Professional Series Fryer manuals


