READ THIS MANUAL THOROUGHLY
BEFORE USING AND SAVE IT FOR FUTURE REFERENCE
55PA1US
INSTRUCTION MANUAL
AIR FRYER
IMPORTANT SAFEGUARDS
INTRODUCTION
Before Using The Air Fryer
For The First Time
1. This appliance is not intended for use by persons (including children younger than 8) with reduced
physical, sensory or mental capabilities, or lack of experience and knowledge, unless they have supervi-
sion.
2. Check if the voltage indicated on the appliance corresponds to the local main voltage before you
connect the appliance.
3. Do not use the appliance if the plug, the main cord or the appliance itself is damaged. Always make
sure that the plug is inserted properly into a wall outlet.
4. Close supervision is necessary when any appliance is used by or near children. Children should be
supervised to ensure that they do not play with the appliance. Cleaning and user maintenance shall not
be done by children unless they are older than 8 and supervised.
5. Do not let the cord hang over the edge of table or counter or touch hot surfaces.
6. To protect against electric shock do not immerse cord, plugs, or appliance in water or other liquid. Do
not plug in the appliance or operate the control panel with wet hands.
7. Never connect this appliance to an external timer switch or separate remote-control system in order
to avoid a hazardous situation. To disconnect, turn off the appliance, then remove plug from the wall
outlet.
8. Do not place the appliance on or near combustible materials such as a tablecloth or curtain. The
accessible surfaces may become hot during use. Do not place on or near a hot gas or electric burner, or
in a heated oven.
9. Do not place the appliance against a wall or against other appliances. Leave at least 4 inches of free
space on the back and sides and 4 inches of free space above the appliance. Do not place anything on
top of the appliance.
10. Do not use the appliance for any other purpose than described in this manual. The use of accessory
attachments not recommended by the appliance manufacturer may cause injuries.
11. Do not let the appliance operate unattended. Extreme caution must be used when moving an
appliance containing hot oil or other hot liquids.
12. Do not use outdoors.
13. Do not touch the hot surfaces; use handle. During hot air frying, hot steam is released through the air
outlet openings. Keep your hands and face at a safe distance from the steam and from the air outlet
openings.
Also be careful of hot steam and air when you remove the pan from the appliance.
14. After using the appliance, the metal cover inside is very hot, avoid contact with the hot metal inside
after cooking. Unplug from outlet when not in use and before cleaning. Allow to cool before putting on or
taking off parts, and before cleaning the appliance.
15. Immediately unplug the appliance if you see dark smoke coming out of the appliance. Wait for the
smoke emission to stop, before you remove the pan from the appliance.
16. FOR HOUSEHOLD USE ONLY.
Thank you for purchasing this Air Fryer from the products. Please read this Manual carefully BEFORE
using the Air Fryer for your own safety. There are many benefits to using an Air Fryer:
• Simple to use controls for cooking quick, healthy meals. • Generous 6.3QT frying capacity.
• Rapid air circulation system to cook food fast and saves energy.
• Healthy alternative to cooking deep fried food with no oil.
• Air Fried food retains its nutritional value, but still has the taste of delicious fried food.
1. Remove all packaging material.
Remove any stickers or labels from the appliance.
2. Thoroughly clean the pan and basket with hot water, some dishwashing liquid and a non-abrasive
sponge.
3. Wipe the inside and outside of the appliance with a moist cloth.
Note: During the first few times of using your new Air Fryer there might be a “hot plastic” smell. This is
perfectly normal in new Air Fryers as the material is heated for first time. It will go away after the first
few uses.
PREPARING FOR USE
SETTINGS
1. Place the appliance on a stable, horizontal and even surface.
Do not place the appliance on non-heart-resistant surface.
2. Put the basket into the pan, Place the ingredients in the basket-do not overload.
3.Plug the Air Fryer into an electrical wall outlet.
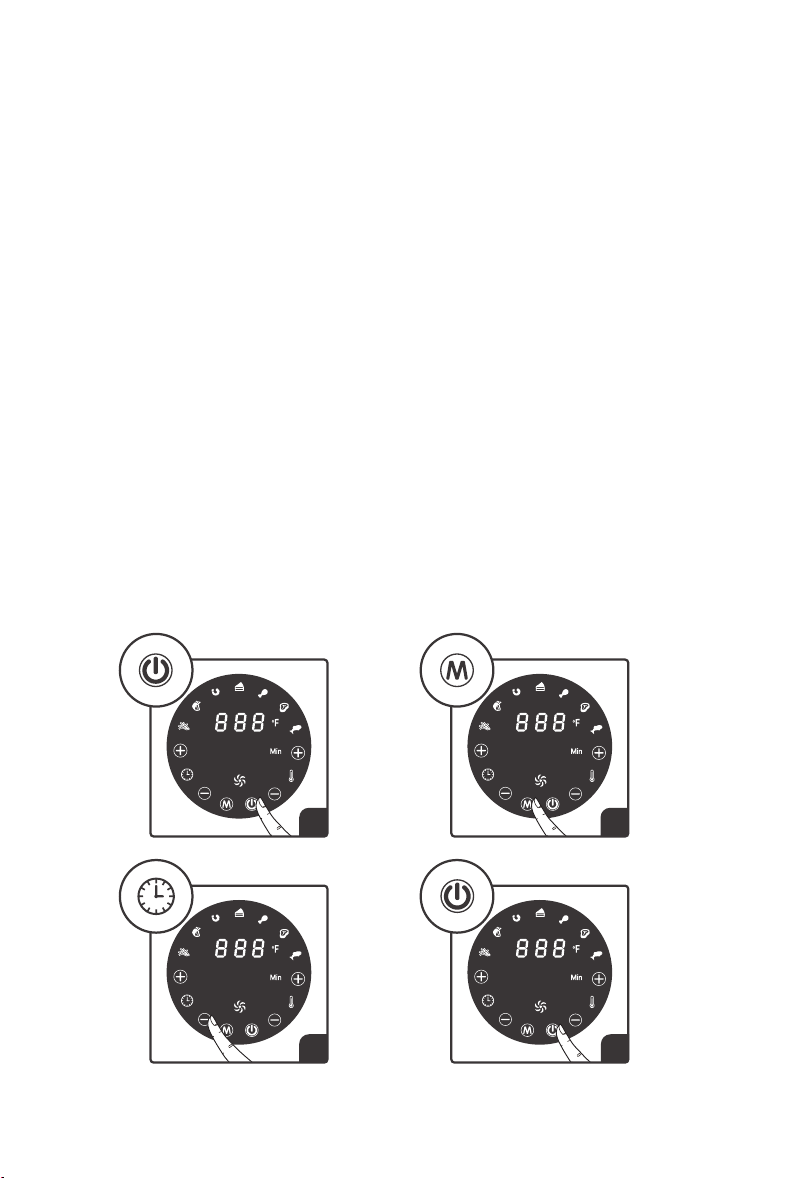
4. To turn on the appliance tap the power icon. The air fryer will first go into default mode
5. To select a preset, tap the menu icon, until desired food icon appears. The selected food will start to
flash. The temperature and time will appear on the screen.
6. To set the temperature and time manually or to adjust the preset temperature or time, tap the arrow
icons to select your desired temperature or time.
7. To begin the air frying process tap the power icon.
CLEANING
Clean the appliance after every use.
The pan and the non-stick coating basket. Do not use metal kitchen utensils or abrasive cleaning
materials to clean them, as this may damage the non-stick coating.
1. Remove the mains plug from the wall socket and let the appliance cool down. Note: Remove the
pan to let the Hot-air fryer cool down more quickly.
2. Wipe the outside of the appliance with a moist cloth.
3. Clean the pan, separator and basket with hot water, some washing-up liquid and a non-abra-
sive sponge. You can use degreasing liquid to remove any remaining dirt.
Note: The pan and basket are dishwasher-proof.
Tip: If dirt is stuck to the basket or the bottom of the pan, fill the pan with hot water with some
washing-up liquid. Put the basket in the pan and let the pan and the basket soak for approximate-
ly 10 minutes.
4. Clean the inside of the appliance with hot water and non-abrasive sponge.
5. Clean the heating element with a cleaning brush to remove any food residues.
WARRANTY INFORMATION
The manufacturer provides warranty in accordance with the legislation of the customer's own
country of residence, with a minimum of 18 months , starting from the date on which the
appliance is sold to the end user.
The warranty only covers defects in material or workmanship.
The warranty will not apply in cases of:
- Normal wear and tear
- Incorrect use, e.g. overloading of the appliance, use of non-approved accessories
- Use of force, damage caused by external influences
- Damage caused by non-observance of the user manual, e.g. connection to an unsuitable
mains supply or non-compliance with the installation instructions - Partially or completely
dismantled appliances.
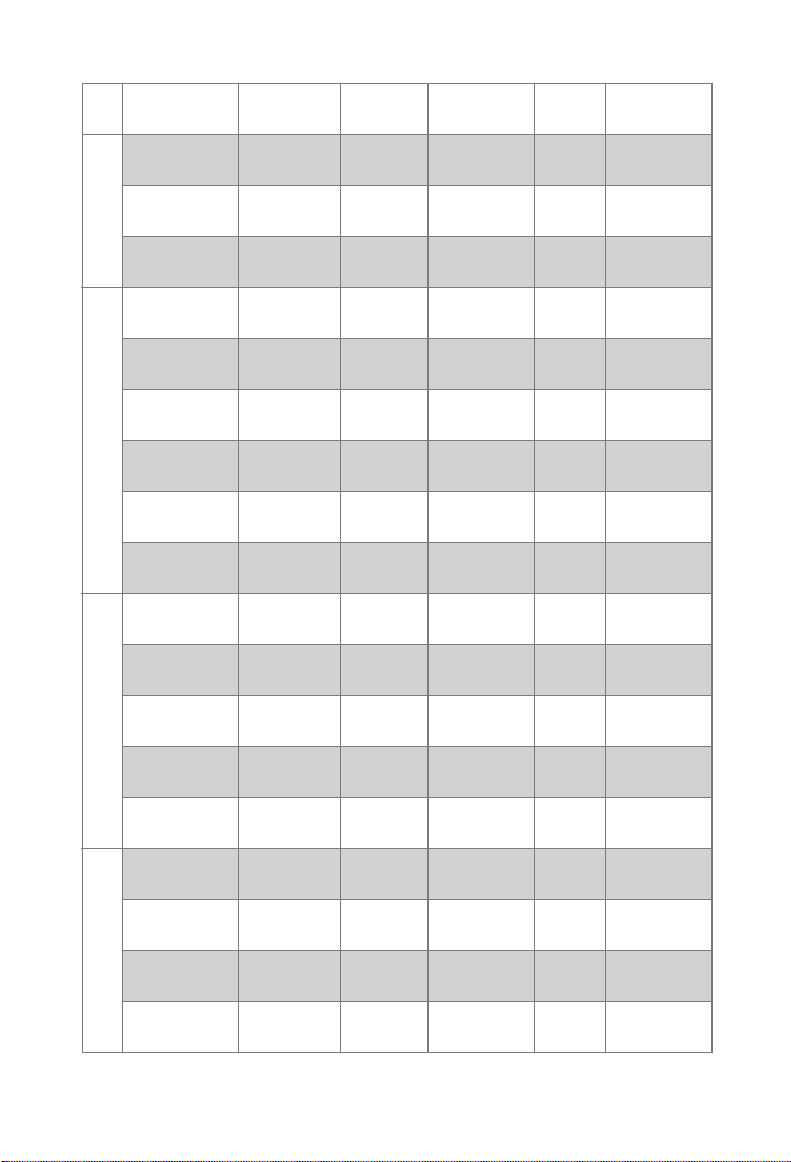
This table below will help you to select the basic settings for the ingredients.
Note: Keep in mind that these settings are indications. As ingredients differ in origin, size,
shape as well as brand, we cannot guarantee the best setting for your ingredients. Because
the Rapid Air technology instantly reheats the air inside the appliance instantly Pull the pan
briefly out of the appliance during hot air frying barely disturbs the process. Tips
- Smaller ingredients usually require a slightly shorter preparation time than larger ingredients.
- A larger amount of ingredients only requires a slightly longer preparation time, a smaller
amount of ingredients only requires a slightly shorter preparation time.
- Shaking smaller ingredients halfway through the preparation time optimizes the end result
and can help prevent unevenly fried ingredients.
- Add some oil to fresh potatoes for a crispy result. Fry your ingredients in the Hot-air fryer
within a few minutes after you added the oil.
- Snacks that can be prepared in a oven can also be prepared in the Hot-air fryer
- Use pre-made dough to prepare filled snacks quickly and easily. Pre-made dough also
requires a shorter preparation time than home-made dough.
- Place a baking tin or oven dish in the Hot-air fryer basket if you want to bake a cake or
quiche or if you want to fry fragile ingredients or filled ingredients
- You can also use the Hot-air fryer to reheat ingredients. To reheat ingredients, set the
temperature to 150°C for up to 10 minutes.
STORAGE
1. Unplug the appliance and let it cool down.
2. Make sure all parts are clean and dry.
8. Some recipes or ingredients call for shaking the ingredients halfway through the preparation
time.To shake the ingredients, pull the pan out of the appliance by the handle and shake it.
Then slide the pan back into the air fryer and continue to cook.
Note:(1)Be careful not to press the basket release button on the handle during shaking. This
will cause the basket to separate from the pan.(2)After sliding the pan out of the appliance,
the display will go into sleep mode, when you return the pan to the appliance, your time and
temperature settings will automatically resume. There is no need to reset your setting or press
start.
9. When your selected cooking time has elapsed the timer bell will ring. Pull the pan out of the
appliance and place it on a heat-resistant surface. If you would like a little more cooking time
on the food, simply slide the pan back into the appliance and set the timer for a few extra
minutes.
10. When your food is ready place the pan on a heat resistant surface. Slide the basket release
cover forward,press down on the basket release button and lift the basket out of the pan.
Empty the basket into a bowl or onto a plate using a pair of tongs; the food, basket and pan
will be hot!
Note:Do not turn the pan or basket upside down, as any excess oil that has collected on the
bottom of the pan or basket will leak onto the ingredients. To avoid scratching the nonstick
surface do not use sharp or metal utensils.
11. When a batch of ingredients is ready, the air fryer is instantly ready for preparing another
batch. No preheating is necessary.
Tip: After hot air frying, the pan and the ingredients are hot - avoid touching. Depending on the
type of the ingredients in the air fryer, steam may escape from the pan.
4
6 7
5
Note: If you want to power off the air fryer in middle of air frying press the power icon
for 3 seconds.
Note:Add 3 minutes to the preparation time when you start frying while the Hot-air fryer
is still cold.
Min-max
Amount (g)
Thin frozen
fries
Thick frozen
fries
Potato gratin
Steak
Pork chops
Hamburger
Sausage roll
Drumsticks
Chicken breast
Spring rolls
Frozen chicken
nuggets
Frozen fish
fingers
Frozen bread
crumbed cheese
snacks
Stuffed
vegetables
Cake
Quiche
Muffins
Sweet snacks
MEAT & POULTRY SNACKS BAKINGPOTATO & FRIES
Time (min.) Temperature
(°C) Shake Extra
information
400-500 18-20 200
200
200
180
180
180
200
180
180
200
200
200
180
160
160
180
200
160
20-25 √
√
√
√
√
20-25
10-15
10-15
10-15
13-15
25-30
15-20
8-10
6-10
6-10
10
8-10
20-25
20-22
15-18
20
400-500
100-600
100-600
100-600
100-600
100-600
100-600
100-600
100-500
100-500
100-500
100-500
400
500
400
500
600
Use oven-ready
Use oven-ready
Use oven-ready
Use oven-ready
Use baking tin
Use baking tin/
oven dish
Use baking tin
Use baking tin/
oven dish
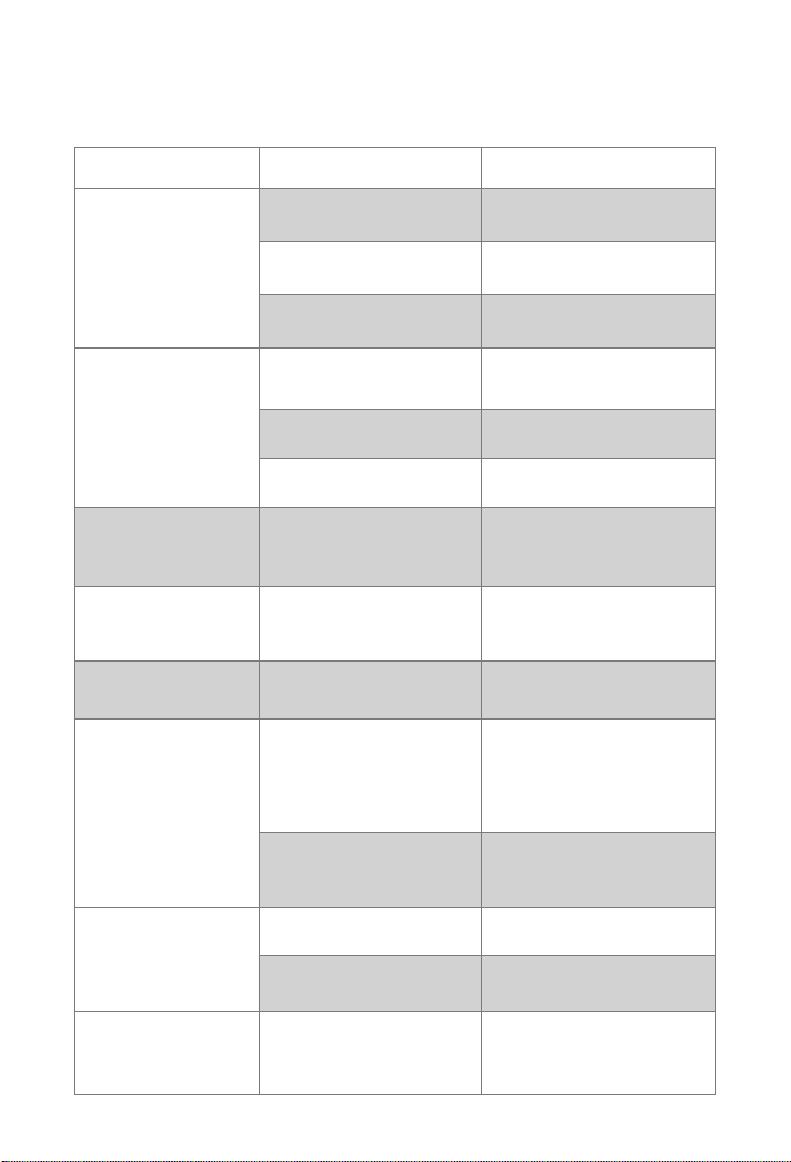
The air fryer does
not work.
The ingredients fried
in the air fryer are
not done.
The ingredients are
fried unevenly in the
air fryer.
Certain types of ingredients
need to be shaken halfway
through the preparation time.
You used a type of snack meant
to be prepared in a traditional
deep fryer.
Fried snacks are not crispy
when they come out of the
air fryer.
I cannot slide the pan into
the appliance properly.
White smoke comes out
of the appliance.
Fresh fries are fried
unevenly in the air fryer.
Fresh fries are not crispy
when they come out of
the air fryer.
The basket is overfilled.
You are preparing greasy
ingredients.
The pan still contains grease
residues from previous use.
Quality potatoes will give an
even cook.
Rinse the potato sticks properly
before you fried them.
The crispiness of the fries
depends on the amount of oil
and water in the fries.
The appliance is not plugged in. Put the main plug in an grounded
wall socket.
Tap the timer icon to set the
required preparation time to turn
on the appliance.
Slide the pan into the appliance
properly.
Put smaller batches of
ingredients in the basket. Smaller
batches are fried more evenly.
Tap the temperature icon to set
the required temperature setting.
Tap the timer icon to set the
required preparation time.
Ingredients that lie on top of or
across each other (e.g.fries) need
to be shaken halfway through the
preparation time.
Use oven snacks or lightly brush
some oil onto the snacks for a
crispier result.
Do not fill the basketbeyond max
line.
When you fry greasy ingredients in
the air fryer, a large amount of oil
will leak into the pan.The oil
produces white smoke and the pan
may heat up more than usual.This
does not affect the appliance or the
end result.
White smoke is caused by grease
heating up in the pan. Make
sure you clean the pan and basket
properly after each use.
Use fresh potatoes and make sure
they stay firm during frying.
Make sure you dry the potato sticks
properly before you add the oil.Cut
the potato sticks smaller for a
crispier result. Add slightly more oil
for a crispier result.
Rinse the potato sticks properly to
remove starch from the outside
of the sticks.
You have not set the timer
The pan is not put into
the appliance properly.
The set temperature is too low.
The preparation time is too short.
The amount of ingredients in
the basket is too much.
PROBLEM POSSIBLE CAUSE SOLUTION
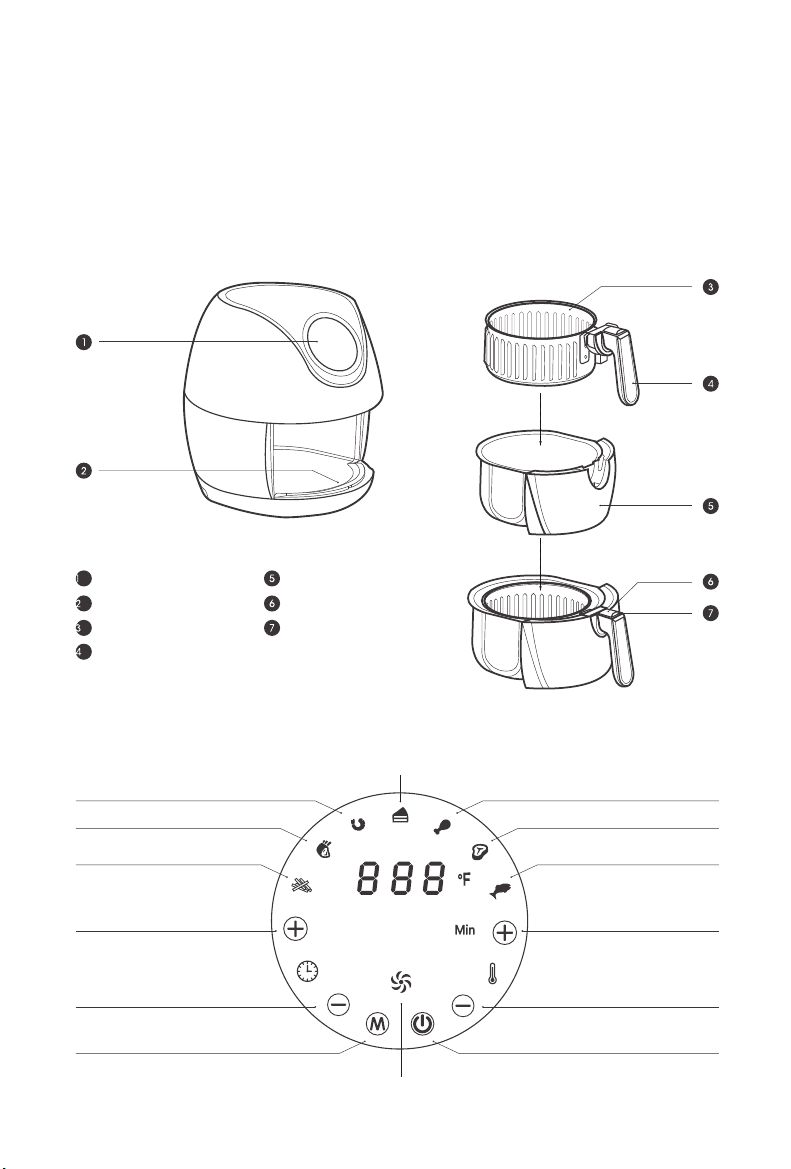
GENERAL DESCRIPTION
TECHNICAL DATA
Control Panel
Description: 6.3QT
Power Consumption: 1700W
Should you encounter problems or require a replacement part, contact the Innsky Customer
Support Team.
Control Panel
Safety Switch
Frying Basket
Frying Tray
Release Button Cover
Basket Release Button
Shellsh
French Fries
Time Controls +
Temperature
Controls +
Temperature
Controls -
Power icon
Time Controls -
Menu icon
Muscle Flesh
Poultry
CAKE
Working Indicator
Steak
Fish
Frying Basket Handle
Air Fryer Model: 55PA1US
Rated Voltage: 110-120V 60Hz
Made in China
Intertek
4007446
CM
Xiaojia Technology Co.,Limited.
Add:5th Floor, 161-167 Des Voeux Road Central,
Hong Kong Trade Centre
Facebook page:https://www.facebook.com/innskyservice/
Website:www.innsky.co