PROPHON P4700 User manual
P4700
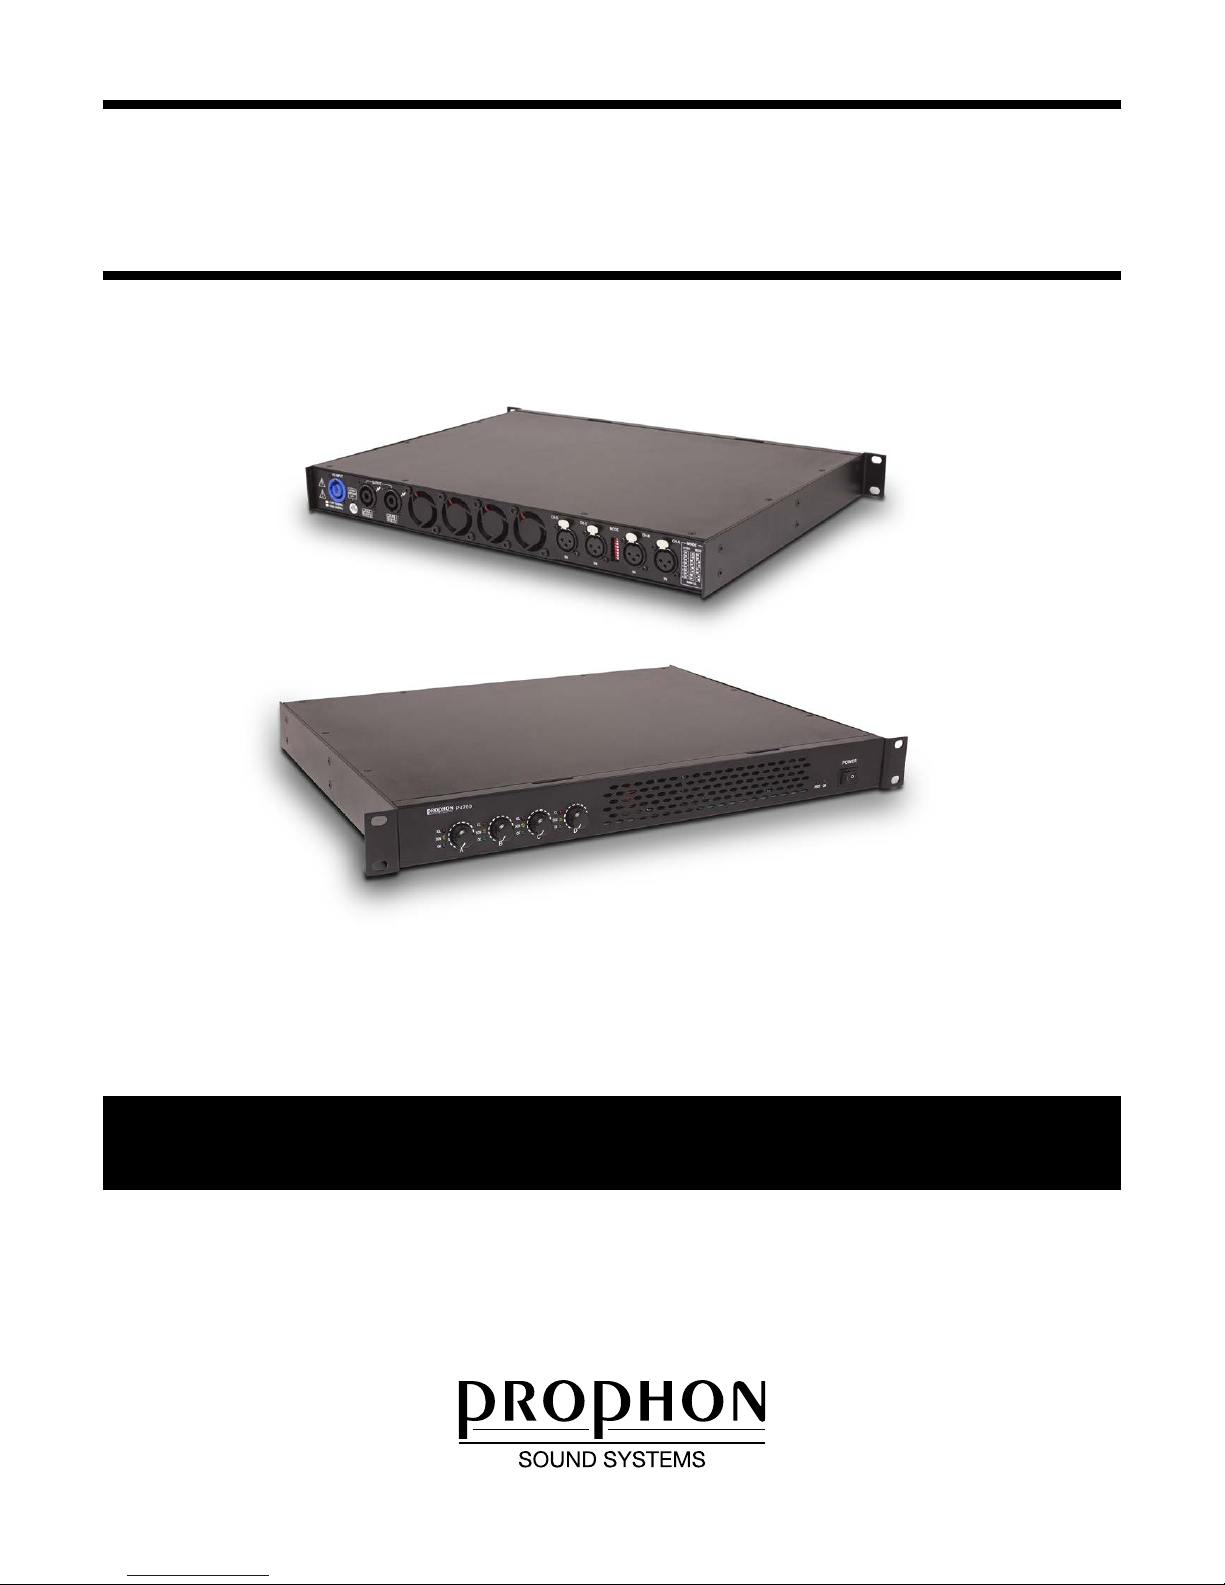
4 - CHANNEL CLASS-D AMPLIFIER WITH SWITCH MODE POWER-SUPLY
4 x 350W / 8 ohm, 4 x 550W / 4 ohm, 4 x 700W / 2 ohm, 2 x 900W in 8 ohm, 2 x 1350W in 4 ohm
1 x 900W 8 ohm + 2 x 350W 8 ohm, 1 x 1350W 4 ohm + 2 x 550W 4 ohm, 1x1350W 4 ohm + 2 x 700W 2 ohm
QUICKGUIDE / MANUAL

Warning!
- Caution: to avoid electric shock hazard, do not remove cover plate, open, or disassembly in any way,
there is no repairable parts inside, contact qualied trained professional for repair and service!
- To avoid re, damage to product, and/or electrical shock,
this equipment cannot be exposed to rain, water or humid environments
- This equipment is intended for professional and commercial use only, not for home use.
- This equipment is capable of (through loudspeakers) producing high SPL (Sound Pressure Levels) that can be damaging
for ears and hearing, due to high levels or long time exposure.
There are dierent standards and regulations in each country, make sure to respect and follow local laws regarding SPL.
To be safe, avoid prolonged exposure to volumes exceeding 90 dB, short bursts of high SPL can also be damaging to
ears and result in hearing loss and / or tinnitus, please keep volume down.
- Keep away from water, rain, moisture, humid environments.
- Read and understand the manual before installing or using.
- Pay attention to all warnings!
- Use and install the equipment only in the intended manner.
- This equipment may not be tempered with or in any other way changed to be used in a way it was not intended to
by the manufacturer
- Clean and wipe only with dry cloth, not with wet cloth.
- The highest ambient temepature is 50o C (122o F)
- Do not restrict or in any way obscure or block the ventillation intake in the front, or outlet in the back
- This equipment uses ventillation cooling systems with fans, when installing make sure there is enough free intake air in
front of the amplier to cool the equipment, and make sure there is enough space for the hot outlet air to dissapate
behind the amplier.
- Do not install heat generating equipment above, below, in front of or at the back of this amplier.
- This equipment must be earthed, Do not cut earth on the power in for omiting ground loop, use the ground lift function.
- Protect all connectors in the back, especially the mains Power input connector
- This equipment needs to be serviced regularly for prolonging the life-span and to make sure the equipment is safe,
make sure the mains power is disconnected before service, only qualied personnell may service this equipment.
- If the amplier in any way act suspiciusly disconnect the power in connector.
- This product is not equipped with an All-Pole power switch, to completely disconnect from the AC power
the AC connector must be unplugged from the AC socket.
- Make sure the mains voltage and frequency match the values specied before connecting the amplier to the mains.
- Rack mount equipment must have reliable grounding.
- Only use accessories and attachements shipped with the product, or buy original accessories from authorized supplier.
- For personnel safety we recommend that all electrical products are connected to a RCCB
(Residual current circuit breaker)
- During lightning storms and / or during time when the amplier is not used, disconnect the power-in cord.
- This device must be maintained and serviced by qualied personell only, if the amplier do not work properly or work
faulty only qualied personell may repair.
- If the product is dropped, or in any other way misshandled it must be veried by qualied service-personnel before use.
- Never place objects containing liquid close to or on top of this device.
- When mounting in a rack, never mount more than four ampliers, due to heat dissapation issues.
- Avoid switching the on/o switch in quick succession, it can cause the equipment to have a shorter life-span.
- Only replace fuses with same type and with same value, only qualied personnell may change fuses.
- When disposing of this equipment, make sure you comply with the laws within your country,
- Sort and seperate plastic and cardoard for a better enviromnet.
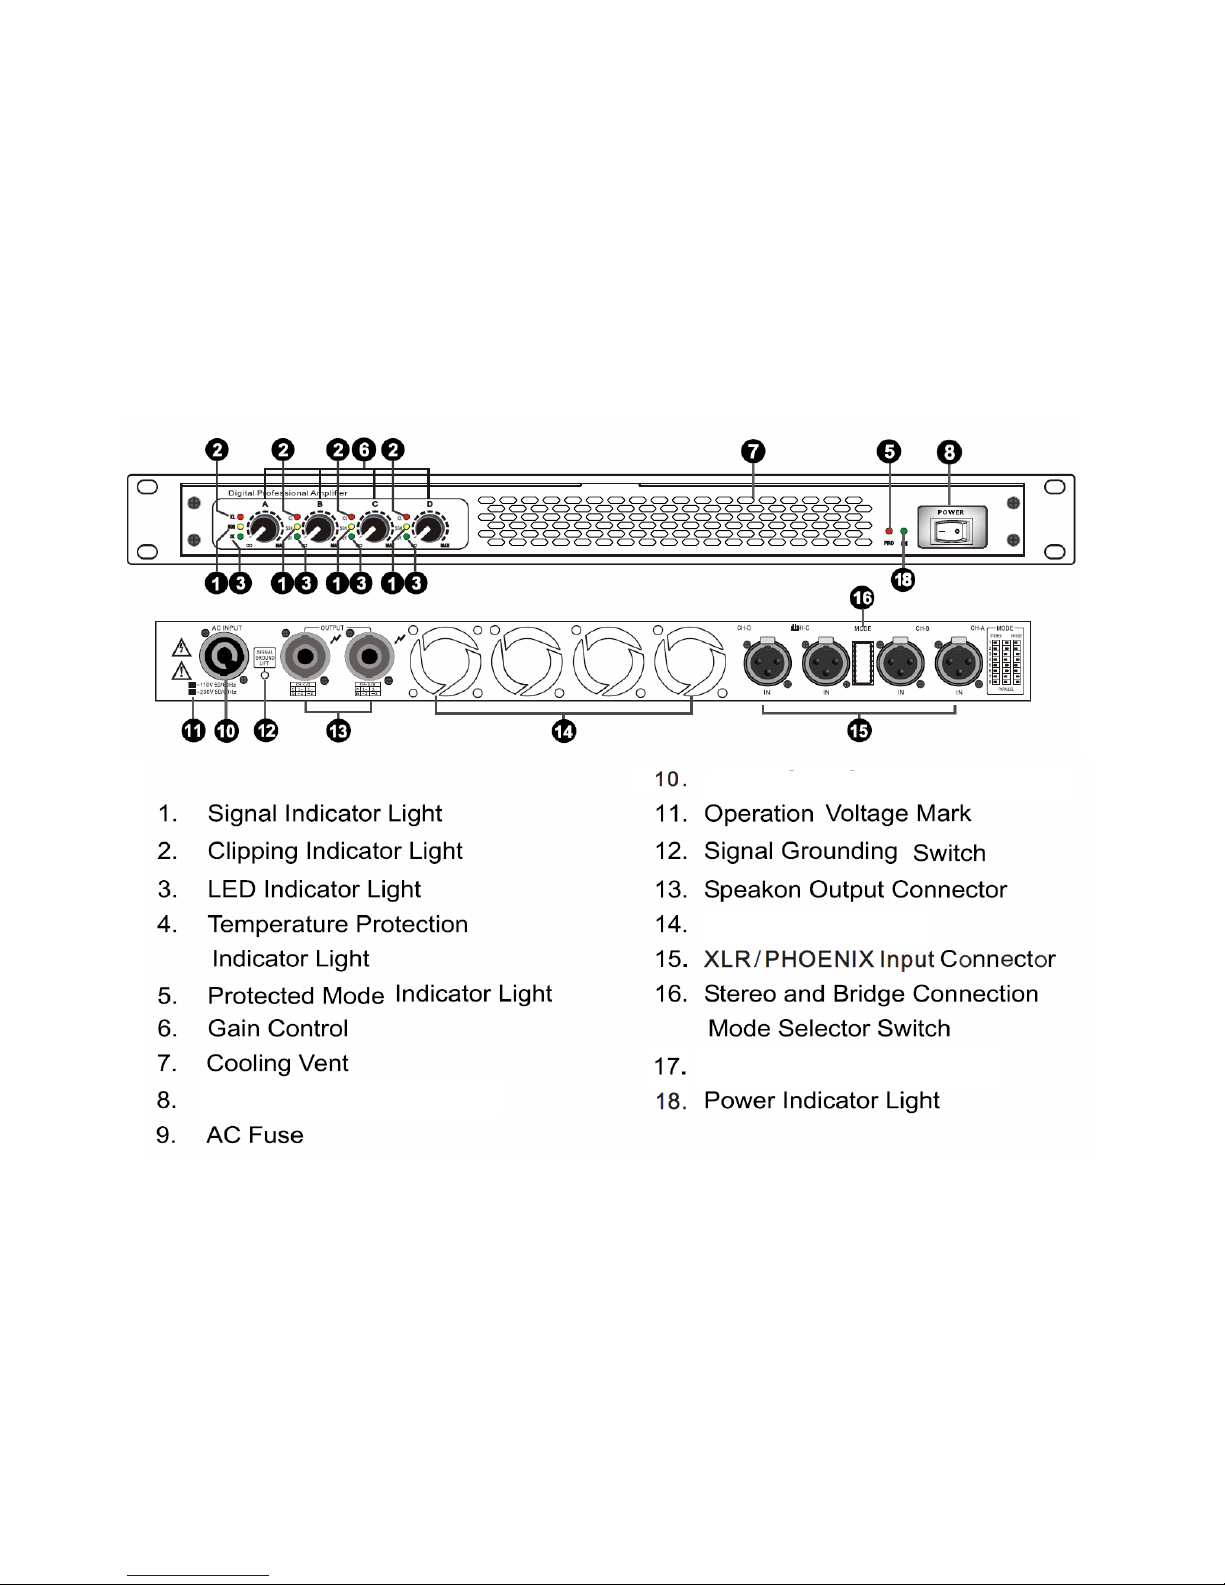
4 x ventillation fans outlet
intake N / A
N / A
Neutrik Powercon Input
CH A+B BRIDGE
CH C & D STEREO
CH C+D BRIDGE
CH A & B STEREO
3-way mode: (one channel bridge + 2 stereo)
the bridged channel uses 1+ as positive and 2+ as negative
for bridging Channel A+B set the switches 1, 2, 5, 6, 7, 8 to the left,
and switches 3, 4 to the right
for bridging Channel C+D set the switches 1, 2, 3, 4, 5, 6, to the left,
and switches 7, 8 to the right
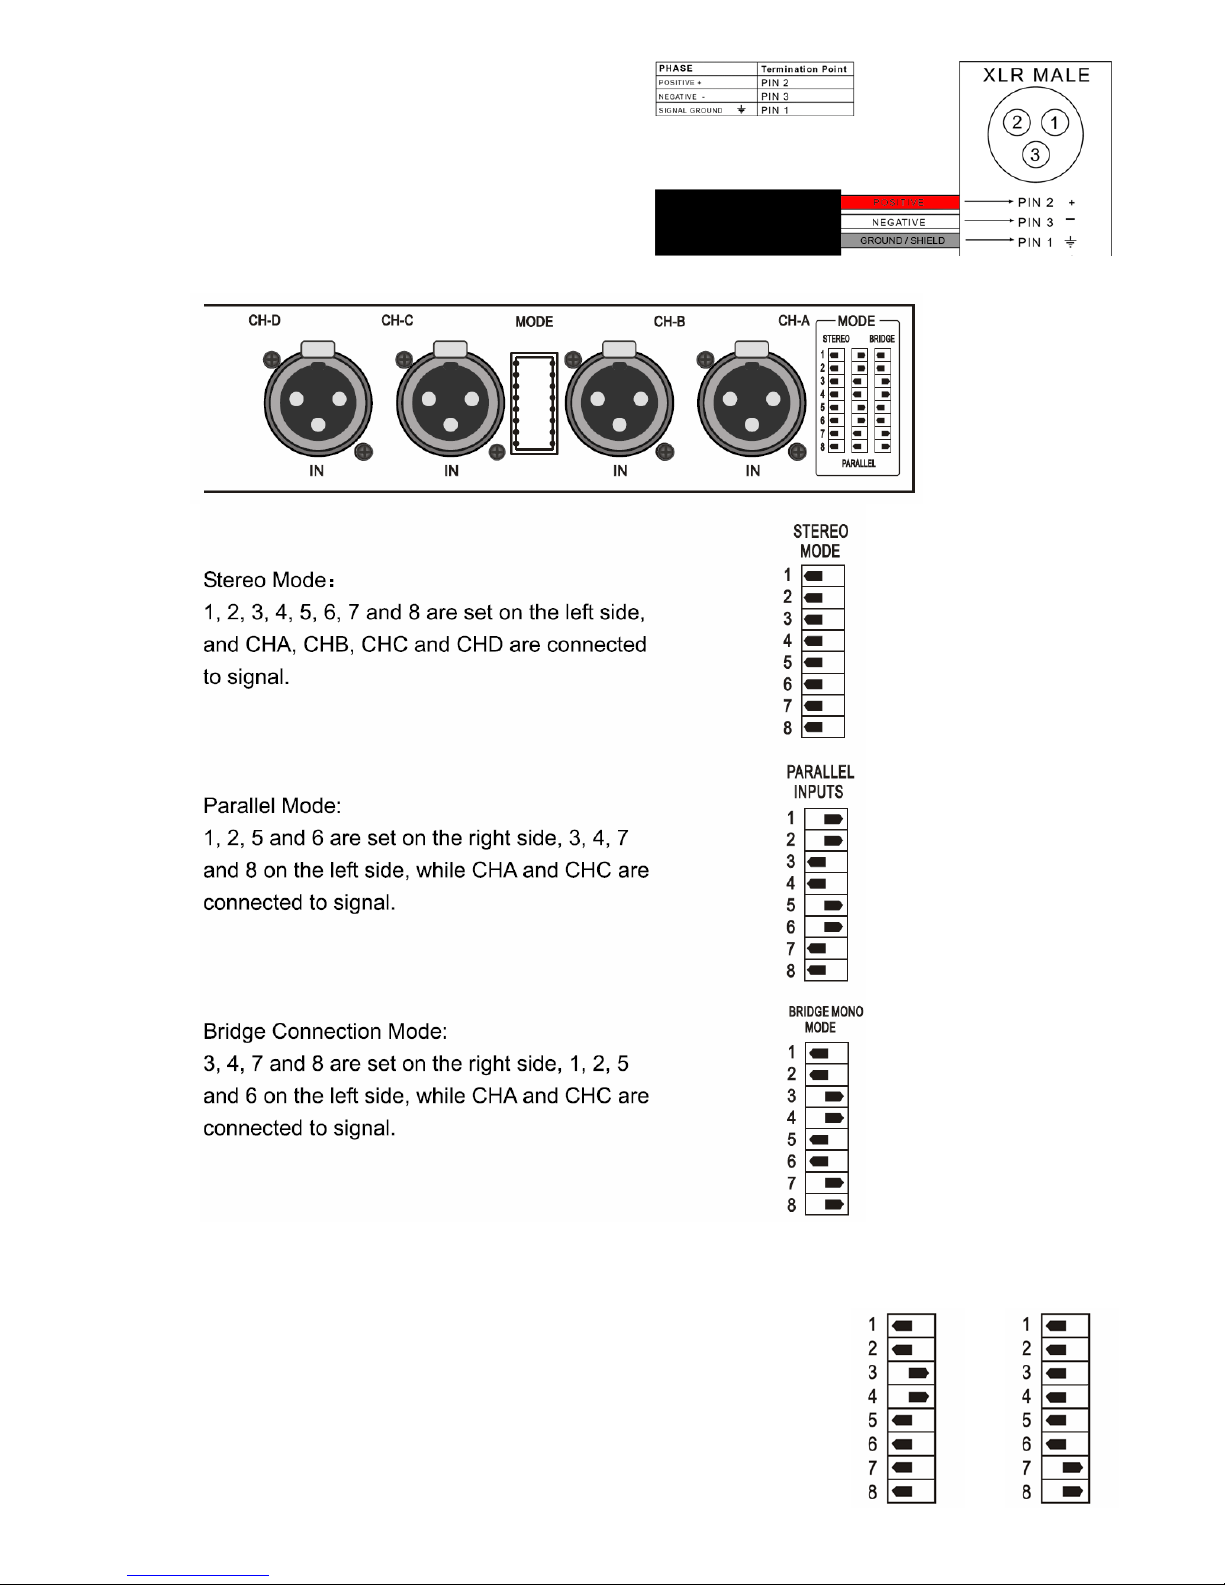
Use balanced XLR male input connector
Wiring:
1) earth/ground/shield
2) hot
3) cold
BRIDGED MODE - 2 channel mode
When used in bridge mode P4700 uses channel A and channel C XLR input, Be sure to set the dip-switches correct,
(1, 2, 5, & 6 to the left, and 3, 4, 7 & 8 to the right) Use 1+ as positive (+) and 2+ as negative (-) in each speakon.
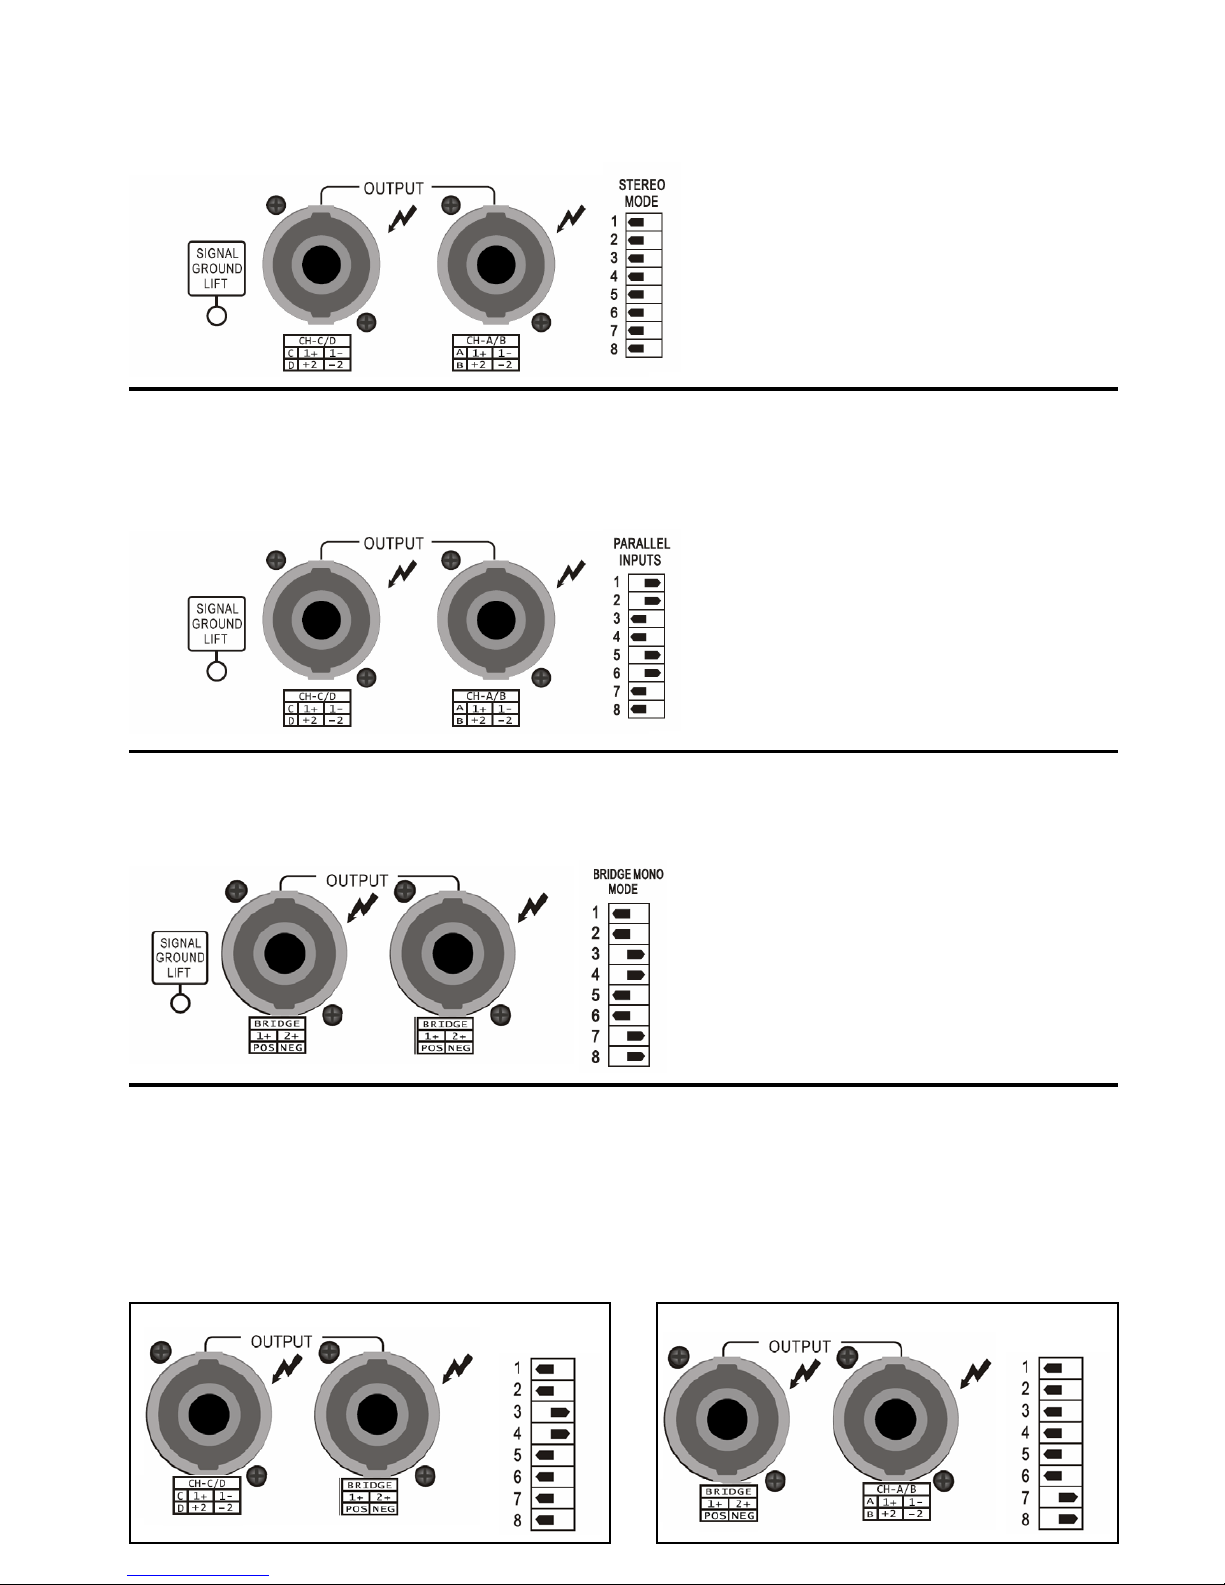
PARALLEL MODE - 2 Signal input / 4 channel output
When using the P4700 in parallel mode,
Input XLR connector A connects to SPEAKON output 1, with 1+/1- for channel A out, 2+/2- to channel B out.
Input XLR connector C connects to Speakon 2, with 1+/1- to channel C out, and 2+/2- to channel D out
SPEAKON 2 SPEAKON 1
SPEAKON 2 SPEAKON 1
STEREO MODE - 4 Signal input / 4 channel output
When using the P4700 in stereo mode each XLR input A, B, C, D corresponds to four seperate amplier channel outputs.
Output A is connected on Speakon connector 1, on 1+/1-, Output B is connected on speakon connector 1 on 2+/2-
Output C is connected on Speakon connector 2 on 1+/1-, Output D is connected on Speakon connector 2 on 2+/2-
SPEAKON 2 SPEAKON 1
3-WAY MODE - 2 channel stereo + 1 channel bridged
When used in 3-way mode P4700 can use two channels bridged (either A+B or C+D) delivering up to 1350W into 4
ohm (not to be used in 2 ohm load) and the other two channels can be used as a stereo with up to 2 x 750W into 2
ohm load.Perfect for a setup with mono subwoofer and two stereo top channels, where the bridged mono subwoofer
can utilize more power in a better and more ecient way.
For bridging A+B and keeping C and D as stereo, set dipswitches 1, 2, 5, 6, 7, 8 to the left and 3, 4 to the right
For bridging C+D and keeping A and B as stereo, set dipswitches 1, 2, 3, 4, 5, 6, to the left, and 7, 8 to the right
The channels that is bridged uses Speakon 1+ as positive (+) and 2+ as negative (-)
SPEAKON 2 SPEAKON 1CH A+B BRIDGE
CH C & D STEREO SPEAKON 2 SPEAKON 1CH C+D BRIDGE
CH A & B STEREO

Power
4 x 350W / 8 ohm
4 x 550W / 4 ohm
4 x 700W / 2 ohm
2 x 900W BRIDGED in 8 ohm
2 x 1350W BRIDGED in 4 ohm
1 x 900W BRIDGED in 8 ohm + 2x350W 8 ohm
1 x 1350W BRIDGED in 4 ohm + 2x550W 4 ohm
1 x 1350W BRIDGED in 4 ohm + 2x700W in 2 ohm
PROPHON AUDIO & TEKNIK AB
Linjalvägen 10C, 187 66 TÄBY
STOCKHOLM, SWEDEN
Tel: +46 8 92 86 00
Mail: [email protected]
Web: www.prophon.com
Depth: 350 mm.
Weight: 5,5 kg.
Weight &
dimensions
Height, width Height: 1RU Width: 19”
mode, stereo, parallel, bridge, ground lift
Table of contents
Other PROPHON Amplifier manuals


