ProScan PDVD1187 User manual
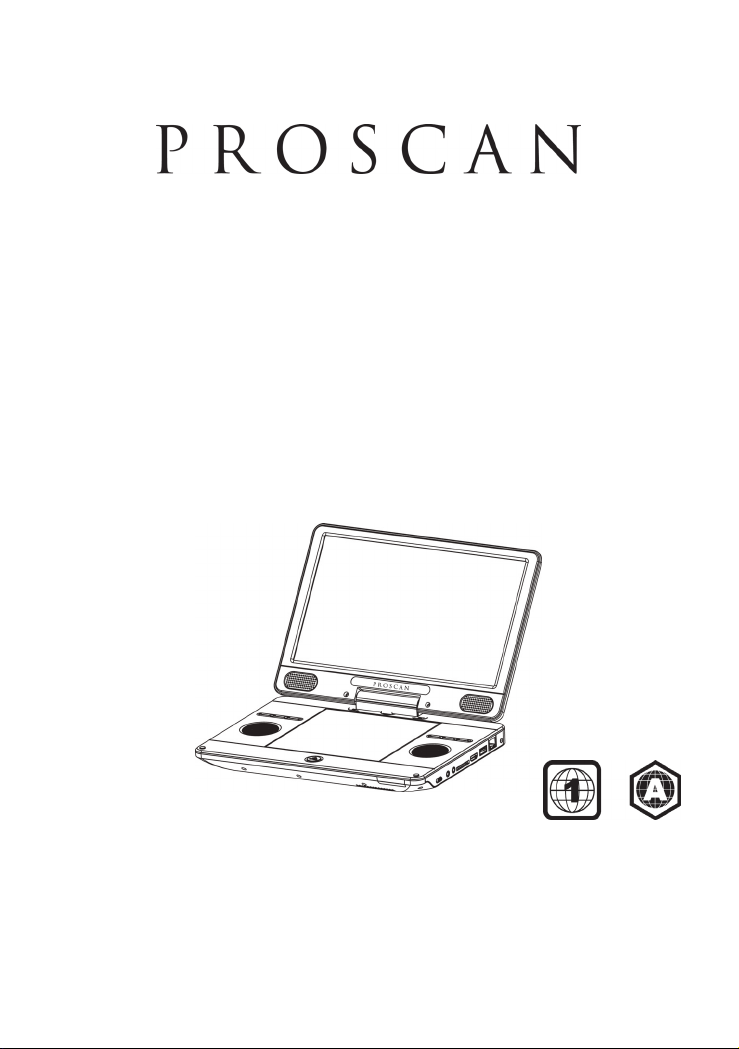
PORTABLE BLU-RAY DISCTM /DVD
PLAYER
USER MANUAL
PDVD1187
This product has been manufactured and sold under the responsibility of CURTIS
INTERNATIONAL LTD.
PROSCAN, and the PROSCAN logo are trademarks used under license by
CURTIS INTERNATIONAL LTD. – further information
at www.proscan-brand.com.
All other products, services, companies, trademarks, trade or product names and
logos referenced herein are the property of their respective owners.


1
Table of Contents
Safety and Maintenance ...................................................................................................... 2
Security Instructions ............................................................................................................. 2
Remote Control .................................................................................................................... 4
Quick Starting Guide ............................................................................................................ 5
Connections ......................................................................................................................... 6
-Connect to the HDMI .......................................................................................................... 6
-Connect Network ................................................................................................................ 6
Play Video ............................................................................................................................ 6
Play a Blu-ray Video Disc ..................................................................................................... 7
Play Music ............................................................................................................................ 9
Play a Photo slideshow ........................................................................................................ 9
General Settings ................................................................................................................. 11
-Basic Operation for the Menu ............................................................................................ 11
-General Player Settings ..................................................................................................... 11
-Display Settings ................................................................................................................. 12
Specifications ...................................................................................................................... 14
Troubleshooting .................................................................................................................. 15
Warranty .............................................................................................................................. 17

2
Safety and Maintenance
This symbol indicates “dangerous voltage” inside the product that presents a risk of
electric shock or personal injury.
This symbol indicates important instructions accompanying product.
WARNING: To reduce the risk of fire or electric shock, do not expose this product to rain or
moisture. Appliance shall not be exposed to dripping or splashing and no objects filled with
liquids, such as vases, shall be placed on the appliance.
Security Instructions
Read all of the instruction before using this Blu-ray player and keep this manual in a safe
place for future reference.
1. Read and keep these instructions.
2. Heed all warnings and follow all instructions.
3. Do not use this player near water.
4. Clean only with dry cloth.
5. Do not block any ventilation openings and install in accordance with the manufacturer’s
instructions.
6. Do not install near any heat sources such as radiators, heat registers, or the player
(including amplifiers) that produce heat.
7. Protect the power cord from being walked on or pinched particularly near the
convenience receptacles, and the point where they exit from the player.
8. Use only with the cart, stand, tripod, bracket, table specified by the manufacturer or sold
with the player. When a cart is used, use caution when moving the cart/player combination
to avoid injury from tip-over.
9. Unplug this player during lightning storms or when unused for long periods of time.
10. Refer all servicing to qualified service personnel.
Servicing is required when the player has been damaged in any way, such as the
power-supply cord or plug being damaged, liquid has been spilled or objects have fallen into
the player, the player has been exposed to rain or moisture, does not operate normally, or
has been dropped.
11. Please keep the unit in an environment with good ventilation.
12. WARNING: To reduce the risk of the fire or electric shock, do not expose this apparatus
to rain or moisture. The apparatus shall not be exposed to dripping or splashing and no
objects filled with liquids, such as vases, shall be placed on the player.
13. WARNING: Where the mains plug or an appliance coupler is used as the disconnect
device, the disconnect device shall remain readily operable.
14. Do not expose the batteries to excessive heat such as fire direct sunshine or similar
sources.
CAUTION: To reduce the risk of electric shock, do not remove cover (or back). No user
serviceable parts inside. Refer servicing to qualified service personnel.

3
CLASS 1 LASER PRODUCT
Use of controls, adjustments or performance of procedures other than those specified here
in may result in hazardous radiation exposure.
Trademark Notice
DVD Logo is a trademark of DVD Format / Logo Licensing Corporation.
The Blu-ray Disc™, Blu-ray™, BD-Live™, BONUSVIEW™ word marks and logos are
trademarks of the Blu-ray Disc Association.
Manufactured under license from Dolby Laboratories. Dolby, Dolby Audio, and the double-D
symbol are trademarks of Dolby Laboratories Licensing Corporation.
For DTS patents, see http://patents.dts.com. Manufactured under license from DTS
Licensing Limited. DTS, the Symbol, & DTS and the Symbol together are registered
trademarks, and DTS 2.0+Digital Out is a trademark of DTS, Inc. © DTS, Inc. All Rights
Reserved.
Java and all other Java trademarks and logo are registered trademarks of Sun
Microsystems, Inc.
SDHC Logo is a trademark of SD-3C LLC.
The terms HDMI, HDMI High-Definition Multimedia Interface, and the HDMI Logo are
trademarks or registered trademarks of HDMI Licensing Administrator, Inc.
Cinavia Notice
This product uses Cinavia technology to limit the use of unauthorized copies of some
commercially-produced film and videos and their soundtracks. When a prohibited use of an
unauthorized copy is detected, a message will be displayed and playback or copying will be
interrupted.
If playback or copying is interrupted and one of the messages shown below is displayed, the
content is an unauthorized copy protected by Cinavia technology.
Message Cinavia Message Code
[Message(s) 1] 1
[Message(s) 2] 2
[Message(s) 3] 3
[Message(s) 4] 4
More information about Cinavia technology is provided at the Cinavia Online Consumer
Information Center at http://www.cinavia.com. To request additional information about
Cinavia by mail, send a postcard with your mailing address to: Cinavia Consumer
information Center, P.O. Box 86851, San Diego, CA, 92138, USA.

4
IPR Message
Copyright 2004-2013 Verance Corporation. CinaviaTM is a Verance Corporation trademark.
Protected by U.S. Patent 7,369,677 and worldwide patents issued and pending under
license from Verance Corporation. All right reserved.
BD LIVE and BONUSVIEW are trademarks of the Blu-ray Disc Association.
SDHC Logo is a trademark of SD-3C LLC.
CAUTION: This product utilizes a laser.
Do not open cover and do not repair yourself. Refer servicing to qualified personnel.
Do not touch the lens by finger.
Remote Control
(1) OSC: To access On Screen Control Menu.
(2) MODE: Switch between DVD and AV IN
(3) RESOLUTION: Press to change the resolution mode
of the player.
(4) REPEAT: The specific repeat mode is different
according disc type.
DVD: RepeatCH>RepeatTT>RepeatAll>Repeat Off.
CD/VCD: Repeat track>Repeat all> Repeat Off.
Playlist: Repeat file>Repeat playlist>Repeat Off.
(5) MEDIA CENTER: To turn on/off Media center.
(6) VOL-: Decreases volume.
(7) UP: Navigates through the Menus.
(8) TOP MENU: To open the Top menu of BD/DVD
video disc.
(9) OK: Confirms an entry or selection.
(10) LEFT: Navigates through the Menus.
(11) SETUP: Access the SETUP menu.
(12) NUMBERS: For direct channel access.
(13) MARK VIEW: View bookmarks of the currently
playing disc
(14) PROG: Edit the program and play.
(15) SUBTITLE: Select a subtitle language on a disc.
(16) AUDIO: Select an audio language.
(17) FAST FORWARD: Search forward.
(18) FAST REVERSE: Search backward.
(19) ANGLE: Playback a scene recorded with multiple

5
angles. (The angle function will not work on DVD video discs that does not contains
recorded with multiple angles.)
(20) MUTE: To mute the sound and press again to restore.
(21) DISPLAY the current status or the disc information.
(22) VOL+: Increases volume.
(23) TITLE: To open the Title menu of a disc.
POPUP: Shows and hides popup menu.
(24) RIGHT: Navigates through the Menus.
(25) RETURN: Return to a previous display menu.
(26) DOWN: Navigates through the Menus.
(27) CLEAR: To clear an entry.
(28) GOTO: Jump to a user specified time during playback.
(29) MARK SET: Set bookmarks of the currently playing disc.
(30) ZOOM: To zoom it or zoom out.
(31) STOP: Stop play.
(32) PLAY/PAUSE: Start (resume) / pause play.
(33) PREV: Skip to the previous title, chapter or track.
(34) NEXT: Skip to the next title, chapter or track.
Operating with the remote control
1. The remote control must point at the remote sensor, in order for
the DVD player to function correctly.
2. The remote works best at a distance less than 5 meters and at
an angle of up to +/-30° toward the front of the unit.
3. Obstacles should not remain in between the remote control and
the remote sensor on the main unit.
Quick Starting Guide
1. Connecting to an External Power Source
Connect the power adapter (supplied with the player) to the side input plug and to a wall
outlet. Do not use any other device otherwise specified by your dealer.
2. Open the screen panel.
The screen panel of the portable DVD opens to a maximum 180°. And it can rotate 270°.
3. Press the open button on the left to open the disc cover.
4. Insert a DVD disc with label side facing upward.
Align the center of the DVD disc with the center of the disc guide. Press gently down on the
DVD to snap the disc into place, and then close the disc cover.
5. Slide the power switch on the left side of the unit to power it on.
6. Press the OK button on the unit to start playback.
In most cases, when you leave by the PLAY/PAUSE button, continue to be used by

6
PLAY/PAUSE button.
The DVD player will immediately start rendering the DVD program.
When you want to stop, press the STOP button, it will return to the power-on logo.
The player can be recharged while playback.
Connections
1. Connect to the HDMI
Connect the HDMI cable (not supplied) to the HDMI jack on this product and to the HDMI
input jack on the TV.
Tip
• You can optimize the video output by pressing the Resolution button repeatedly from the
remote to select the best resolution the TV can support.
• To play the digital video images of a BD-video or DVD video via an HDMI connection, it is
necessary that both this product and the display device (or an AV receiver/ amplifier)
support a copyright protection system called HDCP (high-bandwidth digital content
protection system).
• This type of connection provides best picture quality.
2. Connect Network
Connect this product to the network to enjoy software updates and BD-Live bonus content.
Connect the network cable (not supplied) to the LAN jack on this product and then connect
the network cable to the LAN jack on the broadband modem or router.
Play Video
Control Video Play
1. Play a title
2. Use the remote to control the play back
Buttons Action
Start or resume play / Pause play.
Stop play.
Skip to a previous/next title or chapter.
Search fast-backward or fast-forward.
Press repeatedly to change the search speed.

7
Note:
For BD disc with Java application, the resume function is not available.
Display Menu
BD-video Disc:
TOP MENU: Stops the video playing and returns to the disc menu. This feature is
disc-dependent.
POPUP: will access the BD-video disc menu without interrupting disc play.
DVD-video disc:
TOP MENU will display the root menu of a disc.
DISPLAY will display disc information and guide you through the available functions on the
disc.
Change Video Play
Play a Blu-ray Video Disc
Blu-ray video discs have larger capacity and support features such as high-definition video,
multichannel surround sound, Interactive menus and so on.
1. Insert a BD-video disc.
2. Playback will automatically start, or select a play option in the menu and press OK.
3. During playback, you can press TOP MENU to display additional information, features or
content store on the disc.
4. During playback, you can press POPUP to display the disc menu without interrupting disc
play.
5. During playback, press the [OSC] button on the RMC - the ON SCREEN MENU will be
displayed.(As shown in the picture bellow)
Button Action
Audio Selects an audio language
SUBTITLE Selects a subtitle language on a disc
REPEAT Select or turn off repeat mode.
Repeat options may vary from the disc type
DISPLAY Display the current status or disc information
ZOOM Zoom in/out of the video image
BOOK MARK SET Set bookmarks of the currently playing disc
BOOK MARK VIEW View bookmarks of the currently playing disc
PROGRAM Edit the program and play
GOTO Jump to a user specified time during playback
OSC Access options relating to the current activity or selection, and
control the video playback

8
second video【BD-V】:Displays the state of the second Video. Use direction key【 】
to open the second video selection box, then press【 】/【 】to select the full screen video
and the second video window (picture in picture).
(A) Primary video (B) Secondary video
second Audio【BD-V】:Displays the state of the second Audio. Use the direction key
【 】to open the selection box, then press【 】/【 】to switch on/off the audio output.
Enjoy BD-LIVE
You can enjoy the BD-Live functions which enable you to use Interactive functions on the
disc when the unit is connected to the Internet.
Example of BD-Live Interactive functions:
1. Additional content (such as movie trailers, subtitles and BD-Java, etc.) can be
downloaded to a connected USB storage device.
2. Special video data may be played while being downloaded.
3. When a disc supporting BD-Live is played, the product or the disc’s ID can be sent to the
content provider via the Internet. Service and functions will differ depending on the disc.
Note
-The unit must be connected and set up to access Internet.
-Depending on the connection environment, it may take time to connect to the Internet.
-When BD-Live functions are used and the unit is connected to the Internet, your standard
Internet service provider charges will apply.
-Follow the instruction given by the disc when using the BD-Live function.
-It is recommended to use a USB storage device for download the content (at least 1GB
free space is recommended).
9
Before you enjoy the BD-Live function, Please set up your Blu-ray as below step: Pressing
the setup button to go into the system setup menu, then selecting BUDA and enter to BUDA
setup to select the USB or Card when playing BD-Live disc.
Play Music
Controlling music playback
Use the remote control to control the playback for audio file.
Buttons Action
Start or Resume play / Pause Play
Stop Play
Skip to a previous or next title or chapter
Search fast-backward or fast-forward. Press repeatedly to change the
search speed.
Select an item to play
REPEAT Select or turn off repeat mode
Play a Photo Slideshow
You can play JPEG on the player as a slideshow.
1. Insert a disc or USB device that contains JPEG files
2. Select a Photo folder, then press OK to play.
-To select a Photo, use the Navigation buttons.
-To enlarge the selected Photo and start slideshow, press OK.
Note:
-It may require more time to display the disc content on your TV if there is a large number
of songs/ photos compiled onto one disc.
-This product can only display digital camera Pictures in the JPEG-EXIF format, typically
used by almost all digital cameras. It cannot display Motion JPEG, or Pictures in formats
other than JPEG, or sound clips associated with Pictures.
-Folders/files that exceed the supported limit of this product cannot be displayed or played.
Controlling Photo slideshow
1. Begin a Photo slideshow.
2. Use the remote control to control the play as follows:
BUTTONS ACTION
Rotate a photo
Flip a photo
Stop play

10
Set slideshow interval and animation
1. During slideshow playback, press OSC. The options menu will be displayed.
2. Navigate the options with the Navigation button.
3. Select an option in the menu, then press OK.
Playing music during a Photo slideshow
Create a musical slideshow to play both CD music files and JPEG Photo files
simultaneously.
Note:
Create a musical slideshow, you must store the CD and JPEG files on the same disc as the
photos.
1. Select your CD music to play and start play-back.
2. Press Media Center to return to the main menu.
3. Navigate to enter a photo folder, then press OK to start slideshow play.
-Slideshow begins and continues till the end of the photo folder.
-Audio continues to play until the end of the disc.
-To stop the slideshow play, Press .
-To stop the music play, press again.

11
General Settings
Basic Operation for the Menu
1. Press twice during playback
2. Press SETUP, the SETUP MENU display on the screen.
3. Select a main menu by / .
4. Select the menu you want by / buttons and press to enter.
5. Select the option by / and press .
You can press to return to the previous menu.
6. Select by / buttons and press OK to confirm.
You can press to return to the previous menu.
7. To return to the main menu from any submenu, press RETURN.
8. To exit the menu, press SETUP.
Note:
These navigation buttons on the right side of the product do not apply to this model.
General Player Settings
System
1. Screen Saver: Turns the screen saver on/off. The screen saver will display in 3 mins if
there is no operation when the unit is turned on.
2. Disc Auto Playback: Turns the disc auto playback function on/off.
3. Disc Auto Upgrade: Turns the Disc Auto Upgrade function on/off.
4. Load Default: Return the player to its default settings.
5. Upgrade: select this when you want to upgrade your player software to the latest version.
6. Easy setup: Make default settings Fast.
7. BUDA: Define memory for BD-J.
* Notice : BUDA Setup has two-submenu of "USB/SD" & "On board". If you choose
" USB/SD ", you must connect USB or Card first.
Language
1. OSD: Selects the OSD language.
2. Menu: Selects the menu language of the disc.
3. Audio: Selects the audio language for the program.
4. Subtitle: Selects the subtitle language for the program
.
Note:
You have to select the audio and subtitle language according to the requirements on the
disc.
Playback
1. Closed Caption: Turn on/off the CC function.
2. Angle Mark: Turn on/off the Angle mark function.
3. PIP Mark: Turn on/off the PIP mark function
4. Secondary Audio Mark: Turn on/off Secondary Audio mark function.

12
5. Last Memory: Turn on/off the last memory function
6. PBC: Turn the PBC function on/off.
7. Audio Watermark Level3
Security
1. Change Password: Changes the password for parental control menu.
2. Parental Control: to set the parental control.
3. Country Code: Select the Country code.
Note:
The original code is 0000. The code can be changed by user.
Network
• Connect this product to a broadband MODEM or router.
• This player will start to detect if there is a connection to the network.
• If the connection test fails, select (Retry) and press OK to try and re-connect to the network
again.
1. Internet Connection: Displays the Internet connection state.
2. Information:Displays information of the current Network.
3. Connection Test: Tests the Internet connection state.
4. IP Setting: Sets the IP for the player.
5. BD-Live Connection: Connection situation of BD-Live.
6. Proxy Setting: Setup Proxy Server.
Display Settings
TV
1. TV Screen: Selects the display mode for the TV.
2. Resolution: Selects the resolution for the TV.
3. TV System: Selects the TV system type.
4. Color Space: Selects the color space.
5. HDMI Deep Color: Selects the color for HDMI.
6. HDMI 1080P 24Hz: Enable/disable this settings.
Video Processing
1. Video Adjust: Enter the submenu to adjust the video display.
2. Sharpness: Select the playback sharpness mode.
Adjust the Brightness, Contrast, Hue, Saturation of the screen to suit.
Audio Setting
1. HDMI: Selects the HDMI mode.
2. Down samping: Selects down samping.

13
(Select this when the Amplifier connected to the placer is not 96KHz compatible)
3. DRC: Set DRC on / off or auto
Speaker Setting
1. configuration: channels 2x
2. Test Tone:
Clean Discs
Wipe the disc with a Micro fiber Cleaning Cloth from the centre to the edge in a straight line
movement.
Note
To prevent possible damage of this product do not turn off the power or remove the USB
flash drive while the software update is in progress.
Caution
Never use solvents such as benzene, thinner, cleaners available commercially, or anti-static
sprays intended for discs to clean the player.
This device complies with Part 15 of the FCC Rules. Operation is subject to the following
two conditions: (1) this device may not cause harmful interference, and (2) this device must
accept any interference received, including interference that may cause undesired
operation.”
• “Warning: Changes or modifications to this unit not expressly approved by the party
responsible for compliance could void the user’s authority to operate the equipment.”
• “NOTE: This equipment has been tested and found to comply with the limits for a Class
B digital device, pursuant to Part 15 of the FCC Rules. These limits are designed to
provide reasonable protection against harmful interference in a residential installation. This
equipment generates, uses and can radiate radio frequency energy and, if not installed and
used in accordance with the instructions, may cause harmful interference to radio
communications.
However, there is no guarantee that interference will not occur in a particular installation. If
this equipment does cause harmful interference to radio or television reception, which can
be determined by turning the equipment off and on, the user is encouraged to try to correct
the interference by one or more of the following measures:
■ Reorient or relocate the receiving antenna.
■ Increase the separation between the equipment and receiver.
■ Connect the equipment into an outlet on a circuit different from that to which the receiver is
connected.
■ Consult the dealer or an experienced radio/TV technician for help.”
Do not mix old and new batteries and Do not mix alkaline, standard (carbon-zinc) or
rechargeable (ni-cad, ni-mh, etc.) batteries

14
Specifications
Playback disc formats
BD, BD-R, BD-RE, DVD-R/RW, DVD+R/RW, DVD-Video, VCD, CD, CD-R/RW
Video formats
H.264/VC1/MPEG-1/MPEG-2/MPEG-4/WMV
Audio formats
Dolby Digital, Dolby Digital Plus, Dolby TrueHD, DTS, WMA
Photos
JPEG, PNG, GIF
Accessories supplied
• Remote control
• Composite Audio/Video cables 1.1m
• Power adapter
• Car power adapter
• Earphone
• User manual
Video
• Signal system: PAL / NTSC
• HDMI video output: Auto, 480i/576i, 480p/576p, 720p, 1080i, 1080p, 1080p@24Hz
Audio
• HDMI output
USB
• As additional USB memory for software updates are storing BD-Live bonus contents.
LED indicator:
Power on: Blue
Charging: Red color during charging, the red LED will be off when fully charging.
Low Battery: Red color blinked.
Charging Time: Around 4 hours.
Playback Time: Around 3 hours.
Main unit
• Dimensions (w x h x d): 290 x51x202 (mm)
• Net Weight: 1.28kg
• Wave length:
-BD: 405 + 5nm/-5nm
-DVD:650 + 13NM/-10NM
-CD:790+15NM/-15NM

15
Troubleshooting
WARNING: Before requesting after service please check this possible resolution. Risk of
electric shock. Never remove the casing of the product. To keep the warranty valid, never
try to repair the product yourself.
No reaction to the remote
control
• Make sure the player is connected to a power
outlet.
• Insert the batteries correctly.
• Point the remote control at the IR sensor located on
the front panel of this product.
• If the remote still does not function, try putting new
batteries into the remote control.
No picture/sound
• Make sure the connection is in good condition;
volume is not too low; audio receiver or TV work
normally; audio setting is proper.
No picture on HDMI connection
• If this player is connected to an unauthorized
display device with an HDMI cable, the audio/video
signal may not be displayed
• Check if the HDMI cable is faulty. If faulty or
damaged, replace the HDMI cable.
• If this happens when you change the [resolution]
setting, press Resolution on the remote control
repeatedly until the picture appears.
High-definition video signal
not playing on the TV
• Ensure that the audio cables are connected to the
audio input of the TV
• Assign the audio input of the TV to the
corresponding video input. See the TV user manual
for details.
No sound on HDMI connection
• You may not hear any sound from the HDMI output
if the connected device is non-HDCP compliant or
only DIVI compatible.
Disc cannot be played
• Ensure that the disc is loaded properly
• Ensure that this player supports the disc. See
Specifications.
• Ensure that this player supports the region code of
the DVD or BD.
• For DVD+RW, ensure that the disc is finalized.
• Clean the disc.
Data Files cannot be played or
read
• Ensure that the data file was recorded in the
standard UDF, ISO9660 or JOLIET format.
• Ensure that the JPEG file extension .jpg, JPG, jpeg
or JPEG.

16
Not entry sign appears on the
TV • The requested operation is not possible.
BD-Live feature
• First, the disc must be marked with BD-LIVE, and
ensure that the network is connected normally, insert
USB disk or memory card, U disk or memory card to
ensure at least 1GB above the space, the bigger the
better. Then, make sure that the BUDA in system
setting is set to “USB/SD”.
Unable to access BD-Live
feature
•Check the network internet connection or ensure
that the network Internet connection has been set up
•Clear USB storage.
•Ensure that the BD disc supports BD Live Feature.

17
To make a warranty claim, please email [email protected] or call 1-800-968-9853.
90 day Warranty
This product is warranted to be free from defects in material and workmanship for a period
of ninety (90) days from the date of original purchase. During this period, your exclusive
remedy is repair or replacement of this product or component found to be defective, at our
option; however, you are responsible for all costs associated with returning the product to us.
If the product or component is no longer available, we will replace with a similar one of equal
or greater value. Prior to a replacement being sent, the product must be rendered
inoperable or returned to us.
This warranty does not cover glass, filters, wear from normal use, use not in conformity with
the printed directions., or damage to the product resulting from accident, alteration, abuse,
or misuse. This warranty extends only to the original consumer purchaser or gift recipient.
Keep the original sales receipt, as proof of purchase is required to make a warranty claim.
This warranty is void if the product is used for other than single-family household use or
subjected to any voltage and waveform other than as on the specified rating on the label
(e.g., 120V~60Hz).
We exclude all claims for special, incidental, and consequential damages caused by breach
of express or implied warranty. All liability is limited to the amount of the purchase price.
Every implied warranty, including any statutory warranty or condition of
merchantability or fitness for a particular purpose, is disclaimed except to the extent
prohibited by law, in which case such warranty or condition is limited to the duration
of this written warranty. This warranty gives you specific legal rights. You may have other
legal rights that vary depending on where you live. Some states or provinces do not allow
limitations on implied warranties or special, incidental, or consequential damages, so the
foregoing limitations may not apply to you.
For faster service, locate the model, type, and serial numbers on your appliance.
ATTACH YOUR PROOF OF PURCHASE HERE, PROOF OF PURCHASE IS REQUIRED
TO OBTAIN
WARRANTY SERVICE.
Please have the following information available when you contact the Support Team:
Name, address and telephone number.
Model number and serial number.
A clear, detailed description of the problem.
Proof of purchase including dealer or retailer name, address and date of purchase.

Lecteur de CD et Dvd Blu -
ray portable
NOTICE D'UTILISATION
PDVD1187
Ce produit a été fabriqué et vendu sous la responsabilité de CURTIS
INTERNATIONAL LTD.
PROSCAN, et le logo PROSCAN sont des marques utilisées sous licence par
CURTIS INTERNATIONAL LTD. – pour plus d’informations : www.proscan-
brand.com.
Tous autres produits, services, dénominations sociales, marques, nom
commerciaux, noms de produits et logos référencés ici sont la propriété de leurs
titulaires respectifs.
Table of contents
Languages:


