ProSpot Fitness AT110 User manual

.aafll-r(o
Owner's
Manual
Table Of Gontents
1
lmoortantSafetvlnstructions-----------
Grounding
Instruction-----------
MainDartslist-----------
parts
list
Console
PanelFunctions---------- 11
Ooeration
instructions-------- ------ 15
l\,laintenanceinstructions------- 16
-18
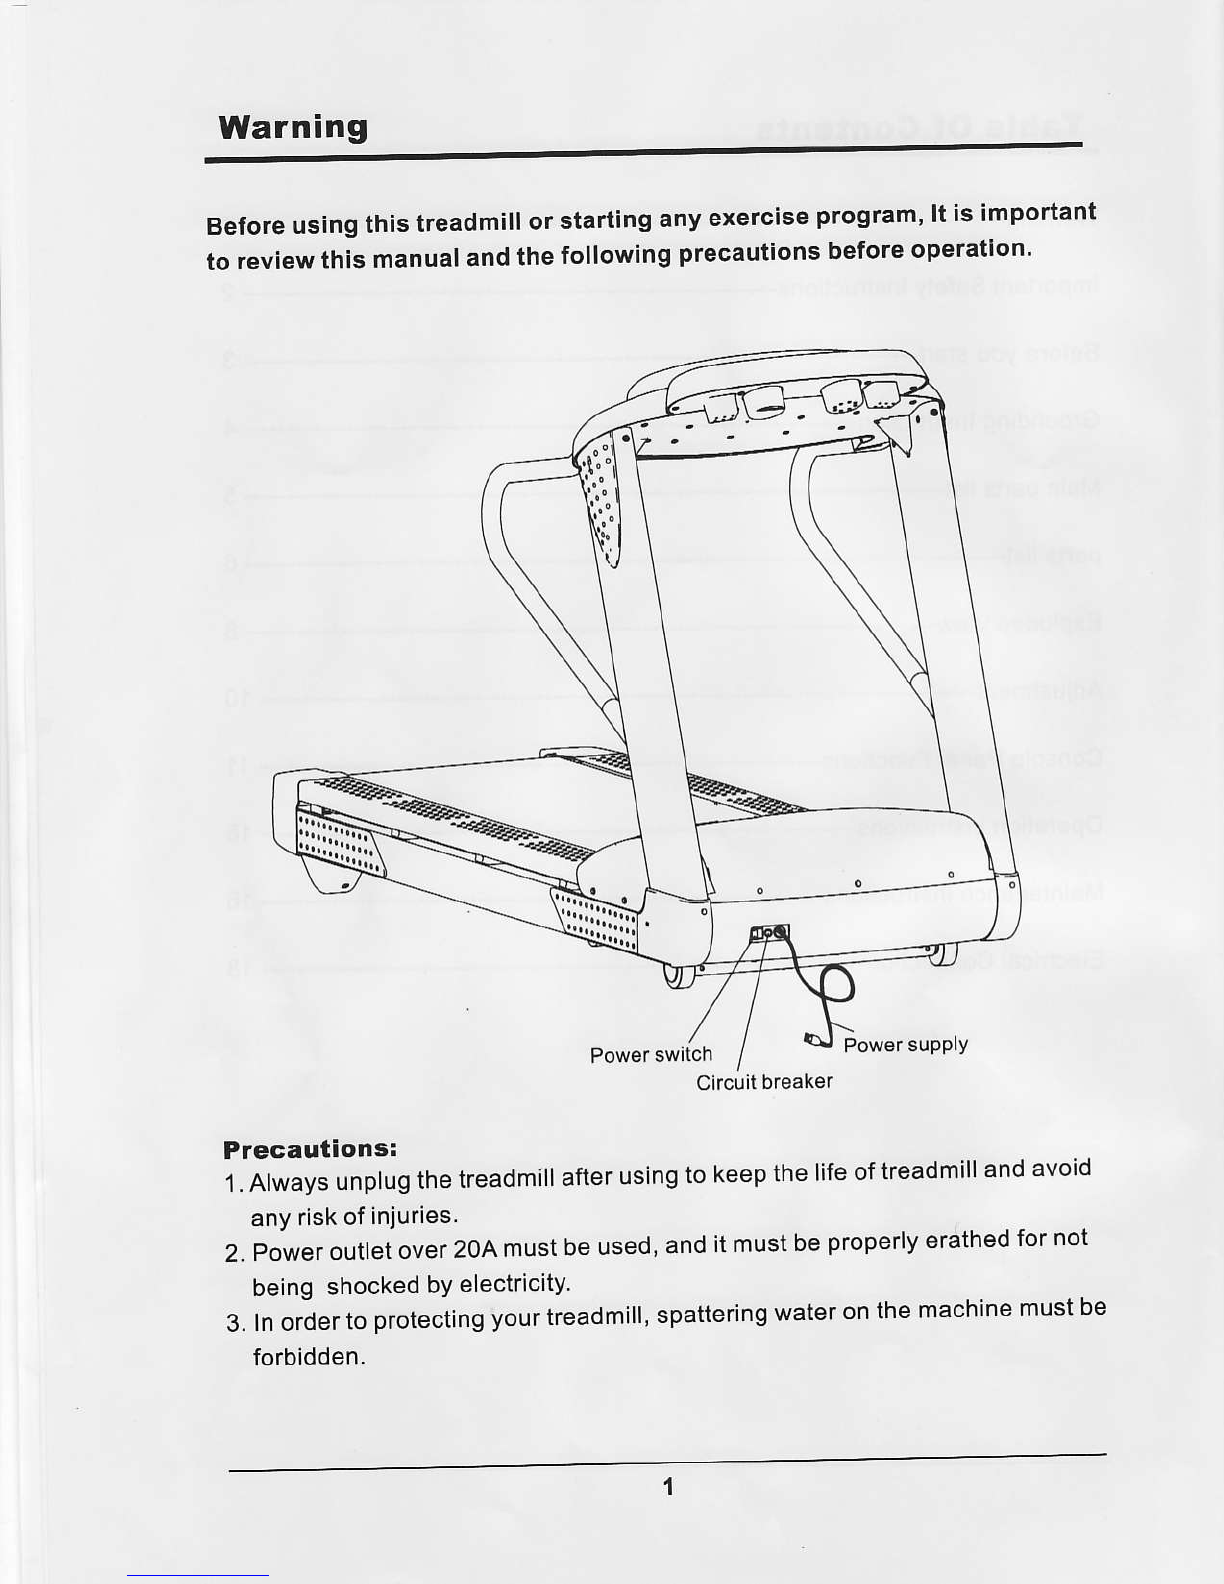
Warning
Before
using
this
treadmill
or
starting
any
exercise
program'ltisimportant
to
review
this
manual
and
the
following
precautions
before
operation'
Power
switch Power
supplY
Precautions:
1.Always
unplug
the
treadmill
after
using
tokeep
thelife
of
treadmill
and
avoid
any
riskof
injuries.
2.Poweroutletover2OAmustbeused,anditmustbeproperlyerathedfornot
being
shocked
bY
electricity
3.
Inorder
to
protecting
yourtreadmill,
spattering
water
onthe
machine
must
be
forbidden.
uitl
Circuit
breaker

lmportant Safety Instructions
When
usinganelectricalappliance,basic
precautions
shouldalwaysbefollowed,
includingthe
following:
Read
all
instructions
before
using
thistreadmill:
DANGER -
fo reducetheriskofelectricshock:
1.Alwaysunplug
this
appliancefromtheelectricaloutletimmediately
afterusing
andbefore
cleaning.
2.Donotreach
foratreadmillthathasfallenintowater.Unplugimmediately.
3.Donotusewhilebathingorinashower.
4.Donot
place
orstorethetreadmillwhereitcanfallorbe
pulled
intoatuborsink.
Donot
place
inordropintowaterorotherliquid.
WARNING -
Toreducetheriskofburns,fire,electric
shock,
orinjury
to
Dersons:
'1.
An
applianceshouldneverbeleftunattendedwhen
plugged
in.Unplugfrom
outletwhennolin
use,
andbefore
putting
on
ortakingoff
parts.
2.Donot
operateunderblanketor
pillow.
Excessive
heatingcanoccurandcause
fire,electricshock,orinjuryto
persons.
3.Closesupervisionisnecessarywhenthistreadmillis
usedby,on,ornear
children,invalids,
ordisabled
persons.
Keep
childrenawayfromextendedback,
footsupport
(or
othersimilar
parts).
4.
Usethistreadmillonlyforitsintendeduseasdescribedinthismanual.Donot
useattachments
notrecommendedby
themanufacturer.
5.Never
operate
this
treadmill
ifit
hasadamagedcordor
plug,
ifitisnotworking
properly,
ifithasbeendroppedordamaged,ordroppedintowater.Returnthe
treadmilltoaservice
center
forexaminationandrepair.
6.Do
notcarrythistreadmillbysupplycordorusecord
asahandle.
7.Keep
thecordawayfromheatedsurfaces.
8.Neveroperatethetreadmillwiththe
airopeningsblocked.Keep
the
airopenings
freeoflint,hair,and
thelike.
Never
operateon
asoftsurfacesuchasabedor
couch
wheretheairopeningsmaybeblocked.
9.
Never
droporinsertanyobjectintoanyopening.
10.Donot
useoutdoors.
11.Do
notoperatewhereaerosol
(spray)products
arebeingusedorwhereoxygen
is
beingadministered.
12.To
disconnect,turnallcontrolstotheoff
position,
thenremove
plug
fromoutlet.
13.
Connectthistreadmilltoaproperlygrounded
outletonly.SeeGrounding
lnstructions.
'14.
Risk
of
InjurytoPersons
-To
AvoidInjury,Standon
theSiderails
Before
StartingTreadmill.
SAVETHESE'NSTRUCT'OA'S
BeforeYouStart
Remembertotakethetimeto revlew
owner'smanualsbefore
you
start,
1.Beforeusingthistreadmillorstarting
anyexercise
program,
consult
your
physician
andaccompaniedbyspecialized
person.
Adjustthespeednotover
5MPH.
2.Takethe
tima
to
perform
thestretchingexercise
provided
to
avoid
injury.
3.lf
you
haveheart
problems,
and/ortheotherdiseases,donotusethetreadmill
programs
without
rsceivingapprovalform
your
physician.
4.
Stopexercisingor
call
physician
if
you
feel
uncomfortable.
5.Donotleavechildren
unsupervisedanddisabled
person
nsaroronthe
treadmill.
6.Runningisoxygenexercise,
recommended30minutes
per
timeisreasonable.
7.Wearcomfortable,
good-quality
walking
or
runningshoedandappropriate
clothing.
8.
Donot
usethe
treadmillwithbarefeet,
sandals,
socks
ofstockingstoavoid
anyrisk
of
injuries.Wearcomfortableshoes
orcottonsocks.
9.
Failure
to
followtheseinstructions
willvoidthe
treadmill
warranty.
10.Theequipmentisdesigned
for
commercialand
household,Maximumload
is170KG.
3

Grounding Instruction
This
product
must
be
grounded.lfitshould
malfunction
orbreakdown,
grounding
providesapathofIeastresistanceforelectriccurrenttoreducetheriskofe|€ctric
shock.
This
product
isequipped
with
acord
having
an
equipment-groundrng
conductor
and
agrounding
plug.
The
plug
must
be
pluggedinto
an
appropriate
outletthat
is
properly
installed
and
grounded
inaccordancs
withall
local
codes
and
ordinances.
DANGER .lmproper
connection
ofthe
equipment-grounding
conductor
can
resultin
ariskof
electric
shock.Check
withaqualified
electrician
orserviceman
if
you
are
in
doubt
as
towhgther
the
product
is
properlygroundedDonotmodify
the
plug
provided
withthe
product
-ifitwill
notfitthe
outlet,
have
aproper
outlet
installed
bya
qualified
electrician.
This
product
is
ratedmore
than
15amperes
and
isfor
use
onacircuit
having
a
nominal
rating
of120
volts
andis
factory-equipped
witha
specific
electric
cord
and
plug
to
permit
connection
toaproper
€lectric
circuit.
l\ilakesure
that
the
product
isconnected
toan
outlet
having
thesame
configuration
asthe
plugNo
adapter
should
beused
withthis
product.lfthe
product
must
be
reconnected
for
useonadifferenl
typeof
electric
circuit,
the
reconnection
should
be
madsby
oualified
service
personnel.
4

Maln
parts list
Itis
theowner's
responsibility
toensure
thatallusers
ofthistreadmill
haveread
theOwner's
Manualsbeforeassembly.
Cupholder
Safety
Key
Loft
upright Righthandle
Lsfthandle
Righi
upright
MotorCover
RunningBellRunning
Deck
Leftend cap
Running
Deck
Rightendcap Adjustsupport
5

Parts list
ItemNo. Description
1
2
5
6
7
8
9
10
11
12
13
14
15
'16
17
'18
19
21
22
23
24
25
26
27
28
28a
29
30
3,I
32
Console
plate
alliance
Sidehandle
Right
upright
Deckframe
Baseframe
Controllershield
Leftadjustsupport
Right
adjustsupport
Adjust
plate
Leflexhusion
Rightextrusion
Leftendcapsupport
Right
endcapsupport
Rubber
pad
Walkingboard
Front
rollor
Rearroller
oecoralecover
Wheel
Walking
belt
PolyV-belt
Foam
Adjust
supportcover
Pillow
blockbearing
Damper
Damper
A
Clipnut
EnchaseNut
Description
Leftcover
Right
cover
Leftcovershield
Rightcovershield
Left
endcap
Right
endcap
Leftsheet
Rightsheet
Bundle
strap
Bundle
strap
Bundlo
strapPLATE
Gripsleeve
Cordspacer
Socketcapbolt1V110.70
Socketcapboltl\48.55
SocketcapboltM10'50
Socketcapbolt[410.130
Hex
boltM12.55
AllenboltN48'15
Phillipsheadscrew
M6'12
SocketcountersunkboltN46'40
Socketcountersunk
bolt
lvl8"20
PhillipscountersunkscrewI\r8"40
Phillips
countersunks6rewl\43'10
Phillips
countersunkscrewM6'12
PhillipsheadscrewM5"10
Phillips
headscrewM6*12
PhillipsheadscrewM6*30
Phillipshead
screw
M3*8
Slotted
pan
headscrewM5*10
Phillips
tappingscrewST'1.9'6.5
QTYltem
No.
1
2
1
1
1
1
1
1
I
2
1
1
1
1
8
1
1
1
2
1
1
2
2
2
2
'10
6
'16
I
1
33
34
36
37
38
39
40
41
42
43
44
45
46
47
4A
49
50
51
52
53
54
56
58
59
60
62
63
QTY
1
1
I
1
1
1
2
2
4
4
4
2
2
3
1
1
1
2
4
4
16
22
4
2
2
3
20
5
I
1
2
6
Parts list
liemNo. Description QTY ltemNo QTYDescriplion
64 PhillipstappingscrewST2.9*9.5
65 PhillipsiappingscrewST2.9*13
66 PhillipstappingscrewST4.2'13
67 PhillipstappingscrewST4.2''16
68 PhillipstappingscrewST4.2'16
69 Phillipscounlersunktappingscrew
ST2.9'19
70 Phillipscounlersunk
formingscrewM4"12
72 Washer
73 Washer
74 Washer
75 Washer
76 Washer
77 Washer
78 Springwash€r
79 Springwasher
"80 Nylonnut
81 Nylonnut
82 Hexnut
83 Jamnut
84 Allenwrench
85 Allen
wrench
86 Leftjunctionbox
87 Rightjunclionbox
88 Washer
89 Phillipscountersunk
screw
g0 Phillipscountersunkscrew
91 Double-endedspanner
92 Upper
plug
93 Bottom
p'ug
94 Basebumper
95 Phillipstappingscrew
12
15
3
45
35
2
6
8
4
13
5
4
4
4
2
4
4
1
1
1
1
20
2
2
I
4
2
8
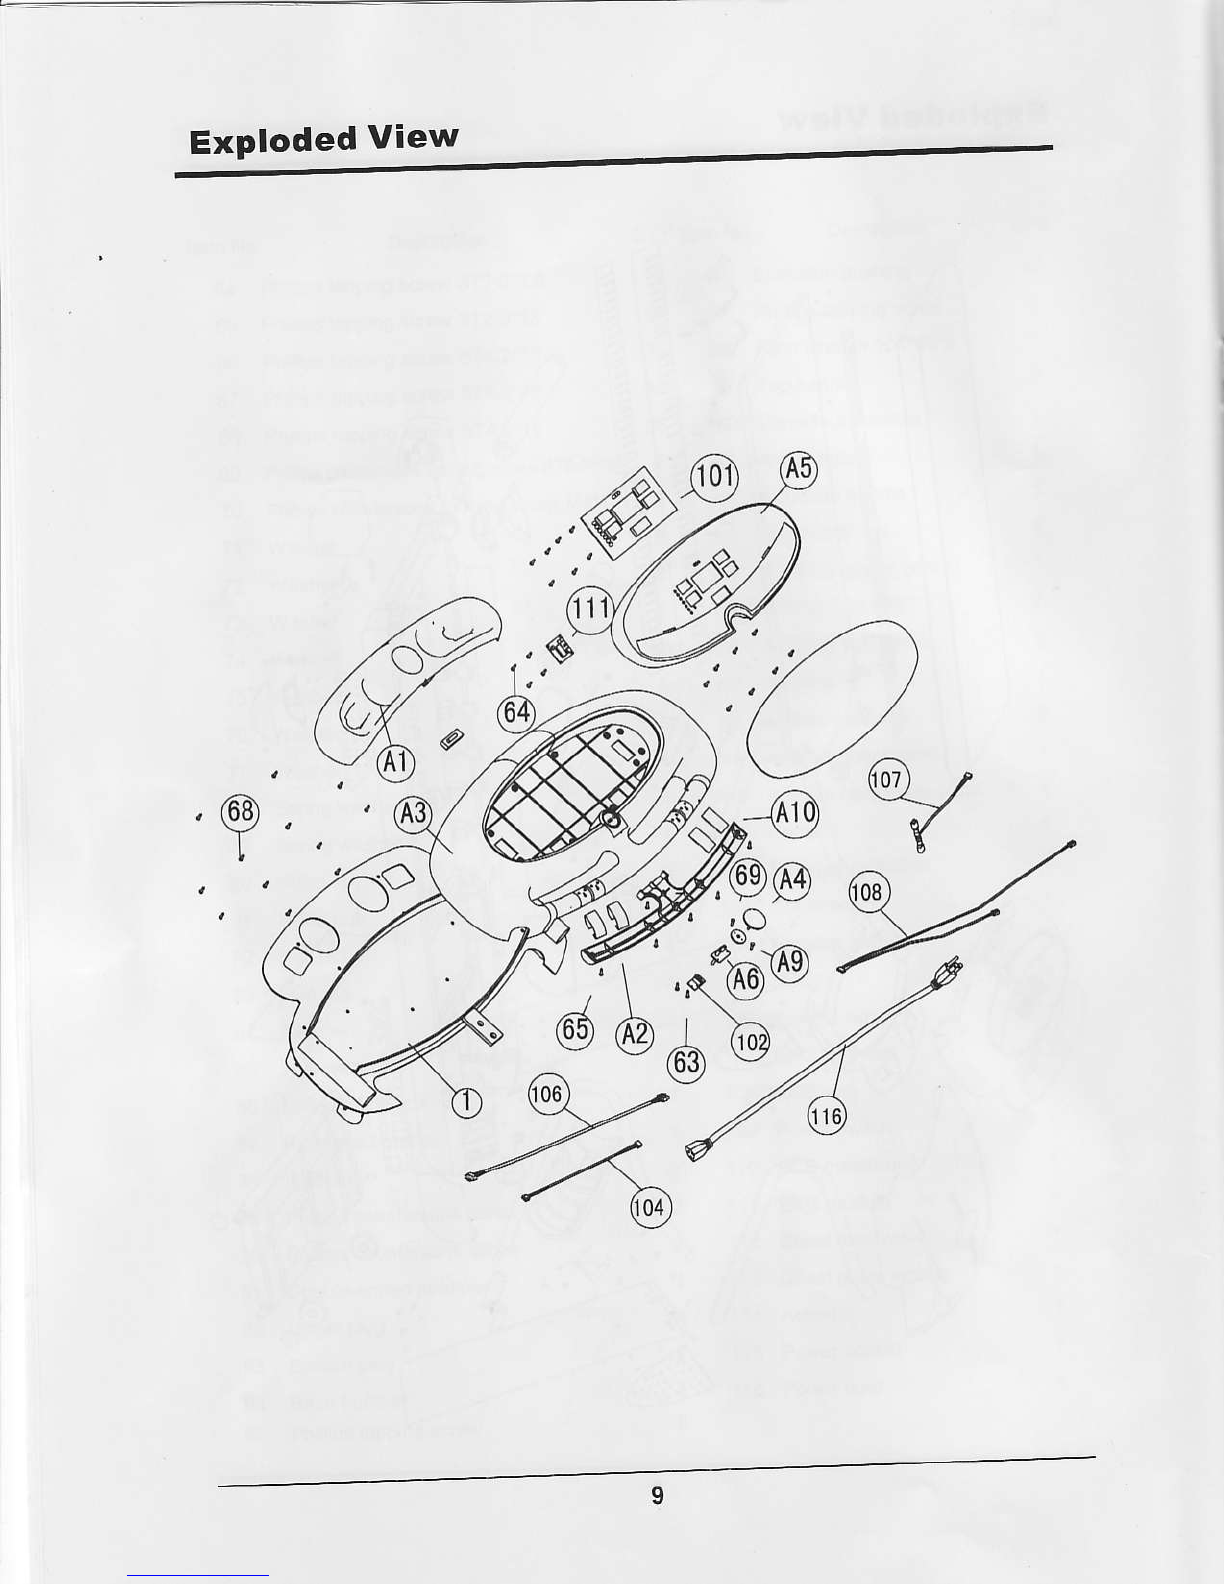
96
97
98
99
100
A2
A3
A5
A6
A8
A9
410
101
102
103
104
105
106
107
108
109
110
111
112
'l
13
114
115
116
Extrusionbushing 16
Phillipslappingscrew 6
Allen
wrench104'89'8 1
Tophandle 2
Consoleassemble
ACupholder
ABottomhandle
AConsolebox
ASafety
glidingpole
APCBBMCKET
ASafetykeyframe
ASpring
APlastic
washer
ASafetykeymount
APul6€receptacle
plate
Console
Emergencyswitch
Controller
Con60le
harness
I\,4otor
Jumpetwrre
EKGHamess
EKGwire
Powerswitch
PCBmembrane
EKGmodule
Chest
receiver
Chest
pulse
emitter
Actuator

Exploded View
\_l
f,\
\1.
Exploded View
6v
,68
Y'
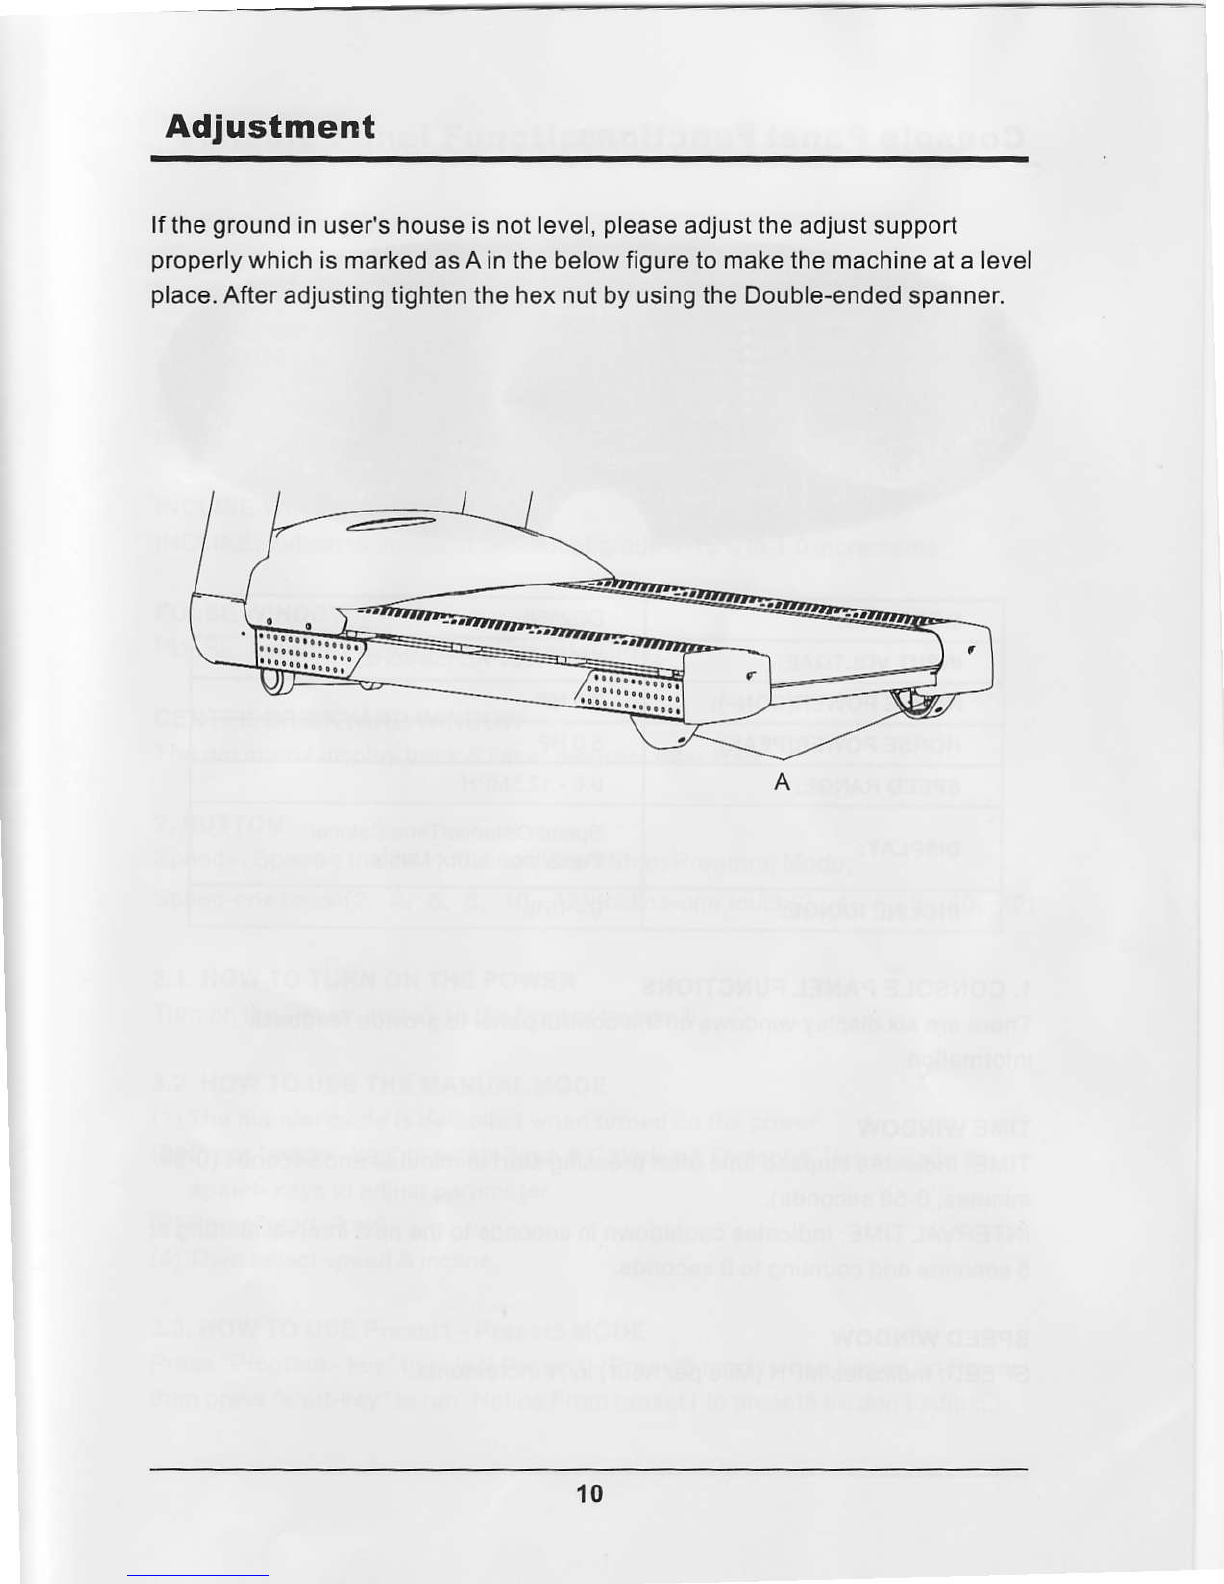
Adlustment
lf
the
ground
inuser'shouseisnotlevel,
please
adjusttheadjustsupport
properly
whichismarked
as
A
in
the
below
figurstomake
themachineat
a
level
place.
AfteradjustingtightenthehexnutbyusingtheDouble-endedspanner.
atiiiiilli
'10

Gonsole
PanelFunctions
MODELNO: DC2950
INPUTVOLTGAE: 110
- 120VAC
(50/60H2)
HORSEPOWER(CON-): 3.0HP
HORSEPOWER(PEAK): 5.0
HP
SPEEDRANGE: 0.6
-12.5MPH
DISPLAY: Speed/Distance/Time/Calorie/
Pulse/lncline/Dot
Matrix
INCLINERANGE: o- 150k
1.CONSOLEPANEL
FUNCTIONS
Therearesixdisplaywindows
onthecontrol
panel
to
provide
feedback
information.
TIMEWINDOW
TIME:Indicateselapsedtimeafter
pressing
startinminutes
andseconds
(0-99
minutes,0-59seconds).
INTERVALTlNilE:Indicatescountdown
inseconds
tothenextintervalstartingat
5secondsandcountingto0seconds.
SPEEDWINDOW
SPEED:
IndicatesNiIPH
(Mile
per
hour)
in.1increments.
11

GonsolePanelFunctions
DISTANCEWINDOW
DISTANCE:
IndicatesMiletraveledin0.1incrementsupto999and0.l
incrementsstartingat0.1.
CALORIESWINDOW
CALORIES:Indicates
estimatedcaloriesusedbasedon75K9.
person
atthe
indicated
speed,incline,andtime.
INCLINE
WINDOW
INCLINE:Indicates
inclinein
percent
of
grade
0-15%in1.0increments.
PULSEWINDOW
PULSE:Indicates
pulseyourpulse
rate(BPM).
CE
NTER
BRICKYARDWINDOW
Thedotmatrixdisplaytrack&listof
program
afterstart.
2.BUTTON
Speed+,Speed-;Incline+,Incline-;
Start/Stop;Program;Mode;
Speed-onetouch(2,4, 6, 8, 10,12);lncline-onetouch(2,4.6,8,
10.
12).
3.I.
HOW
TOTURNONTHEPOWER
TurnonthePower-switchonthefrontoftreadmill.
3.2.HOW
TOUSETHEMANUALMODE
(1)
Themanualmodeisdefaultedwhenturnedonthe
power.
(2)
Press"mode
-key"toselectTime&Calories&Distance,usespeed+&
speed-keys
toadjust
parameter.
(3)
Press"start
-key".
(4)
Thensdlectspeed
&
incline.
3.3.HOWTOUSEPresetl
-PresetsMODE
Press
"Program
-key"toselectPresetl
-PresetsmodewhenturnedonPower
then
press
"start-key"to
run.NoticeFrom
presetl
to
presets
bedon'tadjust.
12

Gonsole
PanelFunctions
3.4.HOWTOUSE
Customerl
-Customer2MODE
Press
"Program
-key"toselectCustormerl
-Customer2modewhenturned
on
power
then
press
"start
-key"to
run.
FromCustomerltoCustomer2
betoadjust.
UseMODEL
-key
toselect10
parts
ofCustomer
program,
Usespeed+&speed-
keys
toadjustlevelof
Speed&Incline.
3.5.HOWTOUSEHRRate
MODE
The
consoleoffersthreeheartrate
programs:
HR1Rate\HR2
Rate\HR3Rate
programs.
Each
program
will
automaticallycontrolthespeedandincline
ofthe
treadmillto
keep
your
heartratewithintargeted
heartratezone.Followthesteps
belowtouseaheartrate
program.
PUTONTHE
CHESTHEARTRAIE SENSOR.
YOUMUSTWEAR
THECHESI PULSESENSORfO USE
A HEARTRATE
PROGRAM.
Asthe
programprogresses,
thespeedandincline
ofthetreadmillwillchange
periodically
tokeep
your
heartratenear
predetermined
settings,
shownby
the
graphs
on
the
leftsideoftheconsole.
3.6.CALIBRATION
MOOE
Calibrationmodeis
enteredby
pressing
SPEED+
&SPEED-AND
INCLINE+
&INCLINE-keys.Thetreadmill
auto.tocalibrateinclinerange.
3.7.
ERRORCODES
(1)
E-0'1:
Console
no
receive
feedback
pulse
from
controller
after
30s
when
start
(2)
E-03:Pleasecheck'safe
-key"
(3)
E-04:
Overcurrent
(4)
E-05:Overvoltage
(5)
E-06:
Overload
(6)
E-07:Controllernoreceivefeedback
pulse
from
Console
,11
Gonsole
PanelFunctions
Trouble
pnenomena Reasonandiroubleshooting
guide
Treadmill
willnotstart
1.l\,4akesurethe
power
cord
plugged
intoaproperly
grounded
outlet.
2.
Check
themainswitch
locatedonthefrontof
the
treadmill.fthe
switchisoff,turn
it
on.
3.Haveanelectrician
checktoensure
thereis
adequatevoltageat
theoutlet.
Treadmillloses
power
dunnguse Checkthe
mainswitchlocatedonthe
frontofthe
treadmill.lftheswitch
isofi,turniton,
Treadmillwalking
beltslowsduringuse
Check
tomakesure
thetreadmillissecurely
plugged
intoa
properlygrounded
outlet
ratedat20amps,
witha
14-gauge
cordofflvefeetor
less.
14

Operationlnstructions
Pleaaereadcarefullyandusing
followthefunctions:
1.
Resetthe
emerggncy
switch.
2-
put
the
plug
inthesocket,turnon
theon-off.
3.
grasp
the
handle
firmly,standon
thetreadle.
4.
You
canoperate
thisdevice
accordingwiththe
manual.Atfirst
you
should
setthelowestspeed,
thenincreasethe
speed
gradually.
5.
you
should
grasp
the
handlefirmlybyone
of
your
hands,when
you
operating
theconsole.
6.
Take
care
tousetreadmill.Start
fromlowspeed
handedtotheUprights
L6avingfromtreadmill
afterreducingspeed
andstoppingall
functions.
7.Presstheemergency
switch
in
an
emergency,thenthe
power
andmotorwill
turnoffatonce,
L Warmandrelax
your
body
afterworkout.
Exercise
time
andexerclse
frequencyatatime:
Exercisetime:30minuates----Normal;
Exercisefrequency:Warm
your
bodyby
l0--20minutes
under
5MPHThen
increasespeedaccordingly.
15

Maintenance lnstructions
l. BeltAdjustment:
(1)Belt
adjustment
andtension
performs
twofunctions:
Thedistancebetween
beltandmotor
coverfromleft
torightwithin
+/-5MM,
thenneededto
beadjusted.
Adjust
beltbyspeednotmorethan2.sMPH.
Nonal positionof bettas
MolorCover
Walkbelt
AdjustmentHere
A. WalkingBeltis shifting to the
fight:
Using
hexkey
provided,
turntheright
rearroller
adjustmentboltturninthe
clockwise
direction
shownasbeloworonthecontrarydirection.
B. WalkingBeltis shlftlng to theright:
Usinghexkey
provided,
turntherightrearroller
adjustment
bolt
turn
inthe
clockwise
direction
shownasbeloworonthecontrarydirection.
(2)Walking
beltis
Slight
walking
belt
key
provided,
turn
distance.
Slippingduring
use:
slippingisonnormalwhileusingforaperiod
Usingthehex
bothleftandrightrearrolleradjustmentboltsinthesame
t6
Maintenance lnstructions
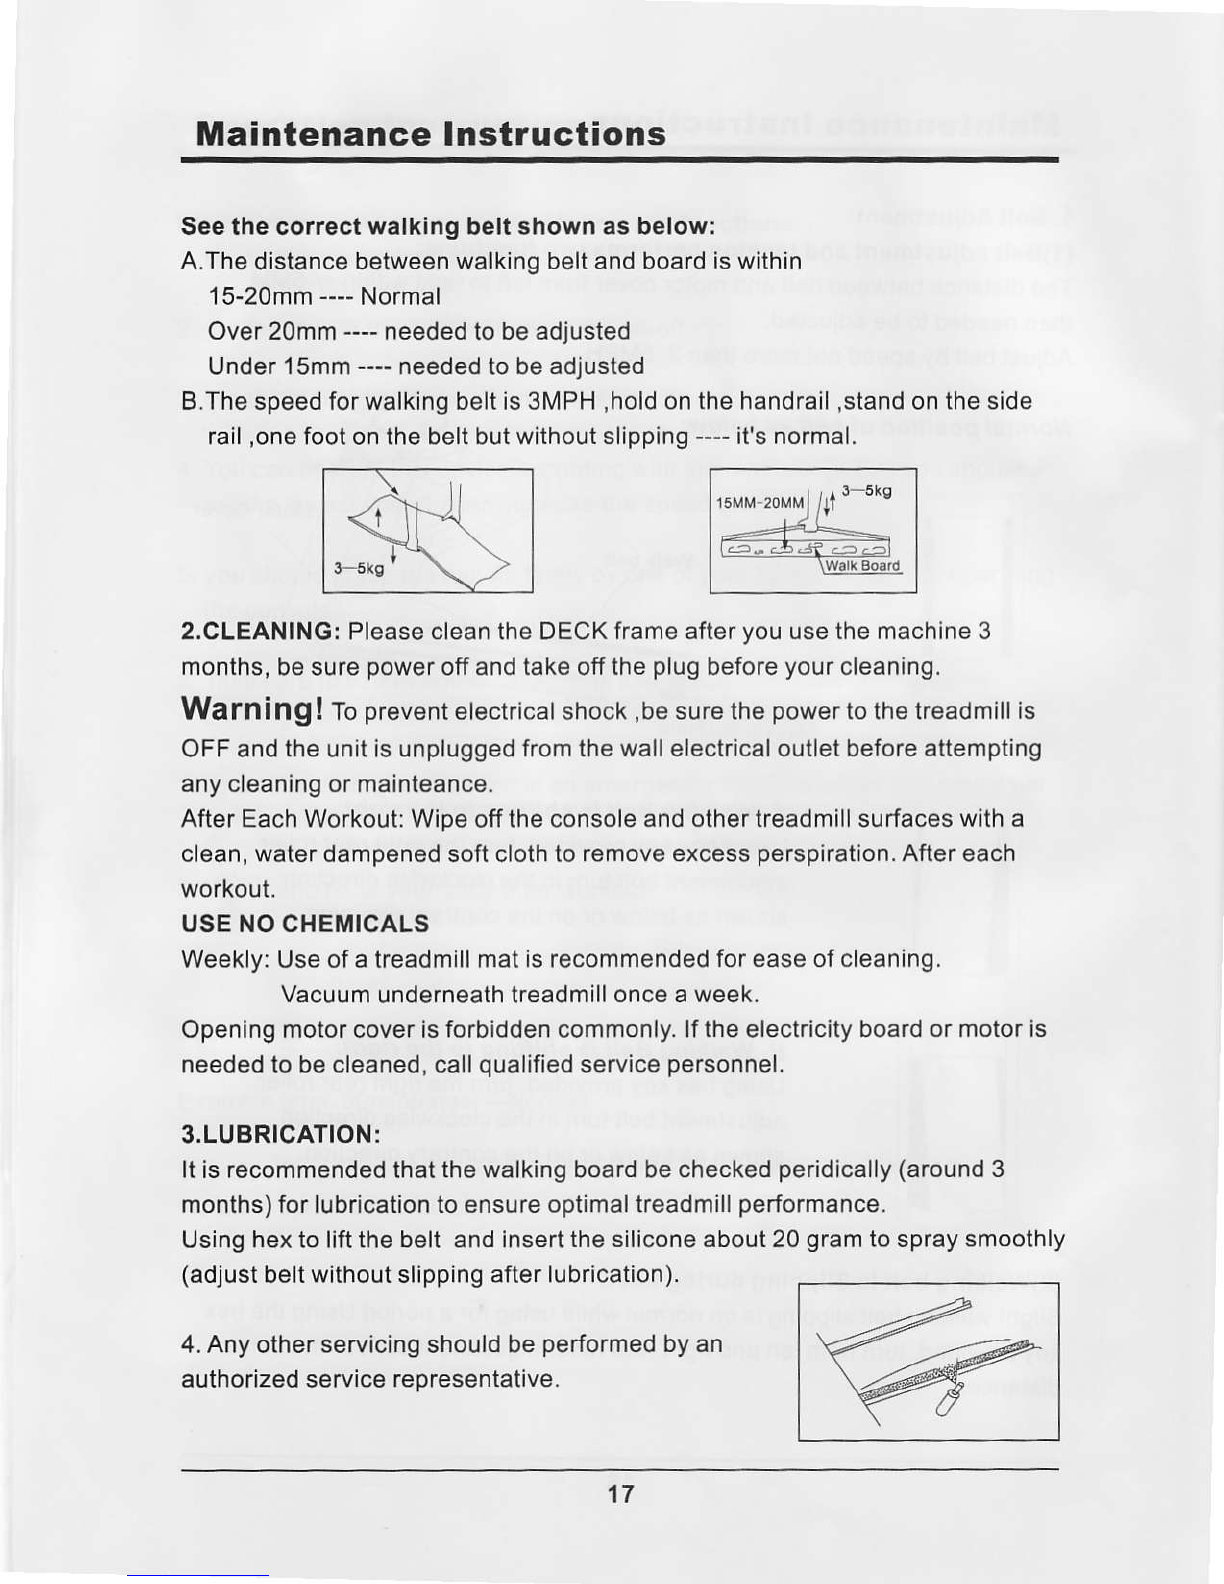
Seethecorrectwalkingbeltshownasbelow:
A.The
distance
betweenwalkingbeltandboardiswithin
15-20mm
-- Normal
Over20mm
----
neededtobeadjusted
Under
1smm
----
neededto
beadjusted
B.Thespeedforwalkingbeltis3MPH
,hold
on
the
handrail
,stand
ontheside
rail
,one
footonthebeltbut
withoutslipping
-- it'snormal.
2.CLEANING:
PleasecleantheDECK
frameafter
you
usethemachine3
months,
besure
power
offand
takeoffthe
plug
before
your
cleaning.
Warning! To
prevent
electricalshock,besurethe
power
to
thetreadmill
is
OFFand
the
unitisunplugged
fromthewallelectrical
outlet
beforeattempting
anycleaningormainteance.
AfterEach
Workout:Wipaofftheconsole
andothertreadmillsurfaceswitha
clean,waterdampenedsoftclothlor€move
excess
perspiration.
After
each
workout.
USENOCHEMICALS
Weekly:Useofatreadmillmat
is
recommended
foreaseofcleaning.
Vacuum
underneathtreadmill
onceaweek.
Openingmotorcoverisforbiddencommonly.lf
the
electricity
boardormotoris
needed
to
becleaned,call
qualified
service
personnel.
3.LUBRICATION:
Itisrecommendedthat
the
walkingboardbe
checked
peridically
(around
3
months)forlubricationtoensureoptimaltreadmill
performance.
Usinghextoliftthebeltand
insertthesiliconeabout20
gram
tospraysmoothly
(adjust
beltwithoutslipping
afterlubrication).
4.Anyolherservicingshouldbe
performed
byan
authorizedservice
reDresentative.
17
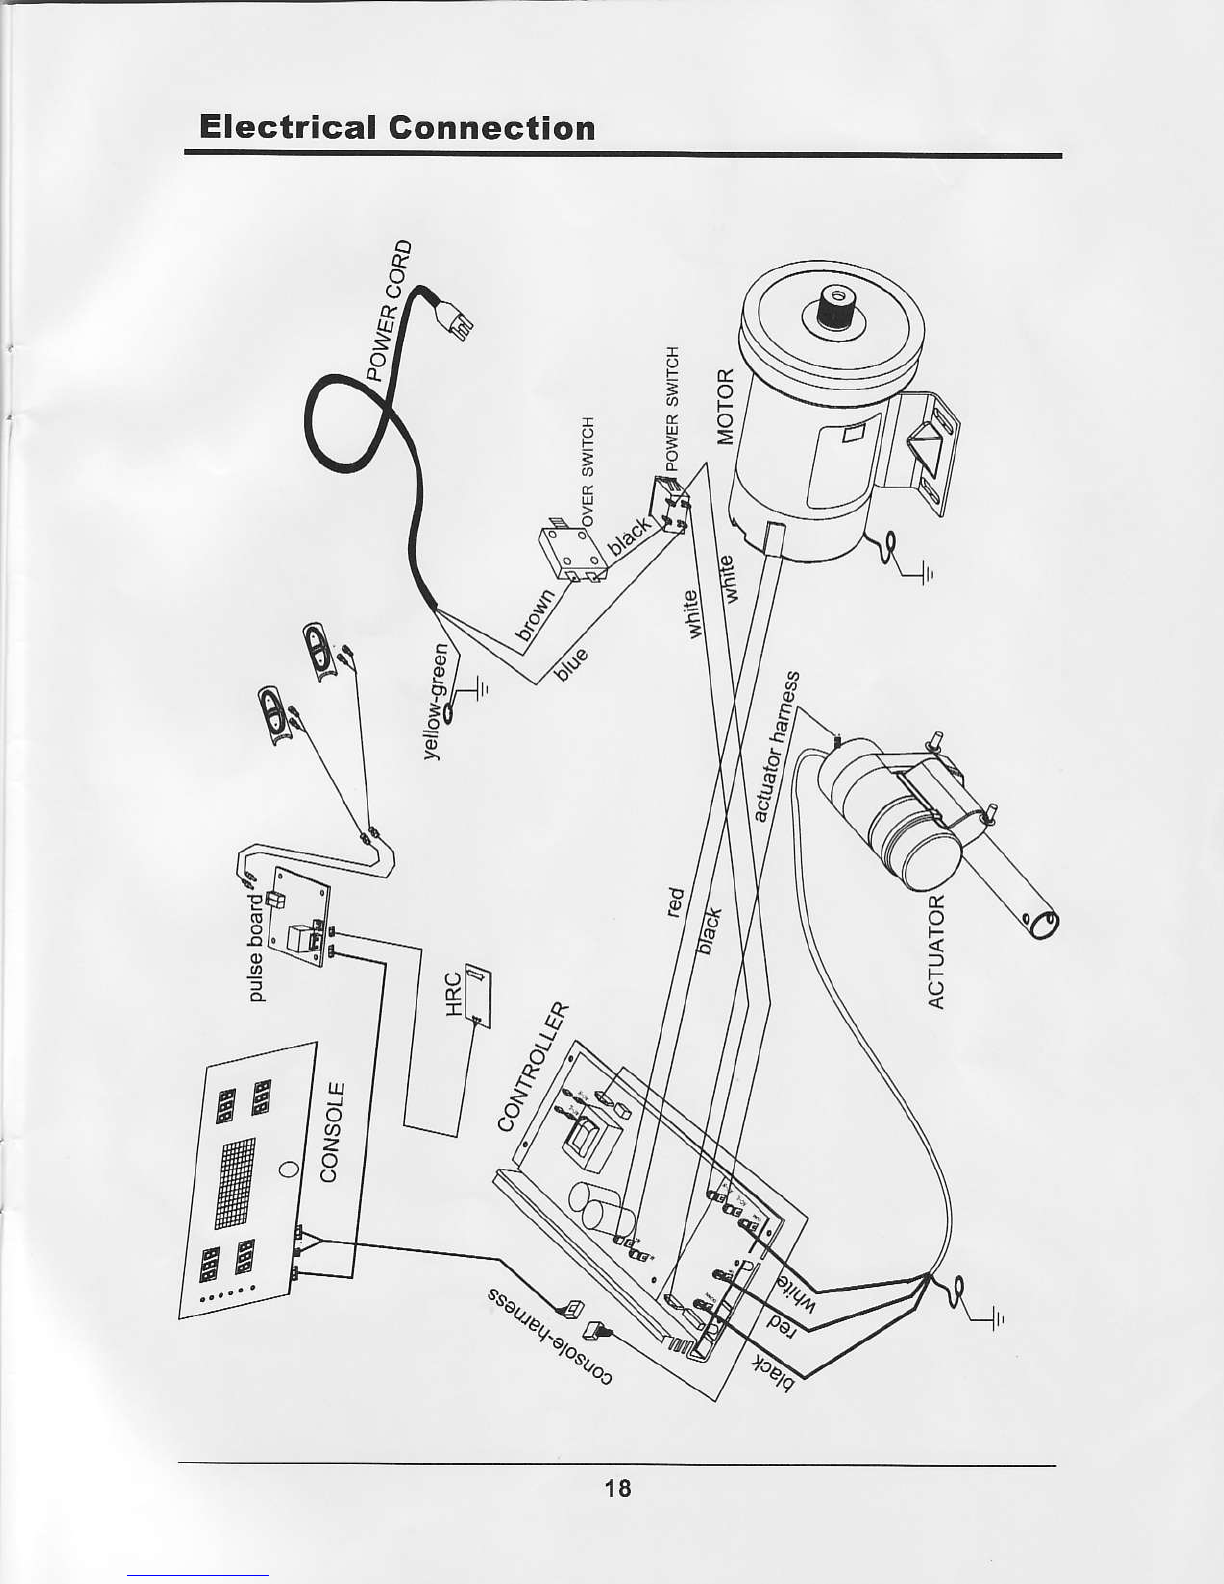
Electrical Gonnection
d/
ol
(ll
Elt
E/it
s-/1\
o
F
ll
=
9,
t
o
F
l
F
(-)
g,
z
(J
I
Ba
ffi
Ea
..,....
18
Other ProSpot Fitness Treadmill manuals

Popular Treadmill manuals by other brands


NordicTrack
NordicTrack NTL1795.2 user manual
ICON Health & Fitness
ICON Health & Fitness NordicTrack S 40 user manual

NordicTrack
NordicTrack T 7.0 Treadmill Manuel de l'utilisateur

iFIT
iFIT Pro-Form Carbon TLX PFTL90924.1 user manual

Matrix
Matrix T50x-02 Service manual

NordicTrack
NordicTrack CLUB REFLEX user manual


