Prysmian Bicon CW User manual
Installation Instructions for CW & CW-LSOH Glands
42508-01
Issue 3
EC 5909
Prysmian Cables & Systems Limited, Components Unit,
Registered Office
Oak Road, Wrexham Industrial Estate,
Chickenhall Lane, Eastleigh
WREXHAM, LL13 9PH, UK
Hampshire SO50 6YU
Registered in England
A Company certified to ISO 9001 and ISO 14001
Number 958507
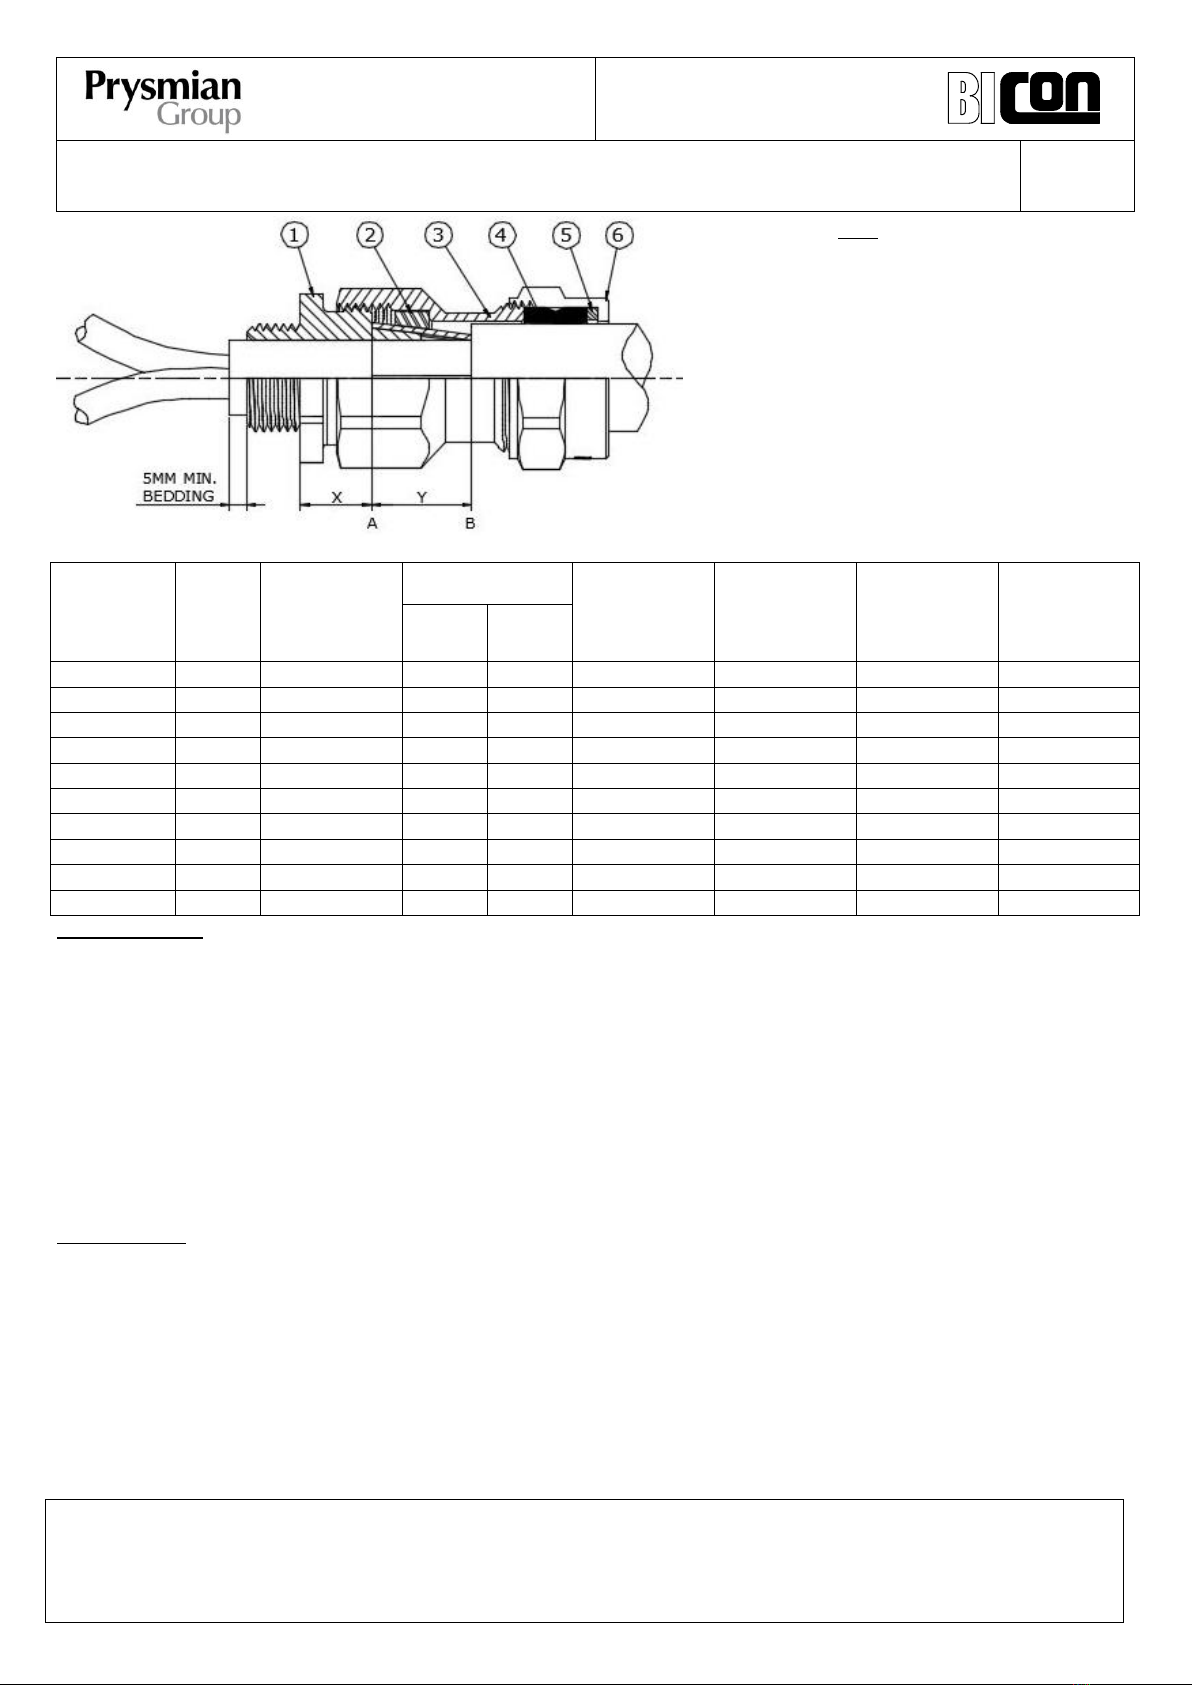
Key :
1. Gland body
2. Armour clamping ring
3. Gland barrel
4. Outer seal
5. Skid washer
6. Gland nut
Not Shown:
Shroud
Earth tag
Lock nut
Equipment Seal (optional)
Design Ref.
419CW-
KA419-
422LSF-
Size
Under Armour
Ø mm (Max)
Overall Ø mm
Armour Wire
Ø mm
Length
‘X’ mm
Exposed
armour length
‘Y’ mm
Tightening
Torque
‘Z’ Nm
Min
Max
51
M16
8.6
8.0
13.2
0.9
13
19.0
20
71
M20ss
8.6
8.0
13.2
0.9
13
19.0
20
52
M20s
11.6
8.0
15.8
0.9 / 1.25
13
19.0
25
53
M20
13.9
12.9
20.8
0.9 / 1.26
13
20.0
30
55
M25
19.9
17.0
27.2
1.25 / 1.6
15
22.0
40
56
M32
26.2
23.5
33.5
1.6 / 2.0
18
25.0
50
57
M40
32.1
29.0
39.9
1.6 / 2.0
17
28.0
65
59
M50
44.0
39.5
52.6
2.0 / 2.5
24
32.0
90
61
M63
55.9
51.3
65.3
2.5
21
35.0
150
63
M75
67.9
62.5
78.0
2.5
29
35.0
150
Cable Preparation
1. Place cable alongside the enclosure and allow sufficient length for spreading and terminating the core(s) to the terminals, then
cut off any surplus cable.
2. If a shroud is required, slide it onto the cable before proceeding with cable stripping.
3. Mark the point where the cable passes through the enclosure wall then measure back the length ‘X’ and mark position ‘A’ on
the cable.
4. Cut through over-sheath at position ‘A’ using a hacksaw or rotary cutter ensuring that the cut is perpendicular to the cable axis,
then continue to cut half way through the armour wires. Remove the over-sheath up to the armour wire cut position ‘A’ and
remove the armours by bending back and forth until they snap off.
5. Using the ‘Y’dimension, mark position ‘B’ and cut and remove the cable over-sheath exposing the armour wires.
Gland Assembly
1. Dis-assemble the gland noting all the components and orientations as shown above.
2. Slide the outer sealing components onto the cable. nut (6), skid(5), seal(4) and barrel (3)
3. Slide the armour clamping ring (2) over the armours - narrow end first.
4. Slightly raise the armour wires and then slide the Gland body (1) along the cable so that the armour cone sits beneath the
armours. Spread the armour wires evenly around the cone.
5. Whilst holding the gland body (1) in place, screw the gland barrel (3) onto the gland body forcing the clamping ring (2) over the
armour wires and tighten to torque ‘Z’. The gland barrel (3) can be unscrewed to check the armour lock and armour continuity.
6. Replace the gland barrel (3) and tighten up. Then screw the outer nut (6) onto the gland barrel (3) to compress the outer seal
onto the cable outer sheath.

Installation Instructions for CW & CW-LSOH Glands
42508-01
Issue 3
EC5909
Prysmian Cables & Systems Limited, Components Unit,
Registered Office
Oak Road, Wrexham Industrial Estate,
Chickenhall Lane, Eastleigh
WREXHAM, LL13 9PH, UK
Hampshire SO50 6YU
Registered in England
A Company certified to ISO 9001 and ISO 14001
Number 958507
7. At this point the bedding cut position can be marked –this should be a minimum of 5mm beyond the equipment thread of the
gland body. Then carefully cut the cable bedding at the marked position and remove to expose the cable cores.
8. Feed the cable cores and gland into the equipment, adding an equipment seal and earth tag if required and secure with a
locknut.
Note: the additional seal between the gland and the equipment is required to achieve IP66
9. Reposition the shroud pushing it over the gland so that it touches the equipment face.
Note: It is advisable to fit cable cleats to support the cable.
This manual suits for next models
1
Other Prysmian Industrial Equipment manuals

Popular Industrial Equipment manuals by other brands

Hubbel
Hubbel KILLARK UGFI Series INSTALLATION, OPERATION & MAINTENANCE DATA SHEET

ABB
ABB HT608458 Operation manual

JohnDow Industries
JohnDow Industries JDI-25HDC Operator's manual

Leroy-Somer
Leroy-Somer LSA 43.2 Installation and Maintenance

Art
Art DAM-3028D user manual

SEW-Eurodrive
SEW-Eurodrive SPIROPLAN W R 7 Series Assembly and operating instructions

nvent
nvent SCHROFF VARISTAR CP installation instructions

ABB
ABB HT563392 Operation manual

Smart Dedicated Design
Smart Dedicated Design BST6800 unpacking instructions

BST
BST EcoGuide Installation and operating instructions

Western Global
Western Global FuelCube FCP250 manual

ABB
ABB HT568932 Operation manual


