PSB ALPHA AM5 User manual

ALPHA AM5
OWNER’S GUIDE
www.psbspeakers.com

IMPORTANT SAFETY INSTRUCTIONS
1. Read these instructions.
2. Keep these instructions.
3. Heed all warnings.
4. Follow all instructions.
5. Do not use this apparatus near water.
6. Clean only with dry cloth.
7. Do not block any ventilation openings. Install in accordance
with the manufacturer’s instructions.
8. Do not install near any heat sources such as radiators, heat
registers, stoves, or other apparatus (including amplifiers) that
produce heat.
9. Do not defeat the safety purpose of the polarized or grounding-
type plug. A polarized plug has two blades with one wider
than the other. A grounding type plug has two blades and
a third grounding prong. The wide blade or the third prong
are provided for your safety. If the provided plug does not fit
into your outlet, consult an electrician for replacement of the
obsolete outlet.
10. Protect the power cord from being walked on or pinched
particularly at plugs, convenience receptacles, and the point
where they exit from the apparatus.
11. Only use attachments/accessories specified by the manufacturer.
12. Use only with the cart, stand, tripod, bracket, or
table specified by the manufacturer, or sold with the
apparatus. When a cart is used, use caution when
moving the cart/apparatus combination to avoid
injury from tip-over.
13. Unplug this apparatus during lightning storms or when unused
for long periods of time.
14. Refer all servicing to qualified service personnel. Servicing is
required when the apparatus has been damaged in any way,
such as power-supply cord or plug is damaged, liquid has been
spilled or objects have fallen into the apparatus, the apparatus
has been exposed to rain or moisture, does not operate
normally, or has been dropped.
15. The apparatus shall not be exposed to dripping or splashing
and that no objects filled with liquids, such as vases, shall be
placed on the apparatus.
16. WARNING: To reduce the risk of fire or electric shock, this
apparatus should not be exposed to rain or moisture.
17. The mains plug or an appliance coupler is used as the
disconnect device, the disconnect device shall remain readily
operable.
The lightning flash with arrowhead symbol within an
equilateral triangle, is intended to alert you to the
presence of uninsulated “dangerous voltage” within the
product’s enclosure that may be of sufficient magnitude
to constitute a risk of electric shock to persons.
The exclamation point within an equilateral triangle
is intended to alert you to the presence of important
operating and maintenance (servicing) instructions in the
literature accompanying the product.
FCC Warnings
This device complies with part 15 of the FCC Rules. Operation
is subject to the following two conditions: (1) This device may
not cause harmful interference, and (2) this device must accept
any interference received, including interference that may cause
undesired operation.
Any Changes or modifications not expressly approved by the
party responsible for compliance could void the user’s authority to
operate the equipment.
Note: This equipment has been tested and found to comply with the
limits for a Class B digital device, pursuant to part 15 of the FCC
Rules. These limits are designed to provide reasonable protection
against harmful interference in a residential installation. This
equipment generates uses and can radiate radio frequency energy
and, if not installed and used in accordance with the instructions,
may cause harmful interference to radio communications. However,
there is no guarantee that interference will not occur in a particular
installation. If this equipment does cause harmful interference to
radio or television reception, which can be determined by turning
the equipment off and on, the user is encouraged to try to correct
the interference by one or more of the following measures:
• Reorient or relocate the receiving antenna.
• Increase the separation between the equipment and receiver.
• Connect the equipment into an outlet on a circuit different from
that to which the receiver is connected.
• Consult the dealer or an experienced radio/TV technician for help
This equipment complies with FCC radiation exposure limits set
forth for an uncontrolled environment. This equipment should be
installed and operated with minimum distance 20cm between the
radiator & your body.
IC WARNING
This radio transmitter has been approved by Industry Canada.
This Class B digital apparatus complies with Canadian standard
ICES-003. This device complies with Industry Canada License
exempt RSS standard(s). Operation is subject to the following two
conditions.
(1) This device may not cause interference and (2) this device must
accept any interference, including interference that may cause
undesired operation of the device.
This equipment complies with ISED radiation exposure limits set
forth for an uncontrolled environment. This equipment should be
installed and operated with minimum distance 20cm between the
radiator & your body.
Operating Environment Temperature
This product is designed to operate within a temperature range of
0 - 70 degrees Celsius only.

Notes on environmental protection
At the end of its useful life, this product must not be
disposed of with regular household waste but must
be returned to a collection point for the recycling of
electrical and electronic equipment. The symbol on the
product, user’s manual and packaging, point this out.
Notes on environmental protection
The materials can be reused in accordance with their markings.
Through re-use, recycling of raw materials, or other forms of
recycling of old products, you are making an important contribution
to the protection of our environment.
Your local administrative office can advise you of the responsible
waste disposal point.
Introduction
Thank you for your PSB Speakers purchase. Our wide collection of high-performance loudspeakers, headphones, and home audio products
bring music and video collections to life. Producing natural musical dynamics and precise imaged sound, PSB Speakers will simply bring you
closer to the music you love.
Alpha stands for the best value in high performance loudspeakers. The Alpha AM5 powered speakers take the Alpha concept to an entirely
new level by including a built-in amplifier to create a complete audio solution with enough acoustic output to fill small to medium sized
rooms. Based on decades of acoustic research and rigorous testing, the Alpha powered speakers benefit from proven knowledge and
techniques, and delivers “true-to-nature” sound quality for today’s music enthusiasts and professionals.
By supplying this owner’s guide, we hope you will read through this information to help assure that you are getting the most out of your
PSB product.
Unpacking
The packing materials are designed to protect the speakers from damage during transport, however if visible or concealed damage
is to occur in handling, it should be reported at once to your authorized PSB dealer, or to the shipping company that delivered your
loudspeakers. We highly recommend retaining all packaging, as it may be needed to transport the speakers in the future.
The Speakers
I. Connect the right speaker to the indicated and corresponding speaker binding post of the speaker amplifier using the included speaker
cable.
II. As these speakers are self-powered, do not attempt to connect the supplied cable to the speaker outputs of a stereo Receiver
III. For improved low frequency response, the Alpha AM5 powered speakers are equipped with a sub out connection for adding a powered
subwoofer, if needed.
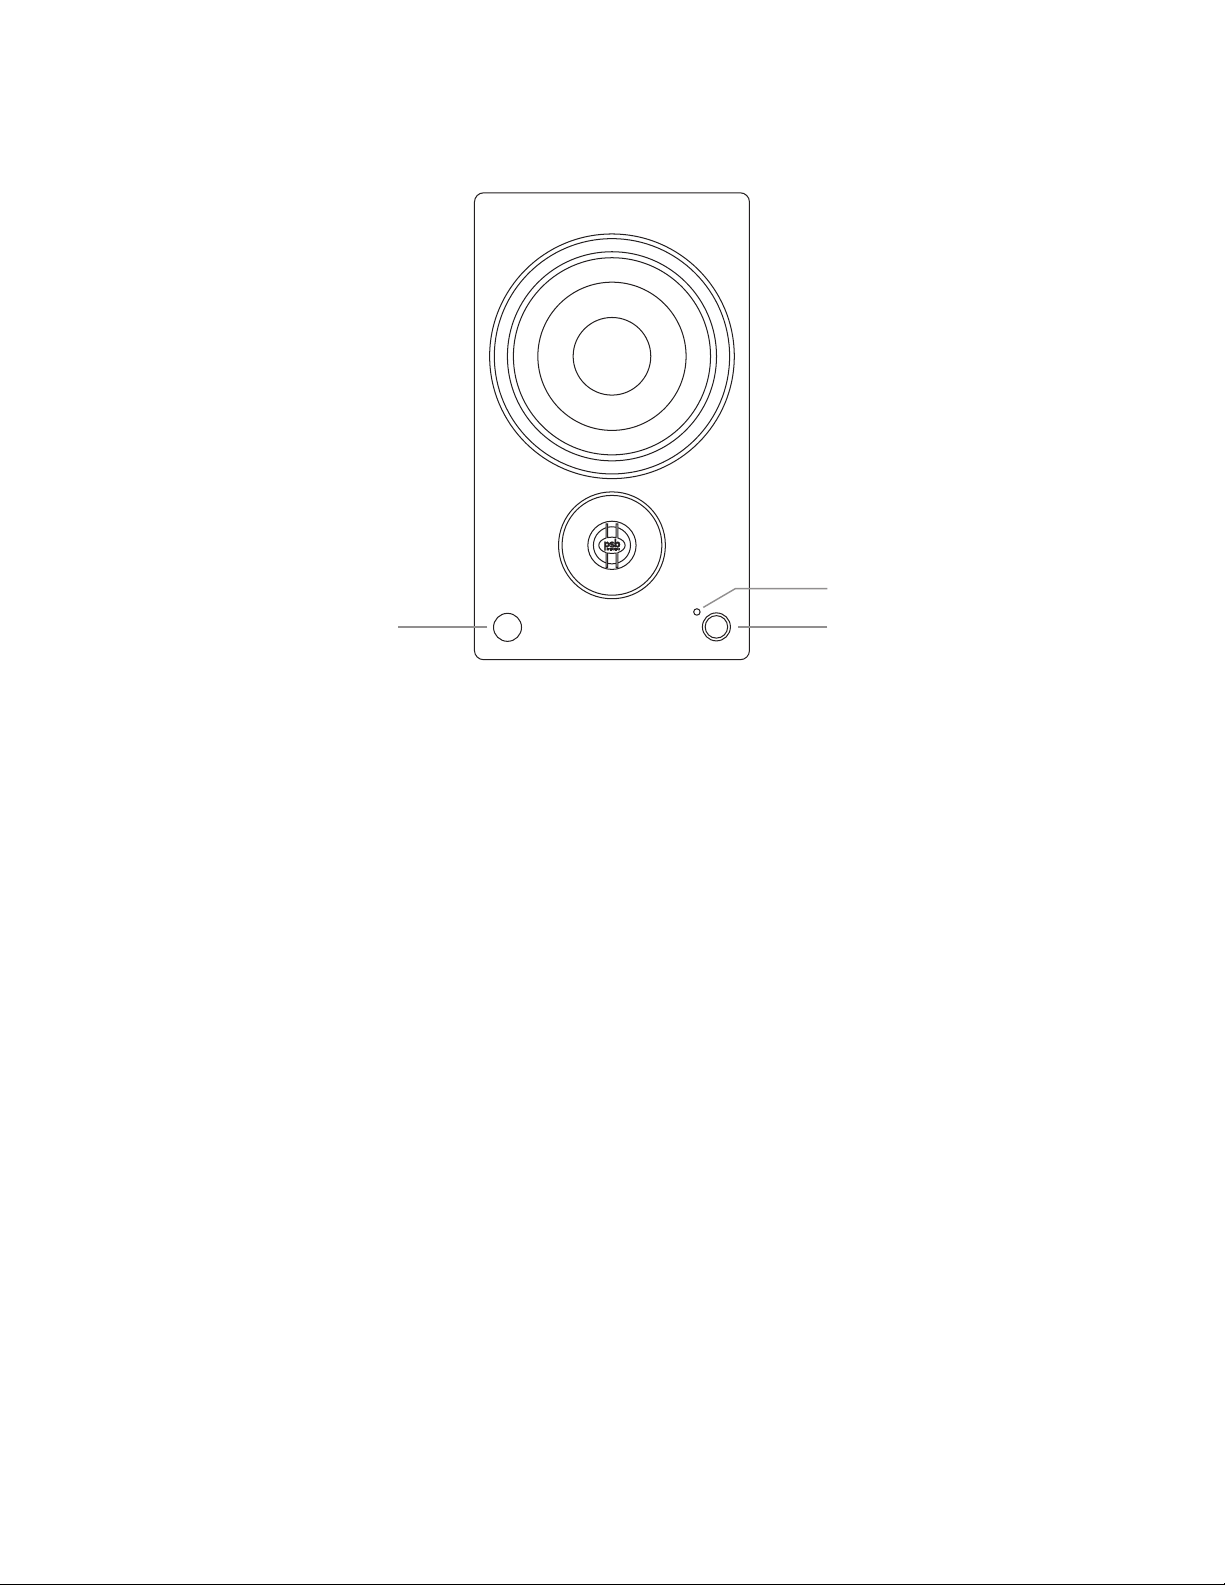
Remote Sensor Control Dial
Status Light
Status Light: Displays different colors to show: - which source is playing
- a listening mode is chosen
- maximum and minimum volume, bass and treble controls
- Bluetooth pairing mode
Control Dial: Turn: to adjust the volume
Press: to change the input
Remote Sensor: Point the remote control at the remote sensor and press the buttons. Do not expose the remote sensor of the speaker
to light source such as direct sunlight or illumination. If you do so, you may not be able to operate the speaker with the
remote control.
Front of the Amplified Speaker

1) Analogue Input (Auxiliary)
Using the supplied 1/8” (3.5mm) connection cable, connect one end to the speaker AUX input, and the opposite end
to the selected audio source. Cyan status light
2) Phono Input
Using RCA cables, connect one end to the phono input. Connect the phono ground cable. Green status light
3) Optical Input (Digital)
For connecting sources with optical output using an optical interconnect (Toslink). This is a connection which is commonly found
on televisions or set top boxes. Connect the optical interconnect from the media source output to the input marked OPTICAL on
the AM5. White status light
4) USB Audio Input
This connection is best used with a common computer. Use a standard USB cable between the speaker and a USB connection on
your computer. Note: Thumb Drives or other storage devices cannot be connected to this input. Purple status light
5) SUB OUT - Low Pass Filtered Output (Mono)
For connecting an external active subwoofer.
Subwoofer output can be activated using the supplied remote control, which will also redirect part of the low frequency content
to the subwoofer. Connect the Alpha AM5 to the low-level input of the external subwoofer using a subwoofer
interconnect cable.
6) Speaker Out binding posts: connect to the speaker posts of the right speaker with the speaker cable
7) Bluetooth Pairing Reset Button: Pressing this button while Bluetooth is in use, will disconnect the current bluetooth device, and
allow another bluetooth device to be paired and connected.
8) Power Inlet: For connecting the unit to included external power supply.
9) USB power port: The AM5 includes a 5V, 1A USB connection. The USB port is for power and charging, not for data
transfer or music playback/streaming.
Back Panel of the Amplified Speaker
1
2
9
8
7
3
4
5
6
AM5 Power Adapter Model:
DQS751-240300-3 24V 3.0A

Place the two AAA batteries supplied into the remote control. Be careful to ensure that it is correctly inserted according to the
polarity (+/-). You should only use the battery specified for this system. Caution: When replacing the batteries, ensure that you only use
standard AAA batteries which are not re chargeable. The use of an incorrect type of battery may cause severe damage to the remote or
risk explosion.
1. ON/Off: Speakers from standby mode to operating mode. The LED on the front will indicate the color of the source last chosen.
2. Volume Control +/-: Increase or decrease audio level. Release mute function.
3. Input Selection: Toggle and select source. The LED on the front of the left speaker will change color, based on the active source:
Analog: Cyan
Phono: Green
USB: Purple
Optical: White
Bluetooth: Blue
4. Mute: Temporarily mute audio output or restore audio output from mute.
5. Listening Mode Selection: Press the “MODE” button on the remote control once to activate the display and cycle through the four
listening modes.
Mode Effect Color
Stereo Normal No Color
Widesound Expanded Soundstage Green
Dialogue Enhanced Dialogue Clarity Amber
WideSound™ Plus Expanded Soundstage with Enhanced Dialogue Clarity Blue
6. Subwoofer On/Off: Subwoofer output can be activated using the supplied remote control, which will also redirect part of the low
frequency content to the subwoofer.
SUB MODE
TREBLE BASS
Remote Control
Power On/Off
Volume Control
Input Selection
Subwoofer ON/OFF
Treble Control
Bluetooth Interrupt
Input Selection
Mute
Sound Mode Selection
Bass Control

7. Bass Control: Controls the amount of bass for your listening preference. When initially activated, the bass will be set to neutral, or
half- way in the range.
8. Treble Control: Controls the amount of treble for your listening preference. When initially activated, the bass will be set to neutral, or
halfway in the range.
Note Bass & Treble: When adjusting the Bass or Treble the status light will make a single red flash to show that the midpoint of the
level has been reached. If you have reached the maximum or minimum level of the Bass or Treble, the status light will flash every time
you press the button to indicate that you have reached the limit.
9. Bluetooth Interrupt: Holding this button for 3 seconds will disconnect the current Bluetooth device. It will allow another device to
be paired or connected.
Infrared Learning
Infrared (IR) Learning enables any non-PSB remote controls learn IR control codes based on the supplied PSB PSR-1 remote control. The
functions Power ON/OFF, Volume UP/DOWN, Input Selection and Mute can be learned. With the learned codes, the configured non-PSB
remote control can be used to command or operate PSB AM5.
How To Learn IR Remote Control Codes
I. Hold MUTE button for 5 seconds to enable the IR learning feature. The Status Light on the front of the powered speaker will flash Red
and White.
II. Press the function/button, POWER ON for example, to be learned from PSB PSR-1 remote control. Status Light flashes Blue twice to
show received command, then change to solid Blue.
III. Press the corresponding button on the non-PSB remote control where POWER ON will be learned. Status Light flashes Green twice to
indicate that function/command has been learned.
I V. Repeat Step 2-3 to learn Power OFF, Volume UP/DOWN, Input Selection and Mute.
Note: IR learning setup times out after 10 seconds of inactivity.

How to Pair with a Bluetooth-Enabled Device
I. Using the input selections buttons on the remote control, toggle between sources and switch to the BT input (Blue). LED will flash
blue-red for two minutes while in Discovery Mode.
II. Open the Bluetooth settings on your mobile device and start searching for the unique device ID of the AM5.
III. Once paired, the LED will be illuminated solid Blue to indicate a successful pairing. Start playback of Bluetooth device upon successful
pairing.
I V. If the pairing connection fails, the LED will be solid Red. Repeat the above steps with the remote control and your mobile device to try
connecting again.
Using a Bluetooth-enabled Device
I. Cycle through inputs and select BT to activate Bluetooth discovery. Bluetooth device that was last paired to the AM5 will connect
automatically when Bluetooth is switched on and the front panel Bluetooth LED is Blue.
II. Start playback on your mobile device and the sound will automatically start to play.
How to Disable Bluetooth Audio Playback
I. Use the input selections buttons on the remote control to switch to one of the other sources (Analogue, Phono, USB or Optical).
II. Open the Bluetooth settings on your mobile device and turn off the Bluetooth connection or “unpair” the device from the Alpha AM5
The active Bluetooth device can be disconnected by pressing the Bluetooth button on the remote control for 3 seconds.
The active Bluetooth stream can also be disconnected by pressing the Bluetooth interrupt button on the back of the left speaker.
Auto Standby
The AM3 will automatically go to standby mode if there is no user interface interaction and no active source input within 20 minutes.
Optical and Analogue Sources
I. With the optical or analogue source selected, the AM5 will automatically go to standby mode and lower the power consumption to
<0.5W, if there is no user interface interaction and no active source input within 20 minutes.
II. The status light will change to Amber to indicate this.
III. To wake up the AM5, press “ON” on the remote control.
Bluetooth Source
I. With an active Bluetooth connection, the AM5 will automatically go to standby mode and lower the power consumption to <0.5W, if
the device’s audio streaming has stopped for over 20 minutes.
II. Status LED will change from Blue to Amber
III. To wake up the AM5 for Bluetooth listening, press “ON” on the remote control to reactivate Bluetooth Discovery Mode.
I V. At this point a previously paired device (remembers up to 3 devices), if within range, can immediately start streaming audio. For
connecting a new device, follow the Bluetooth pairing instructions in this manual.

Positioning
I. As symmetrically as possible, place your Alpha AM5 Powered Speakers at a comfortable listening location with no obstructions at the
front or back.
II. We recommend at least three inches of clearance around the back of both speakers. Good air circulation is required for heat
dissipation, and to ensure proper performance of the rear-firing ports. Similar positioning and clearance should be used for both
speakers.
For more detailed information about speaker placement, please visit www.psbspeakers.com.
Troubleshooting
Issue
I. If a speaker begins to sound distorted or fatigued, check to see whether playing at a lower
volume resolves this issue.
I. If there is low or no volume output, check that the audio source is powered “ON”, and that
the audio is set to a medium volume level and not muted.
II. If audio source is indeed powered “ON”, check and ensure that the cable connection to the
audio source is properly secured, or try a different cable.
I. If there is volume output from only the left channel, check that the cable connection is properly
secured, and connected to the corresponding output jacks on both speakers.
Audible Distortion
Low or No Volume Output
No Sound from Right Speaker
Protecting your Investment
For long lasting enjoyment of your PSB product, you should respect their limits and avoid excessive volume levels for music or movie
playback. Excessive volume levels can damage all types of speakers. If your speakers are pushed to excessive volume levels, they could be
driven into “clipping”, which may result in severe and/or permanent damage.
If listening to your speakers at loud levels, listen carefully for any signs of harsh, distorted midrange and diminishing precision. If detected,
turn the volume down immediately.
NEVER TEST PEAK LISTENING LEVELS OF YOUR SPEAKERS BY TURNING THE VOLUME TO THE MAXIMUM LEVEL.
Care and Cleaning
For safe, sanitary use, it is essential to maintain and clean your speakers periodically. However, excessive cleaning may cause damage
and jeopardize the longevity of the product. When not in use, avoid storing in extreme hot or cold temperatures and humidity, and avoid
exposure to liquids.
Packaging
We highly recommend retaining all product packaging for any necessary transporting. To transport, carefully place the speakers into their
original packaging and close each panel.
Cabinet Care
PSB cabinets have varying materials and finishes, including wood veneers, vinyl, anodized aluminum, and high gloss, and should be treated
with the same care you would with similar finishes such as on furniture. Dust lightly with a soft cloth, avoiding abrasive materials that will
cause permanent damage to the cabinet. If necessary, wipe carefully with a cloth slightly dampened with water-based cleaner to remove
heavy soil.
Drivers and Port Care
During light cleaning, avoid touching speaker diaphragms as it could cause permanent damage to the tweeter and/or drivers. To clean the
driver ports, we suggest using a lint-free cloth.

20-066 AM5 Owner’s Manual
Table of contents
Other PSB Speakers manuals

PSB
PSB CHS80 User manual

PSB
PSB the CustomSound Series User manual

PSB
PSB VisionSound VS300 User manual

PSB
PSB CHS212 User manual

PSB
PSB Alpha Alpha LR1 User manual

PSB
PSB CWA-1 User manual

PSB
PSB 6919217 User manual

PSB
PSB Custom Sound m6x6.1 User manual

PSB
PSB Synchrony Series User manual

PSB
PSB ALPHA PS1 User manual

PSB
PSB the CustomSound Series User manual

PSB
PSB GB1 User manual

PSB
PSB Alpha iQ User manual

PSB
PSB CWS8 Quick start guide

PSB
PSB CustomSound CW60R User manual

PSB
PSB THECUSTOMSOUND SERIES User manual

PSB
PSB CW600E User manual

PSB
PSB CW160R User manual

PSB
PSB CHS40 Quick start guide

PSB
PSB Alpha iQ User manual


