PUK HYDROBOULEVARD 01 User manual
ASSEMBLY AND OPERATING INSTRUCTIONS:
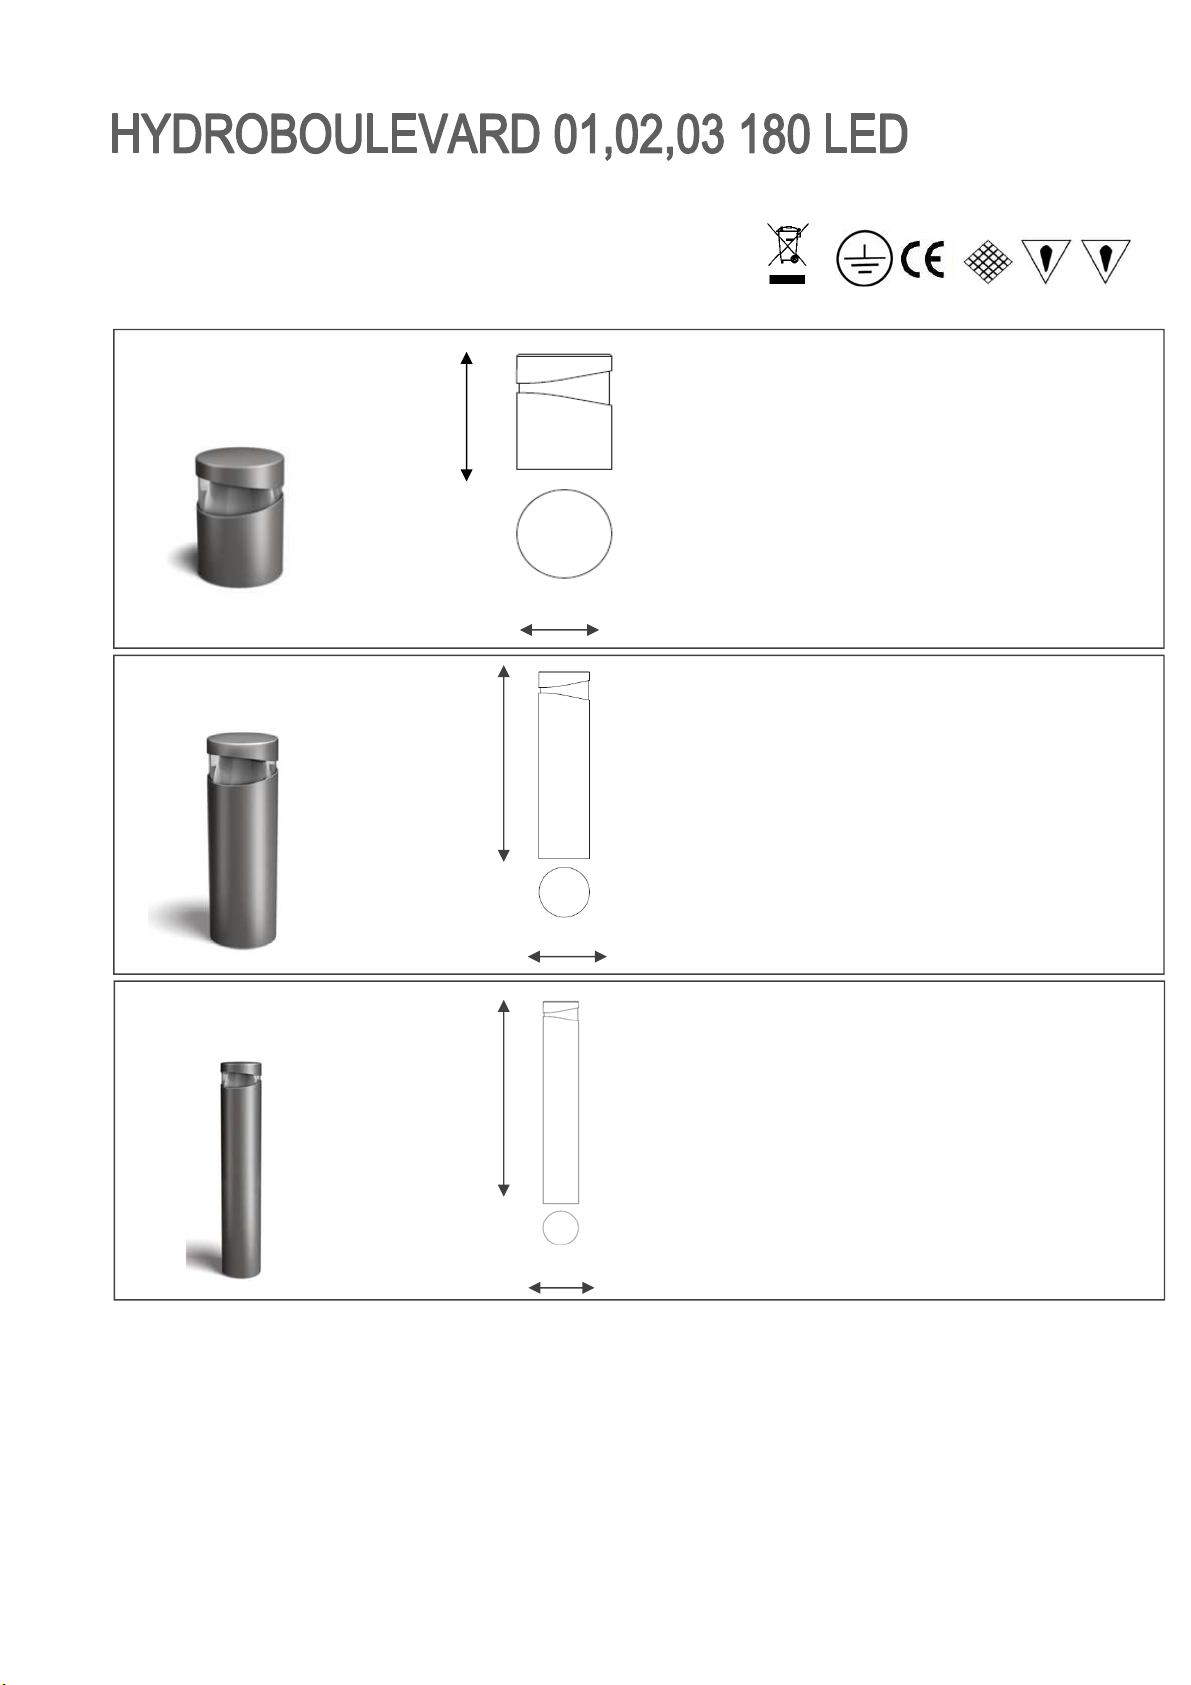
HYDROBOULEVARD 01 180 LED
-Power consumption : 10W
-Vo tage :220/240V 50/60Hz
-Co or Temperature : 3000K or 4000K
-Lumen output: 800 m
-Lens Type : 180° beam
-Insu ation c ass: 1
-IP protection: IP65
-Gross weight: 4kg
Made in Italy
COD. 609001
COD. 609003
COD. 609005
COD. 609001
COD. 603003
Ø170mm
600mm
220mm
Ø170mm
COD. 603005
1000mm
Ø170mm
HYDROBOULEVARD 02 180 LED
-Power consumption : 10W
-Vo tage :220/240V 50/60Hz
-Co or Temperature : 3000K or 4000K
-Lumen output: 800 m
-Lens Type : 180° beam
-Insu ation c ass: 1
-IP protection: IP65
-Gross weight: 5kg
HYDROBOULEVARD 03 180 LED
-Power consumption : 10W
-Vo tage :220/240V 50/60Hz
-Co or Temperature : 3000K or 4000K
-Lumen output: 800 m
-Lens Type : 180° beam
-Insu ation c ass: 1
-IP protection: IP65
-Gross weight: 7 kg
Attenzione: La sicurezza de ’apparecchio è garantita so o con ’uso appropriato de e seguenti istruzioni pertanto è necessario conservar e
Warning: the safety of this fixture is guaranteed on y if you comp y with these instructions remember to conserve in a safe p ace.
Achtung: die sichereit des gerates wird nur durch sachmasse befo gung nachtehender asweisungen gewahr eistet; ihre aufbewah ing ist desha b sehr wichting.
Attention: a secutie de ’apparei n’est garantie qu’en cas d’uti ization correcte des instructions stivante; i faut par consequent es conserver
Recommendations
1) verify that the equipment used to connect our devices to enjoy
a the guarantees required under European aw;
2) use the cab es, connectors and qua ity materia s for e ectrica wiring;
3) Products with IP65/68 degree make the wiring / connections with accessories
provide the same degree IP of the se ected product (avai ab e in the cata og);
4) In the case of insta ations outside is not recommended to insta the power supp ies in the
formwork and / or in the junction box without adequate protection;

-Read the instructions for insta ation and commissioning.
-Pass the instructions to the customer for safekeeping.
-Do not remove the type p ate of the uminaire.
-P ease note the nationa insta ation and accident prevention regu ations during insta ation.
-The insta ation must be performed on y by a trained e ectrica specia ist.
-Damaged cab es may on y be changed by trained e ectrica personne .
-For improper insta ation or any subsequent change to the uminaire no iabi ity is accepted.
-The ight source of this amp may be rep aced on y by the manufacturer or an authorized service technician or a simi ar y qua ified person.
-LED amps (without IP67 protection) must not be c eaned.
-C ean the uminaire regu ar y with a smooth damp c oth. On y use so vent-free c eaning agents. Attention: previous y cut off the mains supp y and a ow
system to coo down.
-To protect the surface from dirt and fingerprints, we recommend the use of protective g oves during insta ation.
-The disposa of the system must be carried out on the disposa of e ectronic products in accordance with the EU Directive WEEE (Waste E ectronica and
E ectronic Equipment).
-In order to answer technica queries, p ease contact our project management respective y our wor dwide branches and distributors
THE WARRANTY IS FALLING IN THE FOLLOWING CASES
1) Ma functions due to improper use of the product, modifications, repairs
inadequate, neg igence on the part of the insta er / e ectrician, fai ure to
assemb y instructions and / or data p ate;
2) Insta ations in p ants not comp y with the genera safety;
3) Damage caused by natura causes such as ightning, fire or f ooding;
4) Damage caused by wiring / connections with IP degree ower than the se ected product.
5) Damage occurring during shipment of the product. In these cases the damage
wi be to charge and notify the carrier;
6) The warranty covers on y the integrity of the product and NOT any costs of remova
of the same;
INSTALLATION
-THE MAINTENANCE MUST BE MADE BY A QUALIFICATE ELECTRICIAN
-SWITCH-OFF THE POWER SUPPLY BEFORE CARRYING OUT ANY MAINTENANCE OPERATIONS
The luminaire is supplied by us with LED illuminator already installed with built in SELV power supply.
The cable and the fixture must not be tampered with for any reason.
-it is essential to do a frequent cleaning of the glass and of the outer surface of the fixture to avoid build up of mud and dirtiness resul-
ting in dangerous overheating due to uncorrect light and heat dissipation. Clean carefully the glass screen removing limestone depo-
sits by means of a scraper.
1– remove the head of amp by pushing and rotating it
2– remove the fixing nut by unscrewing it
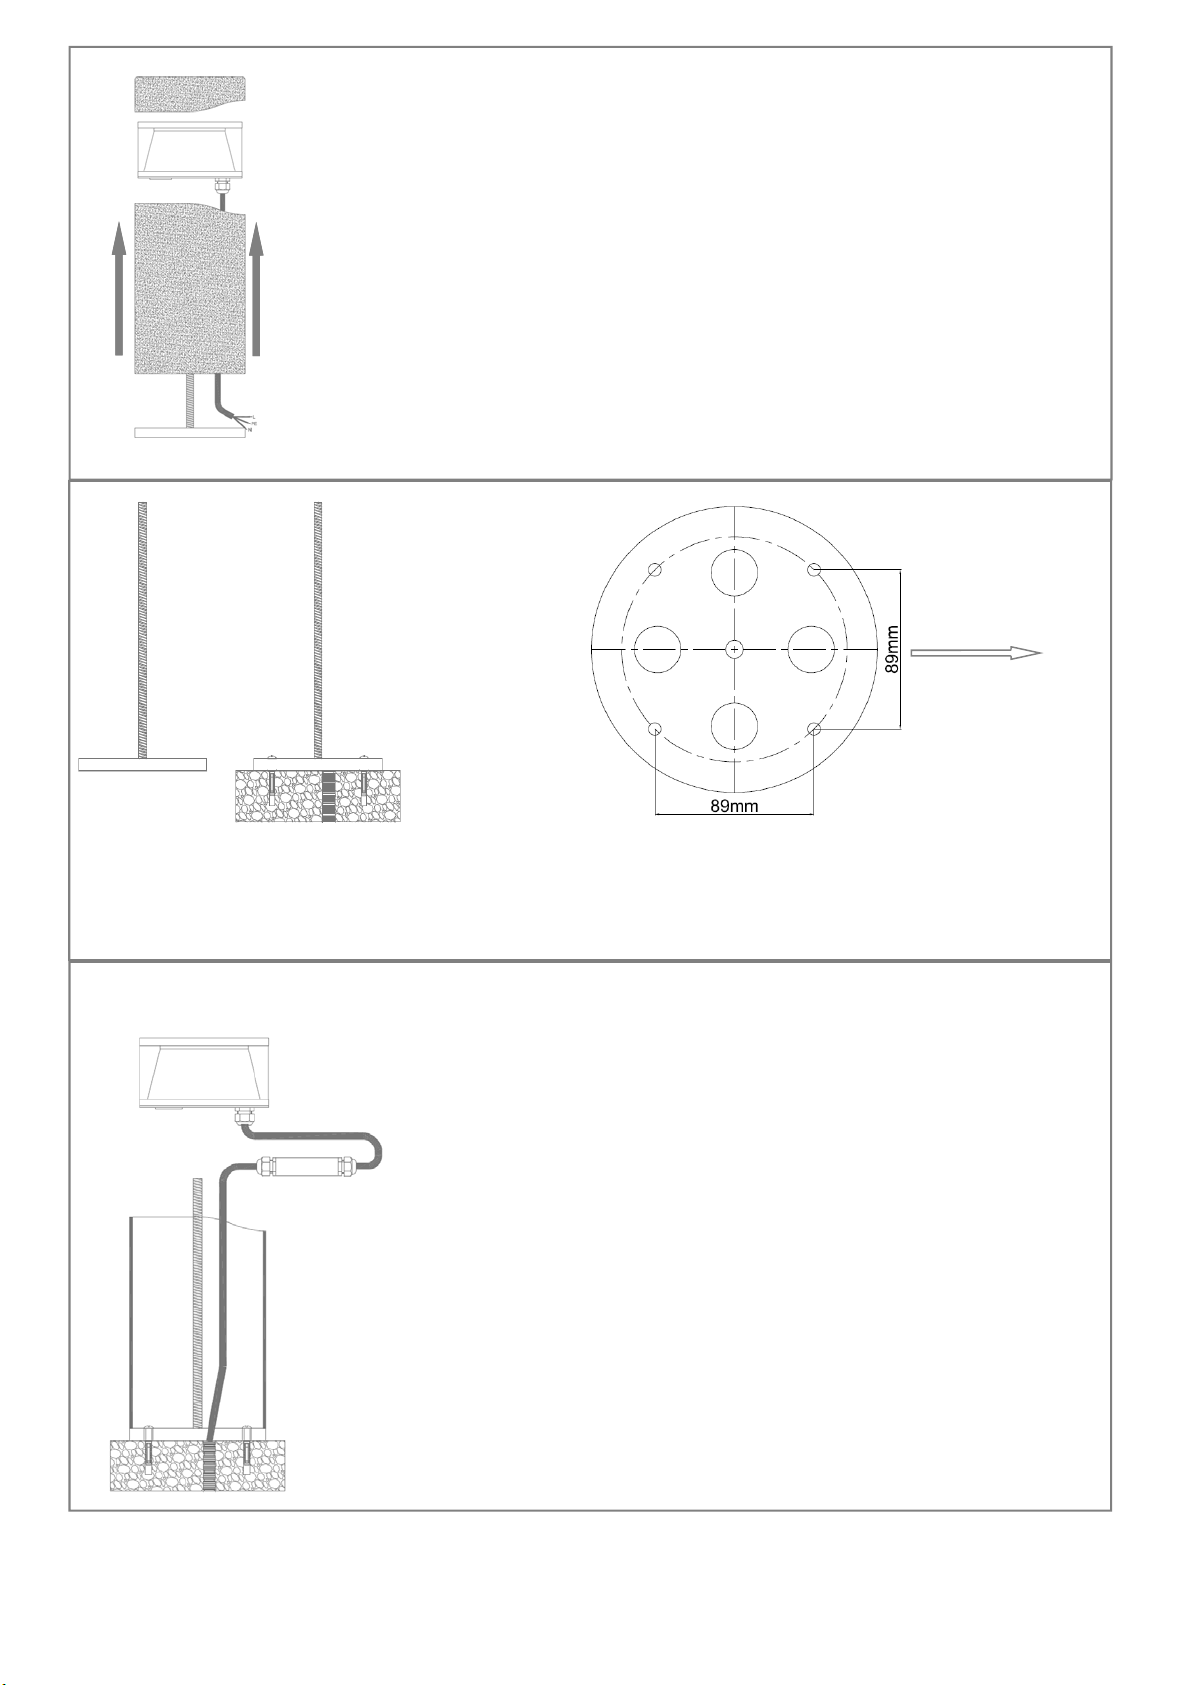
3– remove the uminaire and the a uminium cy inder
4– choose the correct position of the amp in the feeding point and fix it to the f oor using
expansion bo t ike “fischer” (not inc uded in the package), pay attention to the symmetrica
position of the base ho es ike the picture
Light beam direction
5– make the adeguate connection (L-N-PE) respecting the
outdoor e ectrica connection ru es, by using devices with
the correct IP protectin (examp e of cab e connector see ca-
ta og)

6– repositioning the amp cy inder pay attention to
the correct position of the ight beam.
The ow wave of cy inder wi be the direction of
ight beam
7– insert the uminaire in the cy inder and pay atten-
tion to the correct symmetrica position of head cup
fixing ho es (must be perpendicura to the ight beam
direction) fix it by screwing the nut
8– reassemb e the amp cover by obtaining the cor-
rect position of the ight beam
This manual suits for next models
2
Popular Landscape Lighting manuals by other brands


ABBA
ABBA SPS02 installation guide

LEGRAND
LEGRAND HPM GLLED003 instruction manual

Cooper Lighting
Cooper Lighting SURE-LITES CCX20RWH Specification sheet

Malibu Boats
Malibu Boats CS508K instructions

Malibu Boats
Malibu Boats LZ11101RB instructions

Solar Technology International
Solar Technology International Venetian SM41303 instructions


