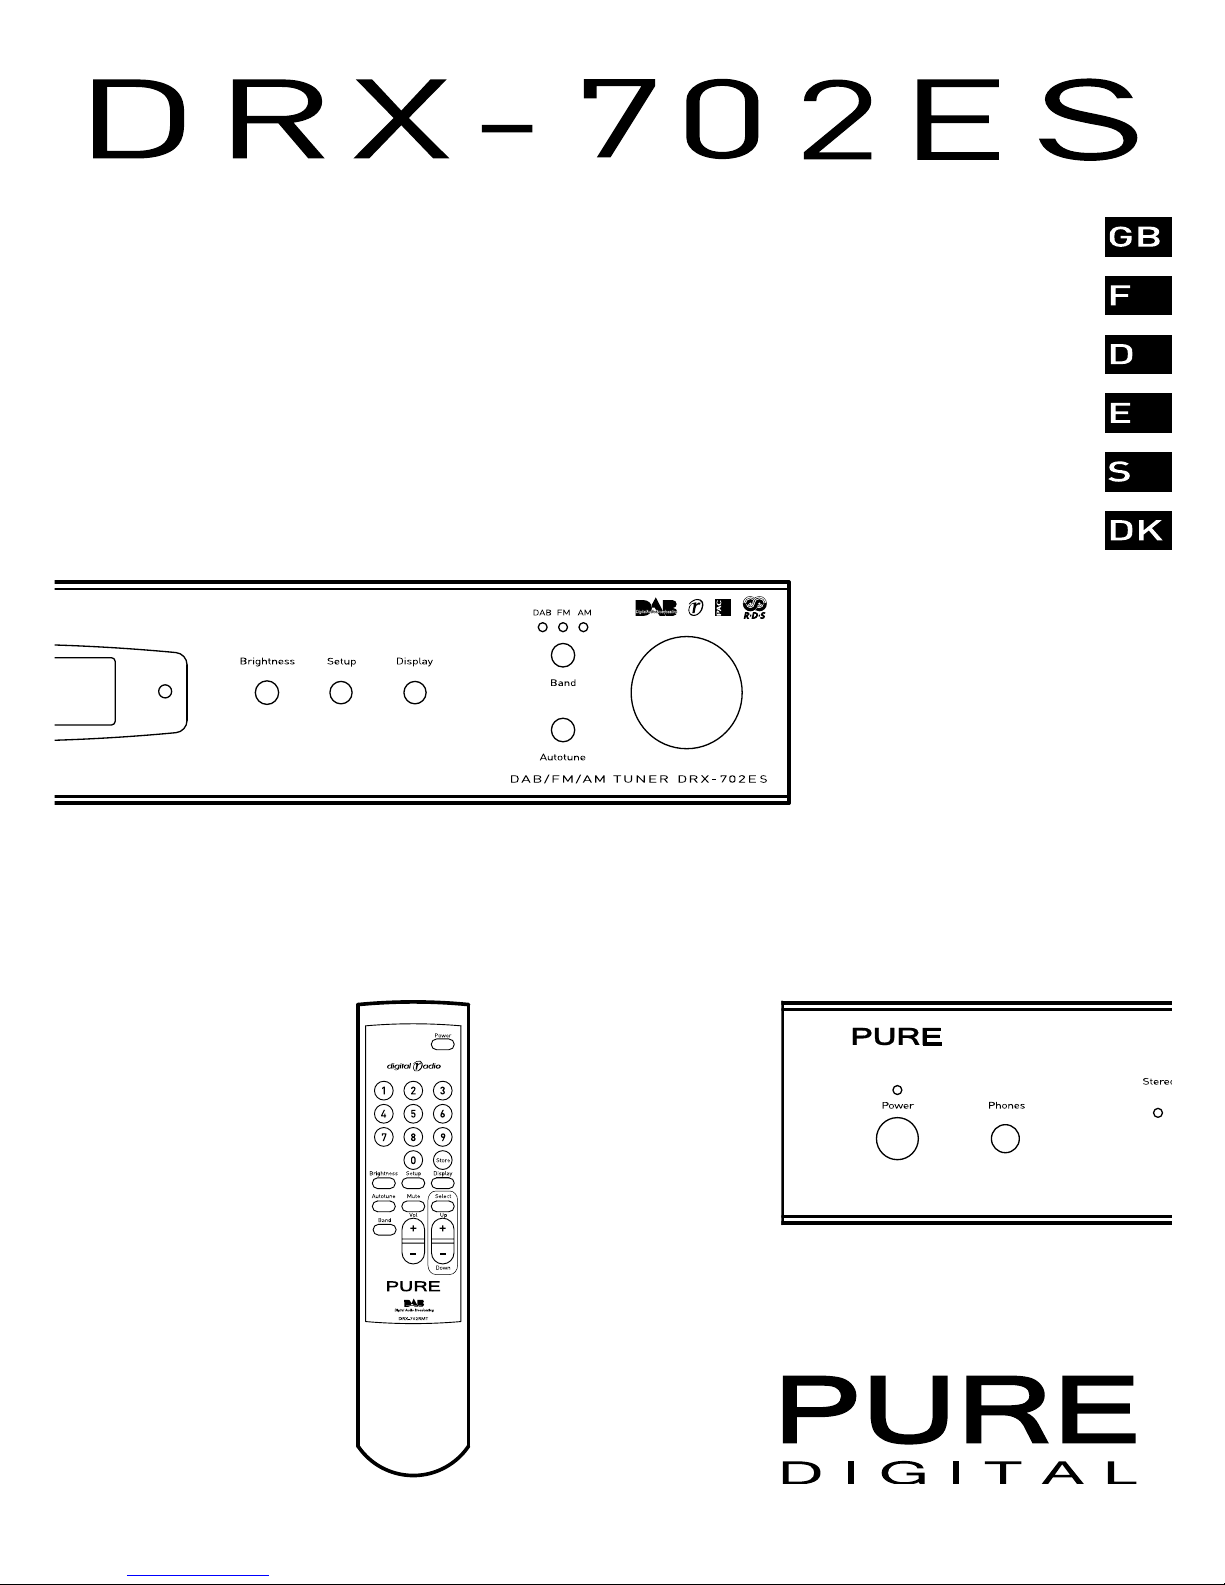
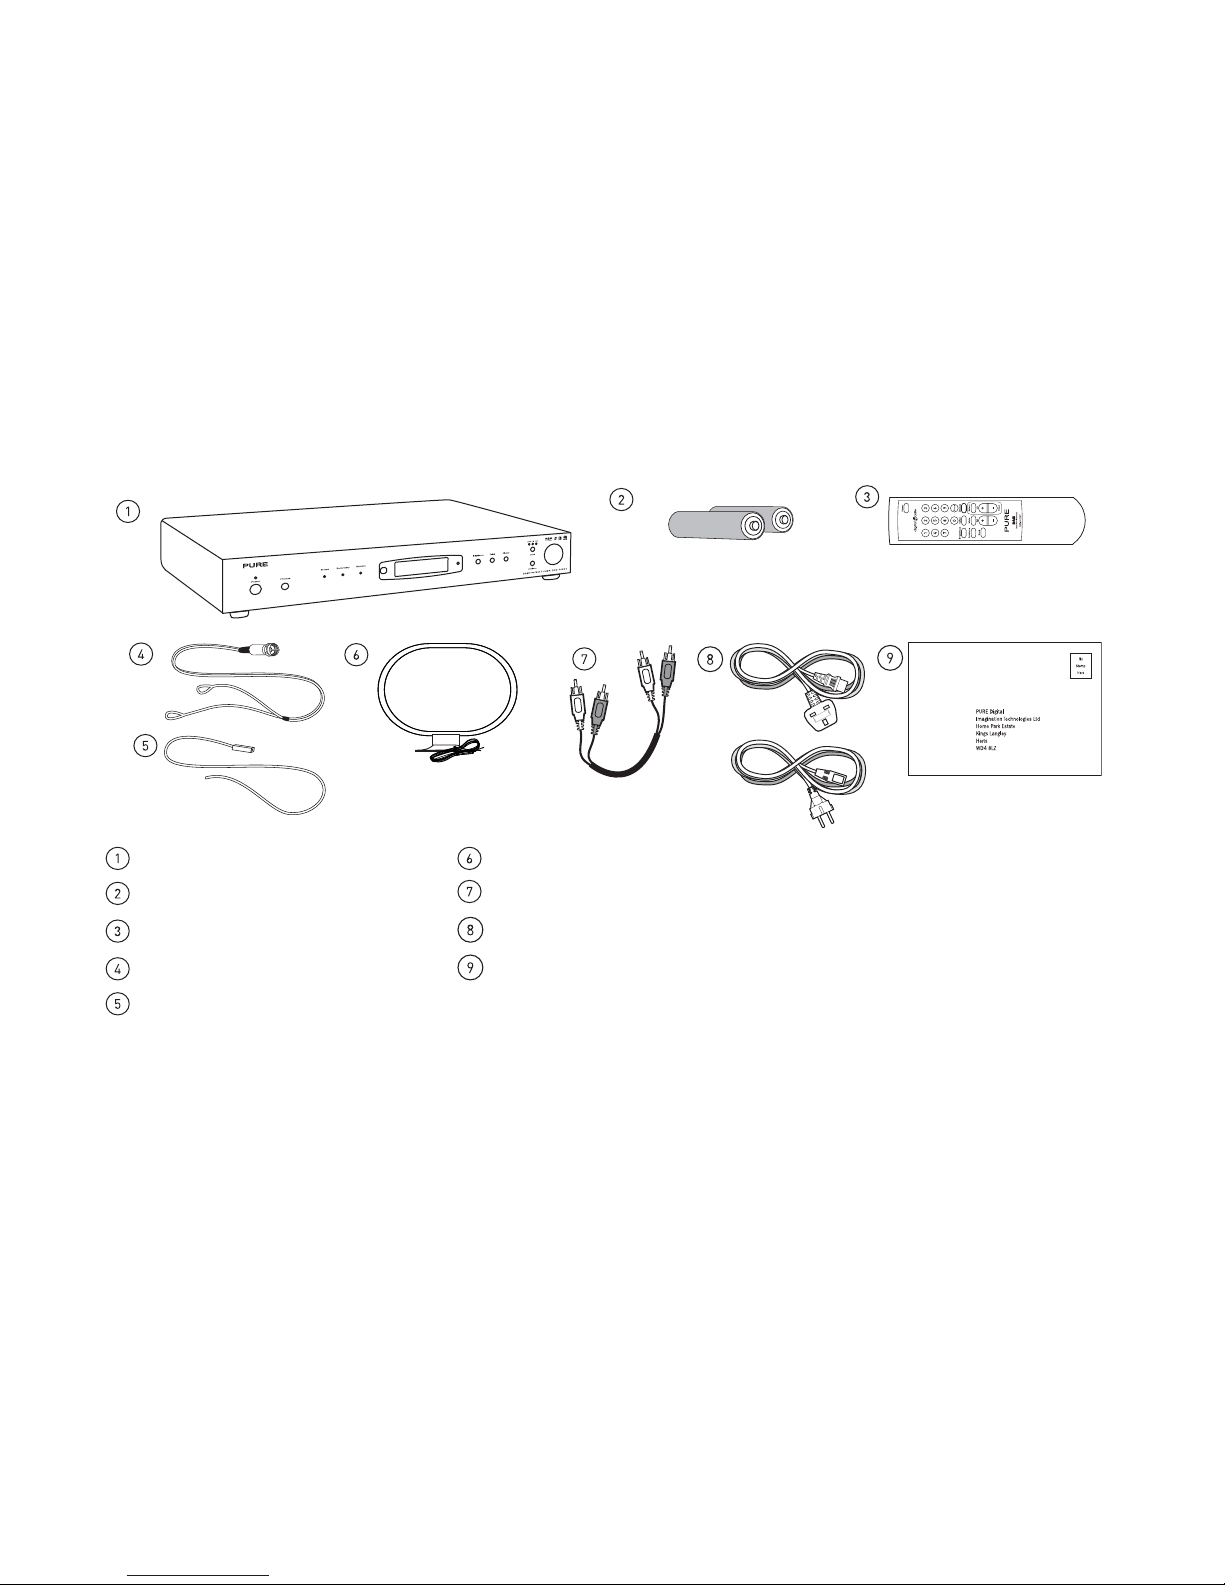
Pure Digital DRX-702ES User manual

Owner's manual
Mode d’emploi
Benutzerhandbuch
Manual del propietario
Bruksanvisning
Betjeningsvejledning

Copyright
Copyright 2003 by Imagination Technologies Limited. All rights reserved. No part of this publication may be copied or distributed, transmitted, transcribed, stored in a retrieval system, or translated into any human
or computer language, in any form or by any means, electronic, mechanical, magnetic, manual or otherwise, or disclosed to third parties without the express written permission of Imagination Technologies Limited.
Disclaimer
Imagination Technologies Limited makes no representation or warranties with respect to the content of this document and specifically disclaims any implied warranties of merchantability or fitness for any
particular purpose. Further, Imagination Technologies Limited reserves the right to revise this publication and to make changes in it from time to time without obligation of Imagination Technologies Limited to notify
any person or organization of such revisions or changes.
Trademarks
PURE, the PURE logo, PURE Digital, Metagence, the Metagence logo, Ensigma, the Ensigma logo, Imagination Technologies, and the Imagination Technologies logo are trademarks or registered trademarks of Imagination
Technologies Limited. All other product names are trademarks of their respective companies.
Edition 1 March 2003
Safety instructions
Keep the unit away from heat sources.
Do not expose this unit to splashing or
dripping.
Ensure that no objects filled with liquids such
as vases are placed on the unit.
Unplug the power lead if the unit will not be
used for a long period.
Mains safety
The unit uses a 220-240V AC
50 Hz power supply.
Connect only to a mains socket
with an earth connection.
When replacing the fuse in the supplied
moulded mains plug, always refit the integral
fuse holder/cover. Always fit a 3 amp
fuse either in the plug or adapter, or at the
distribution board.
Do not attempt to remove any screws or open
the unit. No user serviceable parts are inside.
For your safety, always obey the warning:
CAUTION - RISK OF ELECTRIC SHOCK - DO NOT
OPEN COVER
Avertissement
Ne pas placer l’appareil à proximité d’une
source de chaleur.
Ne pas exposer l’appareil à la pluie ou à
l’humidité.
Ne pas placer d’objets remplis de liquides,
tels qu’un vase, sur l’appareil.
Débrancher le câble d’alimentation de
l’appareil en cas de non utilisation prolongée.
Sicherheitshinweise
Halten Sie das Gerät fern von Wärmequellen.
Setzen Sie das Gerät nicht spritzendem oder
tropfendem Wasser aus.
Stellen Sie sicher, dass keine mit Flüssigkeiten
gefüllten Objekte wie Vasen auf das Gerät
gestellt werden.
Wenn Sie das Gerät über einen längeren
Zeitraum nicht benutzen, trennen Sie das
Instrucciones de seguridad
Mantenga el equipo alejado de toda fuente
de calor.
Evite que el equipo reciba salpicaduras o
vertidos de líquidos.
No coloque sobre el equipo objetos que
contengan líquidos, como jarrones, por
ejemplo.
Desenchufe el cable de alimentación si no va a
usar el equipo durante largos períodos de tiempo.
Säkerhetsföreskrifter
Håll enheten på avstånd från värmekällor.
Utsätt inte enheten för stänkande eller
droppande vatten.
Placera inte föremål som innehåller vätska
(exempelvis vaser) på enheten.
Koppla bort nätsladden om enheten inte ska
användas på länge.
Sikkerhedsinstruktioner
Opbevar enheden på afstand fra varmekilder.
Udsæt ikke enheden for stænk eller
dryppende væsker.
Undgå at placere genstande fyldt med væsker,
f.eks. vaser, oven på enheden.
Tag ledningen ud af stikkontakten, hvis
enheden ikke skal bruges i en længere
periode.
Consignes de sécurité
L’appareil est alimenté en
courant alternatif 220-240 V
50 Hz.
Connecter l’appareil à une prise reliée à la
terre uniquement.
Ne pas tenter de retirer des vis ou d’ouvrir
l’appareil. Il ne contient aucune pièce pouvant
être réparée par l’utilisateur.
Par mesure de sécurité, respecter
l’avertissement :
ATTENTION – RISQUE D’ELECTROCUTION – NE
PAS OUVRIR LE COFFRET
Netzversorgungssicherheit
Das Gerät verwendet eine
220-240V AC 50 Hz-
Stromversorgung.
Schließen Sie das Gerät nur
an eine Steckdose mit Erdanschluss an.
Versuchen Sie nicht, Schrauben zu entfernen
oder das Gerät zu öffnen. Es befinden sich
keine Teile im Inneren, die gewartet werden
müssten.
Beachten Sie zu Ihrer eigenen Sicherheit
immer diese Warnungen:
WARNUNG - ELEKTROSCHOCKGEFAHR -
NICHT DEN DECKEL ABNEHMEN
Seguridad de la red eléctrica.
El equipo funciona con una
fuente de alimentación de 220-
240 V CA, 50 Hz.
Conecte únicamente a una toma de corriente
provista de conexión a tierra.
No intente extraer tornillos ni abrir el equipo.
El interior no contiene piezas susceptibles de
reparación.
Por su propia seguridad, preste siempre
atención al aviso:
PRECAUCIÓN – RIESGO DE DESCARGA
ELÉCTRICA – NO ABRIR TAPA
Säker strömförbrukning
Enhetens strömkälla är 220-
240V växelström 50 Hz.
Anslut endast till jordade uttag.
Lossa inte på några skruvar och försök inte
att öppna enheten på något sätt. Enheten
innehåller inte några delar som kräver
underhåll.
Lyd alltid följande säkerhetsvarning:
FARA - RISK FÖR ELCHOCK - ÖPPNA INTE
SKYDDET
Strømsikkerhed
Enheden skal anvendes
sammen med en
strømforsyning på 220-240 V
vekselstrøm, 50 Hz.
Tilslut kun enheden til en stikkontakt med
jordforbindelse.
Forsøg ikke at afmontere skruer eller åbne
enheden. Enheden indeholder ikke dele, som
brugeren selv kan reparere.
Overhold for din egen sikkerheds skyld altid
advarslen:

1
Contents
Introduction ................................................................................... 2
Unpacking...................................................................................... 2
Quick start ..................................................................................... 2
Setting up ...................................................................................... 3
Connecting to your amplifier......................................................................................................3
Connecting to an auxiliary source..............................................................................................3
Connecting to digital devices .....................................................................................................3
Connecting the aerials ...............................................................................................................3
Connecting the DAB aerial ......................................................................................................................3
Connecting the FM aerial ........................................................................................................................3
Connecting the AM loop aerial ................................................................................................................3
Connecting to an external DAB decoder ....................................................................................3
Connecting to the power supply.................................................................................................3
Connecting to a USB device........................................................................................................4
Connecting using the Balanced Outputs ....................................................................................4
Using your DRX-702ES................................................................... 5
Switching on and off...................................................................................................................5
Changing the display brightness................................................................................................5
Resetting your DRX-702ES.........................................................................................................5
Replacing the fuse......................................................................................................................5
Using DAB mode ........................................................................................................................5
Autotuning...............................................................................................................................................5
Retuning your unit...................................................................................................................................6
Selecting a station...................................................................................................................................6
Advanced DAB setup options...................................................................................................................6
Changing the display mode .....................................................................................................................7
Using FM or AM mode ................................................................................................................8
Autotuning in FM mode ...........................................................................................................................8
Retuning your unit in FM mode ...............................................................................................................8
Selecting a station...................................................................................................................................8
Advanced FM/AM setup options..............................................................................................................9
Changing the display mode .....................................................................................................................9
Using the remote control ............................................................. 10
Getting help ................................................................................. 11
Accessories ................................................................................. 11
Technical specifications............................................................... 11
Warranty information .................................................................. 11
Index............................................................................................ 12

2
DRX-702ES unit AM loop aerial
Two AA batteries for the remote control Stereo phono to stereo phono cable
Infrared remote control handset Power cable with moulded UK 3-pin (3A fused) plug or European 2-pin plug
DAB ribbon indoor aerial Warranty registration card
FM ribbon aerial
Unpacking
This section lists the contents of your DRX-702ES package.Contact us if any items are missing or damaged.
Introduction
Thank you for choosing the PURE DRX-702ES DAB Digital radio and FM/AM tuner.
This manual provides information on setting up your unit, instructions on using it and details of the accessories and support available.
The DRX-702ES has a range of input and output sockets including: dual phono for stereo analogue audio output to your amplifier; coaxial and
optical S/PDIF digital output (48 kHz) for direct digital recording to MiniDisc,CD-R or DAT;Auxiliary line-level input with auto pass-through to
output at power off; optical RDI data output connector, headphone socket and USB port.
Quick start
This section provides information on how to set up and start using your DRX-702ES in DAB mode.For further details on using your radio see
Using your DRX-702ES,page 5.
1. Connect your aerials, amplifier and power lead.
2. Plug in to your power supply and switch on at the wall.
3. Push the Power button to switch the unit on.The LCD lights up, the display shows‘PURE DRX-702ES’ and the bottom line indicates the
progress of a Band III and L-band DAB autotune to find the stations available in your area,see Tuning for the first time,page 5.
4. You will also be asked if you want to perform an FM Autotune,see page 8 for details.
5. Adjust the Volume control on your remote control or amplifier if necessary to hear the station.
6. Turn the large tuning knob to see all the stations stored and push to select and listen to another station,see Selecting a station,page 6
7. You can change the display language on your unit from the default English,see page 7 for details.

3
Setting up
This section provides information on connecting your DRX-702ES to your hi-fi and connecting your aerial.
Before connecting other devices to your DRX-702ES,switch both devices off.This helps prevent electrical charge damage.
You may also want to peel off the protective film from the LCD display panel at this stage.
Connecting to your amplifier
To get sound from your DRX-702ES you need to connect it to an amplifier.This may be a stand alone unit or it may be
built into your existing hi-fi system or powered speakers.Connect the (L)eft and (R)ight OUTPUT sockets to theTuner-in
sockets on the back of your amplifier using the supplied stereo phono cable.
Note You can also use S/PDIF or BALANCED OUTPUT if your amplifier has the appropriate connectors, see below.
Connecting to an auxiliary source
If you have a CD player,or other auxiliary device,you can connect it through your DRX-702ES to reduce the number
of connections to your amplifier.The auxiliary device output will then be passed through the analogue outputs to your
amplifier when your DRX-702ES is switched to standby or off.
Connect the (L)eft and (R)ight INPUT sockets to the output sockets on the back of your auxiliary device using a stereo
phono cable.
Connecting to digital devices
Your DRX-702ES can provide digital audio output (DAB only) for connection to the digital input on your amplifier or
digital devices such as MiniDiscs,CD-Rs or DAT recorders.
Connect the coaxial S/PDIF or the optical S/PDIF socket to the digital-in socket on your digital device using a suitable
cable.Connecting cables are available from PURE Digital, see Accessories,page 11.
Connecting to an external DAB decoder
The RDI (Receiver Data Interface) optical connector provides access to raw DAB multiplex data.This may be used in the
future to connect to an external decoder or computer for access to extra services.These services may not currently be
available in your area.
Connecting the aerials
You need to connect either the supplied aerials or alternatives to receive radio transmissions.
Connecting the DAB aerial
1. Screw the aerial plug onto the F-type DAB connector.
2. For the best reception,if using the indoor aerial supplied, attach the aerial horizontally to a wall using
some adhesive tape and extend the arms on the end of the aerial wire vertically into a‘T’
shape on its side,as illustrated.
Connecting the FM aerial
1. Push the aerial plug onto the FM connector
2. For the best reception,if using the indoor aerial supplied, attach the aerial vertically to a wall using some adhesive
tape.
Connecting the AM loop aerial
1. Hold down the AM spring connectors and insert the bare ends of the wire into the clips.
2. Clip the loop antenna into the base and stand the aerial on or behind your unit
Connecting to the power supply
Once all audio connections are complete,as described above,connect the power cable to the power socket on the rear
panel of your DRX-702ES and the other end to a wall power outlet.
Connecting to headphones
The Phones socket on the front panel of your DRX-702ES enables you to plug in and use a pair of headphones instead
of using an external amplifier.

4
Connecting to a USB device
The USB connector enables you to perform software upgrades.Fill in the appropriate section of your warranty card
to automatically receive details of when software upgrades are available and instructions on how to install them.
Alternatively,you can check our website for the latest information.
Connecting using the Balanced Outputs
The optional-fit balanced outputs enable you to use high quality, low interference XLR connections between your DRX-
702ES and your amplifier.Ideally when connecting to these outputs you should ensure that your DRX-702ES is switched
on but that your amplifier is not switched on.If you want to use balanced outputs your unit does not already have them
fitted contact your dealer or PURE Digital for information on the Balanced Outputs upgrade.
Connect the (L)eft and (R)ight BALANCED OUTPUT sockets to the balanced input sockets on your amplifier using a
suitable XLR cable.

5
Switching on and off
Before switching on for the first time,check all connections and ensure that the volume on your amplifier is low.
Push the Power button to switch the unit on or off.The Power LED will light up when the unit is on.
Using your DRX-702ES
This section provides information on using your DRX-702ES in DAB,FM and AM modes.Topics include tuning, selecting stations and altering the
displayed information.
Changing the display brightness
The DRX-702ES has eight levels of brightness which you can alter to suit the light level in your room.The lowest level
turns off the LCD backlight and the Stereo, Secondary and Remote LEDs.
Press the Brightness button and repeat to cycle through the eight brightness levels.
Using DAB mode
DAB mode is the default mode for your DRX-702ES which is entered when you first power up your unit.When you next
switch on your unit will return to the mode selected when you turned the unit off.To select DAB mode at any time push
the Band button on the unit or on the remote until the DAB LED lights up on the front panel.
Autotuning
Tuning the DRX-702ES in DAB mode is very simple.When you first switch on the unit it will start an automatic tuning
process described below in Tuning for the first time.You may want to re-tune the unit at a later date if you move the unit
or if you want to receive a newly introduced multiplex – see Retuning your unit on page 6.
Tuning for the first time
When you switch on your DRX-702ES for the first time an autotune process will be performed automatically.The
autotune scans Band III and L-band frequencies.A progress indicator on the display shows that autotune is underway.
If stations are found during the autotune
The stations will be stored in alphanumeric order and you will be asked if you want to additionally perform an FM
Autotune,see page 8 for details.If you do not want to perform an FM Autotune,leave the unit for a few seconds and it
will return to DAB mode.The first DAB station on the list will be selected and you will hear it through your speakers.To
listen to other stations,see Selecting a station on page 6.
If no stations are found during the autotune
‘No stations available’will be shown on the display for a few seconds and then you see a menu of options.
Use the large tuning knob to scroll through the following options and push it to select that option.
Tuning aid - See Tuning aid,page 7,for details of using the tuning aid to improve reception.
Autotune local - See Retuning your unit on page 6 for details of the local autotune option.
Autotune full - See Retuning your unit on page 6 for details of the full autotune option.
Resetting your DRX-702ES
A reset option is provided to enable you to reset your unit.This removes all presets,stored stations and favourite station
settings and resets all options to defaults.To select the reset option:
1. Press and hold the Setup button for more than two seconds.The display will show‘Press Select to confirm reset’
2. Press the tuning knob to confirm the reset or press no buttons for around seven seconds to cancel the reset.
Replacing the fuse
Your DRX-702ES has a replaceable 125mA fuse situated below the power socket on the rear panel.A spare fuse is
provided in the fuse drawer.To replace the fuse:
1. Switch off your DRX-702ES at the wall and remove the power cable from the socket on the rear panel.
2. Pull out the fuse drawer below the power socket and remove the inner most fuse and replace with the spare fuse in
the drawer or another of the same size and rating as specified on the rear panel of your DRX-702ES.
3. Close the drawer and re-attach the power cable.

6
Selecting a DAB station
Once you have tuned your DRX-702ES you can use the large turn-and-push tuning knob to select digital radio stations.
1. The top line of the display shows the name of the currently selected station.Rotate the tuning knob to scroll through
the names of other stored stations on the bottom line of the display. Stop when you find the station you want.
2. Push and release the tuning knob to listen to the station you have selected.The display may show‘Now tuning...’
briefly as it finds the new station.
If the station you select is in stereo, the Stereo LED will light up.
If a station has one or more secondary services available the display will show‘>>’next to the station name while you
are scrolling the station list and they will appear after the primary service as you turn the tuning knob.The Secondary
LED will light up when you select the station.Secondary services accompany some primary services,providing extra
information or alternative content and may only be broadcast at certain times.
A secondary service will display ‘<<‘ before the station name while you are scrolling the station list indicating that it
belongs to the primary service before it in the list.The Secondary LED will light up when you select the station.
If the station has‘?’ before its name the station is currently inactive or not obtainable.If you select a station which has
this symbol the DRX-702ES tries to tune to that station.If still unavailable ‘Station not available’or‘Station off-air’will
be displayed and your DRX-702ES will attempt to tune to an alternative station.A flashing cursor will indicate that this is
underway. If you want to try to manually tune to this station you have five seconds after the above messages in which to
push the tuning knob and see the tuning aid,see Tuning aid, page 7.
Advanced DAB setup options
The DRX-702ES has a number of setup options which you can use to change the way your unit operates in DAB mode.
Press the Setup button to enter the setup menu,turn the tuning knob to scroll through the following options and push to
select one.
Station Order
This option enables you to choose the order in which stations appear as you scroll through the station list.
When you select this option you see the currently selected order on the top row of the display and a scroll list on the
bottom.Turn the tuning knob to scroll through and push to select the following options:
Alphanumeric Displays all stations in alphanumeric order.This is the default setting.
Fav station Displays the ten most listened to stations at the top of the station list in alphanumeric order and the rest
below in alphanumeric order.Your favourite stations will be displayed with a next to the station name
when you scroll through the station list.
Active station Displays active stations at the top of the service list in alphanumeric order and inactive ones at the
bottom in alphanumeric order. See Selecting a station,above,for information on active stations.
Trim stn. list Removes inactive stations from the station list.See Selecting a station, above, for information on active
stations.
→presets Available only when Fav station order (above) has been selected.Transfers your 10 favourite stations to
the presets 1 to 10.See page 10 for information on using presets.
Multiplex Lists stations in groups according to their multiplex.
Retuning your unit
You can re-tune your unit at any time using the autotune process.You may wish to do this if a new DAB multiplex is
launched or you move your unit.You do not need to perform an autotune to pick up new stations within a multiplex you
already have stored as your DRX-702ES monitors and refreshes the list of available stations automatically when you
tune to a station within that multiplex.
1. Ensure your DRX-702ES is switched on and the DAB aerial is connected and positioned correctly.
2. Push and release the Autotune button once for local scan (UK band III) or hold down for around two seconds for
a full scan (Full band III and L-band).Note You can cancel the autotune by pushing the Autotune button again.
The display will indicate tuning is underway and show the number of stations found on the top line.When finished,the
DRX-702ES will return to the station you were listening to and you will hear it through your speakers.All the stations
found are now stored in the unit and you can select another station as described in Selecting a station on page 6.
If no stations are found,you see the message ‘No stations available’and the display shows an option menu,see If no
stations are found during the autotune on page 5 for details of this menu.Check your aerial is securely connected and
correctly positioned and try one of the available tuning options.

7
Tuning aid
This option provides a signal level display which you can use to find the best position for your radio and aerial for DAB
reception.When you select this option, the bottom line of the display shows the channel identifier and frequency.Each
multiplex has a different channel and frequency,contact the multiplex operators for details.
1. Turn the tuning knob to scroll through different channels and push the tuning knob to select one.You see a signal
level display.The empty block indicates the minimum required level for reception and the solid blocks indicate the
current level.
2. Move your aerial whilst watching the display and to try to raise the current level to the empty block or beyond.The
display will change to show the multiplex name on the bottom line of the display once a good signal is received and
the multiplex will be added to the service list.
3. Push the Setup button to exit the tuning aid or turn the tuning knob to select another channel.
Note You can also display the signal level for any station you are listening to by pushing the tuning knob.
DRC Value
DRC (Dynamic Range Control) enables you to alter the dynamic range of the received audio (dependent on broadcast
material) by making the quieter sounds in a broadcast more audible at low volume or in a noisy environment.The DRC
level of a broadcast is set by a broadcaster and transmitted with the service. Changing this DRC value enables you to
apply a scaling factor to this level.
When you select this option you see the current DRC scaling factor on the top line of the display and a scroll list on the
bottom.Turn the tuning knob to scroll through and push to select the following options:
DRC 0 DRC scaling is switched off.This is the default setting.
DRC ½ DRC scaling is set to ½ that sent with the transmitted service.
DRC 1 Applies the DRC scaling as sent with the transmitted service.
Language
Language enables you to set the display to one of six languages; English,French, German,Spanish,Swedish or Danish.This
affects the language of your menu options and programme type information only - broadcast text remains in the language
in which it is broadcast.When you select this option you see the current language on the top line of the display and a scroll
list on the bottom.Turn the tuning knob to scroll through the languages and push the tuning knob to select one.
Sw version
This option enables you to view the version number of the software installed in your DRX-702ES.You may be asked to
quote this if you contact PURE Digital technical support for advice.This option can only be viewed,not adjusted.
Sw upgrade
This option enables you to upgrade the software in your DRX-702ES using a PC connected to the USB connection on
the rear panel.Fill in the appropriate section of your warranty card to automatically receive details of when software
upgrades are available and instructions on how to install them,or check our website for the latest information.
Changing the DAB display mode
The DRX-702ES has seven display modes which enable you to view different elements of the broadcast data on the
bottom line of the display. Press the Display button and repeat to cycle through the seven different display modes.
Scrolling text The default mode,displays scrolling text accompanying the audio,where available.
Program type A description of the type of content being broadcast by the station.
Multiplex name The name of the multiplex in which the current station is found.Multiplexes or ensembles are
groups of stations broadcast by a multiplex operator.
Date and time Displays the date and time obtained from the current multiplex.
Channel Displays the channel identifier and frequency for the station to which you are tuned.
Mode Displays the mode of the current station,Stereo or Mono,and the data rate at which the audio
signal is being transmitted.This rate is set by the broadcaster to suit the type and quality of
material being transmitted.
Signal quality Displays the signal quality for the signal to which you are tuned.As a guide,values from 85 to
100 indicate good reception,70 to 84 borderline reception and 0 to 69 poor reception.You can
attempt to improve signal quality by adjusting your aerial position using the Tuning aid option,
explained above.

8
Using FM or AM mode
Push the Band button to select FM orAM mode at any time until the FM or AM LED is lit on the front panel.
Autotuning in FM mode
Your DRX-702ES offers an advanced autotune in FM mode very similar to that used in DAB mode.This automatically
scans through the FM frequency range and stores the stations in a station list.You can then scroll through this list as a
way of quickly tuning to FM stations.SeeTuning options on page 9 for details.When you first switch on the unit it will
give you the option to start an FM autotune described below in Tuning for the first time.You may want to repeat the
autotune at a later date if you move the unit or if you want to add a newly introduced station to the list – see Retuning
your unit in FM mode below.
Tuning FM for the first time
When you switch on your DRX-702ES for the first time a DAB autotune process is performed automatically. Once
complete you will be given the option to also perform an FM autotune.The display shows 'Autotune FM? Push the tuning
knob to start the FM autotune.A progress indicator on the display shows that autotune is underway.
If stations are found during the autotune
The stations will be stored in alphanumeric order on the FM station list.
If no stations are found during the autotune
‘No stations available’will be shown on the display for a few seconds and then you see a menu of options. Use the
tuning knob to scroll through the following options and push it to select that option.
Manual tune - Selects the manual tune option,see Manual tune below.
Seek tune - Selects the seek tune option,see Seek tune below
Autotune FM - Starts an FM Autotune,see Retuning your unit in FM mode below.
Selecting an FM/AM station
You use the large turn-and-push tuning knob to select radio stations. Three methods of selecting stations are available in
FM mode and two inAM mode,you can change the method using the tuning options as described on page 9 or whilst
listening to a station by pushing the tuning knob to toggle between available modes.
Manual tune
1. Rotate the tuning knob to scroll through the available frequencies.FM scrolls in 50 kHz steps AM in 9 kHz steps.
2. Stop when you reach the desired frequency.You now hear the station and if the station has an RDS name (FM only)
or manually entered name it will be shown on the display.
Seek tune
Rotate the tuning knob one or two clicks to start a frequency search in the direction you turned the knob.When the next
station is found the search will stop.You now hear the station and if the station has an RDS name (FM only) or manually
entered name it will be shown on the display.
Tune by name (FM mode only)
1. The top line of the display shows the currently selected station.Rotate the tuning knob to scroll through the names
of other stored stations on the bottom line of the display. Stop when you find the station you want.
2. Push and release the tuning knob to listen to the station you have selected.The display may show‘Now tuning...’
briefly as it tunes to the new station.
Retuning your unit in FM mode
You can re-tune your DRX-702ES at any time using the autotune process.You may wish to do this if a new station is
introduced or you move your unit.
1. Ensure your DRX-702ES is switched on,the FM aerial is connected and you are in FM mode.
2. Push and release the Autotune button to start the autotune scan.You can cancelAutotune by pushing the
Autotune button again during the tuning process.
The display will indicate tuning is underway.When finished,the DRX-702ES will return to the station you were
listening to and you will hear it through your speakers.All the stations found are now stored in the unit and you
can select another station as described in Selecting a station below.
If no stations are found,you see the message ‘No stations available’and the display shows an option menu,see
If no stations are found during the autotune above for details of this menu.Check your aerial is securely
connected and correctly positioned and try one of the available tuning options.

9
Changing the FM/AM display mode
The DRX-702ES has four FM and twoAM display modes which enable you to change what you see on the bottom line of
the display. Press the Display button and repeat to cycle through the different display options.
Scrolling text The default option in FM mode,displays scrolling text (radio text) accompanying the audio,where
broadcast.This option is only available for FM stations with RDS.
Program type A description of the type of content being broadcast by the station.This option is only available for
FM stations with RDS.
Frequency Displays the frequency for the station to which you are tuned.
Signal strength Displays a signal strength meter for the signal to which you are tuned.You can attempt to improve
signal strength (more bars) by adjusting your aerial position and observing this meter.
Advanced FM/AM setup options
The DRX-702ES has a number of setup options which you can use to change the way your unit operates in FM orAM
mode.Press the Setup button to enter the setup menu, turn the tuning knob to scroll through the following options and
push to select one.The language,software version and software upgrade options are the same as in DAB mode, see
page 7.
Tuning options
This option enables you to choose one of three tuning methods available.When you select this option you see the
currently selected option on the top row of the display and a scroll list on the bottom.Turn the tuning knob to scroll
through the following options and push to select one:
Manual tune Enables you to manually increase or decrease the frequency in steps across the FM or AM band.
Seek tune Enables you to start a frequency search in the direction you rotate the tuning knob.When the next
station is found the search will automatically stop at that station.
Station name Enables you to scroll through and select from a list of named stations (RDS or manually named
stations).This option is only available in FM mode after performing an FM autotune,see page 8.
Station order
This option enables you to choose the order in which stations appear as you scroll through the FM station list.This
option is only available in FM mode after performing an FM autotune, see page 8.
When you select this option you see the currently selected order on the top row of the display and a scroll list on the
bottom.Turn the tuning knob to scroll through the following options and push to select one:
Alphanumeric Displays all stations in alphanumeric order.This is the default setting.
Fav station Displays the ten most listened to stations at the top of the station list in alphanumeric order and
the rest below in alphanumeric order.Your favourite stations will be displayed with a next to the
station name when you scroll through the station list.
Named stations Displays manually named and RDS stations only.
Station name
This option enables you to add and edit names for non RDS stations and remove stations from the station list.The
names can be up to 8 characters long and can include,numbers, spaces or special characters.This option is only
available in FM mode.
When you select this option you see the currently selected frequency on the top row of the display.Turn the tuning knob
to scroll through the following options and push the tuning knob to select one:
Add/edit name To add a name,turn the tuning knob to scroll through the available characters. Push the knob to
select the currently displayed character,you automatically move to the next space, repeat this until
finished - then select the enter character ( ).
To delete a character select the backspace character ( ).
To edit a name use the same process.The character you are editing flashes on the display.
Delete station This deletes the selected station from the station list.
Delete list This deletes the whole FM station list,use the FM autotune feature to create a new list if required.
See page 8 for details.

10
Using the remote control
This section provides information on using the remote control.The infrared remote control provides access to the main functions of your
DRX-702ES and also facilities such as presets and volume control.Before using your remote, insert the supplied batteries.Aim the remote
control at the sensor on the display panel on your DRX-702ES.
Buttons (0-9) and the Store button enable you to store your favourite radio services for easy access.
To store a station
You can store a station to a preset while listening to it or when you see the station name on the bottom line of the
display while scrolling through the station list.
1. Press the Store button.The display on your DRX-702ES shows‘Store preset’
2. Press the number (from 1to 99) under which you want to store the preset.
3. Press the Select button to confirm your selection.
To recall a previously stored station
Press the numbered button(s) under which you stored the station.If the selected preset is empty, the display
shows‘Preset empty’for a few seconds and you will continue to hear the currently selected station.
Press the Display button and repeat to cycle through the seven display modes.This button performs the same function
as the Display button on the main unit.
The Setup button enables you to view the advanced setup menu on your DRX-702ES.This button performs the same
function as the Setup button on the main unit.
Press the Setup button to enter the menu then use the Up/Down button to scroll through the menu options and push
the Select button to select that option.
The Up, Down and Select buttons enable you to scroll through and select stations and menu options.Together,these
buttons perform the same function as the large tuning knob on the main unit.
The Mute button is a quick way of reducing the output volume from your DRX-702ES.
1. Press the Mute button to mute the sound.The display on your DRX-702ES shows 'Mute'.
2. Press the Mute button again or change station to return to the previous listening volume.
Press the Brightness button and repeat or hold to cycle through the eight display brightness levels.This button performs
the same function as the Brightness button on the main unit.
The Autotune button enables you to perform an autotune to find new stations.This button performs the same function
as the Autotune button on the main unit.
The Volume +/-button increases (+) or decreases (—) the output volume of your DRX-702ES.A level indicator is shown
on the display while you adjust the volume.
Press the Power button to turn your DRX-702ES on or return it to standby.This button performs the same function as the
Power button on the main unit.
The Band button enables you to change between DAB,FM and AM modes. This button performs the same function as
the Band button on the main unit.

11
Getting help
If you have a problem with your DRX-702ES,either visit our website at www.pure-digital.com or contact us using the details on the back cover of
this manual for the latest support information.
Accessories
PURE Digital supply a range of accessories and complementary products for your DRX-702ES including external aerials,signal boosters,aerial
cable adapters and home cinema and hi-fi surround speaker systems.
Visit our website at www.pure-digital.com or contact us using the details on the back cover of this manual to find out more.
Technical specifications
This section lists the technical specifications for the DRX-702ES.
General DAB/FM/AM radio tuner with full Band III and L-Band DAB reception capability, for reception of all DAB broadcasts.
Fully compliant with ETS 300 401.Features PAC IITM technology,FM and DAB autotune,RDS text in FM mode,analogue
stereo output,optical and coaxial 48 kHz S/PDIF digital output and RDI digital output. USB port for software upgrades.
Frequency Range DAB Band III (174 - 240 MHz) and L-Band (1452-1490 MHz),FM 87.5 -108 MHz,AM 531-1602 kHz.
Integrated DAC 24-bit 192 kHz capable stereo DAC (DAB Only)
Rear panel connectors Aerial connectors: RF F-connector 75 Ωfor DAB,IEC connector for FM aerial,spring clips forAM loop (aerials supplied)
Dual phono for external line level audio input (from CD player or similar) with auto pass-through to output at power off
Dual phono for stereo analogue audio output
OpticalToslink connector for digital S/PDIF output (IEC958 @ 48 kHz)
Coaxial connector for digital S/PDIF output (IEC958 @ 48 kHz)
OpticalToslink connector for digital RDI data output
USB port for functional upgrades
Front panel connector ¼" headphone socket (front panel)
Controls Power on/off - switches the unit between on and standby
Rotary selection switch - enables scrolling through and selection of stations and menu options
Autotune - automatically tunes in unit to broadcast services (DAB or FM modes)
Brightness - selects between 8 levels of LCD display brightness
Display - changes the display mode
Setup - enables access to advanced setup options
Band - toggles unit between DAB,FM andAM modes
LCD Display High visibility STN LCD display with 16 x 2 characters and 8 user-selectable brightness levels including off.
Indicators Power-on indicator
(front panel) Standby indicator
Remote control activity indicator
Stereo service indicator
Secondary service availability/selection indicator
DAB/FM/AM mode indicators
DAB performance Frequency response - (limited by broadcast - DAC capable of higher responses) 20 Hz to 24 kHz for 48 kHz decode;
20 Hz to 12 kHz for 24 kHz low sample frequency (LSF) decode
THD (nominal output) - Less than 0.002% at 1 kHz
S/N Ratio - 103 dB
Power supply High-performance low noise internal toroidal transformer power supply.230V AC 50 Hz.
Fuse ratings Power socket on unit 125 mA fuse fitted (spare supplied). UK Mains plug on power lead 3A fuse fitted.
Approvals CE marked.Compliant with the EMC and Low Voltage Directives (89/336/EEC and 73/23/EEC)
Dimensions 430mm (width) x 65mm (height) x 270mm (depth)
Warranty information
ImaginationTechnologies Ltd.warrants to the end user that this product will be free from defects in materials and workmanship in the course of
normal use for a period of two years from the date of purchase. This guarantee covers breakdowns due to manufacturing or design faults; it does
not apply in cases such as accidental damage,however caused, wear and tear, negligence,adjustment,modification or repair not authorised by
us.Please return your warranty card to register your product with us. Should you have a problem with your unit please contact your supplier or
contact PURE Digital Support at the address on the rear cover of this manual.

12
Index
A
Accessories 11
Active station 6
Add/edit name 9
Advanced DAB setup 6
Advanced FM/AM setup 9
Aerials 2
AERIAL connector 3
Aerial position 7
Alphanumeric 6,9
AM aerial 2,3
AM mode 8
Approvals 11
Autotune 10
Autotune button 6,8,10
B
Backspace character 9
Balanced outputs 4
Balanced output upgrade 4
Band button 5,10
Batteries 2
Box contents 2
Brightness 5
Brightness button 5,10
C
CD player 3
Change language 7
Channel 7
Channels 7
Channel identifier 7
Complementary products 11
Connecting cables
aerials 3
amplifier 3
auxilliary source 3,4
balanced outputs 4
CD-R 3
DAT 3
digital devices 3
external decoder 3
MiniDisc 3
power 3
RDI 3
S/PDIF 3
USB device 4
XLR 4
Connecting headphones 3
D
DAB aerial 2,3
DAB autotune 5
DAB LED 5
DAB mode 5
Damaged items 2
Data rate 7
Date 7
Delete list 9
Delete station 9
Dimensions 11
Display brightness 5
Display button 10
Display mode 7
Down button 10
DRC 7
DRX-702ES 2
Dynamic Range Control 7
E
Enter character 9
F
F-type connector 3
Favourites to presets 6
Favourite stations 6,9
Fav station 6,9
Flashing cursor 6
FM/AM display mode 9
FM aerial 2,3
FM autotune 5,8
FM mode 8
Frequency 7,9
Frequency range 11
Fuse ratings 11
Fuse replacement 5
G
Getting help 11
Getting started 2
H
Help 11
I
Improve reception 7
Inactive station (?) 6
INPUT connectors 3
Introduction 2
L
Language 7
Leads 2
M
Main unit 2
Manual tune 8,9
Menu options 10
Missing items 2
Mode 7
Mono mode 7
Multiplex 6
Multiplexes 7
Multiplex name 7
Mute 10
Mute button 10
N
New stations 10
Now tuning 6
No stations available 6,8
O
OUTPUT connectors 3,4
P
PAC II 11
Phones socket 3
Phono cable 2
Power button 10
Power cable 2
Power LED 5
Power socket 3
Presets 6,10
Preset buttons 10
Preset empty 10
Program type 7,9
Protective film 3
Q
Quick start 2
R
RDI socket 3
RDS name 8
RDS stations 9
Recall preset 10
Registration card 2
Remote control 2,10
Replace fuse 5
Reset unit 5
Retuning your unit (DAB) 6
S
S/PDIF sockets 3
Scrolling text 7,9
Secondary LED 6
Secondary services 6
Seek tune 8,9
Selecting an FM/AM station 8
Selecting a DAB station 6
Select button 10
Setting up 3
Setup button 6,9,10
Sig. quality 7
Signal level 7
Signal quality 7
Signal strength (FM/AM) 9
Software upgrade 7
Software version 7
Spare fuse 5
Specifications 11
Station name 9
Station not available 6
Station off-air 6
Station order 6
Stereo LED 6
Stereo mode 7
Store button 10
Store preset 10
Switching off 5
Switching on 5
Sw upgrade 7
Sw version 7
T
Technical specifications 11
Time 7
Trim station list 6
Tune by name 8
Tuning 5
Tuning aid 6,8
Tuning DAB for the first time 5
Tuning FM for the first time 8
Tuning knob 6,7,8
Tuning options 9
manual tune 9
seek tune 9
station name 9
U
Unpacking 2
Upgrading software 7
Up button 10
USB port 4,7
Using DAB mode 5
Using your DRX-702ES 5
V
Volume button 10
W
Warranty card 2,11
Warranty information 11
Website 11
X
XLR connectors 4


PURE Digital
Imagination Technologies Ltd.,
Home Park Estate,
Kings Langley, Herts WD4 8LZ, UK +44 (0)1923 270188 fax
sales@pure-digital.com +44 (0)1923 277488 sales
support@pure-digital.com +44 (0)1923 277477 support
www.pure-digital.com
11Z26
Table of contents