PYE PPAC12 User manual

12,000 BTU Portable Air Conditioner
Model: PPAC12
User Manual
READ AND SAVE THESE INSTRUCTIONS

2
CONTENTS
Important Safe Guards
Safety…….........................................................................3
Product Introduction
Identification…………………...............................................5
Control Panel and Remote Control......................................6
Product Operation
Installation..........................................................................7
Operation……….................................................................9
Cleaning and Maintenance
Water drainage .................................................................10
Maintenance......................................................................10
Common Failures and Diagnosis
Error Detection..................................................................12
Fuse Parameters...............................................................12
Trouble-shooting................................................................12

3
Dear Customer,
Thank you for purchasing our PYE Portable Air Conditioner. Please be sure to read this
user manual carefully before using it.
BEFORE FIRST USE
Read and follow the instructions in this user manual even if you feel you are familiar with
the product, and find a place to keep it handy for future reference.
For your convenience record the model number (located on the product identification plate)
and the date you received the product, together with your purchase receipt and attach to
the warranty and service information. Retain your proof of purchase in the event that
warranty service is required.
NOTE: the rating of this product (as marked on the product identification plate) is based
on specific loading tests. Normal use or the use of other recommended attachments may
draw significantly less power.
IMPORTANT SAFEGUARDS
When using any electrically powered product, basic safety precautions should
always be followed, including the following:
PLEASE READ ALL INSTRUCTIONS CAREFULLY BEFORE USING THIS PRODUCT
SAFETY
•Read all instructions.
•Always operate the product from a power source of the same voltage,
frequency and rating as indicated on the product identification plate.
•Disconnect the power plug before dismantling, assembling or before cleaning.
•Avoid touching mobile parts of the appliance.
•Do not use the appliance for any other purpose other than its intended use.
•Do not operate this product with a damaged cord or plug, or after the product
malfunctions, or appears damaged in any way. If the supply cord is damaged,
it must be replaced by the manufacturer or its service agent or a similarly
qualified person in order to avoid a hazard.
•This appliance is for indoor use only.
•Keep the appliance away from heat sources, and direct sunlight.
•Never insert fingers, pencils, or any other objects through the air vent guards
whenever the power plug is connected, especially while running.
•Always switch off the appliance before unplugging it.
•The appliance is not intended for use by young children or infirm persons
unless they have been adequately supervised by a responsible person to
ensure that they can use the unit safely. Young children should be supervised
to ensure that they do not play with the appliance.

4
•This appliance is not to be used by children or persons with reduced physical,
sensory or mental capabilities, or lack of experience and knowledge unless
they have been given supervision or instruction.
•When using the appliance never leave the appliance unsupervised when in
use. Switch off the appliance if you have to leave for even a short period of
time.
•Never use the mains point switch as a switch to start and turn off the air
conditioning unit. Use the provided On/Off switch located on the control panel.
•Do not use this appliance with an extension cord, unless it has been checked
and tested by a qualified electrician or electrical supplier.
•Always place the portable air conditioner on a dry stable surface.
•The air conditioning unit must always be stored and transported upright,
otherwise you may cause irreparable damage to the compressor; in case of
any doubt after moving the appliance we suggest to wait for at least 24 hours
before you start the air-conditioning unit.
•Always unplug the appliance before cleaning or changing any parts of the
appliance, or when it’s not in use.
•Never immerse the appliance in water or any other liquid.
•If the power cord is not long enough, an extension cord can be used. The cord
should not be in a well trafficked area as people can trip over the cord and pull
the plug out of the socket.
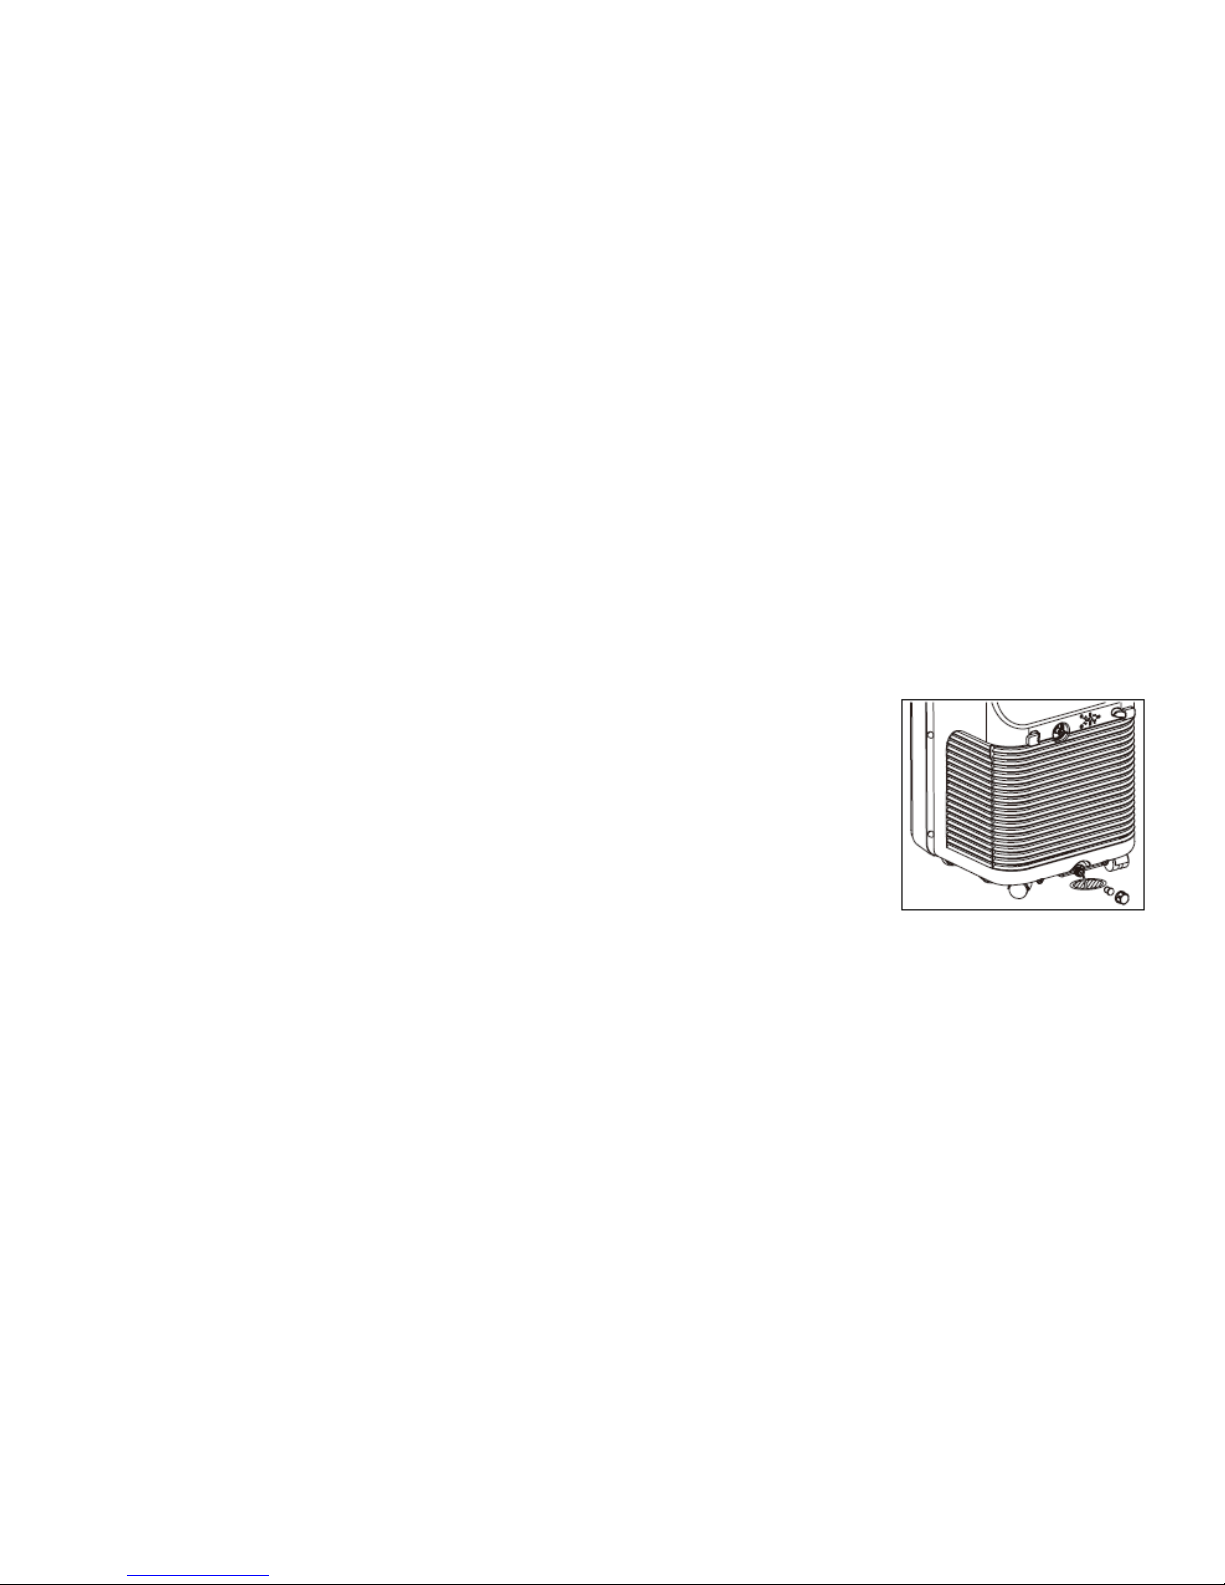
•Clean the appliance according to the User Manual.
•Do not repair the appliance by yourself. Any possible hazard incurred by
maintenance of the general public will void the warranty. The power cord
should be replaced by a qualified electrician.
•Please use the accessories provided by the manufacturer; otherwise, the
appliance may be damaged.
SPECIAL RECOMMENDATION
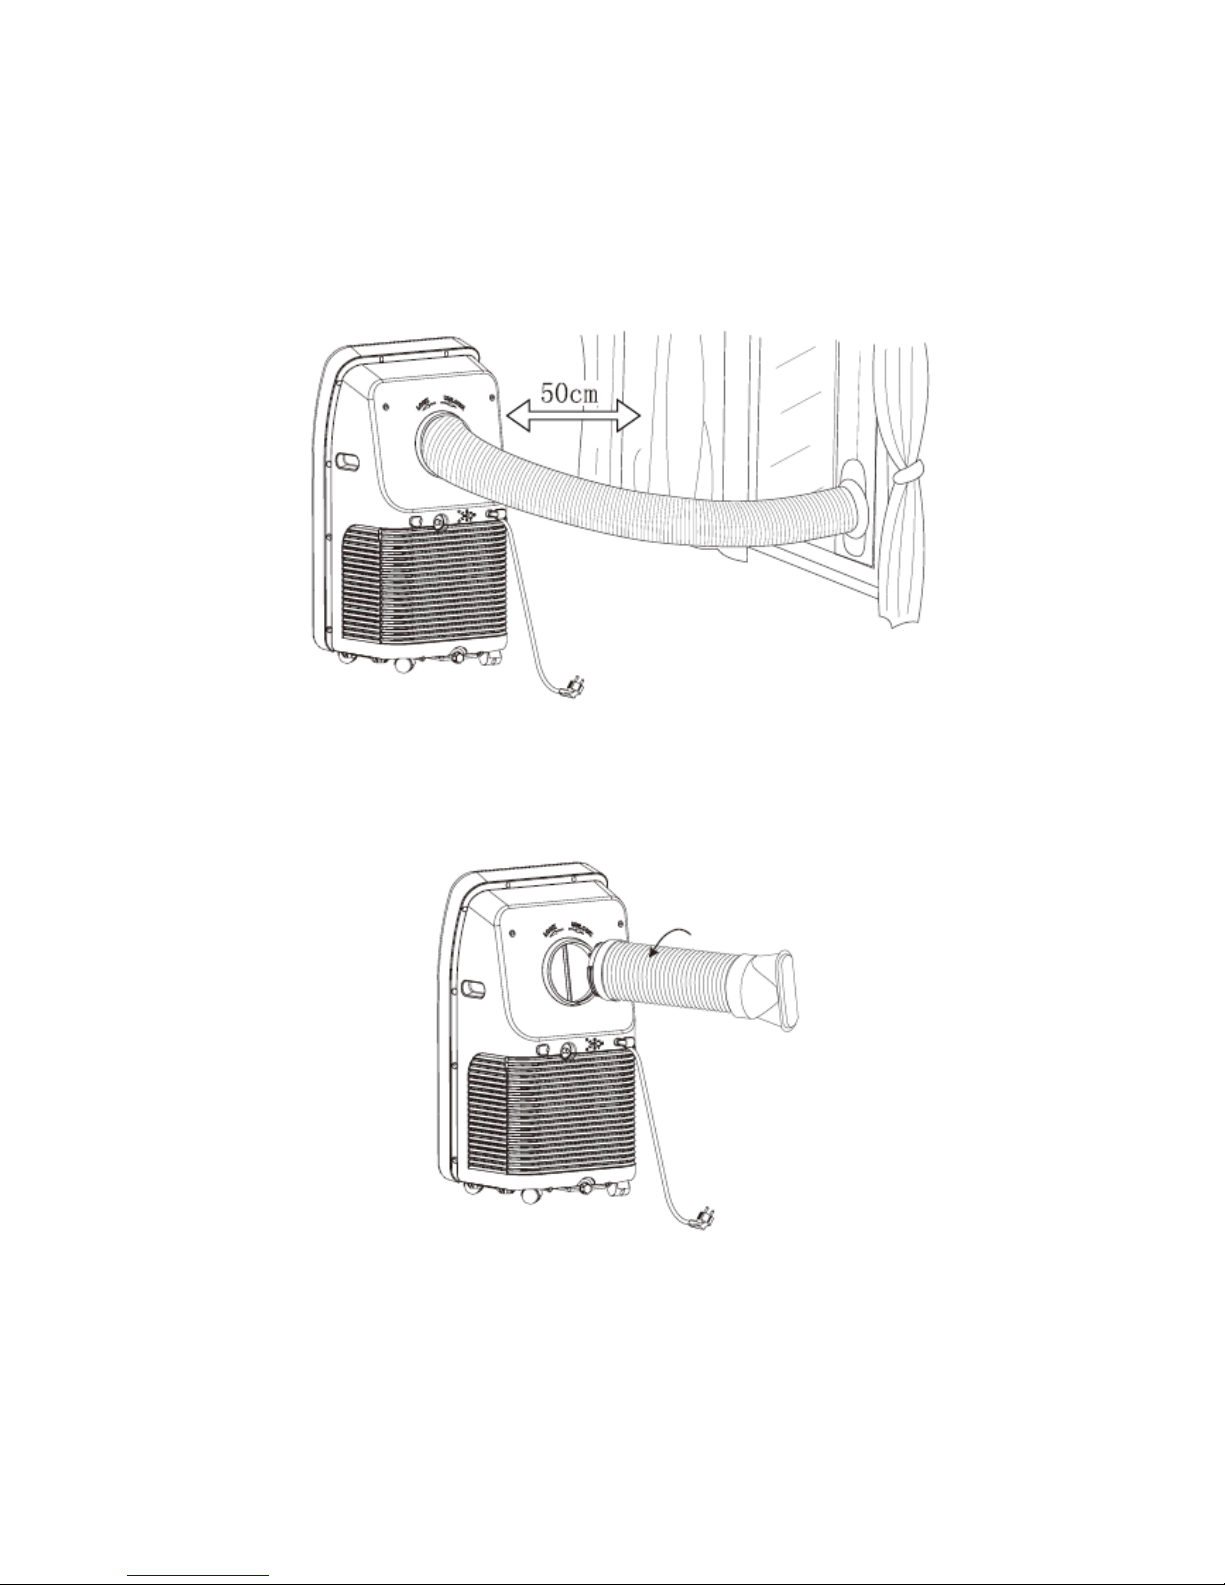
•Ensure that the appliance is positioned on a flat, large, dry surface without any
obstacles nearby. A minimum distance from furniture and walls is 50cm in all
directions.
•The plug should be easily accessible.
•In order to maintain the function of the compressor, the appliance should
always be in a vertical position.
•Do not use the appliance near gas or other flammable liquids.
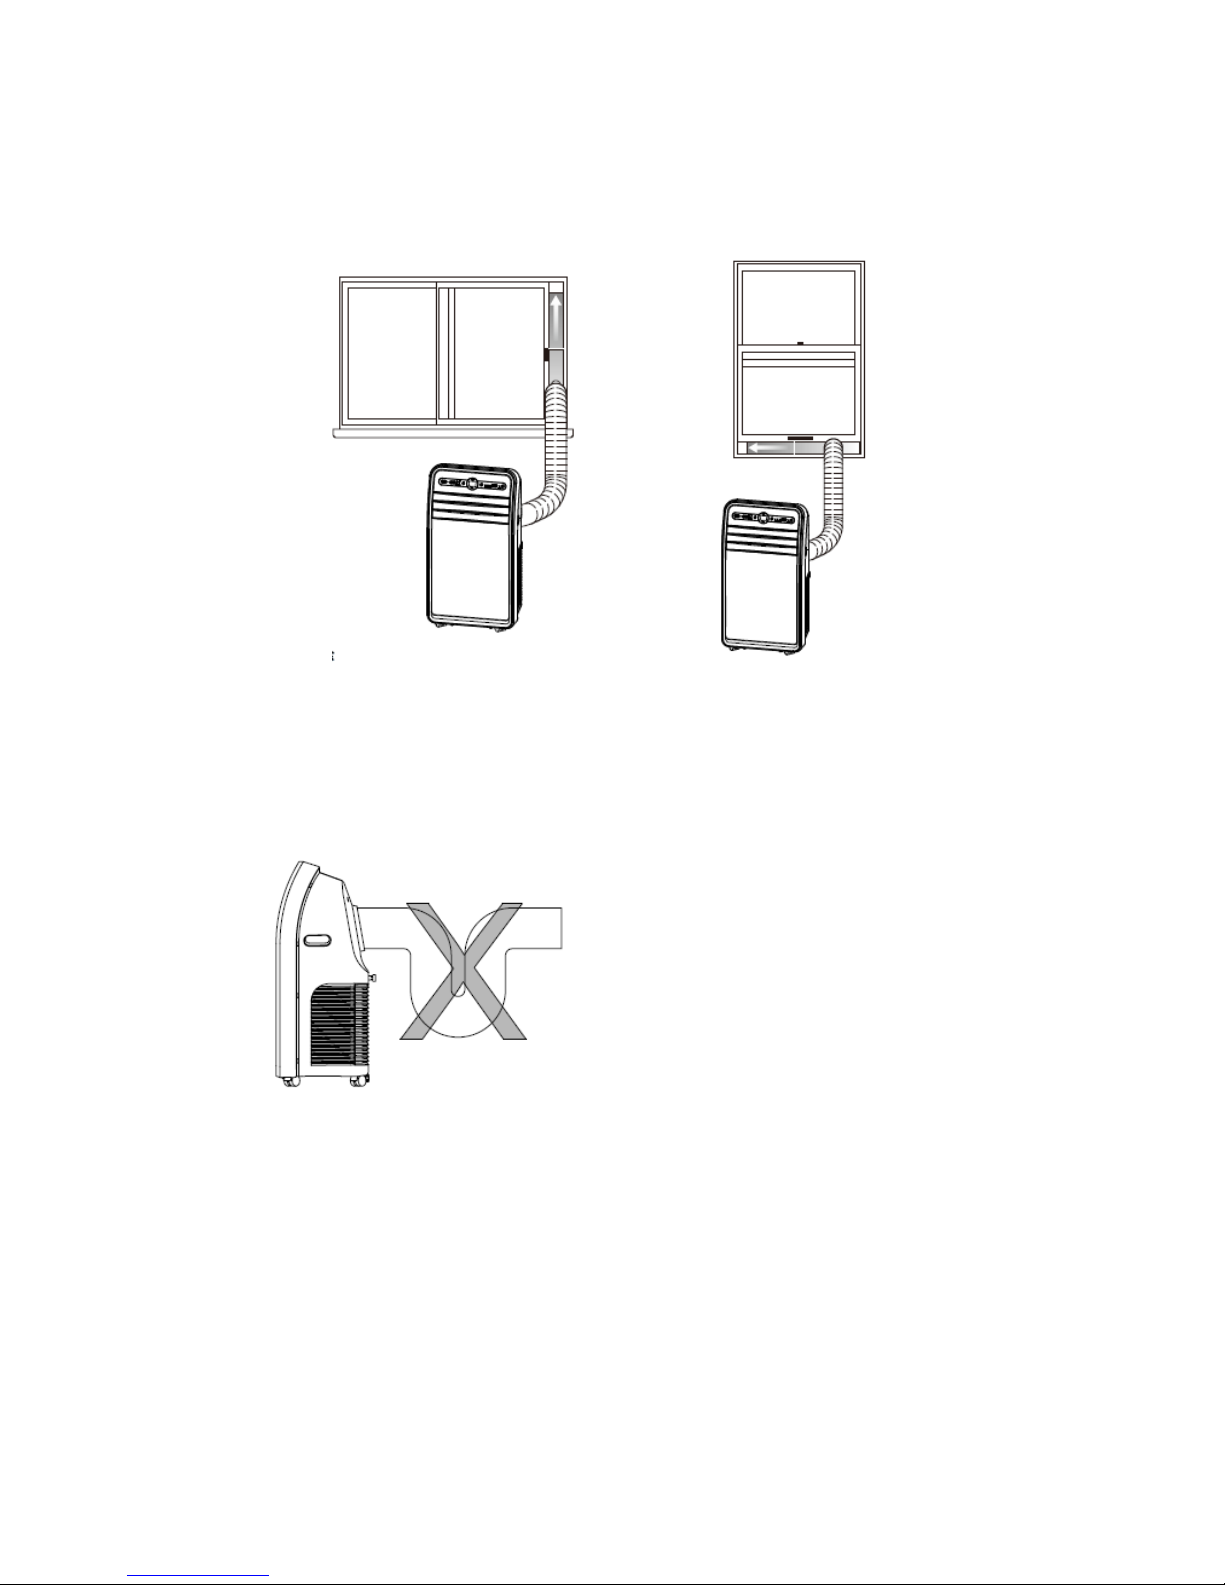
•Do not block the air outlet or the air inlet ventilation.
•Do not use spray (insecticides, paint) or any other flammable products near
the appliance as the plastic may become deformed. The unit may also sustain
electrical damage.
POWER SOURCE
•The plug should be well secured and not damaged.
•Do not plug in the appliance with an adaptor.

5
•Plug into the wall socket before switching on the appliance, and then press the
ON/OFF button.
THE MANUFACTURER WILL NOT ASSUME ANY RESPONSIBILITY FOR
NON COMPLIANCE OF INSTRUCTIONS. KEEP THIS USER MANUAL FOR
FUTURE REFERENCE.
IDENTIFICATION
1. Handle
2. Air inlet (L)
3. Control panel
4. Louver
5. Castor
6. Remote control
7. Air inlet (R)
8. Air outlet
9. Dehumidification drainage nozzle
10. Air inlet grille
11. Exhaust pipe assembly
12. Window slider kit

6
CONTROL PANEL & REMOTE CONTROL
1. Power On/Off button
Press the button toturn On/Off.
2. Auto-swing button
Press this key at any time after turning on the appliance to swing
the louvers automatically.
3. Speed button
Press the key to choose high/ Mid /low fan speed.
4. Temperature/time adjusting button
Press the key at cooling mode to increase/reduce the setting
temperature; press it at timing mode to adjust timing ON/OFF
time; press Up and Down keys simultaneously to switch
Fahrenheit and Centigrade degree temperature.
5. Mode button
Press the key to choose cooling, fan, dehumidifying and
auto-mode
6. Timer button
Press the key at standby mode to set TURN-ON time.
Press this key set TURN-OFF time when the unit is on.
7. Temperature/ time display window
This window displays the adjusted temperature and time.
8. Remote controller receiving window
This window is used toreceive signal of remote control.
9. °C/℉button
Press the key to switch from ℃to ℉and vice versa.
Note:To achieve maximum cooling,please press Timer+Up
button on the unit control panel.
4
3
2
6
5
1
9
8
7
6
2
3
4
1
5

7
INSTALLATION
Placement
Place it in an even and dry place, and keep it at least 50cm away from any
surroundings.
Installation
Screw the exhaust pipe assembly into the air outlet in the back panel (anticlockwise).

8
Insert the air exhaust hose into the window slider kit, adjust the opening width of the
window so that the window slider kit width matches properly; the length of the kit is
adjustable.
Incorrect installation:
•It’s important to keep the exhaust pipe smooth, and with no bends. Incorrect
mounting can contribute to the efficiency of the air conditioner.
•Ensure that the air can flow freely through the pipe.
Warning:
The exhaust pipe is designed especially for this model. Do not replace or lengthen it;
otherwise it will result in failure.
Notice:
Maximum length of the exhaust pipe is 1500mm. It’s better to keep it the shortest
length possible and keep it horizontal.

9
OPERATION
Cooling mode
•When the A/C enters cooling mode after it’s turned on, the cooling indicator
will light up.
•Press the Up/Down button to adjust the temperature (17°-30°).
•Press the Speed button to choose High/Low fan speed.
Fan mode
•When pressing the mode button or choosing the fan mode by pressing the
remote control, the wind indicator will light up.
•Press the Speed button to choose High/Low fan speed.
•Temperature cannot be set when fan mode is selected.
Dehumidifying mode
•When pressing the mode button or choosing the
dehumidifying mode by pressing the remote control, the
dehumidifying indicator will light up.
•Remove the dehumidification water drainage nozzle,
insert the water pipe, and place the other end of the
water pipe into the water vessel (bucket – not supplied)
or into a drainage passage, as shown in the right figure.
•After entering the dehumidifying mode, if the room
temperature is more than 15°, the compressor will work.
When room temperature is less than 13°, the compressor switches OFF; when
the temperature increases to more than 15°, the compressor will restart (in
order to protect the compressor, it will restart 3 minutes later).
•In dehumidifying mode, the fan is defaulted to run at low speed, and the fan
speed cannot be adjusted.
•Temperature cannot be set.
NOTE: When choosing the dehumidifying mode, please remove the exhaust pipe,
otherwise it will affect the dehumidifying performance and make the display window
show “FL”.
Auto-mode
•When pressing the mode button or choosing auto-mode by pressing the
remote control, the auto indicator will light up.
•After choosing auto-mode, the operation state is determined by ambient
temperature: when the ambient temperature is higher than 25°, the operation
state is the same as that of the cooling mode; when the ambient temperature
is lower than 25° the operation state is the same as that of the fan mode.

10
Max cool mode
•Press the “Max Cool” button on the remote control whilst in cooling mode to
utilize maximum cooling.
•In Max Cool mode, the A/C will cool regardless of the temperature.
•In Max Cool mode, the fan speed is high, and it cannot be adjusted.
Timer mode
•When the appliance is in standby mood, press the button to turn the timer on.
Press the Up and Down keys to set the timer (0~24H), and the timer indicator
will light up.
•Press the timer button to turn off the timer when the unit is on.
WATER DRAINAGE
This product is equipped with an automatic water evaporative system. The
condenser is cooled with the circulation of condensed water, which improves
cooling efficiency and saves energy.
•If the internal vessel is full of water, the display screen will
display “FL”, and the compressor will stop working automatically.
After you power off the appliance, unscrew the water cover, pull
out the water plug to drain all of the water out. Once drained, it
will restart again.
MAINTENANCE
Note: in order to avoid electric shock, please turn off the A/C and unplug the
plug before maintenance or repair.
Cleaning
•Switch off and unplug the appliance before cleaning.
•Wipe with a soft damp cloth. Do not use chemical solvents, such as benzene,
alcohol and gasoline etc; otherwise the surface of the A/C will be damaged.
•Prevent any water from coming into contact with the A/C.
Filter
•Wash the filters every two weeks. If it is blocked by dust, the cooling efficiency
of the appliance will be reduced.
•Take out the air inlet grille and pull out the filters from both sides.
•Wash the filters in warm soapy water (neutral detergent), dry it in a shady
place once clean.

11
Seasonal cleaning
If the A/C will not be used for a long time:
•Straight after use, pull out the water plug and drain.
•Run the A/C on the fan mode for 2 hours until its dry inside.
•Turn off the A/C and unplug.
•Wash the filters and reassemble once dry.
•Remove the exhaust pipe and keep it in a safe place.
•Cover the A/C with a plastic bag and store it in a dry place.
NOTE: Please ensure unit is completely dry before storage to avoid mould smell.

12
ERROR DETECTION
Error Code
Multi-functional defection
E1
Error of the coil’s temperature sensor
E2
Error of indoor temperature sensor
E4
Anti-frozen protection: temperature of the coil is too low and
the A/C is off. When the temperature increases to 8
℃
, the
protection is released and will start to work again as normal.
FUSE PARAMETERS
Specification: Φ5×20mm
Voltage: 250VAC
Current: 3.15A
TROUBLE SHOOTING
Before contacting the retailer for a replacement, check the below first to see if it can solve
the problem
Problem Cause Solution
The air
conditioner does
not function.
No power supply. Connect to power supply outlet and
switch on.
“FL” flashes on the display screen Drain water.
Timer-off is running. You can turn the unit on three minutes
later.
The air conditioner
restarts frequently
In direct sunlight. Close the curtains.
Windows or doors open, lots of
people or there is a heat source in the
room.
Close doors and windows, remove the
heat source.
Dirty filter. Clean or replace the filter(s).
Air inlet or air outlet blocked. Remove the blockage.
The unit is too
noisy Unit stands on an uneven surface. Place on an even, solid surface (less
vibration).
Compressor is not
working Self protect of the compressor
Wait for 3 minute and restart again
after the descend of temperature
Caution: Switch off the unit and unplug it immediately if anything
abnormal happens. Then contact a qualified electrician.
GAF Control (Sale) Pty Ltd
441 Kororoit Creek Road (Po Box 19)
Altona Vic 3018
Tel: 1300 659 489
Table of contents
Other PYE Air Conditioner manuals
Popular Air Conditioner manuals by other brands

EIC Solutions
EIC Solutions AAC-145A-4XT Series Installation and operation manual

QuietCool
QuietCool QC18DVS owner's manual

Roller
Roller DHN 401 N EC Mounting instructions

Panasonic
Panasonic CS-MKE7NKU Technical & service manual

Haier
Haier HSU-18LEK03/R2 Service manual

Toshiba
Toshiba HWS-455XWHM3-E owner's manual