Pyle Pro PDCD810 User manual


- 1 -
TABLE OF CONTENTS
NOTE ON USE ……………………………………………………………2
FOR SAFE AND EFFICIENT OPERATION ……………………………2
DESCRIPTION OF THE FUNCTIONS …………………………………3
FUNCTION OF THE MAIN UNIT……………………………………………3
FUNCTION OF THE CONTROL UNIT………………………………………4
CONNECTIONS ………………………………………………………6
BAS IC OPE RAT ION …………… …………………… ……………7
LOADING AND EJECTING THE DISC ……………………………………7
TRACK SKIP ……………………………………………………………8
ANTI SHOCK MEMORY……………………………………………………8
MATCHING THE BEATS PER MINUTE ……………………………………9
BEAT MATCHING USING PITCH BEND……………………………………9
OPERATION OF CUE AND LOOP ……………………………………10
BEFORE SWITCHING OFF THE POWER …………………………11
TROUBLESHOOTING GUIDE ………………………………………11

- 2 -
NOTE ON USE
BE CAREFUL OF HIGH TEMPERA-
TURE
TO AVOID DUST& MOISTURE TO AV OID PLACING ON UN-
STABLE LOCATION
DO NOTUSE CHEMICALS
IF OUT OF WORK, CONTACT
SALES AGENCY IMMEDIATE LY
KEEP AWAY FROM TV &
MAGNETIS M
DO NOT OPEN THE CASE CARE WITH THE POWE R CORD
For Safe and Efficient Operation
•Select the installation location of your unit carefully.
Avoid placing it in direct sunlight. Also avoid locations
subject to vibration and excessive dust, heat, cold or
moisture. Keep away from sources of hum such as
transformers or motors.
•Do not use this compact disc player where there are
extremes in temperature ( below 41 oF/5 oC or
exceeding 95 oF/35 oC ).
•Do not open the cabinet as this might result in damage
to the set or electrical shock.
•Be sure your hands are clean when handing discs.
Never insert a disc which has a crack on its surface.
•When disconnecting the power cord from the AC
outlet, always grasp it by the plug. Never pull the cord.
•Do not use force when operating the switches and
buttons.
•Before moving the set, be sure to disconnect the
power cord and all connecting cables.
•To keep the laser pickup clean, do not forget to close
the disc tray.
•Do not attempt to clean the unit with chemical
solvents as this might damage the finish. Use a clean,
dry cloth.
•Keep this manual in a safe place for future reference.
SAFETY CERTIFICATION
Laser Diode Properties
Material: Ga.-Al-As
Wavelength: 755-815 nm (25oC)
Laser Output: Continuous Wave max. 0.5mW
CAUTION:
USE OF CONT ROLS OR ADJUSTME NTS OR
PERFORMANCE OF PR OCEDURES OT HER THAN
THOS E S PECIFIED HEREIN MAY RES ULT IN
HAZARDOUS RADIATIO EXP OSURE.
To prevent electric shock do not remove cover (or
bottomscrews). No user serviceable parts inside refer
servicingtoqualifiedservicingpersonnel.

- 3 -
DESCRIPTION OF THE FUNCTIONS
Function of the Main Unit :
1.POWER(Power Switch)
Press the power switch to turn the unit on. To switch the
POWER off press the POWER switch again.
2.Disc Loader
The disc is placed on the loader and the CD disc will be
loaded automatically. Pressing the Eject button to eject the
CD Disc tray.
3.Eject Button
Press to load or eject the disc
4.DISC illuminator
To illuminate for disc.
5.AC INPUT
Connecting this power cord into an AC wall outlet with the
proper AC voltage.
6.LINE OUT (Output Jacks)
The audio from each CD player is output from these jacks.
7.CONNECTOR PORTS
The 8-pin termination permits the connection of the main
unit to the control unit.
8.DIGITAL OUT
The digital from each CD player is output from these
jacks. Connect to the line input of the D/A Amplifier.
9.START/PAUSE
This connector is used for fader start; connect it to a
mixer and remote control the “START/PAUSE”by moving
the fader of mixer.
10.TACT-LOCK option
Select the type of switch in the mixer for FADERSTART
wire remote control.
Connect to the line input of the mixer.
8
1
0
230V
50Hz
115V
60 Hz

- 4 -
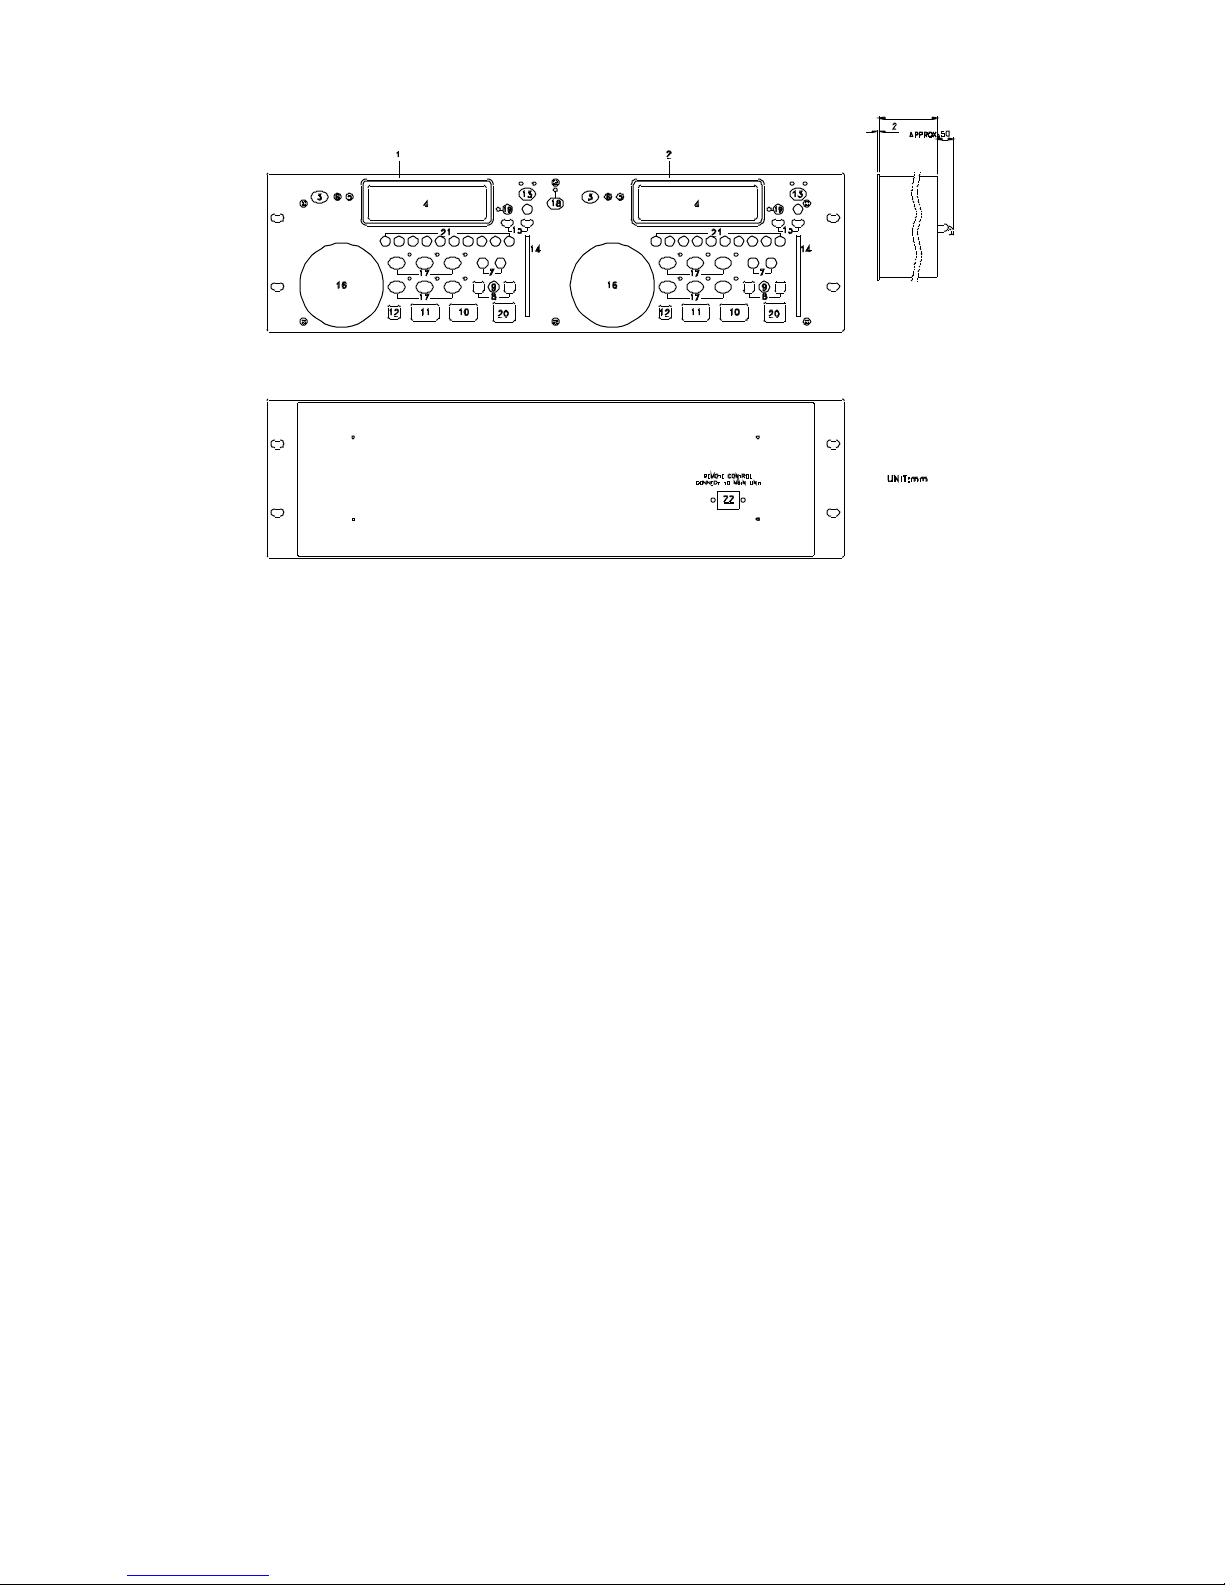
Function of the Control Unit
40
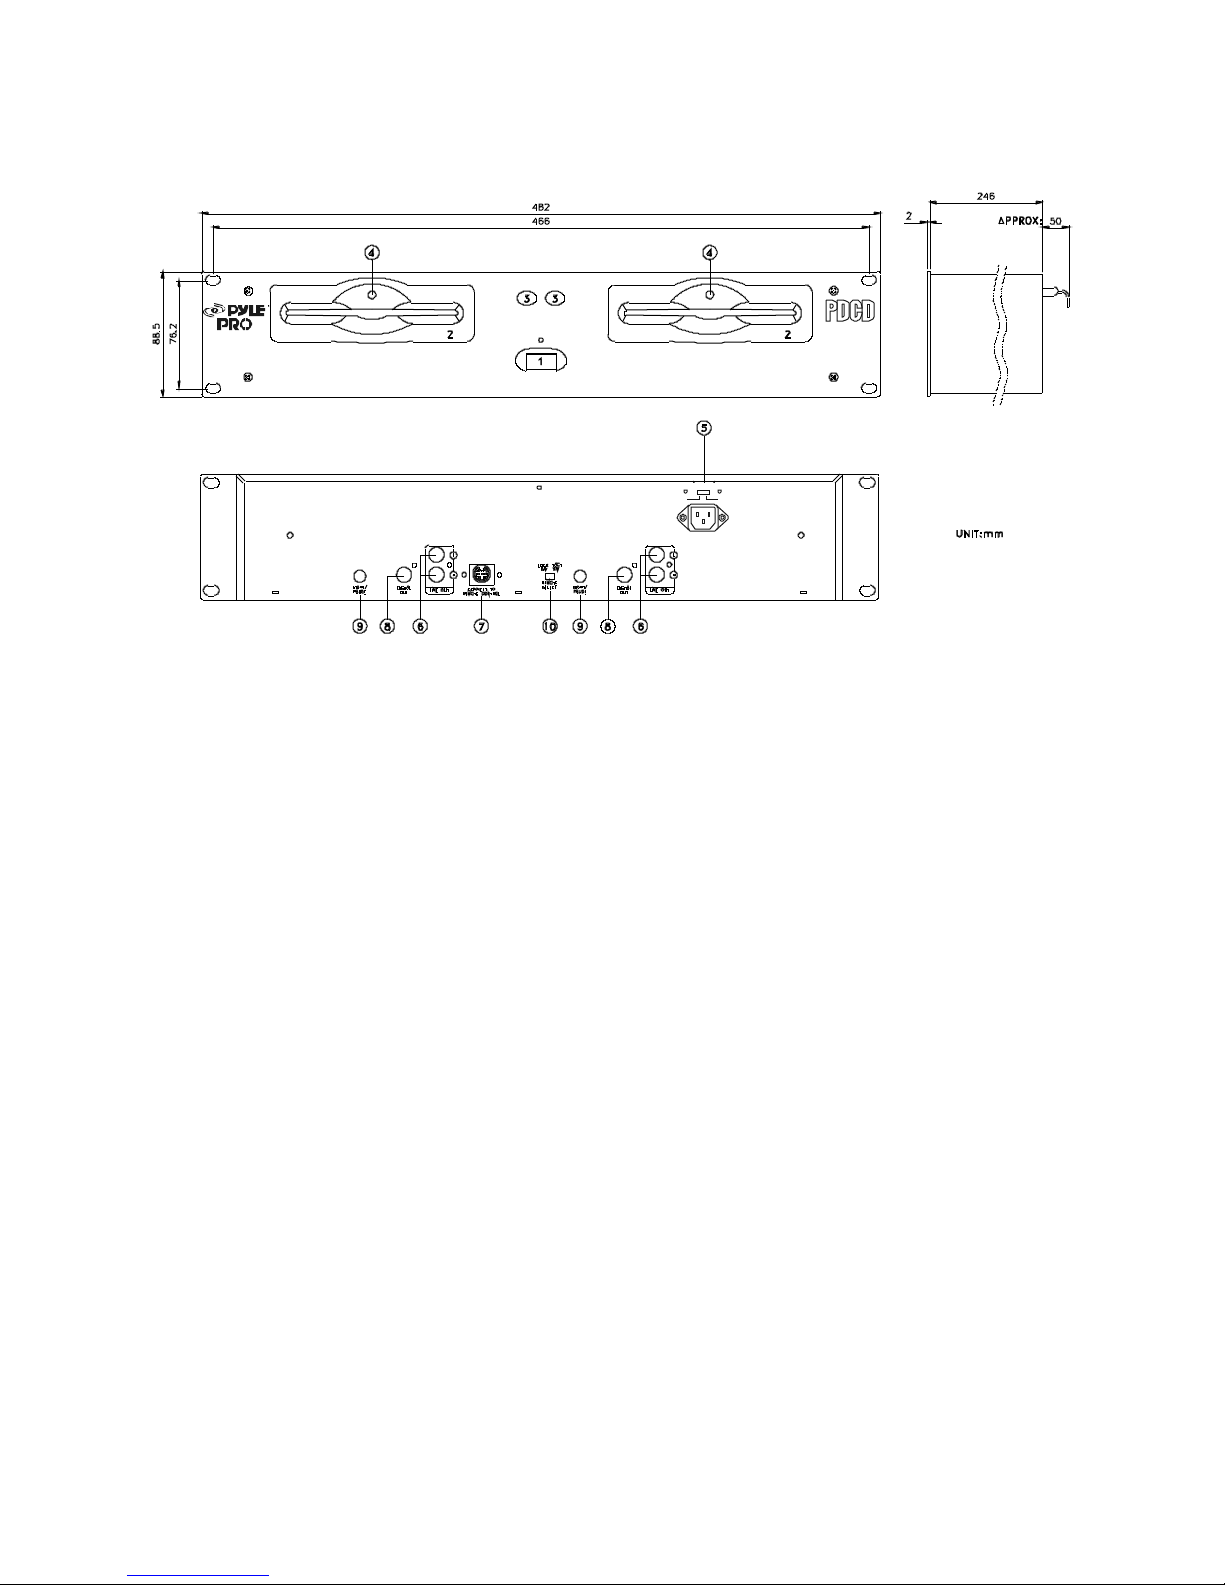
1.UNIT 1-CONTROL OPERATION PANEL
This operation panel remotely controls the main unit 1.
2.UNIT 2- CONTROL OPERATION PANEL
This operation panel remotely controls the main unit 2.
3.OPEN/ CLOSE BUTTON
Press to load or eject the disc. Each press will open or
close the disc tray.
Note: Disc will not ejec t. Unless the stop or pause button
has been push first
4.L.C.D
These liquid cry stal display (L.C.D.) indicate the track
numbers, time (minutes, second, frame), remain, pitch,
beat, loop, auto cue single, continue and time bar.
5.CONT./SINGLE BUTTON ( OUTRO)
To press this button it can switch between auto cue
single and continue. The selected mode is indicated on
the display.
*AUTO CUE SINGLE-After each track, the unit pauses at
the beginning of next track. The playback starts from
audible point.
*CONTINUE—To play the whole tracks.
*OUTRO-Press the button for 3 seconds for OUTRO
function, the unit will play the last 30 seconds of each track.
6.TIME / STOP BUTTON
This button switches the time display between each
remaining time, elapsed playing time, and total remaining
time. The unit will be in the “
stop”
mode if you continue to
press the button for more than 3 seconds.
7.SEARCH BUTTON
Pressing the button for quick forward or backward
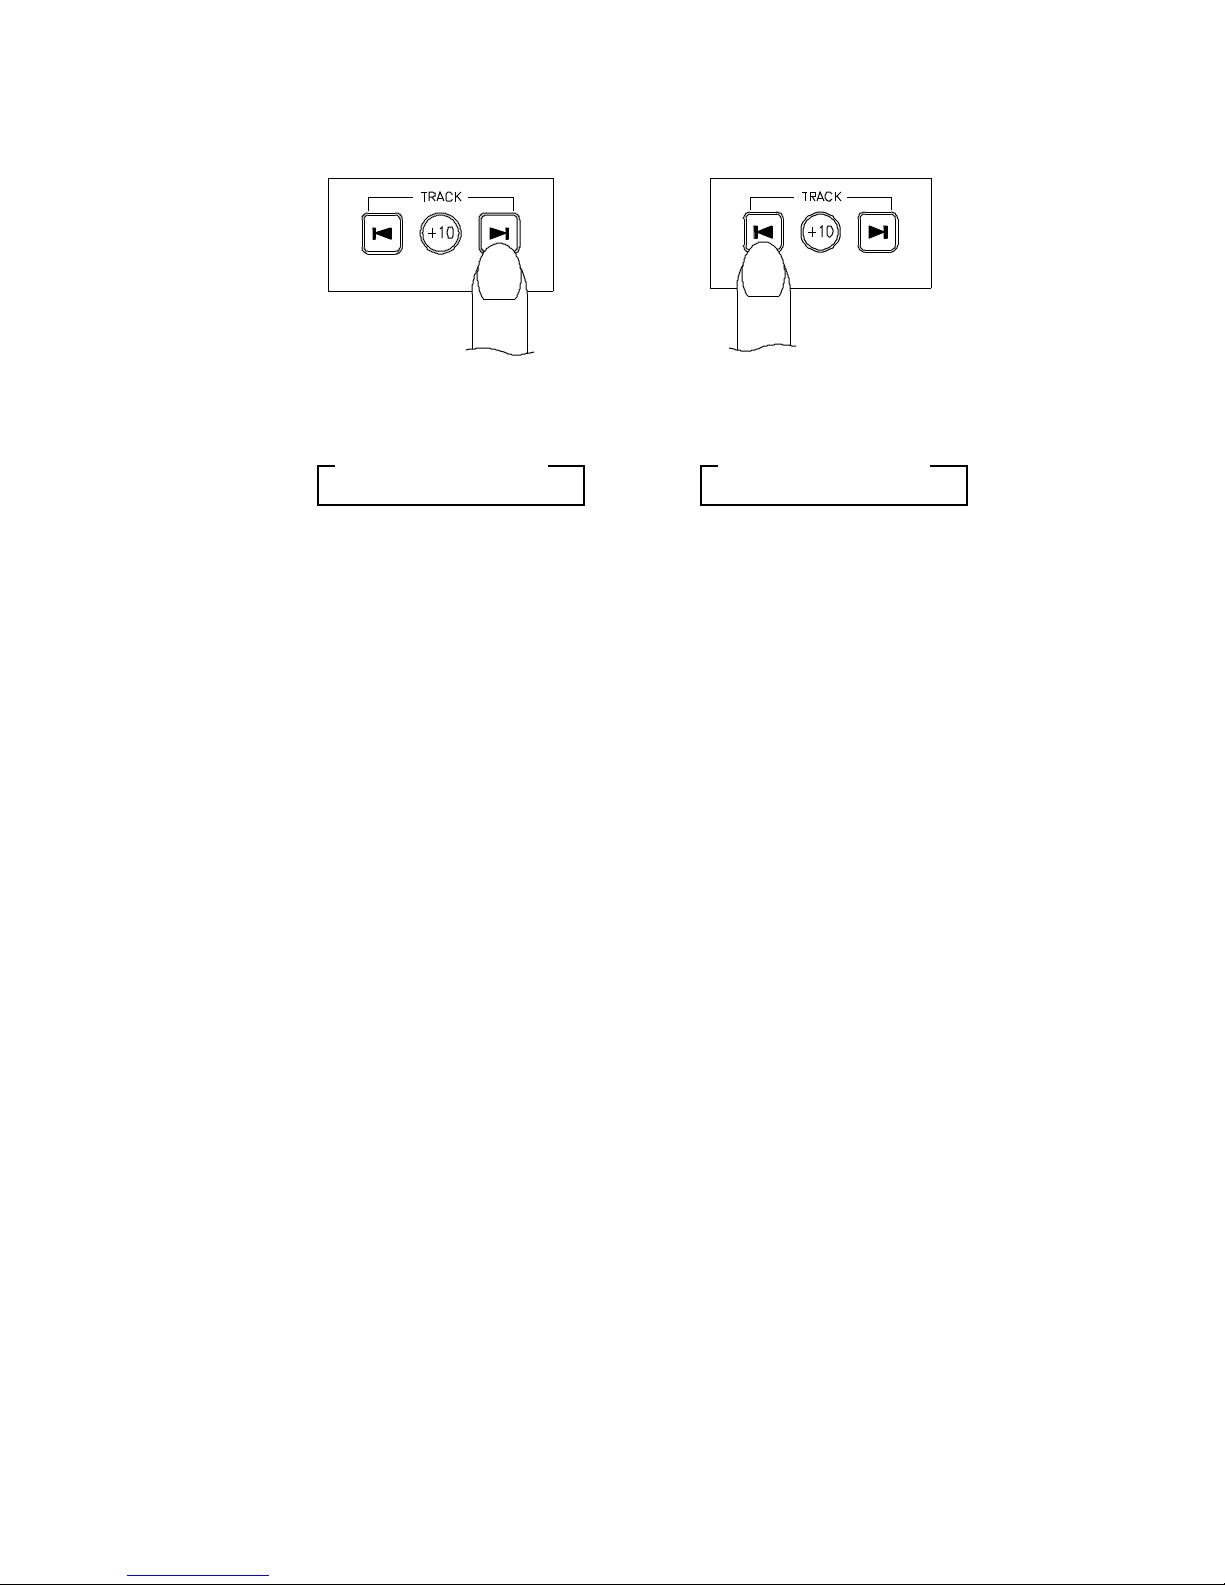
8.TRACK BUTTON
This button selec ts the track to be played
9.+10 BUTTON
Pressed the button to forward 10 tracks. If you forward 10
tracks, and the tracks over total tracks, the unit will jump to
track 1.
10. PLAY/ PAUSE BUTTON
Each press of this button causes the operation to change
between PLAY and PAUSE modes.
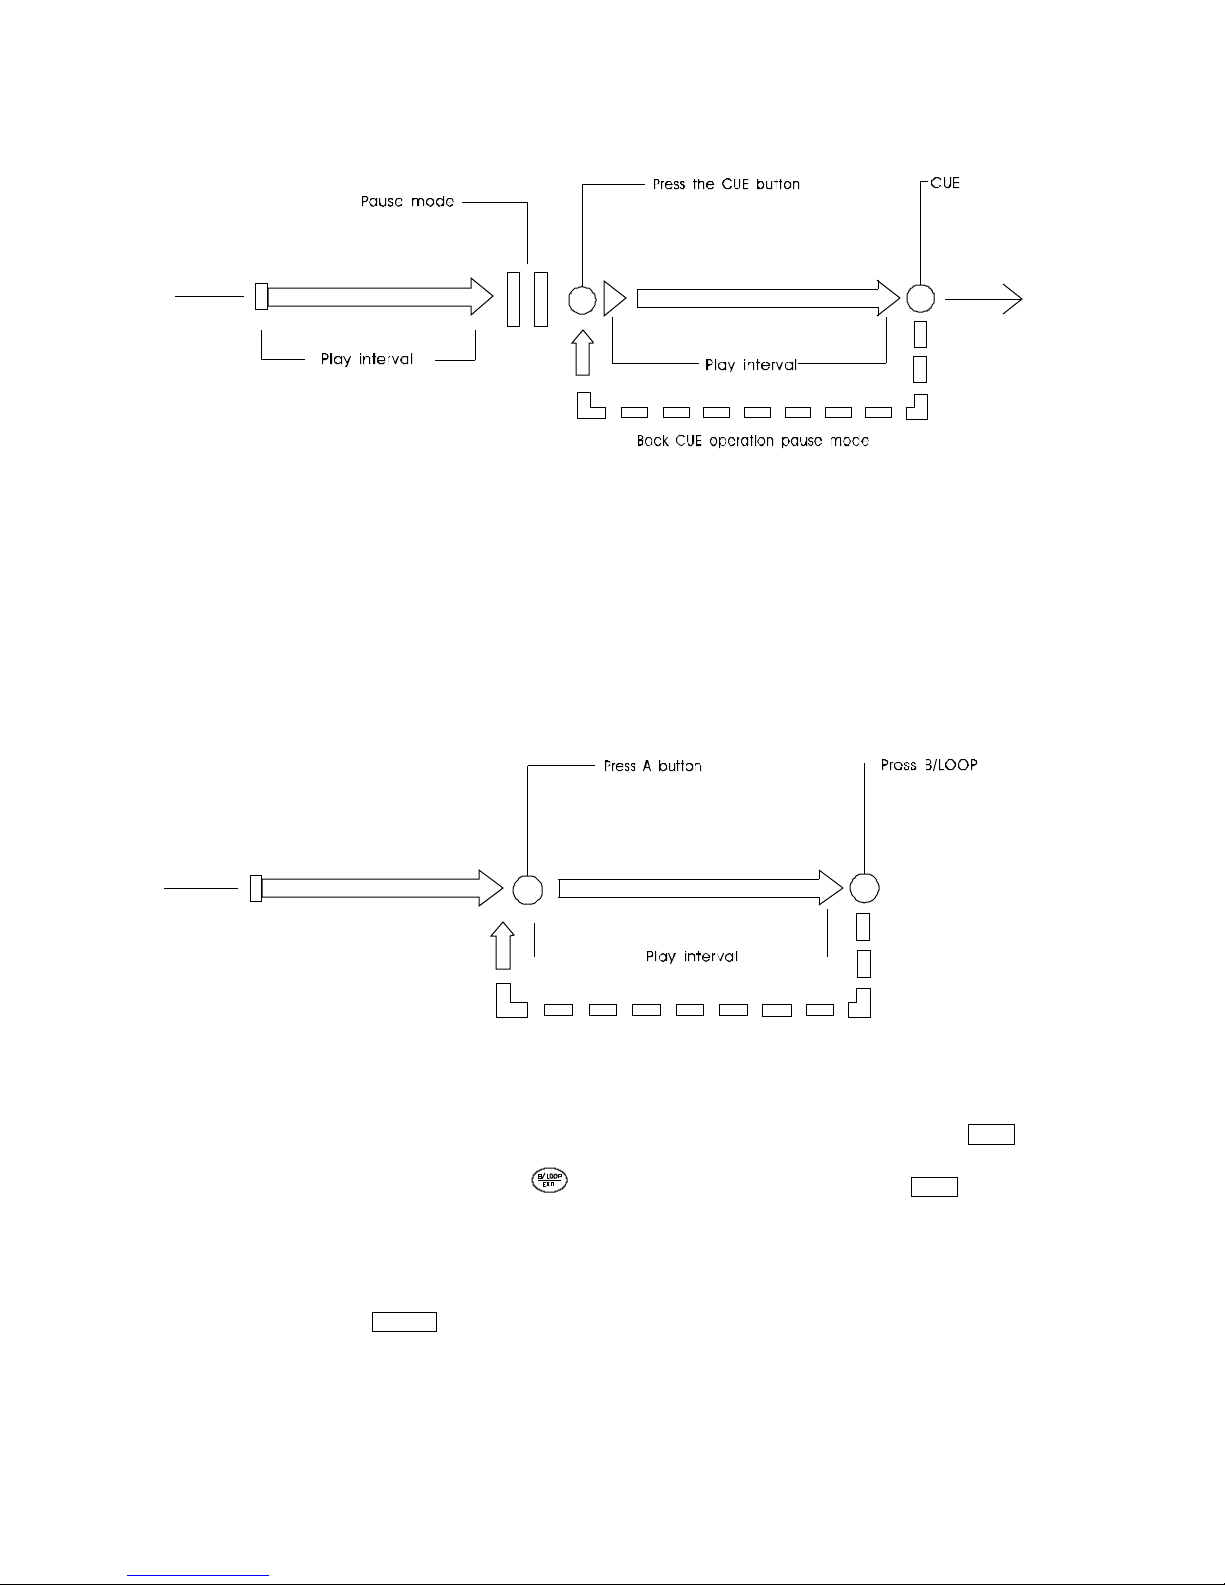
11. CUE BUTTON
The cue function allows the CD to be played from the
memorized point any number of times. W ith the unit in the
pause mode, pressing the CUE button to set up the
memorized cue point and then the cue button blinks.
12. BOP BUTTON
The playback will automatically play from the CUE point upon
the button is pressed.
13. PITCH BUTTON
W ith unit on the PITCH ON mode, to select the pitch range
from 8%, 16%, which the LED indicator flashes. To select 8
% will assign +/-8 % to pitch control slider and so does 16%.
W ith the unit on the PITCH OFF mode, it means playback
speed is normal (0%). The playback speed will not change
when you move the pitch control slider.
14. PITCH CONTROL SLIDER
To match the choices of playback speed (8%, 16% ), y ou
can choose what range you want between minimum (up side)
and maximum (bottom side) by moving the pitch control
slider.
15. PITCH BEND + / - BUTTON
W hen each of the two CD players is playing, the pitch bend
function allows the position of the bass beat to be matched
after the pitch has been adjusted. The pitch will automatically
rise up to + 16% from the current setting while pressing the
“+ “button. While pressing the “–“button, the pitch will
automatically drop to - 16 % from current setting. By the way
of changing the pitch the position of the beats can be
matched.
16. JOG WHEEL
This contains various functions, as follows:
*Speed Control
Rotating the wheel, in play mode, will change the play back speed
accordingly. W hile rotating clockwise, the play er speed increase;
rotating counterc lockwise, the speed decrease.
*Searching
Rotating the wheel in pause mode, the play er will forward or
backward to the desired point to start. The searching speed
changed according to the dialing speed. It can be carried out by
one frame increment.

- 5 -
17. Seamless Loop (2 set)
There is A, B/LOOP/ EXIT, RELOOP buttons.
1. A BUTTON---“start point” (A point. Also, Cue 1 could be a
A point) After setting up the A point, the red Led light up!
2. B/LOOP/ EXIT BUTTON: ---“ End point”(B point). Press the
B /LOOP button to set up the B point and start the loop
playback automatically . Loop lights on the display and the 3
LEDs flash. Press this button again to exit the LOOP
playback.
3. RELOOP BUTTON
Return to the loop playback by pressing the RELOOP while
in performance. However, if y our want to return to loop
playback, you can press RELOOP BUTTON.
4. Change “ START POINT” and” END POINT” by pressing
the A& B/ LOOP/ EXIT button again.
The interval between A and B point must be more than 20
frames; otherwise, the B point will be canceled, then LOOP
function disappear and LOOP fades on the display.
18. RELAY
Press the “RELAY” button to activate. W hen one unit is in
play mode, and the other unit is in “pause” mode; pause the
playing unit, the other unit will automatically start to play.
19.PROGRAM BUTTON
You can program the track you want. While the unit is
stopped, pressing the PROG button first to enter memorized
mode, by pressing the skip buttons to select the tracks y ou
want to order and then press the PROG button again to
compete set up per track. The max tracks you can program
are 30 tracks. While playing programmed tracks, the LED of
PROG lights up. W hile the unit is stopped, open the tray
disc or turn off the power, the program will be exited.
20.BPM BUTTON
To get the BPM number manually.
21.Direct Access Key(0~9)
To select the number of the track you would like to play.
22.CONNECTOR PORTS
The 8-pin termination permits the connec tion of the control
unit to the main unit.
23.SLEEP:
Leave the unit unused for 30 minutes; the machine will shut
off automatically .
Connections
Typical connections with a mixer is illustrated below. Please use it for reference.
* Connect the connection cords to the line inputs of your mixer.
* The connection cords and the remote control connection cable are supplied with the main unit.
* Be sure to use the remote c ontrol connection cable which has been supplied. Use of another cable type might cause damage.
230V
50Hz
115V
60H z

- 6 -
BASIC OPERATION
Loading and Ejecting the Disc
When the disc is loaded, press the EJECT button to
eject the disc (T his may be done on either the player or
the remote control side.)
Place a disc in the disc loader
12 cm disc
8 cm disc
Push the disc to the loader.
While the disc is loaded, the preparation for disc play
will begin.
When preparation is completed, the total tracks number &
total playing time will display.
To the desired track

- 7 -
TRACK SKIP
T o go back thro ugh the tracks To a dvance throu gh the tracks
Tracks change as follows
(This is for a disc containing 4 tracks) Tracks change as follows
When this button is pressed once, the CD player will skip
backward to the beginning of the track, press twice will
skip backward to the previous track.
When this button is pressed once, the CD player
will advance to the beginning of the next track.
ANTI SHOCK MEMORY
This CD Player is equipped with an anti-shock memory , wish memorize 10 seconds of music before reading, to be not in
case of shock.
W arning: This system c an't work in c ase of repetitive shocks or vibrations and if the memory is not completely c harged.

- 8 -
MATCHING THE BEATS PER MINUTE
Matc h th e pi tc h by mo ni tori ng the mu sic of both UNIT 1 a nd UNI T 2 by ear . W he n the te mpo o f the mus ic of the
se lected CD p laye r is slow compared to the temp o of the other p lay e r, move the slid er to the + side and matc h the
tempo. W he n fast, mo ve to the - si d e.
The follo wing desc r i ptio n is for th e case of matc hing the pi tc h of UNI T 2 to the p itch o f the musi c bei n g playe d on
UNI T 1.
B
u
o
e
f
re
f
M
m
r
y
UNIT 1 is playing. Press PLAY/PAUSE to start UNIT 2.
o
m
u
B
M
f
er
f
e
y
r
Both CD players are playing discs.
Listen to UNIT 2 in your headphones.
When UNIT 2 is slow compared
to UNIT 1
When UNIT 2 is fast compared
to UNIT 1
Beat Matching Using Pitch Bend
A de sc r i ptio n of the p roced ur e fo r matc hi ng the be at of UNIT 1 a nd UNI T 2 using the PI TCH BEND stick is give n
below.
This des cr ip tion is for the c as e of ma tc hi ng the beat of UNIT 2 to the beat of the musi c be in g play ed on UNIT 1.
(Thi s pr oc edu re c an be d on e on ei ther Uni t).
After Matching the BPM's
BPM’s (Beat Per Minute) are the
same, however the bass beats are
not matched.
When UNIT 2 is ahead. When UNIT 2 is behead.

- 9 -
OPERATION OF CUE (WITH PLAY/PAUSE)
1. In pause mode, p ress CUE b utton to memo rize a p oint f or playi ng b ac k. W e mean it “ c ue p oi nt”.
2. After “c ue po in t” is m emor ized , i n play mode, pr es si ng CUE b utton will return the musi c b ac k to the cu e po in t
and keep i t i n p aus e mod e.
3. Press PL AY button a ga in to perf or m fr om “c ue p oi nt”.
OPERATION OF A AND B/LOOP
1. Set “A POI NT” under p lay mode by pre ssi ng A b utton (witho ut i n terr upti on d ur ing playbac k) .
2. Press B/ LO OP to memor i ze the endi ng p oi nt of loop, we m ean i t “ B POI NT”. A t the meanti me, i t b links LOOP o n
the LCD, and the music automati cally comes bac k to “ A POI NT” a nd loops betwee n A & B p oi nts.
3. W h ile the mu si c loop s be tween A & B, pre ss to leave th e loop. At the meantime , i t lig hts LOOP on
the LCD.
4. Press RE LOOP a gain duri n g playb ac k, i t r etur ns the loop fu nc tion.
5. W i thi n play i nter val, yo u c an c ha nge “ A POI NT” & “B POI NT” by p ressi ng A & B/ LOOP button unde r play mo de.
6. Also available to ch ange “s tart poi nt” b y pr ess i ng A bu tton in pause mode dur in g loop f un ctio n.
7. The i nter val between A & B point m ust be mo re than 20 f rames, or the B p oi nt will b e cance led, then loop
fu nc ti on dis app ear , a nd LOOP fa des on the LC D.

- 10 -
BEFORE SWITCHING OFF THE POWER
When you have finished using the CD player, before switching off the power, ensure that the disc is ejected.
Do not switch off the power when the
disc in the loader.
POWER OFF
Switch off the power after the disc is
ejected.
POWER OFF
TROUBLESHOOTING GUIDE
If difficulties arise with your compact disc play er, locate the apparent problem in the left-hand column of the table and follow the
corrective action suggested in the right-hand column.
1. Is the compact disc player properly connected to the amplifier?
2. Is the amplifier set for the proper operation?
3. Have the operating instructions for the compact disc player been followed?
Symptom Possible Cause Corrective Action
The power fails to switch on
when the POWER switch is set
to ON
Poor power plug connection at the AC outlet. Insert the power plug firmly into the AC outlet.
Disc play does not start The disc is loaded upside down.
The disc is too dirty.
Reload the disc with the label side up.
Clean the disc.
No sound Improper output cable connections.
Improper amplifier operation.
Connect the output cable properly.
Make sure that the amplifier controls are set
properly.
Sound skips The CD player is subject to vibrations or
physical shock.
Change the installation location.
Hum Loose cable connections. Firmly connect all audio plugs.
Table of contents
Other Pyle Pro CD Player manuals

Pyle Pro
Pyle Pro PDCD500 User manual

Pyle Pro
Pyle Pro PDCD205 User manual

Pyle Pro
Pyle Pro PDCD3000MP User manual

Pyle Pro
Pyle Pro PYLE PRO PDCDTP300 User manual

Pyle Pro
Pyle Pro PYLE PRO PDCD200N User manual

Pyle Pro
Pyle Pro PRO PDCOTP100 User manual

Pyle Pro
Pyle Pro PT-668C User manual

Pyle Pro
Pyle Pro PDJ150U User manual

Pyle Pro
Pyle Pro pdcdtp500 User manual

Pyle Pro
Pyle Pro PDCD510MU User manual