Qbex Aero Style User manual


You are reading the User’s Manual provides
information regarding the various componets in
the notebook PC and how to use them. After
you read through this manual, please keep it well
for you can refer it anytime in the future.
User ’s Manual
Table of Content
User´s Manual............................................. 3
Safety Precautions...................................... 5
■How To Use Your Notebook
Power System............................................. 9
■Before Operating Your
Notebook
Introducing Your Netbook............................ 11
Connecting AC Adapter
and Charging Battery.................................. 17
Using Touchpad.......................................... 21
Using Keyboard.......................................... 23
Adjusting Volume........................................ 26
Adjusting LCD Resolution........................... 27
Using Wireless LAN.................................... 30
Please read the safety precautions mentioned
on Page 3 before you operate the notebook


5
qbex aero style / User’s guide
Safety Precautions
The following safety precautions will increase the life of the notebook. Follow all precautions and instructions.
Except as described in this manual, refer all servicing to qualied personnel. Do not use damaged power cords,
accessories, or other peripherals. Do not use strong solvents such as thinners, benzene, or other chemicals on
or near the surface of your notebook.
The sign shows the behavior prohibited
The sign shows the regulative behavior or the indication
DO NOT expose to or use near liquips,
rain, or moisture. DO NOT use the LAN
during the electrical storm
DO NOT use the AC adapter notincluded in
the package. Use ofanother type of adapter
may riskre or explosion.
Warning (The device and AC adapter
Before you connect the notebook to a
power source, ensure the voltage rating of
the AC adapter matches the available
powe source.
DO NOT attempt to service this product by
yourself. As opening or removing covers,
you will be exposed to the dangerou
svoltage or other risks.
When you fell the surface of the AC adapter
is very hot or bad odor give off from it.
Please pull out the power plug immediately.
Continue to usem the AC adapter may risk
re or electrical shock.
DO NOT leave the notebook on your lap or
any part of the body to prevent discomfort
or injury from heat exposure.

6qbex aero style / User’s guide
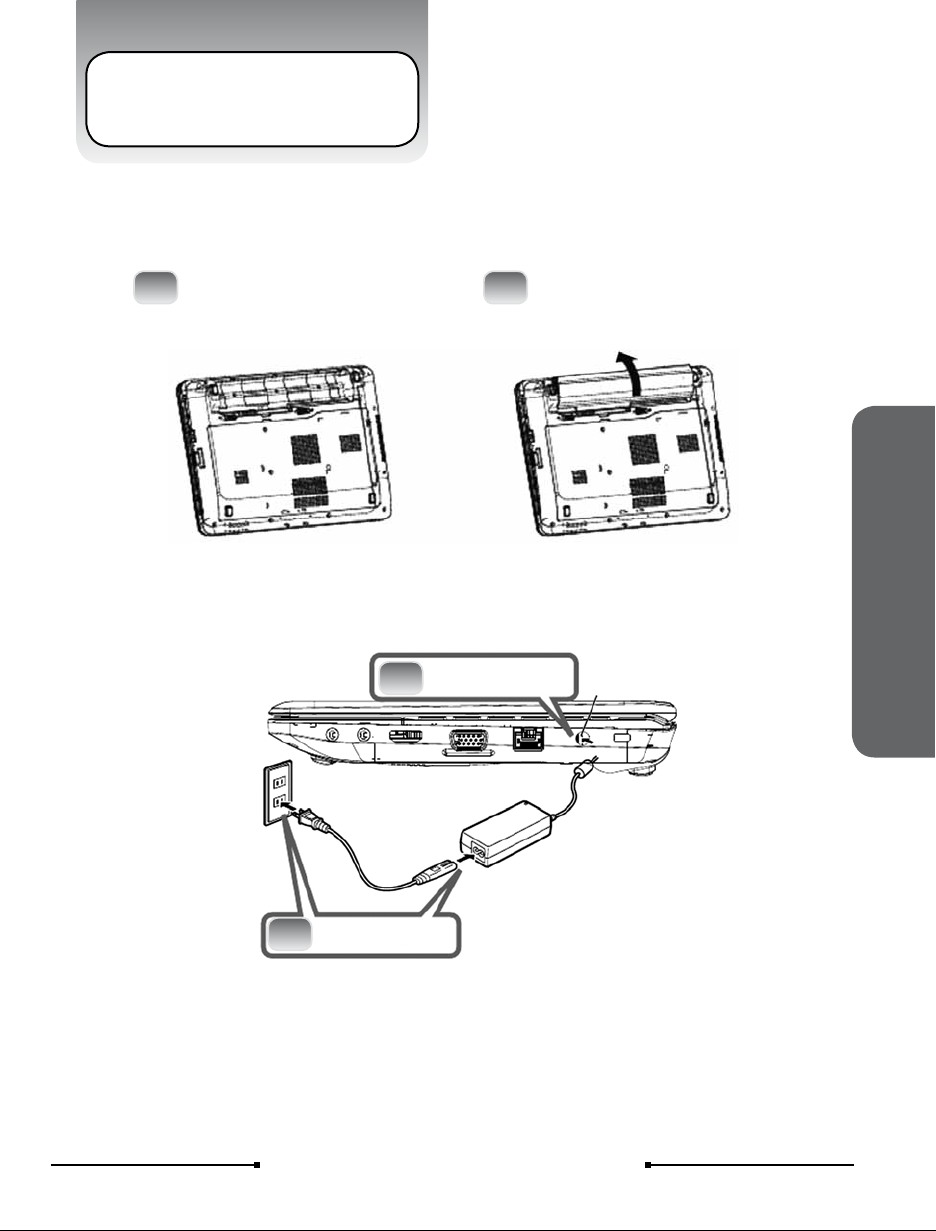
Please be sure not to pull out thepower plug
from the cord only. You have to pull out the
power plug from the plug part.
Attention (The device and AC adapter)
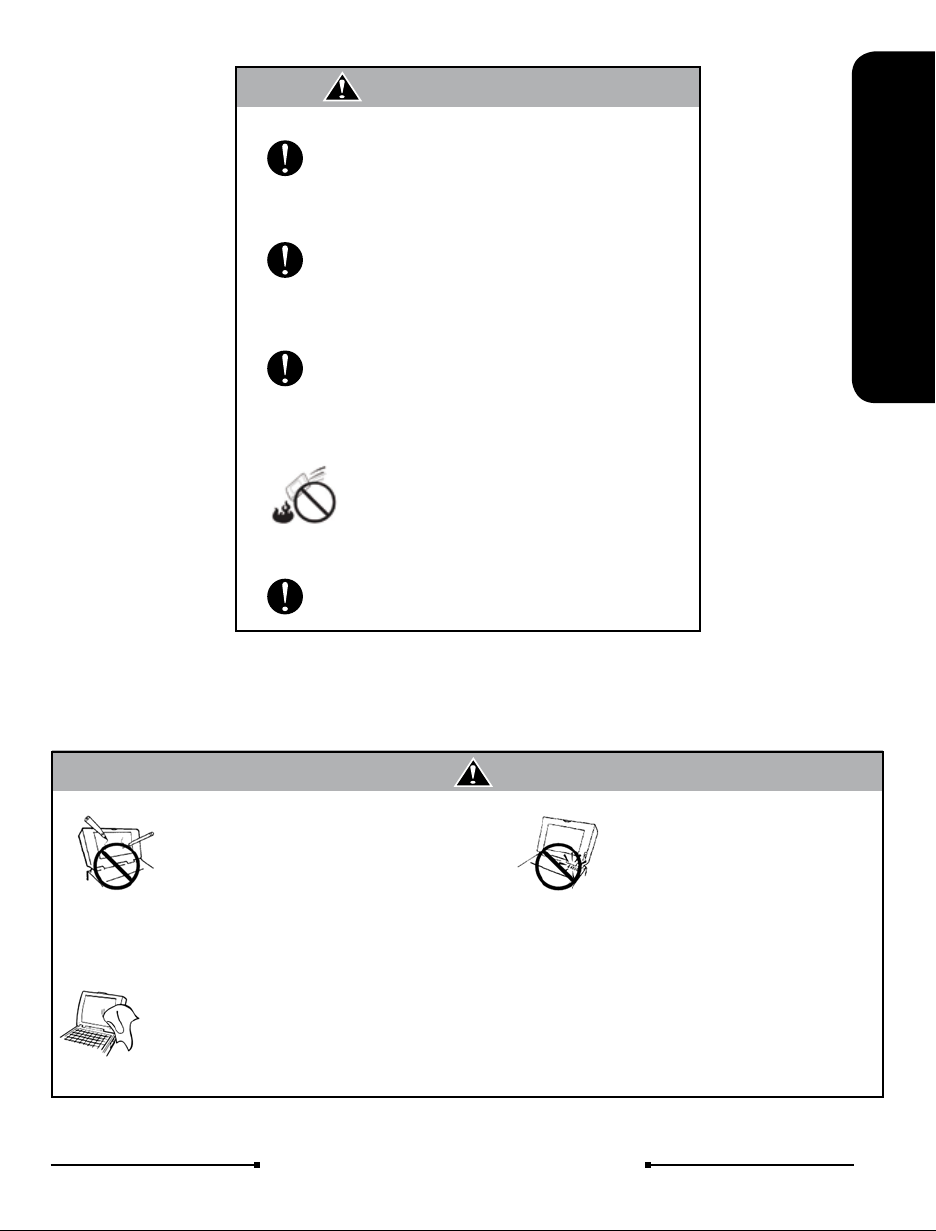
DO NOT place this notebook on an
unstable cart, stand, or table.
DO NOT place heavy object on this
notebook. It may be broken to cause some
serious damage.
Please verify whether there is no foreign
object such as ball-point pen on the
keyboard when you close the notebook lid.
When while the foreign object is put, there is
possible to break display panel.
When you carry the notebook, please close
the display lid. It is possibe to break the
dispplay panel by the unexpected force.
If an extension cord is used with this
notebook, make sure that the total ampere
rating of the1 equipment plugged into the
extension cord does not exceed the
extension cord amper rating.
Unplug this notebook from the wal outlet
when you stop using this notebook.
SAFE TEMP:
This notebook should onl be used in
environments with ambient temperatures
between 10°C and 35°C.
DO NOT press or touch the display panel.
DO NOT place together with small items
that may scratch or enter the notebook.
If you operate the touchpad with
unreasonable force or posture, it may hurt
you nger or wrist.
Avoid using the notebook during
anelectrical storm. Disconnect all plugs and
cables to avoid the possible damage.
DO NOT allow anything to rest on the
power cord. DO NOT locate this notebook
where people will step on the cord.
Danger of explosion may occur if battery is
incorrectly replaced. Replace only with the
same or equivalent type battery
recommended by the manufacturer
DO NOT impact the battery.
If it exceed the specied charge time and
the charge doesn’t complete, please stop
the battery charge. It may risk re or
explosion if you continue to charge the
battery.
Do not crush, disassemble, puncture, or
incinerate the short external contacts of the
battery pack
DO NOT dispose batteries in a re.
They may explode. Check with local
authorities for disposal instructions.
If the battery pack leaks and the uid ge
in your eyes, do not rub them. Instead,
rinse your eyes with clean running water
and immediately seek medical attention.
Otherwise, eye injury may be resulted
If the battery pack leaks, gives off a bad
odor, generates heat, becomes
discolored or deformed, or in any way
appears abnormal during use, recharging
or storage, immediately remove it from the
notebook and stop using it.

7
qbex aero style / User’s guide
How To Use Your Notebook
Attention (Battery Pack)
If liquid solution from the battery comes
out and contacts with skin or clothes,
ush out with clean water.
Do NOT immerse the battery pack in water
or allow it to get wet. Its protective features
can be damaged. Abnormal chemical
reactions may occur, possibly leading it to
leak acid, overheat, emit smoke, burst and
/or ignite.
If you nd a bad odor, overheating, battery
balloon or swell up, discolor, deformation,
and/or other irregularities when using the
battery, return it to your supplier or vendor.
Keep the battery away from children.
Do not connect the positive (+) and
negative (-) terminals with a metal object
such as wire. Short-circuiting may occur
leading the battery pack to leak acid,
overheat, emit smoke, burst and/or ignite.
DO NOT throw the battery in re.
General Warnings
LCD monitors are obviously more
vulnerable to damage than the
classic CRT. Even the slightest
contact with a sharp object can
leave your liquid crystal display
damaged
Clean your computer with a soft cloth
dampened with water. Do not use liquid
or aerosol cleaners, which may contain
ammable substances.
● Please keep all accessori es well
● Periodical ly backup your data i n the
hard disk.
DO NOT
knock or scratch
the machine
DO NOT
moving the machine
while operating
DO NOT remove your note-
book while the hard disk is in
operating status. It may be
broken to cause some serious
damage.


9
qbex aero style / User’s guide
Before Operating Your Notebook
Power System
1 To install the battery pack
1Close the notebook lid and
turn over it gently. 2Slide the battery pack into the slot.
Battery Pack .
2 Connect the DC plug to DC-IN Jack
2DC-IN Jack
Connect the AC power cord to the AC adapter
Connect the AC power cord to an AC outlet
3
Connect the DC
plug to DC-IN Jack


11
qbex aero style / User’s guide
Before Operating Your Notebook
Introducing Your Netbook
Open the panel cover and adjust it to a easy to see
angle.
Close the panel cover and make sure the
notebook is closed well.
Open/Close the Netbook
Front Side
1 Web Camera
2 Display Panel
3 Wireless LAN Switc
4 Power Button
5 Keyboard
6 Internal Microphone
7 Status LEDs
8 Stereo Speaker
9 Touchpad(right button)
Touchpad(left button)
10 Touchpad
8
5
6
7
99
10
4
3
1
2

12 qbex aero style / User’s guide
1 Web Camera
The built-in camera allows picture taking or video recording.
2 Display Panel
It functions as the same as a desktop monitor. The LCD panel does not produce any radiation or ickering
so it is easier on the eyes. Use a soft cloth without any chemical liquids to clean the display panel.
3 Wireless LAN Switch ( )
Press the button to enable the built-in Wireless LAN.
4 Power Button ( )
The button allows powering ON and OFF the notebook.
The blue indicator LED lights when the notebook turned on.
When HDD LED light up, please do not directly push the
power button to turn off the notebook.
It is possibe to damage the data or notebook.
After turn OFF the notebook, please wait 5 more
seconds for the second time power on.
Attention
5 Keyboard
The keyboard provides with comfortable travel (depth at which the keys can be depressed) and palm rest
for both hands.
6 Internal Microphone
It can be used for video conferencing, voice narration, audio recording, and multimedia applications.
7 Status LEDs
Indicate the system status of the notebook.
8 Stereo Speaker
The built-in speaker allows you to hear audio without any additional accessories
For Speaker volume down and up, you can use the Fn key to increase/decrease the volume.
9 Touchpad (right button/ left button)
The touchpad and its buttons comprises a pointing device that provides the same functions as a desktop
mouse.
10 Touchpad
This is the pointing device of the notebook.

13
qbex aero style / User’s guide
Before Operating Your Notebook
Right Side
1 DC-IN Jack ( )
To connect the AC adapter
To prevent damage to the notebook and battery pack, always use the supplied
power adapter.
May become warm to hot when in use. Be sureAttention not to cover the adapter
and keep it away from your body
Attention
2 Display Output Port ( )
To connect an external monitor
3 LAN Port ( )
The 10/100/1000 Ethernet connector is used to connect a LAN cable for network connection.
The cable which can be connected to the LAN port is the 10BASE-T/100BASE-
X/1000BASE-T standard Ethernet cable.Please do not use the cable other than
that.
Do not connect the especially ISDN cable and the modular cable to the LAN port.
It may be broken to cause damage
Attention
4 HDMI Port
To input Audio or A/V signal synchronously to TV set with HDMI interface.
5 Microphone Jack ( )
It is designed to connect the microphone used for Skype, voice narrations, or simple voice recordings
6 Headphone Output Jack ( )
It connects the notebook’s audio out signal to amplied speakers or headphones. Using this jack automatically
disables the built-in speakers.
7 Kensington Lock Port ( )
Allows the notebook to be secured using Kensington Lock
1
2
3
4
56
7
1 DC-IN Jack
2 Display Output Port
3 LAN Port
4 HDMI Port
5 Headphone Output Jack
6 Microphone Jack
7 Kensington Lock Port

14 qbex aero style / User’s guide
1 USB Port ( )
The USB port is compatible with USB 2.0 or 1.1 devices.It allows many devices to run simultaneously on a single
computer, with some peripherals acting as additional plug-in sites or hubs. The USB also supports hot-swapping
function. Allows the notebook to be secured using Kensington Lock
2 Ventilation Slot
The slot is designed to cool the system. DO NOT block the ventilation for air circulation
3 Card reader
The following cards listed belown can be used on this notebook
Left Side
* Memory Stick
* Memory Stick Pro
* SD
* MMC
Memory cards have different insert directions, Please make sure the
correct direction before insert it into the memory card slot.
miniSD card cannot insert into the memory card slot. Please verify
the card type before you insert it.
Notice
1
2
1
3
1 USB Port
2 Ventilation Slot
3 Card reader

15
qbex aero style / User’s guide
Before Operating Your Notebook
Bottom Side
1 Battery Release Latch:
The latch keeps the battery pack secure. When the battery pack is inserted, it will automatically lock.When
remove the battery pack, this latch must be retained in the unlocked position.
2 Battery Pack:
The notebook will be powered by the battery pack when the AC adapter is disconnected.
3 Battery Lock Switch:
The switch is used to keep the battery pack secured.Move the lock to the unlocked position to insert or
remove the battery pack. Move the lock to the locked position after inserting the battery pack.
4 Memory Module and HDD Cover:
The memory module, hard disk drive, and wireless LAN module are located under the cover. Please take the
cover off when adding/removing the module.
5 USB Port:
The USB port is compatible with USB 2.0 or 1.1 devices. It allows many devices to run simultaneously on a
single computer, with some peripherals acting as additional plug-in sites or hubs. The USB also supports
hot-swapping function.
1
4
3
2
1 Battery Release Latch
2 Battery Pack
3 Battery Lock Switch
4 Memory Module and HDD Cover
5 USB Port

16 qbex aero style / User’s guide
About Status LEDs
1 Num LK LED ( )
This LED light when you press Num LK key on keyboard
2 Caps Lock LED ( )
Pressing Caps Lock key will set this LED light and in lower case when the Shift key is pressed the letter typed will be
in lower case.
3 HDD ( )
The LED blinks when data is written to or read from HDD
When HDD LED lights up, please do not directly push the power button to turn off
the notebook. It is possibe to damage the data or notebook
After turn OFF the notebook, please wait more than 5seconds for the second time
power on.
Attention
1
2
3
4
5
4
4 Power LED ( )
The LED lights when the notebook is turned ON and blinks slowly when the notebook is in the Save-to-RAM
(Suspend) mode. The LED is off when the notebook is turned OFF.
5 Wireless LAN LED ( )
When the built-in WLAN is enabled, the LED lights.

17
qbex aero style / User’s guide
Before Operating Your Notebook
Connecting AC Adapter
and Charging Battery
For the First Time Using
The battery included in the package is not fully charged. When you use the notebook for the rst time, please
connect the AC adapter after slide the battery pack
DO NOT use the AC adapter not included in the package. Use of another type of
adapter. Attentionmay risk re or explosion.
DO NOT allow anything to rest on the AC adapter. It may overheat the AC adapter
and risk re or explosion.
Attention
Connecting AC adapter and charging battery
1Connect the DC plug to DC-IN Jack. 2Connect the AC power cord to the AC
adapter and connect the AC power
cord to an AC outlet.
The notebook comes with a universal AC-
DC adapter for connecting to any 100V-240V
outlets without setting switches or using power
converters.
Different countries may require an adapter to
connect the provided AC power cord to a
different standard. Most hotels will provide
universal outlets to support different power cords
as well as voltages.
When operating with the battery only, please
remove the AC adapter.When using with AC
power, please connect the AC adapter.
Tip
You can use the notebook while charging the batery.
Tip
DC-IN Jack

18 qbex aero style / User’s guide
Power and Battery Status LEDs
Power LED ( )
Status Content
Blue ON The notebook is powered on
Blue Blinking The notebook is in suspend mode
Orange Blinking Battery charge is between 15% ~ 3%
Red Blinking Battery charge is less than 3%
Status Content
ON Battery charging
OFF Battery is fully charged
Battery LED ( )
Battery pack cannot be exchanged during battery charging.
Attention For “Removing and Installing the battery”
When the charge remained amount of the battery is small, your data is possible to
lose if your continue to operate the notebook. When the remained charge of the
battery is gone entirely, even while using the application the power will be OFF.
When alarm of the battery sounds, please store your data immediately.
Attention
Difference of stand-by and hibernate state
Stand-by:
Put the notebook on stand-by when it is idle. While on standby, the notebook switches to a low-power
state where devices, such as the monitor and hard disks turned off and the notebook uses less power.
When you want to use the notebook again, it comes out of stand-by quickly, and your desktop is
restored exactly as you left it. Stand-by is particularly useful for conserving battery power in portable
computers.
Because Stand-by does not save your desktop state to disk, a power failure while on Stand-by can
cause you to lose unsaved information.
Hibernate
Put the notebook in hibernation. The hibernate feature saves everything in memory on disk, turns off
your monitor and hard disk, and then turns off the notebook. When you restart the notebook, your
desktop is restored exactly as you left it. It takeslonger to bring your notebook out of hibernation than
out of stand-by.

19
qbex aero style / User’s guide
Before Operating Your Notebook
For the First Time Using
Ensure the notebook is powered off before doing battery exchange. Please ensure ()The battery LED is off.
DO NOT use the AC adapter not included in the package. Use of another type of
adapter may risk re or explosion.
Do not connect the positive (+) and negative (-) terminals with a metal object such
as wire. Short-circuiting may occur leading the battery pack to leak acid, overheat,
emit smoke, burst and/or ignite. DO NOT throw the battery in re.
Please refer to the safety precautions in this manual.
Attention
1Before removing the battery, ensure the
notebook is powered off.
2Move the battery lock switch to the right
(unlock position).
3Slide and hold the battery release latch
Remove the battery
4Slide and hold the battery release latch
Remove the battery
Tip
Ensure the battery lock switch is
unlocked then insert the battery
rmly.
5Slide the battery lock to switch back
to the locked position.
Battery Lock Switch
Battery Lock Switch

Table of contents