QSC K8 User manual

Product Model: K8, K10, K12, KSub
Document #: TD-000487-00
Initial Release: February 2015
Revised Release:
Revision: A
Service Manual
QSC Audio Products, LLC
Costa Mesa, California, USA
www.qsc.com
K Series

2QSC Audio Products, LLC

3
TD-000487-00
K Series Service Manual
Table of Contents
1. Introduction..................................................................................................................................................................................5
1.1 Restriction of Hazardous Substances Directive (RoHS) ...................................................................................................................................................... 5
1.2 Revision history......................................................................................................................................................................................................................... 5
1.3 Service bulletins ........................................................................................................................................................................................................................ 5
1.4 Serial Numbers.......................................................................................................................................................................................................................... 5
1.5 The well-equipped service bench........................................................................................................................................................................................... 6
2. Product specification and images ................................................................................................................................................ 7
3. Firmware.......................................................................................................................................................................................8
3.1 Firmware revisions and program numbers .......................................................................................................................................................................... 8
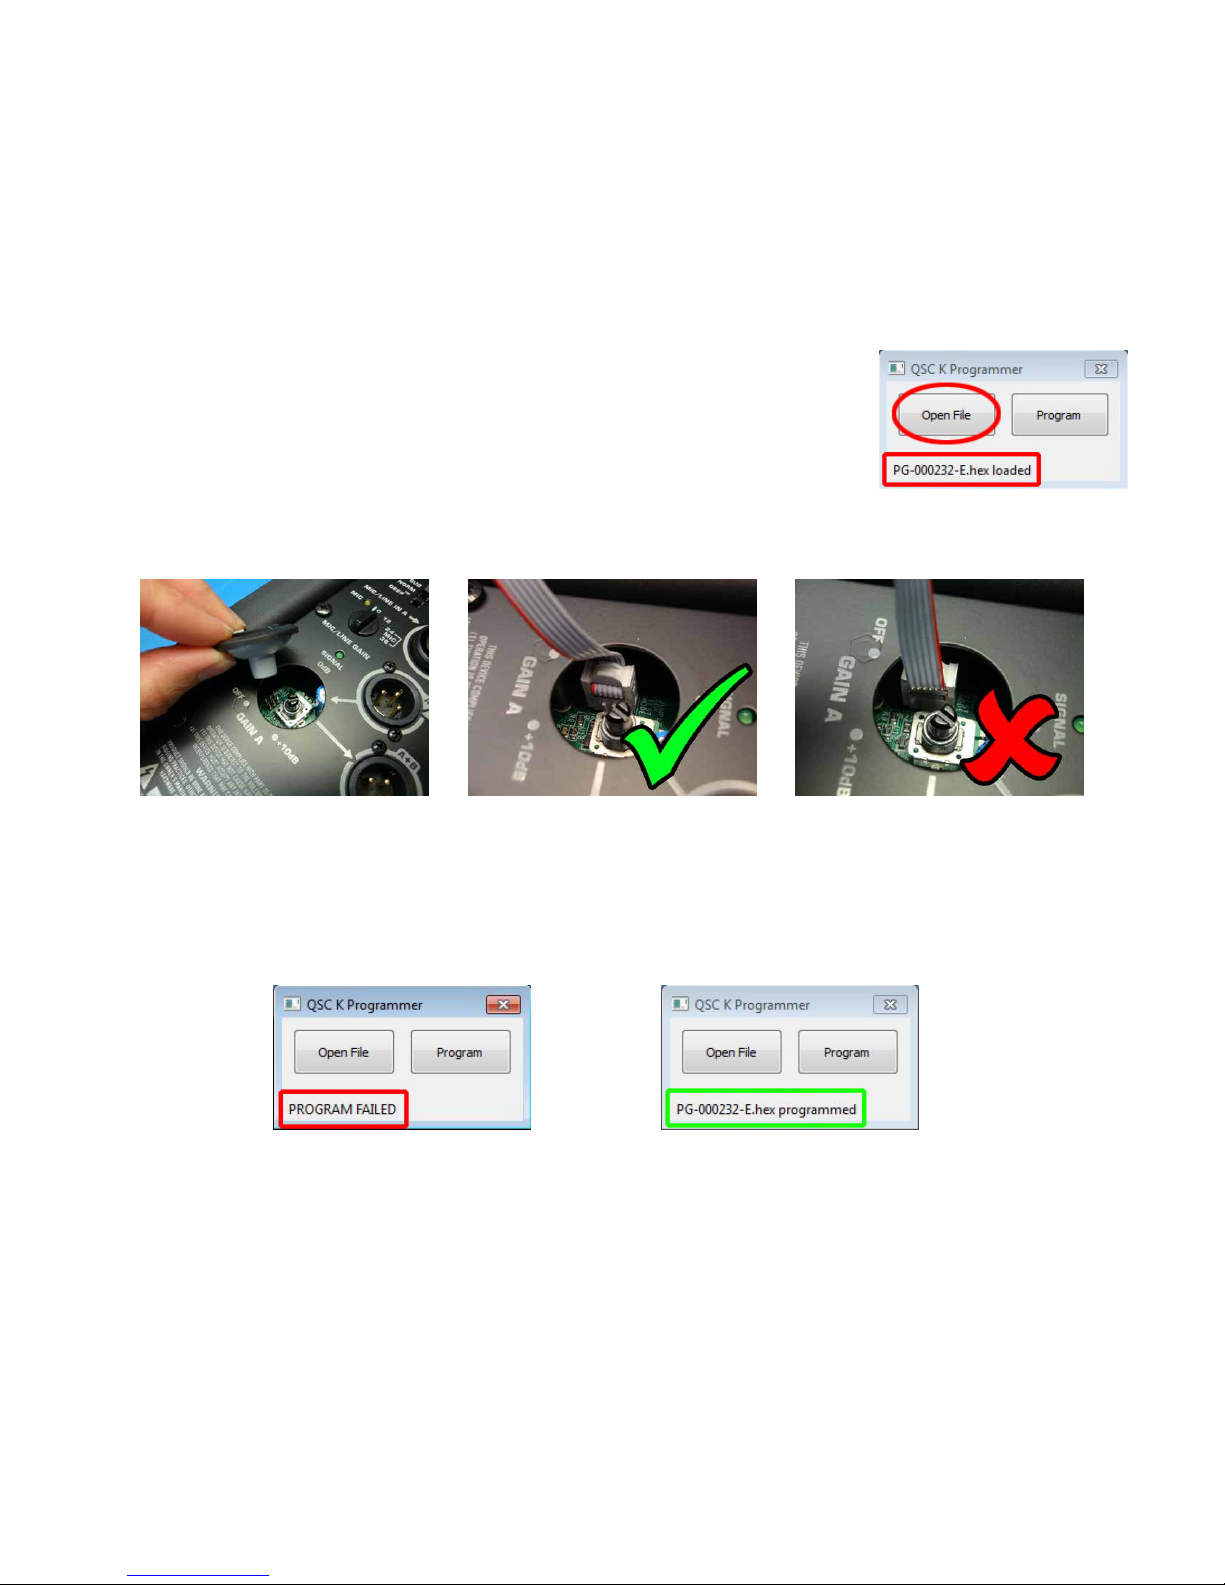
3.2 Firmware programming instructions..................................................................................................................................................................................... 9
4. Operational description ............................................................................................................................................................. 11
4.1 Series description.....................................................................................................................................................................................................................11
4.2 Top-Box Models .......................................................................................................................................................................................................................11
4.3 KSub ..........................................................................................................................................................................................................................................12
4.4 Bucket of power (BOP) amplifier module............................................................................................................................................................................12
5. Top-box disassembly instructions.............................................................................................................................................. 15
5.1 Bucket of power.......................................................................................................................................................................................................................15
5.2 Front grille ................................................................................................................................................................................................................................16
5.3 Front baffle...............................................................................................................................................................................................................................16
5.4 High frequency transducer.....................................................................................................................................................................................................17
5.5 Low frequency transducer .....................................................................................................................................................................................................18
5.6 Handles, feet, and pole mount..............................................................................................................................................................................................18
6. KSub disassembly and repair procedures .................................................................................................................................20
6.1 Bucket of power...................................................................................................................................................................................................................... 20
6.2 Low frequency transducers................................................................................................................................................................................................... 20
6.3 Handles, threaded pole mount, and casters........................................................................................................................................................................21
7. BOP disassembly and repair procedures...................................................................................................................................23
7.1 Faceplate................................................................................................................................................................................................................................... 23
7.2 PSU/amplifier board............................................................................................................................................................................................................... 24
7.3 Input/DSP board...................................................................................................................................................................................................................... 25
7.4 Power inlet, power switch, and fan ...................................................................................................................................................................................... 25
8. Testing.........................................................................................................................................................................................26
8.1 Requirements .......................................................................................................................................................................................................................... 26
8.2 Bucket of power testing......................................................................................................................................................................................................... 26
8.3 Loudspeaker testing............................................................................................................................................................................................................... 29
9. Troubleshooting guide................................................................................................................................................................ 31
9.1 General tips and tricks.............................................................................................................................................................................................................31
9.2 Line filter - broken components (BOP) ............................................................................................................................................................................... 33
9.3 Broken capacitor C45 (BOP)................................................................................................................................................................................................. 34
9.4 Input op-amp damage (BOP) ............................................................................................................................................................................................... 34
9.5 Amplifier section, MOSFET failure (BOP)............................................................................................................................................................................ 35
9.6 Power supply, MOSFET failure (BOP) ................................................................................................................................................................................. 36
9.7 Fan behavior............................................................................................................................................................................................................................ 37
9.8 Internal wiring harness.......................................................................................................................................................................................................... 37
9.9 Front LED................................................................................................................................................................................................................................. 38
9.10 Transducer issues.................................................................................................................................................................................................................. 39
9.11 Broken baffle ......................................................................................................................................................................................................................... 40
10. Service updates .......................................................................................................................................................................... 41
10.1 Inductor reinforcement, L13.................................................................................................................................................................................................41
10.2 XLR combo jacks with locking tabs .....................................................................................................................................................................................41
11. Schematics and PCB images.......................................................................................................................................................42
11.1 Schematic with notes (all models)...................................................................................................................................................................................... 42
11.2 PCB image with notes (all models) .................................................................................................................................................................................... 46
12. Component identification ..........................................................................................................................................................48
12.1 Top-box assembly components .......................................................................................................................................................................................... 48
12.2 KSub assembly components............................................................................................................................................................................................... 49
12.3 BOP components .................................................................................................................................................................................................................. 50

4QSC Audio Products, LLC
QSC Audio Products, LLC
Technical Services Group
1665 MacArthur Blvd.
Costa Mesa CA 92626 USA
K Series Powered Loudspeakers Service Manual
Copyright © 2014 by QSC Audio Products, LLC. All Rights Reserved.
QSC and the QSC logo are trademarks of QSC Audio Products, LLC in the U.S. Patent and Trademark Office and other coun-
tries. Patents may apply or be pending.
Windows® is a registered trademark of Microsoft Corp.
Audio Precision® is a registered trademark of Audio Precision, Inc.
All other trademarks are property of their respective owners.
+1 (714) 957-7150
1-800 QSC AUDIO (USA only)
+1 (714) 754-6173 (fax)
www.qsc.com (main web site)
www.qscservice.com (Technical Service Group web site)
www.qscparts.com (parts and accessories sales)
13. Exploded view drawings ............................................................................................................................................................52
13.1 K8 exploded view.................................................................................................................................................................................................................. 52
13.2 K10 exploded view................................................................................................................................................................................................................ 53
13.3 K12 exploded view................................................................................................................................................................................................................ 54
13.4 KSub exploded view............................................................................................................................................................................................................. 56
14. Replacement parts...................................................................................................................................................................... 57
14.1 FG-003300-01 (120V) or FG-003320-01 (230V), K8 ........................................................................................................................................................ 57
14.2 WP-003300-01, K8 speaker assembly................................................................................................................................................................................ 57
14.3 FG-003302-01 (120V) or FG-003322-01 (230V), K10 ....................................................................................................................................................... 58
14.4 WP-003302-01, K10 speaker assembly .............................................................................................................................................................................. 58
14.5 FG-003304-01 (120V) or FG-003324-01 (230V), K12 ....................................................................................................................................................... 59
14.6 WP-003304-01, K12 speaker assembly .............................................................................................................................................................................. 60
14.7 WP-00330x-00, BOP module assembly (K8, K10, K12 only) ...........................................................................................................................................61
14.8 WP-00331x-00, BOP PCB assembly (K8, K10, K12 only)..................................................................................................................................................61
14.9 FG-003306-01 (120V) or FG-003326-01 (230V), KSub..................................................................................................................................................... 64
14.10 WP-003306-01, KSub speaker assembly.......................................................................................................................................................................... 65
14.11 WP-003310-00, KSub BOP module assembly.................................................................................................................................................................. 65
14.12 WP-003314-00, KSub BOP PCB assembly........................................................................................................................................................................ 66

5
TD-000487-00
K Series Service Manual
1. Introduction
1.1 Restriction of Hazardous Substances Directive (RoHS)
QSC K Series loudspeaker products are manufactured to conform to the European Union’s RoHS Directive, which reduces
the amount of hazardous substances allowed in products for sale within its member nations. In electronic equipment such
as audio processors, this applies primarily to certain toxic heavy metals, such as lead, which may be present in electronic
components, solder, and other parts.
RoHS-compliant materials
When servicing RoHS-compliant electronic products, it is important for the service technician to use only RoHS-compliant
components and solder (lead-free). All replacement parts provided by QSC for RoHS-compliant products are certified as
RoHS compliant.
RoHS-compliant tools
Soldering irons and desoldering apparatus used on RoHS-compliant products must also not be contaminated by hazardous
substances, such as lead. Therefore, you cannot use the same soldering and desoldering tools for RoHS-compliant products
and solder as you do for non-compliant products and solder. You must either use separate soldering irons, desoldering tools
and braid, etc., or at the very least designate separate tips and braids and use only the appropriate ones. If you contami-
nate a tip or braid, even inadvertently, by using it on a non-compliant product or solder, you should no longer use it with
RoHS-compliant products or solder.
1.2 Revision history
No revision history yet.
1.3 Service bulletins
At the publish date of this service manual, two service bulletins concerning the K Series loudspeakers have been issued.
Check www.qscservice.com or contact QSC Technical Services Group (TSG) for the latest information on applicable service
documents. For a quick summary, refer to “10. Service updates” on page 41.
1.4 Serial Numbers
Serial numbers on QSC K Series loudspeakers are nine digits long. The second digit represents
the month of manufacture, and the third digit represents the year; use the decoder chart on the
right to find the manufacture date. (The first digit is an individual factory code, and the fourth
through ninth digits are the sequential identifying number for each individual speaker.) For
example, a serial number of GJCxxxxxx would indicate that the speaker was built on 10/12, or
October 2012.
The speaker’s serial number can be found on a label on the amplifier module’s face plate.
MODEL:
KW122,BLK
100–240 V 2.3–1.1 A 50/60HZ
QSC AUDIO PRODUCTS, LLC
COSTA MESA, CA. USA
MADE IN CHINA
GJC669897
Year
Month
GX X 5xxxxx
Month Year
A = Jan
B = Feb
C = Mar
D = Apr
E = May
F = Jun
G = Jul
H = Aug
I = Sep
J = Oct
K = Nov
L = Dec
9 = 2009
A = 2010
B = 2011
C = 2012
D = 2013
E = 2014
F = 2015
G = 2016

6QSC Audio Products, LLC
1.5 The well-equipped service bench
Hardware and Software
• Personal computer (PC) running Windows® 7 or newer operating system with available USB2.0 or newer port
• Total Phase Aardvark I2C host adapter (for programming)
• Digital multimeter (DMM)
• Oscilloscope
• Audio sine wave generator
• 8ohm resistive load, capable of 500 W power handling
• SPL meter
• Soldering iron
• K Family test adapter
• Distortion analyzer (Audio Precision recommended)
• Class D output filter for distortion analyzer
Tools required
• Electronic screwdriver
• Various hand tools for electronic repair, including Phillips screwdrivers, needle-nose pliers, etc.
• 2.5x or higher magnifier with lamp
• ROHS-compliant (lead-free) soldering iron
• RoHS-compliant electronic solder
• ROHS-compliant desoldering equipment or desoldering braid

7
TD-000487-00
K Series Service Manual
2. Product specification and images
1 For comparison purposes and in accordance with common industry practice, maximum peak SPL specifications are theoretical calculations based upon transducer sensitivity and peak available amplifier power.
2 Independent of limiters and driver protection circuits.
Specifications subject to change without notice.
K Series Specifications
K8 K10 K12 KSub
Configuration Trapezoidal 2-way Multipurpose 2-way Multipurpose 2-way 4th Order Bandpass
Transducers
Low-frequency
High-frequency
8" cone transducer
1.75" diaphragm compression driver
10"cone transducer
1.75" diaphragm compression driver
12"cone transducer
1.75" diaphragm compression driver
2 x 12"cone transducers
Frequency Response (-6 dB) 66 Hz – 18 kHz 60 Hz – 18 kHz 52 Hz – 18 kHz 48 Hz – 134 Hz
Frequency Range (-10 dB) 61 Hz – 20 kHz 56 Hz – 20 kHz 48 Hz – 20 kHz 44 Hz – 148 Hz
Nominal Coverage (-6 dB) 105° conical 90° conical 75° conical
Maximum SPL 1127 dB peak 129 dB peak 131 dB peak 130 dB peak
Amplifiers
Power Output 21000 W continuous Class D (500 W LF, 500 W HF), 2000 W peak 1000 W continuous Class D
(2 x 500 W), 2000 W peak
Input Impedance (Ω)XLR / ¼": 40k balanced / 20k unbalanced • XLR / ¼" MIC mode: 2260 balanced • RCA: 10k
Controls Power • Gain A • Gain B • Mic/Line • LF Mode (Ext Sub/Norm/DEEP™) • HF Mode (Flat/Vocal Boost)
Front LED (On/Off/Limit)
Power • Gain • LF Mode (Normal/
DEEP™) • Polarity (Normal/Reverse)
• Front LED (On/Off/Limit)
Indicators Power • Signal A • Signal B • Standby • Limit • Mic Power • Signal • Standby • Limit
Connectors Balanced female XLR / ¼" line/mic level input • Balanced female XLR / ¼" line level input • Dual Balanced male XLR
full range line level out • Balanced male XLR “mix” out • Stereo RCA line level input • Remote gain control • Locking
IEC power connector
Dual balanced female XLR / ¼" line
level input • Dual Balanced male
XLR full range line level out •
Remote gain control • Locking IEC
power connector
Cooling On demand, 50 mm variable speed fan
Amplifier Protection Thermal limiting • Output overcurrent • Overtemperature muting • GuardRail™
Transducer Protection Thermal limiting • Excursion limiting
AC Power Input Universal power supply 100 – 240 VAC, 50 – 60 Hz
AC Power Consumption
1/8 Power
100 VAC, 2.3 A • 120 VAC, 2.01 A • 230 VAC, 1.13 A
Enclosure Impact resistant ABS Painted birch plywood
Finish Black Paint Black textured paint
Grille Black powder coated 18 gauge steel
Dimensions (HWD) 17.7" x 11" x 10.6"
450 mm x 280 mm x 269 mm
20.4" x 12.6" x 11.8"
519 mm x 320 mm x 300 mm
23.7" x 14" x 14"
603 mm x 356 mm x 356 mm
26" x 14" x 28.1" (including casters)
665 mm x 356 mm x 714 mm
Weight (Net) 27 lb (12.2 kg) 32 lb (14.5 kg) 41 lb (18.6 kg) 74 lb (33.6 kg)
Available Accessories K8 TOTE • K8 YOKE •
K SERIES M10 KIT
K10 TOTE • K10 YOKE •
K SERIES M10 KIT
K12 TOTE • K12 YOKE •
K SERIES M10 KIT
KSub COVER

8QSC Audio Products, LLC
3. Firmware
Very infrequent DSP firmware updates have occured to K Series loudspeakers during production. While firmware can be up-
dated from the programming header using an Aardvark I2C programmer, it’s not recommended and almost never needed
to perform updates on the DSP firmware after a repair.
What is more important is understanding the behavior of the particular DSP firmware revision that is loaded in the speaker
being serviced. Use the table below to see all firmware changes.
3.1 Firmware revisions and program numbers
Current firmware revision at the publication of this service manual (January 2015) is: revison F
Revision Effective Date S/N range Description of changes
A March 11, 2009 GC9xxxxxx only Production release
B March 25, 2009 GD9xxxxxx — GE9xxxxxx Increased mute turn-on time to avoid signal passing
through when the system powers off with certain AC input
situations
C April 21, 2009 GF9xxxxxx — GAAxxxxxx Increased the fan turn-on voltage because some fans
wouldn’t come on with lower voltage
D January 28, 2010 GBAxxxxxx — GLAxxxxxx Adjusted fan thresholds to accommodate hardware chang-
es and modified limiters based on amplifier updates. The
fan no longer spins until it’s absolutely needed.
F December 16, 2011 GABxxxxxx and newer Test mode changes only to shorten burn-in times.
The firmware revision for K-Series loudspeakers is printed on a small label near the channel A gain pot. Remove the chA
gain knob to locate the DSP firmware revision that the amplifier was originally manufacutred and programmed with.
K8 K10 K12 KSub
QSC PG- number PG-000210-00 PG-000211-00 PG-000212-00 PG-000213-00
Same DSP board for K8, K10, and K12 - different firmware
K8, K10, and K12 models have exactly the same DSP board. There is no physical difference between the boards and the
components stuffed on the PCB. The only difference between them is the firmware code that is programmed into the DSP.
This means that you can program a DSP/input board that was originally programmed as a K8 into a K10, K12, or vice-versa.
The KSub DSP/input board is the exception to this rule since less components are stuffed on the PCB.
Please note the PG- numbers in the table above for the correct firmware files.
Important Note: Due to component changes between board revisions, it is not recommended to upload a different
firmware revision than the revision that is printed on the small label on the DSP board. The firmware will upload into the
DSP fine, but temperature sensing, limiting, speaker voicing, and fan speed may behave strangely due to the component
changes between board revisions.

9
TD-000487-00
K Series Service Manual
3.2 Firmware programming instructions
Warning
If the instructions are not followed carefully, there is a possibility that the amplifier inside the loudspeaker will stop work-
ing. Because House of K loudspeakers use DSP technology, all audio signals are routed through the DSP controller. If the
firmware is not programmed into the DSP controller correctly, then the amplifier will fail to pass audio. While performing a
firmware update, never plug the ribbon cable into the programming header with the amplifier turned on.
Equipment needed
• Total Phase Aardvark I2C Host Adapter, TP240141
• Ribbon cable adapter, 6 pin to 10 pin (not needed for some older K models)
• USB cable, A-type to B-type (included with Aardvark)
• Computer with Windows XP, Vista, or 7 operating system (32 bit or 64 bit okay)
Software needed
• Total Phase USB driver setup file: TotalPhaseUSB-v2.10.exe
• K Programmer Utility (32 bit or 64 bit)
• HEX file which contains specific loudspeaker firmware
Installing the Total Phase Aardvark USB Drivers
This step must be performed before any programming takes place. The installation file for
the USB drivers will work on Windows XP, Vista, 7 (32 bit and 64 bit), and 8.
1. Disconnect the Aardvark if you’ve already connected it.
2. Open the installer file named TotalPhaseUSB-v2.10.exe.
Important Note: There is a known bug in the installer that affects Windows Vista
only. You must run the installer in a different mode. Right-click on the install file Total-
PhaseUSB-v2.10.exe and click on Properties. Click the Compatibility tab and mark the
box titled “Run Compatibility mode for Windows XP (Service Pack 3)”. Click OK to save the
changes.
3. Mark the box titled “Install USB Drivers” and continue with the installation utility until
complete.
4. Connect the Aardvark to the computer with the USB cable.
5. The Total Phase USB drivers will install automatically. You may skip any
Windows Update notification as you do not want Windows to look for USB
drivers via the Internet. Windows will let you know that the drivers installed
correctly with a pop-up window.
Note: If you want to check that the USB drivers installed correctly, go to the
Device Manager under the Control Panel menu and look for “Total Phase
Aardvark I2C/SPI Host Adapter” under Universal Serial Bus controllers.

10 QSC Audio Products, LLC
Programming a House of K Loudspeaker
In order to program the loudspeaker with new firmware you must open the correct K Programmer utility that works with
your Windows operating system. To find out what type of operating system you have, go to the System icon under Control
Panel. The information will be available there.
1. Connect the Aardvark to the computer with the USB cable.
2. If you own 32 bit operating system, open the file KProgrammer.exe in the folder labeled “XP-Vista-win7 32bit”. If you
own a 64 bit operating system, open the file KProgrammer.exe in the folder labeled “Vista-win7 64bit”.
Note: If the USB drivers did not install correctly or the USB cable is not securely connected to the computer’s USB port,
the K Programmer utility will display the text “Aardvark not attached”.
3. Click on the button labeled “Open File” and navigate to the directory where the HEX
file you received is located. If you received this firmware file from a QSC employ-
ee, make sure that it’s the correct one or the speaker will not work after being pro-
grammed.
4. Turn the power switch to the off position and connect the IEC power cable.
5. Remove the plastic knob of Gain A and insert the header (6 pin or 10 pin) into the
jumpers on the PCB with the correct orientation. The red strip on the ribbon cable
should be on the bottom as in the photo.
6. Connect the IEC power cable and turn the power switch to the ON position. Wait at least 5 seconds.
7. Press the “Program” button on the K Programmer utility.
8. In the bottom of the window, the utility will display “PG-xxxxxx-xx programmed”. Occasionally the utility will display
“PROGRAM FAILED”, so press the Program button again on the K Programmer utility until you have a successful pro-
gram. This process may take two or three tries.
9. Turn the power switch to the off position and disconnect the header from the PCB.
10. Test the speaker with an audio source to verify that the firmware uploaded properly.

11
TD-000487-00
K Series Service Manual
4. Operational description
4.1 Series description
Converging our expertise in loudspeaker, amplifier, and digital signal processing technologies, QSC has created a spectrum
of active loudspeakers designed with one common goal - accurate acoustical performance for the widest selection of appli-
cations. Ranging from a compact and potent eight-inch, two-way utility loudspeaker to a fixed-accurate line array system, all
K Family models feature common power modules, DSP and performance characteristics - irrespective of their size or config-
uration. Models are differentiated primarily by coverage angle, bass extension, woofer diameter and enclosure size. With the
K Family there is no “good, better, best” - only “best, best, best”.
4.2 Top-Box Models
The K8, K10, and K12 loudspeakers are all top-box style loudspeakers. The enclosure is constructed of ABS plastic and are
painted over with QSC black RAL 9011. The front grille, which displays the QSC logo, is 16 gauge steel and finished with a
black powder coat. Behind the grille is the main baffle of the speaker. The baffle incorporates a wave guide that determines
the coverage angle of the speaker. Attached to the baffle are two transducers — the low and high frequency. Each model
has a different size low frequency transducer - the K8 has a 8”, K10 has 10”, and K12 has a 12”, all extending bass response
as diameter increases. Top-box models share the same high frequency transducer, which has a 1.75” diameter voice coil
with a neodymium magnet to decrease overall size of the transducer. The transducers are powered by a two channel class
D amplifier module which is fastened to the rear of the ABS enclosure. The amplifier module is bi-amped. The low channel
is connected to the low frequency transducer and is dedicated to frequencies below 2 kHz and the high channel is connect-
ed to the high frequency transducer and is dedicated to frequencies above 2 kHz.
Top-box models are effective as mains or monitors. The K10 and K12 have rubber feet on the side so they can be placed
sideways in the monitor wedge position. All models share the same handles and hardware. The pole-cup assembly is
different on each model but share the same characteristics. The speakers can be placed on a speaker stand at a 0 or 7.5
degree downward angle. Three mounting points are available for vertical suspension with QSC’s M10 Kit-C. There are two
M10 mounting points on the top and one on the lower-back. If horizontal suspension is preferred, a yoke mount kit must
be used.

12 QSC Audio Products, LLC
4.3 KSub
The KSub is a dual-12” bandpass design, constructed of premium birch. The wood
enclosure is texture painted with a water-based acrylic paint color RAL 9011. A single
large port sits behind the front panel. The two transducers are mounted vertically on
a piece a wood panel that is in the center of the enclosure. The two channel class
D amplifier module is similar in size, weight, and design compared with the top-box
models. Each amplifier channel is dedicated to powering, in phase with each other, a
single 12” transducer.
The KSub includes four low-noise casters. The subwoofer features a threaded pole
receptacle for a positive, wobble free connection to a threaded speaker pole (in-
cluded in box). There are two handles on the subwoofer enclosure - one on the top
panel and another on the bottom. Four round rubber feet are also on the bottom for
support.
4.4 Bucket of power (BOP) amplifier module
Startup sequence
When mains voltage is applied, the IC charges up its large supply capacitor via trickle-start circuitry inside the power supply
controller IC. Once a preset voltage threshold is reached on the cap, the IC shuts off the trickle start and begins switching
the power supply FETs. Once the supply is running, an auxiliary winding on the transformer powers the controller IC. Thus,
an auxiliary supply is not needed for BOP because the main supply is able to start itself. While the DSP is booting, audio is
muted since the DSP is not passing any signal. After booting, the DSP has an additional 4.5 second delay before the amplifi-
er comes out of muting, to allow all internal voltages to fully settle.
Power supply
The BOP’s switch mode power supply is a regulated, fixed frequency, active-clamped flyback. It is similar to a typical flyback
converter except that when the main switch is off another switch turns on and recovers the transformer energy into a res-
onant tank. A typical flyback power supply has good cross-regulation and can operate over a wide input voltage range, but
the power dissipation of a passive clamp limits the power level a flyback can
reasonably output; adding the active clamp allows a flyback converter to scale
to much higher power levels. Because the power supply accepts universal AC
voltages, the incoming mains voltage is bridge rectified to DC and stored in
a bank of 2 primary capacitors in parallel. This rectified voltage varies directly
with mains voltage. The main and clamp FETs, operating at 200kHz, couple
energy to the secondary diodes through the transformer. The regulated ±85V
secondary voltage is stored in a pair of secondary capacitors, one per rail. Reg-
ulation is taken across the entire +170V secondary voltage, relying on proper
circuit operation to keep the rails balanced. Adjusting the duty cycle of the
PWM signal driving the power supply FETs keeps the power supply’s output
voltage constant regardless of changes to input voltage or load.
Housekeeping voltages of ±15V and +7V nominal are created with separate
transformer windings from the main secondary rails, but all windings are tied
together at ground. Under load, the amplifiers will pull energy from the main
rails and the power supply will increase the duty cycle to compensate and
keep the main rails at ±85V; this means the housekeeping voltages increase
under load.

13
TD-000487-00
K Series Service Manual
Class D amplifier
Each of the BOP amplifiers is a type of class D amplifier called ‘self-oscillating’, as opposed to a class D amplifier that
requires a clock to switch. Self-oscillating class D amplifiers create a PWM signal solely by using feedback; although many
different variations have been invented. Unique to the BOP’s type of self-oscillating amplifier, PWM is created by taking
feedback only after the output filter and bringing it to a comparator input through a lead filter network. The lead filter in the
feedback network, combined with the output filter phase shift and the delay between the comparator and FETs, creates the
required phase shift with gain to allow oscillation at a specific frequency. Idle frequency is about 400kHz, and the switching
frequency dips to about 100kHz at full power since this is a self-oscillating amplifier and switching frequency varies with
modulation index.
The modulated switching voltage must be filtered to recover the audio signal before being connected to a transducer. The
filter uses a toroid inductor and film capacitor for each channel. When idle, a capacitor between the amplifier outputs cou-
ples high frequencies between the channels, thus forcing a common switching frequency to eliminate sirens and lower hiss
from HF transducers. Because this isn’t enough to get acceptably lower noise floor, a high pass filter is used to further lower
both the amplifier power and the noise from only the amp channel driving the HF transducer. Although not required with
the type of self-oscillating amplifier used in the BOP, small Zobel filters are present on each channel to aid in stability and
help reduce cross-channel interference during over-current (OC) conditions.
A terminal block, sticking through the back of the bucket into the loudspeaker cabinet, brings both amplifier outputs to the
transducers via a detachable wire harness. Another pair of wires goes to the front LED which is mounted in the loudspeaker
cabinet
Input/DSP board
The BOP has two separate input sections, A and B, each with a balanced combination female XLR/TRS jack with a pass-
through male XLR jack. On 2-way versions of BOP, each input also has unique features. Input A has a switch which increas-
es the gain by 25.4dB to boost low-amplitude signals, specifically microphones. When in MIC mode, a yellow LED is lit to
indicate this mode setting to the user. Input B has an unbalanced stereo phono jack, with 6dB more gain, that can mix its
signal with the XLR/TRS input. Each input has a separate gain knob, allowing adjustment from OFF to +10dB, with 0dB right
in the middle. The gain knob markings also indicate the level
of another female XLR, labeled LINE OUT, which carries the
signal of the two inputs after being mixed together. With the
gain knob at 0dB, the LINE OUT XLR is the same amplitude as
a signal at either input; with the gain knob at +10dB the LINE
OUT XLR level is 10dB greater than a signal at either input.
The subwoofer version of BOP has only the balanced XLR/
TRS inputs, with pass-through female XLRs, that are summing
to a single gain knob. No MIC/LINE or phono connections are
present.
Green LEDs for each input indicate the presence of an audio
signal before the gain controls, meaning even with the BOP
output level at zero the LEDs will still light up and indicate if
a signal above about 3.5mVp is presented to the inputs. The
subwoofer version, naturally, only has one signal presence
LED as it has only one input. The DSP controls the other 3
LED on the faceplate, labeled LIMIT, STBY, and PWR. STBY
and PWR are mutually exclusive and indicate the operation
of the amplifiers; if the DSP turns off the amplifiers the green
STBY LED is on, while the blue PWR LED is on when the DSP
allows the amplifiers to run. A condition in which the DSP
performs long-term amplifier limiting or muting triggers the
red LIMIT LED. OC conditions are handled by the amplifiers
without the DSP’s knowledge so the LIMIT LED is not turned
on when OC is detected.
Besides the MIC/LINE switch on input A, 3 other switches are
present on the BOP faceplate. The FRONT LED switch selects
between 3 different modes of operating for the blue LED
on the front of the loudspeaker cabinet: PWR, LIMIT, or OFF.
When switched to PWR the front LED is always bright and

14 QSC Audio Products, LLC
when in OFF the front LED is always off. By setting this switch to LIMIT, the
LED is normally glows dimly but becomes bright when the DSP is limiting the
amplifiers, giving some feedback to the loudspeaker operation from the front
of the system.
On 2-way systems, HF and LF switches allow adjustment of the amplifier’s
response. The LF switch selects between EXT SUB with a 100Hz high-pass
filter, NORM that does not change the amplifier’s natural response, and DEEP
which provides boost at low frequencies which diminishes as volume increas-
es. Setting the HF switch to FLAT also has no response change while selecting
VOCAL BOOST increases the amplifier’s gain only in the mid frequencies to
help bring out the typical frequency range of the human voice. The subwoofer
BOP has a MODE switch instead of LF, with NORMAL and DEEP selections,
equivalent to FLAT and DEEP on 2-way systems. The HF switch is replaced by
a POLARITY switch in subwoofer versions, with the self-explanatory choices of
NORMAL and REVERSE.
The final connector on the faceplate of BOP is a versatile 3 pin ‘Euro’ header
called REMOTE GAIN. The +5V pin, naturally, supplies +5V and is internally
protected and current limited by an op amp; the chassis ground pin is earth
ground. The middle pin, labeled with a triangle having the tall side by the +5V,
can be used to adjust the level of the BOP output. With nothing connected
to this pin, it is internally pulled up to +5V and the output is not attenuated.
When at ground, the DSP output, and thus the amplifier output, is muted.
Any voltage between +5V and ground continuously adjusts the BOP output
level by varying the DSP output level. Connecting a potentiometer between
+5V and ground, with the wiper on the attenuation pin, allows full control of
volume. Because the attenuation pin is buffered, a single pot can control the
level of multiple BOPs. Voltage can also be injected into the connector, or a
contact can pull the attenuation pin to ground to affect a muting function.
Protection systems
As with all audio amplifiers, full rated power is only required for brief program peaks and typical use rarely exceeds 1/8
average power. High peak power must be able to flow for reasonable periods of time, while providing various protective sys-
tems that limit this power to reasonable long-term levels. The amplifier’s protection systems rely on the DSP to perform all
protection systems except amplifier OC, based on predetermined limits and operating conditions of the amplifier and trans-
ducers. A thermal sensor is placed near the amplifier FETs and is read by the DSP to perform thermal limiting and muting,
but also for fan speed control. Measurement of the amplifier output current is done by the gate driver which terminates a
PWM pulse if the current rises above a certain level. Muting of the amplifier, by the gate driver or DSP, occurs only if stresses
continue to build up.
As part of the current loop of the power supply, cycle-by-cycle current limiting will protect the power supply FETs from
damage. Another advantage of having the power supply current monitored is that the maximum AC mains current can be
limited in case the mains voltage drops below a level at which the amplifier should not be allowed to output full power.
Although the DSP signal level limiting and power supply current limiting will keep the mains current draw from blowing the
fuse in normal operation, a fuse is present and will open under catastrophic circumstances.

15
TD-000487-00
K Series Service Manual
5. Top-box disassembly instructions
To reduce the number of pages in this service manual, all top-box K-Series loudspeakers have been combined into one
section. The K10 powered loudspeaker is used as an example for these generic disassembly and repair procedures. The K8
and K12 models are assembled nearly identical to the K10. Slight differences are as follows:
• K8 does not have rubber feet on the side for floor monitor wedge use.
• Pole-cup assembly is slightly different on each model
• The K12’s high frequency transducer is not secured to the front of the baffle with screws. Instead, it’s all mounted behind
the waveguide with screws and washers.
For QSC part numbers, use “12. Component identification” on page 48 or “13. Exploded view drawings” on page 52.
5.1 Bucket of power
Removal
1. Remove the 10 screws along the outer perimeter of the BOP.
2. Partially remove the amplifier module out of the main enclosure as seen in Figure 5.1.
Note: Occasionally the module will be stuck to the enclosure. Place a putty or butter knife between the enclosure and
edge of the module to pry the module out.
3. Detach the multi-pin molex connector from the read of the module.
4. The BOP can now be fully removed.
Installation
1. Verify all internal wiring. The positive and negative terminals of the LF and HF transducers should be securely connect-
ed. The molex connector should be inspected for loose wires.
2. Lay the speaker face-down on its front grille.
3. Connect the molex connector into the module.
4. Slowly drop the BOP down and align the holes along
the rim of the BOP to the holes on the enclosure.
5. Fasten the 10 screws that secure the BOP to the enclo-
sure, beginning with the corner screws.
Figure 5.1 - BOP removal from a top-box model

16 QSC Audio Products, LLC
5.2 Front grille
Removal
1. Remove the four screws that attach the front grille to the
baffle.
2. Using a putty or butter knife, pry the grille outward and
remove it. If the grille is stuck, gently pry along the sides
in multiple locations until the grille becomes loose
enough to remove.
Installation
1. Verify that the gasket along the top and bottom of the
grille is still in place. If you are replacing the grille with a
new one, install new gasket along the top and bottom
of the grille to reduce vibrations between the grille and
baffle.
Note: Recommended gasket size is 1/2” width and at
least 1/16” thickness.
2. Fit the side edges of the grille in the space between the
baffle and enclosure. Press down gently. Be careful not
to bend the grille. If the grille does not fit in the space,
the baffle may need to be realigned.
3. Fasten the four screws that secure the grille to the baffle.
4. Use a rubber mallet with a large head to gently press in
the sides of the grille so that the grille is flush with the
enclosure.
5.3 Front baffle
Removal
1. To access the front baffle, the front grille must be
removed. Follow the instructions in “5.2 Front grille” on
page 16.
2. Remove all screws around the perimeter of the baffle.
3. Place the speaker on a work surface so that the baffle is
face-down.
4. Partially lift the enclosure away from the baffle assem-
bly.
5. Disconnect the molex connector from the BOP.
6. You may now fully remove the baffle assembly from the
main enclosure.
Installation
It’s recommend that the LF and HF transducers are installed
before reinstalling the baffle to the main enclosure assem-
bly.
1. Verify that the positive and negative terminals on the LF
and HF transducers are connected securely to the wiring
harness.
2. Verify that the gasket is properly installed around the
edge of the baffle.
3. Reinstall all acoustic insulation in both the main enclo-
sure assembly and baffle assembly.
Figure 5.3 - Front baffle removal
Figure 5.2 - Front grille removal

17
TD-000487-00
K Series Service Manual
4. Set the baffle assembly face down on a work surface.
5. Gently place the main enclosure assembly on top of the baffle assembly, paying close attention to the orientation. If
possible, connect the molex connector to the BOP.
Note: Connecting the wiring harness to the BOP at this stage can be difficult. Perform that step after the baffle has been
installed by removing the BOP, connecting the harness, and reinstalling the BOP.
6. Verify that the small gap between the sides of the main enclosure and the baffle are even. Both sides of the front grille
must fit inside these gaps.
7. Fasten the screws that secure the baffle to the enclosure, starting with the corner screws.
5.4 High frequency transducer
The K8 and K10’s HF transducer is secured to the baffle by four mounting points that come out of the waveguide. Covering
the screws are four rubber plugs that allow the high frequency sound waves to propagate out correctly. The K12’s HF trans-
ducer is secured on the baffle as well, but behind the waveguide.
K8 and K10 high frequency transducer removal
It’s recommended to remove the baffle from the main enclosure but not re-
quired for HF transducer removal. Alternately, the BOP can be removed if you’re
okay with working in tight spaces.
1. Disconnect the yellow and yellow/black wires from the HF transducer’s
terminals.
2. Remove the 4 rubber plugs from the waveguide.
3. Remove the 4 screws that secure the HF transducer to the baffle.
4. The HF transducer can now be removed from the baffle.
K12 high frequency transducer removal
It’s required to remove the baffle from the main enclosure for HF transducer
removal.
1. Disconnect the yellow and yellow/black wires from the HF transducer’s
terminals.
2. Remove the 4 screws, 4 lock washers, and 4 normal washers that secure
the HF transducer to the baffle.
3. The HF transducer can now be removed from the baffle.
Diaphragm replacement
Instead of replacing the entire HF transducer, the transducer can be repaired by replacing the diaphragm. Replacing the
diaphragm can be much cheaper than replacing the entire HF transducer. Follow the instructions below to replace the dia-
phragm (QSC part number SR-000145-00).
1. Remove the 4 screws that secure the cover to the frame of the transducer.
2. Lift the cover away from the transducer assembly.
3. Remove the diaphragm.
4. Clean out the gap that the voice coil sits in. Wipe the edges of the gap with
isopropyl alcohol and spray the gap with compressed air to remove all contam-
inants inside.
5. Install the new diaphragm with the correct orientation.
6. Place the cover back on the transducer assembly.
7. Fasten the 4 screws to secure the cover on the transducer assembly.
Transducer installation
Simply follow the removal instructions in reverse.
Figure 5.4 - HF transducer removal on K8
and K10
Figure 5.5 - Diaphragm replacement.

18 QSC Audio Products, LLC
5.5 Low frequency transducer
The LF transducer can be removed and reinstalled without removing the baffle.
Removal
1. Follow the removal instructions in “5.2 Front grille” on page
16.
2. Place the speaker on it’s back (or in monitor wedge posi-
tion) so the LF transducer doesn’t fall out after the screws
are removed.
3. Remove 8 screws around the perimeter of the transducer’s
frame.
Note: Be very careful when removing the screws. The
screwdriver can easily slip and pierce a hole in the surround
or cone of the transducer.
4. Partially lift the transducer out of the speaker assembly.
5. Disconnect the fastons from the transducer’s positive and
negative terminals.
6. Fully remove the transducer from the speaker assembly.
Installation
1. Place the speaker on it’s back (or in monitor wedge posi-
tion).
2. Connect the fastons to the transducer’s positive (green
wire) and negative (green/black wire) terminals.
Important note: This connection must have high retention force! Crimp new fastons (0.205” or 5.21 mm female,
14–16 AWG, insulated straight ) to the wiring harness if the old ones are weak.
3. Gently lower the LF transducer into the speaker assembly.
4. Fasten the 8 screws that secure the transducer to the baffle in a star pattern.
Note: Be very careful when installing the screws. The screwdriver can easily slip and pierce a hole in the surround or
cone of the transducer.
5.6 Handles, feet, and pole mount
Handle removal and installation notes
• The handle is secured to the enclosure with machine screws (on the
exterior of the enclosure) and mounting plates (on the interior of the
enclosure).
• Access to the interior of the speaker assembly is required to remove
and install the handles.
• The easiest way to access the interior of the enclosure is to remove the
BOP. See removal instructions in “5.1 Bucket of power” on page 15.
• Reapply a small amount of thread locking fluid to the mounting plate
when replacing the handles.
Figure 5.6 - LF transducer removal with baffle installed
Figure 5.7 - Handle removal

19
TD-000487-00
K Series Service Manual
Rubber feet removal and installation notes
• Rubber feet are secured to the enclosure with machine screws (on the exterior of the enclosure) and nuts (on the interi-
or of the enclosure).
• Access to the interior of the speaker assembly is required to remove and install the rubber feet.
• The easiest way to access the interior of the enclosure is to remove the BOP. See removal instructions in “5.1 Bucket of
power” on page 15.
• Reapply a small amount of thread locking fluid to the nuts when replacing the rubber feet.
Pole cup removal and installation notes
• Replace the entire pole-cup assembly if any parts are broken or have failed.
Individual parts are not available.
• The pole cup assembly is secured to the enclosure with machine screws (on
the exterior of the enclosure) and mounting nuts (on the interior of the enclo-
sure).
• Access to the interior of the speaker assembly is required to remove and install
the pole cup assembly.
• Due to the limited space inside the enclosure, the baffle assembly and BOP
must be removed from the main enclosure to replace the pole-cup assembly.
• Reapply a small amount of thread locking fluid to the nuts when replacing the
pole-cup assembly.
Figure 5.8 - To remove the rubber feet,
there must be access to the interior of the
enclosure
Figure 5.9 - To remove the pole cup
assembly, you must locate the nuts on the
interior of the enclosure

20 QSC Audio Products, LLC
6. KSub disassembly and repair
procedures
6.1 Bucket of power
Removal
1. Remove the 10 screws along the outer perimeter of the
BOP.
2. Partially remove the amplifier module out of the cabinet as
seen in Figure 6.1.
Note: Occasionally the module will be stuck to the cabinet.
Place a putty or butter knife between the cabinet and edge
of the module to pry the module out.
3. Detach the multi-pin molex connector from the read of the
module.
4. The BOP can now be fully removed.
Installation
1. Inspect the molex connector for loose wires.
2. Connect the molex connector into the module.
3. Carefully insert the BOP and align the holes along the rim
of the BOP to the holes on the cabinet.
4. Fasten the 10 screws that secure the BOP to the cabinet,
beginning with the corner screws.
6.2 Low frequency transducers
Removal
Contrary to the top-box models, the LF transducer can only be
removed through the rear hole (that the BOP sits in). There is
no access to the transducers through the front section of the
cabinet.
1. Follow the removal instructions in “6.1 Bucket of power”
on page 20.
2. Place the cabinet assembly on a padded surface front
grille-side-down so the LF transducer doesn’t fall out after
the screws are removed.
3. Remove the 8 screws around the perimeter of the LF
transducer.
Note: This can be an extremely difficult task without the
right equipment. We recommend you use a flexible exten-
sion bit holder that can be adjusted and twisted, similar to a
snake.
Figure 6.2 - LF transducer removal can only performed
through the rear of the cabinet
Figure 6.1 - BOP removal on the KSub.
Other manuals for K8
3
This manual suits for next models
3
Table of contents
Other QSC Speakers manuals

QSC
QSC AcousticDesign AD-S52 User manual

QSC
QSC SB-15121 User manual

QSC
QSC MH-1075C-F User manual

QSC
QSC SC-443 User manual

QSC
QSC AcousticDesign S8T User manual

QSC
QSC WL2102 User manual

QSC
QSC E110 YM User manual

QSC
QSC HPR151W User manual

QSC
QSC AcousticCoverage AC-C8T User manual

QSC
QSC AcousticDesign Series Instructions for use