Quadivator ST50 User manual

READ & SAVE THIS MANUAL
QUADIVATOR INC.
Assembly/Operators/Parts Manual
Quad Snow Thrower
English Language Version 05
Printed: January, 2005
Part #: 89329A
www.quadi ator.com
1000 6th A e. NE
Portage La Prairie, MB
Canada, R1N 3C5
ST 0 - 0
ST50 - Snow Thrower
50" Width


SAFETY FIRST
This symbol, the industry’s “Safety Alert Symbol”, is used throughout
this manual and on labels on the device itself to warn the possibility of
personal injury.
Read these instructions carefully.
It is essential that you read the instructions and safety regulations
before you attempt to assemble or use this mower.
DANGER Indicates an immanently hazardous
situation, which if not avoided, will
result in death or serious injury.
WARNING Indicates a potentially hazardous
situation which, if not avoided, could
result in death or serious injury.
CAUTION
Indicates a potentially hazardous
situation which, if not avoided, may
result in minor or moderate injury.
Important – indicates that equipment or property damage could
result if instructions are not followed.
Notes – Gives helpful information.

FOREWARD
You are now the owner of a Quadivator ST50 Snow Thrower.
To obtain the best use of your Snow Thrower, read this manual
carefully. It will help you become familiar with the operation and
maintenance of the Quadivator ST50.
It is Quadivator’s Policy to use all research, design and manufacturing
improvements to improve our mower. This may result in some of the
minor parts in the manual becoming outdated.
Quadivator will have the most up to date parts and service information
– call 866 770-2069 for service information and parts orders!
Snow Thrower Model & Serial # -

Pre-Delivery Check List
Check off all items as they are found satisfactory or after adjustments
are made:
1All safety shields and guard are securely in place!
1All decals are in place and readable!
1Tighten all hardware – see Checking Bolt Torque in Service Section.
1Check the drive belt is adjusted properly – see Service Section.
To help prevent personal injury
from rotating impeller or thrown
objects, never walk or stand in line
with the discharge during run-in or
operation!
CAUTION
1Start the Quadivator Snow Thrower and allow it to run for 5 – 10 minutes, check
for excessive operation or unusual noise.
1The Quadivator Snow Thrower has been tested and to the best of my
knowledge, is ready to be delivered to the customer!
Date Predelivered –
Signature –


OWNER’s Register
Name –
Address –
City/Town –
State/Prov. –
Mail Code -
Model & Serial # –
Date Sold –
DELIVERY Checklist
1Tell the customer not to remove any of the safety shields or guards.
1Review the Quadivator Warranty with customer.
1Safe Operation and Service.
1Daily and Periodic Lubrication and Maintenance.
1Daily and Periodic Inspections.
1Parts & Service Availability.
Prior to delivery to the customer, do the following:
1Record Serial Numbers for the Quadivator Products
1Sign and remove this section for the dealer’s record.
1Give the customer the Operator’s Manual and encourage the customer to
read the manual.
Date Delivered –
Signature –


Table of Contents
1. Safe Operation – Quadivator ST50 Snow Thrower
2. Service
3. Introduction
.1Specifications
.2 Snow Thrower Terminology
4. Set – Up
.1 Setting up the ST50 Snow Thrower.
5. Mounting of the ST50 to the ATV – Initial Fit Up
6. Mounting and Dismounting of the Snow Thrower to the ATV – Routine
7. Operating Section
.
1 Snow Thrower Operation – good practice
.2 Operation of the Quadivator ST50 Snow Thrower
8. Maintenance Section
.1 Service & Maintenance intervals
.2 Shear Bolt Replacement
.3 Belt Replacement
.4 Tightening Torque Chart
9. Troubleshooting Section
10. Parts Manual for the Quadivator ST50 - Snow Thrower 05 Model
11. How to order Repair Parts – ST50
12. Quadivator Contact Information
13. Quadivator Warranty Statement
14. Warranty Registration

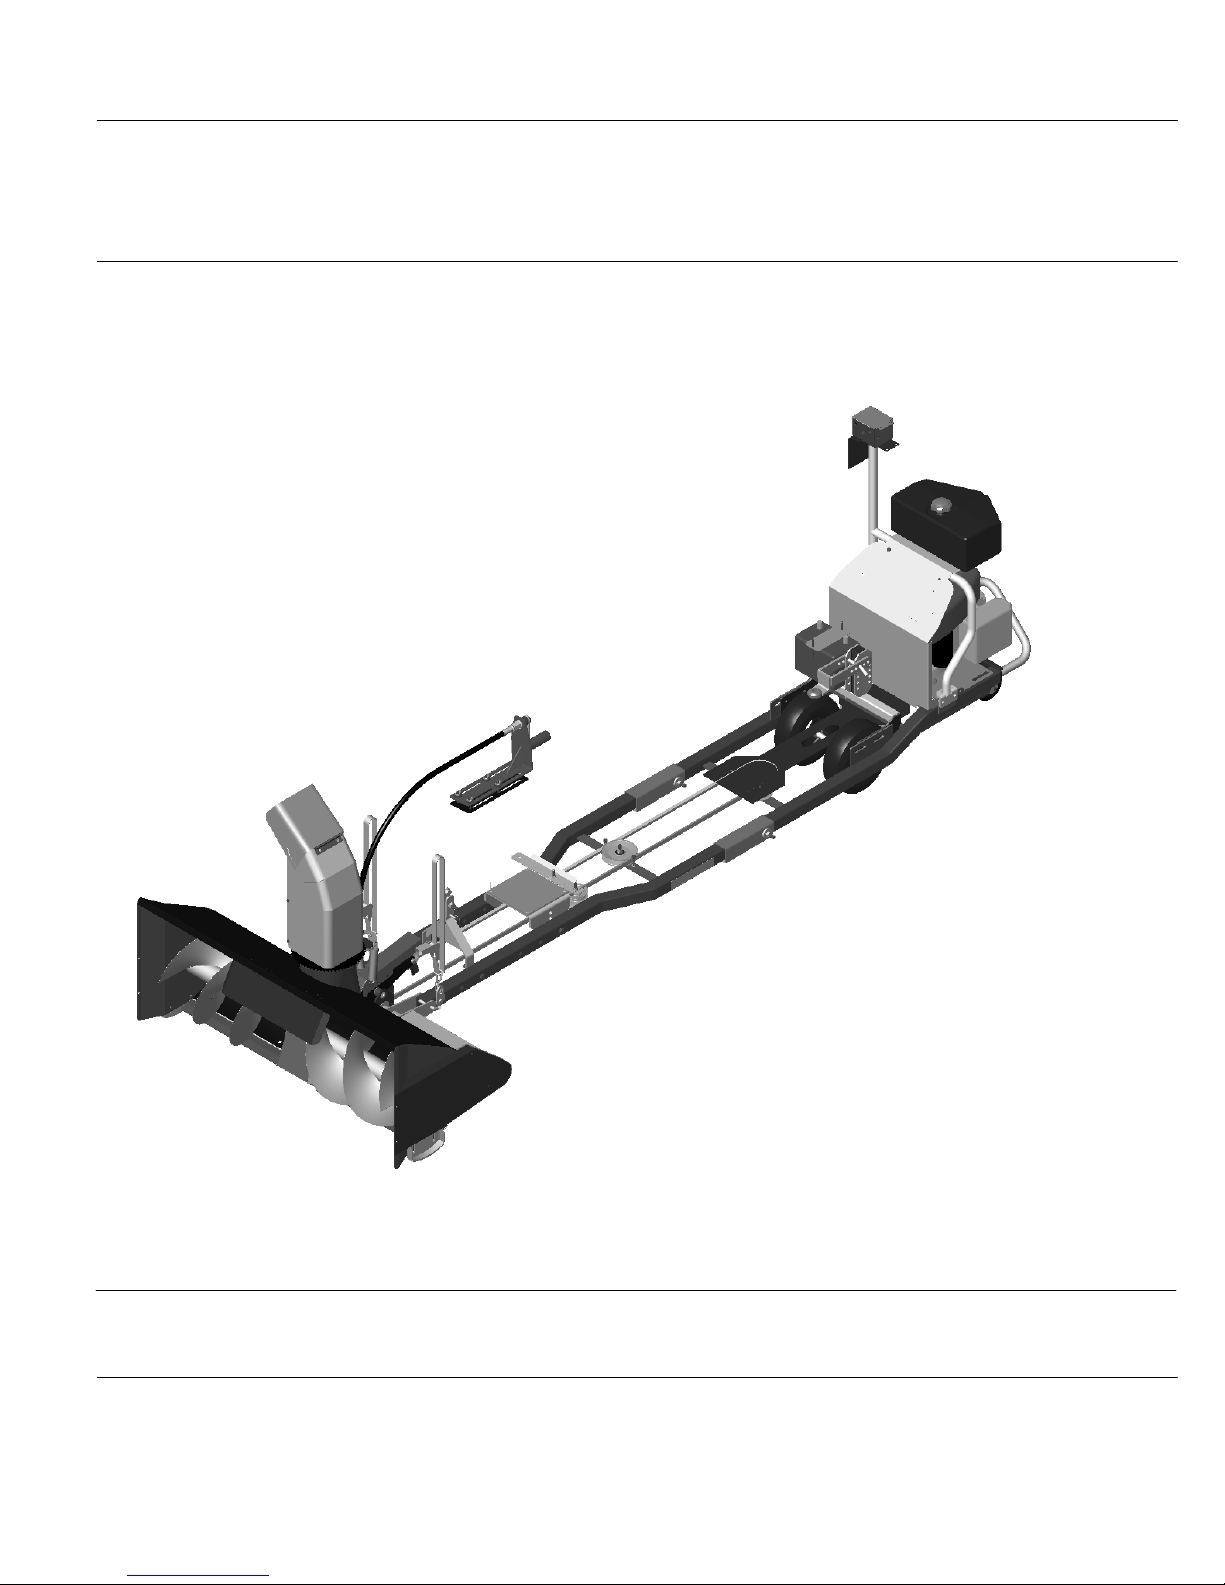
1. Safe Operating Practices for the
Quadivator ST50 - ATV Mounted Snow Thrower
This machine is capable of amputating hand and feet and
throwing objects significant distances.
Failure to observe the following safety instructions could
result in serious injury and or death.
DANGER
.1 GENERAL OPERATION - Training
.1 Read, the operating and service instruction manual carefully.
.2 Be thoroughly familiar with the controls and the proper use of the
equipment. Know how to stop the unit and disengage the controls quickly.
.3 Only allow responsible adults, who are familiar with the instructions, to
operate this machine. Never allow children to operate the equipment.
.4 Be sure the area is clear of bystanders, children and pets before
operating. Stop machine if anyone or anything enters the area.
NEVER CARRY PASSENGERS while clearing snow with the ST50 -
EVEN IF YOURS is a TWO-UP ATV!
When operating the ATV Mounted Snow Thrower – ALWAYS
attach the clip end of the Tether Chord to your belt, until you
dismount from the ATV. The switch the chord is attached to
will shut off the mower’s engine if pulled deliberately or b
y
inadvertent dismount from the ATV seat.
DANGER
.2 GENERAL OPERATION - Preparation
.1 Thoroughly inspect the area where the equipment is to be used and
remove all floor mats, sleds, boards, wires or other foreign matter.
.2 Disengage clutch on ATV and shift ATV into neutral before starting the
engine (motor) on the ST50 Snow Thrower.
.3 Do not operate the equipment without wearing adequate winter outer
garments. Wear footwear that will improve footing on slippery surfaces.

.4 Adjust the collector housing height of the ST50 Snow Thrower to clear
gravel or crushed rock surface that is being cleaned.
.5 Never attempt to make adjustments to the ST50 Snow Thrower while the
engine (motor) is running!!
.6 Let engine (motor) and machine adjust to outdoor temperatures before
starting clear snow.
.7 Always wear safety glasses or eye shields during operation or while
performing an adjustment or repair to protect eyes from foreign objects that
may be thrown from the machine.
.3 General Device Operation – ST50 Snow Thrower
.1 Do not put hands or feet near or under rotating parts. Keep clear of the
discharge opening at all times.
.2 Exercise extreme caution when operating on or crossing gravel drives,
walks or roads. Stay alert for hidden hazards or traffic – NEVER carry
passengers.
.3 After striking a foreign object, stop the engine (motor) remove the wire
from the spark plug, thoroughly inspect the snow thrower for any damage,
and repair damage before restarting and operating the snow thrower.
.4 If the unit should start to vibrate abnormally, stop the engine (motor) and
check immediately for the cause. Vibration is generally a warning of trouble
with the snow thrower.
.5 Stop the engine (motor) whenever you leave the operating position,
before unclogging the collector/impeller housing or discharge guide, and
when making any repairs, adjustments or inspections.
.6 Take all possible precautions when leaving the machine unattended.
Disengage the drive, lower the attachment, set the parking brake, stop the
engine and remove the key.
.7 When cleaning, repairing or inspecting, make certain the
collector/impeller and all moving parts have stopped. Disconnect the spark
plug wire and keep the wire away from the plug to prevent accidental
starting.
.8 Do not run the engine indoors, except when starting the engine and for
transporting the snow thrower in or out of the building. Open the outside
doors: exhaust fumes are dangerous.

.9 Do not clear snow across the face of slopes. Exercise extreme caution
when changing direction on slopes. Do not attempt to clear steep slopes.
.10 Never operate the snow thrower without proper guards, plates or other
safety protective devices in place.
.11 Never operate the snow thrower near glass enclosures, automobiles,
window wells, drop offs and the like without proper adjustment of the
snow discharge angle. Keep children and pets away!
.12 Do not overload the machine capacity by attempting the clear snow at
too fast a rate.
.13 Never operate the machine at high transport speed and use care when
backing up!
.14 Never discharge at by-standers or allow anyone in front of the unit.
.15 Disengage power to the collector/impeller when the snow thrower is
transported or not in use.
.16 Never operate the snow thrower without good visibility or light!
.4 General Device Operation – Maintenance and Storage
.1 Check shear bolts and all other fasteners at frequent intervals for
tightness to be sure the equipment is in safe operating condition.
.2 Always refer to operator’s guide instructions for important details if the
snow thrower is to be stored for an extended period.
.3 Maintain or replace safety and instruction labels, as necessary.
.4 Run the machine a few minutes after throwing snow to prevent freeze-up
of the collector/impeller during the next operation.
.5 Never tamper with safety devices and check their proper operation
regularly.

2. SERVICE
1. When in need of parts or service, give the serial number of the
Quadivator product to your dealer.
2. There is a serial number on the left side of the snow thrower, just to the
left of the collector chute.
3. For your reference, record the serial number of your Quadivator product
at the front of this manual and keep it for reference when contacting
your dealer and/or Quadivator.
3. INTRODUCTION
3.1 SPECIFICATIONS of Quadivator ST50
3.2 Snow Thrower Terminology – see included Quadivator ST50 Snow
Thrower Parts Manual – Section 10 - for illustrated part terminology!
Quadivator Model ST50
Height Adjustment
Method Right & Left Side Height Adjustment with fixed wear
skids on either side of the impeller housing!
Mounting Method 2 point bolted assembly to the Interframe.
ST50 Width inch (mm) 50 (1270)
ST50 Height inch (mm) 0.5 to 2.5 (13 to 63.5)
ST50 Weight Approx lbs (kg) 440 (200)
Impeller Diameter inch (mm) 14.25 (362)
Impeller Speed RPM 925
Overall Height
(Controls) inch (mm) 41.0 (1040)
Overall Length –
Snow Thrower inch (mm) 137.8”(3500)
Length - Hitch point
to front of the Snow
Thrower
inch (mm) 102.8 (2611 +/- 38)
Length - Hitch point
to the rear of the
Snow Thrower
inch (mm) 35 +/- 1.5 (890 +/- 38)

4. Setting up the ST50 Snow Thrower
.1Remove the ST50 Snow Thrower from the shipping box:
1. The ST50 Impeller Housing Assembly
2. The ST50 Drive Belt – Part # 89513
3. The ST50 Discharge Chute & Spout Assembly
4. The ST50 Discharge Chute Crank Mechanism
5. ST50 Belt Tension and hardware package
.2 Set the ST50 Impeller housing on a smooth level surface for assembly!
.3 Attach the Discharge Chute & Spout Assembly to the Impeller Housing
with the 4 attaching sliders and hardware – as shown!
.4 Attach the ST50 Discharge Chute Crank Mechanism – with two bolts
attached!
A
ttach the chute to the
Housing with the sliders
and hardware provided!
A
ttach the chute adjuster to
the Housing with the
hardware provided!
A
djust the chute for smooth
operation by centering chute
to housing and then
installing the chute crank
mechanism.

5. Initial Mounting of the Quadivator ST50 to an ATV
NB - General Principles for mounting the Snow Thrower to ATV, (the ST50
requires an electric winch to lift the unit during transport).
1. Mounting Power Unit
2. The ST50 is attached to the Interframe with pins provided.
3. Belt is attached and tensioned.
4. Winch is attached to the hook location and lifted.
5. Snow Thrower is adjusted side to side.
This initial fit up – Quadivator ST50 to ATV - should take place on a flat hard
surface that has enough room to mount the thrower to the ATV, and then
manoeuvre the assembled unit!
Step 1 – Please refer to the Power Unit manual for instructions on mounting the
PU/Interframe to ATV
Step 2 – Attach the ATV to the ST50 with the two pins at the forward ends of the
Interframe.
frame.
Springs (2) shown in place
providing belt tension – from
the pulley adjust to the
Belt shown in place, RHS of
belt (from the driver’s
position) goes to bottom of
the pulley to the front, over
the top, through the idler to
the left side of the Interframe
back to the engine drive.
The ST50 attached to the
Interframe with attaching
hardware.
Step 3 – Attach the belt to the front drive pulley – RHS of belt (from the driver’s
position) goes to bottom of the pulley to the front, over the top, through the idler
to the left side of the Interframe back to the upper pulley on the Interframe

Step 4 – Attach the belt tension springs (2) from the adjust arm to the frame
above it.
Step 5 – Attach the winch to the hole on the frame provided.
NOTE – the initial lifting of the ST50 by winch should be done very cautiously,
the winch should “bottom” on the winch hook – before the ST50 contacts the ATV
front frame or the ATV itself. Use the chain provided to loop through the
mounted hole as shown in illustration below.
The ST50 with winch
attached in attaching hole.
The ST50 with winch
attached through the
extended winch attach hole -
extended with looped chain
– to allow winch hook to
bottom on the winch, prior to
the ST50 contacting the ATV
or the ATV’s front
bumper/tubing!
NOTE – be very cautious with
the first use of the winch to
raise the ST50.

Step 6 – Attach the Outlet Spout Crank to the ATV.
A
ttach the Outlet Spout
Crank with the provided
hardware to the rack for a
smooth curve to the ST50.
The crank assembly should be mounted with the hardware as far rearward on the
front rack, but not so far as to interfere with the steering mechanism of the ATV.
Clamp it in place, turn the steering from maximum right to left and vice versa and
ensure that there is no interference between the crank and the ATV steering!
Move the crank clockwise and counter-clockwise to ensure that the spout moves
smoothly – adjust if required to ensure smooth movement.
Step 7 – Level the ST50 from side to side with spacers under the scraper blade
and adjust the skid shoes to the same height, start with 10 mm (3/8”) and then to
your operating preference.

Level from side to side from
the ground with spacer from
the scra
p
er blade to
g
round.
Chain drive behind the guard
on the LHS of the ST50.
Skid shoe adjust up and
down via slotted bolts.
Lift height need be no more
than 4.0” to the ground.
Step 8 – Thoroughly check all drives, belt routing and chain tension.
NOTE – initially direct the spout as low as possible and directly away from the
operator for start up!
Step 9 – Start the engine, engage the clutch just above idle, then run the engine
to maximum RPM, and allow it to operate for several minutes to reach operating
temperatures in all of the drives.

NOTE – Starting the Completely Assembled ST50 with ATV for the first time!
Initial Start Up the Quadivator ST50:
1. Allow the engine to warm up to operating temperature before engaging
the ST50 for the first time.
2. Engage the clutch for the ST50 at just above idle, then run the engine to
maximum RPM, and allow the ST50 to rotate or operate for several minutes
to reach operating temperatures in all of the drives.
3. Shut the ST50 and the engine off and check all drives for operation!
4. Restart the engine of the ST50 and start use as a snow thrower.

6. Routine – Re-attaching the ST50 from the ATV.
When disconnecting the ST50 from your ATV, take the following Steps:
NEVER attempt to disconnect the ATV from the
ST50 Snow Thrower with the engine running –
A
LWAYS shut the motor engine off before
disconnecting from the ATV.
WARNING
Step 1 - Stop the ATV where you want to leave the ST50, SHUT OFF the ATV and
place in PARK and apply the handbrake – ensure the ST50 motor is off.
Step 2 – First to Disconnect the ST50 from Interframe:
- removing the Spout Crank Assembly from the front rack, removing the
attaching bolts & nuts.
- with the ST50 in the air – recommended to place wood spacers under the
skid shoes!
- Remove the winch hook from the ATV, by relaxing the tension in the
winch to ST50 connection.
- Remove the springs that provide the belt tension.
- Remove the belt from the drive pulley; loop it into the winch hook.
- Unhook the ST50 from the Interframe – two pins on the bottom
connection.
Remove the Spout Cran
k
A
ssembly from the ATV,
rest on the ST50.
Remove the Winch hoo
k
from the spacer chain.
Remove the springs that
provide belt tension.
Remove the belt from the
drive pulley and loop it into
the winch hook.
Remove the two connection
pins from ST50 to
Interframe – then drive
slowly in reverse to
disconnect!
Table of contents