Quantex SW1 SERIES User manual

SW1 SERIES NOTEBOOK PC
USER’S MANUAL
JAN2006
ENGLISH

2
ENGLISH FRANÇAIS DEUTSCH ESPAÑOL ITALIANO
CONTENTS
BEFOREYOUSTART ............................................................................................. 5
Make sure you have everything..................................................................................... 5
Familiarize yourself with the computer ........................................................................ 6
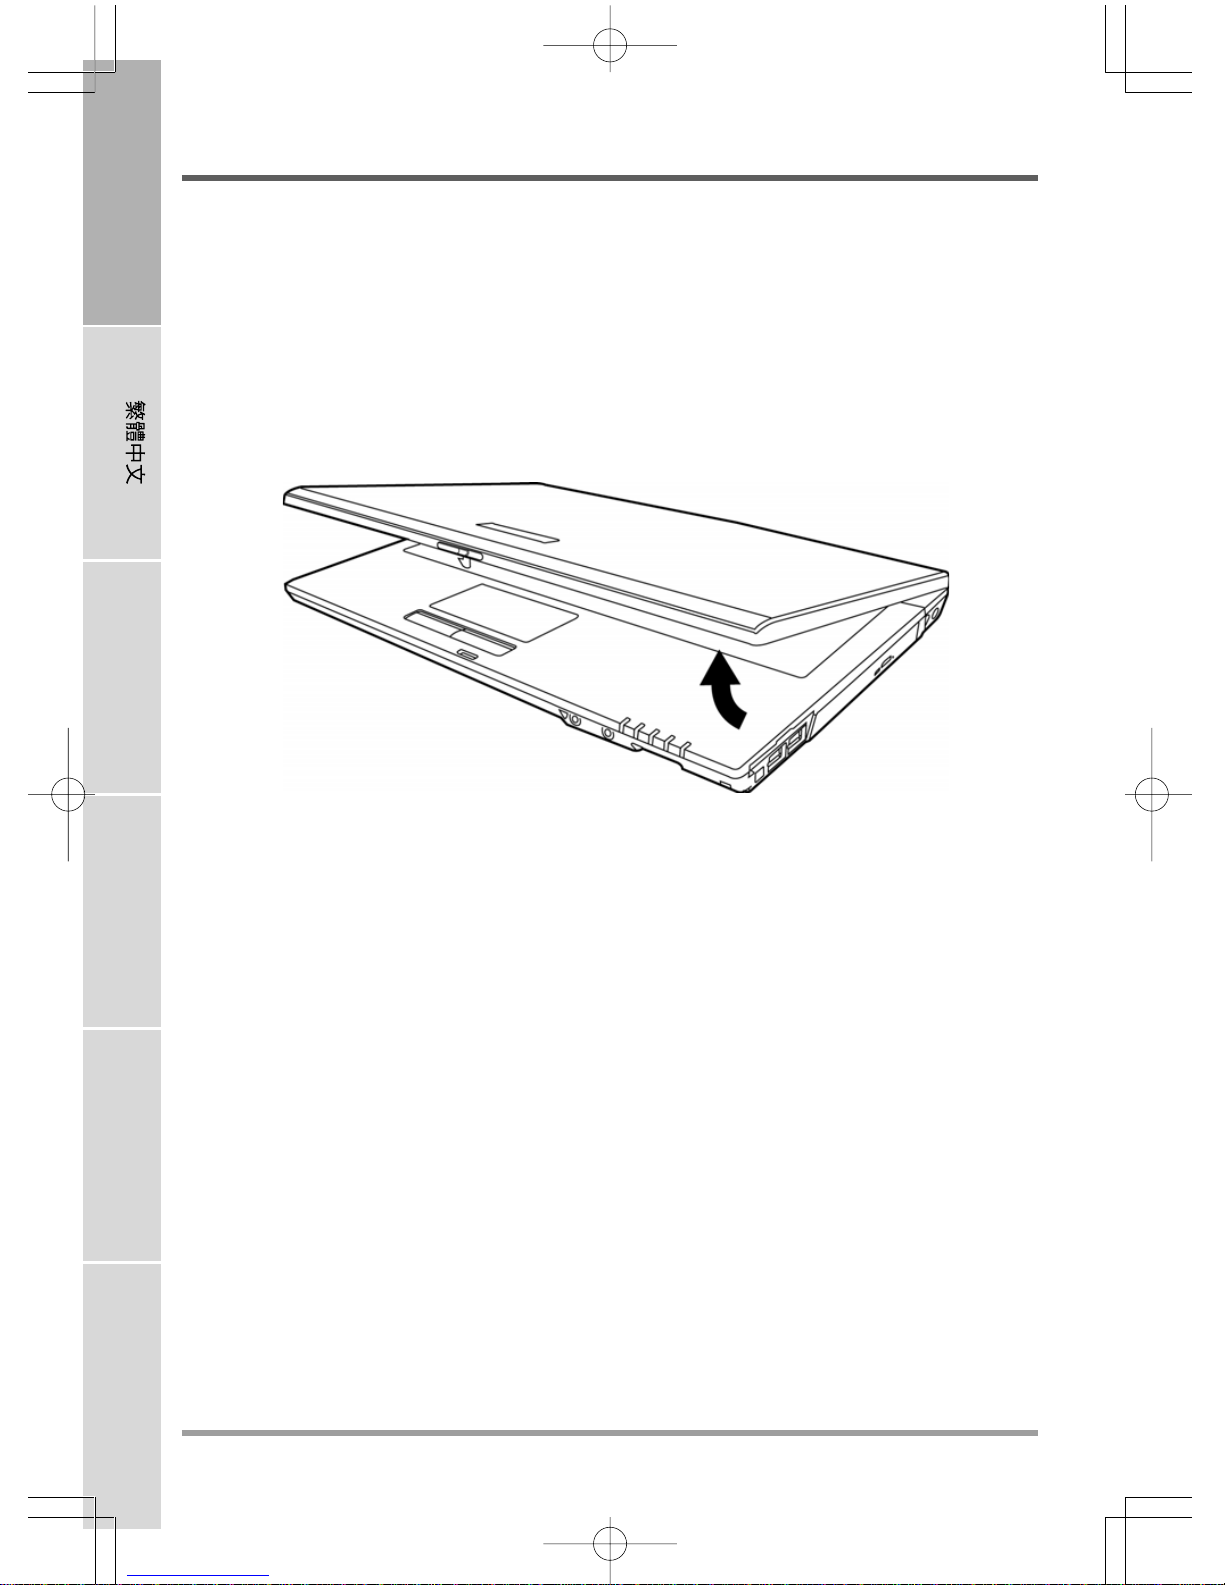
OPENINGTHEDISPLAY PANEL ................................................................................ 6
FRONTOVERVIEW .................................................................................................... 7
LEFT SIDE OVERVIEW .............................................................................................. 9
RIGHT SIDE OVERVIEW.......................................................................................... 11
BACKOVERVIEW..................................................................................................... 12
BOTTOMOVERVIEW................................................................................................ 12
GETTINGSTARTED ............................................................................................. 13
Power Sources ............................................................................................................. 13
CONNECTINGTHE POWER ADAPTERS ............................................................... 13
RECHARGINGTHE BATTERY ................................................................................. 14
Starting Your Notebook................................................................................................. 15
POWER ON .............................................................................................................. 15
Status Indicators ...................................................................................................... 16
Using Function Keys ................................................................................................ 18
Using the TouchPad................................................................................................. 19
Memory Module Upgrade......................................................................................... 20
TROUBLESHOOTING........................................................................................... 21
Identifying the Problem................................................................................................. 21
APPENDIX ............................................................................................................ 22
Notebook Specifications .............................................................................................. 22

3
TAKING CARE OF YOUR NOTEBOOK PC
DO NOT place or drop objects on the computer
and DO NOT apply heavy pressure on it. DO NOT subject the computer to magnetic
fields.
To prevent possible overheating of the computer's
processor, make sure you don't block the open-
ings provided for ventilation.
DO NOT press or touch the display panel.
DO NOT place on uneven or unstable work
surfaces. DO NOT use your notebook computer under
harsh conditions.
DO NOT expose to direct sunlight. DO NOT use or store in extreme temperatures.

4
ENGLISH FRANÇAIS DEUTSCH ESPAÑOL ITALIANO
DO NOT expose to dust and/or corrosive
chemicals.
DO NOT spray water or any other cleaning fluids
directly on the display.
DO NOT slam your notebook shut and never
pick up or hold your notebook by the display.
If you are traveling with your computer, remem-
ber to carry it as hand luggage.Do not check it in
asbaggage.
DONOT place near fire or other sources of heat. DO NOT tamper with the batteries. Keep them
away from children.
Avoid sudden changes in temperature or humid-
ity by keeping it away fromA/C and heating vents. DO NOT expose the computer to rain or
moisture.

5
BEFORE YOU START
Make sure you have everything
When you receive your notebook PC, unpack it carefully, and check to make sure you have all the
items listed below. For a pre-configured model you should have the following:
• Notebook Computer
• Lithium-Ion battery
• AC adapter with power cord
• Driver and Applications CD
• Quick Start Guide or User Guide
Depending upon the configuration of your notebook, you may also need following items:
• DVD / CD-RW Combo Application CD
• Dual DVD+/-RW Application CD
Once you have checked and confirmed that your notebook system is complete, read through the
following pages to learn about all of your notebook components.

BEFORE YOU START
6
ENGLISH FRANÇAIS DEUTSCH ESPAÑOL ITALIANO
Familiarize yourself with the computer
OPENING THE DISPLAY PANEL
To open, slide the latch and then simply lift the lid up.
When closing it, be sure not to slam it shut.

BEFORE YOU START
7
Display Panel
Suspend/Resume/Power
On Button
Keyboard
Status Indicator
Lights
Memory Card
Reader
Microphone Jack
Headphone Jack
TouchPad
Pointing Device
Quick Start Buttons
Wireless LAN
FRONT OVERVIEW
The following is an overview of the front of the notebook.
Display Panel
The display panel is a color LCD panel with back lighting for the display of text and graphics.
Array Microphone
The built-in array microphone is an omni-directional audio input device. It allows for the stereo
reception and transmission of voice and/or other audio data to any program capable of accepting
such input.
Keyboard
A full-size keyboard with dedicated Windows®keys.
Stereo Speakers
The built-in dual speakers allow for stereo sound.
Microphone Jack
The microphone jack allows you to connect an external mono microphone.
Stereo Speakers
Array Microphone

BEFORE YOU START
8
ENGLISH FRANÇAIS DEUTSCH ESPAÑOL ITALIANO
Headphone Jack
The headphone jack allows you to connect headphones or external speakers and amplifiers.
Status Indicator Lights
The Status indicator lights correspond to specific operating modes. These modes are: Power On
status, Battery status, Hard Drive Activity (HDD), Memory Card Reader Activity, Wireless
LAN/Bluetooth Activity, Caps Lock, Scroll Lock, and Num Lock. Indicator lights are located
below the TouchPad and above the Keyboard.
Wireless LAN
The Wireless LAN button enables and disables Wireless LAN activity.
TouchPad Pointing Device
The TouchPad pointing device is a mouse-like cursor control with two buttons and a touch
sensitive movement pad.
Suspend/Resume/Power On Button
This button turns your notebook on and off as well as puts it to sleep. (See Suspend/Resume/
Power On Button in the Power On section for more information.)
Quick Start Buttons
The four quick start buttons allow you to launch your favorite email and Internet applications
with the press of a button. You can also engage the computer's Silent and Mute modes by press
Silence and Mute button.
Memory Card Reader
The memory card reader offers the fastest and most convenient method to transfer pictures, music
and data between your notebook and flash compatible devices such as digital cameras, MP3
players, mobile phones, and PDAs.

BEFORE YOU START
9
Port Replicator Interface
External Monitor Port/ DVI Port LAN (RJ-45) Port
Kensington
Lock Slot
Modem (RJ-11) Port
USB Port
LEFT SIDE OVERVIEW
The following is a brief description of the left side of the notebook.
Depending on your configuration:
External Monitor Port
The external monitor port allows you to connect an external monitor.
Or
DVI Port
The DVI port allows you to connect an external monitor or television to the computer using
aDigital Video Interface cable.
Port Replicator Interface
The Port Replicator Interface allows you to connect additional peripheral devices to your com-
puter through a "universal" port, as it were. The Port Replicator itself contains all the necessary
additional ports, and connects to your computer through a single port on the left side of the
computer. (Not available in all configurations.)
LAN (RJ-45) Port
The LAN port is designed to support a 10/100 or 10/100/1000(option) Base-TX standard RJ-45
plug.
USB Port
The USB port allows you to connect Universal Serial Bus devices. It supports v2.0 of the USB
standard, which allows data exchange rates as high as 480 Mb/s.

BEFORE YOU START
10
ENGLISH FRANÇAIS DEUTSCH ESPAÑOL ITALIANO
Modem (RJ-11) Port
The modem (RJ-11) port is used to attach a telephone line to the internal 56K modem.
Kensington Lock Slot
The Kensington lock slot allows you to secure your notebook to an immovable object through an
optional security cable.

BEFORE YOU START
11
IEEE 1394 Port
PC Express Card Slot
USB Ports
Optical Drive Activity
Indicator
Optical Drive Emergency Tray Release
Optical Drive
Eject Button
Power
Adapter
Port
S-Video/
TV Out Port
RIGHT SIDE OVERVIEW
The following is a brief description of the right side of the notebook.
IEEE 1394 Port
The 1394 port is used to connect between your and a peripheral such as a digital video camera.
PC Express Card Slot
The PC Card Slot allows you to install one Type-II PC Express Card.
USB Ports
The USB ports allow you to connect Universal Serial Bus devices. They support v2.0 of the USB
standard, which allows data exchange rates as high as 480 Mb/s.
Optical Drive
The Optical Drive allows you to play back a media discs, such as CDs and DVDs.
Optical Drive Activity Indicator
This light flickers to indicate activity when the ODD is playing a media disc or is being accessed
by the operating system.
Optical Drive Eject Button
The Optical Drive Eject Button allows you to open the Optical Drive tray to remove or insert a
DVD or CD.
Emergency Tray Release
The Emergency Tray Release allows you to open the Optical Drive tray without powering on
your notebook.
S-Video/TV Out Port
The S-video/TV out port allows you to connect to video devices such as, a television, projector,
or a VCR, to your computer.
Power Adapter Port
The power adapter port allows you to plug in the AC adapter to power your notebook and charge
the internal Lithium-Ion battery.

BEFORE YOU START
12
ENGLISH FRANÇAIS DEUTSCH ESPAÑOL ITALIANO
Fan Outlets
Compartment
Cover
Lithium-Ion Battery Bay
Rating Label
BOTTOM OVERVIEW
The following is an overview of the bottom of the notebook.
Fan Outlets
These are open ports for the fan to dissipate heat from the computer's internal components. Do
not block or place the computer in such a position that you inadvertently allow the outlets to
become blocked.
Rating Label
The label shows the model number and other information about your notebook.
Compartment Cover
The Wireless LAN compartment contains the Wireless LAN card. The memory compartment
contains the computer's memory modules. The internal hard disk drive is accessible through the
hard disk drive bay. The CPU sits in the CPU bay.
Lithium-Ion Battery Bay
The battery bay contains the internal Lithium-Ion battery. It can be opened for the removal of the
battery when stored over a long period of time or for swapping a discharged battery with a
charged Lithium-Ion battery.
BACK OVERVIEW
The following is an overview of the back of the notebook.

13
GETTING STARTED
Power Sources
Your computer has two types of power source: a Lithium-Ion battery or an AC adapter.
CONNECTING THE POWER ADAPTERS
The AC adapter provides power for operating your notebook PC and charging the battery.
Connecting the AC Adapter
1. Plug the DC output cable into the DC power jack of your notebook PC.
2. Plug the AC adapter into an AC electrical outlet.
Switching from AC Adapter Power to Battery Power
1. Be sure that you have at least one charged battery installed.
2. Remove the AC adapter. Your notebook will automatically switch from DC power to battery
power.
The Lithium-Ion battery is not charged upon purchase. Initially, you will need
to connect the AC adapter to use your notebook PC.
NOTE

GETTING STARTED
14
ENGLISH FRANÇAIS DEUTSCH ESPAÑOL ITALIANO
RECHARGING THE BATTERY
The Lithium-Ion battery is recharged internally using the AC adapter. To recharge the battery,
make sure the battery is installed and the computer is connected to the AC.
There is no "memory effect" in Lithium-Ion batteries; therefore you do not need to discharge the
battery completely before recharging. The charge times will be significantly longer if your note-
book PC is in use while the battery is charging. If you want to charge the battery more quickly,
put your computer into Suspend mode, or turn it off while the adapter is charging the battery.
Low Battery State
When the battery charge is low, a notification message appears. If you do not respond to the low
battery message, the batteries continue to discharge until they are too low to operate. When this
happens, your notebook PC goes into Suspend mode. There is no guarantee your data will be
saved once the notebook reaches this point.
To protect your computer from damage, use only the power adapter that came
with it because each power adapter has its own power output rating.
Once your note computer goes into Suspend mode as a result of a dead battery you will be unable
to resume operation until you provide a source of power either from an adapter, or a charged
battery. Once you have provided power, you can press the Suspend/ Resume button to resume
operation. In Suspend mode, your data is maintained for some time, but if a power source is not
provided promptly, the Power indicator stops flashing and the goes out, in which case you have
lost the data that was not saved. Once you provide power, you can continue to use your com-
puter while an adapter charges the battery.
CAUTION

GETTING STARTED
15
Starting Your Notebook
POWER ON
Suspend/Resume/Power On Button
The suspend/resume/power on switch is used to turn on your notebook from its off state. Once
you have connected your AC adapter or charged the internal Lithium-Ion battery, you can power
on your notebook by pressing the suspend/resume/on button located above the keyboard. If you
need to take an extended break, press the button again to turn it off.
Do not carry your notebook around with the power on or subject it to shocks or
vibration, as you risk damaging the hard disk.
When you power on your notebook, it will perform a Power On Self Test (POST) to check the
internal parts and configuration for correct functionality. If a fault is found, your computer emits
an audio warning and or displays and error message.
Depending on the nature of the problem, you may be able to continue by starting the operating
system or by entering the BIOS setup utility and revising the settings.
After satisfactory completion of the Power On Self Test (POST), your notebook loads the
installed operating system.
Never turn off your notebook during the Power On Self Test (POST), or an
unrecoverable error may occur.
CAUTION
CAUTION

GETTING STARTED
16
ENGLISH FRANÇAIS DEUTSCH ESPAÑOL ITALIANO
Power On / Suspend
Status Indicator
Battery
HDD Activity Indicator
Media Card Status Indicator
Wireless
LAN Activity
Indicator
Internet
E-mail
Silence
WLAN
Mute
Status Indicators
The Status indicator lights correspond to specific operating modes. These modes are: AC Adapter
Status, Battery status; Hard Drive Activity; Memory Card Reader Activity; and Wireless LAN/
Blurtooth Activity. Furthermore, at the top of the keyboard there are three additional status
indicator lights: Caps Lock, Scroll Lock, and Num Lock.
The Caps Lock Indicator
This indicator tells you that the keyboard is set to type in all capital letters.
The Num Lock Indicator
This indicator states that the internal keyboard is set in ten-key numeric keypad mode.
The Scroll Lock Indicator
This indicator states that the internal keyboard is set in scroll lock mode.
Power On Indicator
This light on the power button illuminates when the computer is powered on.
Suspend Status Indicator
This light flashes when the computer is in the Suspend mode.

GETTING STARTED
17
Battery Indicator
The Battery indicator light tells you whether the Lithium-Ion battery is charging or is already
fully charged.
• If you are charging your battery, the Battery indicator lights remains on even if your notebook
is shut off.
• If there is no battery activity, the power adapters are not connected, or the power switch is
Off, the Battery indicator will also be off.
• Batteries subjected to shocks, vibrations or extreme temperatures can be permanently damaged.
Hard Disk Drive (HDD) Activity Indicator
The Hard Disk Drive (HDD) Activity indicator tells you whether your internal hard drive is being
accessed and, if so, how fast.
Media Card Status Indicator
This light flickers when the computer is reading a multimedia or SD card.
The Bluetooth Indicator
This indicator states that the Bluetooth device is active.
Wireless LAN Activity Indicator
The Wireless LANActivity indicator tells you whether your computer is connected to a wireless
network or not.

GETTING STARTED
18
ENGLISH FRANÇAIS DEUTSCH ESPAÑOL ITALIANO
Using Function Keys
Your computer has 12 function keys, F1 through F12. The functions assigned to these keys differ
for each application. You should refer to your software documentation to find out how these keys
are used.
The [FN] key provides extended functions for the notebook and is always used in conjunction
with another key.
• [FN+F1]: Places the notebook in Suspend mode. Pressing the Power button returns it to
active mode.
• [FN+F2]: Enables or disables the wireless network connection.
• [FN+F3]: Allows you to change your selection of where to send your display video. Each
time you press the combination of keys you will step to the next choice. The choices, in
order, are: built-in display panel only, both built-in display panel and external monitor, or
external monitor only.
• [FN+F4]: Decreases the screen Brightness.
• [FN+F5]: Increases the screen Brightness.
• [FN+F6]: Mutes the computer's volume.
• [FN+F7]: Decreases the computer's volume.
• [FN+F8]: Increases the computer's volume.
• [FN+F9]: Plays or pauses the current multimedia track.
• [FN+F10]: Stops the current multimedia track.
• [FN+F11]: Goes to the previous multimedia track.
• [FN+F12]: Goes to the next multimedia track.
• [FN+Esc]: Enables or disables the Bluetooth function.
• [FN+Home]: Enable “Num Lk” first, then press FN+Home to Enable or disable the Light
sensor function.

GETTING STARTED
19
Using the TouchPad
A TouchPad pointing device comes built into your computer. It is used to control the movement
of the pointer to select items on your display panel.
The TouchPad consists of a cursor control, a left and right button, and two scroll buttons. The
cursor control works the same way a mouse does, and moves the cursor around the display. It
only requires light pressure from the tip of your finger. The left and right buttons function the
same as mouse buttons. The actual functionality of the buttons may vary depending on the
application that is being used. Finally, the scroll buttons allow you to navigate quickly through
pages, without having to use the on-screen cursor to manipulate the up and down scroll bars.
Clicking
Clicking means pushing and releasing a button. To left-click, move the cursor to the item you wish to
select, press the left button once, and then immediately release it. To right click, move the mouse cursor
to the item you wish to select, press the right button once, and then immediately release it. You also
have the option to perform the clicking operation by tapping lightly on the TouchPad once.
Double-Clicking
Double-clicking means pushing and releasing the left button twice in rapid succession. This procedure
does not function with the right button. To double-click, move the cursor to the item you wish to
select, press the left button twice, and then immediately release it. You also have the option to perform
the double-click operation by tapping lightly on the TouchPad twice.
Dragging
Dragging means pressing and holding the left button, while moving the cursor. To drag, move the cursor
to the item you wish to move. Press and hold the left button while moving the item to its new location
and then release it.Dragging can also be done using the TouchPad. First, tap theTouchPad twice over the
item you wish to move making sure to leave your finger on the pad after the final tap.Next, move the
object to its new location by moving your finger across the TouchPad, and then release your finger.
Using the Scroll buttons allows you to navigate through a document quickly without using the
window's scroll bars. This is particularly useful when you are navigating through on-line pages.

GETTING STARTED
20
ENGLISH FRANÇAIS DEUTSCH ESPAÑOL ITALIANO
Memory Module Upgrade
Your notebook PC comes with either 128MB of high speed Synchronous Dynamic RAM
(SDRAM) factory installed. To increase your notebook's memory capacity (up to 2GB maximum),
you may install an additional memory upgrade module. The memory upgrade must be a dual-in-
line (DIMM) SDRAM module.
Do not remove any screws from the memory upgrade module compartment except for the ones
specifically shown in the directions here.
Installing a Memory Module
To install a memory upgrade module follow these steps:
1. Turn off power to your notebook using the power switch, disconnect the power adapter, and/
or remove the battery pack.
2. Place your notebook upside-down on a clean work surface.
3. Open the top cover all the way, so that it is lying flat on the work surface.
4. Remove the five screws securing the compartment cover.
The memory upgrade module can be severely damaged by electrostatic discharge (ESD). Be
sure you are properly grounded when handling and installing the module.
5. Align the connector edge of the memory upgrade module, chip side up, with the connector slot
in the compartment.
6. Insert the memory upgrade module at a 45oangle and press it firmly onto the connector.
7. Press the memory upgrade module down into the compartment until it locks into the retaining
clips on either side. You will hear a click when it is properly in place.
8. Replace the cover and screws that were removed previously. Installation of the new memory
module is now complete.
The memory upgrade module is not something you routinely remove from your notebook PC.
Once it is installed, you should leave it in place unless you want to increase system memory
capacity.
Table of contents
Languages: