Quartet IdeaShare User manual

Quartet IdeaShare (use logos)
Thank you for purchasing this exciting new product from GBC! The Quick Set Up Guide
explains how to install your new system quickly and easily. This Users Manual will show
you how to save time and money by capturing notes and diagrams, collaborating with
colleagues, and enhancing presentations. Please see the Software Reference Guide for
quick explanations of how to use the various features made possible by eBeam Soft-
ware.
System Requirements
For PC
•Windows
®-compatible PC with Pentium®100Mhz + processor
• Windows 98, 2000, ME, XP and Windows NT®4.0 compatible (other platform users
can participate in shared meetings via JavaTM applet through Java-enabled Inter-
net browser)
• 10 MB available hard drive space
• 256 color VGA or SVGA monitor
• CD-ROM drive or Internet connection for software installation
• One available serial port or USB port
For Macintosh
•PowerMacintosh
®
• Mac OS 9.X with Macintosh Runtime for Java 2.2 or higher and 64 MB RAM, or
•Mac
®OS X v10.1 or higher
• 10 MB available hard drive space
https://www.supplychimp.com

https://www.supplychimp.com

Chapter 1 . . . . . . . . . . . . . . . . . . . . . . . . . . . . . . . . . . . . . . . . . . . . . . . . . . . . . . 1
QuartetPortable IdeaShareTM . . . . . . . . . . . . . . . . . . . . . . . . . . . . . . . . . . . . 1
Software Features . . . . . . . . . . . . . . . . . . . . . . . . . . . . . . . . . . . . . . . . . . . . 1
Chapter 2 . . . . . . . . . . . . . . . . . . . . . . . . . . . . . . . . . . . . . . . . . . . . . . . . . . . . . . 3
Using Quartet Portable IdeaShare . . . . . . . . . . . . . . . . . . . . . . . . . . . . . . . . . . . 3
Using Quartet Portable IdeaShare as a Digital Whiteboard . . . . . . . . . . . . . . . . 3
Using Quartet Portable IdeaShare as a Virtual Touchscreen . . . . . . . . . . . . . . . 4
Using Quartet Portable IdeaShare with a Flip Chart . . . . . . . . . . . . . . . . . . . . . 6
Chapter 3 . . . . . . . . . . . . . . . . . . . . . . . . . . . . . . . . . . . . . . . . . . . . . . . . . . . . . . 9
Using eBeam Software with Quartet Portable IdeaShare . . . . . . . . . . . . . . . . . . . . 9
Terminology . . . . . . . . . . . . . . . . . . . . . . . . . . . . . . . . . . . . . . . . . . . . . . . . 9
Software Installation & First Time Use . . . . . . . . . . . . . . . . . . . . . . . . . . . . . 10
Whiteboard Mode . . . . . . . . . . . . . . . . . . . . . . . . . . . . . . . . . . . . . . . . . . . . 12
Calibrate Whiteboard Mode . . . . . . . . . . . . . . . . . . . . . . . . . . . . . . . . . . . . . 12
Using The Whiteboard Mode Application . . . . . . . . . . . . . . . . . . . . . . . . . . . . 12
Projection/Virtual Touchscreen Mode . . . . . . . . . . . . . . . . . . . . . . . . . . . . . . 16
Projection Mode Setup . . . . . . . . . . . . . . . . . . . . . . . . . . . . . . . . . . . . . . . . 16
Shortcut Strip - Calibrate & Use . . . . . . . . . . . . . . . . . . . . . . . . . . . . . . . . . . 17
The Whiteboard Mode Shortcut Strip . . . . . . . . . . . . . . . . . . . . . . . . . . . . . . 17
The Flip Chart Mode Shortcut Strip . . . . . . . . . . . . . . . . . . . . . . . . . . . . . . . . 18
The eBeam Software Help System . . . . . . . . . . . . . . . . . . . . . . . . . . . . . . . . 19
Chapter 4 . . . . . . . . . . . . . . . . . . . . . . . . . . . . . . . . . . . . . . . . . . . . . . . . . . . . . 21
Troubleshooting . . . . . . . . . . . . . . . . . . . . . . . . . . . . . . . . . . . . . . . . . . . . . . . 21
Troubleshooting Tips . . . . . . . . . . . . . . . . . . . . . . . . . . . . . . . . . . . . . . . . . 21
Website Support . . . . . . . . . . . . . . . . . . . . . . . . . . . . . . . . . . . . . . . . . . . . 22
Additional Technical Support . . . . . . . . . . . . . . . . . . . . . . . . . . . . . . . . . . . . 22
https://www.supplychimp.com

https://www.supplychimp.com

Chapter 1
QuartetPortable IdeaShareTM
The Quartet Portable IdeaShare system uses eBeamTM electronic imaging technology
to capture notes and images from any standard whiteboard, easel, or even flip chart
pads. Using the Quartet Portable IdeaShare, whatever you draw on a whiteboard or
easel is captured electronically in color and in real time and can be saved to a PC, Mac,
the Internet or local Intranet. Using the software, you can also share sessions with
remote participants live over the Internet/Intranet and create interactive presentations
with the virtual touchscreen capability.
Software Features
Additional popular software features:
• Share whiteboard drawings in real time over the Intranet/Internet in an eBeam
meeting. Microsoft Netmeeting can also be used to share meetings.
• Replay, edit, and annotate images from your meetings and attach them to email
messages.
• Import images, files, or even a snapshot of your own computer screen into the
background of the current meeting for all users to see and annotate.
• Use eBeam Software with a projector to turn your whiteboard into a virtual touch-
screen.
• A "wake up" or Autolaunch feature automatically wakes up the eBeam Software
and begins to record once an electronic pen touches the whiteboard.
Chapter 1 Page 1
https://www.supplychimp.com

• eBeam Software automatically checks for software updates to make sure you
always have the latest features.
The Software Reference Guide is included for quick, easy-to-understand instructions
on how to use the main software features. This guide is very handy when your Quartet
Portable IdeaShare is shared by many users. Simply leave the guide next to the prod-
uct so everyone can be comfortable with the software and begin taking advantage of
this collaboration tool! For more detailed instructions on how to use all of the many
software features, refer to the Help menu in the software.
Page 2 Quartet“ Portable IdeaShareTM
https://www.supplychimp.com

Chapter 2
Using Quartet Portable IdeaShare
The Quartet Portable IdeaShare layout is shown in the image below...
Figure A
The following sections describe the three different ways to use the Quartet Portable
IdeaShare system:
• As a digital whiteboard (page 3).
• As a virtual touchscreen (page 4).
• With a flip chart (PC Only) (page 6).
Using Quartet Portable IdeaShare as a Digital Whiteboard
Refer to “Terminology” on page 9 for the definition of various terms used in this sec-
tion.
In whiteboard mode, the Quartet Portable IdeaShare receiver is connected to a com-
puter using eBeam Software. In whiteboard mode, notes and images that you draw on
a whiteboard are captured electronically in real time and available for storage and dis-
play both locally and remotely through your local intranet or the Internet.
See “Using eBeam Software with Quartet Portable IdeaShare” on page 9 for more
information about using the software.
To use the Quartet Portable IdeaShare as a digital whiteboard:
Chapter 2 Page 3
https://www.supplychimp.com

1. Set up the electronic pens, the electronic eraser, and the software as shown on the
Quick Set Up Guide, and make sure that the receiver is connected to your
computer using the USB cable.
2. Set up the Shortcut Strip on the whiteboard by peeling away the backing and
placing the strip along an edge of the Image Area. The Shortcut Strip is best
positioned along the bottom or side edge to avoid taking up writing space on the
whiteboard.
3. Launch eBeam Software on your computer, and make sure that you are in
whiteboard mode. You must calibrate the Quartet Portable IdeaShare to the
whiteboard, and also calibrate the Shortcut Strip. See “Software Installation &
First Time Use” on page 10. To make sure you are in whiteboard mode:
• PC: Open the eBeam task bar menu and select “Capture from Whiteboard”
• Macintosh OS 9.X: Open the eBeam control panel from the control strip menu
and select “Whiteboard mode”.
• Macintosh OS 10: Open the eBeam System Settings dialog from the eBeam
docklet icon. Select “Whiteboard mode”.
4. Begin writing on the whiteboard using the electronic pens and electronic eraser.
Notes and images drawn using the electronic pens and eraser are stored in your
computer. See “Using eBeam Software with Quartet Portable IdeaShare” on page 9
for more information about using the software.
Using Quartet Portable IdeaShare as a Virtual Touchscreen
Refer to “Terminology” on page 9 for the definition of various terms used in this sec-
tion.
In virtual touchscreen mode, Quartet Portable IdeaShare allows you to use your white-
board as your computer desktop. Both the Quartet Portable IdeaShare receiver and
the projector connect to your computer. The projector displays your computer desktop
onto the whiteboard and the Quartet Portable IdeaShare receiver detects when you
touch the board, allowing an electronic pen (using the plastic stylus insert) to act as a
virtual mouse used to control your computer’s desktop.
In virtual touchscreen mode, you can operate your computer directly from the white-
board. You can open, work in, and close applications; draw freehand in painting and
drawing applications, or you can operate the eBeam meeting application directly from
the whiteboard.
Virtual touchscreen mode setup is illustrated below.
Page 4 Using Quartet Portable IdeaShare
https://www.supplychimp.com
Figure B
To use the Quartet Portable IdeaShare in virtual touchscreen mode:
1. Set up a single electronic pen with the plastic stylus insert. The plastic stylus insert
looks just like a dry-erase marker except it is entirely plastic and contains no ink.
2. Connect the USB cable to the Quartet Portable IdeaShare receiver and your
computer, and set up the software as shown on the Quick Set Up Guide.
3. Attach the projector to your computer, and make sure that both the projector and
your computer are turned on.
4. Aim and focus the projector as near the center of the whiteboard as possible.
5. Launch eBeam Software on your computer, and make sure that you are in
projection mode. You will also need to calibrate. See “Projection/Virtual
Touchscreen Mode” on page 16. To make sure that you are in projection mode:
• PC: Open the eBeam task bar menu and select “Use With Projector”
• Macintosh OS 9.X: Open the eBeam control panel from the control strip menu
and select “Projection mode”.
• Macintosh OS 10: Open the eBeam System Settings dialog from the eBeam
docklet icon. Select “Projection mode”.
6. Begin using the Quartet Portable IdeaShare and whitebaord as a virtual
touchscreen. Click or double-click applications to open them, move files, draw in
paint programs, or share a meeting using the eBeam meeting software. Anything
that you can do with the mouse attached to your computer, you can do with
Quartet Portable IdeaShare using the electronic pen and stylus.
Chapter 2 Page 5
https://www.supplychimp.com

Using Quartet Portable IdeaShare with a Flip Chart
Refer to “Terminology” on page 9 for the definition of various terms used in this sec-
tion.
Important: To use Quartet Portable IdeaShare with a flip chart you must run eBeam
Software on a PC. The Mac version of eBeam Software is not compatible with Flip Chart
mode.
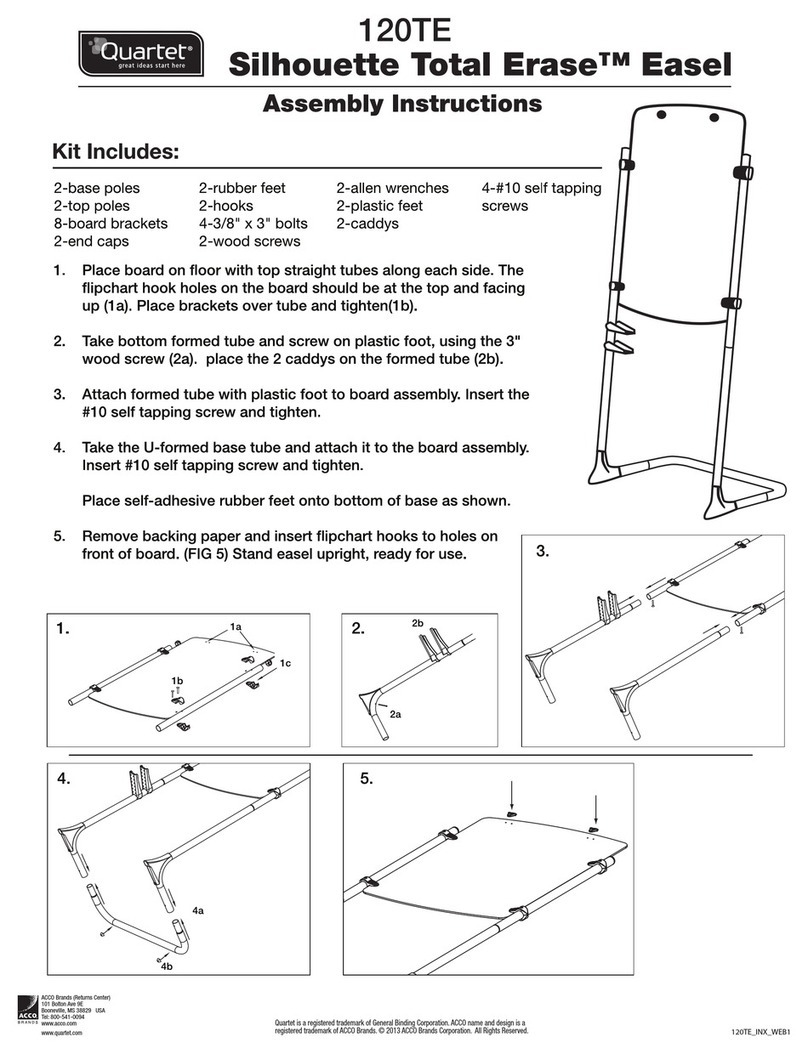
Quartet Portable IdeaShare with flip chart clip can be used with two standard flip chart
sizes (27” x 34” and 25” x 30.5”), or a custom size that the user specifies. The flip
chart clip (shown below) is included in the box.
Figure C
The flip chart clip (Figure C) has a raised portion that is used to mount the Quartet Por-
table IdeaShare receiver, and an embedded Shortcut Strip.
To set up Quartet Portable IdeaShare with a flip chart:
1. Set up the electronic pens and the software as shown on the Quick Set Up Guide,
and make sure that the receiver is attached to your computer using the USB cable.
2. Attach the flip chart clip to the cardboard flip chart pad backing. The flip chart clip
is designed to attach on the right side of the flip chart (your left side when facing
the flip chart), and as close to the top as possible.
Page 6 Using Quartet Portable IdeaShare
https://www.supplychimp.com
Figure D
3. The Quartet Portable IdeaShare receiver attaches to the flip chart clip in the same
way that it would attach to a mounting bracket (see Figure D and Figure E). Notice
that there are small hooks on the back of the receiver. These hooks fit into slots
located at the top left raised portion of the flip chart clip. Fit the receiver hooks
into the flip chart clip slots, and then press the receiver down until you either hear
a click or feel the receiver snap into place on the flip chart clip.
4. Connect the USB cable to the Quartet Portable IdeaShare receiver and your
computer. The smaller USB connector attaches to the receiver. The larger
connector attaches to your computer.
Figure E
5. Launch eBeam Software and make sure that you are in flip chart mode. To make
sure you are in flip chart mode, open the eBeam task bar menu and select
“Capture from Flipchart”.
6. You must then select the flip chart size. The first time you select “Capture from
Flipchart” a calibration warning dialog opens warning you that you need to
Chapter 2 Page 7
https://www.supplychimp.com

calibrate. Click the Calibrate button to open the Flipchart Setup dialog. To manually
open the Flipchart Setup dialog, choose “eBeam Hardware>Flipchart Setup...”
from the Tools menu.
7. The Flipchart Setup dialog allows you to select a 27” x 34” flip chart size, a 25” x
30.5” flip chart size, or to specify a custom flip chart size. Select/Specify the flip
chart size and click OK.
8. Begin writing on the flip chart using the electronic pens (the electronic eraser
cannot erase markings on a flip chart). Notes and images drawn using the
electronic pens are stored in your computer. See “Using eBeam Software with
Quartet Portable IdeaShare” on page 9 for more information about using the
software.
Page 8 Using Quartet Portable IdeaShare
https://www.supplychimp.com

Chapter 3
Using eBeam Software with Quartet Portable IdeaShare
eBeam Software is provided with Quartet Portable IdeaShare.
Terminology
Commonly used terms are described below:
• Active Page: In whiteboard mode, the active page is the page that currently dis-
plays data as it is written on the whiteboard.
• Calibration: Calibration is a process that defines the width and height of the
Image Area, as well as the accurate placement of each captured point within the
software window. The whiteboard area must always be calibrated to ensure that
the electronic pen position is properly detected. After calibration, for each point
that is tapped, the point is placed in the software window relative to the calibration
points. The software knows that the point must be within the calibrated width and
height range, or the point is not valid and is thrown out. The software also uses
the calibrated width and height to place the point within the coordinate system in
the software window.
• Flip Chart Mode: eBeam Software has three modes: whiteboard, projection, and
flip chart modes. Flip Chart mode is whiteboard mode for a flip chart. Flip chart
mode is used with the Flip Chart Clip that is shipped with your Quartet Portable
IdeaShare. The Flip Chart Clip and Quartet Portable IdeaShare are set up with
your flip chart as described in “Using Quartet Portable IdeaShare with a Flip Chart”
on page 6. Flip Chart mode identifies (for the software) the location of the Shortcut
Strip on the Flip Chart Clip, as well as the size of the flip chart itself, making it
unnecessary to calibrate.
• Image Area: The Image Area of the whiteboard is the area of the whiteboard or
flip chart where the electronic pen strokes you make are captured by Quartet Por-
table IdeaShare and transferred into the eBeam Software window. The Image
Area is determined by the placement of the receiver(s), and the software calibra-
tion.
• Projection Mode or Virtual Touchscreen mode: eBeam Software has three
modes: whiteboard, projection, and flip chart modes. Projection mode (also
known as virtual touchscreen mode) is when Quartet Portable IdeaShare, your
computer, and a projector are all used together to make your whiteboard a touch-
screen. Quartet Portable IdeaShare and the projector plug in to your computer.
The projector displays your computer desktop onto the whiteboard and Quartet
Portable IdeaShare detects when you touch, allowing any electronic pen to act as a
virtual mouse.
• Whiteboard Mode: eBeam Software has three modes: whiteboard (digital white-
board), projection, and flip chart modes. Whiteboard mode is when Quartet Porta-
Chapter 3 Page 9
https://www.supplychimp.com

ble IdeaShare acts as a whiteboard recorder; recording data as it is written on the
whiteboard and displaying that data in the eBeam Software application window.
Software Installation & First Time Use
This chapter describes how to set up and use eBeam Software.
1. Set up Quartet Portable IdeaShare as described in the Quick Set Up Guide that is
included with Quartet Portable IdeaShare.
2. Insert the software CD into the CD-ROM drive on your computer. The installer
(Macintosh or PC) will start up automatically. If the installer does not start up
automatically, browse to your CD-ROM drive and select the setup program. Follow
all on-screen directions.
3. Launch eBeam Software. The first time eBeam Software opens, it opens in
Whiteboard mode (see “Terminology” on page 9). You are prompted to calibrate
Whiteboard mode immediately.
If you do not wish to use Whiteboard mode, skip this step.
If you do wish to use Whiteboard mode, click Calibrate to open the Whiteboard cal-
ibration wizard and follow all on-screen instructions. See “Calibrate Whiteboard
Mode” on page 12 for a description of how to manually start calibration for White-
board mode.
Note: If eBeam Software was unable to autodetect Quartet Portable IdeaShare,
see “Troubleshooting” on page 22.
4. Select the mode you wish to use. The three possible modes (described in
“Terminology” on page 9) are:
• Whiteboard mode
• Flip Chart mode
• Projectionmode
Note: In the PC version of eBeam Software, the first time you launch eBeam Soft-
ware, eBeam Software opens a mode selection dialog. Select “Capture from
Whiteboard” (Whiteboard mode), “Capture from Flipchart” (Flip Chart mode), or
“Use with Projector” (Projection mode), and click the Calibrate button. eBeam
Software opens the appropriate calibration wizard.
Page 10 Using eBeam Software with Quartet Portable IdeaShare
https://www.supplychimp.com
To select a mode, see the following table.
Platform Instructions
PC • The “Tools->eBeam Hardware” menu in eBeam Software’s
Whiteboard mode application. See “Using The Whiteboard
Mode Application” on page 12.
• The Status icon right-click menu in eBeam Software’s
Whiteboard mode application. See “Using The Whiteboard
Mode Application” on page 12.
• eBeam Software’s Windows taskbar menu.
Macintosh OS 9.X • The “Tools->eBeam Hardware” menu in eBeam Software’s
Whiteboard mode application. See “Using The Whiteboard
Mode Application” on page 12.
• eBeam Software’s control strip menu.
Macintosh OS 10 • The System menu in menu in eBeam Software’s Whiteboard
mode application. See “Using The Whiteboard Mode
Application” on page 12.
• The Status icon menu in menu in eBeam Software’s
Whiteboard mode application. See “Using The Whiteboard
Mode Application” on page 12.
• The eBeam System Settings icon from the docklet. File
menu.
5. The first time you use any mode you are prompted to calibrate that mode
immediately. Click the Calibrate button to automatically open the calibration
wizard.
Manually starting is described in:
• “Calibrate Whiteboard Mode” on page 12 for Whiteboard mode.
• “Using Quartet Portable IdeaShare with a Flip Chart” on page 6 for Flip Chart
mode.
• “Projection/Virtual Touchscreen Mode” on page 16 for Projection mode.
6. Set up the Shortcut Strip if you are using either Whiteboard mode or Flip Chart
mode. Shortcut Strip setup is described in:
• “The Whiteboard Mode Shortcut Strip” on page 17.
• “The Flip Chart Mode Shortcut Strip” on page 18.
Chapter 3 Page 11
https://www.supplychimp.com

Whiteboard Mode
Whiteboard mode is the Quartet Portable IdeaShare acting as a whiteboard recorder;
recording data as it is written on the whiteboard and displaying that data in the eBeam
Software application window.
Calibrate Whiteboard Mode
The first time you use Whiteboard mode you are automatically prompted to calibrate.
To manually start the calibration wizard, see the following table.
Platform Instructions
PC Select “eBeam Hardware>Calibrate eBeam Hardware” from the
Tools menu.
Macintosh OS 9.X Select “eBeam Hardware>Calibrate eBeam Hardware” from the
Tools menu.
Macintosh OS 10 Select “Calibrate” from the System menu.
Using The Whiteboard Mode Application
The look and feel of the whiteboard mode application varies between the PC and Mac-
intosh platforms. The functionality remains the same.
Menus
Toolbar
Thumbnail View
Participants View
Annotation Tools
Active Page
Play Controls
Page 12 Using eBeam Software with Quartet Portable IdeaShare
https://www.supplychimp.com
Menus Allows access to all of software functions and features.
Toolbar Allows access to the most commonly used features.
Active Page Receives data written on the whiteboard. The active page will
always be the most recently created page in the meeting.
Thumbnail Displays thumbnails of all pages in the meeting.
View
Participants Displays the login names of all users connected to a meeting, as well
View as allows users to “chat” with each other using the software’s instant
messaging system.
Web View The Web View allows access to web pages, and allows the meeting
(PC Only) host to lead a Web Tour.
Annotation Palette of tools that allow the user to annotate/draw on the
Tools displayed meeting page using the a mouse and/or keyboard.
Play Controls Allows you to play back the meeting like a movie. The meeting is
played forward, line by line, at varying speeds. Also, playback can be
restricted to either the current page, or set to play all pages.
Toolbar
New Saves the active page and opens a new active page.
Duplicate Copies the selected page and makes the copy the Active Page.
Delete Deletes the selected page.
Print Prints the selected page to the printer connected to your
computer.
Full Screen Maximizes the software application window on the screen.
Share Meeting Allows you to share the current meeting either over the local
intranet or the Internet.
Join Meeting Allows you to log on to a meeting broadcasting over the local
intranet or Internet.
Status Icon The Status icon reports the connection status of eBeam Software
to the hardware. A whiteboard icon indicates Whiteboard mode, a
projector icon indicates Projection mode, a flip chart icon
indicates Flip Chart Mode. A grayed out icon indicates that eBeam
Software is not connected to the hardware. See eBeam Software’s
help system for a desciption of the Status Icon.
Chapter 3 Page 13
https://www.supplychimp.com

Annotation Tools
Marker Allows you to write freehand in one of four solid colors on any
page.
Highlighter Allows you to write freehand in one of four transparent colors on
any page.
Eraser Erases both whiteboard data and annotations from within the
software.
Zoom Enlarges the view of the displayed page.
Text Allows you to add text annotations to a page.
Pointer The Pointer tool is only enabled during a shared meeting. The
Pointer tool allows each participant in a meeting to point to data
anywhere within the meeting window. Each participant’s pointer is
displayed in a different color.
The pointer direction (right, left, up, down) can be selected from
the palette that appears when the Pointer tool is selected. You can
also hide the pointer by clicking the “Hide Pointer” button from
the palette that appears when the Pointer tool is selected.
Selector Allows you to draw a selection rectangle in the displayed page,
and then copy and paste the selected area into another
application.
Play Controls
Jump to
Beginning Jumps to the very beginning of the meeting, which is always the
original blank page.
Drag Control
Slider Allows you to step through the meeting forward or reverse by
clicking on the drag line, or to immediately jump to a specific
point in the meeting by dragging the drag bar to a location on the
drag line.
Play Replays the meeting from beginning to end, beginning with a
blank screen. While playing, the Play button changes to a Stop
button, allowing you to stop the playback. See Play Speed.
Jump to End Jumps to the end of the meeting, restoring all whiteboard strokes
and annotations.
Page 14 Using eBeam Software with Quartet Portable IdeaShare
https://www.supplychimp.com
Loop Replays the meeting from beginning to end, beginning with a
blank screen. Once the end of the meeting is reached, begins to
replay from the beginning. Runs continuously. While playing, the
Play button changes to a Stop button, allowing you to stop the
playback.
All Pages If “All Pages” is checked, then clicking “Play” causes the entire
meeting is played back. If “All Pages” is not checked, then only
the currently displayed page is played back.
Play Speed Speed at which the meeting is played. 0.5x is the slowest speed
possible, and 8.0x is the fastest speed possible.
Chapter 3 Page 15
https://www.supplychimp.com

Projection/Virtual Touchscreen Mode
Projection mode consists of Quartet Portable IdeaShare, your computer, and a projec-
tor; all used together to make your whiteboard a touchscreen.
Quartet Portable IdeaShare and the projector plug in to your computer. The projector
displays your computer desktop onto the whiteboard and Quartet Portable IdeaShare
detects when you touch, allowing an electronic pen (using the plastic stylus insert) to
act as a virtual mouse, controlling your computer’s desktop.
In projection mode, you can operate your computer directly from the whiteboard. You
can open, work in, and close applications; draw freehand in painting and drawing
applications, or even operate the digital whiteboard mode application directly from the
whiteboard.
Projection mode setup is illustrated below.
Projection Mode Setup
1. Set up Quartet Portable IdeaShare as described in the Quick Set Up Guide.
2. Set up the projector, and attach to the same computer as Quartet Portable
IdeaShare.
3. Turn on your projector, and project your computer’s desktop on the whiteboard.
4. Open any electronic pen and insert the plastic stylus insert. The plastic stylus
insert is a plastic piece that has the same shape as a dry-erase marker, but has a
plastic tip that does not leave marks.
5. Launch the software and switch to projection mode according to the description in
“Software Installation & First Time Use” on page 10.
6. If this is the first time Projection Mode has been run on this computer, you will be
prompted to calibrate. That calibration is saved. If the projector is moved at any
time, you must recalibrate the software to retain accuracy.
Page 16 Using eBeam Software with Quartet Portable IdeaShare
https://www.supplychimp.com
Other manuals for IdeaShare
1
Table of contents
Other Quartet Whiteboard manuals
Popular Whiteboard manuals by other brands

Herman Miller
Herman Miller Canvas Office Landscape Installation and Disassembly for Recycling Instructions

PLAYTIVE JUNIOR
PLAYTIVE JUNIOR 285758 Instructions for use

3M
3M Post-it Dry Erase Surface quick start guide

Ghent
Ghent 5' Porcelain Board Hanging Instructions

SMART
SMART V280 quick reference

TeamBoard
TeamBoard T492 instruction manual

NEC
NEC Mediaboard-102 Operation and installation manual

BenQ
BenQ PointWrite user manual

Da-Lite
Da-Lite Cosmopolitan Electrol Instruction book

Displays2go
Displays2go WHBM2840 Assembly instructions

Little Partners
Little Partners DELUXE LEARN AND PLAY ART CENTER LP0280 R2 Assembly

Ghent
Ghent 3-Door Rubber Mounting instructions