TABLE
OF
CONTENTS
Before
Operation
Precautions
for
Microwave
Energy..........cccssssccsssserscesssenssessssrsssceeesssssceusnecceesensserees
Inside
Front
Cover
Important
Safety
Instructions
T
arriendan
dando
reir
AEREA
iaa
Tal
soi
2
Installation
and
Grounding
Instructions
....uusassseensonausouessonanonunnennnnnsonnunnnnnannmnnnnnnnnennenuunnnnnenaunennnnnnsanen
3-4
A
M
ov
dig
ves
es
plas
EOS
as
tes
OD
Velo
dad
ca
Pa
br
au
a
ae
sb
ANA
ETUR
UIN
D
EAD
e
E
REUÉ
5
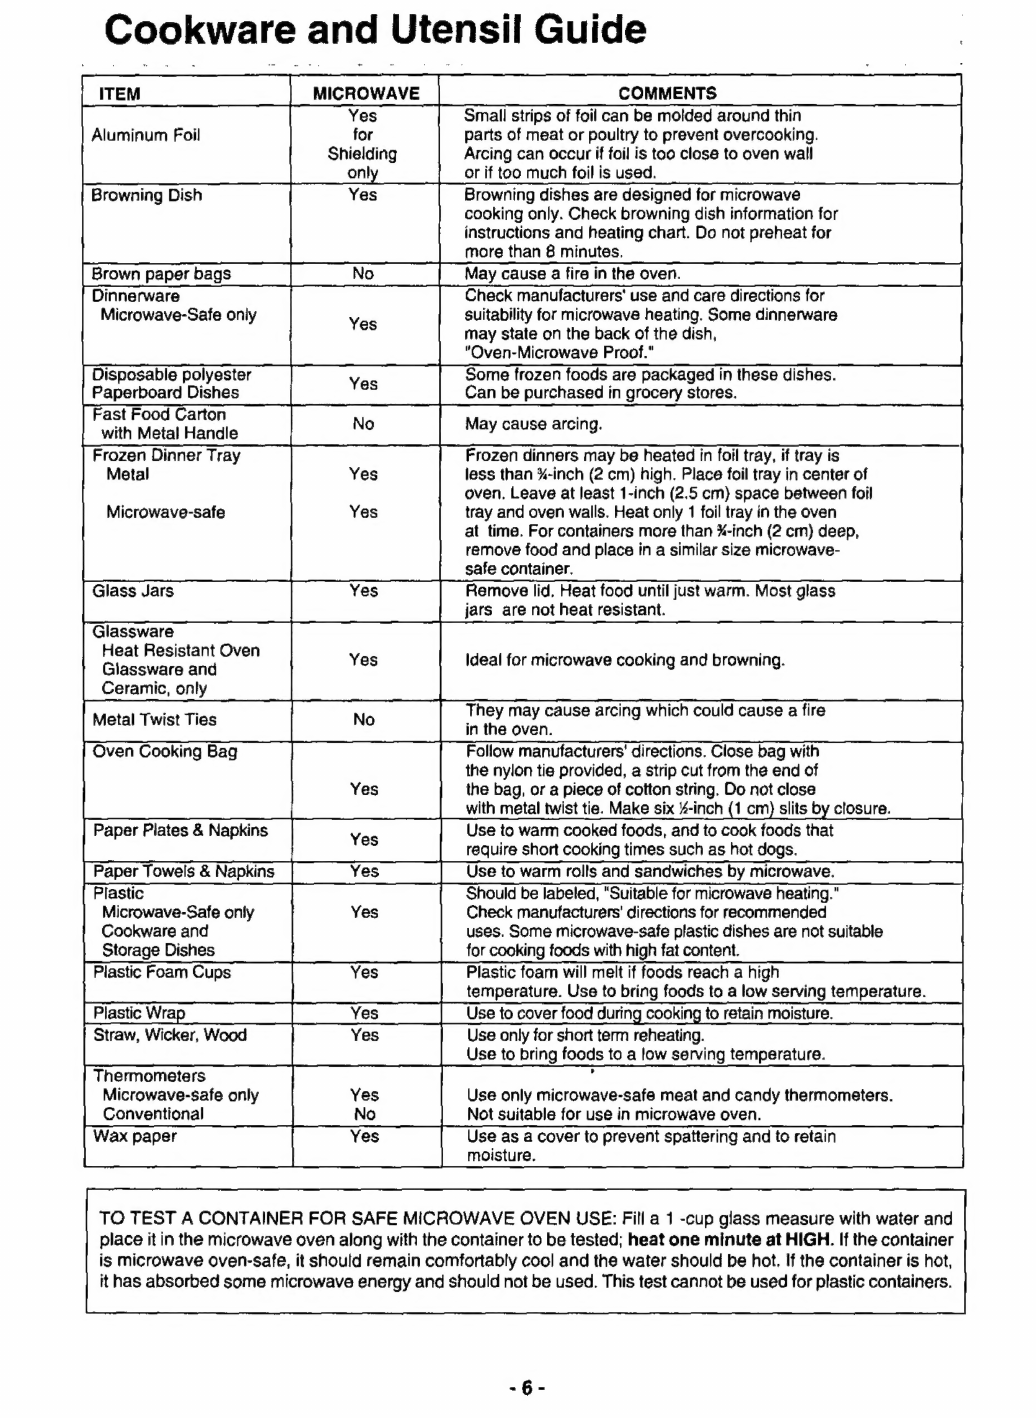
Cookware
and
Utensil
GUÍBB...
inae
ap
roni
ca
sarna
nicind
anne
nn
une
SER
Hann
Ua
d
Fa
nU
ek
x
Mi
ARR
Y
ci
iaa
idad
6
Food
Characterisikks
mee
E———
HE
7
Cooking
TOCOMIQUES
rc
ia
7
Feature
DIA
aa
9
Control
PA
A
a
dió
9
Operation
Weight
Conversion
(OZ/ID
or
G/KG)
......................
eee
eene
eere
neret
n
aree
arrastra
sana
aa
nao
ranac
o
nanna
ares
ena
nasa
ana
9
Clock
Setting
PSP
ERE
10
Child:
Safety
LOCK
quM
——————————
€
10
Power
&
Time
Settings.
iocos
eate
dee
qva
RO
ii
Vii
DE
IN
QPÉRE
10
lauri
Pee
MR
————Á———————
€
10
juni
dipl
eL
e
—————————————Y
11
ll
1
|
fate
—É———————
Opak
nts
12
Auto
DCTS
AC
e
LC————————Ó—————————
——S
12
ii
eror
iii
€—
P
13
Microwave
ShOHECUIS
uiris
GRE
quu
A
e
me
Ec
ee
ca
cU
aerate
Cere
15
Maintenance
Parts
Order
FO
Mint
casi
is
ii
13
Before
Requesting
SOPVICG
sisi
ciscscccsesdccsusvenscispasisabduicacedesgecavaevlecuteaiivinbsnitess
o
Eo
rn
d
ae
17
Care
of
Your
Microwave
AA
ehe
a
édivtv
t
eir
Cal
EE
Teen
17
Technical
Specifications
MT
€————Á—————————
Tee
1
Quick
Guide
to
Operation
ius
rascar
cdi
Back
Cover
Technical
Specifications
Power
Consumption:
111A
1180W
Output:
750
W
Outside
Dimensions
including
trim
kit
14%”
x
20"
x
14%"
(H
x
W
x
Dy:
(365
x
510
x
360mm)
Oven
Cavity
Dimensions
9"
x
13%"
x
13e"
(Hx
W
xD):
(229
x
353
x
338mm)
Operating
Frequency:
2,450
MHz
Uncrated
Weight:
Approx.
37
lbs.
(16.8
kg)
*IEC
705-88
Test
procedure
Specifications
subject
to
change
without
notice.


M Service manual")