R/Evolution REV-PROGBOX User manual

REV-PROGBOX
(480) 497-4400 (800) 338-3133 E-mail: sales@tomar.com www.tomar.com
Page 1 of 8
IS0746
-
00
01-15-2018
Instruction Manual
Inputs - with Banana Plug ends, on the Left side of the p oduct
RED banana plug: +VDC f om the Powe Supply
BLACK banana plug: G ound f om the Powe Supply
Outputs - with Alligato Clip ends, on the Right side of the p oduct
RED alligato clip: to the RED wi e of the Rxx lamp
BLACK alligato clip: to the BLACK wi e of the Rxx lamp
YELLOW alligato clip: to the YELLOW wi e of the Rxx lamp
BLUE alligato clip: to the BLUE wi e of the Rxx lamp
Power LED - Red LED on the uppe left of the p oduct will illuminate when voltage is applied ac oss the
RED and BLACK input wi es.

(480) 497-4400 (800) 338-3133 E-mail: sales@tomar.com www.tomar.com
Page 2 of 8
IS0746
-
00
01-15-2018
Switches - Left to Right
Switch 1 - fo connecting +VDC and/o G ound to the RED and/o BLACK outputs.
Switch 2 - fo connecting eithe +VDC o G ound to the YELLOW outputs.
Switch 3 - fo connecting eithe +VDC o G ound to the YELLOW & BLUE outputs.
Switch 4 - fo connecting eithe +VDC o G ound to the BLUE outputs.
Switch Positions
Switch 1 - labelled RED/BLK
(1) Position 1 - +V - Nothing connected to the BLACK output
+VDC connected to the RED output
(2) Position 2 - BOTH - G ound connected to the BLACK output
+VDC connected to the RED output
(3) Position 3 - GND - G ound connected to the BLACK output
Nothing connected to the RED output

(480) 497-4400 (800) 338-3133 E-mail: sales@tomar.com www.tomar.com
Page 3 of 8
IS0746
-
00
01-15-2018
Switch 2 - labelled YELLOW
(4) Position 1 - +V - +VDC connected to the YELLOW output
(5) Position 2 - Cente - Nothing connected to the YELLOW output
(6) Position 3 - GND - G ound connected to the YELLOW output
Switch 3 - labelled YEL/BLU
(10) Position 1 - +V - +VDC connected to the YELLOW and BLUE outputs
(11) Position 2 - Cente - Nothing connected to the YELLOW and BLUE outputs
(12) Position 3 - GND - G ound connected to the YELLOW and BLUE outputs
Switch 4 - labelled BLUE
(7) Position 1 - +V - +VDC connected to the BLUE output
(8) Position 2 - Cente - Nothing connected to the BLUE output
(9) Position 3 - GND - G ound connected to the BLUE output

(480) 497-4400 (800) 338-3133 E-mail: sales@tomar.com www.tomar.com
Page 4 of 8
IS0746
-
00
01-15-2018
Smart Mode, Active High Operation
Switch 1 (RED/BLK) in the BOTH position, apply +VDC to the RED input and G ound to the BLACK input.
The lamp will flash in the selected P ima y Flash Mode.
Switch 4 (BLUE) in the +V position, the lamp will flash in the Seconda y Flash Mode.
Switch 3 (YEL/BLU) in the +V position, the lamp will flash in the Seconda y Flash Mode.
Smart Mode, Active Low Operation
Switch 1 (RED/BLK) in the BOTH position, apply +VDC to the RED input and G ound to the BLACK input.
The lamp will flash in the selected P ima y Flash Mode.
Switch 4 (BLUE) in the GND position, the lamp will flash in the Seconda y Flash Mode.
Switch 3 (YEL/BLU) in the GND position, the lamp will flash in the Seconda y Flash Mode.
Direct Mode, Active High Operation
Switch 1 (RED/BLK) in the GND position, apply +VDC to the RED input and G ound to the BLACK input.
Switch 2 (YELLOW) in the +V position, the fi st half of the lamp will tu n on Steady.
Switch 4 (BLUE) in the +V position, the second half of the lamp will tu n on Steady.
Switch 3 (YEL/BLU) in the +V position, both halves of the lamp will tu n on Steady.
Direct Mode, Active Low Operation
Switch 1 (RED/BLK) in the +V position, apply +VDC to the RED input and G ound to the BLACK input.
Switch 2 (YELLOW) in the GND position, the fi st half of the lamp will tu n on Steady.
Switch 4 (BLUE) in the GND position, the second half of the lamp will tu n on Steady.
Switch 3 (YEL/BLU) in the GND position, both halves of the lamp will tu n on Steady.

(480) 497-4400 (800) 338-3133 E-mail: sales@tomar.com www.tomar.com
Page 5 of 8
IS0746
-
00
01-15-2018
What Mode is the lamp in
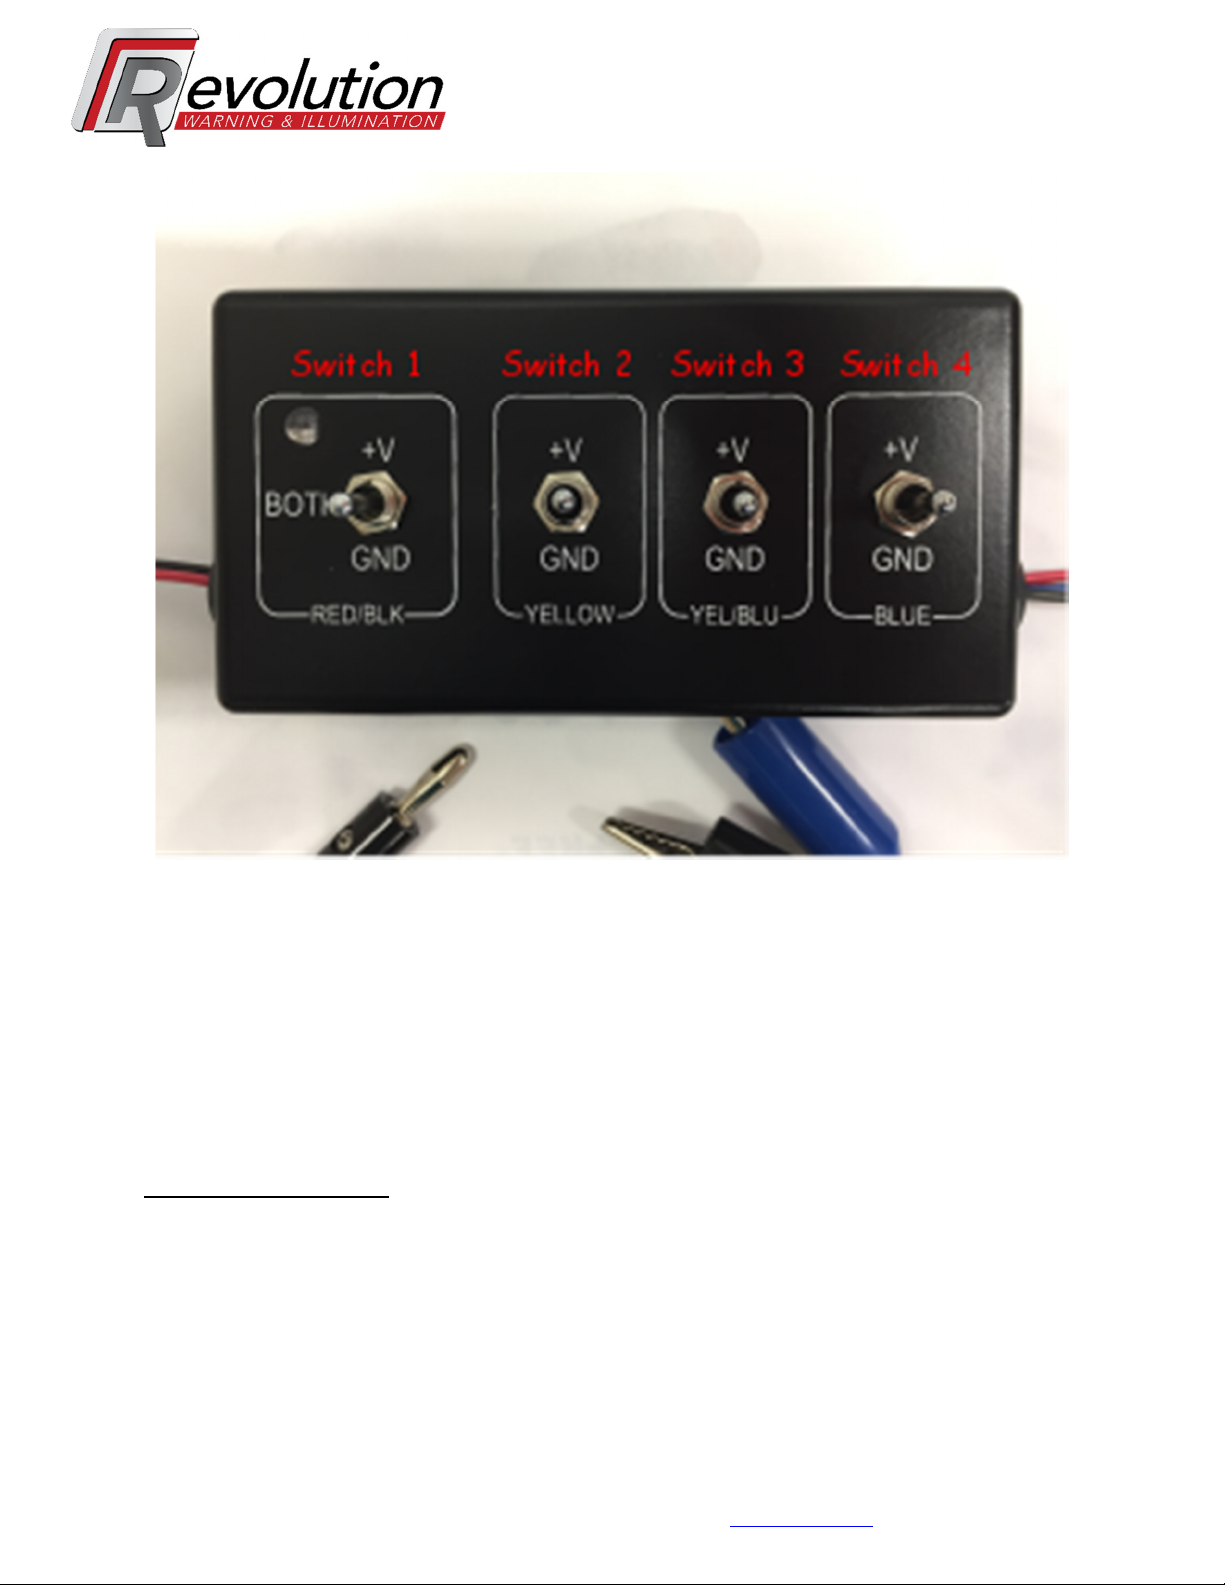
Initial switch positions: Switch 1 BOTH (2), Switch 2 Cente (5), Switch 4 Cente (8), Switch 3 Cente (11)
1) Test fo Sma t o Di ect:
Connect the Powe Supply to the BLACK (G ound) and RED (+VDC) inputs, Switch 1 BOTH (2).
If the lamp flashes immediately, o the lamp tu ns on immediately, then the lamp is in a Sma t Mode, go
to step 2.
If the lamps stays off, and then afte 3 seconds the lamp flashes th ee times, then the lamp is in a Di ect
Mode, go to step 4.
2) Sma t Mode, Test fo Active High:
Connect the BLUE/Alte nate output to +VDC, Switch 4 Center (8) to +V (7).
If the flash patte n changes, then the lamps is in Sma t Mode, Active High.
If the flash patte n doesn't change, then go to step 3.
3) Sma t Mode, Test fo Active Low:
Disconnect the BLUE/Alte nate output f om +VDC, Switch 4 +V (7) to Center (8).
Connect the BLIE/Alte nate output to G ound, Switch 4 Center (8) to GND (9).
If the flash patte n changes, then the lamps is in Sma t Mode, Active Low.
If the flash patte n doesn't change, then the e's a p oblem with the lamp, skip the emaining steps.
4) Di ect Mode, Test fo Active High:
Disconnect the RED output f om +VDC, Switch 1 BOTH (2) to GND (3).
Connect the YELLOW/Sync output to +VDC, Switch 2 Center (5) to +V (4).
If half the lamp o the enti e lamp tu ns on Steady, then the lamp is in Di ect Mode, Active High.
If the lamps does not tu n on, then go to step 5.
Ve ify Di ect Mode, Active High by also connecting the BLUE/Alte nate output to +VDC, Switch 4 Center
(8) to +V (7), the othe half of the lamp should tu n on, o if a dual led lamp, the second colo of the
lamp tu ns on.
5) Di ect Mode, Test fo Active Low:
Disconnect the YELLOW/Sync output (and BLUE/Alte nate output) f om +VDC, Switch 2 +V (4) to Center
(5) and Switch 4 +V (7) to Center (8).
Disconnect the BLACK output f om G ound and connect the RED output to +VDC, Switch 1 GND (3) to +V
(1).
Connect the YELLOW/Sync output to G ound, Switch 2 Center (5) to GND (6).
If half the lamp o the enti e lamps tu ns on Steady, then the lamp is in Di ect Mode, Active Low.
If the lamp does not tu n on, then the e's a p oblem with the lamp, skip the emaining steps/actions.
Ve ify Di ect Mode, Active Low by also connecting the BLUE/Alte nate output to G ound, Switch 4
Center (8) to GND (9), the othe half of the lamp should tu n on, o if a dual led lamp, the second colo
of the lamp tu ns on.

(480) 497-4400 (800) 338-3133 E-mail: sales@tomar.com www.tomar.com
Page 6 of 8
IS0746
-
00
01-15-2018
Entering Programming Mode
Enter Program Mode from Smart Mode, Active High
To P og am the P ima y Flash Mode:
Disconnect the Powe Supply f om the Switch Box.
Connect the YELLOW/Sync to +VDC: Switch 1 (2), Switch 2 (4), Switch 4 (8), Switch 3 (11)
Connect the Powe Supply to the Switch Box.
Wait fo two seconds, the lamp should flash 3 times, elease the YELLOW/Sync f om +VDC,
Switch 2 (4) to (5).
The lamp should be flashing in the selected P ima y Flash Mode.
To P og am Alte nate Flash Mode:
Disconnect the Powe supply f om the Switch Box.
Connect the YELLOW/Sync and BLUE/Alte nate to +VDC: Switch 1 (2), Switch 2 (5), Switch 4 (8),
Switch 3 (10)
Connect the Powe Supply to the Switch Box.
Wait fo two seconds, the lamp should flash 4 times, elease YELLOW/Sync and BLUE/Alte nate
f om +VDC, Switch 3 (10) to (11).
The lamp should be flashing in the selected Alte nate Flash Mode.
YELLOW/Sync to +VDC fo Flash Type and Rate. Switch 2 (5) to (4)
BLUE/Alte nate to+VDC fo Flash Patte n. Switch 4 (8) to (7)
YELLOW/Sync and BLUE/Alte nate to +VDC fo Quad ants. Switch 4 (11) to (10)

(480) 497-4400 (800) 338-3133 E-mail: sales@tomar.com www.tomar.com
Page 7 of 8
IS0746
-
00
01-15-2018
Enter Program Mode from Smart Mode, Active Low
To P og am the P ima y Flash Mode
Disconnect the Powe Supply f om the Switch Box.
Connect the YELLOW/Sync to G ound: Switch 1 (2), Switch 2 (6), Switch 4 (8), Switch 3 (11)
Connect the Powe Supply to the Switch Box.
Wait fo two seconds, the lamp should flash 3 times, elease YELLOW/Sync f om G ound, Switch
2 (6) to (5).
The lamp should be flashing in the selected P ima y Flash Mode.
To P og am Alte nate Flash Mode
Disconnect the Powe Supply f om the Switch Box.
Connect the YELLOW/Sync and BLUE/Alte nate to G ound: Switch 1 (2), Switch 2 (5), Switch 4
(8), Switch 3 (12)
Connect the Powe Supply to the Switch Box.
Wait fo two seconds, the lamp should flash 4 times, elease YELLOW/Sync and BLUE/Alte nate
f om G ound, Switch 3 (12) to (11).
The lamp should be flashing in the selected Alte nate Flash Mode.
YELLOW/Sync to G ound fo Flash Type and Rate. Switch 2 (5) to (6)
BLUE/Alte nate to G ound fo Flash Patte n. Switch 4 (8) to (9)
YELLOW/Sync and BLUE/Alte nate to G ound fo Quad ants. Switch 3 (11) to (12)
Enter Program Mode from Direct Mode, Active High
To P og am the P ima y Flash Mode
Disconnect the Powe Supply f om the Switch Box.
Switch 1 (2), Switch 2 (5), Switch 4 (8), Switch 3 (11)
Connect the Powe Supply to the Switch Box.
Wait fo two seconds, the lamp should flash 3 times, then stay Off.
YELLOW/Sync to +VDC fo Flash Type and Rate. Switch 2 (5) to (4)
BLUE/Alte nate to +VDC fo Flash Patte n. Switch 4 (8) to (7)
YELLOW/Sync and BLUE/Alte nate to +VDC fo Quad ants. Switch 3 (11) to (10)

(480) 497-4400 (800) 338-3133 E-mail: sales@tomar.com www.tomar.com
Page 8 of 8
IS0746
-
00
01-15-2018
Enter Program Mode from Direct Mode, Active Low
To P og am the P ima y Flash Mode
Disconnect the Powe Supply f om the Switch Box.
Switch 1 (2), Switch 2 (5), Switch 4 (8), Switch 3 (11)
Connect the Powe Supply to the Switch Box.
Wait fo two seconds, the lamp should flash 3 times, then stay Off.
YELLOW/Sync to G ound fo Flash Type and Rate. Switch 2 (5) to (6)
BLUE/Alte nate to G ound fo Flash Patte n. Switch 4 (8) to (9)
YELLOW/Sync and BLUE/Alte nate to G ound fo Quad ants. Switch 3 (11) to (12)
Table of contents