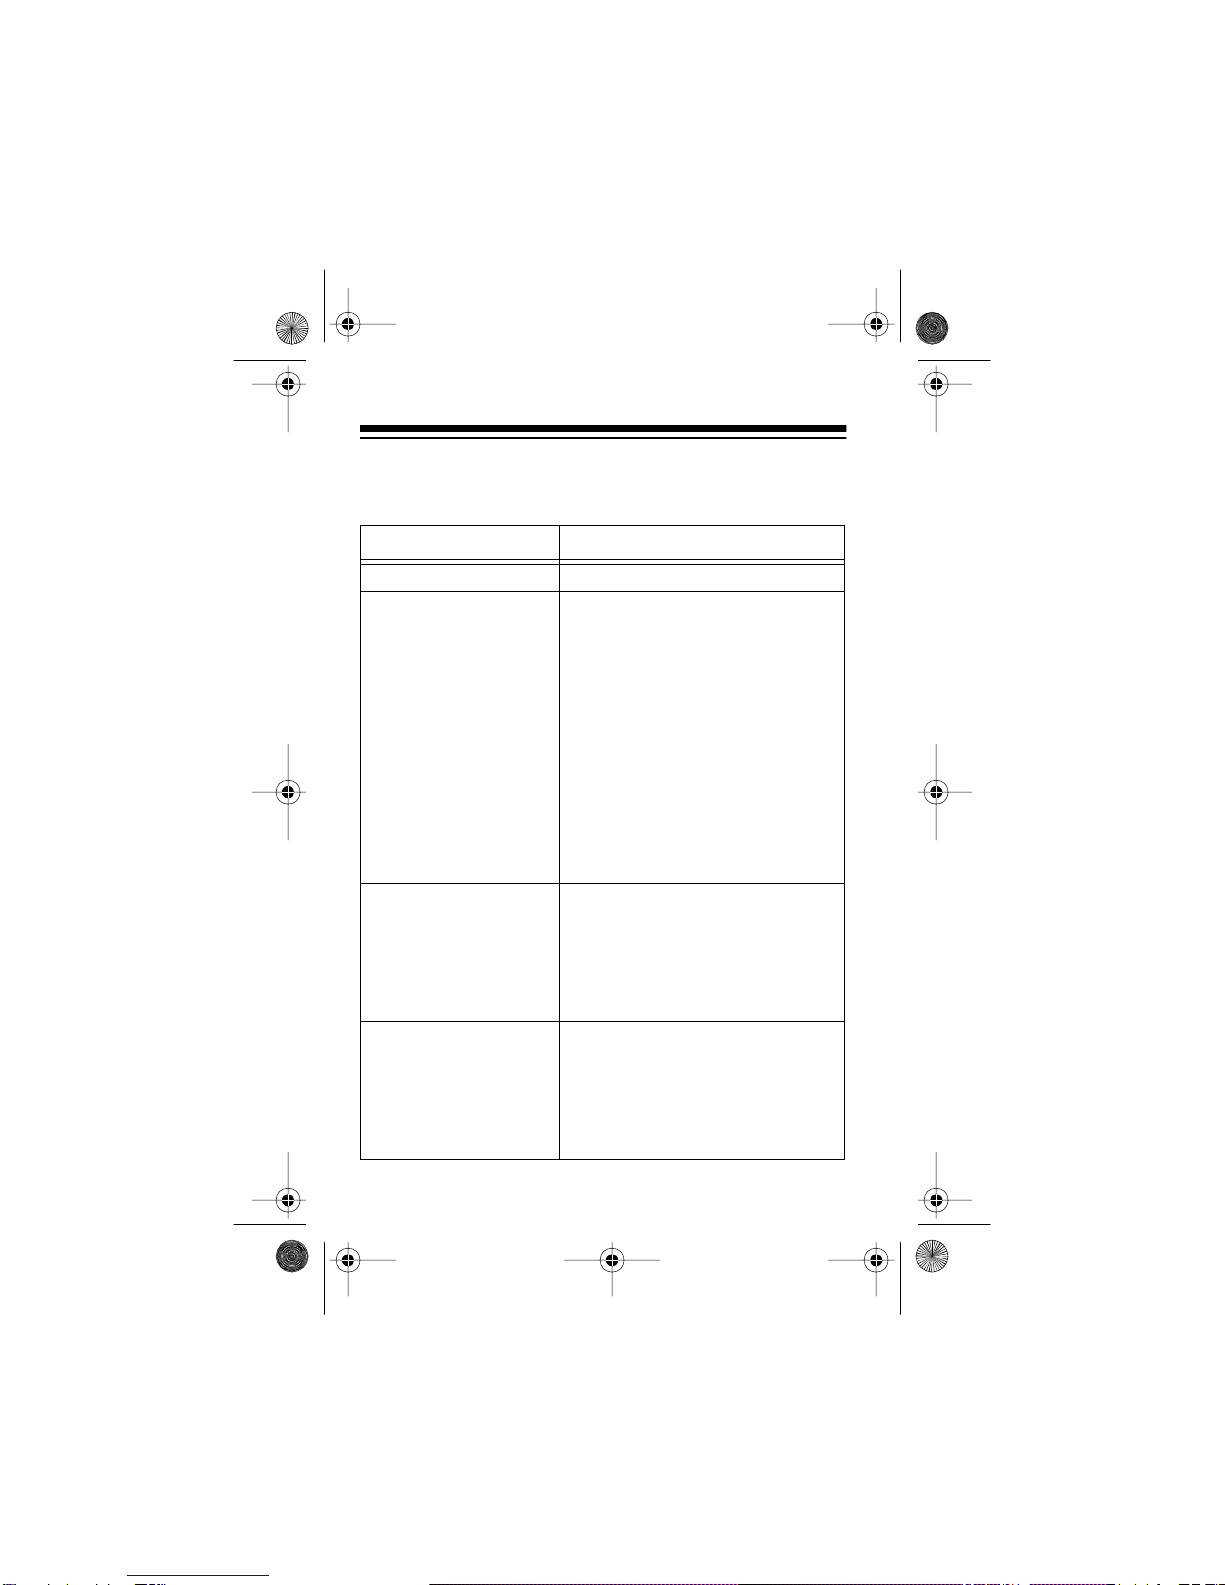
Radio Shack RS-500 User manual

Cat. No. 49-805
OWNER’S MANUAL
Please read before using this equipment.
RS-500
Auto Security Alarm System
49-805.fm Page 1 Thursday, August 19, 1999 9:51 AM

2
FEATURES
Your RadioShack RS-500 Auto Security Alarm System pro-
vides both easy installation and advanced vehicle protection.
Its simple, two-wire hookup lets you install your alarm in min-
utes, and its 115 dB alarm alerts anyone nearby that your ve-
hicle is being tampered with.
Its features include:
Current Sensing System — triggers the alarm when a door
or trunk is opened and the vehicle’s dome or trunk light turns
on or when your vehicle is hot wired, by sensing the current
draw.
Current Sensor Bypass — lets you turn off current sensing
if other electronic devices in your vehicle (such as a high-
power audio system or cellular phone) make your alarm
sound false alarms.
Adjustable Shock Sensing System — sounds the alarm
when the system detects an impact.
Electric Fan Sensing — can tell the difference between your
vehicle’s electric fan (which can make other alarms sound a
false alarm) and the dome or trunk light, without using addi-
tional wiring.
115 dB Siren — loud enough to get attention from hundreds
of feet away.
Four-Button Keychain Remote — lets you easily control
your alarm from a distance.
©1996 Tandy Corporation.
All Rights Reserved.
RadioShack is a trademark used by Tandy Corporation.
49-805.fm Page 2 Thursday, August 19, 1999 9:51 AM

3
Car Finder — lets you make the alarm sound four loud
beeps to help you find your vehicle in a crowded parking lot.
Instant Panic Alarm — sounds a loud alarm to alert others
that you need assistance while you are in or near your vehi-
cle.
No-Tool Installation — uses an adhesive backing for mount-
ing and spring clamps for connecting to power, so you can in-
stall the alarm in minutes.
Toll-Free Help — just call:
1-800-598-2527
if you have any questions about or problems with your alarm
system.
Warning: This alarm produces an extremely loud (115
dB) siren when triggered. Extended exposure to the siren
from a close range can be painful and might damage
your hearing.
49-805.fm Page 3 Thursday, August 19, 1999 9:51 AM

4
INSTALLATION
Follow these simple steps to install your alarm.
1. Select a location for the alarm that is:
• Flat so the alarm’s adhesive surface makes good con-
tact
• Within 1 foot of your vehicle’s battery
• Not on an engine part or any part that moves or gets
hot
• Not in the way of normal engine operation or mainte-
nance
Note: If there is space, the battery itself is usually an
ideal location.
2. Clip the alarm’s red clip to the battery’s positive (+) termi-
nal.
3. Clip the alarm’s black clip to the battery’s negative (–)
terminal. The alarm chirps three times.
49-805.fm Page 4 Thursday, August 19, 1999 9:51 AM

5
4. Wash the surface with soap and water and allow it to dry.
Then use the supplied alcohol wipes to thoroughly clean
the mounting surface. Allow the surface to completely
dry.
5. Peel off the alarm’s adhesive backing and press it onto
the prepared surface. Hold the alarm in place for 10 sec-
onds to help ensure a secure mount.
Note: If the surface is not flat, you can cut the adhesive
to fit into surface grooves for a more secure mount.
Straighten the alarm’s yellow antenna wire and let it
hang down. For the greatest remote control range, avoid
running the yellow wire along metal parts.
6. Press DISARM on the remote control. The alarm beeps
very loudly twice. This trains the alarm to recognize the
remote.
49-805.fm Page 5 Thursday, August 19, 1999 9:51 AM

6
OPERATION
USING THE SYSTEM
To arm the system, press ARM. The alarm chirps once. The
alarm activates the shock sensor 6 seconds after arming and
activates the current sensor 20 seconds after arming.
If the alarm detects a violation while it is armed, it sounds a
loud alert for about 30 seconds, then resets and is ready to
detect additional violations.
To silence the alert sooner, press any button on the remote
control. The alarm disarms.
To disarm the system, press DISARM. The alarm beeps
twice if there have been no alarms, or three times if the alarm
sounded while you were away.
To find your vehicle in a crowded parking lot, press FIND-
ER. If you are within range of the alarm, it chirps four times.
Note: The alarm must be armed for the car finder to work.
To sound the alarm at any time, press and release PANIC.
The alarm sounds the alert tone for about 30 seconds. To si-
lence the alert sooner, press any button on the remote con-
trol.
Caution: You can sound the panic alarm or arm the alarm
even when your vehicle’s engine is running and the vehicle is
moving. Operating a siren on a moving non-emergency vehi-
cle is illegal in some areas.
49-805.fm Page 6 Thursday, August 19, 1999 9:51 AM

7
SETTING THE CURRENT SENSOR
If another electronic device installed in your vehicle, such as
a cellular phone, causes your alarm to sound when it should
not, press PANIC for 2 seconds. The alarm beeps twice and
current sensing turns off. To turn current sensing back on,
press PANIC for 2 seconds. The alarm beeps once.
SETTING THE SHOCK SENSOR
The shock sensor is preset for average conditions. Follow
these steps to set the shock sensor to a different level.
1. Disarm the system.
2. Press and hold FINDER for 2 seconds. The alarm chirps
four times.
3. Within 3 seconds, tap or hit your vehicle directly over the
alarm with the amount of force you want the alarm to
respond to. The alarm chirps three times.
Notes:
• If you do not tap or hit your vehicle within 3 seconds, the
alarm chirps three times and is set to maximum sensitiv-
ity.
• If your alarm loses power, the shock sensor resets to its
average setting when power is restored.
49-805.fm Page 7 Thursday, August 19, 1999 9:51 AM

8
ADDING A REMOTE CONTROL
You can add one additional remote control to your system or
replace a lost remote control. Remote controls (Cat. No. 49-
845) are available from your local RadioShack store. Each re-
mote control has its own unique electronic code.
Follow these steps to teach your system to respond to an ad-
ditional remote’s code.
1. Press and hold ARM on the original remote for about 10
seconds. The alarm beeps once when you first press
ARM, then three times when it is ready to learn the new
remote’s code.
2. Press DISARM on the new remote control. The alarm
beeps once and now works with either remote.
To replace a lost remote, disconnect power from the alarm.
Then restore power and immediately press any button on the
replacement remote.
Note: If your alarm loses power, it loses all remote codes. To
restore the first remote’s code, immediately press any button
after you restore power. Then follow the above steps to re-
teach the alarm the second remote’s code.
49-805.fm Page 8 Thursday, August 19, 1999 9:51 AM

9
REPLACING THE REMOTE
CONTROL’S BATTERY
When the remote’s range is reduced, or if the remote’s indi-
cator does not turn on when you press a button, follow these
steps to replace its battery with a fresh 12-Volt remote battery
(RadioShack Cat. No. 23-144).
Note: We recommend you change the remote’s battery in-
doors on a flat surface, as it involves keeping track of small,
easily lost parts.
1. Lay the remote face down on a flat surface, then use a
small Phillips screwdriver to remove the two screws on
the remote’s back cover.
2. Carefully remove the remote’s back cover.
Note: Leave the remote laying face down on a flat sur-
face. If you turn over the remote, the buttons fall out.
3. Remove the battery.
4. Place the new battery between the power contacts,
according to the polarity symbols (+ and –) marked in the
remote’s case.
5. Replace the back cover and secure it with the screws
you removed in Step 1.
49-805.fm Page 9 Thursday, August 19, 1999 9:51 AM

10
TROUBLESHOOTING
This section describes some problems you might encounter,
and gives their possible solutions.
Problem Solution
Alarm does not operate. Check all power connections.
Frequent false alarms. •Another electronic accessory is
triggering the alarm. Try turning
off current sensing temporarily to
see if this solves the problem.
Note: Your alarm is not triggered
if your vehicle’s electric fan turns
on while the system is armed.
•Your alarm’s electrical connec-
tors are not making good con-
tact. Secure the connections.
•The shock sensor is too sensi-
tive. See “Setting the Shock
Sensor” to change the setting.
Alarm does not sound
when it should. •The shock sensor is not sensi-
tive enough. See “Setting the
Shock Sensor.”
•Confirm that you have not dis-
abled current sensing. See “Set-
ting the Current Sensor.”
The remote control’s
range is poor. •The antenna wire is too close to
metal. Move it away from metal.
•The antenna wire has been cut
or extended. Changing the
antenna’s length (longer or
shorter) makes the range worse.
49-805.fm Page 10 Thursday, August 19, 1999 9:51 AM

11
SPECIFICATIONS
Main System
Sound Level . . . . . . . . . . . . . . . More than 115 dB at 1 Meter
Current Drain . . . . . . . . . . . . . . . . . . . . . . . 22 mA (Standby)
1 Amp (Sounding)
Power . . . . . . . . . . . . . . . . . . . . . . . . . . . . . 10–14 Volts DC
Remote Control
Carrier Frequency . . . . . . . . . . . . . . . . . . . . . . 303.875 MHz
RF Output Power . . . . . . . . . . . . . . . . . . 5,580 µV at 1 Meter
Power . . . . . One 12-Volt Alkaline Battery (Cat. No. 23-144)
Specifications are typical; individual units might vary. Specifi-
cations are subject to change and improvement without
notice.
49-805.fm Page 11 Thursday, August 19, 1999 9:51 AM

RadioShack
A Division of Tandy Corporation
Fort Worth, Texas 76102
8/96 Printed in the USA
RadioShack Limited Warranty
This security product is warranted against manufacturing defects in
material and workmanship for ninety (90) days from the date of pur-
chase from RadioShack company owned stores and authorized
RadioShack franchisees and dealers. Within this period RadioShack
will repair the security product without charge for parts and labor.
Simply brin
g
y
our RadioShack sales slip as proof-of-purchase
date to any RadioShack store.
This warranty does not cover damage or failure caused by or attribut-
able to Acts of God, abuse, misuse, improper or abnormal usage,
faulty installation, improper maintenance, lightning or other incidence
of excess voltage, or any repairs other than those provided by a
RadioShack Authorized Service Facility, or transportation costs.
RadioShack is not responsible or liable for indirect, special, or
consequential dama
g
es arisin
g
out of or in connection with the
use or performance of the product or other dama
g
es with
respect to loss of propert
y
, loss of revenues or profit, or costs
of removal, installation or reinstallation.
EXCEPT AS PROVIDED HEREIN, RadioShack MAKES NO
EXPRESS WARRANTIES AND ANY IMPLIED WARRANTIES ARE
LIMITED IN DURATION TO THE DURATION OF THE WRITTEN
LIMITED WARRANTIES CONTAINED HEREIN. Some states do not
allow the limitation or exclusion of incidental or consequential dam-
ages and some states do not allow limitation or exclusion of implied
warranties; therefore, the aforesaid limitation(s) or exclusion(s) may
not apply to the purchaser. There will be charges rendered for
repairs to the product made after the expiration of the aforesaid
ninety (90) day warranty period.
This warrant
y
g
ives
y
ou specific le
g
al ri
g
hts and
y
ou ma
y
have other ri
g
hts
which var
y
from state to state.
We Service What We Sell
10/95
49-805.fm Page 12 Thursday, August 19, 1999 9:51 AM
This manual suits for next models
1
Table of contents
Other Radio Shack Car Alarm manuals
Popular Car Alarm manuals by other brands

Roog-Performance
Roog-Performance OBD-Saver BASIC Mounting instruction

Scytek electronic
Scytek electronic ASTRA 777 Mobile product manual

Hawk
Hawk ha-280 pro user manual

Viper
Viper 480XV installation guide

Black Widow
Black Widow BW-1500 CHALLENGER PLUS installation manual

Directed Electronics
Directed Electronics Clifford 2.2 owner's guide