Ranger 3068-DL User manual

INSTALLATION GUIDE
3068-DL STRAIGHT PARTITION
Sprinter ( Sliding Door, Aluminum )

For technical support, contact us at 1-800-565-5321 3068-DL Installation Guide |REV. D2 | Page 2
QUICK START GUIDE
REQUIRED ITEMS
2
PERSONS
qCordless Impact
qCordless Drill
qCutter
qMallet
qPlusnut Tool
qTape Measure
qT40 Torque Bit
q3/8" Drill Bit
q7/16" Socket
q1/2" Socket
q9/16" Wrench
q3/16" Driver Bit
q1.1 Setup...................................................................................................................................................
q1.2 Partition Assembly...............................................................................................................................
3 - 4
5
Phase 1 - Assembly
q2.1 Tips On How To Attach a Plusnut.......................................................................................................
q2.2 Vehicle Preparation.............................................................................................................................
q2.3 Sliding Door Partition Installation........................................................................................................
6
7 - 9
10 - 13
Phase 2 - Installation

For technical support, contact us at 1-800-565-5321 3068-DL Installation Guide |REV. D2 | Page 3
PHASE 1 – ASSEMBLY
1.1 SETUP
1.1.2 Verify all parts are present.
Item No. Description Qty.
30-051 Top Bracket 1
30-052 Floor Bracket 1
30-500 Edge Trim ( QTY in Inches ) 28
70-350 Grab Handle 1
79-932 Warning Label ( Bilingual ) 1
30-0530 Passenger Side Panel w/ Sliding Door 1
30-6805 Driver Side Panel 1
94-3035 Assembly Fastener Bag 1
94-6093 Assembly Fastener Bag 1
96-3022 Installation Fastener Bag 1
1.1.1 Unpack components; compare with the bill of materials.
30-500
30-051
30-052
30-6805
30-0530
70-350

For technical support, contact us at 1-800-565-5321 3068-DL Installation Guide |REV. D2 | Page 4
1.1.3 Identify the Assembly and Installation fastener bags.
94-3035 Fastener Bag Hardware Assembly
94-6093 Fastener Bag Hardware Assembly
96-3022 Fastener Bag Hardware Assembly
Flat Washer
5/16", 7/8" OD
ZINC
# 98-116
8×
Serrated Nut
5/16"-18
ZINC
# 94-116
8×
Hex Bolt
5/16"-18 × 3/4"
GR-5 ZINC
# 90-204
8×
8×
#90-204 Hex Bolt 5/16" × 3/4"
#98-116 Flat Washer
#94-116 Serrated Nut
Flat Washer
1/4", 3/4" OD
ZINC
# 98-112
17×
Plusnut .250
# 94-130
17×
Lock Washer
Regular 1/4"
ZINC
# 98-118
17×
Hex Bolt
1/4"-20 × 1-1/4"
GR-5 ZINC
# 90-118
17×
17×
#90-118 Hex Bolt 1/4" × 1-1/4"
#98-118 Lock Washer
#98-112 Flat Washer
#94-130 Plusnut .250
Serrated Nut
1/4"-20
ZINC
# 94-112
2×
# 90-893 Cap Screw
1/4" × 3/4"
2× 2×
#90-893 Cap Screw 1/4" × 3/4"
#94-112 Serrated Nut

For technical support, contact us at 1-800-565-5321 3068-DL Installation Guide |REV. D2 | Page 5
PHASE 1 – ASSEMBLY
1.2 PARTITION ASSEMBLY
TOOLS
qMallet
qCutter
TOOLS
qCordless Impact
q3/16" Driver Bit
HARDWARE USED
2×
#90-893 Cap Screw 1/4" × 3/4"
#94-112 Serrated Nut
1.2.1 Remove all the PVC from all the parts, then attach the grab handle on the passenger side panel.
1.2.2 Remove all the PVC from all the parts, then attach the edge trims on these locations.

For technical support, contact us at 1-800-565-5321 3068-DL Installation Guide |REV. D2 | Page 6
PHASE 2 – INSTALLATION
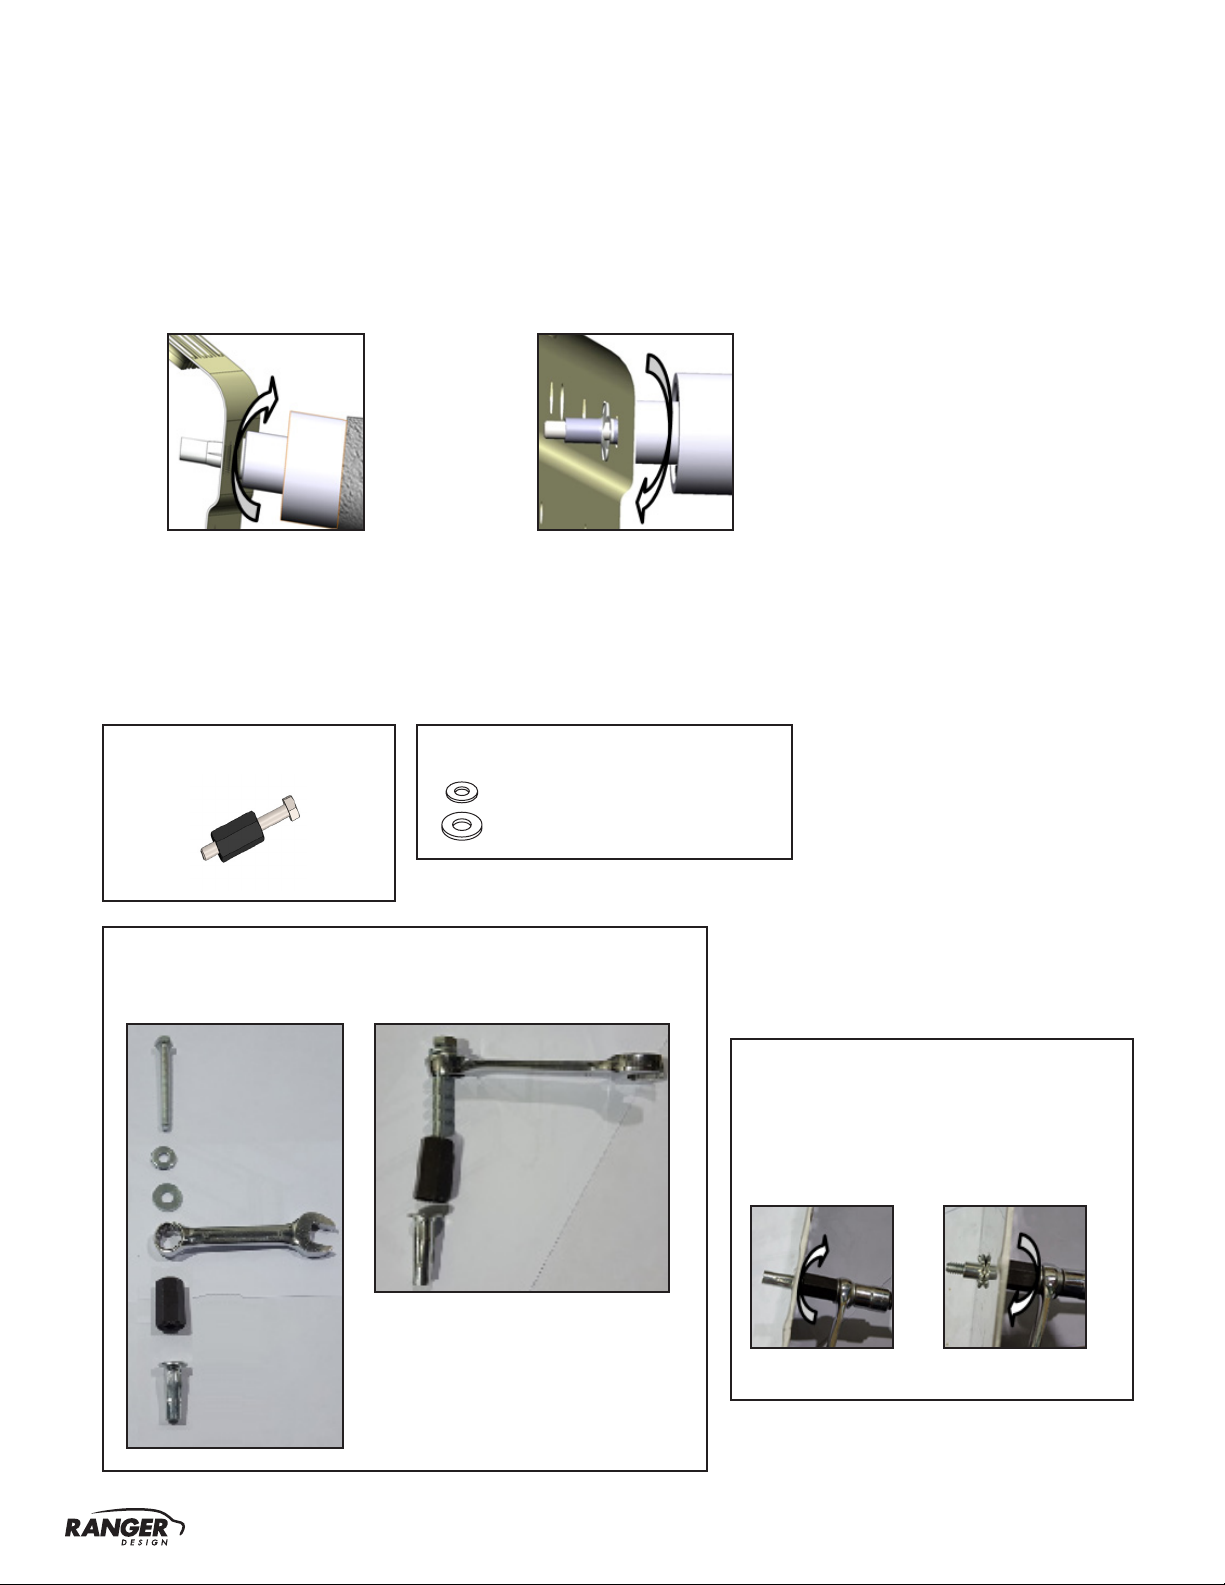
2.1 TIPS ON HOW TO ATTACH A PLUSNUT
FORWARD REVERSE
TIPS: Put the plusnut on the plusnut gun, then attach the plusnut in the hole by turning the gun forward until the
plusnut locks, then remove the gun by turning in reverse.
2.1.1 Attach the plusnut using the plusnut gun.
2.1.2 Attach the plusnut using the 6490 plusnut tool.
6490 HARDWARE USED
Flat washer 1/4"
Flat washer 1/4" BS × 3/4" OD
TOOLS
qCordless Impact
q7/16" Socket
q9/16" Wrench
TIPS STEP 1:
Assemble the 6490 plusnut tool with the hardware needed,
plusnut and the 9/16" wrench as shown.
FORWARD REVERSE
TIPS STEP 2:
Attach the plusnut in the hole by turning
the bolt forward using an impact with a
7/16" socket until the plusnut locks, then
remove the bolt by turning the impact in
reverse.
NOTE: The hardware used for the 6490 plusnut tool is not included in the fastener bag.
The 6490 plusnut tool can be ordered separately upon demand at no charge.

For technical support, contact us at 1-800-565-5321 3068-DL Installation Guide |REV. D2 | Page 7
2.2.1 Assembly preparation.
PHASE 2 – INSTALLATION
2.2 VEHICLE PREPARATION
TOOLS
qCordless Impact
q1/2" Socket
HARDWARE USED
4×
#90-204 Hex Bolt 5/16" × 3/4"
#98-116 Flat Washer
#94-116 Serrated Nut
Lift the driver side panel and passenger side panel w/ sliding door
inside the van, put the panels in place, then attach the top bracket
on the driver and passenger side panels.

For technical support, contact us at 1-800-565-5321 3068-DL Installation Guide |REV. D2 | Page 8
2.2.2 Attaching plusnuts.
TOOLS
qPlusnut Tool
# 94-130
Plusnut .250
HARDWARE USED
17×
Attach plusnuts in the 15 holes.
TOOLS
qCordless Drill
q3/8" Drill Bit or Step Drill
Enlarge all the holes in the van that are aligned with the holes
of the partiton using 3/8" drill bit or step drill.
NOTE: Using the assembled partition as a template, check the alignment of the holes with the
holes of the van. Make new 3/8" holes as necessary.

For technical support, contact us at 1-800-565-5321 3068-DL Installation Guide |REV. D2 | Page 9
2.2.3 Floor preparation.
TOOLS
qCordless Impact
qT40 Torque Bit
Put the assembled partition on the side,
then remove the two D-rings in the pillars,
for re-use.

For technical support, contact us at 1-800-565-5321 3068-DL Installation Guide |REV. D2 | Page 10
PHASE 2 – INSTALLATION
2.3 SLIDING DOOR PARTITION INSTALLATION
2.3.1 Floor bracket installation.
Attach the oor bracket to the oor
re-using the 2 D-ring bolts.
HARDWARE USED
2×
Use the D-ring bolt
TOOLS
qCordless Impact
qT40 Torque Bit

For technical support, contact us at 1-800-565-5321 3068-DL Installation Guide |REV. D2 | Page 11
2.3.2 Put the assembled partition in place, then bolt the driver and passenger side panels to the van
and oor bracket.
HARDWARE USED
4×
TOOLS
qCordless Impact
q1/2" Socket
#90-204 Hex Bolt 5/16" × 3/4"
#98-116 Flat Washer
#94-116 Serrated Nut
HARDWARE USED
12×
TOOLS
qCordless Impact
q7/16" Socket
#90-118 Hex Bolt 1/4" × 1-1/4"
#98-118 Lock Washer
#98-112 Flat Washer

For technical support, contact us at 1-800-565-5321 3068-DL Installation Guide |REV. D2 | Page 12
2.3.3 Attach the top bracket to the van.
TOOLS
qCordless Impact
q7/16" Socket
HARDWARE USED
5×
#90-118 Hex Bolt 1/4" × 1-1/4"
#98-118 Lock Washer
#98-112 Flat Washer

For technical support, contact us at 1-800-565-5321 3068-DL Installation Guide |REV. D2 | Page 13
2.3.4 Apply the warning label on the passenger side panel.
NOTE: Put the warning label in a
place where it’s easy to see.

For technical support, contact us at 1-800-565-5321 3068-DL Installation Guide |REV. D2 | Page 14
“Congratulations, you have successfully installed your
Sliding Door Partition!
Thank you for doing business with us.”
Table of contents
Popular Door manuals by other brands

Therma-Tru
Therma-Tru Light Commercial/Multi-Family / 22 & 24 Gauge Steel Edged... Specifications

RYTEC
RYTEC Pharma-Roll installation manual

NuTone
NuTone LA107WH installation instructions

Sterling Plumbing
Sterling Plumbing Pivot Shower Doors 950C Series Specifications

Ives
Ives Top Center Pivot 7253 installation instructions

Pella
Pella V981553 installation instructions