Raymarine ST60+ SPEED INSTRUMENT User guide

ST60+ Tridata
Instrument
Owner’s Handbook
Document reference: 81263-2
Date: December 2005
81263_2.book Page 1 Monday, December 5, 2005 9:08 AM

Raymarine, ST60+ and SeaTalk are trademarks of Raymarine UK Limited
© Handbook contents copyright Raymarine UK Limited 2005
81263_2.book Page 2 Monday, December 5, 2005 9:08 AM

i
Contents
Important information
Safety notices
EMC conformance
All Raymarine equipment and accessories are designed to the best industry
standards for use in the recreational marine environment.
The design and manufacture of Raymarine equipment and accessories conform to
the appropriate Electromagnetic Compatibility (EMC) standards, but correct
installation is required to ensure that performance is not compromised.
Handbook information
To the best of our knowledge, the information in this handbook was correct when
it went to press. However, Raymarine cannot accept liability for any inaccuracies
or omissions it may contain.
In addition, our policy of continuous product improvement may change
specifications without notice. Therefore, Raymarine cannot accept liability for any
differences between the product and the handbook.
WARNING: Product installation & operation
This equipment must be installed and operated in accordance
with the Raymarine instructions provided. Failure to do so could
result in personal injury, damage to your boat and/or poor
product performance.
WARNING: Electrical safety
Make sure you have switched off the power supply before you
start installing this product.
WARNING: Navigational safety
Although we have designed this product to be accurate and
reliable, many factors can affect its performance. Therefore, it
should serve only as an aid to navigation and should never
replace commonsense and navigational judgement. Always
maintain a permanent watch so you can respond to situations as
they develop.
81263_2.book Page i Monday, December 5, 2005 9:08 AM

ii ST60+ Tridata Instrument Owner’s Handbook
Product disposal
Waste Electrical and Electronic (WEEE) Directive
The WEEE Directive requires the recycling of waste electrical and
electronic equipment.
Whilst the WEEE Directive does not apply to some of Raymarine's products, we
support its policy and ask you to be aware of how to dispose of this product.
The crossed out wheelie bin symbol, illustrated above, and found on our products
signifies that this product should not be disposed of in general waste or landfill.
Please contact your local dealer, national distributor or Raymarine Technical
Services for information on product disposal.
81263_2.book Page ii Monday, December 5, 2005 9:08 AM

iii
Contents
Important information.................................................................................................. i
Safety notices .......................................................................................................... i
WARNING: Product installation & operation.......................................... i
WARNING: Electrical safety .......................................................................... i
WARNING: Navigational safety................................................................... i
EMC conformance ................................................................................................... i
Handbook information ............................................................................................ i
Product disposal ..................................................................................................... ii
Contents ............................................................................................................... iii
Introduction ..........................................................................................................vii
Data inputs ............................................................................................................vii
SeaTalk ............................................................................................................vii
Stand alone operation ....................................................................................viii
Remote control ....................................................................................................viii
Mounting options ................................................................................................viii
Chapter 1: Operation ..................................................................................................... 1
1.1 Getting started ................................................................................................. 1
WARNING: Calibration requirement......................................................... 1
Switching on and off......................................................................................... 1
Displayed information ...................................................................................... 1
1.2 Normal operation ............................................................................................. 2
Depth information ............................................................................................ 2
Using with fishfinder products ................................................................. 2
Current depth display............................................................................... 2
Depth alarm level displays ....................................................................... 3
Speed information ............................................................................................ 4
Boat speed............................................................................................... 4
Maximum speed ...................................................................................... 5
Average speed ......................................................................................... 5
Velocity made good (to windward).......................................................... 5
Distance, temperature & timer information ...................................................... 5
Water temperature................................................................................... 6
Timers ...................................................................................................... 6
Log........................................................................................................... 7
Trip screen ............................................................................................... 8
1.3 Display settings ................................................................................................ 8
Illumination ...................................................................................................... 8
Contrast............................................................................................................ 8
1.4 Remote control ................................................................................................ 8
81263_2.book Page iii Monday, December 5, 2005 9:08 AM

iv ST60+ Tridata Instrument Owner’s Handbook
Chapter 2: Maintenance & Troubleshooting ...........................................................9
2.1 Maintenance ....................................................................................................9
Servicing and safety ..........................................................................................9
Instrument ........................................................................................................9
Transducers.......................................................................................................9
Cabling............................................................................................................10
2.2 Troubleshooting .............................................................................................10
Preliminary procedures ...................................................................................10
Fixing faults.....................................................................................................10
CAUTION: Prevention of flooding ............................................................10
Technical support ............................................................................................11
World wide web..................................................................................... 11
Telephone help line................................................................................ 11
Help us to help you ................................................................................ 12
Chapter 3: Installation ................................................................................................13
3.1 Planning your installation ...............................................................................13
Site requirements............................................................................................13
Transducers............................................................................................ 13
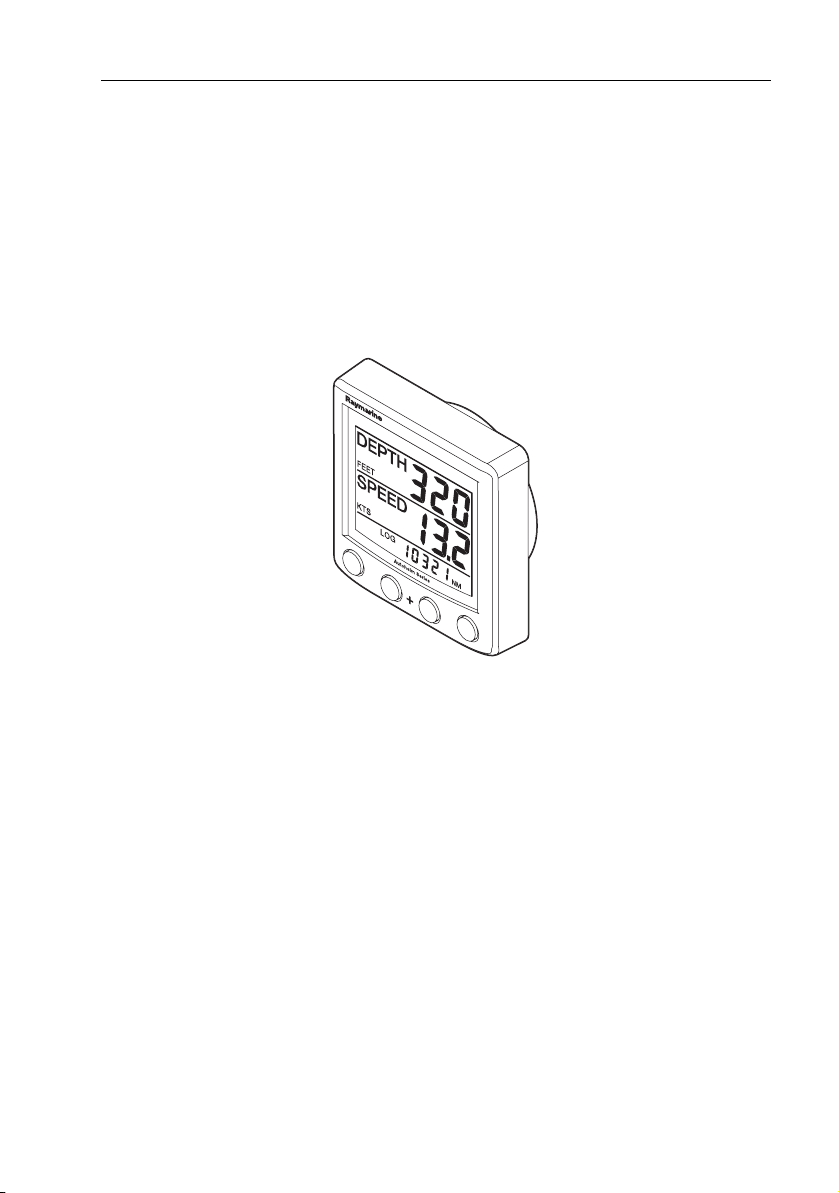
Instrument.............................................................................................. 15
CAUTION: Keep the rear of the instrument dry..................................15
EMC Installation Guidelines............................................................................16
Suppression Ferrites ............................................................................... 17
Connections to Other Equipment ........................................................... 17
3.2 Procedures .....................................................................................................18
CAUTION: Maintain structural safety .....................................................18
Unpacking.......................................................................................................18
Fitting the instrument......................................................................................18
Surface mounting................................................................................... 18
Flush mounting ...................................................................................... 19
CAUTION: Use the correct screws.............................................................21
Bracket mounting................................................................................... 22
Fitting transducer............................................................................................22
Running transducer cable....................................................................... 23
Connecting the instrument .............................................................................24
Types of connection ............................................................................... 24
Fitting ferrites......................................................................................... 24
Signal connections ................................................................................. 25
Power supply connections...................................................................... 25
CAUTION: Protect the power supply.......................................................25
3.3 Switching on ..................................................................................................27
WARNING: Calibration requirement .......................................................27
EMC conformance...........................................................................................27
81263_2.book Page iv Monday, December 5, 2005 9:08 AM

v
Chapter 4: Calibration ................................................................................................. 29
4.1 Introduction ................................................................................................... 29
4.2 User calibration .............................................................................................. 29
Depth.............................................................................................................. 30
Depth units ............................................................................................ 31
Depth offset ........................................................................................... 31
WARNING: Use the correct depth offset............................................... 32
Shallow alarm lock................................................................................. 32
Speed.............................................................................................................. 32
Set speed units....................................................................................... 33
Set speed resolution............................................................................... 34
Set log units........................................................................................... 34
Setting the correct speed ....................................................................... 34
Set temperature units............................................................................. 35
Temperature calibration......................................................................... 35
Timer alarm buzzer ................................................................................ 35
Leaving User calibration ................................................................................. 35
4.3 Intermediate calibration ................................................................................ 35
Speed calibration............................................................................................ 36
Leaving Intermediate calibration.................................................................... 39
4.4 Dealer calibration ........................................................................................... 39
User calibration on/off .................................................................................... 39
Speed select (SOG on/off) ............................................................................... 40
Response settings........................................................................................... 41
Boat show mode............................................................................................. 41
CAUTION: Do NOT enable Boat Show Mode ........................................ 41
Factory defaults .............................................................................................. 41
Leaving Dealer calibration .............................................................................. 41
Glossary........................................................................................................................... 43
Index ................................................................................................................................. 45
81263_2.book Page v Monday, December 5, 2005 9:08 AM

vi ST60+ Tridata Instrument Owner’s Handbook
81263_2.book Page vi Monday, December 5, 2005 9:08 AM

Preface vii
Preface
Introduction
Thank you for purchasing a Raymarine product. We are sure your ST60+
instrument will give you many years of trouble-free operation.
This handbook describes how to install and use the Raymarine ST60+
Tridata instrument. This instrument provides accurate depth, speed, trip and timer
information, on a high quality Liquid Crystal Display (LCD). The instrument is
constructed in a rugged weather-proofed case to provide reliable performance,
even under the most demanding conditions.
Data inputs
The ST60+ Tridata instrument can fulfil master and/or repeater roles by receiving
data either from the appropriate transducers and/or from a SeaTalk
instrumentation system.
SeaTalk
SeaTalk enables a number of compatible instruments to operate as a single,
integrated navigational system. Instruments in a SeaTalk system are linked by
means of a single cable, which feeds both power and data. Instruments can
therefore be added to the system by plugging them into the network. SeaTalk is
flexible enough to adapt to any number of compatible instruments without
requiring a central processor. SeaTalk can also communicate via an interface, with
non-SeaTalk equipment using the internationally-accepted National Marine
Electronics Association (NMEA) protocol.
D8169-1
TRIDATA
ST60+
DEPTHSPEEDTRIP RESET
81263_2.book Page vii Monday, December 5, 2005 9:08 AM

viii ST60+ Tridata Instrument Owner’s Handbook
In a SeaTalk system, each instrument can be either a master or dedicated repeater
unit. A master instrument is directly connected to a transducer (the device that
provides the raw data), and provides data and control appropriate to its function,
to all other equipment on the SeaTalk network. A repeater instrument is not
directly connected to a transducer but displays information provided by other
equipment in the SeaTalk network.
Stand alone operation
In Stand alone operation, the ST60+ Tridata instrument is connected only to the
relevant transducer and does not display information from, or provide
information to, any other instruments.
Remote control
When connected to SeaTalk, the ST60+ Tridata instrument can be controlled
remotely by a SeaTalk Remote Keypad Unit, to provide instant remote access to
the various display readouts.
Mounting options
A standard ST60+ instrument is surface-mounted at the required location. If you
do not want to surface mount your ST60+ instrument, options are available for:
• Flush mounting. If you have ordered the flush mounting option a flush mount
bezel and four fixing screws are also provided.
• Bracket mounting.
81263_2.book Page viii Monday, December 5, 2005 9:08 AM

Preface ix
Parts supplied
Unpack your ST60+ instrument and check that the following items are present:
• Item 1, ST60+ Tridata instrument fitted with standard bezel for surface
mounting.
•Item2,Fixingstuds(2).
• Item 3, Thumb nuts (2).
•Item4,Gasket.
• Item 5, Depth transducer.
• Item 6, Speed transducer, plus bung (not illustrated).
• Item 7, SeaTalk interconnection cable.
• Item 8, Power cable.
• Item 9, Instrument Cover.
• Item 10, Owner’s Handbook. A Warranty document and fitting templates are
included in this Handbook.
• Item 11, Cue Card.
Spare spade terminals are also provided, to re-terminate the transducer cable if it
has to be cut to facilitate installation.
Note:
The above packing list is for an ST60+ Tridata system. Where an instrument is pur-
chased separately, Speed and Depth transducers are not included.
81263_2.book Page ix Monday, December 5, 2005 9:08 AM

x ST60+ Tridata Instrument Owner’s Handbook
D8170-1
ST60+
Tridata
Instrument
Owner's
Handbook
14
9
32
32
7
8
1110
5 6
Quick Start Guide
ST60+ Tridata
Instrument
ST60+TRIDATA
DEPTH SPEED TRIP RESET
81263_2.book Page x Monday, December 5, 2005 9:08 AM

1
Chapter 1: Operation
1.1 Getting started
This handbook describes how to operate, maintain and install the Raymarine
ST60+ Tridata instrument.
Switching on and off
All the time that power is applied to the instrument, you can use the depth
button to switch the instrument off and on as follows:
• To switch the instrument off, hold down the depth button for approximately
5 seconds. After this time, a switch off count down of 4 seconds occurs. Keep
the depth button pressed during this period, to switch off the instrument.
• To switch the instrument back on, hold down the depth button for approxi-
mately 1 second.
When the power supply is switched off, none of the instrument buttons (including
depth) has any effect.
Notes: (1)
Each time power to the instrument is switched on, the instrument is ini-
tially in the on condition. You do not need to use the
depth
button to
switch the instrument on.
(2)
When the instrument is on, the operation of the
depth
button will
perform other operating functions, as described below.
Displayed information
The ST60+ Tridata instrument screen is divided into three separate areas, each of
which displays a separate type of information, as shown in the following
illustration.
WARNING: Calibration requirement
To ensure this product performs at its best on your boat, you
MUST calibrate it before use, in accordance with the instructions
in
Chapter 4, Calibration
. Do NOT use the product until you have
successfully calibrated it.
81263_2.book Page 1 Monday, December 5, 2005 9:08 AM

2 ST60+ Tridata Instrument Owner’s Handbook
1.2 Normal operation
Use the flow charts in this Chapter to operate your ST60+ Tridata instrument.
Flow charts are provided for:
•Usingthedepth button. This gives access to current depth information. On
master instruments, this also gives access to depth alarm level information,
and allows you to set the alarm levels.
•Usingthespeed button. This gives access to maximum speed, average speed
and Velocity Made Good (VMG) to windward.
•Usingthetrip button to gain access to log, trip, water temperature and timer
information.
All button presses are momentary unless otherwise stated.
Depth information
Use the depth button to select the required information, as shown in the
Using
the depth button
illustration. The depth measurement units are either feet or
metres, as selected during user calibration (see
Chapter 4, Calibration
).
Using with fishfinder products
Depth information is normally obtained from the Depth transducer, fitted as part
of an ST60+ Depth or Tridata system. However, when the ST60+ Tridata
instrument is connected to a SeaTalk system, to which a compatible fishfinder is
also connected, the depth information is provided by the fishfinder all the time the
fishfinder is switched on.
Current depth display
The current depth screenshows the title DEPTH, the selected depth units and the
depth measurement. It also shows a depth trend indicator, which is either an up
arrow to show seabed rising or a down arrow to show seabed falling.
If for any reason depth information is lost, the DEPTH title will flash once per
second and the displayed depth value will be the last good reading.
Depth
Speed
Trip, log, water
temperature & timer
Screen layout
D8171-1
81263_2.book Page 2 Monday, December 5, 2005 9:08 AM

Chapter 1: Operation 3
Depth alarm level displays
Alarm displays are available if the instrument is operating as a master. Each
display is identified by the presence of an alarm symbol ( )and either an up
depth trend arrow for a shallow alarm or a down depth trend arrow for a
deep alarm. The shallow and deep anchor alarms are identified by means of an
additional anchor symbol ( ).
You can enable and disable individual alarms by pressing the reset button for
2 seconds, while the relevant alarm screen is displayed.
Each alarm screen is displayed for a nominal 7 seconds, and if no action is taken
during that time, the display will timeout to the current depth display.
Shallow alarm
threshold
To adjust an alarm level:
Deep
alarm
threshold
Anchor deep
alarm threshold
Anchor
shallow alarm
threshold
reset
To enable/disable an alarm:
select the relevant screen then hold down
for 2 seconds
resettrip or
In adjust mode, use
either
to set the alarm level
Current depth
depth
depth
depth
depth
depth
resettrip +
Select relevant
screen then press
To enter/leave alarm adjust mode
Using the depth button
D8172-1
81263_2.book Page 3 Monday, December 5, 2005 9:08 AM

4 ST60+ Tridata Instrument Owner’s Handbook
An alarm condition occurs if:
• The depth is less than the SHALLOW or SHALLOW anchor level.
• The depth is greater than the DEEP anchor level.
• The depth crosses the DEEP level.
An alarm condition is indicated by an alarm buzzer and a flashing alarm symbol
( ) on the display. SHALLOW or DEEP alarms are indicated by up and down
arrows respectively, and for anchor alarms, the anchor symbol ( ) is displayed.
When the instrument is operating as a master, you can check the alarm levels and
if necessary set them up. If an alarm is not enabled, the associated display shows
an OFF legend.
Adjusting alarm levels
To adjust the alarm levels:
1. Use the depth button to display the alarm screen you want to adjust
2. Press the trip and reset buttons simultaneously to enter adjust mode, then
use either the trip button (to decrease) or the reset button (to increase) the
level.
3. When you have set the required value, press the trip and reset buttons
again, to save the alarm setting and exit the adjust mode.
Note:
Adjustment of the shallow alarm level can be disabled during calibration. If adjust-
ment is disabled, you cannot enter adjust mode.
Speed information
Use the speed button to select the required information, as shown in the
Using
the speed button
illustration. The speed measurement units are either knots
(KTS), miles per hour (MPH) or kilometres per hour (KMH), as selected during
user calibration (see
Chapter 4, Calibration
).
The maximum speed, average speed and VMG to windward are each displayed
for 7 seconds, and if no action is taken during that time, the display will timeout to
the Boat speed display.
Boat speed
Shows the current speed and selected speed units. The speed information is
obtained either from a speed transducer, or derived from Speed Over Ground
(SOG). SOG is available if you are connected to a SeaTalk system to which a
compatible GPS is also connected.
The source of speed information (transducer or SOG) is selected during Dealer
calibration (see
Chapter 4 , Calibration
).
81263_2.book Page 4 Monday, December 5, 2005 9:08 AM

Chapter 1: Operation 5
Maximum speed
The screen shows the maximum speed attained since the last reset.
The maximum speed value is reset automatically at power-up. If the instrument is
operating as a master, the maximum speed can also be reset manually by pressing
the reset button for 2 seconds.
Average speed
The screen shows the average speed since the last reset.
The average speed value is reset automatically at power-up. If the instrument is
operating as a master, the average speed can also be reset manually by pressing
the reset button for 2 seconds.
Velocity made good (to windward)
Velocity made good (VMG) information is available if your instrument is part of a
SeaTalk system to which a SeaTalk-compatible wind instrument is also
connected.
Distance, temperature & timer information
The trip button gives access to log, trip, water temperature and timer displays, as
shown in the
Using the trip button
illustration.
Using the speed button
Boat speed
Maximum
speed
speed
speed
speed
speed
2 s
reset
Resets to
current boat
speed
Resets to
zero
D8173-1
VMG to
windward
Average
speed
81263_2.book Page 5 Monday, December 5, 2005 9:08 AM

6 ST60+ Tridata Instrument Owner’s Handbook
Water temperature
The water temperature is shown in either degrees Celsius (°C) or Fahrenheit (°F),
as set during calibration (see
Chapter 4, Calibration
).
Timers
The count-up timer and the two race-start timer times are either in seconds (S) or
minutes (M), depending on the counter values.
Refer to the
Using the trip button
flow diagram to display the required timer.
Once you have done this, press the reset button to start the timer running. When
a timer is running, the delimiter ( .or :) flashes. When a timer is running, press
the reset button for lap times. To stop a timer, press the reset button.
To reset a timer to the start value, stop it then hold down the reset button for
1 second.
Once a timer is running, you can leave the timer page and select any other display.
The counter will continue to run in the background.
Hold down
Using the trip button
reset
trip
*When timer stopped reset starts timer *When timer running reset gets lap time
for 1 s to reset timer
to start value.
D8174-1
Water
temperature
Count-up
timer*
Race start
timer 1*
Race start
timer 2*
Log
Trip
trip
trip
trip
trip
81263_2.book Page 6 Monday, December 5, 2005 9:08 AM

Chapter 1: Operation 7
Race-start timers
You can set each race-start timer to any whole-minute value from 1 to 15 minutes.
Note:
When the instrument is first installed, the race-start timers are set to 4 and 5 min-
utes respectively.
To set a race-start timer:
1. Use the trip button as shown in the
Using trip button
flow diagram to select
the required race-start timer.
2. Simultaneously press the trip and reset buttons to enter the race-start timer
adjust mode.
3. Use either the trip or reset button to set the required value.
4. Simultaneously press the trip and reset buttons to save the value and leave
the race-start timer adjust mode.
If you are using one of the race-start timers and the timer buzzer is enabled, the
buzzer will:
• Double-beep every minute.
• Beep three times at the start of the last 30 seconds.
• Beep once for each of the last 10 seconds.
• Beep for 2 seconds at zero.
The timer buzzer is enabled or disabled as part of the calibration procedure (see
Chapter 4, Calibration
).
Note:
After a race-start timer has counted-down to zero, it will then start counting up.
Log
The Log screen shows the total distance covered by the vessel since the
instrument was fitted.
trip
reset
trip
reset
+
Decrease time
Increase time
Timer adjust mode
Set race-start timer
trip
reset
+
OR
D8175-1
81263_2.book Page 7 Monday, December 5, 2005 9:08 AM

8 ST60+ Tridata Instrument Owner’s Handbook
Trip screen
The trip screen shows the distance covered since the trip value was last reset.
The trip value is reset automatically at power-up, and if the instrument is
operating as a master, the trip value can also be reset manually by pressing the
reset button for 3 seconds.
1.3 Display settings
Illumination
When the instrument is first powered up, the display illumination is set to its
lowest (courtesy) level, to facilitate initial access to the button s.
To adjust the level of display illumination:
1. Hold down the depth button for approximately one second, to enter the illu-
mination-adjust mode.
2. There are four preset illumination levels. Use the depth button to cycle
through these levels until you reach the level you want.
3. Press any other button to leave the illumination-adjust mode.
Note:
The display will also return to normal operation 7 seconds after the last button
press.
Contrast
To adjust the display contrast:
1. Hold down the depth button for approximately two seconds, to enter the
contrast-adjust mode.
2. There are four preset contrast settings. Use the depth button to cycle through
these settings until you achieve optimum display quality.
3. Press any other button to leave the contrast-adjust mode.
Note:
The display will also return to normal operation 7 seconds after the last button
press.
1.4 Remote control
When it is connected to SeaTalk, the ST60+ Tridata instrument can be controlled
remotely with a SeaTalk Remote Keypad Unit. Remote control of an instrument is
indicated by a REMOTE legend on the display, to indicate that the button pad
has control.
Details on how to use the remote control facility are given in the
SeaTalk Remote
Keypad Owner’s Handbook
.
81263_2.book Page 8 Monday, December 5, 2005 9:08 AM
Other manuals for ST60+ SPEED INSTRUMENT
8
Table of contents