Razer RZ19-03860 Use and care manual

.
RAZER AUDIO MIXER
MASTER GUIDE

FOR GAMERS. BY GAMERS .™
1
Streamline your setup and optimize your production with the Razer Audio
Mixer—an easy-to-use, all-in-one analog mixer for broadcasting and
streaming. With total control over your mix and studio-like quality,
professional audio has never sounded this good or felt this simple.

FOR GAMERS. BY GAMERS .™
2
CONTENTS
1. WHAT'S INSIDE / WHAT'S NEEDED ........................................................................................................3
2. LET'S GET YOU COVERED........................................................................................................................5
3. TECHNICAL SPECIFICATIONS ..................................................................................................................6
4. GETTING STARTED..................................................................................................................................8
5. USING THE RAZER AUDIO MIXER.........................................................................................................11
6. CONFIGURING YOUR RAZER AUDIO MIXER.........................................................................................13
7. SAFETY AND MAINTENANCE................................................................................................................34
8. LEGALESE..............................................................................................................................................35

FOR GAMERS. BY GAMERS .™
3
1. WHAT'S INSIDE / WHAT'S NEEDED
WHAT'S INSIDE
▪Razer Audio Mixer
A. Channel volume slide faders
Powered by Razer ChromaTM RGB
lighting
B. Channel mute buttons
C. Bleep button
D. Microphone mute button
E. Microphone port
F. Headphone port
G. XLR mic input port
H. 48V Phantom power button
I. Line In port
J. Line Out port
K. Optical In port
L. Type C port
▪Type C to Type A cable
Rear
Front

FOR GAMERS. BY GAMERS .™
4
▪2 x Ground loop isolators
▪Important Product Information Guide
WHAT'S NEEDED
Product requirements
▪PC (Windows® 10 64-bit or higher)
▪Direct USB-A connection
Razer Synapse requirements
▪Windows® 10 64-bit or higher
▪Internet connection for software installation

FOR GAMERS. BY GAMERS .™
5
2. LET'S GET YOU COVERED
You've got a great device in your hands, complete with a 1-year limited warranty coverage. Now
maximize its potential and score exclusive Razer benefits by registering at razerid.razer.com
Got a question? Ask the Razer Support Team at support.razer.com
Your product’s serial
number can be found
here.

FOR GAMERS. BY GAMERS .™
6
3. TECHNICAL SPECIFICATIONS
ANALOG CONNECTIONS
Microphone in from one of the following sources:
▪XLR balanced Jack
▪6.35 mm TRS balanced Jack
▪3.5 mm TS unbalanced Jack
▪3.5 mm TRS Line In
▪3.5 mm TRS Line Out
▪3.5 mm TRS Headphone Out
DIGITAL CONNECTIONS
▪1 x USB 2.0 (Type C)
▪1 x Optical Toslink
HARDWARE USER CONTROL
▪4 x Channel volume slide faders
▪4 x Channel mute buttons
▪Microphone mute button
▪Bleep button
▪48V Phantom Power Button
AUDIO FEATURES
▪A/D and D/A Conversion: 24 bits @ 48kHz
▪Effects: Noise Gate, Compressor, EQ, Echo Reverb, Presets, Voice Changer, Key Shifter, Vocal
Fading
▪Frequency Response: 10Hz to 20kHz
▪Dynamic Range: >110dB
▪S/N Ratio: >100dB
▪THD+N: <-90dB
▪Channel Crosstalk: <-90dB
CHROMA LIGHTING

FOR GAMERS. BY GAMERS .™
7
▪Razer Chroma RGB for all buttons (except for 48V Phantom Power Button), channel number
and volume level customizable in Razer Synapse.
DISPLAY (LED INDICATORS)
▪Channel Volume level (11 LED Levels from 0 to 100% for each channel)
▪4 x Channel mute button
▪Microphone mute
▪Bleep button
▪Razer wordmark logo
POWER SUPPLY/VOLTAGE
▪Power Input: USB Power
▪Power Consumption: 5V / 500mA

FOR GAMERS. BY GAMERS .™
8
4. GETTING STARTED
SETTING IT UP
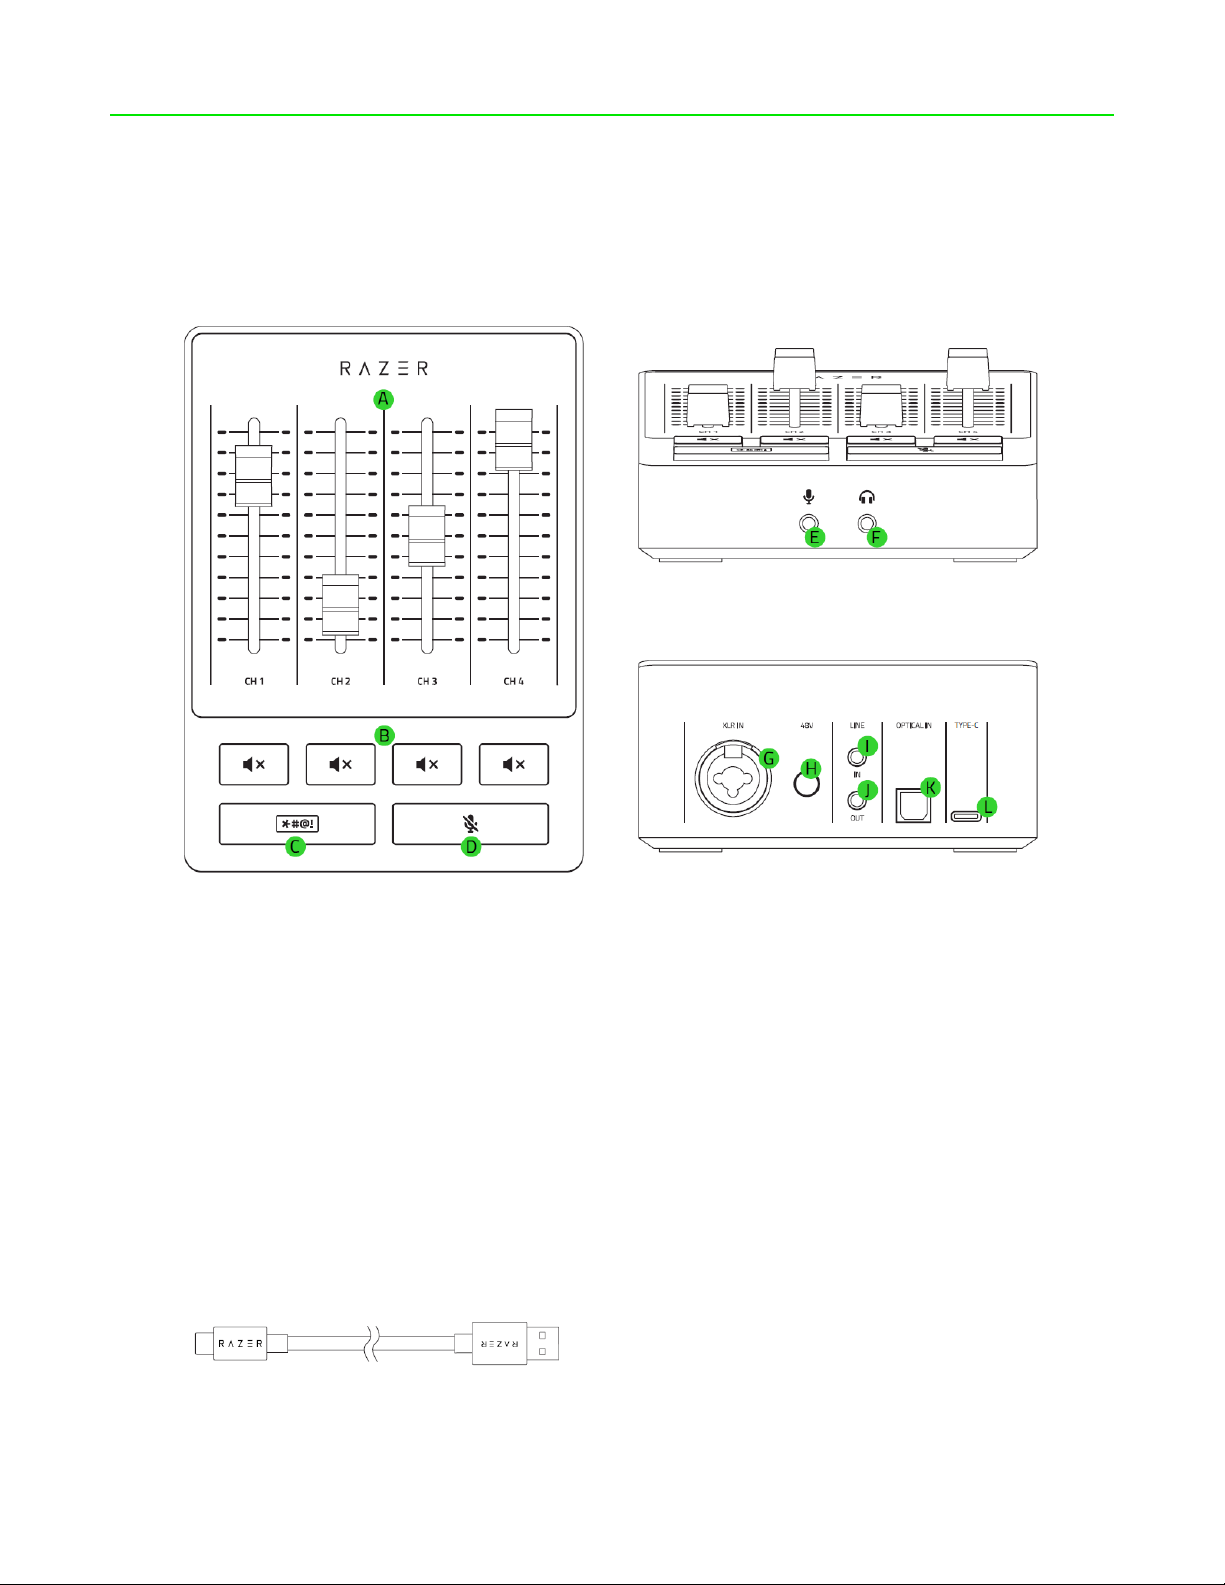
1. Connect an XLR mic to the XLR mic input port AND/OR a microphone to the Line In port,
depending on which is available in your setup.
Make sure that Phantom Power is off before connecting an XLR microphone into the XLR
mic input port. Moreover, when using a USB-powered microphone in your setup, ensure
that the microphone is connected to your PC's USB port. It's also recommended that you
connect a ground loop isolator before plugging the microphone into the Line In port of
the Razer Audio Mixer.
2. Plug an optical cable from the Optical In port on your Razer Audio Mixer to your gaming
console. This is applicable if you're planning to use a gaming console in your stream.
3. Connect the Razer Audio Mixer to your gaming PC using the Type A to Type C cable.
To optimize the performance of the Razer Audio Mixer, it's highly recommended that you
connect it directly to a USB port on your PC. Connecting the device to a USB hub, switch
or extender may affect its performance.
4. Connect your headset to the headphone port.
If you want to use your headset's microphone, use an audio / mic splitter extension cable
(if applicable), and then connect its stereo output to the headset port and its mic input to
the microphone port.
XLR microphone
USB powered
microphone
Gaming console
(if applicable)
AND/OR
Streaming / gaming PC
Headset

FOR GAMERS. BY GAMERS .™
9
5. On your PC, right-click on the sound icon on the system tray and select Open Sound settings.
6. Depending on your connected devices, set the Razer Audio Mixer as the default Output and
Input device.
For Headphone port / XLR mic input port connection
For Line in / Line out port connection

FOR GAMERS. BY GAMERS .™
10
SETTING UP A DEDICATED STREAMING PC
To set up a streaming PC that will handle all of the Razer Audio Mixer's audio output, connect the Line
Out port of the Razer Audio Mixer to the Line In port of your streaming PC using an aux cable.
It's recommended that you connect a ground loop isolator into the Line Out port of the Razer
Audio Mixer before connecting an aux cable. To set which audio sources will be routed to the
Line Out port, use the Razer Synapse app.
RAZER SYNAPSE
Use the Razer Synapse app to route audio output sources, assign applications to desired audio
channels, customize mic equalizer presets and features, and even personalize its lighting for an
immersive streaming experience that's truly yours.
Install Razer Synapse when prompted or download the installer from razer.com/synapse.
Streaming PC
Gaming PC
LINE IN
AND/
OR
XLR microphone
USB powered
microphone

FOR GAMERS. BY GAMERS .™
11
5. USING THE RAZER AUDIO MIXER
CHANNEL MUTE BUTTONS
Press any of the Channel mute buttons to mute the corresponding channel. The pressed button will
light up in red to show that its corresponding channel has been muted.
MICROPHONE MUTE BUTTON
Mute microphone
Press the microphone mute button to mute or
unmute microphone input. The microphone
mute button will turn red to indicate that the
microphone is muted.
Apply echo effect on microphone
Press and hold the microphone mute button to
apply an "Echo" effect on microphone input.
BLEEP BUTTON
Press and hold the Bleep button to immediately mute and censor the microphone input with a beep
sound.

FOR GAMERS. BY GAMERS .™
12
48V PHANTOM POWER
WARNING! Before using this feature, please check if your XLR microphone supports 48V phantom
power to avoid damaging your device. Moreover, make sure to turn off this feature when not
required.
Some XLR microphones may require additional external power to operate. Press the Phantom power
button to activate this feature and transmit phantom power to the XLR mic input port. The Phantom
power button will light up, indicating that this feature is active.
This feature can also be enabled from Razer Synapse.
GROUND LOOP ISOLATORS
Use a Ground Loop Isolator to eliminate ground loop problems created in your setup and prevent
unwanted noise or hum on devices connected to the Line In and Line Out port.
USB-powered
microphone /
Streaming PC

FOR GAMERS. BY GAMERS .™
13
6. CONFIGURING YOUR RAZER AUDIO MIXER
Internet connection is required for installation, updates, and cloud-based features.
Registering for a Razer ID account is recommended but optional. All listed features are
subject to change based on the current software version, connected device(s), and
supported apps and software.
SYNAPSE TAB
The Synapse tab is your default tab when you first launch Razer Synapse. This tab allows you to
navigate the Dashboard subtab.
Dashboard
The Dashboard subtab is an overview of your Razer Synapse, where you can access all your Razer
devices, modules, and online services.

FOR GAMERS. BY GAMERS .™
14
Modules
The Modules subtab displays all installed and available modules for installation.
Global Shortcuts
Bind operations or Razer Synapse functions to custom key-combinations from Razer Synapse-enabled
device inputs that apply across all device profiles. Learn more about Profiles
Only Razer Synapse-enabled device inputs will be recognized.

FOR GAMERS. BY GAMERS .™
15
STREAMING TAB
The Streaming tab is the main tab for your Razer Audio Mixer. Use this tab to personalize device
lighting effects, control and route virtual channels, map button controls, customize channel mixes,
and access advanced microphone features. Changes made under this tab are automatically saved to
your system and cloud storage.
Customize
The Customize subtab is for setting up the various channels available for the Razer Audio Mixer when
you install Razer Synapse. You can map input sources to channel faders and map functions to channel
mute and mic mute buttons under this page.
Profile
A Profile is a data storage for keeping all your Razer devices' settings. By default, the profile name is
based on your system's name. To add, import, rename, duplicate, export, or delete a profile, press the
profile's corresponding Miscellaneous button ( ).

FOR GAMERS. BY GAMERS .™
16
Setting it up
Provides basic and advanced steps and the needed shortcut links in setting up the Razer Audio Mixer
on your system. Click on the Open Windows Sound Settings to manage your system's sound settings,
such as modifying the default output and input device. You can also click on the Open Windows
Sound Mixer Options to route specific applications to various channels.
Understanding virtual channels
The Windows OS recognizes channels as Output or Input devices. Upon installing Razer Synapse, the
following channels immediately become available:
Input channels
(Output device)
Output channels
(Input device)
Game
Music
Chat
System (default)
Stream Mix
Microphone
Voice chat
Console
Line-in
Assigning channels to applications
Assigning channels as your applications' input and/or output devices will allow you to control which
channel(s) will be used by specific applications.
You can also use channel assignment to group applications according to the purpose (e.g., all chat
applications to use Chat and Voice Chat as Output and Input device, respectively), allowing you to:

FOR GAMERS. BY GAMERS .™
17
▪adjust each channel individually, including all applications assigned with the corresponding
channel
▪set channels to channel faders, to adjust its volume through channel faders physically
To set an input and/or output channel as the output or input device on your desired application:
1. Make sure the desired application is running.
2. On Razer Synapse, go to the Customize subtab and then click Open Windows Sound Mixer
Options.
3. Set the application's
oOutput to the preferred input channel (e.g., Spotify to Music, Skype to Chat).
oInput to the preferred output channel (e.g., all applications with chat function to Voice
Chat or Line-in if you want to use the Line In port connection).
4. Repeat these steps for other applications.
IMPORTANT! Some applications may also have in-app functions which allow you to change the
input and output device it will use.
Channel Mapping
Map input sources to channel faders, channel mute button functions, and a long press function to the
mic mute button.
▪Source. Assign channels to any of the channel faders on the Razer Audio Mixer. Once assigned,
you'll be able to control its volume using the corresponding channel fader physically.
To control the volume of specific applications, make sure a channel is set as the desired
app's output or input device (e.g., Spotify is using Music as an Output device). You may
then select the assigned channel from the dropdown list (e.g., Channel 4 to Music).
▪Mute button mapping. Set which channel will be muted when you press the corresponding
channel mute button.

FOR GAMERS. BY GAMERS .™
18
▪Long press mic mute button. Set a function when you press and hold the mic mute button.
You can choose between muting all or specific channels, enabling/disable microphone effects,
and even activating a preset of your choice.
By default, the long press function of the mic mute button is set to Toggle Voice Changer.
Mixer
Use the Mixer subtab to individually mute or adjust the volume of all channels and control which
channels can be heard on each channel mix.
Output Mixer
Individually mute or adjust the volume of specific channels. Click on the percentage/decibel toggle to
change how the Output Mixer displays volume.
Channel Mixes
A channel mix is a blend of your (preferred) channels. You can mute or adjust how loud each channel
mix is and control which channels can be heard on each channel mix.

FOR GAMERS. BY GAMERS .™
19
▪Playback Mix. The channel mix you will hear on the Headphone port of the Razer Audio Mixer.
▪Stream Mix. The channel mix for your streaming applications. Set this channel as the
microphone or input device of your streaming software (e.g., OBS, Twitch, Streamlabs, etc.) to
control the volume of each channel using Razer Synapse individually.
▪Line Out. This is a clone of the Stream Mix, which you can use to route audio from your
gaming PC to your dedicated streaming PC (if applicable) via the Line Out port.
▪Voice Chat. The channel mix for all your chat applications.
The following controls are available on all channel mixes:
▪Percentage / Decibel toggle. Change how the corresponding channel mix displays its volume.
▪Mute Mix ( ). Mute or unmute the corresponding mix.
▪Slider. Adjust the volume of the corresponding mix.
▪Routing. Select which channels are included on the corresponding mix.
Table of contents