RCA Scenium P42WHD33 User manual

Changing Entertainment. Again.
Plasma User's Guide

iMPORTANT
Tile exclamation point \vithin an equilateral triangle, is
intended to alert tile user to the l)rcsence of important
operating and maintenance (servicing) instructions in
the literature accompanying tile appliance.
Caution: To prevent the risk of electric shock, (Io not remove cover (or back).
No user serviceable parts inside. Retbr servicing to qualified service personnel.
AThis lightning flash \\ith arrowhead
symbol, within an equilateral triangle, is
intended to alert the user to the presence of
uninsulated "dangerous voltage" within the
product's enclosure that may be of sufficient
magnitude to constitute a risk of electric
shock to persons.
WARNING
TO REDITCE THE RISK OF FIRE OR ELECTRIC SHOCK,
D(-) NOT EXPOSE THIS PR(-)DITCT T(-) RAIN OR
MOISTURE. THE APPARATITS SHALL NOT BE EXPOSED
TO DRIPPING OR SPLASHING AND NO OI_]ECTS
FILLED WITH LIQITI1)S, SUCH AS \'ASES, SHALL BE
PLACED ON THE APPARATITS.
CAUTION
This product satisfies FCC regulations \\-hen shielded
cables and connectors are used to connect the unit to
other equipment. To prevent electromagnetic interference
with electric appliances such as radios and televisions, use
shielded canes and connectors for connections.
Warning: Do not use the Freeze fbature for an extended period of time. This can cause the image to be permanently
imprinted on-screen. Such damage is not covered by your warranty. Press any button to unhv,eze the picture at any
time.
iMPORTANT NOTICE
The serial number for this equiptnent is located on the rear panel. Please write this serial number on your enc]ose(I
warranty card and keep it in a secure area. This is for your security.
CAI!TION: WHEN POSITIONING THIS EQI 7IPMENT ENSI 7RETHAT THE MAINS PLI 7G AND SOCKET IS EASIIX
ACCESSIBLE.
This symbol indicates that this product contains mercury. Special disposal of this product for environmental
reasons may be required under the la\_,s applicable to your jurisdiction. For (lisposa] or r(._cyc]ing
information, [)]case contact your local authorities or the Electronic Industries Alliance: \vww.eiae.org.
Retbr to the identification/rating ]abe] located on the back pane] of your product for its proper operating voltage.
FCC Regulations state that unauthorized changes or modifications to this equipment may vokl the user's authority to
operate it.
Cable TV Installer: This reminder is provided to call your attention to Article 820-40 of the National Electrical Code
(Section 54 of the Canadian Electrical Code, Part 1) which provides guidelines for proper grounding and, in particular,
specifies that the cable ground shall be connected to the grounding system of the building as close to the point of cable
entry as practical.
]lnportant: This television is a table model and is designed to sit on a firm, fiat, surface. Don't [)]ace the TV on soft
carpeting or similar surface because the ventilation slots on the bottom of the unit \\-ill be blocked resulting in reduced
lifetime tix)m overheating. To assure adequate ventilation for this product, maintain a spacing of 4 inches from the top
and sides of the TV receiver and 2 inches from the rear of the TV receiver and other surfaces.
Also, make st]]-<,the stand or base you use is of adequate size and strength to prevent the TV from being accidentally
tipped over, pushed off, or pulled off. This could cause persona] injury and/or damage the TV. Ref_,r to the Important
Saf_,ty Instructions on the next page.
Product Registration
Please fill out the product registration card (packed separately) and return it immediately. For US customers: Your I,'CA
Consumer Electronics prod uct may also be registered at www.rca.comitelevision. Registering this product al]o\vs us to
contact you if needed.
Product Information
Kcc I) your salts rcccil)t to obt:un warranty parts and service and for proof of purchase. Attach it hcrc and record the
serial and model re]tubers in case you need them. These re]tubers are located on the product.
Model No. Serial No. Purchase Date
Dealer/Address/Phone

important Safety instructions
Important Sa_bty Instructions
1. Read these instructions.
2. Keep these instructions.
3. Heed all warnings.
4. Follow all instructions.
5. I)o not use this apparatus near water.
6. (]lean only with dry cloth.
7. Do not b]ock any ventilation openings. Insta]] in accordance with the manufacturer's instructions.
S. Do not instal] neat any heat sources such as radiators, heat registers, stoves, or <)tiler apparatus (inc]uding
amplifiers) that produce heat.
9. Do not detbat the safety purpose of the polarized or grounding-type plug. A polarized plug has two blades with
one wider than the other. A grounding type plug has two blades and a third grounding prong. The wide blade or
the third prong is provided for your safety. If the provided plug does not fit into your outlet, consult an electrician
for replacement of tile obsolete outlet.
10. Protect the power cord from being walked on or pinched particularly at p]ugs, convenience receptacles, and tile
point where they exit flom the apparatus.
11. Only use attachtnen>iaccessories specified by tile manufi_cturer.
12. l;se only with the cart, stand, tripod, bracket, or tab]e specified by the manufacturer, or sold with the
aD[)arattlS. \V]len a cart is LiSt.}({, USe caution when moving the c t tpp t TtttlS combination to avoid _-_
injury/]'om tip-over.
13 Unplug this apparatus (luring lightning storms or when unused for long periods of time.
14. Retbr all servicing to qualified service personnel
Servicing is required when the apparatus has been damaged in any way, such as powe>supp]y cord or plug is
damaged, liquid has been spilled or objects have fid]en into the apparatus, tile apparatus has been exposed to rain
or moisture, does not operate normally, or has been dropped.
15. If an outside antenna or cane system is connected to tile product, be sure tile antenna or cable systetn is grounded
st) as to provide some protection against voltage surges and built-up static charges. Section 810 of tile National
Electrical Code, ANSIiNFPA No. 70-1984 (Section 54 of Canadian Electrical Code, Part 1) provides information
with respect to proper grounding of the mast and supporting structure, grounding of tile leadqn wire to an
antenna-discharge unit, size of grounding conductors, location of antenna-discharge unit, connection to grounding
electrodes, and requilv,ments for tile grounding electrode. See following example.
LEAD IN
WIRE
ANTENNA
(NEC SECTION 810-20)
EQUIPMENT
GROUNDING CONDUCTORS
(NEC SECTION 810-21)
POWER SERVICE GROUNDING
ELECTRODE SYSTEM
(NEC ART 250, PART H)
fmporf_ant fnformaffon

This page intentionally left blank

Important Safety Instructions ....................................... i
Chapter I: Connections and Setup
Things to Consider Before You Connect ..................... 6
Protect Against Power Surges ................................ 6
Protect Devices from Overheating ........................ 6
Position Cables Properly to Avoid Audio
Interference .......................................................... 6
Use Indirect Light .................................................... 6
Check Supplied Parts .............................................. 6
Connecting Speakers to Your TV ................................ 7
Mounting Your TV to the Wall ..................................... 7
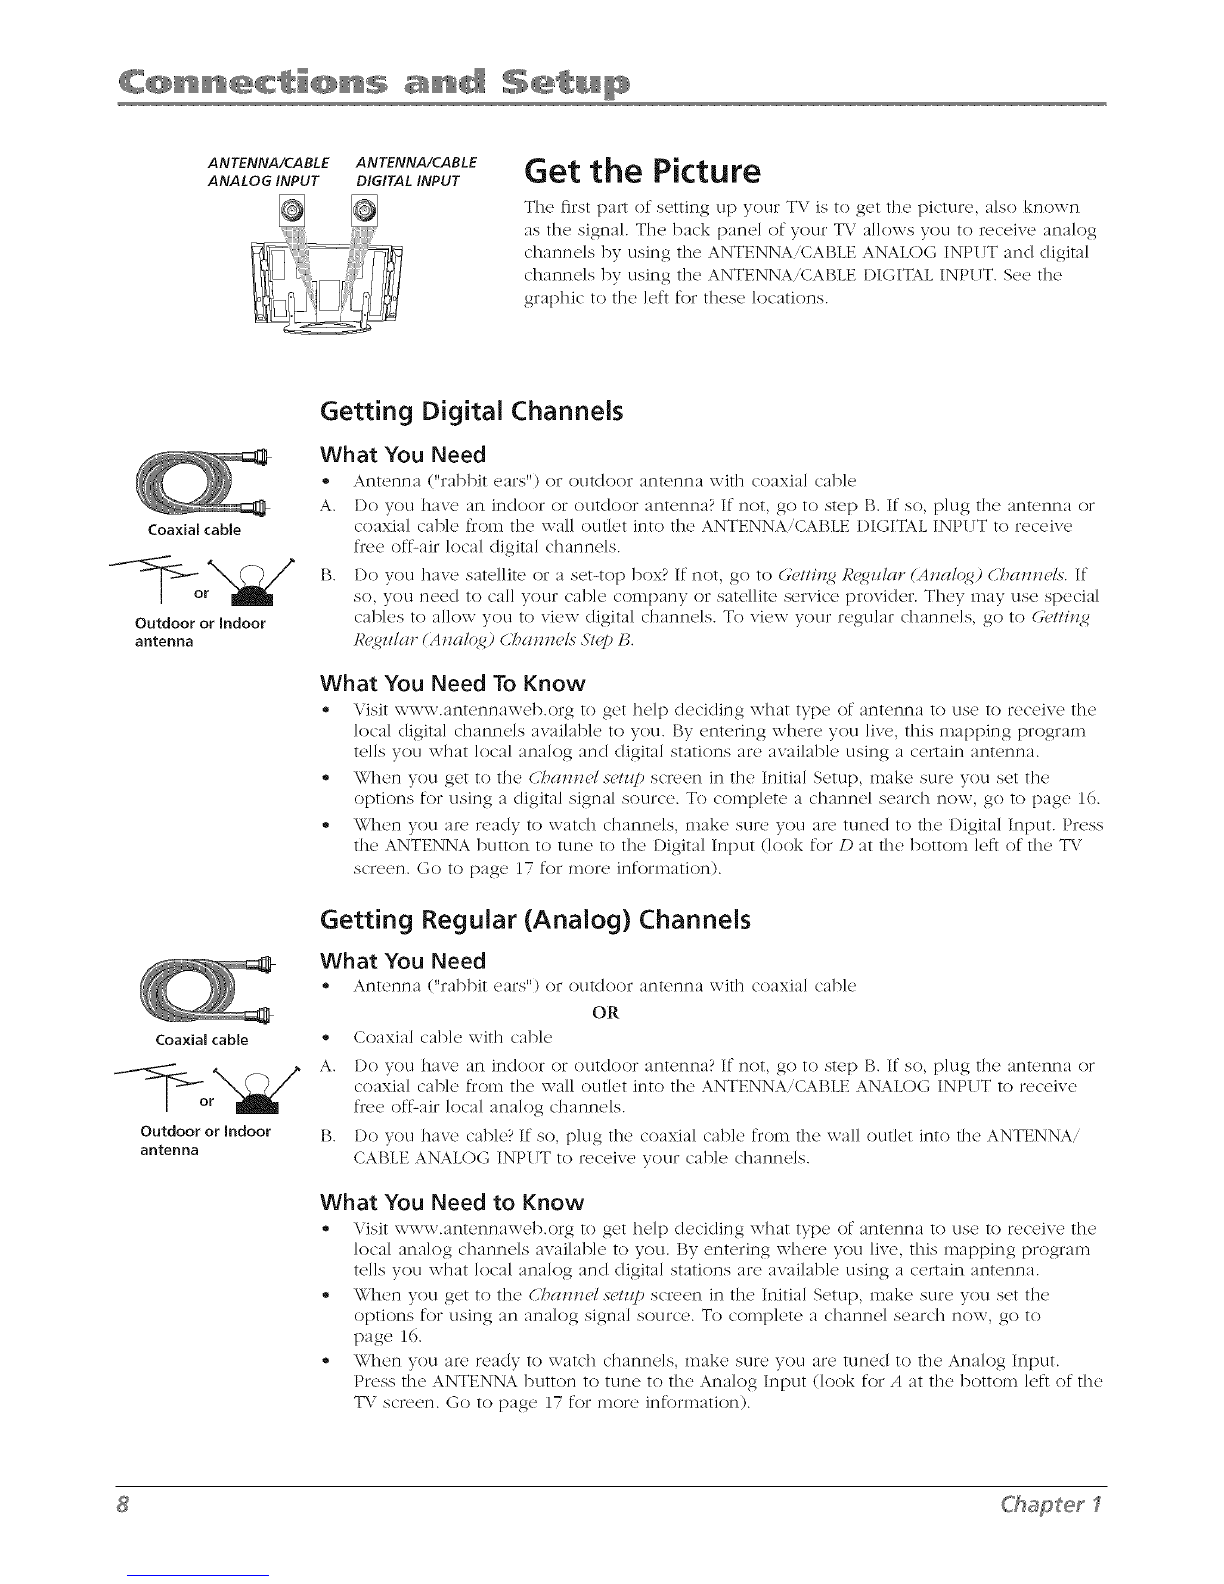
Get the Picture .............................................................. 8
Getting Digital Channels ........................................ 8
Getting Regular (Analog) Channels ...................... 8
Choose Your Connection .............................................. 9
Video (Basic) Connection ..................................... 10
Component Video (Advanced) Connection ........ 10
HDMIIDVI Connection .......................................... 12
VGA Connection ................................................... 14
Plug in the TV .............................................................. 15
Put Batteries in the Remote ....................................... 15
Turn on the TV............................................................. 15
How to Use the Remote Control to Complete the
Initial Setup ............................................................... 15
Complete the Initial Setup ......................................... 16
Set the Menu Language ...................................... 16
Complete Channel Setup ..................................... 16
What To Expect ........................................................... 17
Watching TV ......................................................... 17
Changing Channels ............................................... 17
Explanation of Jacks(in alphabetical order) ............. 18
Buttons and Other Jacks On Your TV ........................ 19
Front Panel Buttons .............................................. 19
Left Side Input Jacks (when facing back of TV),, 19
Chapter 2: Using the Remote Control
Button Descriptions for TV Mode .............................. 20
Button Descriptions for DVD and VCR Modes .......... 21
Using the INPUT Button ....................................... 21
Programming the Remote to Operate Other
Devices ....................................................................... 22
Find Out If You Need to Program the Remote ,,22
Programming the Remote ................................... 22
How to Use the Remote After You've
Programmed It.................................................... 23
Remote Control Codes ................................................ 24
Chapter 3: Using the TV's Features
Channel Banner ........................................................... 25
Autotuning .................................................................. 25
Parental Controls and V-Chip ..................................... 26
How V-Chip Works for USA and Canada ............. 27
Lock/Unlock Parental Controls ........................... 27
US V-Chip TV Ratings ............................................ 28
Blocking Canadian V-Chip Ratings ...................... 29
V-Chip Movie Rating Limit ................................... 30
Block Channels ...................................................... 30
Block Digital Channels .......................................... 30
Front Panel Block .................................................. 31
Lock Time Menu .................................................... 31
Blocking Unrated/Exempt Programs ................... 31
Future Rating Region ........................................... 31
Additional Features .................................................... 32
Screen Formats ...................................................... 32
MultiTask Audio .................................................... 33
Calendar ................................................................ 33
Chapter 4: Using the TV's Menu System
Using the Menu System ............................................. 34
Channel Guide Menu .................................................. 34
Sound Menu ................................................................ 34
Picture Menu ............................................................... 36
Setup Menu ................................................................. 38
Parental Control Menu ............................................... 41
Time Menu ................................................................... 41
Chapter 5: Other Information
Frequently Asked Questions (FAQs) .......................... 42
Troubleshooting .......................................................... 43
V-Chip Rating Explanations ........................................ 46
US V-Chip Rating System ...................................... 46
Canadian English V-Chip Rating System .............. 46
Canadian French V-Chip Rating System .............. 47
Limited Warranty ........................................................ 48
Care and Cleaning ....................................................... 49
Plasma Panel's Protection Function ..................... 49
Image Burn-in and After-image Lag .................... 49

Things to Consider Before You Connect
Protect Against Power Surges
• Connect a]I ok,vices b_'fore you plug :my of their power cords into the' wan outk't or power
strip. NEVER plug your T\" into an outlc't that is controlk'd by :) wan switch.
'_ Turn off tile TV and/or device(s) heft)re you connect or disconnect an} cables.
- Make sure all antennas and cables are properly grounded. Ref_,r to tile Important Safety
Instructions at rile beginning of tile User's Guicle.
Protect Devices from Overheating
® I)on't block v{,ntilation holes on any of th{' (l{,vic{,s. Arrange the (I<,vic{,s so that air can
circulate t}eely.
,_ I)on't stack devices.
,_ If you place devices in a stand, make sure you allow adequate ventilation.
,_ If you connect an audio receiver or amplifier, place it on rile top shelf so the heated air
from it won't flow around other devices.
Position Cables Properly to Avoid Audio interference
® Ins('rt each cable' firmly into the (l('signat('d jack.
,_ If you place devices above rile TV, route all cables down the skle of tile back of the TV
instead of straight (Iown rile middle.
,_ If your antenna uses 300<)hm twin lead cables, do not coil rile cables. Also, keep tile twin
lead cables away from audio/video cables.
Use indirect Light
't place' th(' TV where sunlight or loom lighting will bo dirocted towald the screen. (Tse soft
or indirect lighting.
Check Supplied Parts
Check that the following parts wero pack_'d with you1 product.
C7__ _'
CZ5_ CZ3_
............................... J
Remote control Eight screws
Part #RCR311TBM2S for speakers
2 AAA batteries Power cord 2 speakers
Note:/i.y(n¢ zzmmclIo r_'placm.l,ozcr rmz'Jzolm,call l-_'00:_3_'-() _76. d sbippi1_ aizd ba_dli_
.I'_>C,cllld /b_' cll)])pol)picll_' .s'c_l_'sl_l.Z:,z_'ill bm cba _md z@o_ o"din:izz_ Hg_vm.l,ozcr l'iS_l,
l]<_x/mrdklrd, or DLs'coz,mr Cklrd rmad.y.
2 sets of speaker
wire
(;*Zlpbics colzlaillmd zz,ilbi!_ lbis pllb/icalio!_ <rzrmfnr rg'prmxml_laliol_ ol_!y. _'_l_J_@r

Pin holes
One conductor is copper
One conductor is gray
Speaker wire
.................
i •
Left
speakel speaker
Speaker terminals
Remove the screws from the two holes on
each side of the TV's base.
Connecting Speakers to Your TV
Note:/j'yoI_'t'("c'omT('(iitz2 cil?om_>//?Pcil('t"to//?P TI" llsit_2 thP
Az/dioO_/t iclcles,yoI_dot_'IJz_'<,dtoc'omwctthPsp_,clk_,rs.Go Io
pcl2P 16',ibr more h!/brmcttioJl o_zthe A_/dio ©z_/icwks.
Th_,T_,aT('two spc'ak_'rspac'M'd with rOUTT\" YOUn_'('cl to attach in
oTder to heaT the sound from yOUTT\;. Locate the two speakeTs, eight
screws, and two sets of speaker wire. You']] need a Philips screwdriver
to attach the screws. To connect your speakers:
1. Stand at the back of the TV and hold the speaker so the speaker
grill faces foTward and the speaker brackets f:_ce you, as the
graphic to the lefi shows.
2. The pin on the back side of the speaker bracket goes into the
middle hole between the screw holes on the TV. Then attach the
SCTeWSto the two holes at the top of the speakeT and two holes at
the bottom of the speaker. Follow the same instructions to attach
the other speaker.
.Take one set of speakeT wire. Notice the conductoTs of the wire
ate diftbrent colors. One conductor is gray; the other one is
copper. This is important to remember when connecting because
the ends of the conductor need to go into the same colored
speaker terminals on the speaker and the TV.
4.
5.
Locate the speaker terminals on the speakers and on the TV. The
bottom graphic to the left shows the locations.
The rubber piece on the speaker wire, cal]e(I a ferrite core,
should be closest to the TV when connected. StaTting with the
lefi speaker, [)TESSdown on the Ted tab of the speaker terminal to
insert the exposed \\-ire of the copper conductor, for example, into
the teTmina] hole. On the back of the T\;, connect the other end
of the copper conductor to the first Ted speaker teTmina] on the
left. Connect the other conductor to the black speaker terminals,
connecting on the back of the T\,' to the first black speaker
terminal on the ]eft. Follow the same instructions to connect the
speakeT \\JR' to the Tight speaker. Make sure the conductors n_atch
red to red and black to black.
Mounting Your TV to the Wall
Cautio*n: 77"_e,c#l mo_Jlt mz_s't Ix,tirol mhHm_lm qi fi_'Pthm,u
theTY_" J_(,tw(,_ht witho_t ca_si_ 2 d(m_((_(,.
You must first purchas{' a univ{,rsa] \\-a]] mount to mount your T\,' to
the wall Then follow th<'so instructions:
1. You need to remove the base first in order to attach the \\-all
InOUn[.
A. Place the T\/ facedown on a surface that is soft, yet strong
enough to hold the TV'.
B. lJse a Philips SCTewdriver to remove the screws from the two
holes on each side of the TV's base as the arrows indicate in
the graphic to the left.
2. Make sure all cables are already connected before attaching the
wall n_ount to the TV.
3. Folio\\- the diTections indu(led with the wall mount to mount the
TV to the wall.
ChaSer l 7

ANTENNA/CABLE ANTENNA/CABLE
ANALOG INPUT DIGITAL INPUT Get the Picture
Tile first part of setting up your TV is to get tile picture, also known
as tile signa]. Tile back pane] of your T\,' a]]o\vs you to receive analog
channels by using the ANTENNA/CABLE ANALOG INPUT and digital
channels by using tile ANTENNA/CABLE DIGITAL INPUT. See the
graphic to the left for these locations.
Coaxial cable
Outdoor or Indoor
antenna
Coaxial cable
Outdoor or Indoor
antenna
Getting Digital Channels
What You Need
,, Antenna ("rabbit era's") or outdoor antenna with ¢'oaxia] €'able
A. I)o you have an indoor or outdoor antenna? If not, go to step B. If so, l)]ug tile antenna or
coaxial came from tile wall outlet into the ANTENNA/CABLE I)IGITAL INPITT to receive
free off-air local digital channels.
B. Do vou have satellite or a set-top box? If not, go to </(,I/fll2 R<gz_/glr(Analq_) CT_anne/s. If
so, you need to call your cable company or satellite service provider. They may use special
cables to allow you to view digital channels. To view your regular channels, go to G'#/lit?g
R<gzdar (At_alqg) C7_at_ne/s 57_y_1_.
What You Need To Know
• Visit www.antcnnawcb.org to get help deciding what type of antenna to use to rcc'ciw, the
local digital channels available to you. By entering where you live, this nmpping program
tells you what local analog and digital stations are available using a certain antenna.
® When you get to tile CT_ant_(,/5_,Iz@screen in tile Initial Setup, make sure you set the
options for using a digital signal source. To complete a channel search now, go to [)age 16.
• When you arc ready to watch channels, nmke sure you as<,tuned to the Digital Input. Press
the ANTENNA button to tune to the Digital Input (look for Dat the bottom left of the TV
screen. Go to page 17 for more information).
Getting Regular (Analog) Channels
What You Need
® Antenna ("rabbit em's") or outdoor antenna with coaxial cable
OR
,, Coaxial cable with cable
A. I)o you have an indoor o1"outdoor antenna? If not, go to step B. If so, plug the antenna or
coaxial came from tile wall outlet into tile ANTENNA/CABLE ANALOG INPI TTto receive
free off-air local analog channels.
B. I)o you have cable? If so, plug tile coaxial cable from the wall outlet into the ANTENNA/
CABLE ANALOG INPI TTto receive your came channels.
What You Need to Know
', Visit \vww.ant{,nnawcb.org to g{,t help clccicling what type of antenna to t]s{' to receive the
local analog channels available to you. By entering where you live, this mapping program
tells you what local analog and digital stations are available using a certain antenna.
,, When you get to tile U?annu/.s_,/z@ screen in the Initial Setup, make sure you set the
options for using an analog signal source. To cOral)]ere a channel search now, go to
[)age 16.
,_ When you are ready to watch channels, make sure you are tuned to the Analog Input.
Press the ANTENNA button to tune to tile Analog Input (look for Aat the bottom left of the
TV screen. Go to [)age 17 for more information).
<hapterI

Choose Your Connection
Note.fi)r {KS"cust(m,eJ'x: ]jyoz# pz'('j(,r, me ca_l pz'oz,i(/(, yozl _it/_ t/_e Jzame (ff'aJz AzltboH_(,d S_'*wice R_t)*n'se*ztgttiz,(?
z_,l_oz_ill z'isi/.Fozlt" /_ot'Jlej'or d ii'¢" 1o i*_stall yoz#" ¢l_'ctz'o*Hc ¢'II/el_IgliHflle_l/._)'s/('*_l alzd 1o i*IS/t'I_( /.FOH itl iIs
o!)mrgl/k)_z, Fo," d_,tail.s a!)oz_t tbi.s".sg>t'z,ice.call 1-&S%'-206-.7.759.
1:o,"additio_zal a.s-si.s-tgl,me_,/_il(> Z_si_l<g.yoz_z'p*>dlmt pl(>gls(>_%it _l,_,_,.*'Ca.(:OfTl/(;HStOflle*_s_![)[)o*'l.
The_e are seve,al ways to connect your TV. P]ease use t/_e fo]]owing chart to determine which connection is best
for you. Proceed to the appropriate page and connect your TV.
Go to...
page 10-11
vloEo@
L/_ONO O
_u_no
0@
L@
@
c_
.....
vo_
AUDIO {_
Jacks Used
Video
Audio R and L/MONO
These jacks are located on
the left side of the TV when
facing the back.
Y Pb/Cb Pr/Cr
Audio R and L
HDMI/DVl
VGA
Audio
Cables Needed
_ Audio/Video
Component Video
Audio
HDMI TM
OR
HDMI
+
HDMI/DVl adapter
+
Audio
VGA
_>, Audio
page 10-11
page 12-13
page 14
HDMI, the HDMI logo, and High-Definition Multimedia Interface are trademarks or registered trademarks of HDMI Licensing LLC.
C'haSer_

Video (Basic) Connection
This is an exmnp]e of a connection using the Video jack. Go to the top )f page 11 fol specific
]i3StFUC[]()]']S.
Don't forget: If necessary,
connect antenna or cable to
get a picture. Go to page 8 for
instructions.
[ii
Component Video (Advanced) Connection
This is :m examp]e of a connection using the Component Video jacks. (3{) to the n_i(l(/]e of
page 11 fol specific instructions.
Don't forget: If necessary,
connect antenna or cable to _
get a picture. Go to page 8 for
instructions.
<hapterI

Red
Yellow
White
Composite cables are color
coded- Yellow= video;
Red= right audio; white=
left audio
Green
Blue
Red
Component Video cables
(Y Pb Pr) are color coded-
Green, Blue and Red
,_ Red
White
Audio cables are color
coded- Red= right audio;
white= left audio
ON,OFF button
C_ _ [_
INPUT /
button
i
Use these buttons
to view the picture
of the device you've
connected to the TV.
Connecting the Device with Video (Basic)
This connection al]ows you to connect a device that has a \kleo ()ll[ jack, _'or (?xaIDD](2, a
I)\"/) player.
Note: {i'U?m dduicc.),oHg"{' COHII_'clill(_ {I/SOhglS C'OH!/)Olg{?lll Uid_'ojglc]as 4_lld pOll hgH'{?
COITI/)OII{?IH l'id{?O Cg_&lc.q, ll'_ I'dCOH1H/{?Ild }'OH giN{? I/?{? C'OH@OI?{?!ll l'id(?O (Adl,g_Hccd)
(,})iglgCCliOll illSl{?g_d. _S'{?_?ilISIFIlCIIOIIS 19_?/OH.
IJsing the examp]e of a I)\"1) p]ayer:
Q If necessary, connect your antenna as on page
cable and/or off-alr described 8.
Q Connect video cable the side of the TV.yellow
your to
Connect a video cab]c to the \.IDEO Input jack on the skit of the TV and 1o the Vkleo
(-)tltptlt jack on the {)\"l) player.
Q Connect red and white audio cables to the side of the TV.
your
Connect die atl(/Jo (r(._dand white) cab]es to the AUDIO R and L,N]()NO jacks on the
skle of the T\ /and to the Atl(l]o ()tltptl[ jacks on the {)VI) p]ayer.
Connecting the Device with Component Video (Advanced)
This connection a]]ows you to connect a dcvke that has Y Pb Pr o1 Y (213CF jacks for
examp]e, a {)\.'1) p]ayer.
l JsJng the examl)]C of a {)\.'/) p]ayer:
Q If connect cable and/or off-alr antenna as described on 8.
necessaxy, your page
Q Connect YPb Pr video cables.
your component
Conncc't three video cables or special Y Pb Pr cables to the COMPONENT INPIJT
( • ( "•
(CMPI)_* Pb,CbPr,Crjackson the back of theT\.'and t)the_ PbPr )1_*CbCr
OLItDLItS OF] the {)\"l) p]ay<T.
Q Connect red and white audio cables.your
Connect the audio (red and white) cables 1o the CN]PI AUDIO R and L jacks on the
back of the TV and to the Atl(/io Otltput jacks on the I)\"1) p]ayer.
Viewing the Picture from the Connected Device
1. Plug in the TV (scc page 15 for (Ictails) and the (levite, if they m'cn't alrc:l(ly
plugged in.
2. Turn on the T\i and the device you want to view, for example a DVD [)]aye,.
3. Repeated]y press the INPUT button on the remote control to scroll through the Video
Input Channels until you see /7/) (if connected to the VII)EO jack) or C.1IP1 (if
connected to the CMPI jacks) displayed at the bottom of the TV's screen. To go back
to viewing T\i channels, press the ANTENNA button.
Note: Ijtbc,pictz_r<fi'om the DI T)p/((V('r (q)/)('(l_>bl(lc/_,and u hit(, and yoz_r c/Pz'ic(,
i.s-connected lo t/Te17I)EO[np_/t .Fozl n!{g_Tt/)etz_n('d to the ztro_z£ i,?/)z_t..lIgi/_,esz_r(,
.pozl p/>.<>.<," L\TqiT zTtTtil.poz7.<,de/71)disolg(pdd at the botlom 9l'the Tl"s sct>dtT.
•Ifyou're done
connecting devices to
your TV,go to page 16
to complete the Initial
Setup.
•To continue
connecting devices, go
to the next page.
ChaSerl 1I

HDMi/DVi Connection
This is an exmnp]e t)_ a ct)rlrlectit)n using the HI)b1I,I)\,I j:_ck.
S
s
*Don't forget: If necessary, connect
antenna or cable to get apicture. Go
to page 8 for instructions. @
L
Device with DVm
Audio Out DVI Out
<hapter

Connecting the Device
Hig]l-D_'finition Multimedia Interface (HDMI) mc]mo]ogy is :m unc'ompressed digital c'onnec'tion
ilia[ carries both video and audio dam by way of an imegrated mini-plug cable. Since HDMI
technology is based on Digital Visual Interhce (1)VI), the jack on the back of your TV is also
colnpati|)le with devices that have a 1)VI output jack.
HDMI came
Using the example of a set-top box:
*If your set-top box has an HDMI jack, connect an HDMI cable.
Connect an HI)MI cab](' to th(' HI)MI,D\;I Input jack on ill(' back of th(' T\" and to
tile HDMI Our jack on tile back of the device.
-OR-
HDMI came
HDMUDVI adapter
Red
White
Audio cables are color
coded- Red= right audio;
White= left audio
If your set-top box has a DVI jack, connect an HDMI cable and an
HDMI/DVI adapter.
Connect an HI)MI cable to the H|)MI,I)VI on the back of the TV.
Inptlt jaclK
QAtmch an HDMI,DVI adapte_ to the end of the HI)MI cab]e, then connect the
adapter to the I)VI ()tl[ jHCk ()n []1(2 S(_[-[()p I)OX.
Since you'_e using an H I)MI,DVI adapter, you to connect Hght
need left and
cables to the HI)MIiDVI R and L AUDIO jacks on the back of the TV and to the R
and Ljacks on the back of the device.
ON,OFF button
_N ¸¸,_t _
D _ _
_ C_ _
INPUT /
button
Use these buttons
to view the picture
of the device you've
connected to the TV.
Viewing the Picture from the Connected Device
The (levite in this connection is connected to the HI)MI,I)VI jack. To view this device:
1. Plug in the T\ /(see page 15 for details) :rod the device, if they aren't already plugged
in.
2.
3.
T/irr] or] 1]1<? T\ arid 1]1_ (l(wic(_ VOLI x,va17£ 1o ViQ\V, for c!xalnl)](} _t sc!t-[o[) ])OK.
Repeatedly press the INPIJT button on the remote control to scroll through the Xqdeo
Input Clmnnels until you s('c HI) IJI displayed at the bottom of the TV's screen. To go
back to viewing TV c]mnnels press the ANTENNA button.
,, If you're done connecting
devices to your TV, go to
page 16 to complete the
Initial Setup.
,If you experience HDM!
problems, go to the HDMI
Troubleshooting section on
page 45.
P
ff'haSet

VGA Connection
This is an examp]e of a connection using file VGA jack.
s
s
s
s
Don't forget: If necessary,
connect antenna or cable to
get apicture. Go to page 8 for
instructions.
Connecting the Device
This connection al]ows you to connect to a persona] computer.
1. If necessary, connect your cable and/or off-alr antenna as described on page 8.
2. Connect your monitor cable.
Connect one end of a 15-pin inonitor cab]e to the V(;A VI1)EO jack on the TV and the
other end to tile PC's video output jack. Note, if your PCs video output isn't 15-pin, you'l]
need an adapter that can connect to a 15-pin monitor cab]e.
3. Connect your audio cable.
Connect a 3.5 mm stereo mini [)in c:fl-}]c (sometimes referred to :is 1,8" stereo mini pin) to
the VGA AUDIO jack on the back of the TV and tile other end to the Au(lio Output jack on
tile PC.
Notes: Doll 'l lcgl_'e itnr(_g>.s"s_lc_ as still imrlq_>._on-sc,'g>_,n ./bt" a lon<_ time becazLs_ >it mq_:
caz_.s_>scr_>¢n b_#rn-in, 41_)to p(tqe 49j'or more fl{/brmatfl)n.
7]'_1>mgl._:imz/n_ pan(>l n>._ohction is 6'52 ,x'4HO./'of mo(/¢l P42_V/]l)._3; 702)4 ._776H.fof
mocl_,l 1"42 _Vl]I)._.3. l_e sz_t'_,to s_,t.Fo_r PC" to the, cotw¢ct monitor ozll[)z_/.s_,tting.
The MsltiTas/, Azidio >_ /_,gtmn, allows yoz_ to listen lo the soz_nd.fi'om the TI' while, the PC
is co_n_ected. 41() to prtqe .-_3.ibr motw i_j'ormatio_.
Viewing the PC
1. Plug in tile T\. (see page 15 for details) and the PC, if they aren't already plugged in.
2. Turn on the TV and tile PC.
3. Press the INPUT button on the remote control to scro]] through the Video Input Channels
until you see Y(;A displayed at the bottom of the T\."s screen. To go back to viewing TV
channels, press the ANTENNA button.
<hap er

Plug in the TV
Plug the end of the powcl cord into file back of the T\". Plug t]l(' other end into a grounded
wall outlet. Insert the p] ug comp]etely into the outlet Do not p] ug into an outlet conm)lled by
a light switch.
Put Batteries in the Remote
• Remove the battery compartment cover from the back of the remote by pushing the mb
and lifting off die cover.
• Insert two fresh batteries. Make sure tile polarities (+ and -) are aligned correcdy.
', Replace tile cover.
Turn on the TV
Turn on your T\ by pressing the Power button on the thmt of the TV or ON®OFF on the
remote contro].
_w_,_,m,D_D OmOFF
GUlD[
_ [EE__
REVER_E _ FORtqmD
A_m Z00r_ OP_.CLO_[
OK
/ button
Toaccessthe setupmenusmanually,pressMENUand
chooseSetup.
How to Use the Remote Control to
Complete the Initial Setup
The technical term is "Navigation' - how you move through the on-
screen i11(21_1!.1s.The t]leorv is the same t]lrOtlghotlt tile _n<_nu screens:
higlllight Votlr C]loice anti select it.
To highlight a men u item, press tile arrow buttons on tile remote to
highlight one of tile items listed on the screen. Use tile up or down
arrow button to move up or down. Use tile right or left arrow button
to view other selections for a menu choice or to display a sul>menu.
More than one selection displays, for example, On...; a menu choice
with a subqnenu displays dots (...).
Note: II{_hl(_htvd m¢,g_nsthat the metn_ itm_ stands o_t./)'om
other menz_ items on the fist ((]!)/)(YI?N d(lF/ae?; br{ghtet: or a
d(/[/'_'r(,ntcolor).
C'haSerl

Complete the initial Setup
Tile Jnenu system in your TV allows the TV's _batUTcSto wolk plopeT]y. The flTst time you turn
()]] VOUT T\ g, tile ]ang/lag<_ SCTCen appears.
Set the Menu Language
The first part of the setup allows you to select you1 pTefcTrcd language
for Ell{2 ]nel]L1 syste]n.
If English is your pretbTTed language, press OK. To choose another
language, pTess the down aTT()W butt{m until that hmguage is
hig]l]ig]lted, and press OK.
CompJete Channel Setup
Make sure you've connected the T\..'to cable an(I or an of_aiT signal
befoTe you StaTt the next paTt of the setup.
Set the Signal Source
1. A. Did you connect a signal to both ANTENNAiCAI_LE ANALOG
and I)IGITAL INPUTS on the back of your TV? If not, go to step
lB. If so, press tile down arrow button to higillight Aria. s_nal
Oy)eand go to step 2.
B. I)id you connect a signal to only the ANTENNA/CABLE
ANALOG INPUT? If not, go to step 1(2. If so press the Tight arrow
button to select AJlalqg and then press the down arrow button to
highlight AJza. s{gnal l.tp_'. Go to step 2.
C. Did you connect a signal to only the ANTENNA/CABLE
I)IGITAL INPUT? If not, go to step 2. If so, press the rigilt arrow
button to select L){gital and then press the down arrow button to
highlight D{g. s{g_za/Oy)e. Go to step 3.
Set the Analog Signal Type
2. A. Did you connect cabk' to the ANTENNAiCAIBLE ANALOG
INPUT? If not, go to step 2B. If so, leave the option set to C?fb/_'
and then press tile down arrow button to higillight l){_. s_na/
Oy)e. Go to step 3.
B. I)id you connect an antenna to the ANTENNAiCAIBLE
ANALOG INPUT? If not, go to step 3. If so, press the right arrow
button to highlight Antenna and then press the down arrow
button to highlight l){q. s(gna/Ope. Go to step 3.
Set the Digital Signal Type
3. If you connected a signal to tile ANTENNA/CABLE I)IGITAL
INPUT, leave tile option set to Azztod_'t(,(/ion. The signal type is
chosen for you and changes on-scTeen according to that type once
a signal is detected. Press the down anx)w button to iligh]ight Az_to
U?..vg,gltVb. Go to step 4.
<hapter

if you connected cables to the ANALOG
and DiGiTAL iNPUTS, the TV runs 2 separate
channel searches,
Look for the Aat the bottom of the screen to
make sure you're on the Analog input.
Look for the Dat the bottom of the screen to
make sure you're on the Digital input,
Complete the Channel Search
4. Ev(,n though th(' initial chann_q soarch can take' sow,ra] minut('s,
you must colI]plete it in order for your T\.' to disp]ay channels and
programming. Press OK to begin the channe] search. The menu
shows the TV is running a channel search. When it's comp]ete, the
C/'_amwl._'('tup menu remains on-screen. To exit the menu system,
press CLEAR.
Some channels might have been found during the channel search
that are unavailable to view and you might want to get rid of these
so they don't appear as you change channels. To do this [)Tess OK
(the Li.s-ta,_d Lab_,/s n]enu appears). Note that removing channels
from your channe] list may be time consu,_]ing, so you might want
to do it later. Go to page 38 for details on editing your
channel list.
What To Expect
Watching TV
® Remember: If you havo an :ma]og signal conn<'ct('d to your
ANTENNA/CABLE ANALOG INPUT, then look for an Aat the
bottom of the screen to make sure you're tuned to the Ana]og
input. Press the ANTENNA button if the Aisn't appearing.
Ana]og video is sent in a 4/3 fore]at, which your T\/ displays these
channels in a 16/9 format. Press the left or right arrow button
to view the different formats available. Go to [)age 32 for n]ore
exp]anation of screen formats.
Remember: If you have a digital signal connected to your
ANTENNA/CABLE I)IGITAL INPUT, then look for a/) at the
bottom of the screen to make sure vou're tuned to the Digital
input. Press the ANTENNA button if the /) isn't appearing.
Most digital vide<) is sent in a 16/9 format which does fill your
screen, but sometimes is sent in 4/3 which does not fill your
screen. It depends on how the station or source device is
formatting the vide(). If there are bars on-screen, press the
left or right arrow button to try a different format that may
eliminate the bars. Go to [)age 32 for n]ore exp]anation of screen
formats.
Changing Channels
,, Digital channels can haw' both primary chann(qs (like th(, :malog
channel number) and sub-channels. First tune to the [)igita] Input
by pressing the ANTENNA button and look for a Dat the bottom
left of the screen. To tune to a digital channel with a sub-channel,
enter the l)ri,]]ary channel number, then press the right arrow
button. Enter the sub-channel nun]beT and press OK.
Depending upon the type of signals you have connected to your
HI)T\.', you might notice that the channels change slower than
you're used to. This is perfectly normal Digital cable channels
sometimes take longer to tune.
ChaSer1 17

Explanation of Jacks (in alphabetical order)
This section (l_,scribes the' jacks on the' back pan_q of your TV. The're ar_' several ways to
connect devices.
ANTENNA!CABLE ANALOG INPUT
from the antenna, cable, or cable box.
ANTENNA!CABLE DIGITAL INPUT
from the antenna.
Lets you connect a coaxial came to receive the sigma]
Lets you connect a coaxial cane to receive the sigma]
COMPONENT INPUTS Lets you connect a device that has component video jacks, such as a
I)V1) p]ayer.
• CMP1 YPb/Cb Pr/Cr (Component Video) Provides optimum picture quality because the
video is separated into three signals. Use three video-grade or component video cables for
the connection. When using CMPI Y Pb/Cb PriCr, make sure you connect le_} and right
audio cables to the CMPI L and R AITDIO jacks.
• CMP1 LAUDIO Provides left audio connection when using the CMP1 video inputs. The left
audio connector is usually white.
• CMP1 RAUDIO Provides fight audio connection when using the CMPI vkleo inputs. The
fight audio connector is usually red.
• CMP2YPBICb Pr/Cr (Component Video) Same as described for CMPI Y PbiCb PNCr and
CMPI Audio above. Make sure you connect the left and right audio cables to the CMP2 L
and R AIJDIO jacks.
HDMI/I)VI Input Lets you connect a device, such as a digital cable box, with am HI)MI or a
i)VI output.
• HDMI/DVI INPUT (High-Definition Multimedia Interface/Digital Visual
Interface) Provides an uncompressed digital connection that carries both video and audio
data by way of an integrated n_ini-plug cable. Since H1)MI technology is based on Digital
Visual Interface (DVI), the jack on the back of your TV is also compatilJe with DVI devices.
• LAUDIO (used for DVI only) Provides left audio connection when using the DVI jack. The
letr audio connector is usually white.
• RAUDIO (used for DVI only) Provides right audio connection when using the DVI jack.
The right audio connector is usually red.
Note: {/'z#sin 2 [ll).lll//)17 as a 1)17 con_zec/ion, remember to con_ze(:/ the lej'l and r{gb/
(n_dio cablus becaz/se the DI 7cablu carrius on{_, tbe pictz_,w s_na/, not the soz177d.
MONITOR OUT Connect a VCR or DVD-recorder to record digital and analog programs
(excluding copy-protected programs and COlnponent video formats) while the TV is turned on.
You must leave the TV on the same channel you are recording.
AI_IO Use the Audio Out jacks when using the MONITOR OUTPUT Video jack or use these
jacks by thelnselves to connect am audio receiver to the T\.' for enhanced sound quality. If you
use these jacks to receive your sound, you don't need to connect the speakers supplied with
the T\.'. Make sure you set the Audio output correctly in the Adz'a_zced &?//ill2s Akmtld inenu. Go
to page 36 for more information.
• L (Audio) Provides left audio connection. The left audio connector is usually white.
• R (Audio) Provides right audio connection. The right audio connector is usually red.
<hapter

VGA CONNeCt your colnputcr, or other (IcvJce with a \/(}A output, to this jack USiNg a 15 piN
I)-sub cable.
VGA AUDIO (Stereo mini jack) Use to obtaiN SOUNd when a PC is CONNeCted to the VGA jack.
ITS(' a U. 111111stereo IniNi pin cab]c (sonlctimes r(._fcT17C(]to as 1,<N' St(' x. o IniNi DiN) tO CONNeCt a
PC to vouY T\". (3o t() [3agc 14 for more infornmtion.
Note: tt'h_?n zzsiz<glhc I(,'A ilzpzll dou 'l l_,(zz,_,img(g_,s szzch as slill imagoes ou-scr_,en./br a
lozz_ lim_ I>_,(:az_s_il may (:az_s_ s(:r_,zz I>zirzz-izz. (7(i Io p(_, 49 ibr mor_ iz_/ormaliozz.
Buttons and Other Jacks On Your TV
Front Panel Buttons
If you cannot ]()cat(' your rcmot(', you can us(' the _]'oNtpaN(q bUttONSof your TV to operate
many of the TV's ff,atures.
MENU BriNgs Ul->the TV Main menu.
VOL > INcreases the volume. In the T\.' menu system, acts like the right arrow button on the
re,note control and a(Ijusts menu controls.
VOL < Decreases the volume. In the T\; menu system, acts like the left arrow button on the
re,note control and adjusts menu controls.
CH ^ ScaNs up through the chaNNel list. In the TV *nenu syste*n, acts like the up anx)w button
on the remote control and adjusts menu controls.
CH v ScaNs down through the chaNNel list. In the T\" menu system, acts like the down arrow
button on the remote control and adjusts menu controls.
POWER Turns the TV on and off.
Left Side Input Jacks (when facing back of TV)
L/MONO and R AUDIO Rccuiw's audio _x)m another device sudl as a cmncordcr, video game
CONSO]C,V(}R, or I)VI) p]ayer. 17se \vhcN CONNectiNgto the VII)EO or S-VII)EO INput.
VIDEO Input Receives video/}o,n another device such as a camcorder, video game console,
VCR, or DVD p]ayer. To access a device CONNected to the VI1)EO jack press the INPUT button
On your remote until //D appears at the bottom of the screeN.
S-VIDEO Input Allows you to CONNectan S-Video came from another device. Make sure
you also CONNectaudio canes from the device to the T\.".To access a device coNNected to the
S-VII)EO jack press the INPI TTbutton On your remote until S/7/) appears at the bottom of the
screeN.
Note: Do nol (:onnc(:l gin g-l ic!_,o and a "_,_1(_ "_'i(!_<) (:(lbl_, I(1 Ibm' sic!_tfn(:ks (II lh(? sa_c
/il']l_?.
(Headphones) A]]ows you to CONnect huadphones to listeN to the sound coming from the
TV. To adjtlst vo]ume CoNtrol Of the ]lCa(I[)]IONCS, go to the [lu(_d!_hOl/_> s_llil/_s optioN iN the
,S'()IIITN ]n(2N tl.
ChaSet

Indicator
ON°OFF
VNL
PRESETS SKIP
SO iNFO
GUIDE
iNPUT ANTENNA
REVERSE PLAY FORWARO
tECORO STOP PAUSE
AGAIN ZOOM OPEN'OLOSE
_PEEQ SlAI_H
Remote control part number
RCR311TBM2S
Note://]),o_'l _¢('ud to t'¢phtcv ),o_zt"
n'mot¢, cclll ;-<IO0-.I.:;<S'-O.IT(.{ A
sb/[)p/ll 2 alld /_al/d//ll2ji'(', ChiC.1t_("
cll)])ropr/cl/_" x(//(,s to/x, _._ill Ix, cl_clt_,_t
z![)oll ot'd('dtlI, tl(ll'_, )tollt" I'Lwl,
,ll(lst('t'(,?lt'd. or" Di.scoz_(,t" (,?It'd t'_,dct.y.
To turn off most RCA,GE,and Proscan components
that are connected to the TV,press ON*OFF twice
within two seconds.
This feature only works with most RCA,GE,and
Proscanproducts.
Button Descriptions for TV Mode
Arrows Us(,d to highlight cliff_,wnt it(,ms in tlw TV menu and to
adjust the menu controls. When viewing a channel, press the left
or right arrow to change the screen format: 4/3, 14/9 zoom, 14/9
panning, 16/9 zoom, Cinerama, and 16/9. Go to page 32 for more
information on screen formats.
Indicator Indicates the programming mode when programming tile
remote to control other devices. Lights when you press a valid button
on t]l(f r(21not(L Flickers when a ]3litton is DF(2SS(X] and t]l(f ]3att(HTi(2s arc!
] 0 ",,v.
(0-9) Number Buttons Enter channd numbers and time settings
directly through tile remote control.
To enter a one-digit analog channel, ent<,r a zero first. To enter a two-
digit channel, press tile two digits. To enter a three-digit channel, press
and hold the "1" button until "1" and two dashes (- -) appear, then
add the second two digits. Example: to tune to channd 123, press and
hold 1 until "1- -" appeam, release tile 1 button and then press 2
and 3.
To enter a digital channel with a sub-channel, enter tile main channel,
then press tile right arrow to enter tile sub-channd and press OK.
ANTENNA Switches between Analog and I)igital input channel.
\\."lien tuned to an input, press to gel back to the most recently used
tuner (Antenna c)r I)igita] input).
CC Brings uI) tile Closed Caption menu.
CH + or CH -Scans uI) or down through tile current channel list.
Press once tE!change tile channd up or clown; press and hold to
continue changing channds.
CLEAR Removes any menu or (lisplay from tile scrc,en and returns
you to nE)rn_aiviewing.
GO BACK Returns you to tile previous channd.
GIRDE I)isp]ays tile U'_aJlJl(,l (;IHd_"menu. Go to page 34 for more
information.
II_@'O Brings up tile channd banner; press again to dear tile screen.
INPUT Accesses tile available video input channds (lYL_ 5171),
C',II]'I. C.1II_. I"(;A, and [11).1II).Press tile CH+ or CH- or ANTENNA
button to resume TV viewing.
MENU Brings up tile Main menu.
MUTE Reduces tile T\"'s volume to its minimum level. Press again to
restore tile volume.
OK When in the menu system, selects highlighted items. While
watching TV, tieezes the picture.
ON®OFF When in TV mode, turns the TV on o1 off. If in another
mode (VCR or I)VI)) and programme(I, will turn tile device on or oft.
PRESETS For the Analog input, displays Picmt'_' and So_l_zdpt'_'set
option. For the Digital input, displays ]'icmtw and Soz¢Jldpt>s_,t; and
D{_. (,7"_.Az/d. La_l2. and C71+/(,71- bz_tto_s.
Other manuals for Scenium P42WHD33
1
This manual suits for next models
2
Table of contents
Other RCA Plasma TV manuals