rec tec grill RT-700 User manual

!"#$%&'()*#+*,
Model # RT-700!
REC TEC GRILLS
BULL

!
REC TEC GRILLS
BULL

-./010234
5!/(!678!!/(69:(
!0;<3
8!(0!7(97!/:(!/(69:((
=!)>6971>;:().7:/1.;9(10(!/(0:./(7?19(
.@@;1.0=:A(
7!(@/:B:07(10C6/<D(0:B:/(.77:)@7(7!()!B:(
2/1;;(-?1;:(?!7D(!/(-17?!67(.99197.0=:A(
0:B:/(97!/:(.0<(2/1;;(10(.(9).;;(9@.=:(!/(
@;.=:(10(.(B:?1=;:(60;:99(=!)@;:7:;<(=!!;(
.08(51/:(19(B:/151:8(.9(:E7102619?:8(
;:.B:(.()101)6)(!5(FGH(=1/=6)5:/:0=:(
>:7-::0(2/1;;D(8:=I9D(?!69:9(!/(.0<(
=!)>6971>;:().7:/1.;9A(
69:(!0(;:B:;(2/!608(.-.<(5/!)(
!B:/?.02102(/!!59(!/(:.B:9AJ

!
REC TEC GRILLS
BULL

REC TEC BULL
;$KK$%(5%LM(/*N(*#O(/L#
Congratulations on the purchase of your new REC TEC BULL Wood Pellet Grill! With proper
care and maintenance, your grill will provide you years of trouble free operation. Please review the
following information carefully for useful tips and information that will help you utilize your grill’s
extensive features and benefits.
Your REC TEC BULL is by far and away the most bang for your buck and comes fully loaded with
a HotFlash Ceramic Ignition System, Stainless Steel Body and state-of-the-art Wi-Pellet Wifi Tech-
nology. Your REC TEC’s revolutionary Smart Grill Technology™ automatically adjusts the rate at
which REC TEC Premium Hardwood Pellets are introduced into the fire pot to maintain a consis-
tent temperature like no other grill you have ever used. The result is the simplest and most conve-
nient way for a backyard enthusiast to Cook, Bake, Roast, Grill or Slow Smoke their favorite foods
while adding flavor profiles that can only come from a real wood fire. Just set your temperature and
let your REC TEC take all the guess work out of your next cookout.
We want you to join the vibrant and growing community of REC TEC owners. Whether you want
to contribute your own tips and recipes, learn from others, or a bit of both, please jump right in.
You now have an incredible tool for cooking. Let’s see how you use it!
Join our online community at:
Thank you for choosing REC TEC GRILLS!!
Ray Carnes & Ron Cundy, Co-Founders, REC TEC Industries, LLC
((PQGRSD(/$T(7$T(1#O+'K%U$'D(;;=1
Website: rectecgrills.com
Facebook: facebook.com/rectecgrills
Twitter: twitter.com/rectecgrills
YouTube: youtube.com/rectecgrills
Instagram: instagram.com/rectecgrills

=L#K$#K'(
Letter From Ray and Ron 1...........................................................................
Important Safety Information 3....................................................................
Carton Contents 4.........................................................................................
Assembling Your REC TEC BULL 5.............................................................
SPECS 7.........................................................................................................
Initial Setup Procedure 8..............................................................................
Temperature Probes 8...................................................................................
Operating your REC TEC BULL 9................................................................
Tips, Tricks, and Temps 11...........................................................................
Maintenance and Cleaning 13......................................................................
Transport & Storage 13.................................................................................
Troubleshooting 14.......................................................................................
Manual Start Up: 17.......................................................................................
Controller Schematic 18...............................................................................
Cooking Notes 19..........................................................................................
Recipes 21......................................................................................................
REC TEC BULL
SIX (6) Year Non-transferable Limited Warranty 24....................................
((PQGRSD(/$T(7$T(1#O+'K%U$'D(;;=2

1MVL%K*#K(9*W$KN(1#WL%M*KUL#
-*%#U#XY(/$*O(*,,(9*W$KN(1#WL%M*KUL#(>$WL%$(!V$%*KU#X(
2%U,,
For outdoor use only. Do not use in any enclosed area. Use on Level Sur-
face, away from overhanging eaves.
Keep grill 60” or more from any combustible surface.
To prevent grease fires, clean your grill on a regular basis (especially after
cooking greasy foods at lower temperatures). In the event of a grease fire,
unplug the grill and leave lid closed until the fire is out.
Do not put anything flammable in the storage area under the grill.
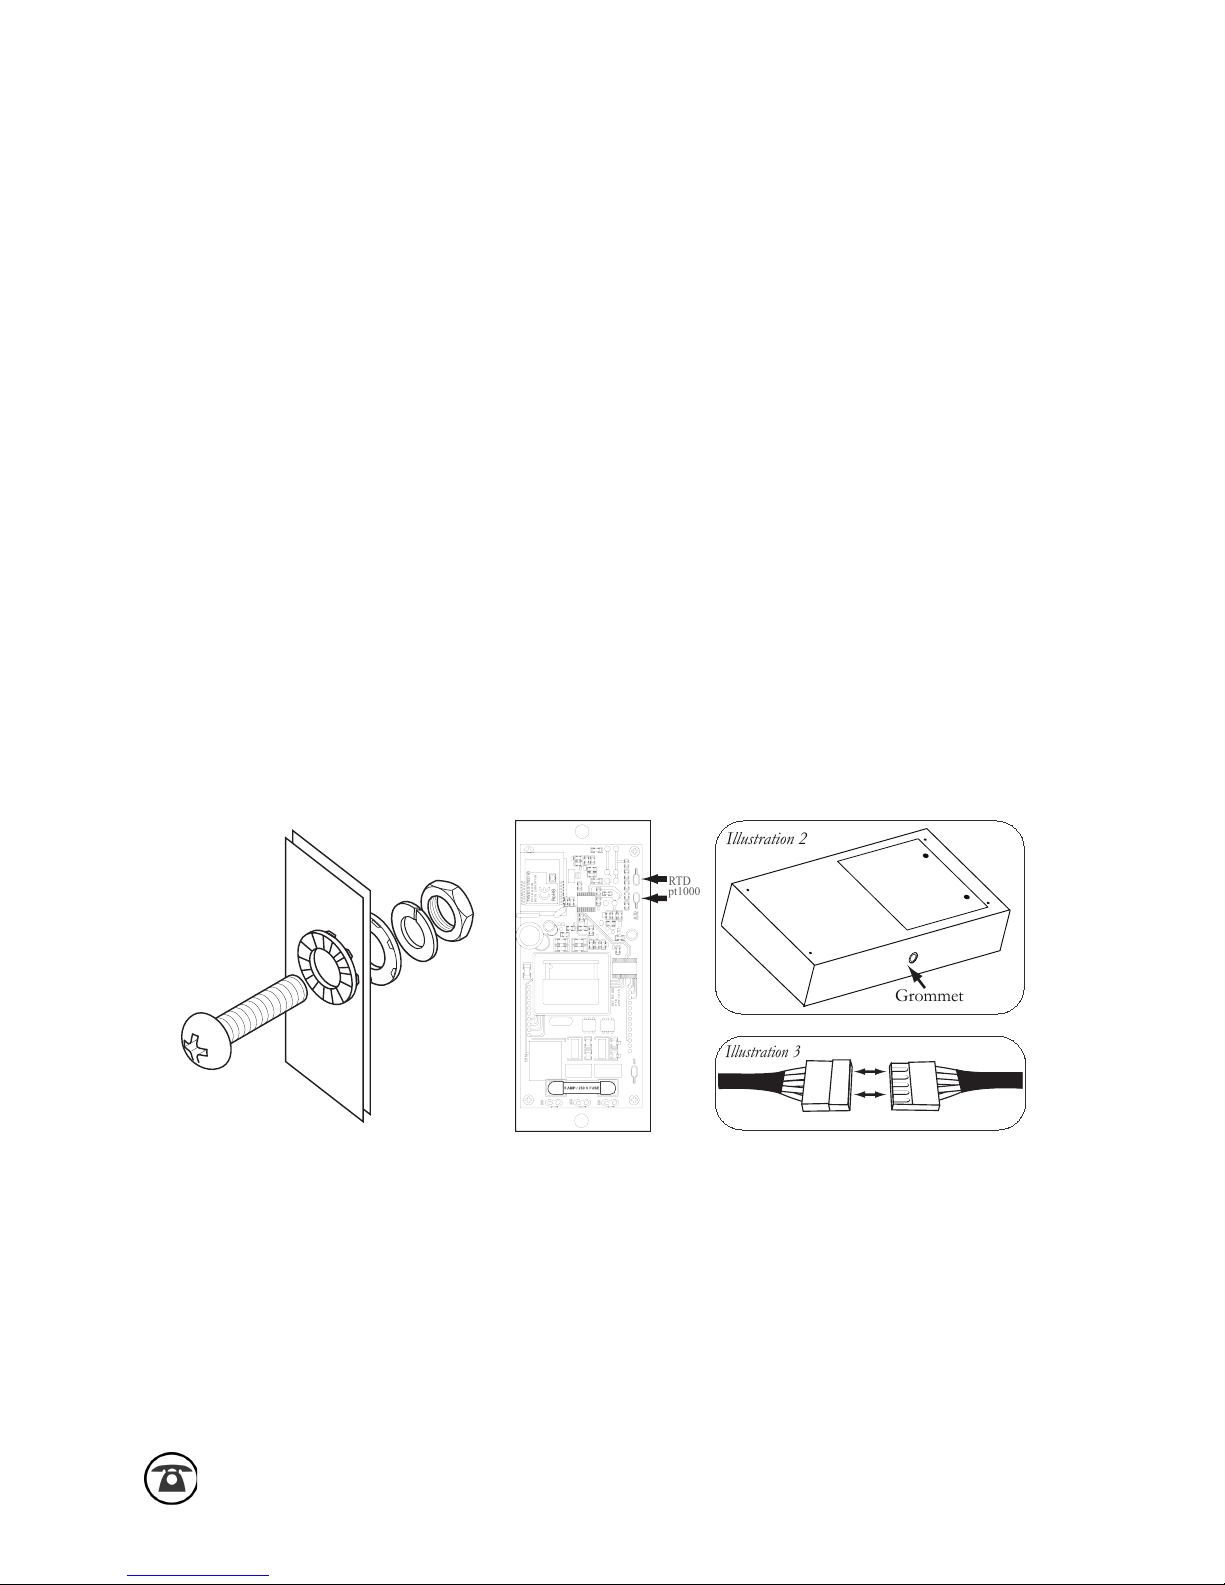
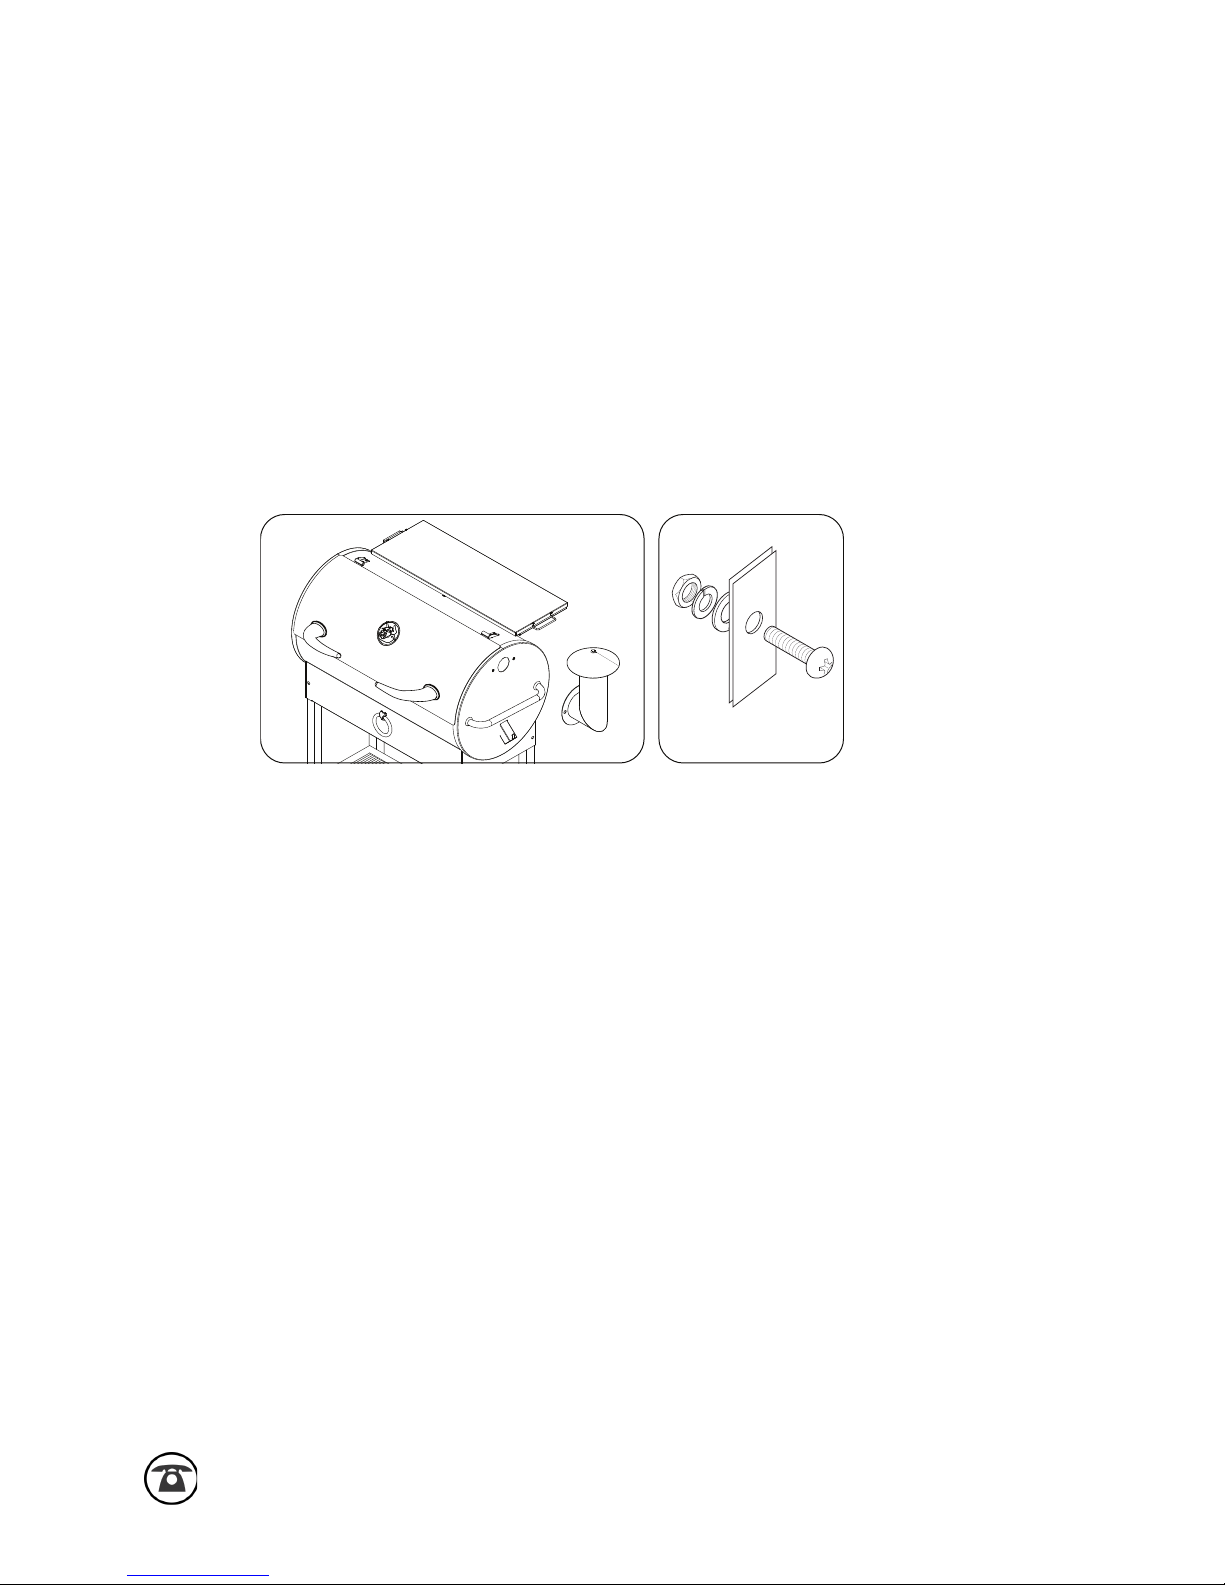
Never plug-in your REC TEC BULL without the service access panels lo-
cated under the controller installed.
Never put your grill in a vehicle without first ensuring that it is completely
cool and that no hot embers, pellets or ashes remain in the fire pot or auger.
Occasionally, your REC TEC BULL should be checked for fire pot obstruc-
tions to make sure proper air flow is maintained. See cleaning instructions
in this manual for correct procedures.
Your REC TEC BULL gets very hot; keep young children and animals
away while in use.
Use heat-resistant barbecue mitts or gloves when operating this unit. Long
handled, non-plastic utensils are also recommended.
Do not touch cooking chamber or attempt to move your REC TEC BULL
while operating or while the grill is hot. Make sure the fire is completely out
and that the grill is completely cool before transporting the grill.
Before covering your grill, make sure that the grill has cooled completely.
Never put your hand in the pellet hopper or attempt to service any part of
your REC TEC BULL while your grill is plugged in.
((PQGRSD(/$T(7$T(1#O+'K%U$'D(;;=3

=*%KL#(=L#K$#K'
Your carton contains the following:
Z1- REC TEC BULL body - #1 Z((1- side shelf / controller - #8
Z2- caster wheel legs - #2 Z((1- flame deflector - #9
Z(2- wheeled legs - #3 Z((1- drip pan - #10
☐1- bottom shelf - #4 Z((2- cooking grates - #11
☐2- bull horn handles - #5 Z((1- drip bucket - #12
☐1- large pull bar handle - #6 Z((2- temperature probes - #13
☐1- smoke stack - #7 Z(1- hardware packet(- #14
!
((PQGRSD(/$T(7$T(1#O+'K%U$'D(;;=4
Please note that during shipping some movement may have taken place, so a
complete visual inspection is required. Be sure to inspect entire grill after re-
moving the protective shipping carton. Some surfaces may be sharp, so wear
gloves when assembling.
Do not plug in the grill until it is fully assembled and you’re ready to
cook.
Questions?
Call our customer service at 1-706-922-0890
10am-8pm EST. Mon-Thurs;
10am-7pm EST Fri;
9am-3pm EST Sat.
#1
#8
#11
#10
#4 #9
#3
#2
#5
#6
#12
#13
#7

.''$M[,U#X(<L+%(/:=(7:=(>6;;
STEP 1 – Unpack and Prepare for Assembly
Remove all items from inside grill body and lay grill body on its back. For ease of assembly, com-
plete steps 1-6 below before standing grill upright.
Tip: Flatten the cardboard box out and lay everything on it. This serves as a good working area and
it helps prevent the grill from getting scratched or damaged during installation.
STEP 2 – Attach Legs
Attach legs with fixed wheels (#3) on the left side, with wheels facing outward to the front and back.
Attach legs with the rotating casters (#2) on the right side of the grill.
Attach all four legs using bolts, flat washers, lock washers and nuts
All hardware is found in included Hardware Packet (#14)
DO NOT FULLY TIGHTEN HARDWARE UNTIL STEP 3 IS COMPLETED
STEP 3 – Attach Bottom Shelf
Align shelf (#4) between grill legs and attach using 4 bolts, flat washers, lock washers and nuts.
STEP 4 - Attach side shelf (#8) to grill body
For all shelf bolts, use 2 toothed contact washers per bolt, with teeth touching the shelf body from
outside the grill and teeth contacting the inside of the grill body
STEP 5 – Install RTD Wires to Smart Grill Technology™ Controller
Locate the access panel underneath the side shelf and open it by removing the two screws. Feed the
two white braided RTD wires inside through the grommet as shown in illustration 2.
Plug the two white braided RTD wires onto the tabs labeled ‘RTDpt1000’
Slide them firmly onto the connectors and be careful to not touch any other parts of the circuit
board.
Replace the access door with the 2 screws.
Connect the wiring harness from under the Smart Grill Technology™ controller shelf to the grill
body wiring harness. See illustration 3.
((PQGRSD(/$T(7$T(1#O+'K%U$'D(;;=5
Call our customer service at 1-706-922-0890
10am-8pm EST. Mon-Thurs;
10am-7pm EST Fri;
9am-3pm EST Sat.
Illustration 2
Illustration 3
Grommet
COM
IGN
AUG
FAN
HOT
RTD
RTD
pt1000
TYWE1S 1703181
RoHS
P/N:2.01.01.10004
FOC ID: 2AFNLTWYE18
REC TEC GRI
Pt1000
V 1.6
2017. 10. 10

STEP 6 – Install Pull bar Handle
Attach the pull bar handle (#6) using the two bolts that are screwed into the handle. The Beauty ring
stays attached to the pull bar handle.
STEP 7 – Bull Horn Handle Assembly
Attach bull horn handles (#5) to grill lid using the small bolts that are screwed into handle.
Proper placement will result in the handle facing inward with the tip slightly upward.
STEP 8 – Stand Grill Upright
You will need two people to do this as the grill is very heavy.
STEP 9 – Install the Smoke Stack
Install the Smoke Stack (#7) using provided hardware. (See Bolt Assembly Order diagram.)
STEP 10 - Flame Deflector (#9), Drip Pan (#10) Cooking Grates (#11), and
Drip Bucket (#12) Installation
Open the lid of the REC TEC BULL. Install the Flame Deflector (#9) over the Air Box Assembly
with the small notches in the flame deflector over the small tabs located at the inside front and the
large cutout to the rear of the grill body.
Install Drip Pan (#10) with the short lip sitting on the left-side drip pan support and
the longer lip resting on the right-side lower support. Make sure to leave equal gap between Drip
Pan and front and back chamber walls to ensure even heat distribution.
BE CAREFUL NOT TO DAMAGE THE TEMPERATURE SENSOR WHILE
INSTALLING THE DRIP PAN.
(TIP: many customers line their drip pan with aluminum foil for easier clean up. When lining drip
pan, keep foil inside drip pan edges and do not wrap around as this can restrict airflow.)
Install the Cooking Grates (#11) by resting it flat on the front and back ledges inside chamber. Be
careful to avoid the temperature sensor during placement.
Install the Drip Bucket (#12) by clipping the handle to the integrated hook on grease spout on right
side of grill and allow it to hang.
((PQGRSD(/$T(7$T(1#O+'K%U$'D(;;=6
Questions?
Call our customer service at 1-706-922-0890
10am-8pm EST. Mon-Thurs;
10am-7pm EST Fri;
9am-3pm EST Sat.
Bolt Assembly Order

9@:=9(
Below is a list of features and specifications for the REC TEC BULL:
Temperature Controls
Smart Grill Technology™ controller
Wi-Pellet Wifi Technology
Automatic lighting feature
Automatic shutdown feature
200ºF to 500ºF in 5º increments
Dual meat probes (Probe A, Probe B)
LO / FUL settings
Exterior
Stainless steel cooking chamber
Micro polished stainless steel bull horn handles
Stainless steel towel ring
4 tool hooks
Large side and bottom shelves
40 pound hopper capacity
Hopper lid doubles as a warming surface
Hopper lid has handles for easy gripping
Rollerblade style wheels and locking casters
Stainless steel logo
Interior
702 sq./in cooking area and tall enough for turkeys or beer can chickens
1054 sq./in cooking area with optional shelf sold separately
Interior light with easily removed dishwasher safe glass lens
304 stainless steel cooking grate
304 stainless steel fire pot
304 stainless steel heat deflector
304 stainless steel drip pan
HotFlash ceramic ignition system
Construction Features
Stainless steel hardware
Probe port hole
Rubber grommets at all wire through holes to prevent chafing
Heat vents to protect electronics
Modular construction allows for individual component replacement
Component access panel for easy repairs
Power Source Fuel Source
110 Volt AC GFCI outlet 100% Natural Hardwood Pellets(
((PQGRSD(/$T(7$T(1#O+'K%U$'D(;;=7
Questions?
Call our customer service at 1-706-922-0890
10am-8pm EST. Mon-Thurs;
10am-7pm EST Fri;
9am-3pm EST Sat.

Initial Setup Procedure
For your first lighting, follow this Initial Setup Procedure.
Before starting your REC TEC BULL, inspect the burn area inside the grilling area. It is a recom-
mended practice to go through the following procedure at initial start up.
1. Open the main lid and remove the stainless steel cooking grate, drip pan, and flame deflec-
tor. Make sure all packing material has been removed.
2. Open the pellet hopper lid found on the back side of your grill and check for any foreign
objects.
3. Plug your REC TEC BULL into the nearest 110 Volt AC GFCI outlet. (Note: If your home
does not have a GFCI outlet, you should have one installed by an electrician.)
4. Put no more than 1/2 cup of pellets directly into the fire pot to provide fuel to burn while
auger tube self-primes.
5. Pour pellets into your grill’s pellet hopper.
6. Wash cooking grate with mild soap and water.
7. Reinstall the stainless steel flame deflector, drip pan, cooking grate, and close lid.
Tip: If you want to line your drip pan with foil for ease of cleanup, we recommend you do this
beforeyourinitialburnin.Whenliningdrippan,keepfoilinsidedrippanedgesanddonot
wraparoundasthiscanrestrictairflow.
8. Turn on your REC TEC BULL by pressing the power button at the left of the panel. Set
temperature to 400ºF by turning temperature control knob.
9. Within a few minutes you will see smoke, and your grill will light.
10. Once grill achieves 400ºF, allow it to run for 1 hour, this will provide a final cure and remove
any residue that may have accumulated during manufacturing and shipping.
After this initial burn, your grill is ready for cooking.
Temperature Probes
Plug your temperature probes into the grill’s controller probe ports A and B.
Feed probes through the probe port hole on the left side of grill cooking chamber.
Insert probes into thickest portion of meat for most accurate reading.
See page 20 for USDA saftey guidelines.
Unplugging probes and cleaning with damp cloth will prolong the life and accuracy of your probes.
Reinstalling rubber protectors over connection ports on controller after each cook will prolong the life
and quality of your controller.
DO NOT FULLY SUBMERGE PROBES IN WATER OR WASH IN DISHWASHER!
((PQGRSD(/$T(7$T(1#O+'K%U$'D(;;=8
Call our customer service at 1-706-922-0890
10am-8pm EST. Mon-Thurs;
10am-7pm EST Fri;
9am-3pm EST Sat.

Operating your REC TEC BULL
Power Button:
Press power button to turn grill on and adjust temperature knob to desired temperature.
• Turning the grill ON activates the automatic startup mode and illuminates the digital readout.
• If your grill fails to light itself within 30 minutes of startup, the Smart Grill Technology™ proces-
sor will turn the grill off and display ER-2 on the screen. See page 16 for ER Codes
•Pressing the power button again activates the shut down mode of your grill. If grill’s actual tem-
perature is below 160ºF, pressing the power button will simply turn the grill off.
• When the power button is used to shut down your grill, the Smart Grill Technology™ processor
will stop adding pellets to the fire pot and the fan will continue running to completely burn the
pellets remaining in the fire pot. During this cooling process, the display screen will display FAN.
WIFI - Download app from Apple App Store for Apple devices or Google Play for Android de-
vices, and follow the directions on app.
Temperature Control Knob: Turn knob to select computer maintained temperature in 5º incre-
ments.( Range: 200ºF - 500ºF )
Additional Temperature settings: LO and FUL
LO: LO will display as actual temperature when knob is turned counterclockwise beyond 200ºF and
Xtreme Smoke will be activated. The grill will feed pellets to the fire at the minimum feed rate (low-
est rate possible to maintain a reliable fire). This will produce the most smoke and achieve the lowest
temperature possible, given environmental conditions / type of pellets used.
FUL: FUL will display as actual temperature when knob is turned clockwise beyond 500ºF. Grill will
feed pellets to the fire at the 100% of auger capacity. This will produce the highest temperature pos-
sible, given environmental conditions / type of pellets used.
Settings Button - Press and hold the setting button to access the adjustable parameters menu.
Short presses of the settings button will scroll through the adjustable parameters. Pressing and hold-
ing the settings button will exit the adjustable parameters menu.
((PQGRSD(/$T(7$T(1#O+'K%U$'D(;;=9
Call our customer service at 1-706-922-0890
10am-8pm EST. Mon-Thurs;
10am-7pm EST Fri;
9am-3pm EST Sat.
Probe A
Probe B
REC TEC GRILLS
SMART GRILL TECHNOLOGY™
WWW.RECTECGRILLS.COM
Temperature
Control Knob
Wi-Pellet Connection Indicator
Wi-Pellet Sync Button
(see app)
Power Button
Settings Button
Display Screen

Test Mode - With grill OFF, press and hold the settings button to enter the Adjustable Parameters
menu. Enter Test Mode from either of the two screens AUG or OFS by pressing the power button.
Each additional press of the power button will advance you through the 8 Test Mode screens. The
last screen is the bYE screen. While on the bYE screen, press the Settings button to return to the
adjustable parameters screen then press and hold the Settings button and your grill’s controller will
return to the OFF state.
Adjustable Parameter 1: Min Feed Rate - Min Feed Rate is the minimum rate that the auger is
allowed to feed fuel to the fire pot, regardless of Set Point. Decreasing the value will allow the grill
to achieve lower temperatures but will increase the risk of flameouts. Increasing the value will pre-
vent losing fire but will limit your ability to maintain low temperatures on hot, sunny days.
Adjustable parameter 1 controller will display AUG. Additionally, the current auger minimum feed
rate will be displayed as a number. Turning the temperature knob clockwise will increase and turning
counter-clockwise decrease the value within the range of 30 - 250. (Factory preset: 65)
Adjustable Parameter 2: Temperature Offset - Your grill has been precisely calibrated at our facil-
ity, but the Temperature Offset allows you to customize how your controller will operate. Should
you choose to rely on a secondary temperature probe, you can use the following process to recali-
brate your Smart Grill Technology Controller.
Adjustable parameter 2 will display OFS. Additionally, the current temperature offset percentage
value will be displayed. Turning the temperature knob clockwise will increase and turning counter-
clockwise decrease the value within the range of -25.0 to 25.0. (Factory preset: 0)
VEr XXX - displays current software version.
Screen 5-1 is test mode for your auger motor. You should be able to look in your grill’s fire pot and
see the end of the auger turning very slowly.
Screen 5-2 is test mode for your grill’s ignition system. You should be able to look into grill’s fire
pot and see your ignitor begin to glow within a few minutes. DO NOT TOUCH THE IGNITOR.
Screen 5-3 is test mode for your grill’s blower fan. You should be able to hear the fan blowing.
Screen 5-4 is test mode for your grill’s control knob. You can turn the knob to see the 000 value
increase and decrease as you turn the knob.
Screen 5-5 is test mode for your grill’s temperature sensor and Probe A and Probe B. You can see
the temperature values for each displayed on the screen. (A value of - - - means the probe is not
plugged in or the grill’s sensor is not connected.)
Screen 5-6 is a internal quality control screen that has no function for the user.
Screen bYE is the final screen of the test mode. Pressing the power button again will return you to
Screen 5-1. Pressing the settings button will return you to the Settings Menu, at which time you can
hold the Settings Button to exit Settings Menu and get you back to a blank screen.
((PQGRSD(/$T(7$T(1#O+'K%U$'D(;;=10
1
AUG
65
2
IGN
0
5-1
AUG
5-2
IGN
5-4
NOb
000
5-5
Actual
Probe B
85ºF
--- ---
Probe A
Adjustable Parameter 1 Adjustable Parameter 2 Screen 5-1 Screen 5-2
5-3
FAN
Screen 5-3
VEr
###
VEr Screen
Screen 5-4
5-6
UF1
Screen 5-6Screen 5-5
BYE
Screen BYE

7UV'D(7%UT\'D(*#O(7$MV'(
Preheating(
It is important to allow your grill to preheat and achieve your desired cooking temperature before
cooking. This allows the entire grill to heat up and quickly return to your desired temperature once
your food is introduced. If you do not allow the grill to preheat, you will find that it takes a longer
period of time to bring both the grill and the food to your desired cooking temperature.(
Pellet Information(
REC TEC GRILLS Ultimate Blend premium hardwood pellets contain approximately 8,200 BTU’s
of heat per pound and have less than 1% ash residue. Pellets should be stored in a dry area, as wet
pellets will swell and turn back into sawdust. For best results, always use premium hardwood
pellets in your grill. The use of grades other than premium hardwood pellets may result in tem-
perature variations, uneven cooking, and poor results. Remember pellets do not contain preserva-
tives and will deteriorate over time.
Caution: Some wood pellets produced for heating fuel have a high content of softwood
which can include pitch, and should not be used for cooking. Always check with the pellet
manufacturer to ensure that you are cooking with a premium 100% hardwood pellet.
Lid Position!
Always cook with the lid closed. An open lid allows heat to escape, sends false temperature informa-
tion to your Smart Grill Technology™ processor, hinders the REC TEC’s natural convection air
flow, and lengthens cooking time. Cooking with the lid closed keeps the temperature even and cooks
food faster. A closed lid also helps to enhance the flavor profile of your food by infusing smoke
from the pellet flavor you selected into your food.
Tips and Tricks
Clean your grill regularly to maintain beauty and proper function. It is advised to clean before any long
cook. (See page 13 for cleaning instruction)
Always use grill on a level surface.
Check and clean fire pot regularly; this will ensure proper ignition and heat output.
Not all pellets are created equal, always use dry and fresh pellets.
Always store pellets in a dry area.
Get to know your grill, keep good cooking notes. This will help with consistency.
Practice makes perfect.
Always allow your meat to rest before serving.
((PQGRSD(/$T(7$T(1#O+'K%U$'D(;;=11
Questions?
Call our customer service at 1-706-922-0890
10am-8pm EST. Mon-Thurs;
10am-7pm EST Fri;
9am-3pm EST Sat.

Always keep your cooking area clean.
Avoid lifting the lid more than necessary.
Wind can cool your grill temperature.
Always preheat grill to desired temperature before use.
Wipe off stainless steel surfaces before preheating; dirt and food stains can cook into surface.
Always check pellet hopper for debris and remove excess pellet dust as needed. (A shop-vac is the pre-
ferred method)
Leave at least one inch of clearance between food for even cooks. (Crowded foods will take longer to
cook)
Foods cooked on pans or in containers will require more time than foods cooked directly on grate. This
also limits the amount of wood smoked flavor.
Use the REC TEC GRILLS Bullpen Instant Read Thermometer to determine meat-doneness, never rely
on time.
Know your food’s internal temp!
Use long handled tongs and spatulas for turning meats, do not use plastic utensils.
Injecting, mopping, and spritzing are great ways to keep meat from drying out.
When going low and slow, plan for your meats stall, larger pieces of meat tend to take longer from
160-180 degrees. Be patient.
Never unplug your grill to turn it off; for proper shutdown see “Power Button” on page 9.
If grill is not used for six weeks or more, it is advised to remove all pellets from hopper.
When not in use, unplug and cover with REC TEC GRILLS Premium Grill Cover.
Temps!
Remember, you can’t tell whether meat is safely cooked by looking at it. Any cooked, uncured red meats -
including pork - can be pink, even when the meat has reached a safe internal temperature.
After you remove the meat from your grill, allow it to rest for a specified amount of time. During the rest
time, its temperature remains constant or continues to rise, which destroys harmful bacteria.
• Hot foods should be held warmer than 140º F.
• Cold foods should be held below 40º F.
• Perishable food should not be left out for more than 2 hours at room temperature - 1 hour when the
temperature is above 90º F.
• Always follow food safety guidelines provided by the USDA.
See page 20 for USDA safety guidelines.
((PQGRSD(/$T(7$T(1#O+'K%U$'D(;;=12
Questions?
Call our customer service at 1-706-922-0890
10am-8pm EST. Mon-Thurs;
10am-7pm EST Fri;
9am-3pm EST Sat.

)*U#K$#*#T$(*#O(=,$*#U#X(
A few simple steps will ensure that your REC TEC BULL will give you many years of service with
minimal effort.
• Clean your fire pot every 3-5 cooks to ensure proper airflow.
• Use a grill brush to clean your cooking grate after every cook to provide years of trouble free use
from them. NOTE: Make sure that no bristles have shed and remain on cooking grate.
• Cover your drip tray with aluminum foil and change it frequently. This is the simplest way to main-
tain your drip pan. If you have completed a low and slow cook that has caused the accumu-
lation of grease on your foil, you must change the foil before cooking at high tempera-
tures. Failure to do so will most certainly cause a grease fire in your grill.
• Clean the ash from the interior of your grill, fire pot, and hopper every 5-6 bags of pellets. It helps
to leave a thin layer of ash on the bottom of the barrel for insulation. (A shop vac is the ideal tool
for this job.) (WARNING–always wait at least 12 hours after cooking to remove ash from
your grill.)
• Use a mild soap and water to clean the exterior of your grill. AVOID USING CAUSTIC
CLEANERS.
• If left in exposed area, keep your grill covered and unplugged when not in use.
• Never let your pellets get wet; they will swell and jam your auger.
• If grill will not be in use for 6 weeks or more, cleaning out pellets from your hopper is recom-
mended.
• For a superior cleaning and shine, clean your grill’s outside surfaces (when completely cooled) and
then use automotive wax, per the directions.
7%*#'VL%K(](9KL%*X$(
Ensure that the unit is cool. Remove the grates, drip pan and flame deflector. Make sure no unburnt
fuel remains in the fire pot / air chamber.
STORE COVERED IN A DRY, SAFE PLACE
((PQGRSD(/$T(7$T(1#O+'K%U$'D(;;=13
Never store the grill in a small space or place in a vehicle
unless completely cool and fire is verified as extinguished.
Never move the grill while it is still hot.
Never move the grill without assistance.
Call our customer service at 1-706-922-0890
10am-8pm EST. Mon-Thurs;
10am-7pm EST Fri;
9am-3pm EST Sat.

7%L+[,$'^LLKU#X
We pride ourselves on our grills, grilling accessories, and on our commitment to serve you. Please
consult the chart below to help resolve issues you may encounter. Also, please don’t hesitate to con-
tact us with any issues.
Issue
Potential Cause
Solution(s)
Power
Make sure power is plugged into
working GFCI outlet, and outlet is
not tripped.
Unplug grill and check for blown
fuse; refer to controller schematic
on page 18.
Fuse
Replace fuse manually and try
again. Call Customer Service or
visit RECTECGRILLS.com if
problem persists.
Grill will not light / turn on
Ignitor
Remove cooking grate, flame
deflector, and drip pan; visually
inspect fire pot and if after 10
minutes:
•your pellets are feeding
• your blower fan is running and
your grill is still not lighting;
Then your ignitor rod may need to
be replaced. Call Customer Service.
Auger motor
Remove cooking grate, flame
deflector, and drip pan; visually
inspect auger turning in the fire
pot.
(Note: the auger turns very slowly).
If auger is not turning, you may
have an obstruction in your
hopper. Clean out pellets and try
again. If problem persists, your
auger motor may need to be
replaced. Call Customer Service.
Control board
UNPLUG GRILL.
Check to make sure the fuse is
intact and has not blown.
Check for any loose wire
connections. If any wires have
become detached, refer to
controller schematic on page 18.
((PQGRSD(/$T(7$T(1#O+'K%U$'D(;;=14
Call our customer service at 1-706-922-0890
10am-8pm EST. Mon-Thurs;
10am-7pm EST Fri;
9am-3pm EST Sat.

Pellet quality / age
Inspect pellets; ensure that pellets
are dry and have not broken down
into sawdust.
If problem persists, remove pellets
from the hopper and clean ash
from your firepot, replace with
fresh dry pellets.
Excess ash in fire pot
Check the burn pot for ash and
clean as necessary (Its advised to
clean fire pot every 3-5 uses).
Grill is smoking excessively/
smoke is discolored
Blower fan
Unplug grill. Remove access panel;
visually inspect blower fan for any
obstructions, loose connections,
bugs, etc.
Remove obstructions. Power grill
on. If problem persists, unplug
grill. Spin fan manually for several
revolutions. Plug grill back in. If
problem still persists, your blower
fan may need to be replaced. Call
customer service.
Grill will not heat up to or
maintain proper temp
Pellet quality / age
Inspect pellets; ensure that pellets
are dry and have not broken down
into sawdust.
If problem persists, remove pellets
from the hopper and clean ash
from your firepot, replace with
clean dry pellets.
Insufficient airflow
Check fire pot for any
obstructions/ash accumulation.
Excess ash in fire pot
Check fire pot for ash and clear as
necessary.
Fire continues to go out
Pellet quality / age
Inspect pellets; ensure that pellets
are dry and have not broken down
into sawdust.
If problem persists, remove pellets
from the hopper and clean ash
from your firepot, replace with
clean dry pellets.
Hopper obstruction
Unplug grill. Remove pellets from
hopper. Clean hopper of any
obstructions or build up.
Issue
Potential Cause
Solution(s)
(( PQGRSD(/$T(7$T(1#O+'K%U$'D(;;=15
Questions?
Call our customer service at 1-706-922-0890
10am-8pm EST. Mon-Thurs;
10am-7pm EST Fri;
9am-3pm EST Sat.

Hopper obstruction
Unplug grill. Remove pellets from
hopper. Clean hopper of any
obstructions or build up.
Pellets are not being delivered
to fire pot
Auger failure
Remove cooking grate and flame
deflector plate; visually inspect
auger turning in the fire pot.
(Note: the auger turns very slowly)
If auger is not turning, you may
have an obstruction in your
hopper. Clean out pellets and try
again. If problem persists, your
auger motor may need to be
replaced. Call Customer Service.
Flare ups
Excessively greasy food while
temperature setting is too high
Cook at 350 degrees or below
when cooking excessively fatty
foods.
Excessive grease/build up
Excessively greasy food
Cook at 350 degrees or below
when cooking excessively fatty
foods.
Excess ash in fire pot
Clean grill interior.
Smoke coming from hopper
Pellet level very low in hopper
Add more pellets to hopper.
Excess pellet dust lining auger
tube causing burn back
Remove pellets from hopper and
vacuum out hopper, auger tube,
and fire pot.
ER-1
Power Failure
Make sure power is plugged into
working GFCI outlet, and outlet is
not tripped.
Turn grill off, then back on again
to reset controller and clear code.
ER-2
Grill hasn’t ignited in over 30
minutes
Refer to “Grill will not light / turn
on” in Troubleshooting (Page #14)
ER-3
RTD unpugged/ grill over
heated
Check RTD connection and let
grill cool. Turn grill off, then back
on again to reset controller and
clear code.
Issue
Potential Cause
Solution(s)
(( PQGRSD(/$T(7$T(1#O+'K%U$'D(;;=16
Questions?
Call our customer service at 1-706-922-0890
10am-8pm EST. Mon-Thurs;
10am-7pm EST Fri;
9am-3pm EST Sat.
This manual suits for next models
2
Table of contents
Other rec tec grill Grill manuals
Popular Grill manuals by other brands

Thulos
Thulos TH-GP205 manual

EXPERT GRILL
EXPERT GRILL XG10-108-002-01 owner's manual

BroilMaster Premium Grills
BroilMaster Premium Grills BHAX2-1 owner's manual

Jenn-Air
Jenn-Air 720-0720 Installation instructions and user guide

Bestron
Bestron FUNCOOKING AGR102 instruction manual

DeLonghi
DeLonghi BG410 manual