RecPro RP-CT-122B-BL User manual

INSTRUCTION MANUAL
2 Burner Gas Cooktop
Models: RP-CT-122B-BL
RP-CT-122B-SS

Thank you for your purchase of the RecPro 2 Burner Gas Cooktop!
Before the use of your new cooktop, please review this user manual
carefully. This manual contains useful information pertaining to
safety, maintenance/upkeep, installation, functions, features, and
warranty.
Please do not discard this manual as you may need to refer to it in
the future.

WARNING: This symbol indicates a safety alert, it
will alert you to possible hazards that can cause serious
bodily harm, property damage, or even death. The safety
symbol will precede important messages about safety.
WARNING: If one does not follow the instructions in this
guide exactly, an explosion or re may occur resulting in
personal injury, property damage, or even death.
Do not use or store ammable substances or liquids, such
as gasoline, near this product or any appliance.
IN THE EVENT THAT A GAS SMELL IS PRESENT:
• Do NOT attempt to ignite or light ANY appliance or
incendiary device
• Do NOT touch ANY electrical switch
• Do NOT use any phone or electrical device in your
recreational vehicle
• Evacuate the recreational vehicle of all occupants and pets
• Shut off the main gas supply or gas tanks supply valve
• From a location away from the gas smell and recreational
vehicle, call your gas supplier immediately for further
instructions.
• If your gas supplier cannot be reached, proceed to call the
local re department or 9-1-1 immediately.
• Have the gas cooktop and system checked and have the
leakage source solved by a qualied installer, manufacturer,
the gas supplier, or a service agency.
!
WARNING

CAUTION:
Hazards or unsafe practices can result in personal injury or harm.
Read the following instructions carefully before attempting the
following application to prevent the potential risk of electric
shock, re or damage to the cooktop, or personal injury. Please
use appliance only for its intended purpose as described by this
manual.
If you are using an external electrical source, please ensure
that the appliance is electrically grounded in accordance to state or
other codes such as the National Electric Code
(NFPA70/ANS1). Do NOT attempt to repair, adjust, service, or
replace any parts on your appliance, unless specically
recommended by this manual. Other services should be referred to
a qualied service technician.
The warning and important safety instructions appearing in this
guide are not meant to cover every condition and possible situation
that may occur. Caution, common sense, and care must be
practiced when maintaining, operating, or installing your appliance.
Instructions for safety
• Before using this appliance, one should remove all tape and
packaging. Properly dispose of the carton and plastic bag after
unpacking the appliance. Never allow children to play with the
packaging material.
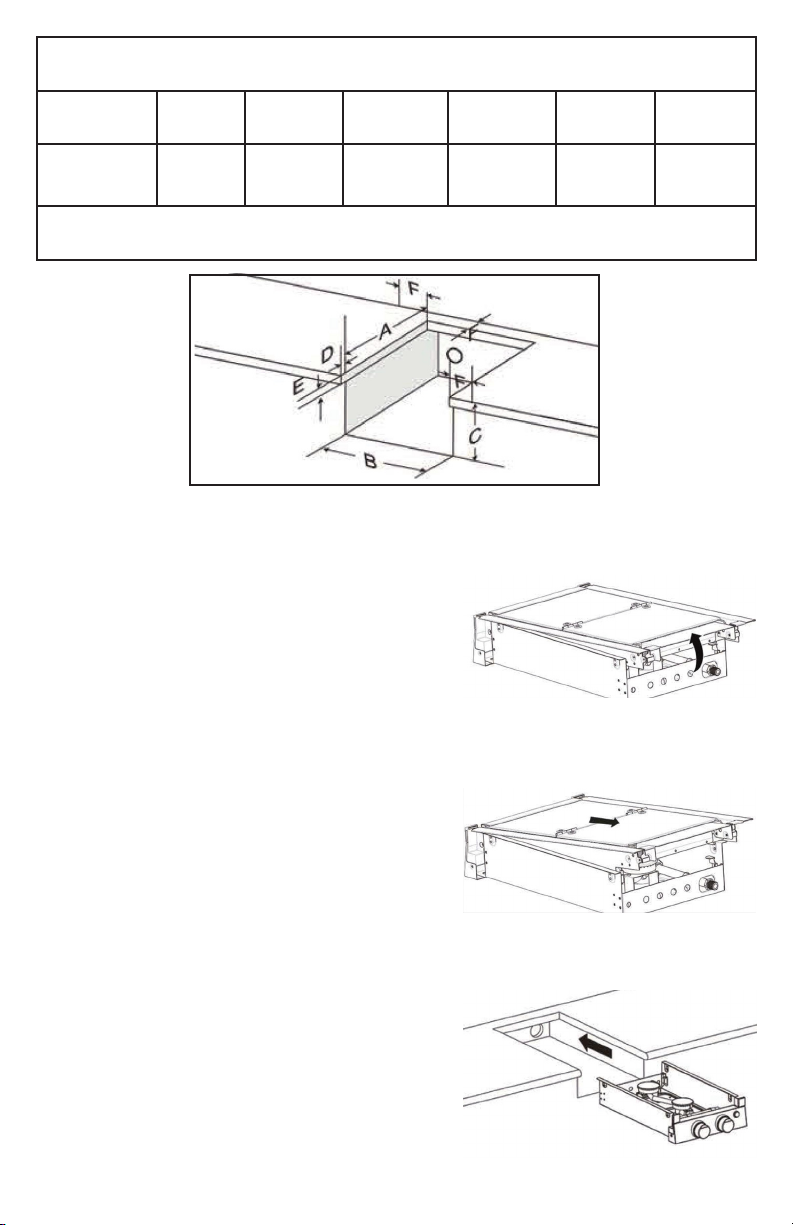
• This appliance should be installed properly by a qualied
technician, in accordance with local and state regulations and law.
• Never modify or alter the appliance by removing screws, anti-tip
brackets, leveling legs, panels or any other part of the product.
• Do not store objects that could be of interest for children in
the cabinets above the appliance. A child could attempt to climb
onto the appliance to reach these items and could be harmed or
seriously injured.

• Do NOT use this cooktop as a space heater to warm a room, as
this may cause carbon monoxide poisoning and overheating of
the cooktop.
• Never cover the rack completely with materials like aluminum foil
or any other ammable objects. Doing this can cause an air ow
block; carbon monoxide poisoning, re, or explosions may occur as
a result.
• The cooktop must be separated from the gas supply piping
system by closing its manual shutoff valve during any pressure
testing equal to or less than 1/2psi(3.SKPa).
• During and after use, do NOT touch or allow ammable materials,
objects, or clothing to touch or come into contact with these areas
until they have cooled down. Burners may be hot even though
ames are not visible, and can inict burns or injuries.
• DO NOT wear loose tting or clothing that hangs while operating
this cooktop, as these items could catch re and cause serious
injury or property damage.
• When heating grease, oil, or fat, watch it closely. Oils, fats, or
grease can catch re if they become too hot. In the event of a
grease or oil re, smother the re with the pan lid, use baking soda,
or a dry chemical, or foam type re extinguishers.
DO NOT USE WATER OR FLOUR!
!
WARNING

Gas leaks may occur in the system and result in dangerous
conditions. In some situations, a gas leak may not be detectable
by smell. Gas suppliers recommend you purchase and install a
UL approved gas detector. These detectors should be installed in
accordance to the manufacturer instructions.
• Do NOT use wet or damp potholders, only use dry potholders.
Do NOT let the potholders touch hot or heating burners.
• Do NOT use a towel or other bulky cloth in place of a potholder.
• Do NOT heat unopened food containers as the pressure of heat
or steam could buildup. This may cause the container to rupture or
explode and could cause harm or serious injury.
CAUTION: Never attempt to utilize the cooktop during a power
failure. In the event the power fails during use, always shut off
the cooktop, as your appliance may turn on unsupervised as the
power restores.

Instructions for cooktop usage:
• Using the correct ame size: Flame should be adjusted so that it
does not exceed beyond the edge of your utensils such as a pot
or pan. Undersized utensils may expose a portion of the burner
and ame, which may result in the combustion of fabric or clothing
if they make contact with the ame. Using correctly sized pots or
pans will improve efciency and safety.
• Do not use stove top grills on a sealed gas burner. Doing so
may cause incomplete combustion, which may result in carbon
monoxide poisoning.
• Please memorize the knobs and their corresponding burners
which they control. Always place a pan on the burner before starting
a ame. And always turn off the burner before removing the pan.
• Always turn the knob all the way to the “Light” mark when igniting
the top burners. Always then check to see if ames are visible,
ensuring that the burner is lit.
• Do NOT face pot or pan handles outward. They should always be
facing inward but not directly over another ame. This practice can
reduce the risk of serious burns, spillage, or even the combustion
of ammable items or materials; in the event there is accidental
contact with the handle.
• Do NOT leave the top burners on a high heat setting unattended.
Failure to supervise can result in a boil over which can cause
smoke or a grease re.
• Protective Sheets: Never use aluminum foil to cover the burner
pans. Improper use or installation of these sheets and liners can
increase the risk of electrical shock or re.
• NEVER use a searing grill on the cooktop: Searing grills are not
designed for use on this cooktop. The utilization of a searing grill
can cause a re.

• NEVER USE A DECORATIVE BURNER COVER
In the event that a burner is turned on accidentally, the covers could
become too hot, could possibly melt, or combust. This can also
result in damage to the cooktop from overheating and can cause
ignition and combustion problems.
• Cooking utensils that are glazed: Please only use certain types
of ceramic, glass, or glazed utensils that are designed for use on a
cooktop. Avoid the use of these utensils when possible.
Cleaning Instructions
You should clean your cooktop regularly, and keep all parts grease
free to prevent re. Clean all grease lters and exhaust fan vents.
Never allow grease to build up on lter or hood as grease buildup
could ignite. Turn on hood fan when cooking under hood.
Installing your appliance
The installation of your cooktop MUST conform with state or local
laws and codes. In the absence of codes and laws, please use the
standard for RV’s (NFPA 1192/ANSl)
When installing this cooktop, you must adhere to the written
instructions in this guide. No representative, agent, or employee
of the manufacturer RECPRO or any other person(s) has
authorization to do any kind of modications, provisions/edits, or
changes.
!
WARNING

CABINET SPECIFICATIONS:
To ensure proper operation of your cooktop, suitable cabinets must
be used.
Cabinet specication information:
• There must be a ventilation hole in the cabinet for air circulation. A
gap at the bottom of the cooktop, with a minimum of 3/8”, will also
provide proper air circulation.
• The minimum required vertical distance from the cooking surface
is 30”. Non-combustible materials and construction can reduce
the distance required. The minimum distance from the top of the
cooking grate to the bottom of non-combustible construction
is 19½″.
• If cabinets are installed above the cooktop, the maximum depth
is 13″. If the hood is below the cabinet, there is no limitation for the
cabinet depth.
• The minimum distance between the vehicle/trailer oor and
bottom of the cut out is 4″.
• The minimum horizontal distance from the rear wall will be no
more than 9″ adjacent to the vertical combustible wall.
• The minimum horizontal distance from the side wall will be no
more than 7¼″ adjacent to the vertical combustible wall.
- All measurements are distances from the center of the
burner, out.

CABINET/COUNTER CUTOUT
MODEL A B C D E F
RP-CT
122B
19⅝″ 10⅝″ 4⅛″ ⅞" 1½″ 2″
Above is the minimum cutout size
Cooktop Installation
Once the cabinet has been prepared
according to the dimensions provided
and the gas line is in place:
1. Remove packing material, tape,
and any temporary labels from your
cooktop.
2. Push back the top glass cover
assembly a little and liftup to remove it
from the cooktop. (Fig. 1/2)
3. Slide the cooktop into the cabinet
opening. Verify the cooktop is level
from side to side and front to rear.
(Fig. 3)
FIG. 1
FIG. 2
FIG. 3

4. Connect a gas supply line with
a shut-off valve and 5/8-18UNF
connection to the cooktop through
the gas cavity on the upper-left rear
corner of the cabinet. Connect a 12V,
not 110V, power supply wire to the
appliance from the upper right-rear
corner of the cabinet. (Fig. 4)
5. Use four tapping screws on both left
and right to secure
the cooktop. (Fig. 5)
6. Check the pipe ttings for leaks
using a soapy solution.
NEVER TEST FOR LEAKS WITH
OPEN FLAMES!
7. Push to insert the top glass
assembly.(Fig. 6/7)
8. The Cooktop is completely installed
into the cabinet. (Fig. 8)
FIG. 4
FIG. 5
FIG. 6
FIG. 7 FIG. 8
Electrical Connection
Model with LED light: Connect the light wires to a 12V DC circuit
with a fuse protected and a max rating of no more than 5 amps.

Igniting Gas Cooktop
Electronically:
1. Ensure all control knobs are in
their OFF positions.
2. Ensure the main gas tank valve
is OPEN.
3. Turn the desired control knob counterclockwise to HI setting, DO
NOT LIGHT more than one burner simultaneously.
4. Immediately after the control knob is set, press the knob until the
burner lights. Fig.9
Turning the gas cooktop ame OFF:
To turn the burner ame off, push and turn the control knob
clockwise until the knob is in the OFF position. If you travel and
need to refuel your gas tank, ALWAYS turn the tank valve off.
Useful information on proper ame for burner:
Gas burners will tend to burn blue, if the ratio of fuel to air is
adjusted properly.
Burner ames that burn yellow on the tip of the ame (over 1
inch) is a sign that the burner is not receiving enough air for
the combustion of gas. If the tip of the ame, is more yellow in
appearance, this could indicate that the burners air shutter
(or Venturi) needs to be adjusted, so that they can
produce more air.
Please be aware of any
carbon or soot deposits
that may build up on the
burner as this too will
affect the burners ability
to cook evenly and
properly.
FIG. 9

ALWAYS PERFORM A GAS LEAK CHECK BEFORE USING GAS
COOKTOP!
Before operating the gas cooktop, always perform an analysis or
check for a gas leak. DO NOT use gas cooktop until the leak test is
preformed and conrmed there are no gas leak indications.
- If there is a gas leak detected, replace the defective part
recommended by the manufacturer or tighten the loose joint
properly.
BEFORE TESTING FOR GAS LEAK
1. Ensure gas cooktop controls are in their OFF positions.
2. Never test for leaks with any open ames present.
3. Do not smoke when testing for gas leaks.
4. Use a soapy solution to detect gas leaks. If there are
bubbles present, there is a gas leak.
RISK OF PRODUCT DAMAGE
• If the control knob is set to the LIGHT position, DO NOT COOK
as damage may occur to the ignition module and the burner
electrodes.
• DO NOT LET children or pets play near, at, or around gas
cooktop. ALWAYS check cooktop before lighting.
!
WARNING

• DO NOT USE pans that exceeds 1 inch larger than the burner
grate. If oversized cookware is used, this may cause extreme heat
build-up and may result in damage to the burner grate, burner, and/
or cooktop (maximum pan size= 10 inches).
• Leaving an empty or dry pans on a hot burner could result in
damage to the cooking utensil or damage and/or re. Remove all
pans/cooking utensils when not in use.
Cooktop Features
Type Propane gas burner
BTU/hr Front Burner: 6,500 BTU
Rear Burner: 6,500 BTU
Inlet Pressure 10" WC Min to 13.8" WC Max
Electric 12V <2 Amps
This appliance conforms to the directive: ANSI Z21.57-2010
Recreational Vehicle Cooking Gas Appliances, ANSI Z21.57a-2012
Addenda to Recreational Vehicle Cooking Gas Appliances,
CAN1-1.16-M79 (reafrmed 2016) Propane Cooking Appliance For
Recreational Vehicles.
1Glass Cover
2 Burner Grate
3 Burner Control Knob
4 Backlight Button
5Burner

Product Troubleshooting
PROBLEM/SYMPTOM POSSIBLE
CAUSE/SOLUTION
Problem / Symptom Possible Cause / Solution
Area surface burners will not
ignite OR area surface burners
do not ignite uniformly.
Surface control knob has
not fully turned to the LIGHT
position.
Check if your propane valve is
open. If closed, open it.
Check if your propane valve is
open. If closed, open it.
Burners are clogged. With
burner off, use a small wire,
toothbrush, or needle to clean
burner ports and slots.
Low propane level in tank. Rell
or replace tank.
There is moisture on the burner.
With burner off, dry burner
throughly. Debris may be
present in gas line.
Surface burner ame is yellow
instead of orange or blue.
Let the burner run for a few
minutes to see if the ame
changes to blue.
High humidity in air, sometimes
caused by running a humidier,
may cause ames to burn
yellow.

Sanitation & Upkeep
• Ensure all control knobs are in OFF position before cleaning.
Ensure the cook-top and all components relating to the gas
Cooktop are cooled off before touching or cleaning.
• When cleaning the cooktop, only use a cleaner specically
designed for cooktops. Ensure proper usage of the cleaner by
following the cooktop cleaners instructions thoroughly.
• If there is a spill on the cooktop, grate(s), burner caps, or any
other component of the gas cooktop, clean the spill right away
(make sure the cooktop is cooled off) as leaving any spill can result
in the discoloration or staining of your cooktop or stainless steel.
• Always use caution when cleaning, especially around the burners.
If caution is not used, you may catch the metal igniter electrode on
your cleaning item (such as your sponge or washcloth, etc.) which
can damage or break the metal igniter electrode. If the metal igniter
electrode is damaged, the igniter may not ignite.
• If you wish to clean or wash porcelain surfaces, you must allow
the areas to cool beforehand. Hot porcelain can crack and can also
burn esh.
• The best way to clean porcelain surfaces, stainless steel surfaces,
painted surfaces, burner grates, plastic items, or any other items
relating to the gas cooktop is to use a mild soapy water solution.
• DO NOT USE bleach.
DO NOT USE rust removers.
• DO NOT USE steel wool. Only use non abrasive pads such as the
soft side of a sponge or a soft washcloth.
• DO NOT USE any abrasive, gritty, or acid-type like cleaners.

• DO NOT BLOCK air vents
• DO NOT STORE ammable liquids or vapors (such as gasoline)
or any other combustible equipment or materials near, at, or around
the gas cooktop.
• DO NOT USE any metallic or wire brush to clean any components
relating to the cooktop. Some wire or metallic brushes lose their
bristles and these bristles could get stuck in the burner ports or
other small crevices and could result in an explosion or a re.
• DO NOT ALLOW food that contains acids such as: vinegar, citrus
juices (lemon, lime, grapefruit, etc), tomatoes, etc. to remain on any
painted, porcelain, cooktop, grates, or any other surface relating to
the gas cooktop. Some acids react to the paint and gloss that is
used. If an egg spill should occur, clean the egg when cooktop has
cooled down. Do not allow the egg to remain on surface.
Exploded-View Drawing
Grate

Product Warranty Information
Your RecPro appliance is covered by a one-year limited warranty. For
one year from your original date of purchase of the original purchaser,
RecPro will replace any parts of this appliance that prove to be defective
in materials or workmanship when such appliance is installed, used, and
maintained in accordance with the provided instructions.
Exclusions
This warranty does not cover the following:
1. Product that has been transferred from its original owner to another
party. Product has been removed outside of the USA or Canada
2. Rust on the interior or exterior of the unit.
3. Products that have been purchased secondhand.
4. Commercial use of product.
5. Service calls which do not involve malfunction or defects in materials
or workmanship, or for appliances not in ordinary household use or used
other than in accordance with the provided instructions.
6. Service calls to correct the installation of your appliance or to instruct
you how to use your appliance.
7. Expenses for making the appliance accessible for servicing, such as
removal of trim, cupboards, shelves, etc., which are not a part of the
appliance when it is shipped from the factory.
8. Service calls to repair knobs, buttons, handles, or other
cosmetic parts.
9. Surcharges including, but not limited to, any after hour, weekend, or
holiday service calls, tolls, ferry trip charges, mileage expense for service
calls to remote areas, including the state of Alaska.
10. Damage to the nish of appliance, RV, or home incurred during
installation, including but not limited to oors, cabinets, walls, etc.
11. Damage caused by services performed by unauthorized service
companies, use of parts other than genuine RecPro parts or parts
obtained from persons other than authorized service companies, or
external causes such as abuse, misuse, inadequate power supply,
accidents, res,or acts of God.

The customer’s sole or exclusive remedy under this limited warranty shall
be product or repair or replacement as provided herein. Claims based on
implied warranties, including warranties of merchantability or tness for
particular purpose, are limited to one year or the shortest period
allowed by law, but not less than one year. RecPro shall not be liable
for consequential or incidental damages such as property damage and
incidental expenses resulting from any breach of this written limited
warranty or any implied warranties. This written warranty gives you
specic legal rights. You may also have other rights that vary from state to
state.
Proof of purchase may be required for warranty purposes. If service,
of any kind, is performed please obtain and keep all original receipts.
Product features or specications as described or illustrated are subject
to change without notice.
For further information, please contact:
806 S. Division St.
Bristol, IN 46507
(574) 848-0405

This manual suits for next models
1
Table of contents
Other RecPro Cooktop manuals