Red Tec Grills BULL RT-700 User manual

©2019, Rec Tec Industries, LLCQuestions? Call or check out our FAQ!
Model # RT-700

©2019, Rec Tec Industries, LLCQuestions? Call or check out our FAQ! 1
REC TEC BULL
SIX (6) Year Non-transferable Limited Warranty 39
A Letter From Ray and Ron 2
Warnings 3
Important Safety Information 4
Carton Contents 5
Assembling Your REC TEC BULL 6
SPECS
31
Initial Setup Procedure
21
Temperature Probes
22
Operating your REC TEC BULL
23
Tips, Tricks, and Temps
26
Maintenance and Cleaning
29
Transport & Storage
30
Troubleshooting
32
Manual Start Up
36
Controller Schematic
37
Cooking Notes
38
Front Shelf Installation
18
Smokebox Installation
20

©2019, Rec Tec Industries, LLCQuestions? Call or check out our FAQ! 2
With proper care and maintenance, your grill will provide you years
of trouble free operation. Please review the following information
carefully for useful tips and information that will help you utilize
your grill’s extensive features and benets.
Your REC TEC BULL is by far and away the most bang for your
buck and comes fully loaded with a HotFlash Ceramic Ignition
System, Stainless Steel Body and state-of-the-art Wi-Pellet Wi
Technology. Your REC TEC’s revolutionary Smart Grill Technology™
automatically adjusts the rate at which REC TEC Premium Hardwood
Pellets are introduced into the re pot to maintain a consistent
temperature like no other grill you have ever used. The result is
the simplest and most convenient way for a backyard enthusiast to
Cook, Bake, Roast, Grill or Slow Smoke their favorite foods while
adding avor proles that can only come from a real wood re.
Just set your temperature and let your REC TEC take all the guess
work out of your next cookout.
We want you to join the vibrant and growing community of REC
TEC owners. Whether you want to contribute your own tips and
recipes, learn from others, or a bit of both, please jump right in.
You now have an incredible tool for cooking. Let’s see how you
use it!
Join our online community at:
Thank you for choosing REC TEC GRILLS!
Ray Carnes & Ron Cundy, Co-Founders, REC TEC Industries, LLC
Congratulations on the purchase of your new
REC TEC BULL Wood Pellet Grill!
Website: rectecgrills.com
Facebook: facebook.com/RECTECGrills
Twitter: twitter.com/rectecgrills
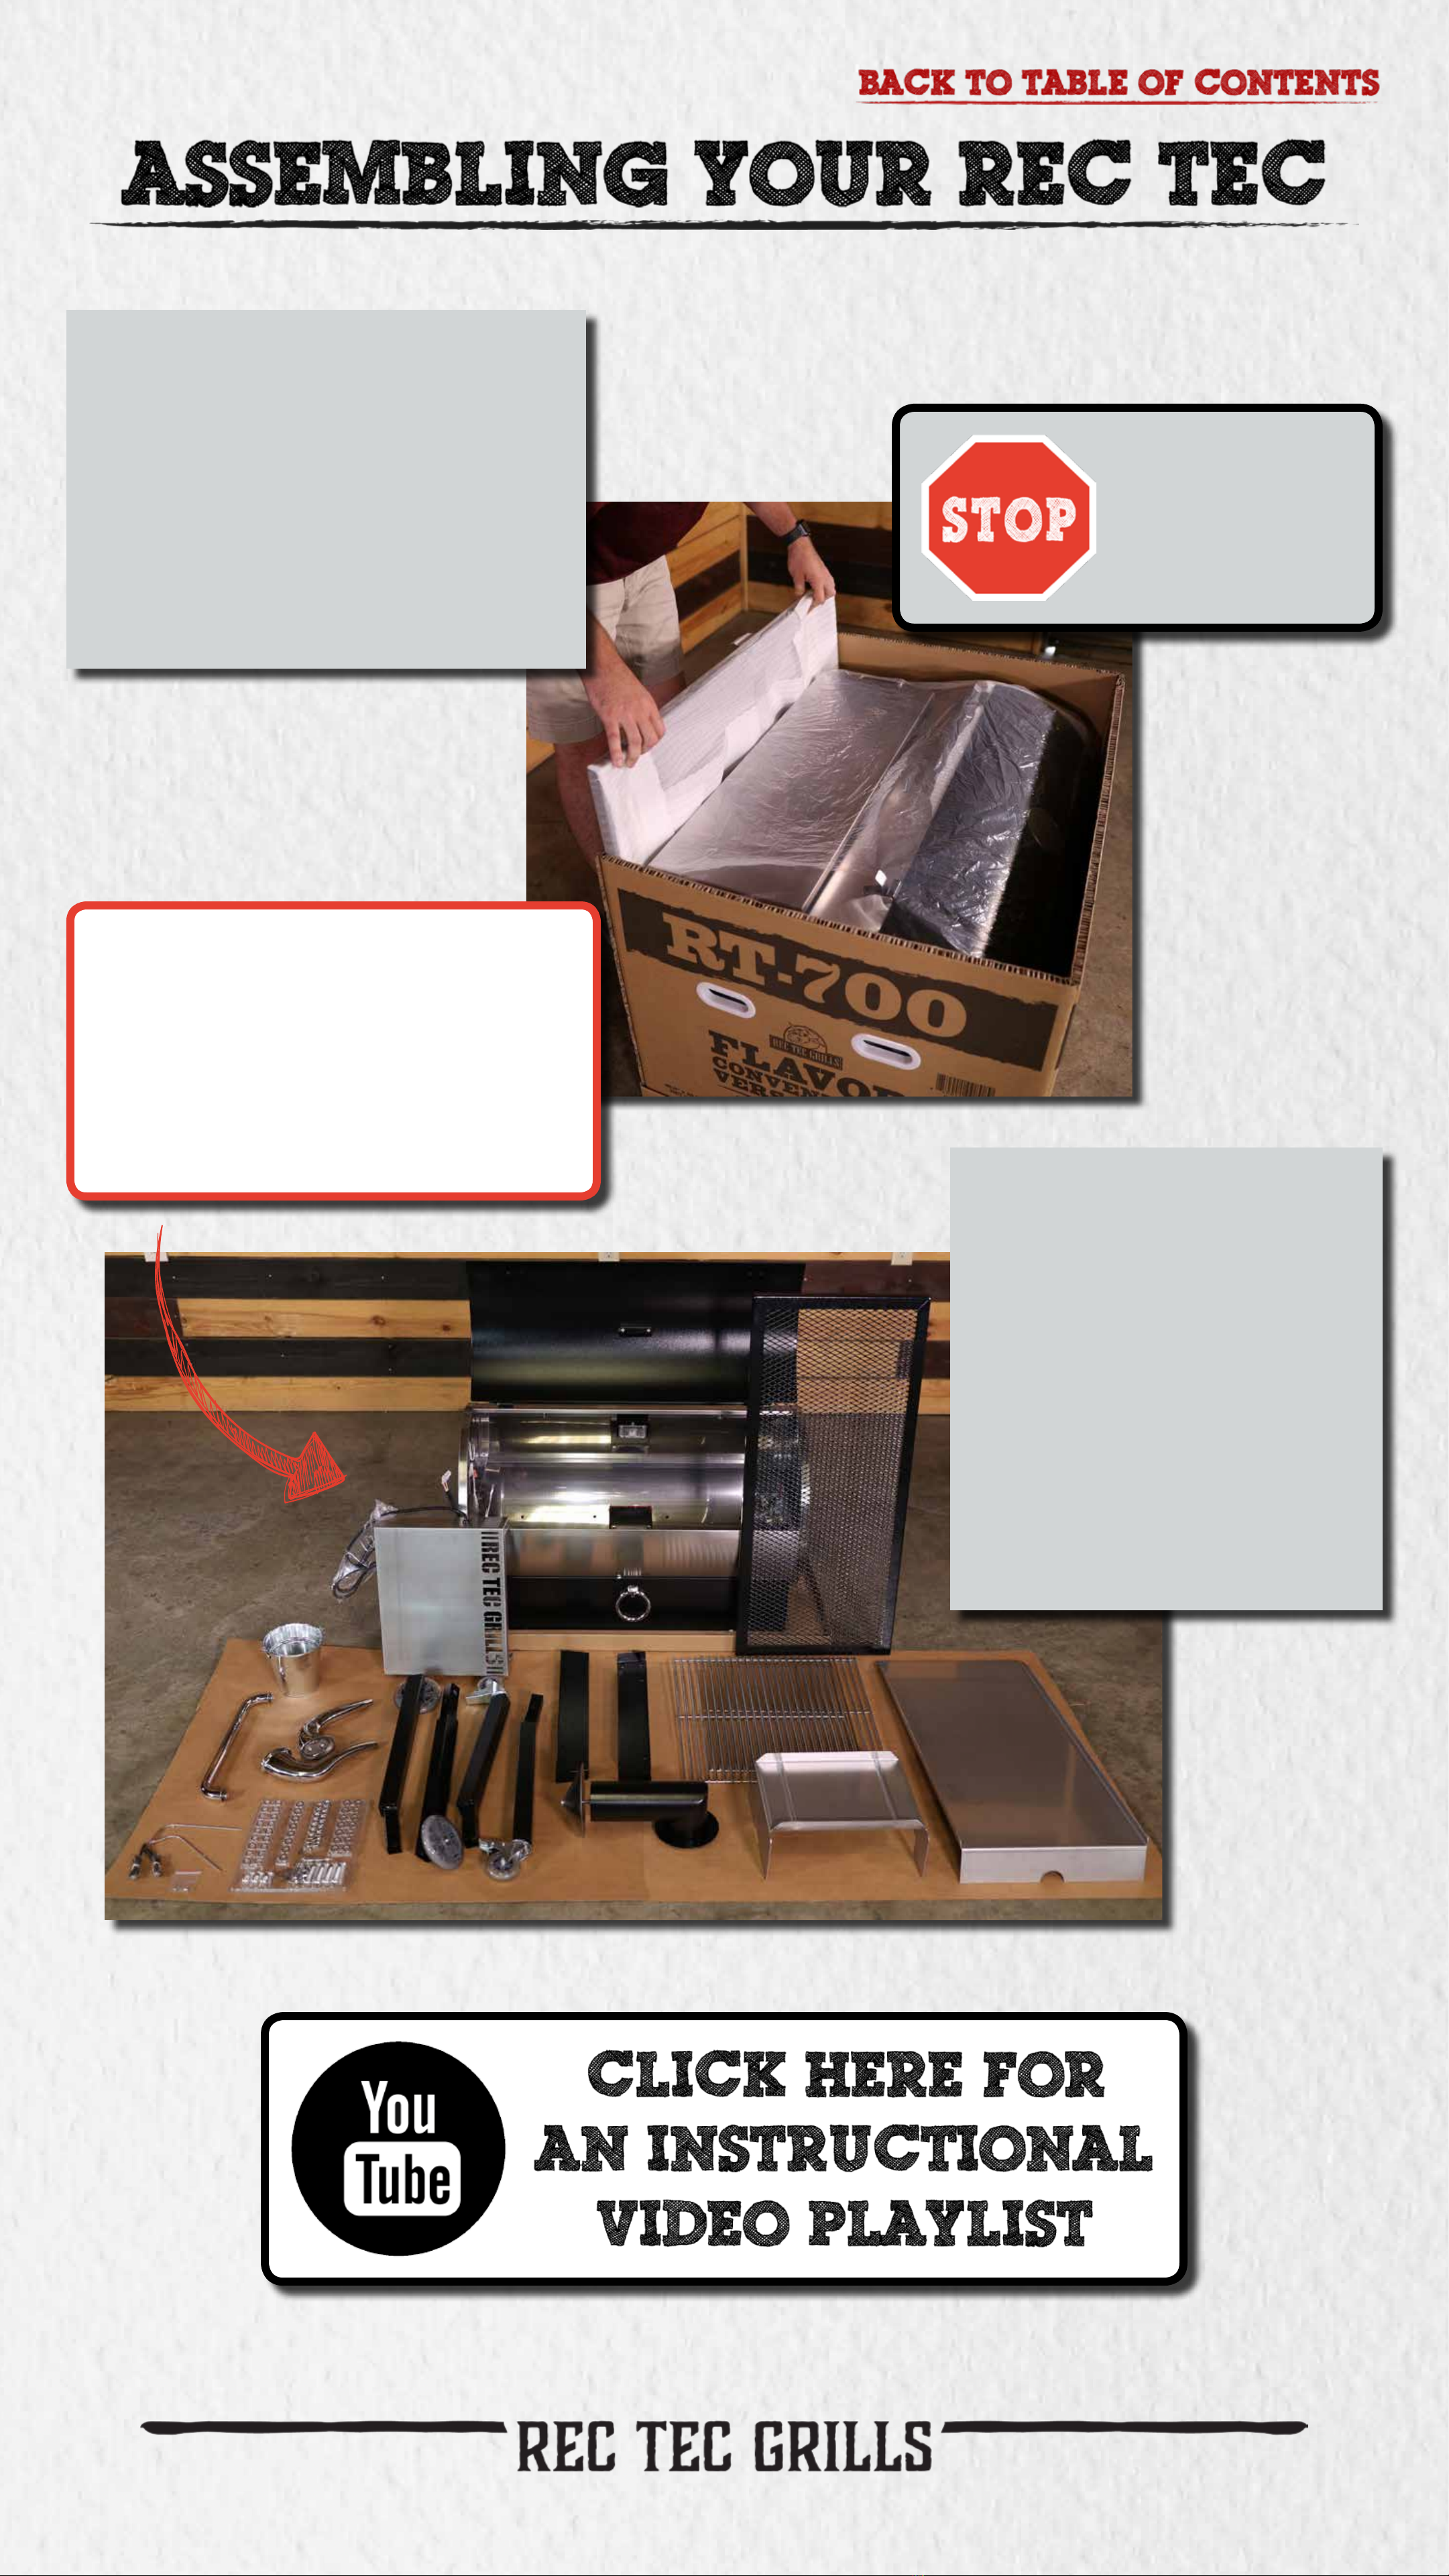
YouTube: youtube.com/rectecgrills
Instagram: instagram.com/rectecgrills

©2019, Rec Tec Industries, LLCQuestions? Call or check out our FAQ! 3
WARNING!
FOR OUTDOOR USE ONLY!
DO NOT STORE OR USE
COMBUSTIBLE MATERIALS IN OR
NEAR THIS APPLIANCE.
TO PREVENT INJURY, NEVER ATTEMPT
TO MOVE GRILL WHILE HOT, OR
WITHOUT ASSISTANCE.
NEVER STORE ANY GRILL IN A SMALL
SPACE OR PLACE IN A VEHICLE
UNLESS COMPLETELY COOL AND
FIRE IS VERIFIED AS EXTINGUISHED.
LEAVE A MINIMUM OF 60”
CIRCUMFERENCE BETWEEN
GRILL, DECKS, HOUSES OR ANY
COMBUSTIBLE MATERIALS.
USE ON LEVEL GROUND AWAY
FROM OVERHANGING ROOFS
OR EAVES.

©2019, Rec Tec Industries, LLCQuestions? Call or check out our FAQ! 4
Important Safety Information
Warning: Read all Safety Information Before Operating Grill
For outdoor use only. Do not use in any enclosed area.
Use on Level Surface, away from overhanging eaves.
Keep grill 60” or more from any combustible surface.
To prevent grease res, clean your grill on a regular
basis (especially after cooking greasy foods at lower
temperatures). In the event of a grease re, unplug the
grill and leave lid closed until the re is out.
Do not put anything ammable in the storage area under
the grill.
Never plug-in your REC TEC BULL without the service
access panel located under the controller installed.
Never put your grill in a vehicle without rst ensuring that
it is completely cool and that no hot embers, pellets or
ashes remain in the re pot or auger.
Occasionally, your REC TEC BULL should be checked
for re pot obstructions to make sure proper air ow is
maintained. See cleaning instructions in this manual for
correct procedures.
Your REC TEC BULL gets very hot; keep young children
and animals away while in use.
Use heat-resistant barbecue mitts or gloves when operating
this unit.
Long handled, non-plastic utensils are also recommended.
Do not touch cooking chamber or attempt to move your
REC TEC BULL while operating or while the grill is hot.
Make sure the re is completely out and that the grill is
completely cool before transporting the grill.
Before covering your grill, make sure that the grill has
cooled completely.
Never put your hand in the pellet hopper or attempt to
service any part of your REC TEC BULL while your grill
is plugged in.

©2019, Rec Tec Industries, LLCQuestions? Call or check out our FAQ!
Your carton contains the following:
1- REC TEC BULL body - #1
2- Caster wheel legs - #2
2- Fixed wheel legs - #3
1- Bottom shelf - #4
2- Bull horn handles - #5
1- Large pull bar handle - #6
1- Smoke stack - #7
1- Side shelf with controller - #8
1- Flame deector - #9
1- Drip pan - #10
2- Cooking grates - #11
1- Drip bucket - #12
2- Temperature probes - #13
1- Hardware packet - #14
2- Leg support brackets - #15
Please note that during shipping some movement may
have taken place, so a complete visual inspection is
required. Be sure to inspect entire grill after removing
the protective shipping carton. Some surfaces may
be sharp, so wear gloves when assembling.
DO NOT PLUG IN THE GRILL UNTIL IT IS FULLY
ASSEMBLED AND YOU’RE READY TO COOK.
5

©2019, Rec Tec Industries, LLCQuestions? Call or check out our FAQ!
Step 1:
Unpack and Prepare
for Assembly
With assistance, remove all
items from inside grill body
and lay grill body on its back.
Recommended
for Assembly:
- A good buddy
- Phillips head, or a at
head screw driver
- Socket wrench (17mm)
- Vise Grips
- Aluminum cooking foil
- Wood pellets
Tip: Flatten the cardboard box
out and lay everything on it.
This serves as a good working
area and it helps prevent the
grill from getting scratched or
damaged during installation.
DO NOT
ASSEMBLE
ALONE!
6

©2019, Rec Tec Industries, LLCQuestions? Call or check out our FAQ!
Step 2:
Attach Legs
Starting with the left side, attach
xed wheel legs (#3) with bracket
holes facing outward from the grill.
Then on the right side, attach caster
wheel legs (#2) with bracket holes
facing outward from the grill.
Hand tighten all four legs using
blot assembly order: bolts, at
washers, lock washers, and nuts.
All hardware is found in included
hardware packet (#14).
7
Do not fully tighten until
Steps 2, 3, & 4 are completed.
Want a Cpetiti Ct?
Buy a
Competition Cart
Competition Cart
Installation Instructions
If you purchased the REC TEC
COMPETITION CART, use this link
for the Assembly Instructions.

©2019, Rec Tec Industries, LLCQuestions? Call or check out our FAQ! 8
If you are installing a front folding
shelf, this is when you install.
Want a Frt Shelf?
Front Shelf
Installation Instructions
Buy a
Front Shelf
Step 3:
Install Left Leg Support Bracket
Starting with the left side xed wheel legs (#3), attach
a leg support bracket (#15) to the outside of the legs
so it wraps around them.
Hand tighten with this
Bolt assembly order:
bolts, lock washer, at
washer, bracket, leg.
All hardware is found
in included hardware
packet (#14).
Do not fully tighten until
Steps 2, 3, & 4 are completed.

©2019, Rec Tec Industries, LLCQuestions? Call or check out our FAQ! 9
Step 4:
Install Bottom Shelf and Right Leg Bracket
Insert bottom shelf (#4) and secure it into place with the
right leg support bracket.
For right leg bracket (#15), hand
tighten with this bolt assembly order:
bolts, lock washer, at washer, bracket,
leg. All hardware is found in included
hardware packet (#14).
Fully tighten all leg bolts after
Steps 2, 3, and 4 are completed.
For bottom shelf (#4), hand
tighten with this bolt assembly
order: bolts, lock washer, at
washer, bracket, bottom shelf.
All hardware is found in included
hardware packet (#14).

©2019, Rec Tec Industries, LLCQuestions? Call or check out our FAQ! 10
Step 5:
Prepare for Side Shelf and Pull Bar Assembly
Remove and discard hex head shipping bolts on LEFT and
RIGHT sides of grill body (#1).
Hex head bolts were used to ensure interior
welds were supported during shipping.
Carefully open the lid on your grill and locate
the RTD wires secured to the temperature sensor.
Feed the RTD wires through the grill body.

©2019, Rec Tec Industries, LLCQuestions? Call or check out our FAQ! 11
Follow this bolt assembly order: short
bolt, at washer, grill body, shelf, at
washer, locking washer, bolt.
Step 6:
Install Side Shelf
With assistance, line up the side
shelf with controller (#8) against
the exterior of grill body (#1).
Tip: Begin with the bolt from the
interior of the grill barrel using the
bolt assembly order. This will give
you easier assembly access with a
Phillips head screw driver for an
easier and more secure build.
Hand tighten until all
screws are in place.

©2019, Rec Tec Industries, LLCQuestions? Call or check out our FAQ! 12
Step 7:
Install RTD Wires to Smart Grill TechnologyTM Controller
Locate the access panel underneath the side shelf (#8) and open it by
removing the two screws. Feed the two white braided RTD wires inside
through the grommet hole.
Plug the two white braided RTD wires
onto the tabs labeled ‘RTDpt1000’
Slide them rmly onto the connectors and be careful
to not touch any other parts of the circuit board.
Replace the access door with the 2 screws.
Connect the wiring harness from
under the Smart Grill Technology™
controller shelf to the grill body
wiring harness. See Illustration 3.

©2019, Rec Tec Industries, LLCQuestions? Call or check out our FAQ! 13
Step 8:
Install Pull Bar Handle
Attach the pull bar handle (#6) using the two
bolts that are screwed into the handle. The beauty
ring stays attached to the pull bar handle.
Hand tighten until all
screws are in place.
Step 9:
Stand Grill Upright
Lock caster wheels and close grill lid before standing grill upright.
You will need two people to lift because the grill is very heavy.
DO NOT ATTEMPT TO
COMPLETE STEP 9 ALONE
WITHOUT ASSISTANCE!
LOCKED &
CORRECT
UNLOCKED&
INCORRECT
LOCK CASTER WHEELS!

©2019, Rec Tec Industries, LLCQuestions? Call or check out our FAQ! 14
Step 11:
Install the Smoke Stack
Install the smoke stack (#7) using provided hardware.
Follow this bolt assembly order: bolt, smoke stack, grill
body, at washer, locking washer, bolt.
If you are installing a Smokebox
accessory, jump to this section. Want a Smokeb?
Smokebox
Installation Instructions
Buy a
Smokebox
Step 10:
Install Bull Horn Handles
Attach bull horn handles (#5) to grill lid using the
small bolts that are screwed into the bull horn handle.
Proper placement will result in the handle
facing inward with the tip slightly upward.

©2019, Rec Tec Industries, LLCQuestions? Call or check out our FAQ! 15
Initial Setup
Procedure
Tip: If you are planning on using your grill right away, save
time and begin your initial burn in here. Finish installing
the inner components while the grill begins to heat up.
Air Box Assembly
BE CAREFUL NOT TO DAMAGE THE TEMPERATURE
SENSOR WHILE INSTALLING THE DRIP PAN.
Step 12:
Flame Deector (#9), Drip Pan (#10), Cooking
Grates (#11), and Drip Bucket (#12)
Open the lid of the REC TEC BULL. Install the ame deector
(#9) over the Air Box Assembly with the small notches in the
ame deector over the small tabs located at the inside front
and the large cutout to the rear of the grill body (#1).

©2019, Rec Tec Industries, LLCQuestions? Call or check out our FAQ! 16
Step 12 Continued:
Drip Pan (#10), Cooking Grates (#11), and Drip
Bucket (#12) Installation
Install the drip pan (#10) with the short lip sitting on the left-side drip
pan support and the longer lip resting on the right-side lower support.
Make sure to leave equal gaps between
the drip pan and front and back chamber
walls to ensure even heat distribution.
When lining the Drip Pan, keep the foil inside the Drip Pan
edges and DO NOT wrap around. This can restrict airow.
Tip: Many customers line their
drip pan with aluminum foil for
easier clean up.

©2019, Rec Tec Industries, LLCQuestions? Call or check out our FAQ!
Wash Cooking Grates
with mild soap and water.
17
Step 12 Continued:
Cooking Grates (#11), and
Drip Bucket (#12) Installation
Install the Cooking Grates (#11) by
resting them at on the front and back
ledges inside chamber.
Tip: Many customers line their
drip pan with aluminum foil for
easier clean up.
Install the Drip Bucket (#12) by
clipping the handle to the integrated
hook on grease spout on right side
of grill and allow it to hang.
BE CAREFUL NOT TO DAMAGE THE TEMPERATURE
SENSOR DURING PLACEMENT.

©2019, Rec Tec Industries, LLCQuestions? Call or check out our FAQ! 18
Step 2:
Attach Legs and Front Folding Shelf
Carefully remove shelf from carton. Place it on a blanket or piece of cardboard
to prevent it from being scratched. The shelf should be in the closed position
when mounting it on your grill. This is the same position you will nd it in when
it is removed from the box.
Want a Frt Shelf?
-OR-
Go Back to
Assembly
Buy a
Front Shelf
2a: The next step is
easier if you have
a helper. Position
the shelf bracket on
the existing holes
and place the bolts
through the shelf
bracket and leg bolt
holes. Next place
the washer, lock
washer and nut on
the bolt and tighten.
DO NOT FULLY TIGHTEN HARDWARE
UNTIL STEPS 3 & 4 ARE COMPLETED!

©2019, Rec Tec Industries, LLCQuestions? Call or check out our FAQ! 19
DO NOT FULLY TIGHTEN HARDWARE
UNTIL STEPS 3 & 4 ARE COMPLETED!
Click to continue
to Step 3
Tip: The more you use your
shelf the easier the spring
buttons will pop into place.
2c: To operate, lift the shelf
upward until the spring buttons
pop into the shelf side holes.
2b: Adjust the shelf frame
so you have enough
clearance when opening
and closing the shelf. You
may need to adjust the
frame outward 1/16” or
less to prevent the shelf
from hitting the frame
during operation. The
bolt hole is cut oblong
to accommodate this
adjustment.
Table of contents
Popular Grill manuals by other brands

Blaze
Blaze BLZ-3-CART Assembly

Broil King
Broil King Broil Chef BC300EN owner's manual

Kenmore
Kenmore 141.16306 Use and care guide

Princess
Princess TABLE CHEF PRO 2300 Instructions for use

Nexgrill
Nexgrill 720-0600 Assembly & operating instructions

Trisa electronics
Trisa electronics 7574.01 Instructions for use