REITEL UNICUT User manual

1
REITEL Feinwerktechnik GmbH
Senfdamm 20
D - 49152 Bad Essen
Tel.: +49(0)5472 / 9432-0
Fax: +49(0)5472 / 9432-40
Operating Instructions
UNICUT
With the purchase of the UNICUT you have made your descision for a REITEL-quality
product.
After having unpacked the device, please check carefully whether transportation damages of
any kind have occurred. If that is the case, the carrier or manufacturer must be notified within
3 days. The company will not be responsible for any damages found after that.

2
CONTENTS
1
EQUIPMENT .....................................................................................................................................3
1.1
B
ASIC
E
QUIPMENT
.........................................................................................................................3
1.2
S
PECIAL
A
CCESSORIES
...................................................................................................................3
2
SAFETY INSTRUCTIONS .................................................................................................................3
2.1
G
ENERAL
S
AFETY
I
NSTRUCTIONS
....................................................................................................3
2.2
S
PECIFIC INSTRUCTIONS FOR THIS DEVICE
.........................................................................................4
3
INSTALLATION ................................................................................................................................5
4
PREPARATION FOR SAWING.........................................................................................................5
4.1
T
OOL ASSEMBLY
............................................................................................................................5
4.2
W
ORKING WITH THE MODEL TABLE WITH MAGNETIC RETENTION
(O
PTION
)..........................................5
4.3
W
ORKING WITH THE MODEL TABLE
MODEL
TRAY
®
(O
PTION
),
WITH SUCTION ADAPTOR
...................6
5
TROUBLESHOOTING ......................................................................................................................9
6
MAINTENANCE ................................................................................................................................9
7
WARRANTY ....................................................................................................................................10
8
RULES FOR DISPOSAL OF COMMERCIAL ELECTRICAL EQUIPMENT.................................10
9
TECHNICAL DATA.........................................................................................................................11
10
KEY ..............................................................................................................................................11

3
1Equipment
1.1 Basic Equipment
•Model saw UNICUT
•Halogen lamp 10 W
1.2 Special Accessories
•Reference: 22802 Diamond cutting blade, s = 0,25, D = 80
•Reference: 22804 Diamond cutting blade, s = 0,25, D = 100
•On request: Carbide cutting blade, 120 teeth, s = 0,30, D = 80
•On request: Diamond cutting blade, fine, s = 0,20, D = 80
•Reference: 22816 MT Model table MODEL TRAY ®, with suction adaptor
•Reference: 22805 Model table, offering a tilt angle up to 90°, with magnetic retention
•Reference: 20308 Laser Guide for model adjustment
2Safety Instructions
2.1 General Safety Instructions
•Check all hose joints for tightness, if necessary, tighten hose clamps.
•Operating instructions must be read and followed by all personnel who use this device
•Furthermore, personnel should follow all local safety rules.
•To avoid injury, appropriate protective clothing, noise absorption, protective eyewear and
other tools have to be used.
•If the machine is defective or working improperly it must be taken out of service. Call your
dealer immediately then.
•This device has been designated to be used only for its intended purpose. All other
applications must be prohibited for safety reasons.
•In case of danger turn off the machine and call your dealer or manufacturer for help.
•This device should not be left running while unattended.
•Turn all power sources off after having finished work.

4
•Repairs may be carried out only by experts. Persons doing repairs take over responsibility
for proper work and adherence to accident-prevention regulations (UVV).
•Use original spare parts only.
•Modifications may only be made after consultation with, and by permission of the
manufacturer. In case of modifications without permission all warranty and liability claims
will expire.
•The machine should be operated in a clean, air-conditioned room with a temperature of 15
to 35°C.
•Danger of fire: Respect the fire regulations. Leave enough space around.
•Don’t use mobiles near the machine since they may lead to disturbances.
•Don’t place anything on top of the machine.
•REITEL GmbH assumes no liability for damages to surfaces caused by equipment
supports/feet.
2.2 Specific instructions for this device
•
The UNICUT model saw is a table-mounted device. When installing make sure to
put the device on a horizontal stable base.
•
Tools may only be changed when the spindle ceases to rotate and the device is
unplugged.
•
The cutting blades are very sensitive to sudden drops. Therefore, always handle it
with care!
•
Always make sure that the tools and workpieces are fixed securely since otherwise
they might be damaged and the user may be hurt.
•
Never put your hands into the running device.
•
Do not use worn or damaged tools.
•
Check the position of the cutting blade - avoid injuries at the eye and hand.
•
Always respect the regulations of the tools’ manufacturer (e.g. max. speed, cutting
speed, material to be worked on)
•
Be careful regarding laser light exposure! Don’t look into the laser beam!

5
3Installation
•Insert mains plug into socket (230V / 50Hz)
•Fix suction with a hose at the suction unit
•Cutting blade installation (see chapter 4.1)
•Dependent on purchase of magnetic swiveling table or MODEL TRAY ® system table, it
has to be fixed (see chapter 4.2)
4Preparation for sawing
4.1 Tool assembly
1. Turn off main switch (3) and pull power plug.
2. Unscrew the clamping screw (12).
3. Remove tension pulley (13).
4. Remove old saw blade (14) and put on new one.
(please ensure that the blade is fixed exactly on the centering ring of the workholder.
5. Put the tension pulley (13) back on.
6. Tighten the clamping screw (12) and check the running of the blade.
7. Insert power plug into socket.
4.2 Working with the model table with magnetic retention (Option)
The model table with magnetic retention is suitable for a variety of model systems.
With the three-jaw chuck your work is easily and securely fixed, trimming from top to

6
bottom with adjusted angle. Optionally the laser guide might be helpful for fine
adjustment (see accessories).
1. Release locking screw (25), if the motor arm cannot be moved.
2. Adjust the balance weight of the motor arm by turning the weight (16) and the lock
nut (17) on the thread rod (lifting and lowering force). Move the sawing blade
upwards so that you can easily access the base (8).
3. Move the suction funnel (6) upwards by releasing the lock lever so that the exhaust
is approximately located on a level with the model.
4. Put the magnetic table (7) on its base (8) .
5. Adjust the depth stop (19) with the wing screw (20) so that the cutting blade doesn’t
touch the magnetic table (7)
6. Use the locking screw (23) for opening the grip jaws and fasten your plaster model.
7. With lever (24) the table’s angle can be adjusted. Adjust the magnetic table’s
position, if necessary lower the saw blade close to the model. If available, the laser
guide will help you for exact positioning.
8. Fasten the model table by pressing the switch (9)
9. Adjust the speed (10),
0 = approx. 1.500 t/min. for a carbide cutting blade
5 = approx. 6.000 t/min. for a standard diamond cutting blade
7 = approx. 9.000 t/min. for a diamond cutting blade, fine cut
10. The motor starts after pressing simultaneously the push button at the housing (15)
and at the handle (1).
11. Slowly saw into the model by softly lowering the motor swivel arm and if necessary
adjust the position by releasing the magnet and adjusting the table position. Please
pay attention that the saw blade doesn’t swing.
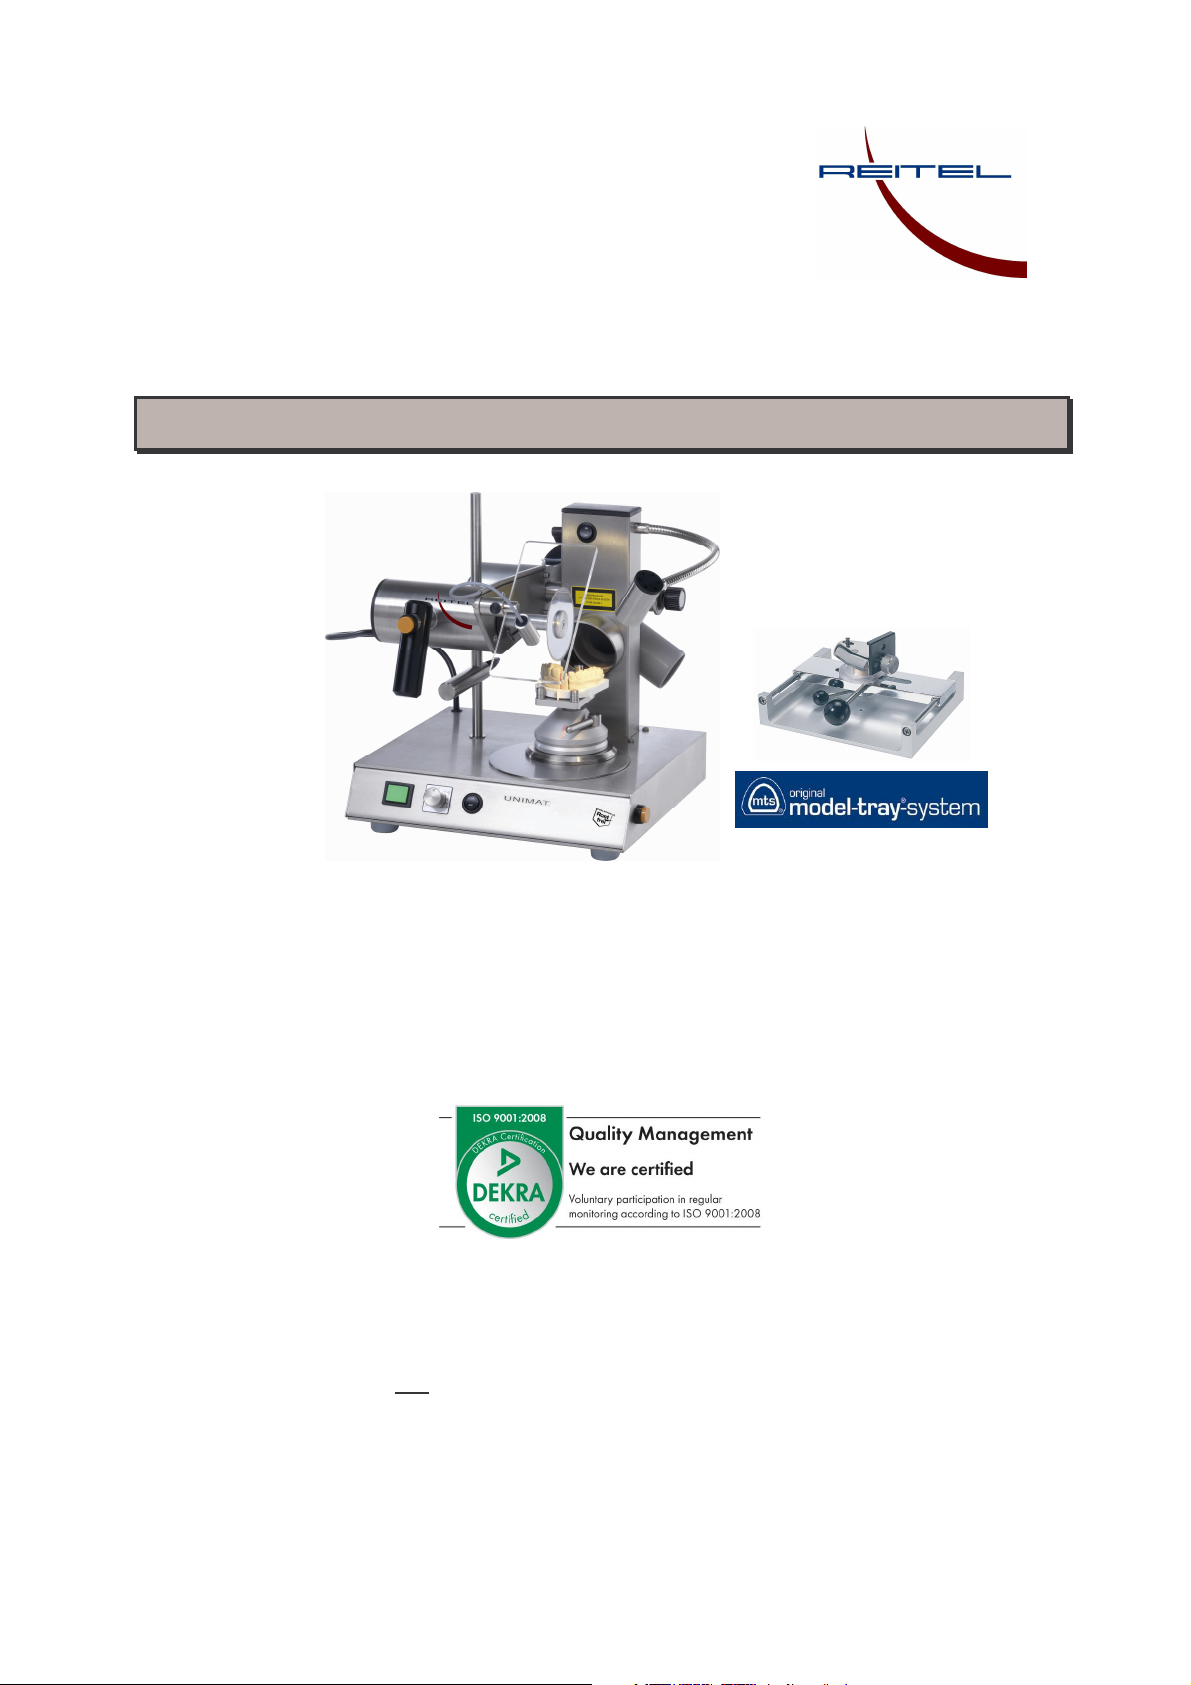
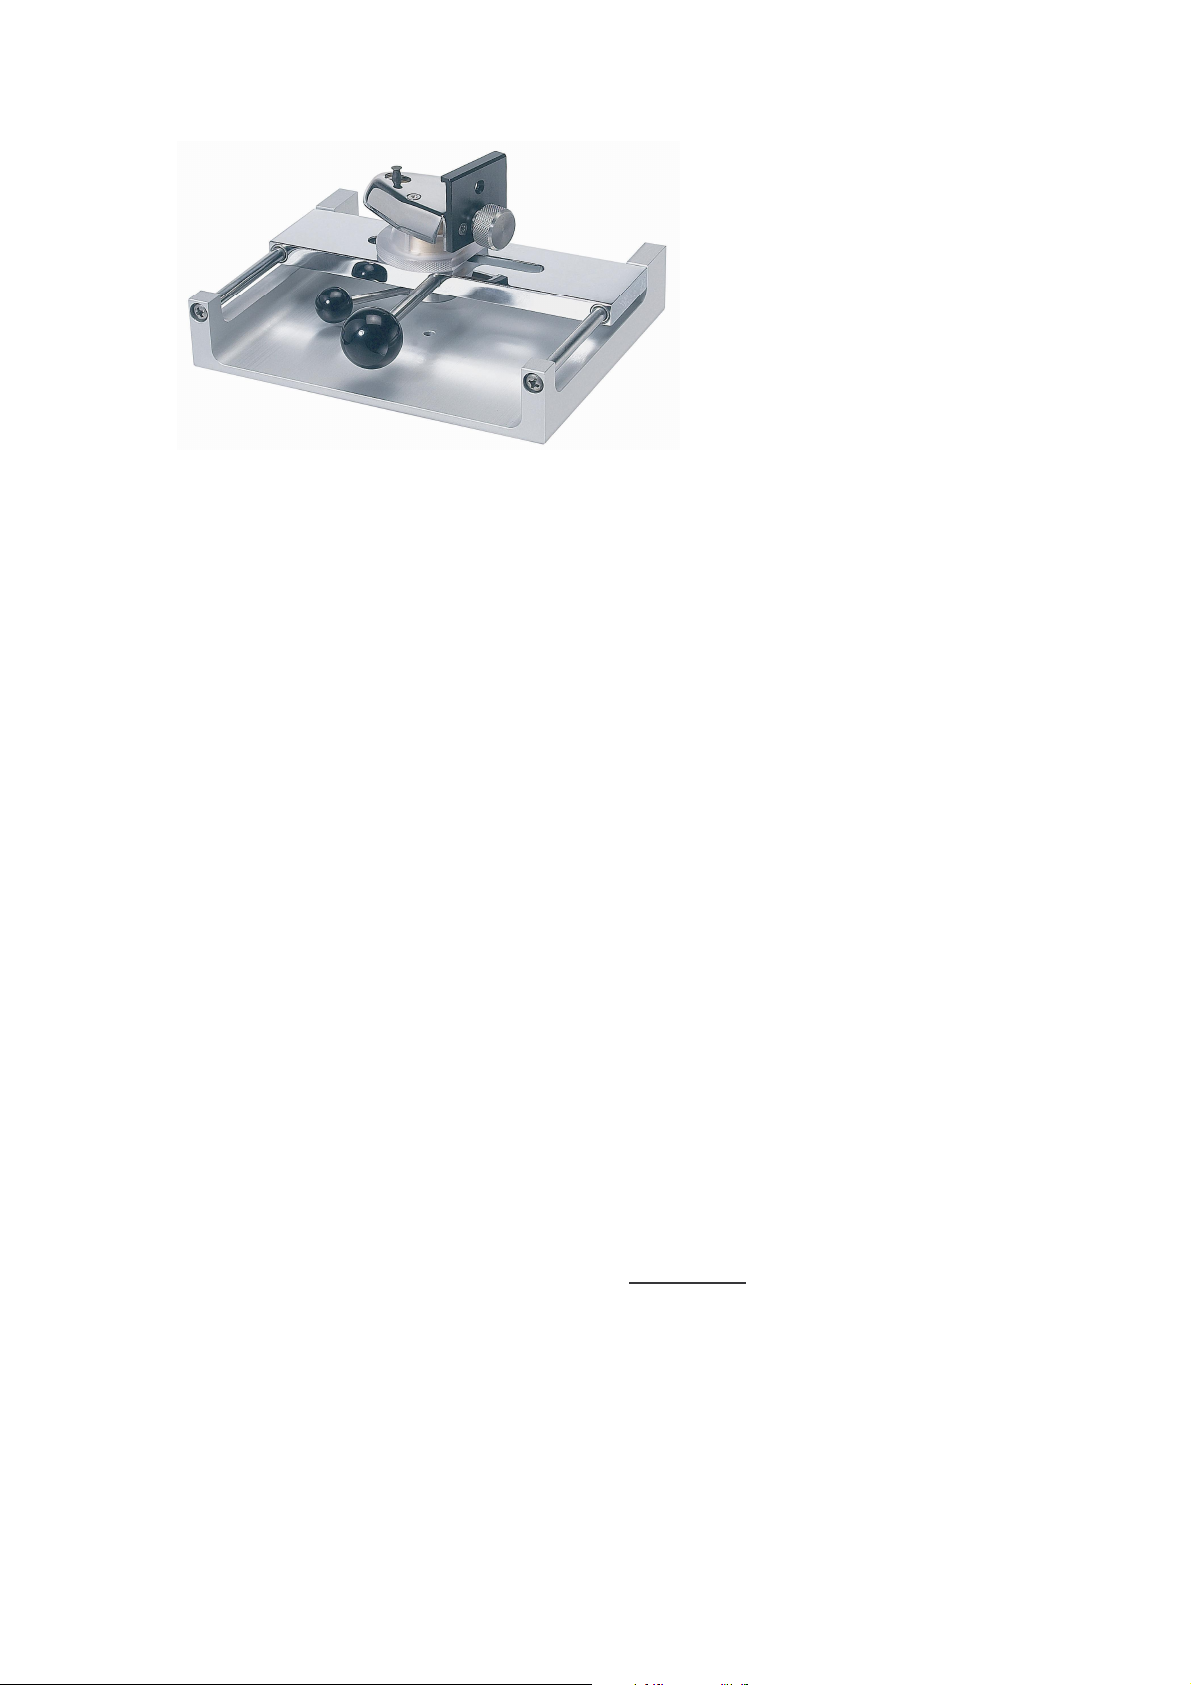
4.3 Working with the model table MODEL TRAY ® (Option), with suction adaptor
With the special model table of the MODEL TRAY ® Systems you’ll profit from this
special model system. The model tray table was optimized especially for use with the
UNICUT model saw with two-hand operation.

7
1. For positioning the MODEL TRAY ® table first release the locking screw (25) and
move the saw blade upwards, so that you can easily access the base (8)
2. Move the suction funnel (6) completely downwards by releasing the locking lever.
3. Move the suction adaptor (29) top down the suction funnel, improving suction
performance with your MODEL TRAY ® System
4. Position the MODEL TRAY ® table (18) on its designated base (8) and plug into
the position holes (26). Put the jack (27) into the side wall to the right of the
pushbutton (15). Secure the magnetic table with the table locking (32)
5. Release the depth stop (19) with the wing screw (20) and let it slide down (not
necessary for the MT table)
6. Lower the cutting blade with the motor arm up to maximum depth and fix the arm
with the locking screw (25)
7. For fixing the model –tray model move the lock lever (31) to the left so that the
model holder is now freely moving. Loosening the model tension screw (23) the
clamping pin (33) may be brought into the front position. Put the model-tray-model
with the corresponding notch on the model clamping pin (33) and turn the model
tension screw (23) to the left until the model clamping strap (34) with the retention
adapter (35) has tightly fixed the model. Please pay attention that the model-tray
model is equipped with a retention adapter ¾ for models of Sockler 3 + 4. For
models of Sockler No. 0 the retention adapter no. 0 may be ordered from model-
tray GmbH. Models with Sockler No. 1 don’t need any retention adapter.
8. Adjust the required sawing position by moving the whole model holder on the slide
to the right or to the left or rotate it. If available the laser guide might be helpful for
precise positioning. For sawing diverging stumps the movable locating ring (36) is
lifted, while the model holder may be inclined by up to 15°. Required position is
fixed by turning the fixing lever (31) to the right.

8
9. Adjust the speed depending on saw blade (10):
Carbide saw blade:
Cutting width: 0,3 mm Adjustment: 0 = approx. 1.500 t./min.
Cutting: 2 - 4 hours after finishing model or
up to 4 – 8 hours after storage in a hydrobox.
Diamond cutting blade „B“:
Cutting width: 0,36 mm Adjustment: 5 = approx. 6.000 t./min.
Cutting: 8 hours after finishing the model at earliest
Diamond cutting blade „SD“:
Cutting width: 0,20 mm Adjustment: 7 = approx. 9.000 t./min.
Cutting: 8 hours after finishing the model at earliest
10. The motor starts by pressing simultaneously the pushbutton at the handle (1) and
at the model tray table (15) or alternatively by simultaneously pressing the
pushbutton at the housing (15) and at the model-tray® model table (15).
11. Sawing is performed by moving forward the model table guidance (28) slowly from
the front into the model. Please avoid swinging of the saw blade. If necessary,
adjust position by removing magnet and table adjustment.
By using the standard table’s function (see chapter 4.2) the MODEL TRAY ® table may also
be used for sawing from top to bottom. Please pay attention to the correct depth-stop (19) and
release the locking screw (25). In case of dust formation additionally remove the suction
adaptor (29).
Attention:
During positioning please pay attention that the saw cuts don’t cross. Regarding
diagonal cuts always do a parallel cut as well so that the diagonally cut stump
segments may later be removed from the model-tray®-Sockler.

9
5Troubleshooting
•Clean dirty tools regularly to ensure cutting accuracy
•Cutting blade runs out of true:
-
Adjust speed
-
Replace blunt tools
•Cutting blade cuts crooked:
-
Replace cutting blade
•Device does not work after having been turned on
(Main switch (4) does not shine after switching on):
-
Fuse has blown (disconnect device and change fuse. The fuse holder is located at the
device’s plug).
-
When using the MODEL TRAY ® table the jack is unplugged.
•Laser is not in focus (Accessories)
-
see chapter 11 for optimum laser adjustment
•Dust formation during cutting:
-
Check suction ( Filter might be blocked or full)
-
Suction funnel (6) has wrong height (Correction by releasing the lever and shifting the
funnel upwards or downwards)
-
Using MODEL TRAY ® table unit the suction adaptor (29) is not plugged in
If the problem cannot be solved, please inform your specialist or REITEL customer services.
6Maintenance
•Regularly clean model saw and model table with a brush and a moist cloth
•Replace illuminant (10 W) if necessary
•Regularly change sawing blade

10
7Warranty
We give a
1 year’s warranty
beginning from the official date of purchase. This warranty covers all defects traceable to
materials, design or workmanship. During this time, we’ll repair these defects at no charge.
Please carefully pack and ship the device pre-paid to us, along with a report describing the
defect. You must also include a copy of your invoice.
This warranty does not include consumable parts or workpieces. We assume no liability for
damages caused by inappropriate use, or damage caused by continued use of malfunctioning
equipment, or any other damage. This warranty does not apply to equipment which as been
modified, whether by the purchaser or any other third party. If the machine shows any failure
regarding function or use it has to be put out of operation. If the machine is continued to be
used warranty expires.
Loan Equipment
Should you need to borrow a device while your device is being repaired, please contact
Messrs. REITEL or your distributor. These loans are a service for which availability cannot
necessarily be guaranteed. After the warranty period, a fee may be charged for loan
equipment as well as for shipping and packaging.
Hotline:
In case of system failures, please don’t hesitate your specialist or directly our Service
Dept., phone: +49 (0) 5472-9432-32 or -0 (exchange)
8Rules for Disposal of Commercial Electrical Equipment
According to valid laws our devices are correctly disposed of according to B2B
– Regulations for proper disposal. Please contact your local dealer for
additional information.

11
9Technical Data
10 Key
(1) Left handed pushbutton (21) Device’s fuse
(2) Handle (22) Mains supply
(3) Main switch (23) Locking screw for models
(4) Switch for laser ON / OFF (24) Locking lever (Magn.-table)
(5) Halogen lamp (25) Locking screw of the
(6) Suction funnel with control lever motor arm (for MT)
(7) Model table with magnetic retention for (26) Position holes (MT)
standard models (optional)
(8) Cutting area (27) Jack (MT)
(9) Magnetic switch ON / OFF (28) Model table guidance (MT)
(10) Speed control (MT) (29) Suction adaptor (MT)
(11) Plexiglass plate (30) Switch for halogen lamp
(12) Tension screw saw blade (31) Lock lever (MT)
(13) Tension pulley saw blade (32) MT table locking
(14) Cutting blade (33) Clamping pin (MT)
(15) Right hand switch (at the MT table or (34) Clapming strap (MT)
at magnetic table on the right of the device) (35) Retention adaptor (MT)
(16) Balance weight (36) Centering ring
(17) Lock nut balance weight
(18) MODEL TRAY ® table top unit MT (Optional)
Line voltage
230V 50/60 Hz
110 V (+/- 10 V) 50/60 Hz
Current consumption 460 W
Width / height / depth 340 + 120 / 330 / 440 mm
Weight 18 kg
Speed 2.000 – 10.000 t/min
Illumination 10 W
Noise level 65 dB (A)
Housing Stainless steel
Order-No. 12801

12
(19) Depth stop (only to be used for (7))
(20) Wing nut depth stop

13
Frontal view:
Right lateral view:
25
1
2
20
19
3
4
30
5
6
7
8
26
9
10
11
12
13
15
27
16
17
14
29

14
Left lateral view:
Magnetic model table (7):
MODEL TRAY ® Model table (18):
33
21
22
35
28
36
32
27
34
31
32
23
24

15
11 Appendix Laser Adjustment
Table of contents
Popular Saw manuals by other brands

Lissmac
Lissmac CC601 E operating manual

Metabo
Metabo KS 216 Lasercut Original operating instructions

GreenWorks
GreenWorks 2003807 user manual

King Industrial
King Industrial KC-26FXT/i50/5052 instruction manual

Diamond Products
Diamond Products CC5555GK-3-36 Operator's manual

Remington
Remington RM1025P Operator's manual