Rekluse Core EXP 3.0 TorqDrive Operation manual

READ ME FIRST
Doc ID: 193-711A
Doc Revision: 021517
There are several crucial steps that must be understood and performed to ensure your Radius X clutch
will function properly. Failure to properly install, break-in and maintain your clutch components will
result in premature wear or failure.
New Friction Disk Break-In Procedure
Failure to follow the break-in procedure and oil filter inspection process could cause motor oil
delivery failure which can result in motor failure, serious injury, or death.
xDO NOT install a new set of friction disks and ride without following the break in procedure and
oil screen inspection process found in the installation manual.
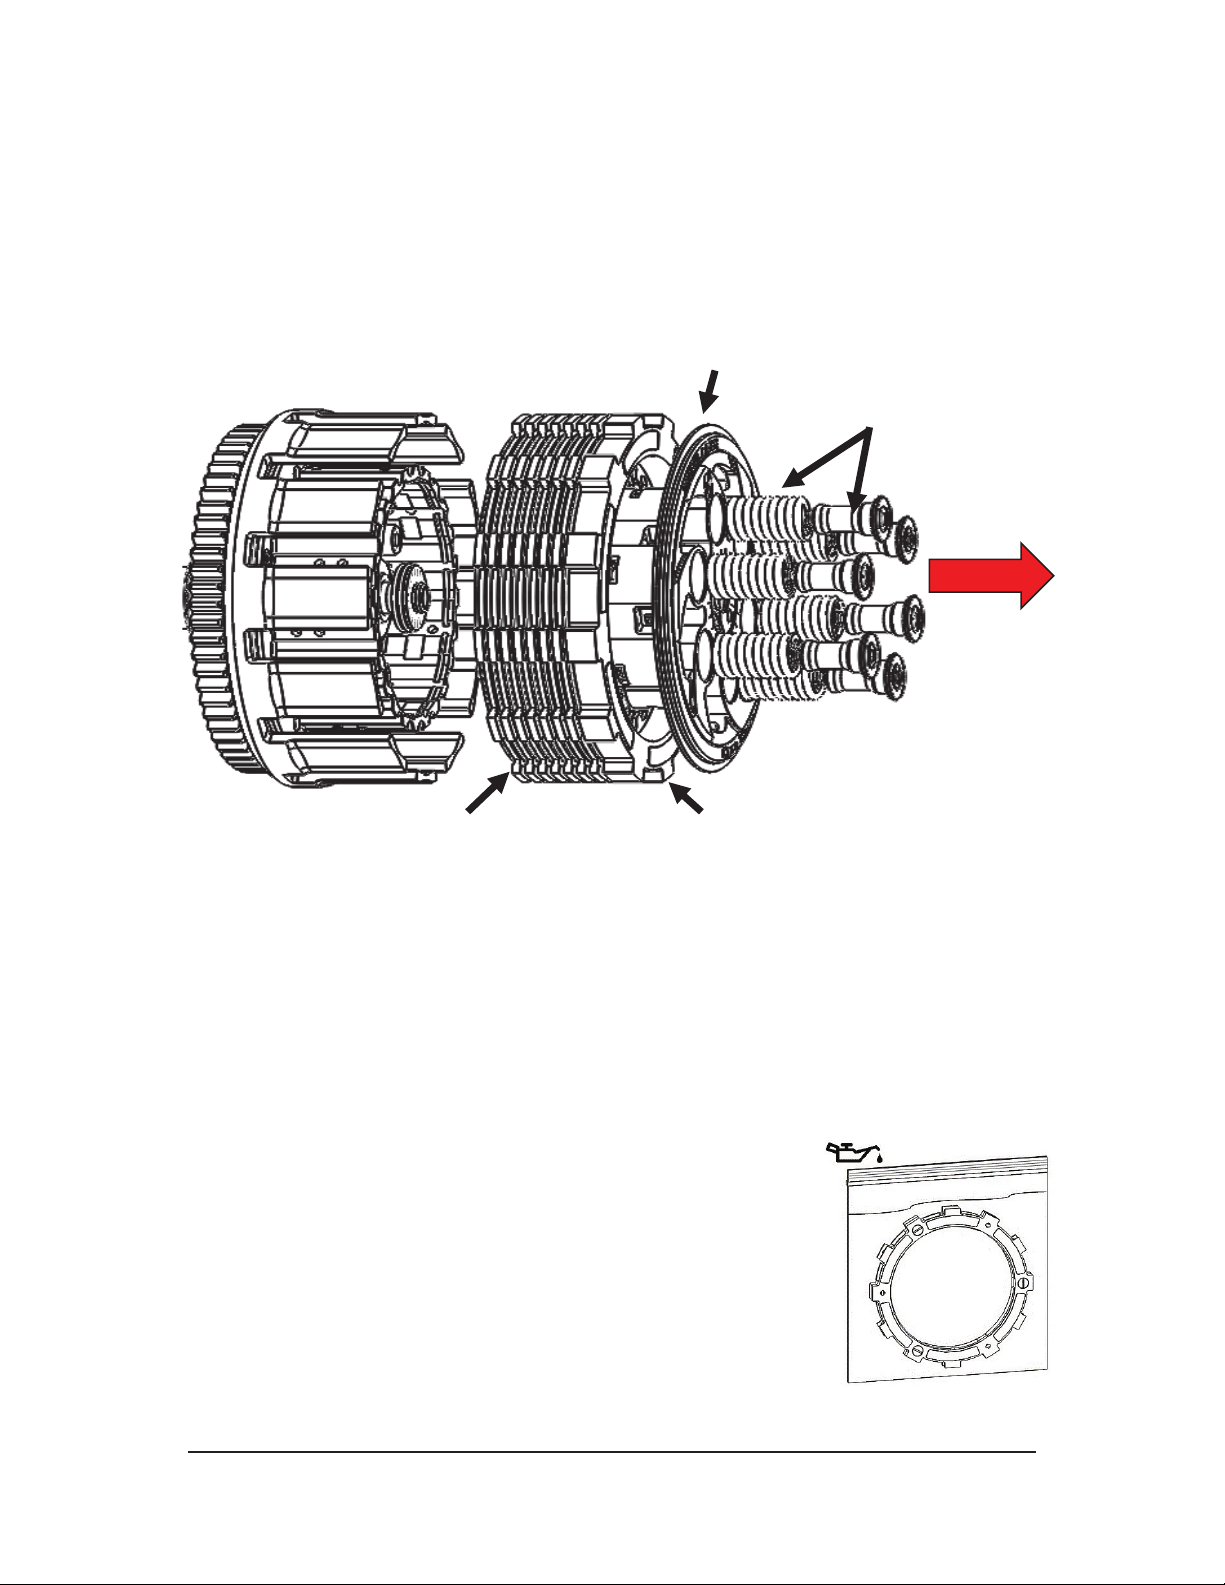
oSoak new friction disks in oil
oInstall new friction disk and set the installed gap
oCheck and verify free play gain
oPerform the break-in procedure found in the installation manual
oFollow the oil filter inspection process found in the installation manual
Clutch Lever Optimization
xThere are some brands of bikes that ship with stock adjustable reach levers. It is important
when setting up any adjustable reach lever to adjust the lever position first, and then adjust Free
Play Gain second. If you were to do it the other way around, you could alter the FPG setting
while changing the reach of the lever, which could cause poor performance and early clutch
wear.
xRekluse offers an adjustable reach lever upgrade for most cable actuated models. This optional
upgrade provides the user with the ability to optimize the clutch lever position for your hand size
and personal preference. This will maximize lever feel for each individual.
xSee the lever optimization section in the manual for more details.
Checking Free Play Gain
Check free play gain at the start of each ride. Details on how to check free play can be found in your
installation manual.
xUnderstand how to properly check for free play gain
oDo not ride if you cannot verify free play gain
oClutch may seem to work fine but could be slipping excessively
xIf you cannot detect free play gain, reset the installed gap

Auto Clutch TROUBLESHOOTING GUIDE
Rekluse Troubleshooting Guide Terms
Free Play Gain –The additional movement of the clutch lever under slight pressure as the RPMs are raised
from idle to approximately 5000 RPM. Free Play Gain should only be checked in neutral as per the
instructions.
Worn Friction Plates –Will be thinner than the factory spec
Overheated Friction Plates –Sometimes referred to as glazed. Most of the time measure within spec, but
the surface will look darker than new and the friction surface will be smooth like glass. The steel drive plates
will also show signs of bluing or darkness
Squeal –Chirping noise under acceleration, or take off
Chatter/Shutter –Vibration or surge under acceleration as the clutch engages
Drag –When stopped or idling in gear, the bike will try pulling, or on a stand the wheel will spin
Chain Slap –Drag at idle, in gear, causing the chain to slap noisily against the swing arm
Low RPM Slip –Considered engagement slip and will make the initial clutch engagement soft
High RPM Slip –Occurs above half throttle while accelerating, as the engine RPMs raise little or no power is
transmitted to the rear wheel resulting in a loss of forward drive causing excessive clutch heat
*Rekluse troubleshooting chart located on back of this page*
Doc ID: 193-707A
Rev: 031417

Note: The “possible fixes” contained in the chart below are listed in the order of things to try first for each
“symptom”
Core EXP 3.0 & EXP 3.0 Troubleshooting Chart
Symptom
Possible Cause
Possible Fix
Drag or Stalling
Clutch break
-in
Complete the recommended clutch break
-in
Transmission oil
Change the oil if it’s not a clean high quality JASO MA certified
oil
Excessive
“
Free Play Gain”
Re
-adjust the installed gap and re-check “Free Play Gain”
Center clutch nut too tight
Re-torque the center clutch nut if it is binding when spun in
neutral
EXP engagement adjustment
Change the EXP
setting to a higher engagement setting
Worn or glazed friction disks
Replace friction disks
(Rekluse or OEM disks
recommended)
Low RPM slip
No
“Free Play Gain”
Re
-adjust the installed gap and re-check “Free Play Gain”
Modified motor
Replace wedges
with a heavier set if slightly modified
If running Core EXP - Replace the pressure plate springs with a
heavier set if highly modified
If running EXP
–upgrading to Core EXP is recommended
Worn or glazed friction disks
Replace friction disks
(Rekluse or OEM disks
recommended)
Tall
Bike gearing
Replace wedges with a heavier set if the gearing is taller than
stock
High RPM slip
No
“Free Play Gain”
Re
-adjust the installed gap and re-check “Free Play Gain”
Modified motor
If running Core EXP - Replace the pressure plate springs with a
heavier set if highly modified
If running EXP
–upgrading to Core EXP is recommended
Pressure plate springs
Be sure the Rekluse springs are being used
Inspect the springs, if they are out of spec replace
Worn or glazed friction disks
Replace frictions disks
(Rekluse or OEM disks
recommended)
Squeal or Chatter
Transmission oil
Change the oil if it’s not clean high quality JASO MA certified
oil. Over-used oil may cause squeal or chatter
Clutch basket
Replace the basket and/or cushions if they are worn (Rekluse
basket recommended if available for your model)
The Rekluse basket is known to eliminate most squeal or
chatter, even if no wear is present (Not available for all models)
No clutch
override
Excessive
“
Free Play Gain”
Re
-adjust the installed gap and re-check “Free Play Gain”
Chain Slap
Adjust idle
Adjust idle closer to the engagement point of the clutch so
there is less delay in clutch engagement
EXP engagement setting
Raise the EXP engagement setting and adjust the idle
accordingly

0(',806(77,1*,6
35(,167$//(',17+((;3',6.
(;3
--
.
6(&7,21--
6&$/(
(;3',6.
7+,&.1(66
&/87&+3$&.
7+,&.1(66
0$;
0,1
0,1
'(7$,/.
6&$/(
&/87&+6(7836+((7
.(<
0,1 0,1,080$//2:$%/(7+,&.1(66
0$; 0$;,080$//2:$%/(7+,&.1(66
(;3781,1*237,216
,7(012
'(6&5,37,21
47<
'5,9(3/$7(
'5,9(3/$7(
7254'5,9()5,&7,21
%$6.(76/((9(6
(;3
7254'5,9((;3
(1*$*(0(17
5306(77,1*
635,1*
&21),*85$7,21
/2:
%/8(
0(',80
%/8(*2/'
+,*+
*2/'
)5$1./,15'
%2,6(,'$+2
:::5(./86(&20
3+
)$;

©2017 Rekluse Motor Sports
Rekluse
Motor Sports, Inc.
customerservice@rekluse.com
INSTALLATION & USER’S
GUIDE
Core EXP 3.0 TorqDrive®Clutch
Upgrade Kit for Hydraulic Motorcycles
Doc ID: 191-7803A
Revision: 041019

Pg. 2
Doc ID: 191-
7803A
Doc Rev: 011918
TABLE OF CONTENTS
OVERVIEW ...........................................................................3
INSTALLATION TIPS ............................................................3
TOOLS...................................................................................4
INCLUDED PARTS ...............................................................4
DISASSEMBLE THE CLUTCH .............................................5
CLUTCH PACK INSTALLATION...........................................6
Notes for Clutch Pack Installation: .....................................8
PRESSURE PLATE INSTALLATION..................................10
Pressure Plate Spring Information ...................................11
SET THE INSTALLED GAP AND CHECK FREE PLAY
GAIN ....................................................................................14
Step 1: Set the installed gap ............................................16
Step 2: Learn how to check Free Play Gain ....................17
Two Ways to Check for Free Play Gain ..............................19
The Rubber Band Method................................................20
The Hand Method ............................................................22
Step 3: Break-in the new clutch...........................................23
Step 4: Adjust the installed gap and Recheck Free Play
Gain..................................................................................25
FREE PLAY GAIN ADJUSTMENTS ...................................26
MAINTENANCE...................................................................27
Disk inspection examples ................................................29
TROUBLESHOOTING.........................................................31
Performance issues .........................................................31
Clutch noise .....................................................................31
EXP TUNING OPTIONS......................................................32
Changing the EXP springs...............................................33
NEED ADDITIONAL HELP?................................................35

Doc ID: 191-
7803A
Doc Rev: 011918
Pg. 3
This guide shows you how to upgrade your Core EXP 3.0 to
Core EXP with TorqDrive®. The following parts are replaced:
·Steel drive plates
·Lining plate
·EXP disk
·OE Friction Disks
·Read the safety information sheet
included with your kit.
·If you install this product for a customer or
another person, instruct them to read the
Safety Information document and the Installation and
User Guide before operating the bike with the product.
·Protect eyes and skin –wear safety glasses and thin
disposable work gloves.
·Read this entire document before performing any steps.
·Lay the bike on its left side when replacing the clutch.
This makes the clutch work easier and eliminates the
need to drain the oil.
·For optimal clutch performance Rekluse recommends
using fresh, clean oil that meets JASO-MA oil rating
requirements. Rekluse offers Factory Formulated Oil™
developed specifically for Rekluse products. Rekluse
Factory Formulated Oil is a perfect complement to any
OEM or aftermarket wet clutch. Visit www.rekluse.com to
learn more.
·Bikes with taller gearing or modified engines with
increased horsepower may require heavier wedges.
These can be purchased separately from Rekluse.
OVERVIEW
INSTALLATION TIPS

Pg. 4
Doc ID: 191-
7803A
Doc Rev: 011918
4 mm
Hex Key
5 mm
Hex Key
Torque Wrench
8 mm
Socket
Hydraulic clutch
fluid
Flat blade
Screwdriver
Fluid Catch
Container
Open-ended
Wrenches
Each upgrade kit includes a set of TorqDrive friction disks,
steel drive plates, an EXP disk, and pressure plate springs.
Please refer to the Setup Sheet for a listing of included parts
for your bike model.
Or visit us at www.rekluse.com/support for a full parts fiche
illustration and part numbers.
TOOLS
INCLUDED PARTS

Doc ID: 191-
7803A
Doc Rev: 011918
Pg. 5
1.Turn the fuel petcock to “OFF” if applicable.
2.Lay the bike on its left side. Catch any fuel that
might drain in a suitable container.
3.Use an 8 mm socket to remove the clutch cover.
DISASSEMBLE THE CLUTCH

Pg. 6
Doc ID: 191-
7803A
Doc Rev: 011918
4.Remove the following parts from the clutch. Set aside the
old clutch pack. It will not be reused.
·Pressure plate bolts
·
Pressure plate springs
·
Pressure plate
·Lining plate
·
EXP disk
·
Clutch pack
Each clutch pack comes with a set of steel plates, a set of
friction disks, and an EXP disk. The specifics of the clutch
pack depends on the bike. The height of the assembled
clutch pack and specific information for each bike can be
found on the Setup Sheet.
1.Soak the friction disks and EXP disk in
new oil for at least 5 minutes. Make sure
the EXP and friction disks are coated on
both sides.
CLUTCH PACK INSTALLATION
Clutch pack
Pressure plate
and lining plate
Bolts and
springs
EXP disk

Doc ID: 191-
7803A
Doc Rev: 011918
Pg. 7
2.Inspect the clutch basket for notching. Do not install
sleeves or use product with a notched basket. Notched
basket tang faces can cause the sleeves to break. Do not
use baskets that have been filed, machined, or modified
on the tangs. Replace basket if necessary.
Failure to inspect the basket and replace if necessary
could result in death, serious injury, and/or property
damage.
3.Install ALL the Rekluse basket sleeves into the basket
slots. Make sure the sleeve tabs sit against the inside the
basket, then push the sleeves down until they contact the
bottom of the tang slot. See pictures for reference.
OE
basket
Basket
sleeve

Pg. 8
Doc ID: 191-
7803A
Doc Rev: 011918
Note: When seated in the basket, the sleeves may stick
slightly above or below flush with the top of the basket. This
is normal.
Notes for Clutch Pack Installation:
·The clutch pack will be replaced with all new frictions and
steel drive plates. Do not reuse the old clutch pack.
·Some friction disks are marked with a small colored dot.
This mark is used for processing and can be ignored.
·The orientation of the clutch pack is different for each bike.
The number and thickness of drive plates included in the
kit also varies by bike. Please refer to the Setup Sheet for
specific information before installing the clutch pack.
Install all the basket sleeves

Doc ID: 191-
7803A
Doc Rev: 011918
Pg. 9
·Some OE basket have “half slots” at the top of the basket
tangs. Rekluse products require the entire clutch pack be
installed into the MAIN (deeper) basket slots. Installing the
clutch pack and EXP disk in the “half slots” will cause
performance issues. See the following picture for
reference.
4.Begin installing the Rekluse clutch pack starting with a
steel drive plate.
5.Continue installing the clutch pack according to
installation order listed on the Setup Sheet.
For Beta: Core EXP to RadiusCX:
If you are moving from Core EXP to RadiusCX, you MUST
use your OE throw-out, bearing, and washer. The Rekluse
throw-out that came with the Core EXP kit will not work with
the new RadiusCX clutch pack.
Install clutch pack
and EXP disk in the
main basket slots

Pg. 10
Doc ID: 191-
7803A
Doc Rev: 011918
1.Add a light film of oil between the lining plate and pressure
plate (this will help the plates stick together for ease of
installation).
2.Place the new steel lining plate onto the Rekluse pressure
plate by lining up the index tabs and slots. Do not reuse
the old lining plate.
3.Install the pressure plate subassembly.
4.Place the pressure plate springs into the assembled
clutch, then insert the screw sleeves into the springs. See
the following chart for spring information.
PRESSURE PLATE INSTALLATION

Doc ID: 191-
7803A
Doc Rev: 011918
Pg. 11
Pressure Plate Spring Information
The upgrade kit includes lighter pressure plate springs. You
have the option of reusing your current pressure plate
springs or using the new springs depending on torque
capacity and clutch lever pull preference. Differences in
clamping force and torque capacity will vary by model.
250F: There are two spring options.
a.Silver springs will give the feel of a smoother clutch with
a clutch lever pull about equal to OE.
b.Gold springs will yield a more aggressive clutch with
clutch pull slightly higher than OE. Rekluse recommends
installing silver springs for a more superior lever feel and
better matched torque capacity to motor output.
KTM 125/150/200 and KTM 450
Beta 250/350 RR and Husky TC250: See the chart below
for spring options. Rekluse recommends installing the “Light”
spring setting for a more superior lever feel and better
matched torque capacity to motor output.
Clutch Lever Pull
Torque Capacity
250F
-Gold Springs
-Silver Springs
OE
-Silver Springs
-Gold Springs
OE

Pg. 12
Doc ID: 191-
7803A
Doc Rev: 011918
All other 450F/250 2-Stroke: There are three spring
options.
a.Gold springs will give the feel of a smoother clutch with a
clutch lever pull lighter than OE.
b.Red springs will yield a more aggressive clutch with
clutch pull similar to OE.
c. Using three of each spring (3 red and 3 gold) will result
in an in-between setup. Be sure to alternate springs
when using 3 red and 3 gold to keep even pressure on
the clutch. Rekluse recommends installing gold springs
for a more superior lever feel and better matched torque
capacity to motor output.
OE
Clutch Lever Pull
Torque Capacity
450F/250 2-Stroke
OE
-Gold Springs
-Red Springs
-Red Springs
-Gold Springs
OE
Clutch Lever Pull
Torque Capacity
KTM 450/125/150/200
Beta 205/350 RR and Husky TC250
OE
- Light
- Standard
- Standard
- Light

Doc ID: 191-
7803A
Doc Rev: 011918
Pg. 13
Bike Model
Standard
Light
Beta
250 RR
3 red / 3 blue springs
6 red springs
Beta 350 RR
6 blue springs
6 red springs
KTM 450
2007-2011
6 blue springs
6 red springs
KTM 125/150
5 red springs
5 gold springs
KTM 200
5 green springs
5 red springs
Husky TC250
2010-2013
5 gold springs
5
silver springs
5.Insert the pressure plate bolts into the screw sleeves.
Do not reuse the OE springs, or clutch cover
interference will occur!
6.Using a torque wrench, tighten the pressure plate bolts to
9 ft-lb (12-N-m).
7.Reinstall the clutch cover gasket or O-ring cord, then
reinstall the clutch cover.

Pg. 14
Doc ID: 191-
7803A
Doc Rev: 011918
8.Reinstall the OE oil plug if it was removed during
disassembly.
9.Torque clutch cover bolts to OE specification.
It is very important that you understand how to set the
installed gap in your new clutch, and be able to verify the
installed gap by checking Free Play Gain.
SET THE INSTALLED GAP AND
CHECK FREE PLAY GAIN
Reinstall clutch cover
gasket or O-ring

Doc ID: 191-
7803A
Doc Rev: 011918
Pg. 15
The “installed gap” is the free space in the clutch pack when
the EXP disk is disengaged (collapsed). This gap allows the
clutch to spin freely until the engagement RPM is reached
and the EXP disk expands to close the gap and apply
pressure to the pressure plate, which in turn drives the
motorcycle forward.
The installed gap is what allows the auto function of the
product to perform properly. Setup, break-in, and rechecking
the installed gap is CRUCIAL. Failure to properly maintain
your installed gap can result in premature wear or failure of
your clutch.
Failure to check and verify Free Play Gain can cause
failure or damage to this product.Setting the correct
installed gap is critical for clutch performance.

Pg. 16
Doc ID: 191-
7803A
Doc Rev: 011918
Setting the installed gap and checking Free Play Gain is a 4-
step process. It is important to follow each step to ensure
that your new clutch functions as designed.
Step 1: Set the installed gap
Do not ride your bike without the adjusting the installed
gap. You will not be able to disengage the clutch until
you set the installed gap.
a) With the bike standing up, locate the adjuster screw in
the center of the adjustable slave cylinder.
b) With the O-ring showing, use a 4 mm hex key to turn
the adjuster screw clockwise until it stops under light
pressure. This is your “starting point.”
Note: The resistance you feel is where the throw-out begins
to lift the pressure plate. Finding the right starting point may
take a few tries, but you will feel a noticeable change in
turning effort once you reach that point. Stop when you feel
the pressure increase. The “starting point” will change as the
clutch pack wears over time.
Table of contents