REL Acoustics Britannia B1 User manual

USER MANUAL
Britannia™Series
B1
B2
B3
REL Acoustics Limited
North Road, Bridgend Industrial Estate
Bridgend, CF31 3TP
Great Britain
Telephone: +44 (0) 1 656 768 777
Fax: +44 (0) 1 656 766 093
Web: www.rel.net

REL Acoustics Britannia Range User Manual
2

REL Acoustics Britannia Range User Manual
3
Contents
CONTENTS ................................................................................................................................................... 3
IMPORTANT SAFEGUARDS ................................................................................................................... 4
WARNING..................................................................................................................................................... 4
WELCOME ................................................................................................................................................... 5
WORLD WIDE WARRANTY.................................................................................................................... 5
SERVICE AFTER WARRANTY.............................................................................................................. 5
DESIGN SAFETY......................................................................................................................................... 6
MAIN FEATURES OF THE REL BRITANNIA B1, B2 AND B3 SUB- BASS SYSTEMS............... 7
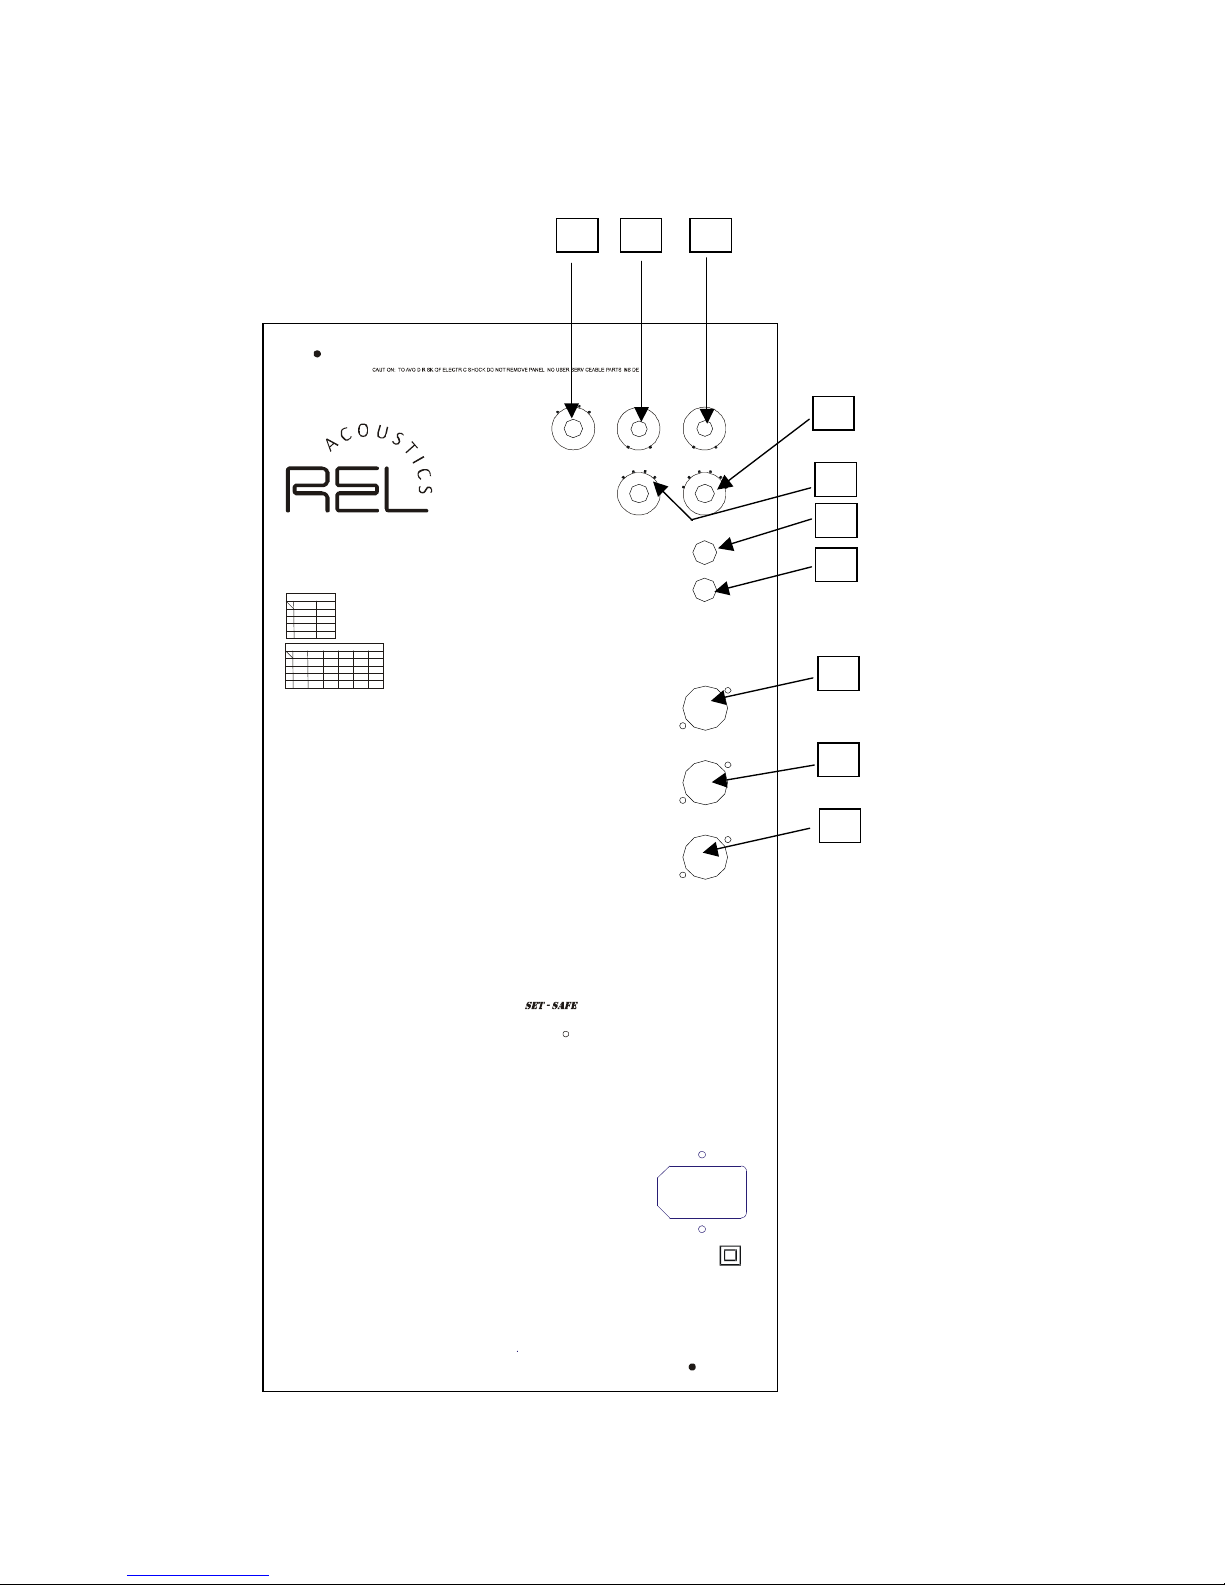
CONTROL PANEL...................................................................................................................................... 8
CONTROLS AND CONNECTIONS B1 ................................................................................................... 9
CONTROLS AND CONNECTIONS B2 ................................................................................................. 10
CONTROLS AND CONNECTIONS B3 ................................................................................................. 11
CONNECTING UP..................................................................................................................................... 13
TO CONNECT TO THE POWER AMPLIFIER USING THE UNBALANCED NEUTRIK HIGH LEVEL INPUT..... 13
TO CONNECT TO MONO BLOCK POWER AMPLIFIERS USING THE HIGH LEVEL NEUTRIK
UNBALANCED INPUT ............................................................................................................................ 14
TO CONNECT TO DIFFERENTIAL (BALANCED OUTPUT) POWER AMPLIFIERS USING THE BALANCED
HIGH LEVEL INPUT ..................................................................................................................................... 16
TO CONNECT TO THE AMPLIFIER/PROCESSOR USING THE PHONO TO PHONO LOW LEVEL INTERCONNECT
................................................................................................................................................................... 17
ALTERNATIVE METHOD FOR CONNECTING AT LOW LEVEL FROM PRE AMPLIFIER .................................. 18
TO CONNECT TO A PRE AMPLIFIER WITH LOW LEVEL DIFFERENTIAL (BALANCED) OUTPUTS.................. 19
REL SET-UP MADE SIMPLE ................................................................................................................. 20
REL SET-UP MADE SIMPLER .............................................................................................................. 23
RUNNING IN .............................................................................................................................................. 24
OVERLOAD PROTECTION ................................................................................................................... 24
CARE AND POLISHING.......................................................................................................................... 24
TECHNICAL............................................................................................................................................... 25
POWER SAVING EFFICIENCY............................................................................................................. 26
TECHNICAL SPECIFICATIONS BRITANNIA RANGE B1, B2 AND B3 ...................................... 27

REL Acoustics Britannia Range User Manual
4
IMPORTANT SAFEGUARDS
1. Read all of these instructions.
2. Save these instructions for future use.
3. Unplug from the wall socket before cleaning. Do not use liquid cleaners or aerosol
cleaners. Use a damp cloth for cleaning.
4. Do not use near water.
5. Do not place on a stand or table it may fall causing injury to a child or adult, and damage
to the unit.
6. The unit should only be operated from the power source indicated on the panel of the
amplifier.
7. Only use the power cord supplied.
8. Do not allow anything to rest on the power cord. Position the power cord such that it
cannot be walked on.
9. For added protection during a lightening storm, or when not in use for long periods of
time, unplug it from the wall socket.
10. Never spill any kind of liquid on the unit.
11. Do not attempt to service the unit yourself, as removing the amplifier may expose you to
dangerous voltages. Refer all servicing to your dealer.
12. Unplug the unit from the wall socket and refer servicing to your dealer under the following
conditions:
a. When the power cord or plug is damaged.
b. If liquid has been spilled onto the unit.
c. If the unit does not operate properly by following the operating instructions.
d. If the unit has been dropped and damaged.
e. When the unit exhibits a drastic change in performance.
WARNING
These items are extremely heavy. To avoid risk of injury, take care when handling.

REL Acoustics Britannia Range User Manual
5
WELCOME
Thank you for buying a REL Britannia range Sub-Bass system. Our Britannia range is
carefully hand built using the finest materials available and is designed for maximum
performance. This manual contains important safety information as well as helpful advice and
should be carefully studied before connecting up.
WARRANTY
This product is warranted to be free of all defects in material and workmanship for three years
from the date of original purchase by the original owner. A purchase receipt or other proof of
original purchase will be required before warranty service is rendered. This warranty is not
transferable and does not apply to any defects caused by negligence, accidents, misuse,
modification, disassembly, or repair by other than the manufacturer, or by other than normal
use for which this product was intended. Within the period of this warranty, Sumiko will repair
or replace at our service center located at 2431 Fifth St., Berkeley, CA 94710 any part proving
defective in material or workmanship. All expenses, except collateral expenses, related to
replacing or repairing a defective part under this warranty will be assumed by Sumiko, except
for the cost of transporting and insuring the product to our above-named service center. The
buyer must notify Sumiko of any defect, malfunction, or nonconformity promptly upon
discovery. Within 30 business days after receiving the defective product from the buyer,
Sumiko will repair or replace the defective part. We neither assume nor authorize any
representative or other person to assume for us any other liability in connection with the sales
or shipment of our products. We reserve the right to make changes or improvements in our
products without incurring any obligation to similarly alter products previously purchased. The
buyer has the right to bring any action at law or equity to resolve disputes concerning or to
enforce the provision of this warranty.
SERVICE AFTER WARRANTY
Please contact your dealer in the first instance before returning any product directly to us.
Should the unit need to be returned for any reason, all shipping costs will be payable by the
customer. Losses or damage caused during transit are the customer's risk.

REL Acoustics Britannia Range User Manual
6
DESIGN SAFETY
This apparatus is designed to Class II specification and is double
insulated, therefore it does not require to be grounded.
[Is below true, or should it be cut as indicated?]
This product is CE marked and has been tested to ensure it satisfies all relevant standards.
It satisfies all relevant standards for Conducted Emissions, Radiated Emissions,
Susceptibility and Immunity.
It also complies with the requirements relating to class II construction detailed in clauses 9 &
10 of BS EN 60065 1994
It also satisfies all relevant safety tests for consumer use provided it is used within the
guidelines of this manual.

REL Acoustics Britannia Range User Manual
7
Main Features of the Rel Britannia B1, B2 and B3 SUB- BASS SYSTEMS
1. Separate volume controls for both high and low level inputs
2. Critically correct semitone resolution of the filter controls
3. Balanced and unbalanced inputs via high quality sockets
4. Mode switch to control phase and low level filter bypass
5. All components of matching superior quality to achieve both long-life and long-term
consistency of sound quality.
6. All cabinets made from 30 mm thick MDF.
7. Superior wood veneered finishes available for all models.
8. Set-Safe® circuitry ensuring ultimate protection if overloaded.

REL Acoustics Britannia Range User Manual
8
Control Panel
The layout of the panel is intended to ensure total ease of use. Both low and high level inputs
can be used concurrently. Individual volume controls for the high and low level inputs ensure
precise individual adjustment for both high-level two channel (stereo) signals and multi-
channel LFE (surround sound) signals.
The mode switch allows both the phase and the filter bypass to be incorporated into one
control. The Line positions route the low level signals through the ABC filter circuits
(crossover controls). In the LFE (Low Frequency Effects) positions the low level signals
bypass this filter. This is to ensure compatibility with multi-channel home theatre surround
sound systems where the bass frequency range is controlled within the software by the
processor’s decoder circuitry. The high level inputs are always routed through the ABC.
The phase can be reversed by 180 degrees by means of this same switch to preserve the
relative phase between your main system and the REL. This acts at both high level and line
level. See table below.
MODE SELECTOR
SOURCE
PHASE
1
LINE
0
2
LFE
0
3
LINE
180 DEG
4
LFE
180 DEG
The two filter controls are to allow coarse and fine control of the filter settings. The coarse
control marked A through D changes the turnover frequency by approximately half an octave
per division. The fine control marked 1 through 6 offers a resolution of approximately one
semitone per division.
The frequencies offered by these two controls are shown in the table below:
ROLLOFF FREQUENCY HERTZ
1
2
3
4
5
6
A
22
23
25
27
28
30
B
32
34
36
38
41
43
C
46
49
53
56
60
64
D
69
73
78
83
89
95
These frequencies are within 1% tolerance and are repeatable between all Britannia range
models.

REL Acoustics Britannia Range User Manual
9
CONTROLS AND CONNECTIONS B1
See page 12 for explanation
1 2 3
4
5
6
7
9
8
10
HIGH LEVEL
UNBALANCED INPUT
CE
FUSE 6.3A/T
~ 100-120 VAC 50-60 HZ
300 WATT MOSFET SUB-BASS SPEAKER SYSTEM
PROTECTED BY
MADE IN GREAT BRITAIN
www.rel.net
R
HIGH LEVEL
BALANCED INPUT
Britannia B1
TM
MAX
MIN
MAX
MIN
1
2
3
4
A
B
C
D
1
2
3
5
6
MODE
LO LEVEL
HI LEVEL
COARSE
FINE
LO INPUT
0dB
+12dB
SOURCE
1
2
3
4
LINE
LFE
LINE
LFE
PHASE
0
0
180 deg
180 deg
MODE SELECTOR
ROLLOFF FREQUENCY
A
B
D
1
2
3
4
5
6
HERTZ
22
23
25
27
28
30
32
34
36
38
41
43
C
46
49
53
56
60
64
69
73
78
83
89
95
ROLLOFF
LINE LEVEL
BALANCED INPUT

REL Acoustics Britannia Range User Manual
10
CE
FUSE 6.3A/T
~ 100-120 VAC 50-60 HZ
200 WATT MOSFET SUB-BASS SPEAKER SYSTEM
PROTECTED BY
MADE IN GREAT BRITAIN
www.rel.net
R
Britannia B2
TM
MAX
MIN
MAX
MIN
1
2
3
4
A
B
C
D
1
2
3
4
5
6
MODE
LO LEVEL
HI LEVEL
COARSE
FINE
LO INPUT
0dB
+12dB
SOURCE
1
2
3
4
LINE
LFE
LINE
LFE
PHASE
0
0
180 deg
180 deg
MODE SELECTOR
ROLLOFF
HIGH LEVEL
UNBALANCED INPUT
LINE LEVEL
BALANCED INPUT
HIGH LEVEL
BALANCED INPUT
ROLLOFF FREQUENCY
A
B
D
1
2
3
4
5
6
HERTZ
22
23
25
27
28
30
32
34
36
38
41
43
C
46
49
53
56
60
64
69
73
78
83
89
95
CONTROLS AND CONNECTIONS B2
See page 12 for explanation
123
4
5
6
7
8
9
10

REL Acoustics Britannia Range User Manual
11
HIGH LEVEL
UNBALANCED INPUT
CE
FUSE 3.15A/T
~ 100-120 VAC 50-60 HZ
150 WATT MOSFET SUB-BASS SPEAKER SYSTEM
PROTECTED BY
MADE IN GREAT BRITAIN
www.rel.net
R
HIGH LEVEL
BALANCED INPUT
Britannia B3
TM
MAXMINMAXMIN
1
2 3
4
A
B C
D
1
2
3 4
5
6
MODE LO LEVEL HI LEVEL
COARSE FINE
LO INPUT
0dB
+12dB
SOURCE
1
2
3
4
LINE
LFE
LINE
LFE
PHASE
0
0
180 deg
180 deg
MODE SELECTOR ROLLOFF FREQUENCY
A
B
C
D
1 2 3 4 5 6
HERTZ
22 23 25 27 28 30
32 34 36 38 41 43
46 49 53 56 60 64
69 73 78 83 89 95
ROLLOFF
CONTROLS AND CONNECTIONS B3
See page 12 for explanation
123
4
5
6
7
8
9

REL Acoustics Britannia Range User Manual
12
MODE SWITCH. Used to set phase* and to bypass crossover for Low Level input**.
Position 1 / Line: 0 degrees phase, crossover engaged low level input
Position 2 / LFE: 0 degrees phase, crossover bypassed for low level input
Position 3 / Line: 180 degrees phase, crossover engaged for low level input
Position 4 / LFE: 180 degrees phase, crossover bypassed for low level input
*Phase selection affects both Hi and Lo level inputs
**Crossover is always engaged for Hi level input regardless of mode switch
position.
LO LEVEL input volume control. Adjust for output level when using LO LEVEL phono
input or balanced line level input XLR socket.
HI LEVEL input volume control. Adjust for output level when using HIGH LEVEL
UNBALANCED INPUT Neutrik socket or HIGH LEVEL BALANCED INPUT Neutrik
socket.
FINE ROLL OFF control. Fine adjustment of roll off point, used in conjunction with
Coarse Roll Off control (below). See chart on amplifier panel or in this manual, page 8,
for crossover frequencies determined by setting combinations of both controls.
COARSE ROLL OFF control. Coarse adjustment of roll off point, used in conjunction
with Fine Roll Off control (above). See chart on amplifier or in this manual, page 8, for
crossover frequencies determined by setting combinations of both controls.
0dB LO INPUT phono socket. Used to connect the Sub Bass System at low level to
the sub/LFE output of the amplifier/processor or left and right pre-amp outputs.
If Lo Level inputs are used to connect pre-amp right and left outputs then a 12dB
attenuator is available from REL to balance the two inputs.
+12dB LO INPUT phono socket . As 6 but a higher sensitivety. If LO LEVEL inputs
are used connected to pre-amp right and left outputs then a 12 dB attenuator is
available from REL to balance the two inputs.
HIGH LEVEL BALANCED INPUT. Neutrik Speakon socket. Used to connect the Sub
Bass System at high level to the speaker output of one channel of a differential output
or bridged to mono amplifier.
HIGH LEVEL UNBALANCED INPUT. Neutrik Speakon socket. Used to connect the
Sub Bass System at high level to the main speaker output of amplifiers.
LOW LEVEL BALANCED INPUT. XLR socket. Used to connect the Sub Bass System
at low level to pre-amplifier balanced line outputs. (Not on B3)
[Mention of Power Switch and underslung LED power indicator needs mention here,
and potential additions to panel graphics on preceding pages.]
1
2
3
4
6
7
8
9
10
5

REL Acoustics Britannia Range User Manual
13
CONNECTING UP
Always switch off your system before disconnecting any wires
To increase the versatility of connecting up, the Britannia range has various separate inputs
depending on the model, see pages 9,10 and 11.
To connect to the power amplifier using the UNBALANCED Neutrik high
level input.
To engage the Neutrik Speakon plug, insert fully into socket and rotate clockwise until locked.
To remove the Neutrik Speakon plug, grip body of plug, place thumb on chrome lever, move
lever backwards rotate plug anti-clockwise (counter-clockwise in the US) quarter turn and
withdraw.
The high level input* is designed to accept the stereo (two channel) signals from the speaker
terminals of your receiver, integrated amplifier, and basic amplifiers. This has the advantage
of ensuring that your subwoofer receives exactly the same signal as the main speakers,
which means that the character of the bass from the main system is carried forward into the
sub-bass. This is a very important point and together with the REL’s ABC circuitry, ensures
far superior system integration of the sub-bass with the main system.
*This input is labeled “HIGH LEVEL UNBALANCED INPUT” on B1, B2 and B3. This is
the most common or standard recommended means of connecting the sub for two
channel use.
Supplied Neutrik Speakon High level Interconnect
HIGH LEVEL Release lever YELLOW + - + -
UNBALANCED INPUT BLACK L R
RED
Amplifier main speaker outputs
High level connections should be made to the same binding posts as the main
speakers
Connect as shown above. Red to amplifier main right speaker red terminal, yellow to
amplifier main left speaker red terminal and black to amplifier main speaker black terminal,
right or left but not both.
Plug the Neutrik Speakon plug into the HI LEVEL Neutrik socket.
The output level is adjusted using the control marked HI LEVEL.

REL Acoustics Britannia Range User Manual
14
To connect to MONO BLOCK power amplifiers using the high level
Neutrik UNBALANCED input (or for use with a single sub-bass system
and stereo or dual mono block differential output amplifiers)
Note: A differential amplifier does not have to be a mono amplifier, or one that has balanced
inputs. There are a number of stereo integrated and basic amplifiers that are differential. The
output topology of the amplifier should be checked before connection to the Sub Bass System
is made, if this is not clear from the amplifier user manual then consult the manufacturer.
To engage the Neutrik Speakon plug, insert fully into socket and rotate clockwise until locked.
To remove the Neutrik Speakon plug, grip body of plug, place thumb on chrome lever, move
lever backwards rotate plug anti-clockwise (counter-clockwise in the US) quarter turn and
withdraw.
Supplied Neutrik Speakon High level Interconnect
RED
HIGH LEVEL Release lever YELLOW + - + -
UNBALANCED L R
INPUT MONO MONO
BLACK BLOCK BLOCK
SPK OUT SPK OUT
PRE AMPLIFIER
Ground
(see below)
High Level connections should be made to the same binding posts as the main
speakers
Connect as shown above. Connect RED to right monoblock speaker positive (red) terminal,
connect YELLOW to left monoblock speaker positive (red) terminal. The BLACK should be
connected to ground at the pre amplifier. If the pre amplifier does not have a dedicated
ground terminal, then use one of the chassis screws at the rear of the pre amplifier or
amplifier.
NOTE:- MAKE SURE THAT ANY CHASSIS SCREW WHICH IS USED IS NOT CAPTURED
ON THE INSIDE WITH A NUT, THE NUT COULD DROP INSIDE THE UNIT.
The output level is adjusted using the control marked HI LEVEL.

REL Acoustics Britannia Range User Manual
15

REL Acoustics Britannia Range User Manual
16
To connect to differential (balanced output) power amplifiers using the
BALANCED high level input
To engage the Neutrik Speakon plug, insert fully into socket and rotate clockwise until locked.
To remove the Neutrik Speakon plug, grip body of plug, place thumb on chrome lever, move
lever backwards rotate plug anti-clockwise (counter-clockwise in the US) quarter turn and
withdraw.
The high level balanced input is also single channel and is designed to take the high level
output from the speaker terminals of differential output (bridged mode) amplifiers. Because
the intention of using separate bridged amplifiers is to ensure entirely separate signal paths
for both channels, two separate Sub-Bass Systems are required for your system to reach its
optimum potential, one for each channel.
A differential amplifier does not have to be a mono amplifier, or one that has balanced inputs.
There are a number of stereo integrated and basic amplifiers that are differential.The output
topology of the amplifier should be checked before connection to the Sub Bass System is
made, if this is not clear from the amplifier user manual then consult the manufacturer.
Supplied Neutrik Speakon High level Interconnect
YELLOW
HIGH LEVEL Release lever RED + -
BALANCED RIGHT
INPUT MONO
BLACK BLOCK
SPK OUT
PRE AMPLIFIER
Ground
(see below)
High Level connections should be made to the same binding posts as the main speakers
Note: Monoblock amplifiers may or may not be bridged output. See the manufacturers
documentation for your amplifier if you are uncertain.
The BLACK should be connected to ground at the pre-amplifier. If the pre amplifier does not
have a ground terminal, then use one of the chassis screws at the rear of the pre-amplifier or
amplifier.
The output level is adjusted using the control marked HI LEVEL

REL Acoustics Britannia Range User Manual
17
To connect to the amplifier/processor using the phono to phono low
level interconnect
Two low level inputs are provided, 0dB and +12dB,
Connect as shown above using a phono to phono interconnect (not supplied). Plug one end
into the sub/LFE output on the amplifier/processor and the other end into the 0dB input on the
sub woofer.
If when using the 0dB input the output of the sub woofer is too low then use the +12dB input.
The output level is adjusted using the control marked LO LEVEL
If the low level connection is to be made to left and right pre-amp outputs then a 12dB
attenuator is available to balance the 0dB and +12dB phono inputs. See below.
Phono to Phono Interconnect.
(Not supplied) To sub/LFE output of
Amplifier/Processor
Sub Low Level
Input
.
Sub Low Level 12dB Phono to phono
Input Attenuator interconnect (Not supplied)

REL Acoustics Britannia Range User Manual
18
Alternative method for connecting at Low Level from pre amplifier
In some circumstances it is not possible to use the high level method of connection, for
example when using active speakers. Instead of using the attenuator as shown on page 16,
connect as shown below using a “Y” adapter from the left and right pre amplifier outputs and a
single phono to phono interconnect from the “Y” adapter to one of the low level inputs on the
REL.
Only use this method if the pre amplifier has two separate outputs.
In the unlikely event that the second pre amplifier output is only a parallel connection to the
other then this method will cause a mono signal to be sent to the main amplifier(s) or active
speakers.
If in doubt then contact your dealer/distributor or the manufacturer of the pre amplifier for
advice.
If the pre amplifier only has one set of left and right outputs then do not use a “Y” adapter
from each channel to a single “Y” adapter to the REL, this will have the effect of causing a
mono signal to be sent to the main amplifier(s) or active speakers.
If the pre amplifier only has one set of left and right outputs then “Y” adapters can be used to
create a second set of left and right outputs. This extra set of left and right outputs should
then be connected to the REL using the attenuator as shown on page 16.
Pre Amplifier
L R L R
Output A
Output B
REL Lo Level Inputs
Phono “Y” Adapter
Phono to Phono
Interconnect

REL Acoustics Britannia Range User Manual
19
To connect to a pre amplifier with low level differential (balanced)
outputs
To engage the XLR plug, insert fully into XLR socket until a click is heard. To Release the
XLR plug, push the lever on the XLR socket forward and pull the XLR plug out.
The XLR balanced input (not fitted on B3) is a single channel input designed for professional
use when connected to a mixing desk or a pre-amp/control unit with balanced line outputs.
Two sub bass systems are required one for each channel. Connections for one channel
shown below.
BAL LO INPUT XLR to XLR Interconnect
(Not Supplied)
To pre amplifier balanced
Line output
Connect as shown above using an XLR to XLR interconnect (not supplied).
The output level is adjusted using the control marked LO LEVEL.

REL Acoustics Britannia Range User Manual
20
REL Set-Up Made Simple
RELs are not traditional subwoofers, but true sub-bass systems. A REL is designed to
augment the performance of “full range” speaker systems, to provide linear response down to
below 12 Hz. Therefore, for the moment, set aside everything you’ve been taught about
subwoofers and how they are integrated into a stereo or theatre system. REL’s set-up and
positioning differs from other subwoofers. A REL will take advantage of physics and room
acoustics to provide deep pressurisation as no other sub-woofer can. It’s important that you
bring to the set-up process a willingness to do things a little differently in order to obtain these
superior results. The end result of your labours will be an utterly seamless integration of true
deep bass to a sound system, regardless of the main speaker’s low bass capability.
Two Things Before You Begin
A. It is helpful to know that you will almost always connect the REL to the input on the
rear panel labelled “HIGH LEVEL.” This connection is made using the supplied 34’
10” (10 meters) cable, the bare leads of which connect to the speaker output
terminals of the power amplifier. The easy and foolproof connection at the REL is
done with a Neutrik Speakon connector. The purpose of connecting to the speaker
output terminals is one of the unique secrets of REL’s success. By connecting to the
high level input on the REL from the amplifier, you build forward the sonic signature of
your main system, including the tonal balance and timing cues of the entire
electronics chain. In this way, the REL is fed the exact signal that is fed to the main
speakers.
B. When possible, the REL should be placed in one of the corners behind the speakers.
Remember, we are dealing with true LOW bass pressurisation with RELs, not the
mid-bass that most competitors settle for. Low bass pressurisation below 40Hz is
best derived from corner placement, where the most linear and efficient low bass can
be produced.
Basic set-up should take no more than ten to fifteen minutes to accomplish once connected.
Connecting
High-level connection, using the enclosed cable with the Neutrik Speakon connector,
is always the first choice. By connecting to the amplifier’s speaker outputs the sonic
signature of the entire amplification chain is folded into the signal for the sub, thereby
keeping timing and timbre cues consistent. In other words, the signal sent to the REL
is exactly the same signal sent to the speakers, allowing for seamless integration. This
connection can be made without affecting the performance of the amplifier because
the sub’s amplifier input impedance is 100,000 ohms. This scheme also avoids adding
any detrimental effects by not interposing any additional electronics into the
amplification chain.
•The standard high level hook up procedure is: attach the red wire to the amplifier’s
right positive speaker output terminal; attach the yellow wire to the amplifier’s left
positive speaker output terminal; attach the black wire to which ever of the amplifier’s
ground output terminals is convenient; plug the Speakon connector into the sub’s
high level input.
•For differential amplifiers using one sub, simply use the standard connecting scheme
with the exception of connecting ground to chassis ground, not to speaker output
ground, and then connecting into the HIGH LEVEL UNBALANCED INPUT.
•For differential amplifiers using two subs, one for each channel: connect red to
positive; yellow to negative; and black to chassis ground; plug the Speakon into the
HIGH LEVEL BALANCED INPUT.
Low-level connection, RCA inputs (or XLR on some models), is always an option, should
high-level connection not be possible, or in a theatre system where both high-level and low-
level connection should be used. When connecting to the low level inputs, connect a single
RCA cable to the 0dB RCA jack. Additional gain can be achieved by connecting to the +12dB
input.
This manual suits for next models
2
Table of contents