Relish 008539993-0002 User manual

User Mnul
Please read this user manual
carefully before using the product
Radio & Music Player
DAB/DAB+/FM

Specifications
Digital Frequency: 174.928MHz(5A) - 239.200MHz(13F)
FM Frequency: 87.5MHz-108MHz
Input: 5.9V DC power adaptor socket (110-230V supplied)
Power Consumption: 8.85W
Speakers: 4/3W/2” drivers
Audio Output Power: 2 x 1.5W RMS
Output: 3.5mm stereo headphone
Mains Power Adaptor: Input AC 100-240V~ 50/60Hz, 1.5A
Output DC 5.9V 1.5A
Battery: 4 x Type D (not included)
Display: 3 line LCD display
Presets: 3 radio stations
USB Playback: MP3
Operational Temperature: Between 0C to +40C (32F to 104F)
Aerial: Captive telescopic aerial
Dimensions: 245 x 108 x h182 mm
Registration Numbers:
EU - 008539993-0002
UK – 6137034
Contents
English Frnçis
Espñol Deutsche
3
About
5
Finding and Saving
Stations
10
FAQ
4
Getting Started
7
8
How to Upload MP3 Files
Download MP3 audio files
12
Precautions
13
À Propos
16
Enregistrement des
stations
17
FAQ
14
Démarrer
17
Lecture de vos propres
fichiers audio
18
Précautions
19
Acerca de
22
Memorizar emisoras
23
Preguntas frecuentes
20
Puesta en marcha
23
Reproducir su
propia música
24
Precauciones
25
Über das Gerät
28
Sender speichern
29
FAQ
26
Erste Schritte
29
Ihre eigenen Audio-
Aufnahmen abspielen
30
Vorsichtsmaßnahmen

3 4
Headphone
socket
USB socket to play
your own music
Factory Reset
Aerial
Aerial
DC power
socket
for power
adaptor
Display
Battery
compartment
4 x D batteries
FM/DAB+ Search between
stations during
setup
‘SELECT’ to select
station during setup
About the Relish Radio & Music Player
Tune in and enjoy the power of music!
Our unique product has been designed specifically to enable people
with all abilities to listen to their favourite music independently.
‘VOLUME’
dial
‘ON’ button
‘OFF’ button
Memory buttons
for your favourite
stations
‘My Playlist’ button
(plays USB)
Customisable
label behind
removable
plastic cover
Plastic cover
Stereo
Speakers
EN
Getting Started
How to set up your radio
Step 1 Assemble the power adaptor with the USA or UK plug.
Connect the power
adaptor supplied to the
DC power socket on the
back of your radio, and
plug the mains adaptor
into the mains supply.
Alternatively, use 4 x D
batteries.
Rotate the aerial to a vertical position and extend to full length.
Step 2
UK
plug
USA
plug
Adaptor
Press ‘ON’ to turn on
the radio. Make sure
the volume is turned up.
Step 3
Remove the back cover on the radio to access the display panel.Step 4
Back
cover

5 6
Press ‘MODE’ to switch
between FM radio and
DAB+ radio modes
(Applies to DAB+ Radio
& Music Player version
only).
Step 1
In FM mode, find the next station by holding down the
‘<’ or ‘>’ button for 3 seconds. Repeat until you find the
station you want to save.
In DAB+ mode, press and hold ‘SELECT’ to auto-scan for
stations. When the scan is complete, press the ‘<’ or ‘>’ button
to browse through the stations. Press ‘SELECT’ to tune into the
station you want to listen to (Applies to DAB+ Radio & Music
Player version only).
Step 2
Press and hold a memory button whilst listening to that
station to save the station to it.
Step 3
Finding and Saving Stations
Saving Your MP3 Files onto Your USB Memory Stick
How to find radio stations and save them to the memory buttons
Downloaded MP3 Audio Files - Windows
When the station is saved, remove the plastic cover on
the label by bending it slightly, and write a personalised
description on the customisable label card. Then, replace
the plastic cover.
Step 4
Step 5
EN
Please find replacement labels in your packaging. Use a
new label if you decide to change the recorded station.
Repeat steps 3 and 4 to setup the remaining two memory buttons.
Save your MP3 files to your ‘Desktop’, ‘Documents’ or ‘Music’
folder. Make sure the files are un-zipped.
Step 1
Click and drag over the MP3 files to select all files.Step 2
Step 3 Right click on the first trck on the playlist. Select ‘Copy’ from
the drop-down menu.

7 8
Insert a formatted USB memory stick into the USB port on your
computer.
Open the USB memory stick drive folder.
Right click inside
the window, and
select ‘Paste’ from
the drop-down
menu. Wait until
the files have
finished uploading.
Repeat the
process to add
more MP3 music.
When you have uploaded your music, eject the USB safely.
Ensure the Relish Radio is in Standby mode by pressing the
‘OFF’ button on the top of the product.
Remove the battery cover, and insert the USB memory stick into
the USB socket. Replace the battery cover.
Should you ever remove the USB memory stick, please press the
‘OFF’ button to put the product into standby mode beforehand.
Switch on the Relish Radio by pressing the ‘ON’ button on the
top of the product. Press the ‘MY PLAYLIST’ button to play your
playlist.
If the radio is switched o or tuned to a radio station mid-way
during an MP3 playlist track, it will resume from the start of the
track when ‘MY PLAYLIST’ is next selected.
Step 4
Step 5
Step 6
Step 7
Step 8
Step 9
Step 10
Step 11
Step 12
Open Windows Media Player.Step 1
Downloded MP3 Audio Files - Windows CD Drive
Click the D drive on the media player to view all the tracks on the CD.
All tracks will default as selected, if you wish to choose only
a few tracks, untick those you don’t want.
Click on ‘Rip CD’ on the tool bar.
Step 2
Step 3
Step 4

9 10
Select the correct copyright option in the ‘Rip Options’ pop-up
window.
The tracks will ‘Rip’ to your music files.
Open up the Files icon on the toolbar, click on My PC folder to
locate the Music folder – all the tracks will be here. Open up
individual folders to see all the tracks.
Step 6
Step 5
Click and drag over the MP3 files to select all files.Step 7
Insert a formatted USB memory stick into the USB port on your
computer.
Step 9
Open the USB memory stick drive folder.Step 10
Right click inside the window, and select ‘Paste’ from the drop-
down menu. Wait until the files have finished uploading.
Step 11
When you have uploaded your music, eject the USB safely.Step 12
Follow these instructions to import audio files from CDs in MP3
format: https://support.apple.com/en-gb/guide/music/mus2965/mac
Locate the MP3 files on your computer.
Insert a formatted USB memory stick into the USB port on your
computer.
Open the USB memory stick drive folder.
Right click inside the window, and select ‘Paste’ from the drop-
down menu. Wait until the files have finished uploading. The
files should now be copied to the USB memory stick:
Repeat the process to add more MP3 music.
Ensure the Relish Radio is in Standby mode by pressing the
‘OFF’ button on the top of the product.
Remove the battery cover, and insert the USB memory stick into
the USB socket. Replace the battery cover.
Should you ever remove the USB memory stick, please press the
‘OFF’ button to put the product into standby mode beforehand.
Switch on the Relish Radio by pressing the ‘ON’ button on the
top of the product. Press the ‘MY PLAYLIST’ button to play your
playlist.
If the radio is switched o or tuned to a radio station mid-way
during an MP3 playlist track, it will resume from the start of the
track when ‘MY PLAYLIST’ is next selected.
Step 1
Step 2
Step 3
Step 4
Step 5
Step 6
Step 7
Step 8
Step 9
Step 11
Step 10
MP3 Audio Files From CD - MAC OS
Step 8 Right click on the first trck on the playlist. Select ‘Copy’ from
the drop-down menu.
Click and drag over the MP3 files to select all files. Right click
on the first trck on the playlist. Select ‘Copy’ from the drop-
down menu.
Ensure the Relish Radio is in Standby mode by pressing the
‘OFF’ button on the top of the product.
Remove the battery cover, and insert the USB memory stick into
the USB socket. Replace the battery cover.
Step 13
Step 14
Why is my rdio reception poor?
1. Make sure the aerial is extended for the maximum signal strength.
2. Move the radio to an alternative location to see if the reception
improves.
3. Check that you do not have other electrical equipment too close
to your radio, this may cause interference.
4. Re-scan the stations by pressing and holding ‘SELECT’ at the
back.
Frequently Asked Questions

11 12
Precautions
EN
Keep the radio away from liquids. Switch o the radio and
disconnect it from the mains immediately if any liquid is spilled
on or near the radio.
The radio should not be used in a high temperature or high
humidity environment over prolonged periods of time as this
may damage the unit.
Avoid using or storing the unit in a dusty or sandy environment.
Clean only with dry cloth.
Use only the AC/DC adaptor supplied with the radio.
Connecting a power supply with a dierent rating will cause
permanent damage to the radio and may be hazardous.
The mains plug or an appliance couple is used as the disconnect
device, the disconnect device shall remain readily operable
To prevent fire or electric shock hazard, do
not expose this product to rain or moisture
: to reduce the risk of electric shock, do not remove the radio cover.
no user serviceable parts inside, refer servicing to qualified service personnel
WARNING:
the lightning flash and arrowhead within the triangle is awarning sign
alerting you of “dangerous voltage” inside the radio.
the exclamation point within the triangle is awarning sign alerting you
of important instructions accompanying this radio
risk of electric
shock do not open
CAUTION
Don’t treat the radio as household waste. Check your local
electronic waste disposal service for right information.
Do not open and repair the radio by yourself.
Why is my rdio not working?
1. Make sure your radio is connected to a power supply. Check the DC
and mains sockets. If you are using batteries, make sure they are fully
charged.
2. Check the volume and adjust it as needed.
How cn I go bck to fctory settings?
Use a pin to press the factory reset button. This can be found near the
USB socket. Please note all memory will be erased once the reset is
pressed.
Why is my plylist plying in n unexpected order?
Please format your memory stick and repeat the step-by-step
instructions. Ensure that you right-click the first track of the playlist
when you are completing Step 2 of ‘Downloaded MP3 Audio Files’
Why is the rdio disply reding ‘T1/0’, and not recognising the
udio files?
1. Please ensure that the MP3 files are being pasted from your
‘Desktop’, ‘Documents’ or ‘Music’ folder. Files may not work if
pasted from the ‘Download’ folder.
2. Make sure any ‘zipped’ files are ‘unzipped’ before moving onto the
USB memory stick.
Cn I Use Downloded MP3s from Mc OS?
Mac OS is not fully supported. Files will play, but playlist issues may
occur. Format in Windows for a more reliable result.
Plese note:
DAB+ radio service is not available in North America.
Visit http://www.worlddab.org/ for more information about digital
radio reception in your area.
Why is the rdio skipping trcks / only plying odd or even trcks?
You have probably uploaded the MP3 files from an Apple Mac computer.
Please see the point below.

13 14
Prise du casque
Prise USB pour
jouer vos propres
fichiers audio
Réinitialisation
de la radio
Antenne
Aerial
Prise
d’alimentation
c.c. pour
l’adaptateur
Achage
Compartiment
pour les piles
Bouton «Select» pour
jouer les stations
Commutation
entre les modes
FM/Numérique
Parcourir les
stations
À propos de notre radio/lecteur de musique
Allumez la radio et profitez du pouvoir de la musique!
En quoi la radio Relish est-elle diérente?
La radio Relish a été conçue spécifiquement pour permettre aux personnes
en situation de handicap d’écouter la musique qui leur plaît en toute
indépendance. Grâce aux trois boutons de préréglage de vos favoris, vous
pouvez facilement retrouver les stations ou les playlists que vous aimez.
Le panneau supérieur incomparable de la radio Relish vous permet de
personnaliser votre appareil comme vous le souhaitez. Que vous inscriviez
«Jazz des années 60», «Musique de détente», «Rythmes entraînants»
ou simplement «Actualités», profitez de la musique qui vous convient
le mieux.
Bouton de
volume
Bouton de
marche
Bouton
d’arrêt
Boutons de
mémorisation de vos
stations préférées
Bouton de
commutation vers
le mode USB
Nommez les
stations comme
vous voulez
Haut-parleurs
FR
Démarrer
Comment régler votre radio?
Étape 1 Assemblez l’adaptateur secteur avec la prise britannique ou
la prise américaine.
Branchez l’adaptateur secteur à la prise c.c. de la radio et
branchez l’autre extrémité à une prise murale. Vous pouvez
également utiliser 4 piles de type R20. Déployez complètement
l’antenne.
Étape 2
Prise britannique
Prise américaine
Adaptateur
Appuyez sur le bouton de marche pour allumer la radio.
Assurez-vous que le volume est activé.
Étape 3

15 16
Retirez le couvercle arrière de la radio pour utiliser le panneau
d’achage.
Appuyez sur le bouton MODE pour alterner entre le mode FM
et le mode numérique.
REMARQUE: Le service de radio numérique n’est pas disponible
en Amérique du Nord. Consultez le site http://www.worlddab.
org/ pour en savoir plus sur la réception des radios numériques
dans votre région.
Étape 4
Étape 5
Si vous êtes en mode FM, syntonisez manuellement en appuyant
sur les boutons < ou >.
Si vous êtes en mode Numérique, maintenez le bouton SELECT
enfoncé pour détecter automatiquement les stations. Lorsque le
balayage des stations est terminé, appuyez sur le bouton < ou >
pour parcourir les stations. Appuyez sur le bouton SELECT pour
sélectionner la station que vous désirez écouter.
Étape 6
Trois boutons Mémoire sont présents
sur le panneau supérieur de la radio.
Vous pouvez enregistrer vos stations
de radio préférées sur ces boutons
afin de les retrouver facilement.
Revenez au panneau d’achage à l’arrière de la radio.
Choisissez le mode FM ou Numérique. Parcourez les stations
pour trouver celle à enregistrer. En mode Numérique, appuyez
sur SELECT pour écouter la station. Pendant l’écoute de la
station de radio, maintenez un bouton Mémoire enfoncé pour
enregistrer la station.
Étape 1
Enregistrement des stations
Comment enregistrer les stations dans les boutons Mémoire?
Lorsque vous êtes satisfait(e) des stations enregistrées, retirez le
film plastique de l’étiquette en le pliant légèrement et inscrivez un
nom descriptif, personnalisé et logique pour vous. Par exemple
«Relaxation d’après-midi» ou «Classique». Replacez le film
plastique sur l’étiquette.
REMARQUE: Vous trouverez des étiquettes de rechange dans votre
emballage. Utilisez une étiquette neuve si vous décidez de modifier la
station enregistrée.
Étape 2
FR

17 18
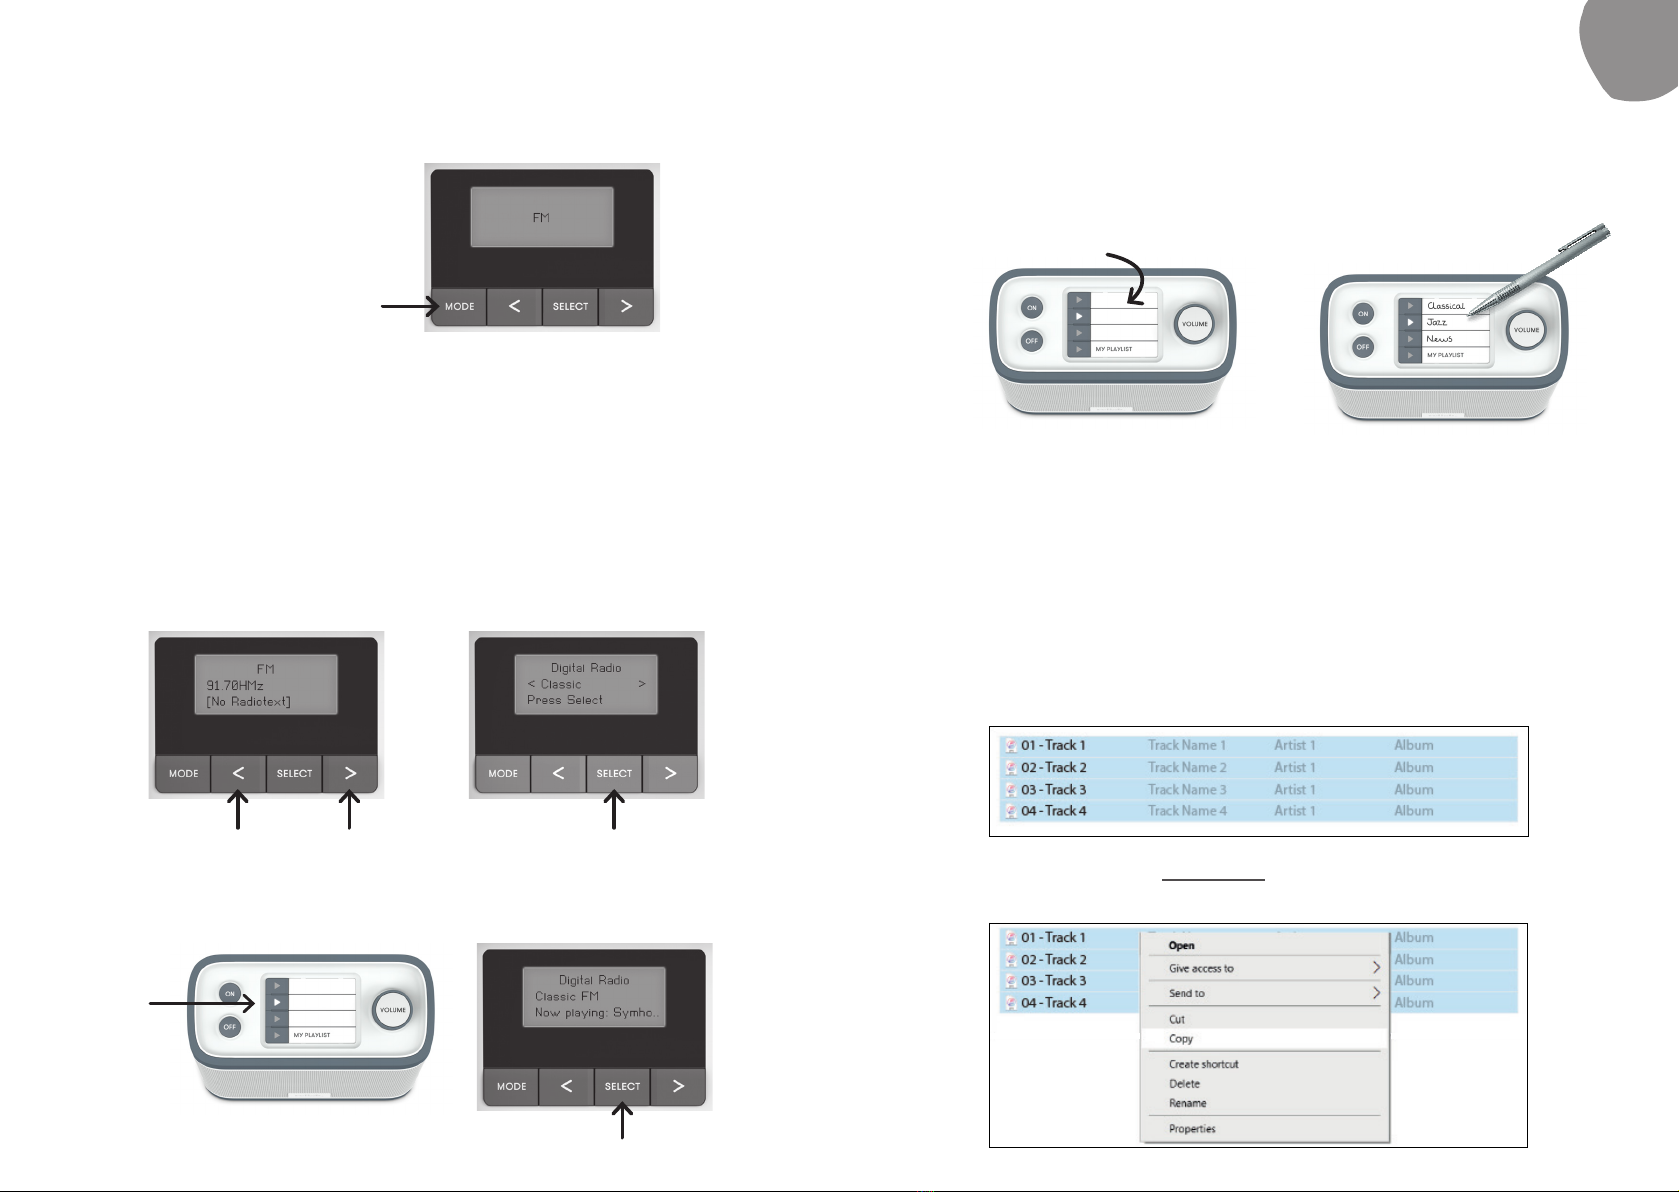
Revenez au panneau d’achage à l’arrière de la radio. Branchez
la clé USB, puis appuyez sur le bouton MY PLAYLIST (4e bouton)
du panneau supérieur.
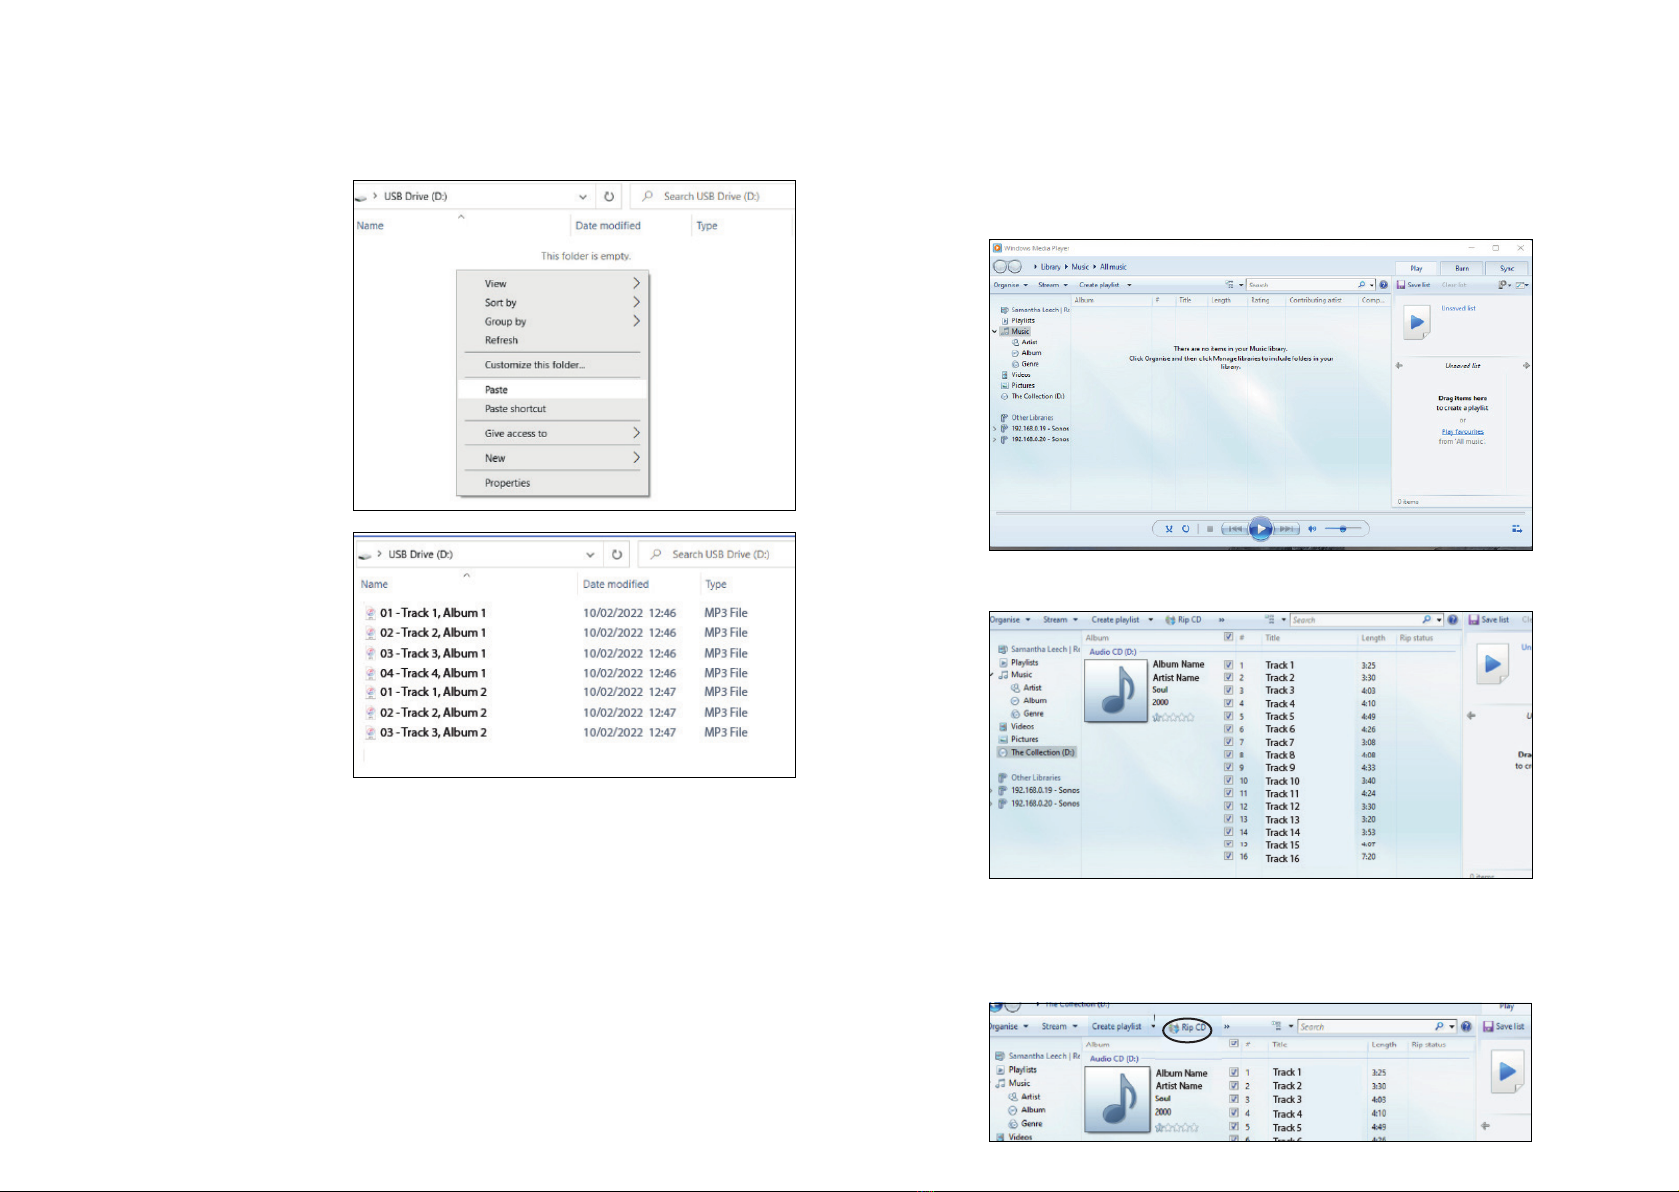
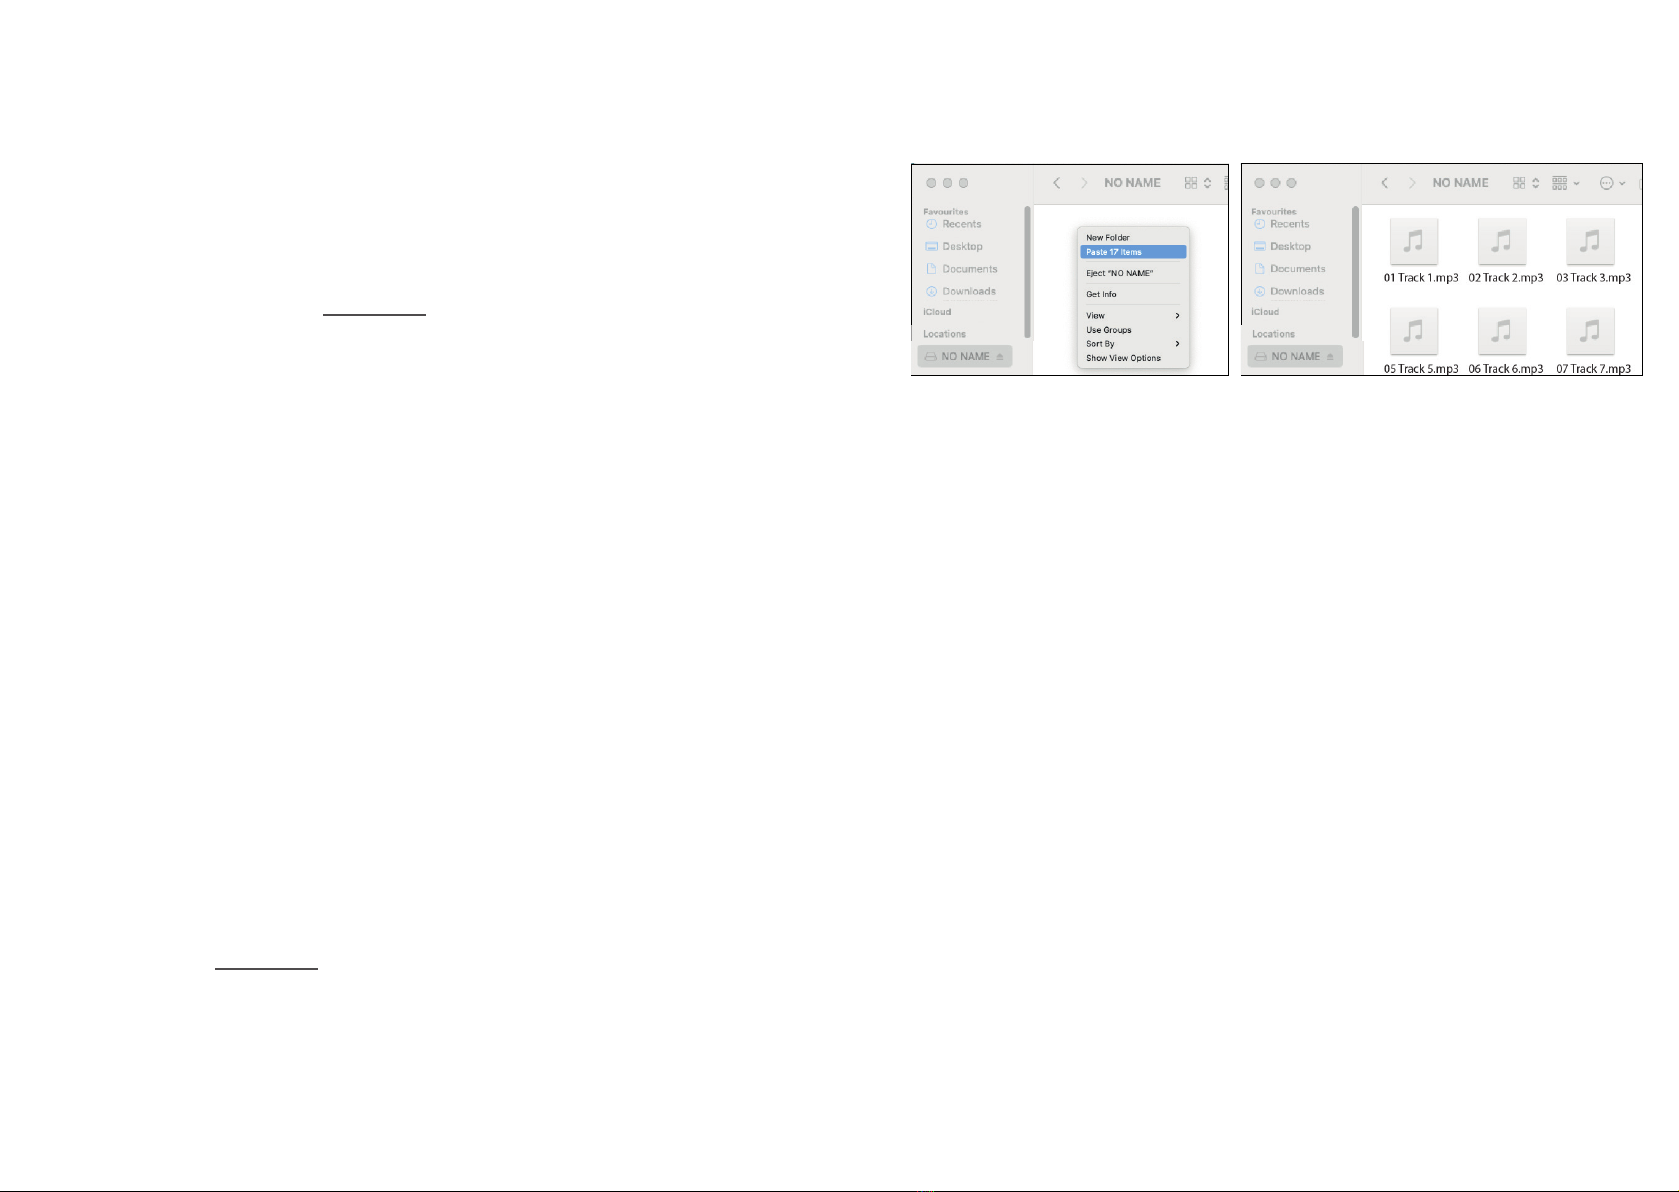
Pour pouvoir lire votre propre liste de lecture, vous devez d’abord
enregistrer les pistes MP3 sur votre clé USB via votre ordinateur
portable ou votre ordinateur.
Étape 2
Étape 1
Lecture de vos propres fichiers audio
Comment lire des fichiers audiobooks à partir d’une clé USB?
Pour quelle rison l réception rdio est-elle de muvise qulité?
1. Vérifiez que l’antenne est bien déployée pour obtenir le meilleur
signal possible.
2. Déplacez la radio à un autre endroit pour tenter d’améliorer la réception.
3. Assurez-vous qu’aucun autre appareil électrique, susceptible de
provoquer des interférences, n’est à proximité de la radio.
4. Relancez le balayage des stations en maintenant le bouton SELECT
enfoncé à l’arrière de l’appareil.
Pour quelle rison m rdio ne fonctionne ps?
1. Vérifiez que votre radio est bien branchée à une alimentation électrique.
Vérifiez la prise c.c. et la prise secteur. Si vous utilisez des piles, assurez-
vous qu’elles sont complètement chargées.
2. Vérifiez le volume et réglez si nécessaire.
Comment revenir ux prmètres pr défut?
Un bouton de réinitialisation se trouve à côté de la prise USB. Utilisez une
épingle pour cliquer sur le bouton et revenir aux réglages d’usine. Notez
que toute la mémoire sera eacée une fois la réinitialisation terminée.
Foire ux questions
Précautions
FR
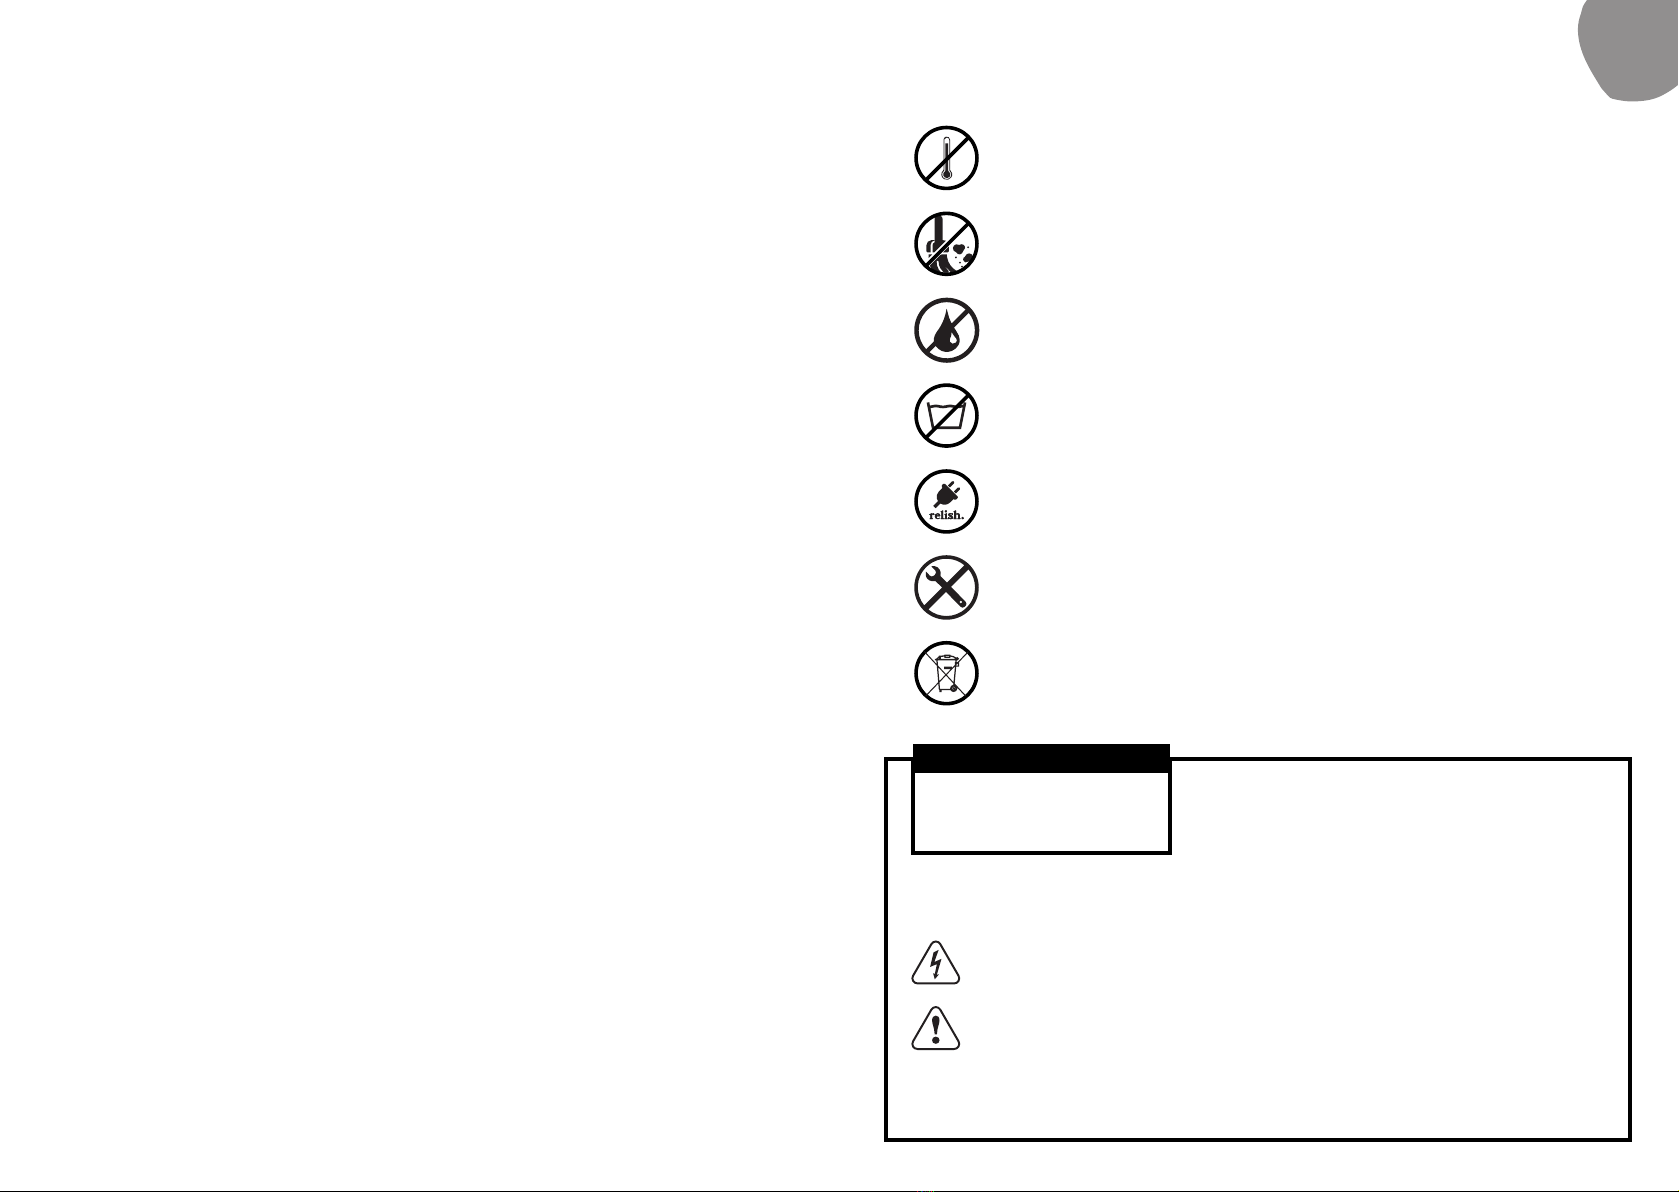
Tenir la radio à l’écart des liquides. Éteindre et débrancher
immédiatement la radio de la prise secteur si un liquide se
répand sur l’appareil
Cette radio ne doit pas être utilisée dans un environnement
très chaud ou très humide pendant une période prolongée au
risque de l’endommager
Éviter d’utiliser ou de ranger l’appareil dans un
environnement poussiéreux ou sablonneux
Nettoyer uniquement avec un chion sec
Utiliser uniquement l’adaptateur c.a./c.c. fourni avec la radio.
Le branchement d’un adaptateur avec une puissance diérente
pourrait endommager irrémédiablement la radio et être dangereux
La prise secteur ou le connecteur est utilisé comme dispositif de
déconnexion. Le dispositif de déconnexion doit rester opérationnel
Pour éviter tout
: pour réduire le risque de choc électrique, ne pas retirer le
couvercle de la radio. ne contient aucune pièce que l’utilisateur peut réparer.
consulter un professionnel pour les réparationspersonnel
AVERTISSEMENT
la flèche en forme de foudre dans un triangle est un signal d’alerte qui
indique une «tension dangereuse» àl’intérieur de la radio.
le point d’exclamation dans le triangle est un signal d’alerte qui indique
que cette radio est accompagnée d’instructions importantes
risque de choc
électrique, ne pas ouvrir
ATTENTION
Ne pas jeter cette radio comme un déchet ménager.
Consulter le centre local de gestion des déchets
électroniques pour connaître la procédure à suivre
Ne pas ouvrir ou réparer la radio soi-même
risque d’incendie ou de choc électrique,
ne pas exposer ce produit à la pluie ou
l’humidité

19 20
Toma para
auriculares
Toma USB para
reproducir su propia
música
Reiniciar la radio
Antena
Aerial
Toma de
alimentación
CC para
adaptador
Pantalla
Compartimento
para las pilas
Seleccione esta
opción «Select»
para escuchar
emisoras
Interruptor de
modo FM/Digital Navegar por las
emisoras
Acerca de nuestro reproductor de música y radio
Sintonice y disfrute del poder de la música
¿Por qué la Radio Relish es diferente?
La Radio Relish se ha diseñado específicamente para permitir a las
personas con todo tipo de habilidades escuchar la música que deseen
de manera independiente. Con tres botones para guardar las emisoras
favoritas, resulta muy fácil encontrar las emisoras o las listas de
reproducción. Exclusivo de la Radio Relish, el panel superior se puede
personalizar con lo que más nos guste. Ya sea con jazz de los años 60,
música relajante, tardes con ritmo o, sencillamente, las noticias, disfrute
de la música que mejor se adapte a cada momento.
Dial de
volumen
Botón ON
(encendido)
Botón OFF
(apagado)
Botones de
memoria para sus
emisoras favoritas
Interruptor para
reproducir USB
Asigne a las
emisoras el
nombre que
prefiera
Altavoces
ES
Puesta en marcha
¿Cómo configurar la radio?
Paso 1 Colocar el adaptador de alimentación con un enchufe de
Estados Unidos o Reino Unido.
Conectar el adaptador de corriente a la toma DC (CC) de la
radio y el otro extremo en la toma de la pared. También se
pueden usar 4 pilas de tipo D. Extender la antena todo lo posible.
Paso 2
Enchufe de Reino
Unido
Enchufe de
Estados Unidos
Adaptador
Pulsar el botón ON (encendido) en la radio. Comprobar que
el volumen esté subido.
Paso 3

21 22
Quitar la tapa trasera de la radio para acceder al panel de
visualización.
Pulsar el botón MODE (modo) para alternar entre los modos de
radio FM y Digital.
NOTA: El servicio de radio digital no está disponible en
Norteamérica. Visite http://www.worlddab.org/ para obtener
más información sobre la recepción de radio digital en su zona.
Paso 4
Paso 5
En el modo FM, sintonice manualmente presionando los
botones < o >.
En el modo Digital, mantenga pulsado el botón SELECT
(seleccionar) para realizar un escaneado automático de
las emisoras. Cuando haya terminado el escaneado, pulse el
botón < o > para recorrer las emisoras. Pulse SELECT (seleccionar)
para sintonizar la emisora que desee escuchar.
Paso 6
Hay 3 botones de memoria en
el panel superior de la radio.
Puede guardar sus emisoras
favoritas con estos botones
para localizarlas fácilmente
en cualquier momento.
Vuelva al panel de visualización en la parte trasera de la radio.
Seleccione el modo FM o Digital. Navegue por las emisoras y
busque la que desee memorizar. En modo Digital, pulse SELECT
(seleccionar) para escuchar la emisora. Mientras escucha una
emisora de radio, mantenga pulsado un botón de memoria para
guardar esa emisora.
Paso 1
Memorizar emisoras
¿Cómo memorizar las emisoras con los botones de memoria?
Cuando haya terminado de memorizar las emisoras, retire la
cobertura de plástico de la etiqueta doblándola ligeramente y
escriba una descripción personalizada que tenga sentido para
usted. Por ejemplo Tardes de relax o Clásica. Vuelva a colocar
la cobertura de plástico en la etiqueta.
NOTA: Encontrará etiquetas de sustitución en el envase. Use una
etiqueta nueva si decide cambiar las emisoras guardadas.
Paso 2
ES

23 24
Vuelva al panel de visualización en la parte trasera de la radio.
Conecte la unidad USB y pulse el botón MY PLAYLIST (mi lista de
reproducción, 4.º botón) en el panel superior.
Para poder reproducir su propia lista de reproducción, primero
debe guardar las pistas MP3 en su unidad USB a través de su
computadora portátil o computadora.
Paso 2
Paso 1
Reproducir su propia música
¿Cómo reproducir música a través de una unidad USB?
¿Por qué es tn ml l recepción de l rdio?
1. Compruebe que la antena esté extendida para lograr la máxima
fuerza de la señal.
2. Mueva la radio a otra posición para ver si mejora la recepción.
3. Compruebe que no haya otros equipos eléctricos demasiado cerca
de la radio, ya que podrían causar interferencias.
4. Vuelva a sintonizar las emisoras manteniendo pulsado el botón
SELECT (seleccionar) en la parte trasera.
¿Por qué no funcion l rdio?
1. Asegúrese de que la radio esté conectada a una fuente de alimentación.
Compruebe la CC y las tomas de red. Si usa pilas, asegúrese de que
estén cargadas.
2. Compruebe el volumen y ajústelo si es necesario.
¿Cómo puedo resturr l configurción de fbric?
Hay un botón que recupera la configuración de fábrica junto a la toma
USB, use un clip para pulsar el botón y restaurar la configuración. Recuerde
que todas las emisoras memorizadas se eliminarán con la restauración.
Pregunts frecuentes
Precauciones
ES
Mantenga la radio alejada de los líquidos. Apague la radio
y desconéctela de la red inmediatamente si se derrama algún
líquido sobre ella.
La radio no debe utilizarse en entornos con altas temperaturas
ni mucha humedad durante periodos prolongados de tiempo,
ya que la unidad podría dañarse.
Evite usar o almacenar la unidad en un entorno polvoriento
o arenoso.
Límpiela únicamente con un paño seco.
Use solamente el adaptador CA/CC que se suministra con
la radio. Conectar una fuente de alimentación con un voltaje
diferente causará daños permanentes en la radio y podría
resultar peligroso.
La clavija de red o un dispositivo específico se utilizan como medio
de desconexión, permaneciendo el dispositivo operativo.
Para evitar el riesgo de incendio o de
descarga eléctrica, no exponga este
producto a la lluvia o la humedad
P: para reducir el riesgo de descarga eléctrica, no quite la tapa de
la radio, no hay piezas que el usuario pueda reparar en su interior, consulte con
un servicio especializado
ADVERTENCIA
el símbolo del rayo yla punta de flecha dentro del triángulo es una señal
de advertencia que alerta de un “voltaje peligroso” dentro de la radio.
el signo de exclamación dentro del triángulo es una señal de advertencia
que alerta de instrucciones importantes que acompañan ala radio.
riesgo de descarga
eléctrica, no abrir
PRECAUCIÓN
No deseche la radio como un residuo doméstico. Consulte con
el servicio local de eliminación de residuos electrónicos para
obtener información.
No abra y repare la radio usted mismo/a.

25 26
Anschluss für
Kopfhörer
USB-Anschluss
Radio zurücksetzen
Antenne
Aerial
Anschluss für
Gleichstrom-
Netzteil
Anzeige
Batteriefach
Drücken Sie die
AUSWAHL-Taste
«Select» für das
Abspielen
von Radiosender
Umschaltung FM/
Digital-Modus Sender
durchlaufen
Über unseren Radio- und Musik-Player
Schalten Sie ein und genießen Sie die Kraft der Musik!
Was macht Relish Radio so anders?
Das Relish Radio wurde speziell dafür entwickelt, Menschen mit allen
Aktivitätsstufen zu ermöglichen, eigenständig die Musik auszuwählen,
die sie wünschen. Dank der drei Tasten zur Voreinstellung Ihrer
Lieblingslieder können Sie Ihre Lieblingssender oder -Playlists leicht
finden. Als einzigartiges Merkmal des Relish Radios können Sie das obere
Feld so individualisieren, wie es am sinnvollsten für Sie ist. Ob ‚Jazz der
60er Jahre‘, ‚Entspannende Musik‘, ‚Peppiger Nachmittag‘ oder einfach
‚Nachrichten‘ – genießen Sie die Musik, die für Sie genau richtig ist.
Lautstärkeschalter
EIN-Taste (ON)
AUS-Taste (OFF)
Speicher-Tasten für
Ihre Lieblingssender
Umschalttaste
zum Abspielen von
USB
Benennen Sie
die Sender so,
wie es für Sie
am besten ist
Lautsprecher
DE
Erste Schritte
Einrichtung Ihres Radios
Schritt 1 Schließen Sie das Netzteil an einen US- oder UK-Stecker an.
Schließen Sie das Netzteil an den Gleichstrom-Anschluss am
Radio und das andere Ende an eine Steckdose an. Alternativ
können Sie zur Stromversorgung 4 Batterien vom Typ D
verwenden. Fahren Sie die Antenne so weit aus wie möglich.
Schritt 2
UK-Stecker
US-Stecker
Netzteil
Drücken Sie auf die EIN-Taste, um das Radio einzuschalten.
Achten Sie darauf, dass der Ton eingeschaltet ist.
Schritt 3

27 28
Nehmen Sie die hintere Abdeckung des Radios ab, um an das
Display zu gelangen.
Drücken Sie auf die MODUS-Taste, um zwischen dem Modus
FM-Radio und Digital-Radio umzuschalten.
HINWEIS: In Nordamerika steht kein Digitalradioservice zur Verfü-
gung. Auf http://www.worlddab.org/ finden Sie weitere Informa-
tionen über den digitalen Radioempfang bei Ihnen in der Nähe.
Schritt 4
Schritt 5
Wenn Sie im FM-Modus sind, stellen Sie ihn manuell ein, indem Sie die
Tasten < oder > drücken.
Wenn Sie im Digital-Modus sind, drücken und halten Sie die AUS-
WAHL-Taste (MEMORY), um einen automatischen Sendersuchlauf zu
starten. Nach dem Ende des Suchlaufs können Sie durch Drücken auf
die Tasten < oder > die Sender durchlaufen. Drücken Sie auf die Taste
AUSWAHL (SELECT), um den Sender einzuschalten, den Sie hören
möchten.
Schritt 6
Im oberen Feld des Radios gibt
es 3 Speicher-Tasten (Memory).
In diesen Tasten können Sie
Ihre Lieblingssender speichern,
damit Sie sie jedes Mal einfach
wiederfinden können.
Gehen Sie zurück zum Anzeigefeld an der Rückseite des
Radios. Wählen Sie entweder den FM- oder den Digital-Modus.
Durchlaufen Sie die Sender, um den Sender zu finden, den Sie
speichern möchten. Wenn Sie im Digital-Modus sind, drücken
Sie auf AUSWAHL (SELECT), um den Sender zu hören. Während
Sie dem Sender zuhören, drücken und halten Sie eine Speicher-
Taste (Memory), um den Sender zu speichern.
Schritt 1
Sender speichern
Wie können Sie Sender in den Speicher-Tasten (Memory) speichern?
Wenn Sie mit den gespeicherten Sendern zufrieden sind, nehmen
Sie die Kunststoabdeckung vom Etikett ab, indem Sie sie leicht
biegen, und tragen eine personalisierte Beschreibung darauf ein,
die für Sie am sinnvollsten erscheint. Zum Beispiel ‚Entspannung
am Nachmittag’ oder ‚Klassisch’. Setzen Sie die
Kunststoabdeckung wieder auf das Etikett.
HINWEIS: In der Verpackung finden Sie Ersatzetiketten. Wenn Sie den
gespeicherten Sender ändern möchten, können Sie ein neues Etikett
verwenden.
Schritt 2
DE

29 30
Ihre eigenen Audio-Aufnahmen abspielen
So spielen Sie Musik über ein USB-Laufwerk ab?
Weshlb hbe ich einen schlechten Radioempfng?
1. Stellen Sie sicher, dass die Antenne vollständig ausgefahren ist,
um die maximale Signalstärke empfangen zu können.
2. Bewegen Sie das Radio an einen alternativen Standort, um zu
sehen, ob sich der Empfang verbessert.
3. Kontrollieren Sie, dass keine anderen elektrischen Geräte zu nah
an Ihrem Radio stehen, das könnte zu Störungen führen.
4. Starten Sie einen erneuten Sendersuchlauf, indem Sie auf die
AUSWAHL-Taste (SELECT) auf der Rückseite drücken und diese
halten.
Weshlb funktioniert mein Rdio nicht?
1. Vergewissern Sie sich, dass Ihr Radio mit einer Stromquelle
verbunden
ist. Kontrollieren Sie die Steckdosen. Wenn Sie Batterien verwenden,
achten Sie darauf, dass diese vollständig aufgeladen sind.
2. Kontrollieren Sie die Lautstärke und stellen Sie sie nach Bedarf ein.
Wie knn ich zur Werkseinstellung zurückkehren?
In der Nähe des USB-Anschlusses gibt es eine Taste zum Zurücksetzen
auf die Werkseinstellung. Diese Taste können Sie mit einer Nadel
eindrücken. Achten Sie darauf, dass nach diesem Zurücksetzen der
gesamte Speicher gelöscht sein wird.
Hufig gestellte Frgen
Vorsichtsmaßnahmen
DE
Halten Sie das Radio von Flüssigkeiten entfernt. Schalten Sie
das Radio unverzüglich aus und trennen Sie es von der Strom-
verbindung, wenn Flüssigkeit auf dem Radio verschüttet wird.
Das Radio sollte nicht über längere Zeit in einer Umgebung
mit hoher Temperatur oder hoher Luftfeuchtigkeit verwendet
werden, da das Gerät dadurch Schaden nehmen kann.
Verwenden oder Lagern Sie das Gerät möglichst nicht in einer
staubigen oder sandigen Umgebung.
Reinigen Sie es nur mit einem trockenen Tuch.
Verwenden Sie nur den im Lieferumfang enthaltenen Gleichstrom-
/ Wechselstrom-Adapter. Der Anschluss an eine Stromquelle mit
einer anderen Nennleistung führt zu bleibenden Schäden am
Radio und kann eine Gefahr darstellen.
Der Netzstecker oder ein Geräteschalter wird als Trennvorrichtung
verwendet. Die Trennvorrichtung sollte betriebsbereit bleiben.
Zur Verhinderung von
V: zur verringerung der stromschlaggefahr entfernen sie nicht die
radioabdeckung. das gerät enthält keine teile, die der nutzer selbst warten kann.
geben sie das gerät zur wartung an fachkräfte.
WARNUNG:
das zeichen mit einem blitz und einer pfeilspitze in einem dreieck ist ein
warnzeichen, das sie auf „gefährliche spannung“ im inneren des radios
aufmerksam machen soll.
das ausrufezeichen in einem dreieck ist ein warnzeichen, das sie auf wichtige
anweisungen hinweisen soll, die im lieferumfang dieses radios enthalten sind.
stromschlaggefahr,
nicht öffnen
ACHTUNG
Geben Sie das Radio bei der Entsorgung nicht in den Hausmüll.
Wenden Sie sich an den Entsorgungsbetrieb vor Ort, um sich
über die Entsorgung zu informieren.
Önen und reparieren Sie das Radio nicht selbst.
Brand- oder Stromschlaggefahren sollten
Sie dieses Produkt weder Regen noch
Feuchtigkeit aussetzen
Um Ihre eigene Playlist abspielen zu können, müssen Sie
zunächst die MP3-Titel über Ihren Laptop oder Computer auf
Ihrem USB-Stick speichern.
Wechseln Sie zurück zum Display auf der Rückseite des
Radios. Stecken Sie das USB-Laufwerk ein und drücken Sie
dann auf die Taste MEINE PLAYLIST (vierte Taste) im oberen
Feld.
Schritt 1
Schritt 2
This manual suits for next models
1
Table of contents
Languages:
Other Relish MP3 Player manuals