Remote Control Systems EVO-DUPLEX-Tx User manual


–2 –
PREPARING THE # EVO-DUPLEX.
The Large Channel # 1 knob is on the Left. The small Channel # 3 knob is on the Right.
Top left is the ON –OFF switch with LED. Top right is the Bind/Ch # 5 pushbutton. Use for servo whistle.
1. “BINDING”.
The 1st procedure is to “BIND” the Receiver (Rx) to the Transmitter (Tx).
“BINDING” is accomplished by following a few simple steps below.
When binding we recommend unplugging the servos from the Rx in case they are not correctly adjusted. Adjust servo
parameters after binding has taken place. KEEP THE TX HANDPIECE AT LEAST ONE METRE FROM THE LOCO.
HOW TO “BIND” USING AN RCS # Rx107-EM or # Rx107-TM Auto Bind receiver.
For Live Steam ONLY, Rx battery goes in any terminal. DO NOT CONNECT A BATTERY IF USING AN ESC!!!
The following steps should be followed, to bind the Rx with your transmitter:
1. Transmitter switched off.
2. Switch on the receiver. Wait 5 seconds for Autobind mode. Fast flashing of the LED-RF.
With the Rx107 set to Low OFF, all servos snap to an idle position except Ch # 1, which goes to Fully OFF.
3. Only when the LED-RF is flashing rapidly, hold down the transmitter Ch # 5 bind button & switch Tx ON .
4. Wait for the transmitter to indicate that it is in bind mode (slow flash) and then release the bind button.
5. The power LED on RCS transmitters will also flash when binding.
6. After approx. 5 –8 seconds, the RF LED will blink twice and go dark. After another 5-6 seconds, both
LED-RF and LED-CPU’s will light and stay on.
7. The receiver is now bound to the transmitter. Both LED’s will be ON. Servos will snap to set positions.
ON OFF SWITCH PRESS & HOLD BIND THEN TURN Tx ON.
If you are using the simpler # AB-EM & # AB-TM Auto Bind Rx, refer to their
instructions for how to bind and wire in lighting outputs.
***********************************************************************************************************
CENTERING CH # 1 ON THE # EVO-DUPLEX Tx HANDPIECE.
The following applies to all EVO Tx handpieces.
The EVO Tx handpiece battery will eventually go flat if left switched on. The operating program may be disrupted.
The Ch # 1 centering on the EVO system will need to be reset;
1.) Speed & Direction control or speed only control on the Ch # 1 knob. Set big knob at the centre.
2.) Press the ON –OFF button to turn the EVO ON. LED light will come ON.
3.) Within 60 seconds, press and hold the bind button for 20 seconds.
4.) After 20 seconds the EVO ON –OFF LED light will go off.
5.) Release Bind button.
6.) LED light will come back ON. Centre reset is complete.
7.) Return knobs to operating settings.
ALWAYS COMPLETE THE ABOVE PROCEDURE WHEN REPLACING THE 9 VOLT BATTERY.

- 3 -
USING THE #DUPLEX
LAYOUT OF THE # EVO-DUPLEX TRANSMITTER HAND PIECE.
There are two pushbuttons on the end plate.
The LH one is for one F2 trigger on Ch # 2. The RH one is for one F4 trigger on Ch # 4.
LOW OFF CONTROL CENTRE OFF CONTROL METHOD
LOW OFF CONTROL.
This is applicable for both Live steam locomotives and Battery R/C Control.
Uses 2 x Channels. One for setting the direction (Ch # 3 - Reverser) & one for controlling the speed (Ch # 1 - Regulator).
CENTRE OFF CONTROL.
This is generally, only used for Battery R/C and is the most common way of operating with battery R/C.
Only one channel is used for both speed and direction. Generally Channel # 1.
Cruise Control. Depending on the Rx it is quite OK to turn the TX handpiece OFF and allow the loco to continue cruising
at the set speed until the Tx handpiece is turned on again.
Be aware that when turning the Tx handpiece back ON, relinking can take a few seconds.

- 4 -
2. PREPARING FOR USE WITH LIVE STEAM LOCOS.
Channel # 1 is 100% (90°) & Ch # 3 is 150% (135°) servo throw. This will suit most situations.
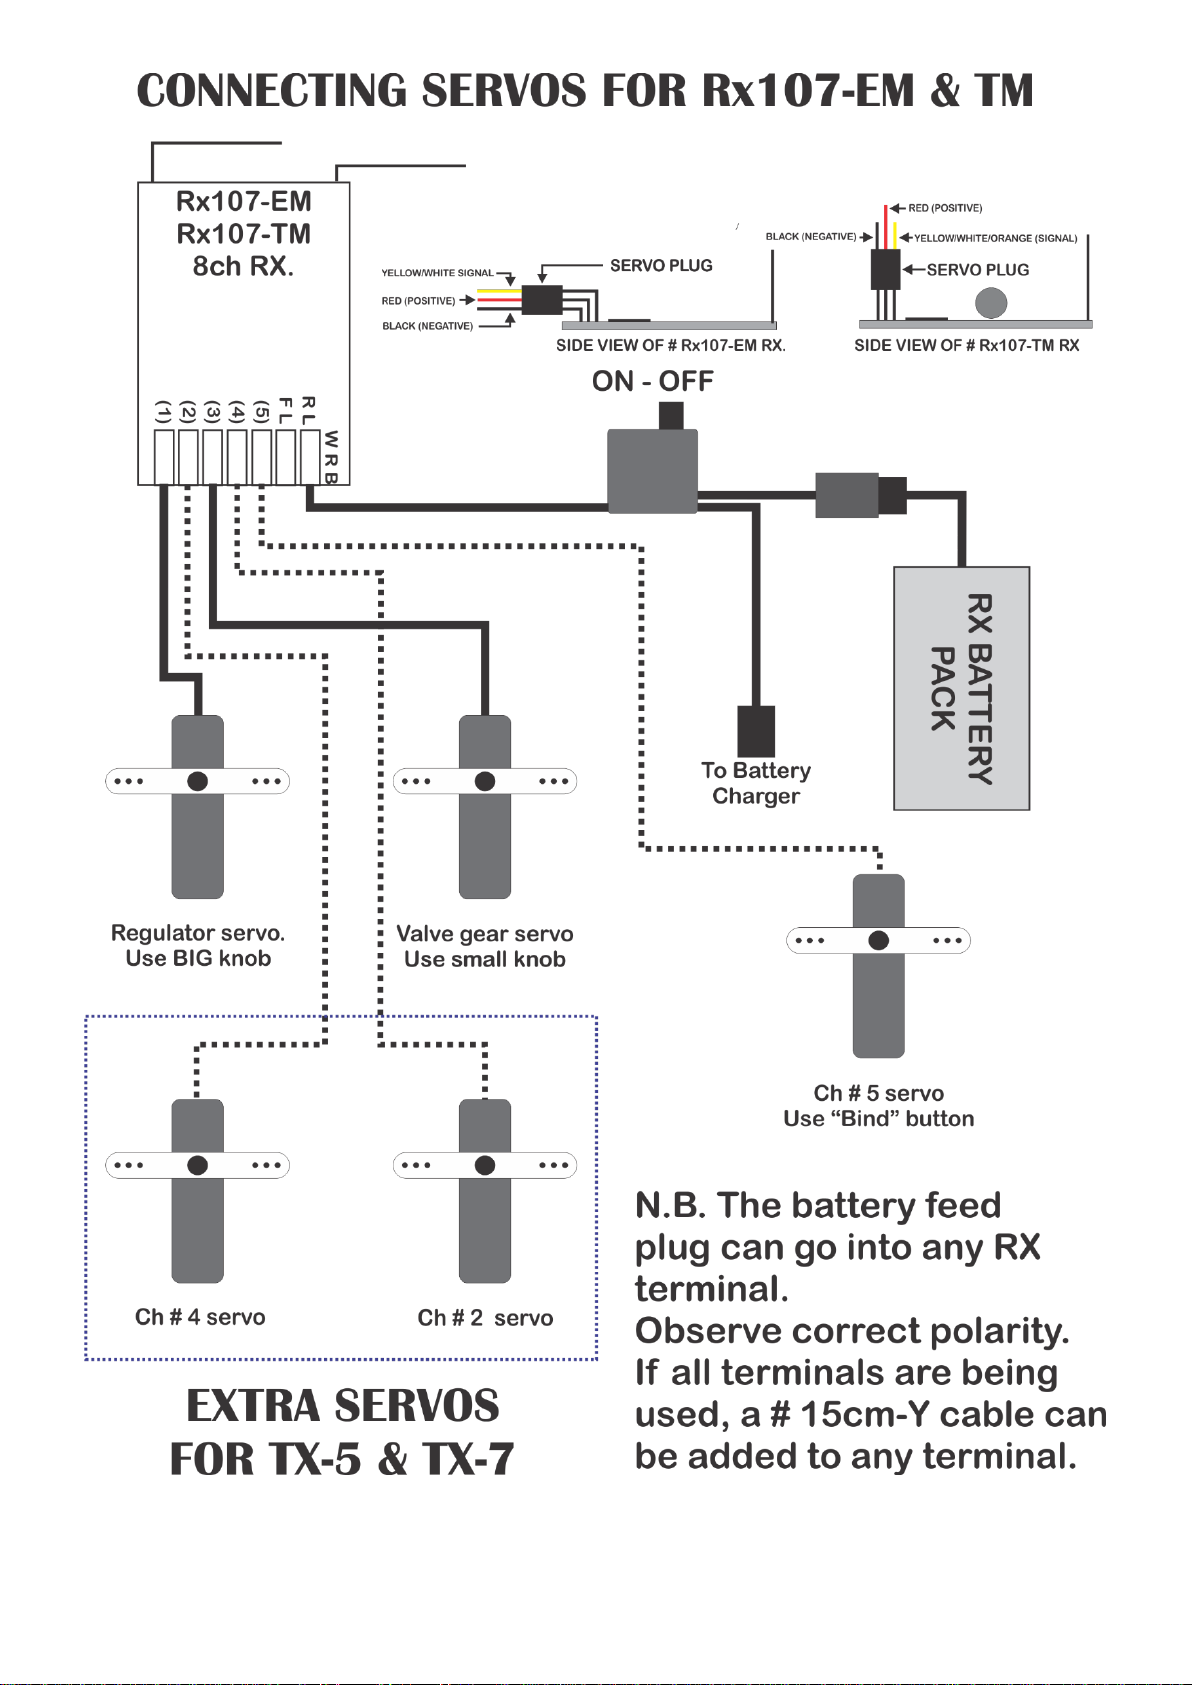
Turn the # EVO-DUPLEX handpiece ON. Make sure Rx is OFF. Then re-insert the servos into the correct Rx sockets.
The Reverser servo goes in Ch # 3 (Elevator) socket. The Regulator servo is controlled by Channel # 1 (Big knob).
N.B. Swapping the knobs will change the servo throws for Regulator & Reverser functions.
However, you can use that feature to increase Regulator servo throw. In this case Ch # 1 becomes the reverser
and Ch # 3 becomes the regulator.
HOW TO ADJUST SERVOS USING Rx107 Auto Bind Rx’s. (See the instructions with our Rx107 receivers).
OR With our # AB-EM & # AB-TM Auto Bind Rx, you can use Plug in, in Line Servo Reversers.
When using for the first time make sure both knobs are centered. Both knobs have a centre détente.
VALVE GEAR REVERSER SERVO.
1.1. Then turn on the Live Steam loco Rx. The two servos should immediately snap to the neutral position.
1.2. Adjust the valve gear servo connecting rod to ensure the centre position of the valve gear matches the servo.
1.3. Turn the reverser knob slowly to the right Clockwise (CW) & check the servo moves the valve gear to the forward
position. If it goes the wrong way you will need to reverse the mechanical connection. See our Rx107 instructions.
If the reverser knob wants to make the servo move too far, put the connecting rod into a servo arm hole closer to the
middle of the servo arm. If it does not move far enough, move the rod into a hole further out.
N.B DO NOT FORCE THE SERVO AGAINST THE STOP. DOING SO WILL DAMAGE THE SERVO.
1.4. Turn the reverser knob slowly and carefully to the left Counter Clockwise (CCW). With regards to any possible
mechanical changes you made during 1.3 above, it should perform correctly.
STEAM REGULATOR SERVO.
2.1. Turn the regulator knob to the left (CCW) the servo will rotate CCW and should close the steam regulator valve.
If it goes the wrong way, you will need to reverse the mechanical connection. See our Rx107 instructions.
If the large knob wants to make the servo move too far, i.e. over closing the regulator, put the connecting rod into a
servo armhole closer to the middle of the servo arm. If it does not move far enough move the rod to a hole further out
OR The Rx107 instructions show how to adjust servo end points on all channels.
N.B DO NOT FORCE THE SERVO AGAINST THE STOP. DOING SO WILL DAMAGE THE SERVO.
2.2. Turn the large knob to the right to check the servo opens the steam regulator far enough.
3. DRIVING LIVE STEAM LOCOS.
Make sure the Tx & Rx are both OFF and the regulator knob is fully CCW. This is the same as the throttle stick on a
conventional stick R/C being fully down.
Ensure the reverser knob is in the middle. Turn ON the # DUPLEX hand piece, & then the loco.
Once steam has been raised, select the direction of valve gear with the CH # 3 Reverser knob. See page # 3.
Then turn the regulator knob CW. That is like raising the throttle stick on a conventional stick R/C.
Turn the big knob CCW to slow the loco. All the way CCW will bring the loco to a stop.
You can have a faster stop by centering the reverser control knob. Then make sure regulator knob is also fully CCW.
The Ch # 5 Bind button.
For Live Steam the Ch # 5 doubles as a whistle control with a servo. It starts at one extreme & when pressed goes fully
the other way. It snaps back to the start point when released. For controlling a servo operated steam whistle.
If not using the # Rx107 receiver you may require a # SIG-REV as default direction is back to front. OR:
For Battery R/C. When the Ch # 5 button is combined with a suitable R/C switch plugged into the Rx, the button can be
used as a sound trigger. For example, the latest MyLocosound features a diesel engine START –STOP feature.
Also suitable for controlling Kadee®servo uncoupler’s.
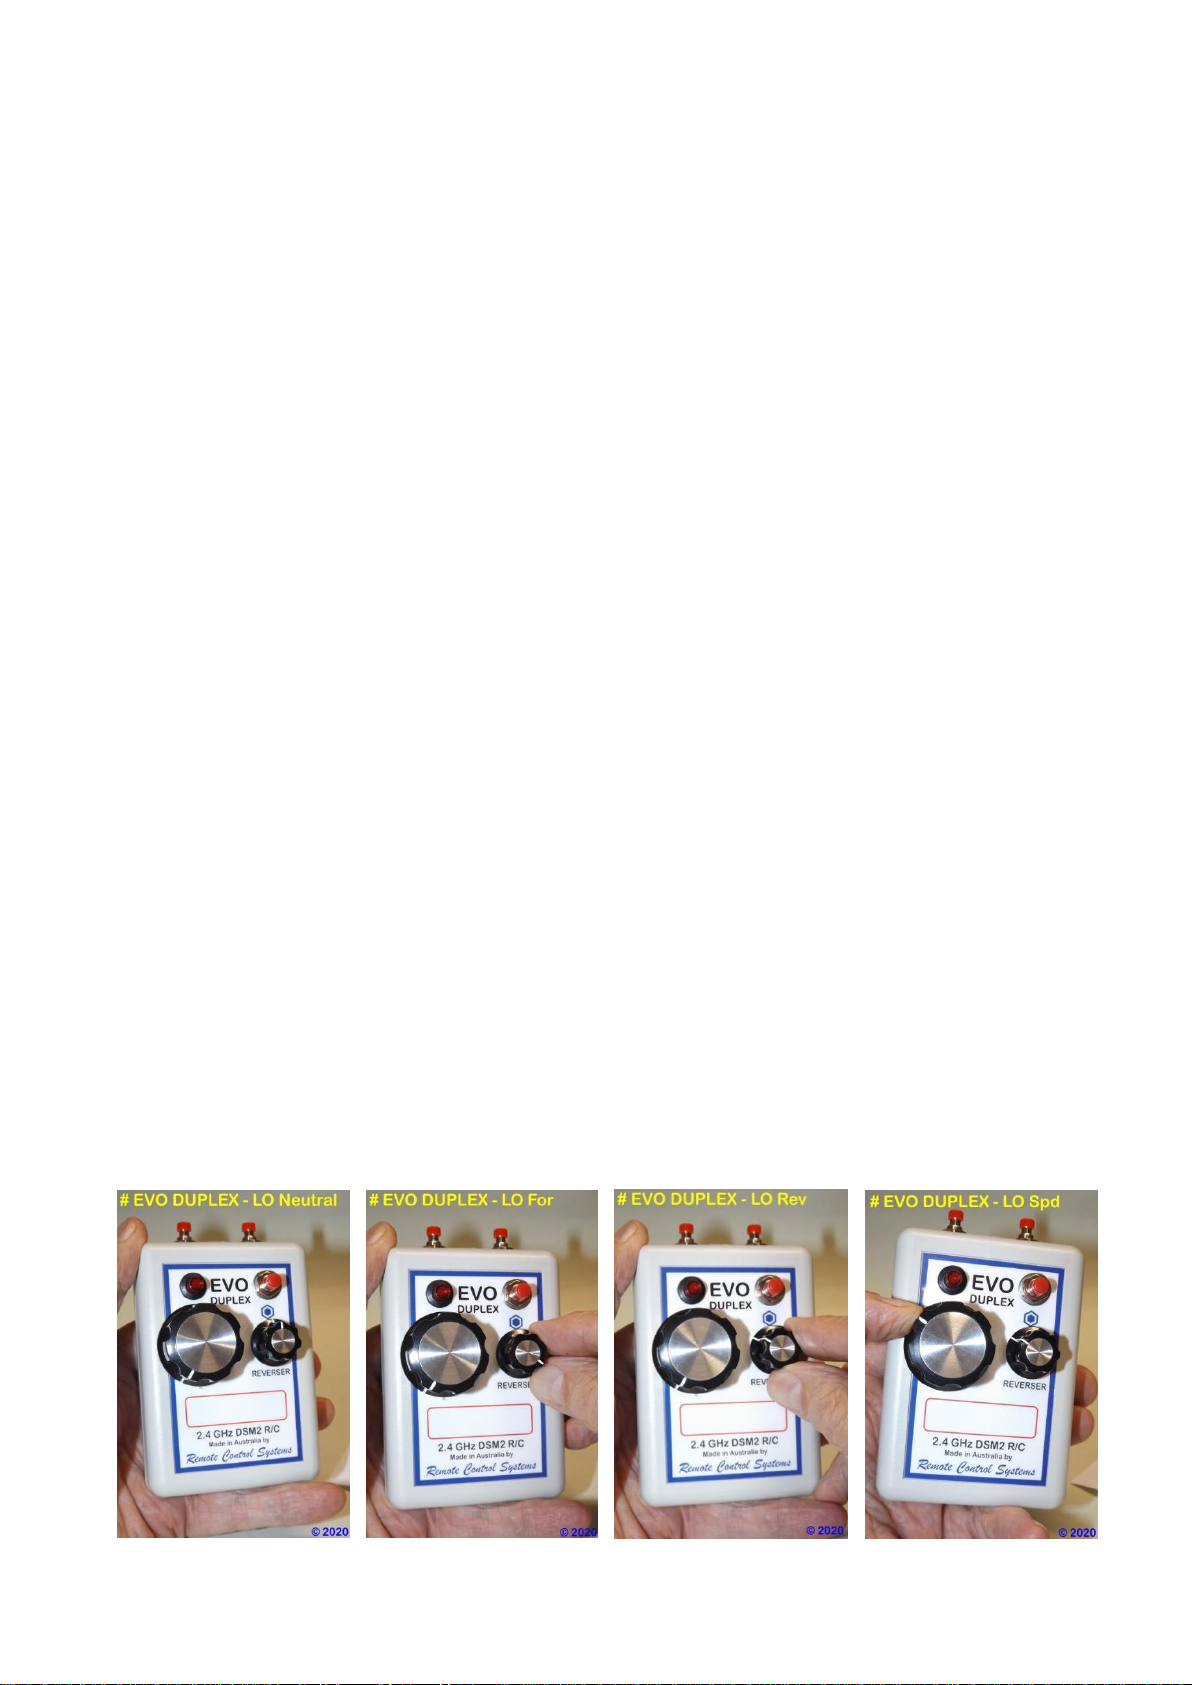
LOW OFF NEUTRAL LO SET FORWARDS LO SET REVERSE LO SPEED UP

- 5 -
4. USING THE # EVO-DUPLEXWITH AN RCS “LOW OFF” ESC.
The # EVO-DUPLEX can be used with RCS LOW OFF ESC’s such as the new RCS # OMEGA-10.
Operation is essentially the same as for Live Steam control. See page # 3 for pics and text.
This # EVO-DUPLEX hand piece is a 5 channel stick R/C in a smaller case and using only three channels.
Make sure the large throttle knob is fully CCW (OFF) and small knob is centered before you switch the system on.
Switch on the # DUPLEX first & then the ESC. (Unless binding)
1. The large knob controls channel # 1, the throttle. Make sure the knob is fully CCW before switching on. This is the
same as the Channel # 1 stick on a stick radio being fully down.
2. The small knob is the same as a Ch # 3 elevator stick.
Turning the small knob to the right (CW) is the same as pushing the elevator stick forwards.
Turning the small knob to the left (CCW) is the same as pulling the elevator stick backwards.
3. From neutral, set the small knob to the direction you want. CW for forwards.
N.B. When using the # OMEGA-10, the small knob is used to set both direction & rate of inertia.
4. Twist the large throttle knob to the right (CW) to accelerate.
5. To slow down twist the large knob to the left (CCW) until the desired speed is reached.
6. To stop loco turn the large knob fully to the left (CCW).
Throttle must be at OFF before changing direction. Twist the small knob CCW once to return loco to neutral.
7. To select reverse direction Then twist it again CCW.
To speed up, slow down & stop in reverse, repeat steps 4, 5, 6, & 7.
The # OMEGA-10 has constant brightness directional lighting outputs. See page 7.
USING THE # EVO-DUPLEX WITH A “CENTRE OFF” ESC.
The # EVO-DUPLEX Tx handpieces are ideal for use with RCS CENTRE OFF ESC’s such as the COBRA-260 ESC’s.
Before you switch the system on, make sure the large throttle knob is in neutral. i.e. at the centre “click”.
For only one loco, the direction knob will not be used. It could be used for another Centre OFF ESC on Ch #3.
CENTRE OFF CONTROL.
FORWARDS - SPEEDING UP.
To select forwards direction, twist the knob from neutral slowly clockwise (CW) to the right.
SLOWING DOWN. Turn the knob back to the left (CCW) to set desired speed.
STOPPING.Completely stop the loco by bringing the knob back to neutral.
REVERSE - SPEEDING UP.
To select reverse direction, twist the knob slowly to the left (CCW).
SLOWING DOWN. Turn the small knob back to the right (CW) to set desired speed.
STOPPING. Completely stop the loco by bringing the small knob back to neutral.
SHUTTING DOWN. When you have finished operating, turn off the loco(s) before the TX.
NEUTRAL OFF POSITION OF THE # EVO-
DUPLEX IN “CENTRE OFF” MODE.
SET THE FORWARDS DIRECTION
& INCREASE SPEED CONTROL.
SET THE REVERSE DIRECTION
& INCREASE SPEED CONTROL.
If the loco runs backwards, we reverse the motor wiring to correct the direction and maintain the standard.
The bind button also controls Ch # 5. You can add a servo for mechanical operation. EG a Kadee servo uncoupler.
If the directional lights are incorrect, swap over the wiring to them so they match the loco speed and direction.
The # COBRA-260 ESC’s have directional lights that can handle multiple LED’s or bulbs. See page # 7.
The Ch # 3 reverser servo output is not being used so could be set up for sound triggers using an R/C Switch such as
the MRW-SSDS.

–6 –

–7 –

–8 –
Table of contents
Popular Transmitter manuals by other brands

Horizon Hobby
Horizon Hobby SPMSLT300 user manual

Cellular Tracking Technologies
Cellular Tracking Technologies PowerTag Operation manual

Wireless Devices
Wireless Devices M-840L Operation manual

Vaisala
Vaisala Indigo300 user guide

Bosch
Bosch ISW-EN1210 Installation and setup

Eurosound
Eurosound HDBT70TxP user manual