Repotec RP-SB101WI User manual

1
Quick Guide
1 Hardware Overview
Front View
Rear View
Left Side View
Figure 1-1 RP-SB101W and RP-SB101WI Wi-Fi Network Camera Outer Shell Profiles
Network
Connector
DC5V Input
WPS Button
Reset Button
Label
Power/Network
LED Indicator
Wireless LED
Indicator
Micro SD Card Slot
Speaker
Light Sensor
Focus
Adjustment Ring
Infrared LED (IR Model)
PIR Sensor (PIR Model)
LED (for PIR Model)
Built-in
Microphone
Power/Network
LED Indicator
Wireless LED
Indicator

2
2 Connecting Camera to Network
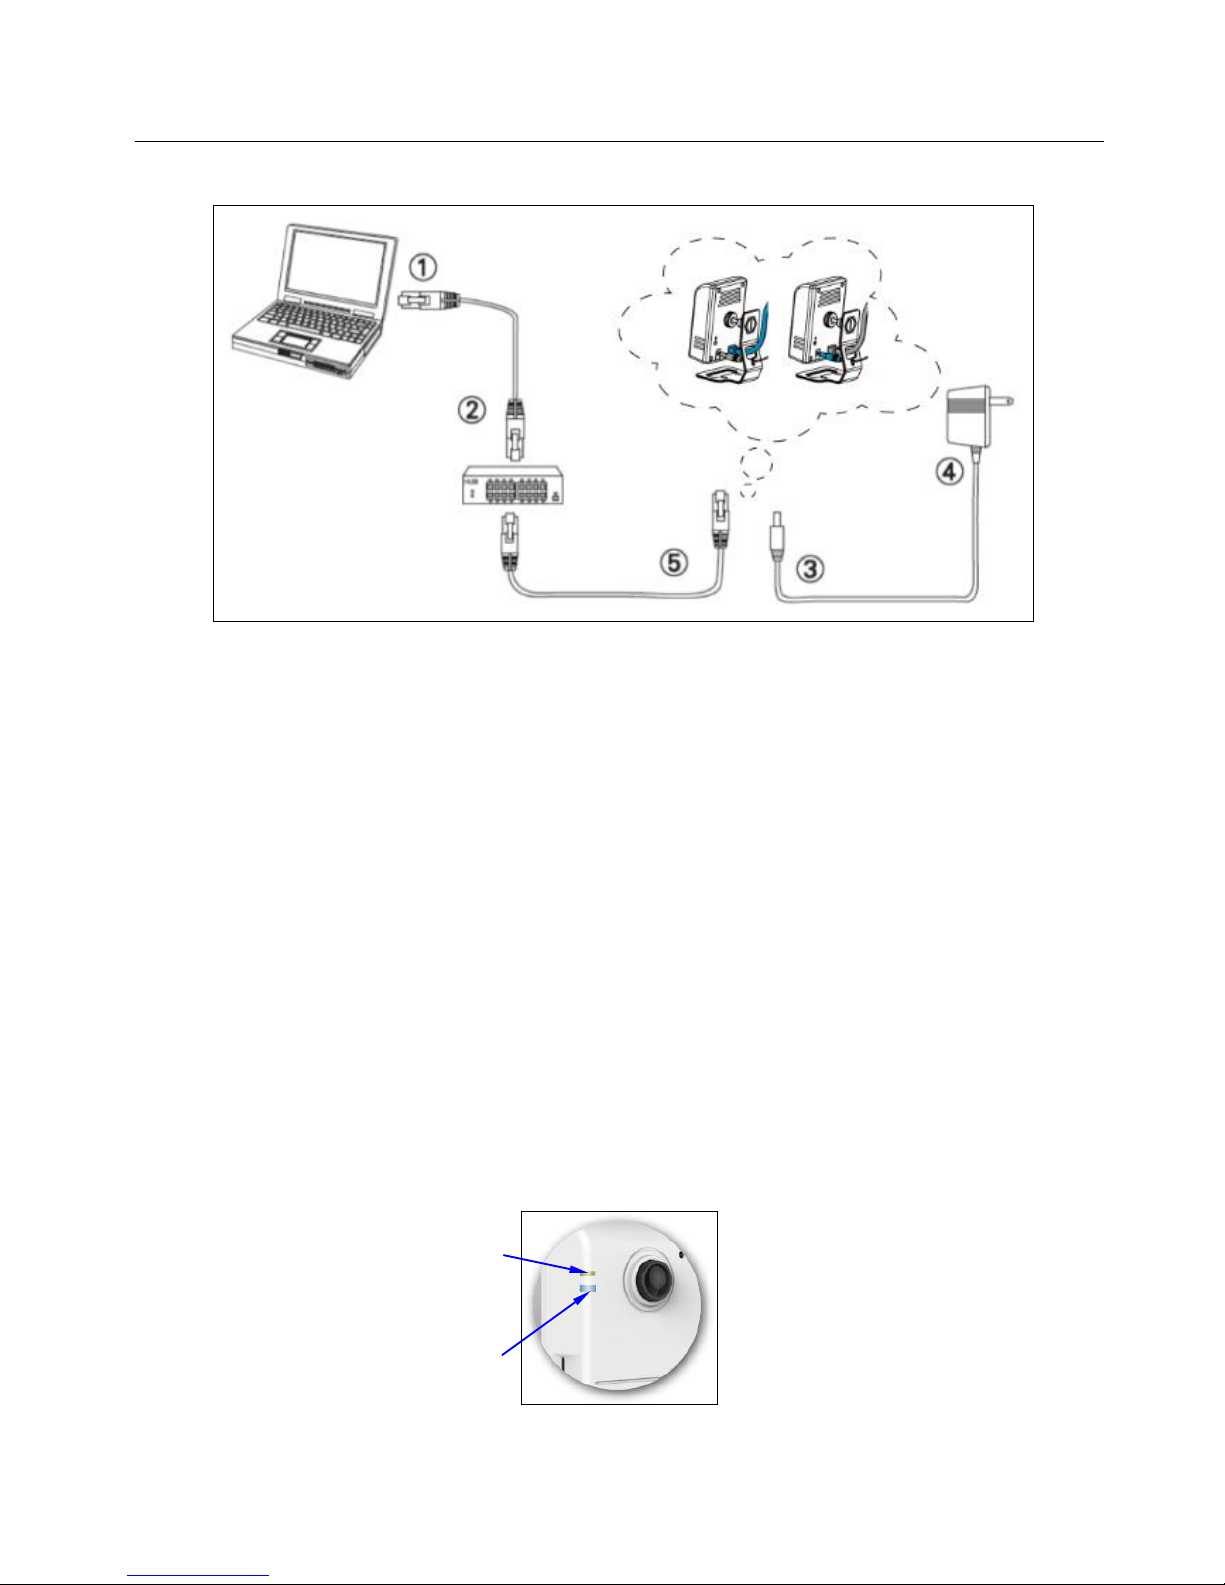
Figure 2-1 Connecting Camera to Network with PC/Notebook/Ultrabook
1. Prepare a smartphone/tablet or PC/notebook/ultrabook with Ethernet link to the local network.
2. When using PC/notebook/ultrabook as host, connect the LAN port of the host to the network router
with an RJ45 network cable ().
NOTE: If you are going to use smartphone/tablet as monitoring device, the PC/notebook/ultrabook is
required only to set up your camera with the “Installation Guide Wizard” program from the
CD (included in the camera package) as described in Section 4.
3. Plug the DC power jack of the power adaptor () to Camera and connect the power adaptor to
power outlet (110V or 220V).
4. Connect the network router to the LAN port of Camera with an RJ45network cable ().
5. With power switched on, check the status of the two LEDs at the left corner of camera:
If the Power/Network indicator (upper LED) turns into green color, it confirms that the Camera
has successfully linked with the Internet. Then proceed to the next Section 3 “CloudLync
Registration”to register your newly installed camera.
If the camera is set up to work on Wi-Fi, the Wireless LED Indicator (lower LED) will light up in
blue to indicate successful connection, while the upper LED remains in orange.
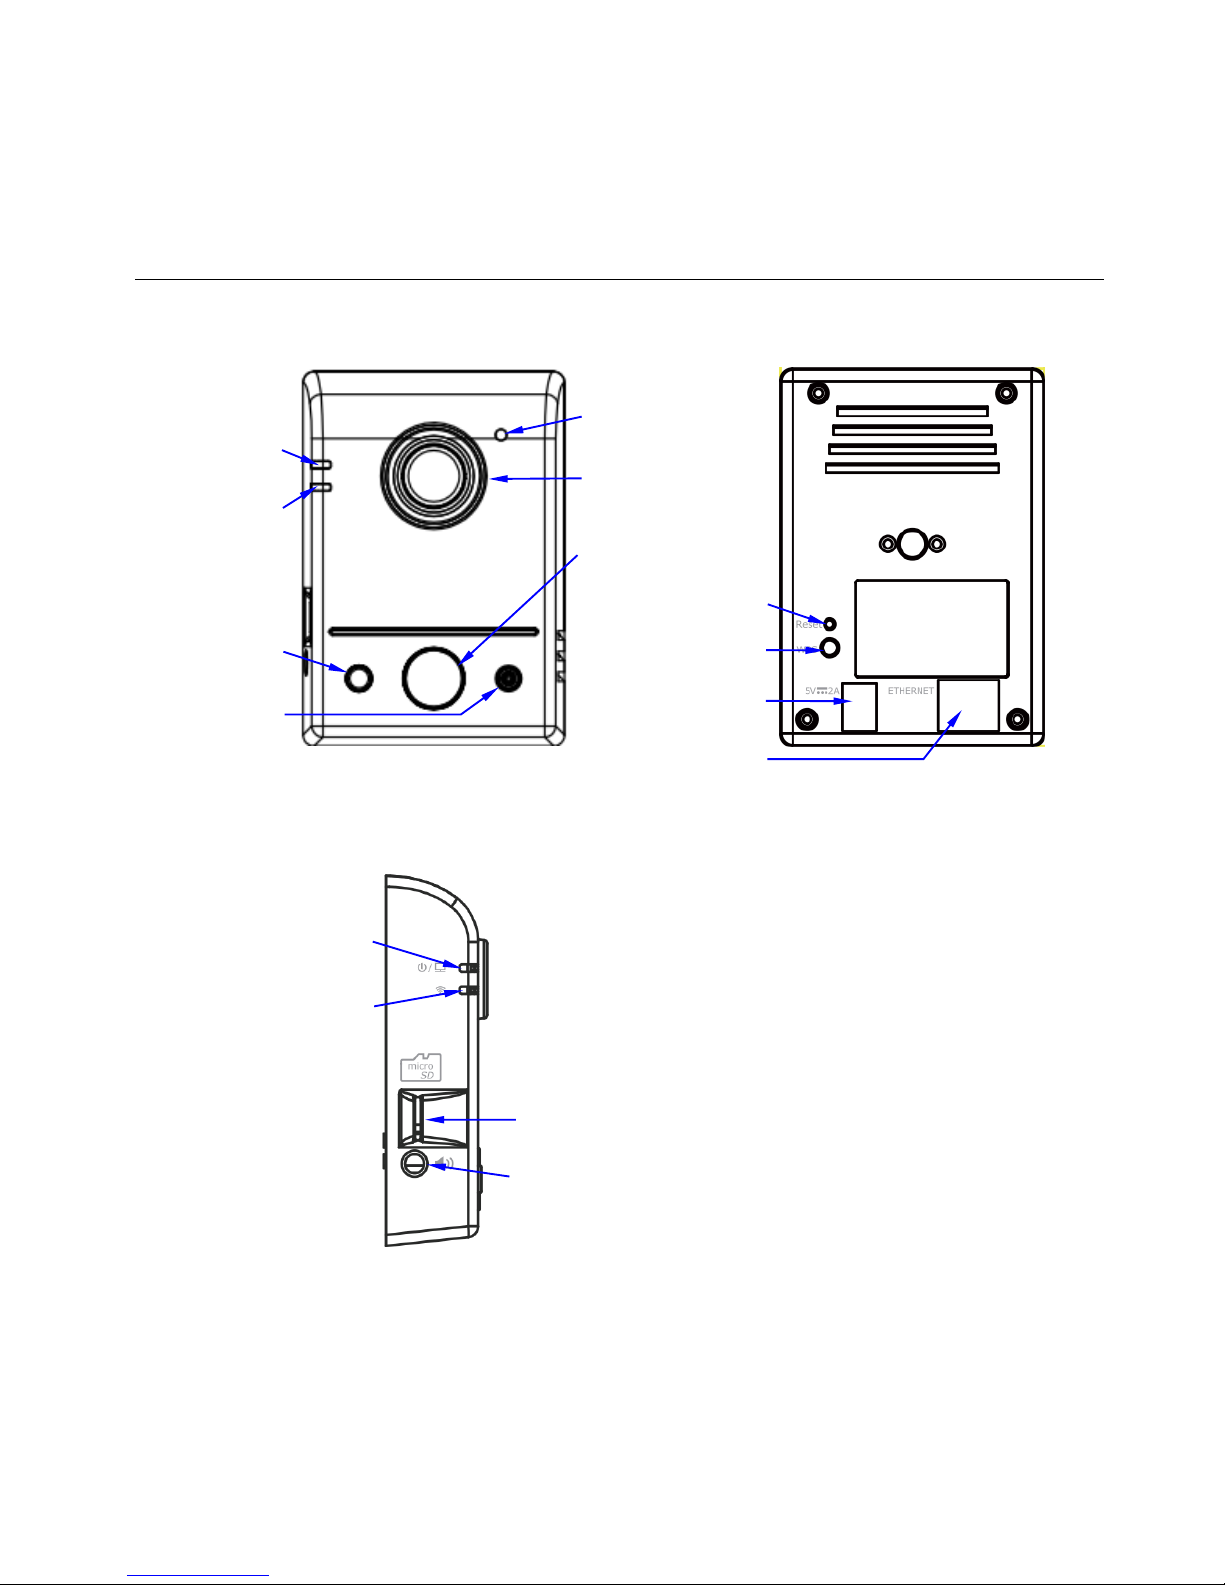
Figure 2-2 Power/Network (Upper LED)& Wireless LED (Lower LED) Indicators
Power/Network LED Indicator
should light up in green to indicate
successful link to the Internet
Wireless LED Indicator lights up (in
blue) only when the Camera is set
up & connected to Wi-Fi
LAN Router
Power Adaptor
The PC host is required
only to set up the camera
with “Installation Guide
Wizard” program when the
camera Power/Network
LED Indicator does not light
up in green within few
seconds after power on.

3
If the upper LED does not turn green (or the lower LED does not turn blue), it means your Camera
failed to properly connect with Internet. Proceed to Section 4, “Installation Guide Wizard” for
more detailed installation guide to help you achieve Internet connection successfully.
3 CloudLync Registration
3.1 CloudLync Registration by Smartphones/Tablets
1. CloudLync offers a more convenient method of registering and monitoring your Camera through
smartphones or tablets via “CloudLync”software tool. It is done by simply touching the “APP
Store”icon (for iPhone/iPad) or “Google Play”store icon (for Android Mobiles). Then key-in
“CloudLync” and the “CloudLync App” icon will display.
“CloudLync”
(CloudLync App Icon)
Or
Figure 3-1 Accessing CloudLync App from Smartphones/Tablets
Alternatively, you may scan the QR Code below to download URL and directly install
“CloudLync App”in your smartphone/tablet.
Figure 3-2 Scan QR Codes to Directly Access CloudLync App from Smartphones/Tablets

4
2. Touch “CloudLync App” icon to launch CloudLync. The following dialog will then display.
(iPhone/iPad Display) (Android Mobile Display)
Figure 3-3 Creating & Registering New CloudLync Account in CloudLync App
Then touch the “Create Account” button to create your new CloudLync account.
Alternatively, if you already have a Google Account, you can click on the “Google Account”
button to log-in and register with CloudLync.
NOTE: a) Google Account provides 5GB free space for recorded video storage. For more on
setting details, please see the User’s Manual (available from the CD).
b) If “Google Account”is used to create the CloudLync account, you have to touch
“Google Account”button every time you need to log-in CloudLync again.
c) Please make sure to use Gmail Address for Google Login

5
3. With CloudLync account successfully implemented, the “Camera List” dialog will display to
prompt you to start the new Camera(s) registration process as described below:
NOTE: Make sure the Camera(s) is properly connected with Internet.
1) Touch the “Add Camera” button
2) Touch the “Next” button
3) Get ready to scan the new Camera QR
Code card (see Figure 3-4 below) with
smartphone/tablet.
4) After scanning the QR Code card, touch
the “Next” button
5) MAC Address of the new Camera will
be treated as its default name. While
new Camera is added to the existing
list, just touch the Camera name to
view the on-line video
6) Live on-line video is now on display.

6
Activation card (with Activate Code and QR Code) is unique to each Camera. It is included in the
Camera package. Note that the card contains data that are very crucial to initial and subsequent
installations of your camera. Effort should be made to preserve the card.
(Front Side View) (Rear Side View)
Figure 3-4 Unique Activation Card for Each Individual Camera
3.1 CloudLync Registration by PC/Notebook/Ultrabook
You may use PC/Notebook/Ultrabook to register your new Camera account through browser, such as
IE, Chrome, Firefox, etc. For details, please refer to the User’s Manual (available from the CD).
4 Installation Guide Wizard
When the Power/Network indicator (upper LED) does not turn GREEN which indicates that the Camera
failed to properly connect with the Internet, insert the CD (included in the package) into your computer
CD-ROM Drive and the “Installation Guide Wizard” program will launched automatically. The Wizard
provides an easy step-by-step installation guide that will ensure successful connection of your Camera to
Internet.
Note that the Power/Network indicator (upper LED) will turn green color to confirm that the Camera has
successfully linked with the Internet.
Figure 4-1 Power/Network (Upper LED)& Wireless LED (Lower LED) Indicators
Power/Network LED Indicator
should light up in green to indicate
successful link to the Internet
Wireless LED Indicator lights up (in
blue) only when the Camera is
connected through and set to Wi-Fi
This manual suits for next models
1
Table of contents
Other Repotec IP Camera manuals