RESISTANCE SRS-G60-15V3-4K User manual

User Manual
SRS-G60-15V3-4K

TABLE OF CONTENTS
Notice ...................................................................................................... 2
Preface .................................................................................................... 5
1.1 Regulations Information..................................................................... 6
1.2 Safety Instructions............................................................................. 7
1.3 Conventions for this Manual.............................................................. 8
1.4 Release History ................................................................................. 9
Getting to know the basics .................................................................... 10
2.1 Product Specication........................................................................11
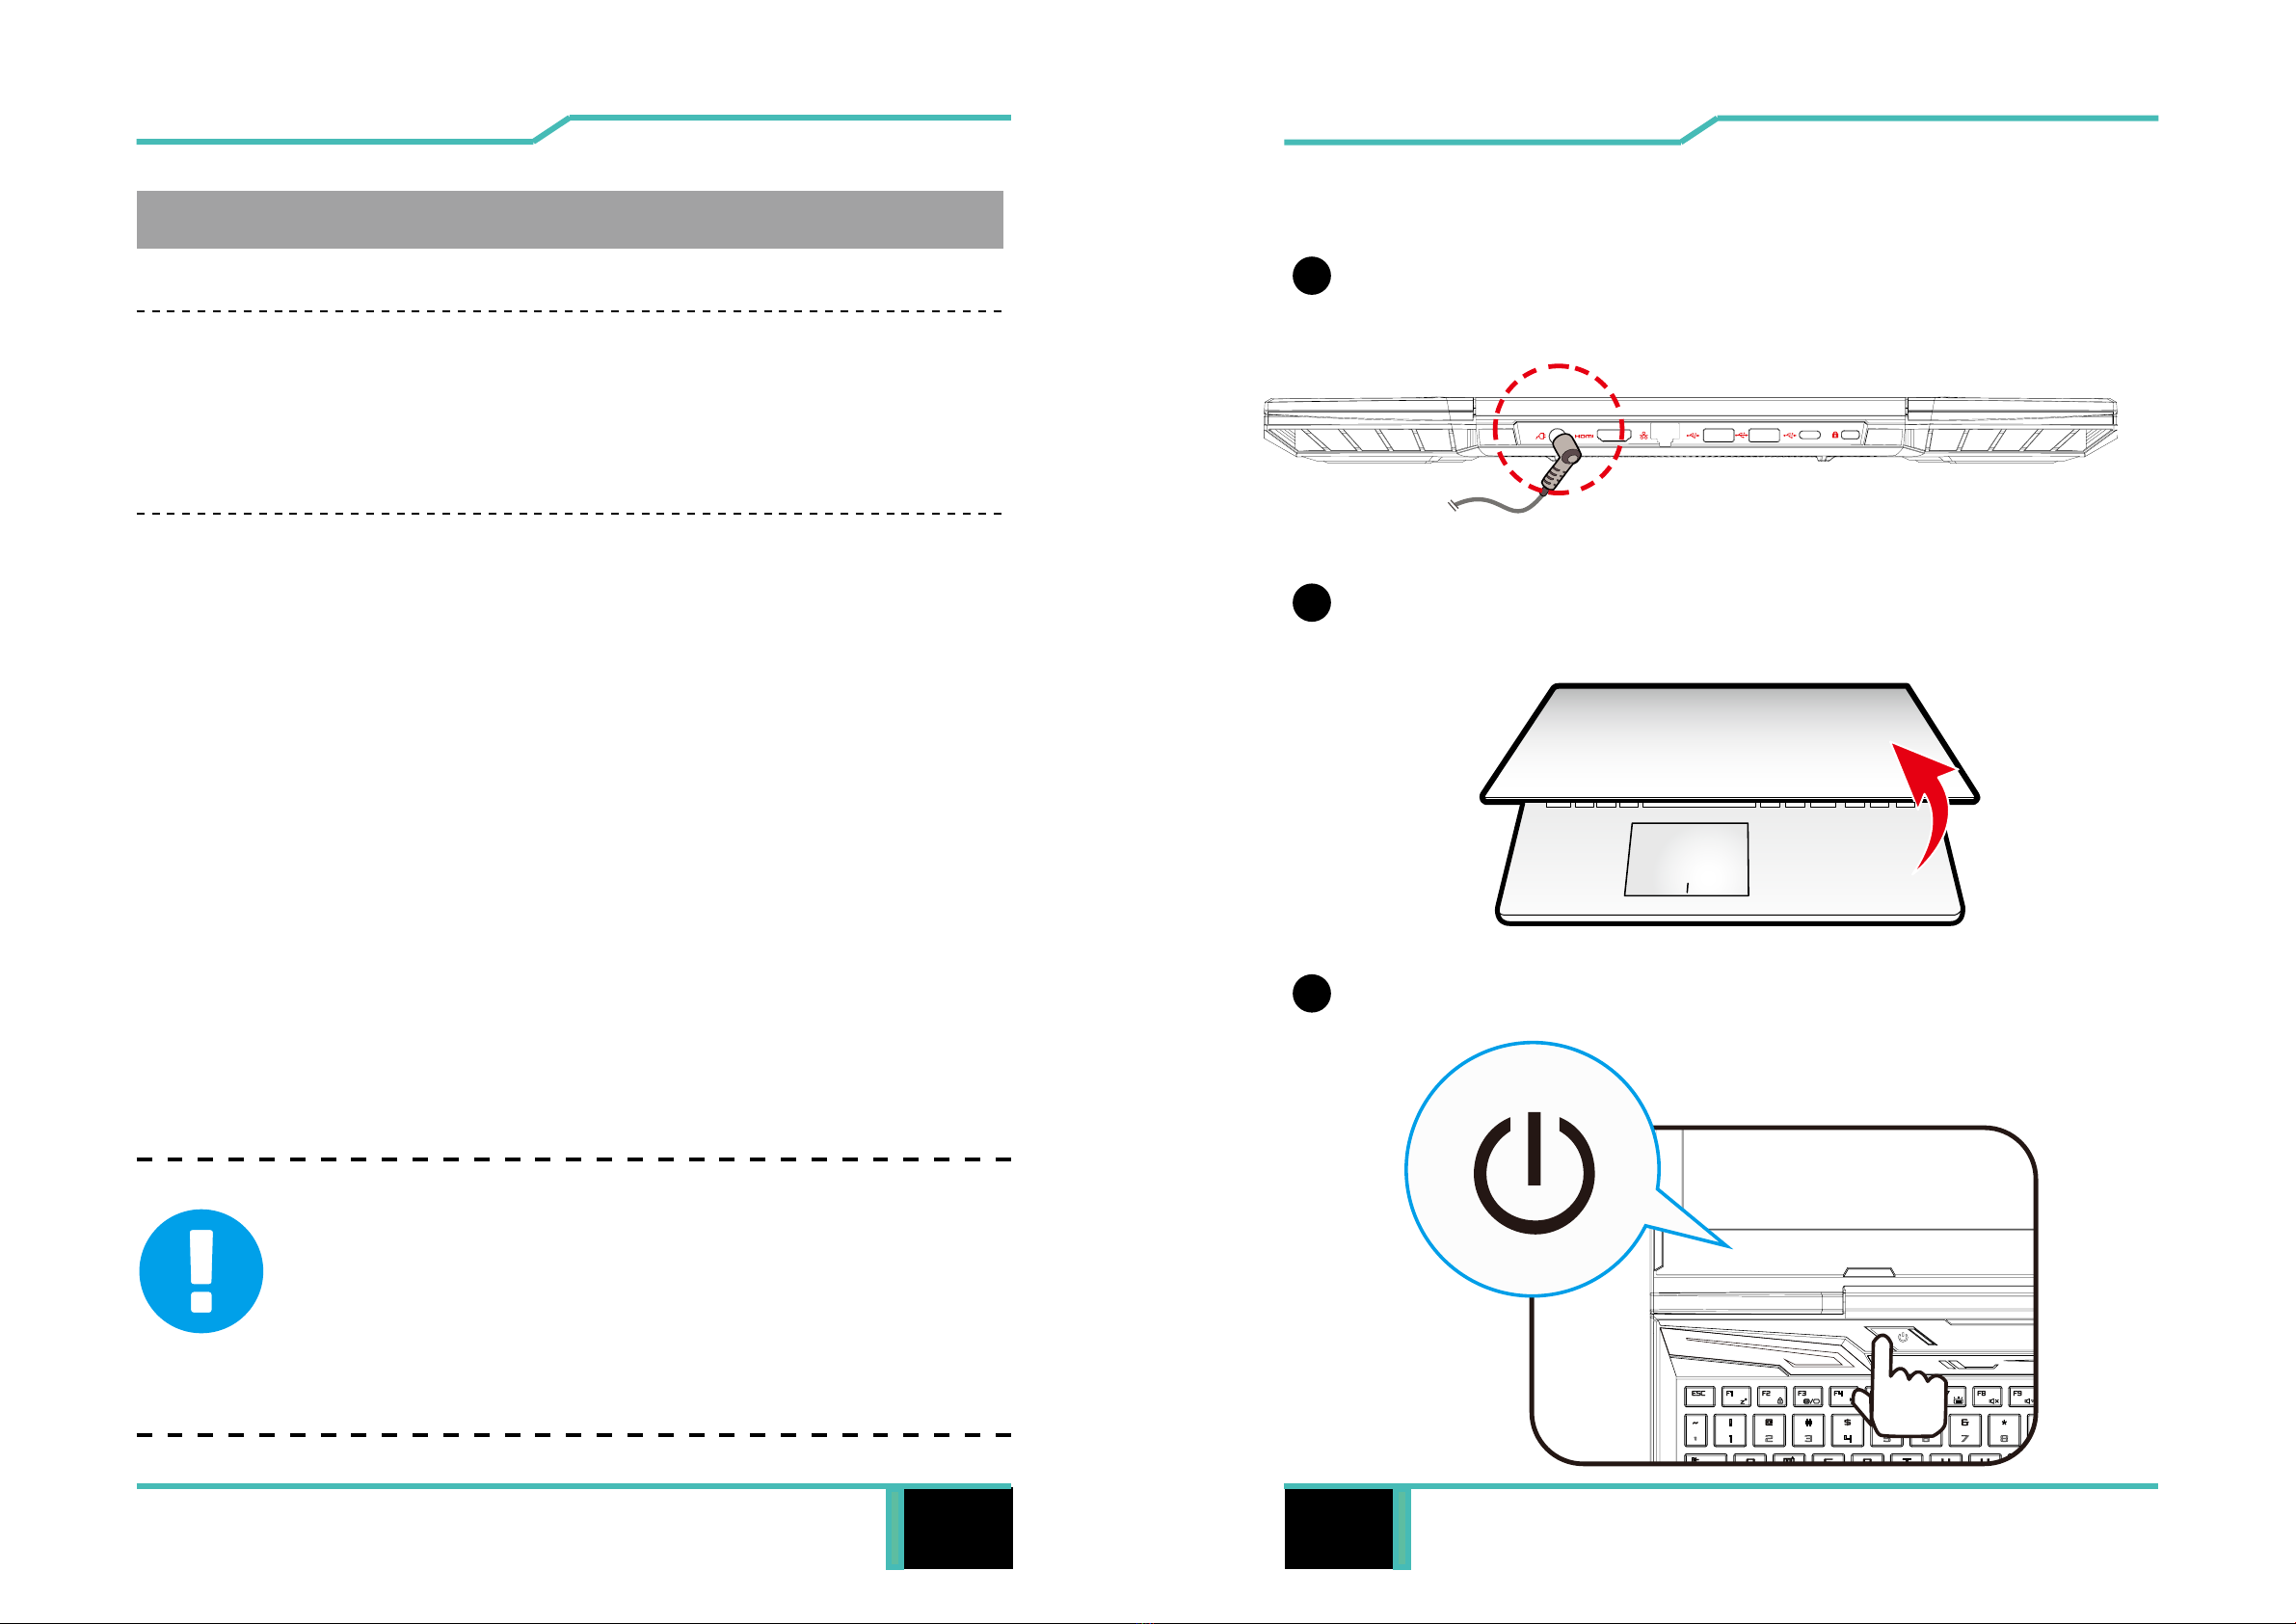
2.2 Preparing your Computer ............................................................... 15
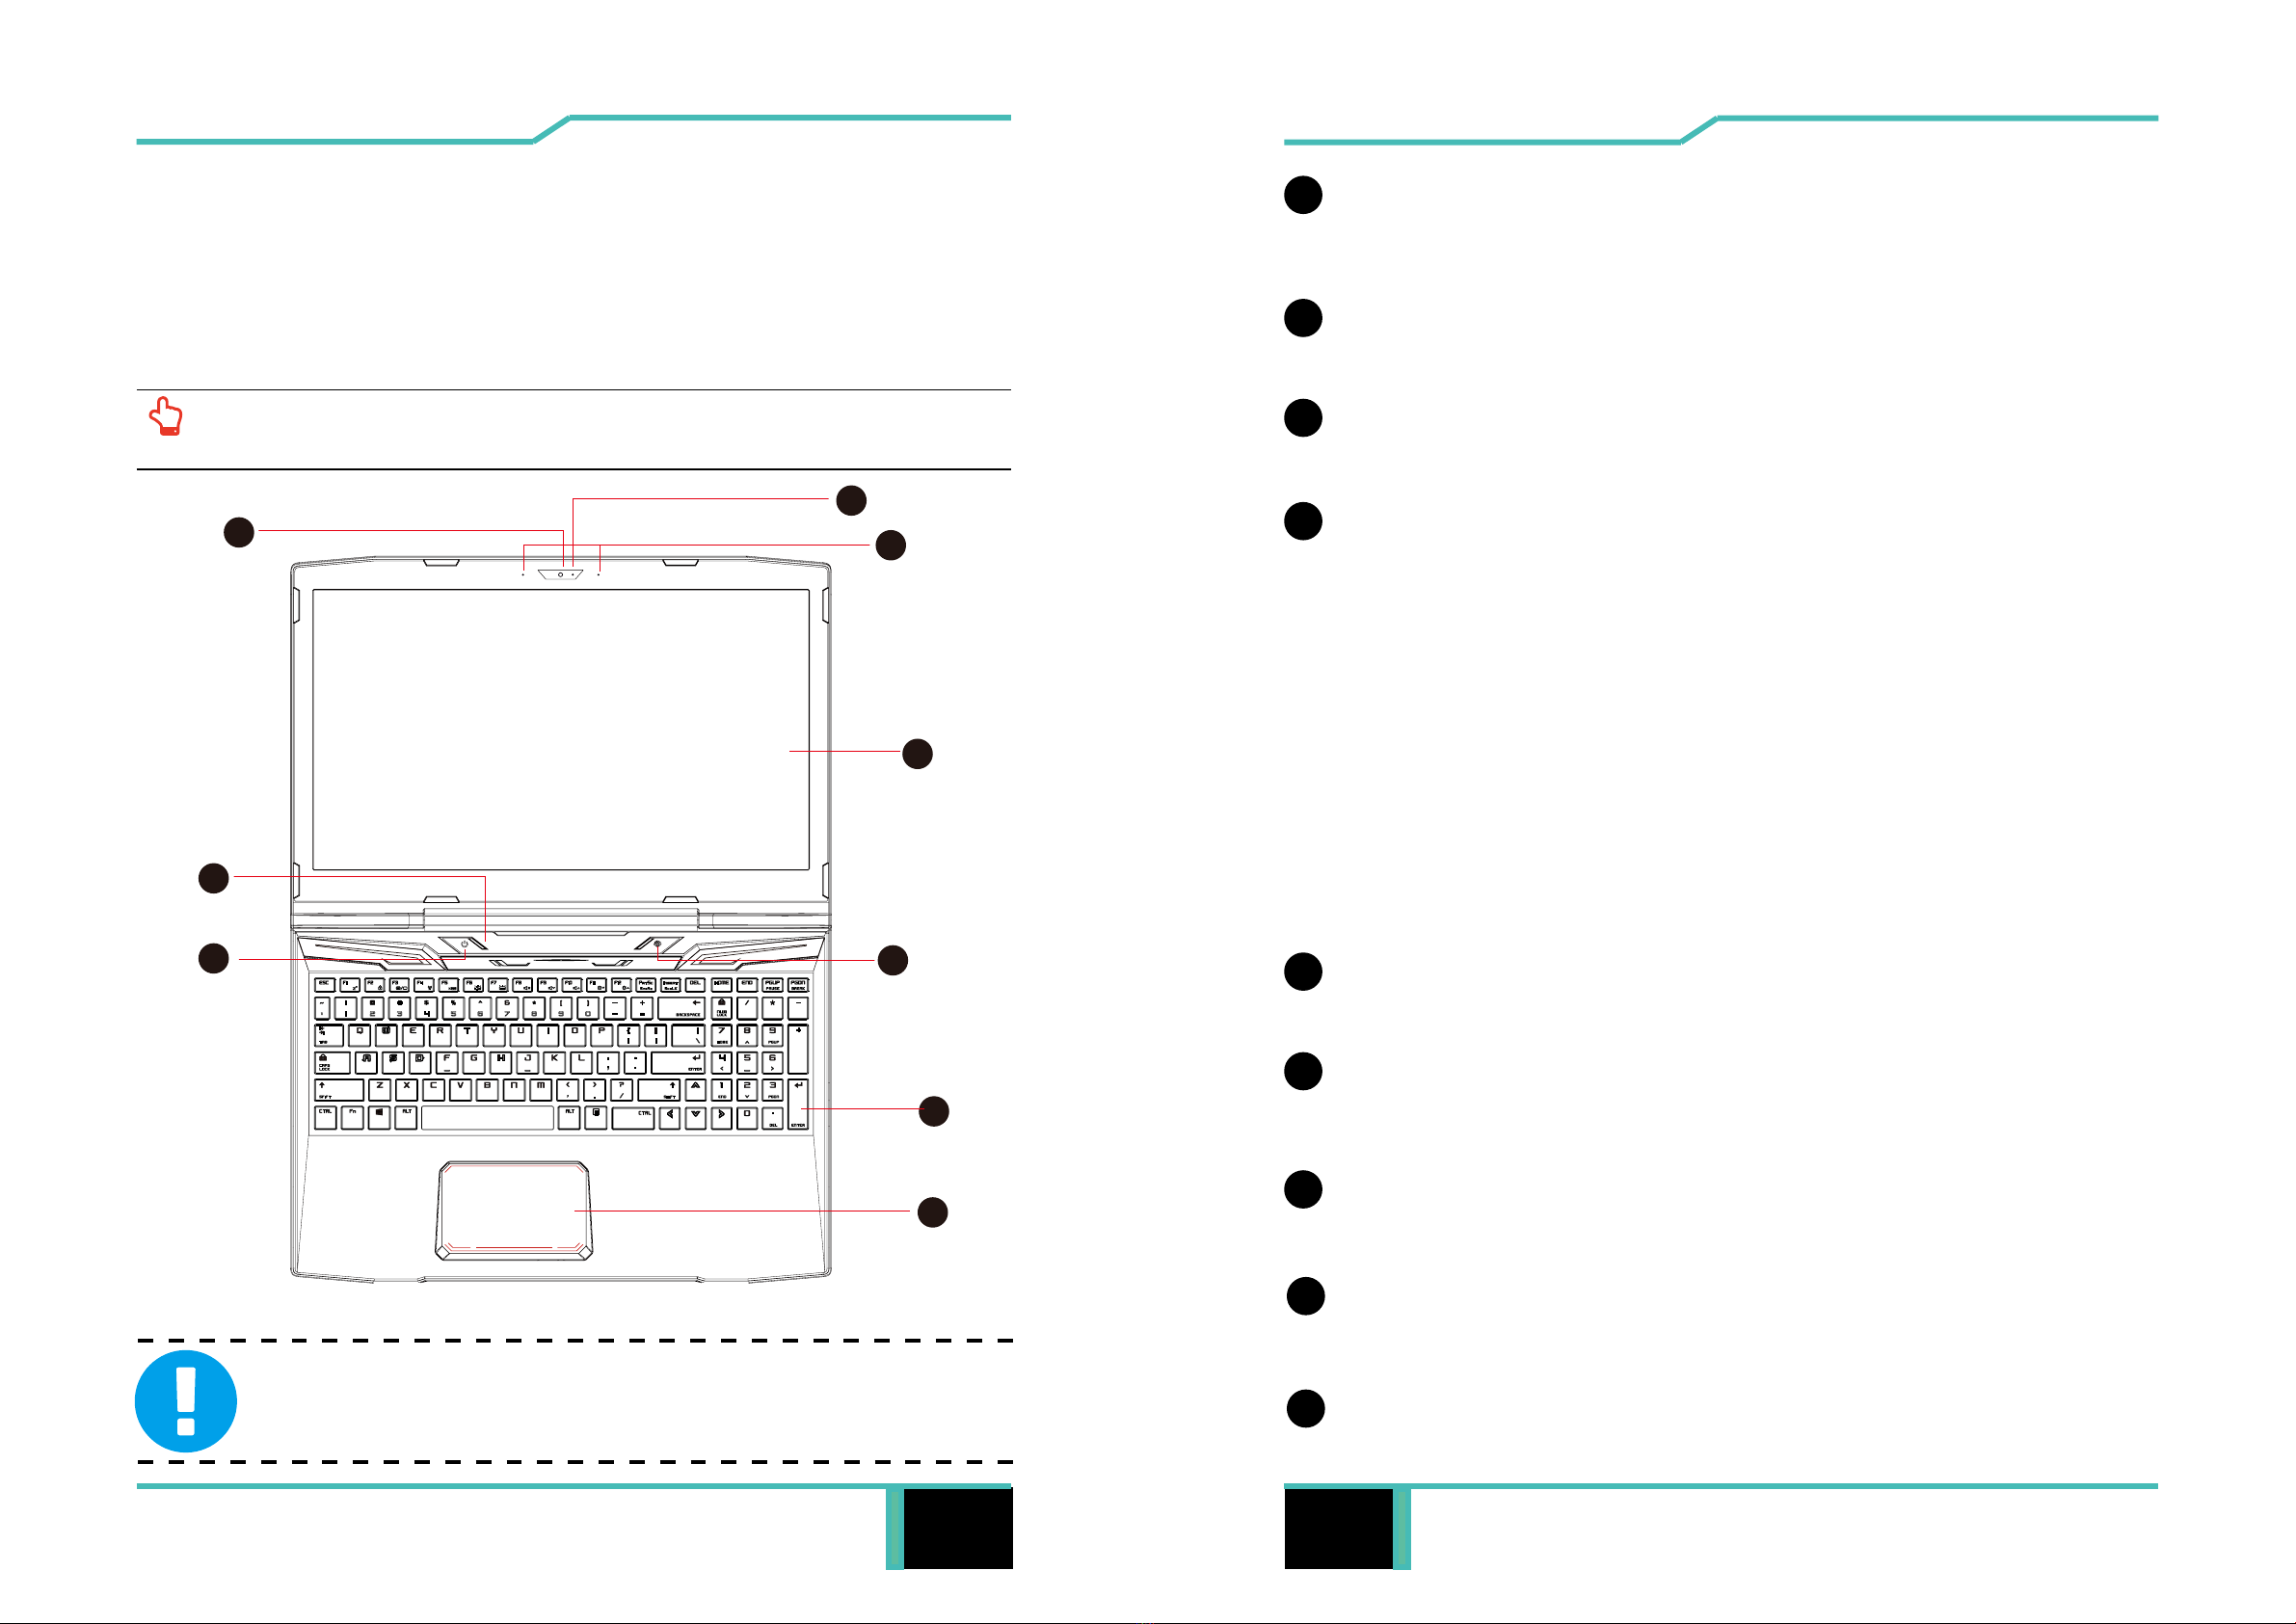
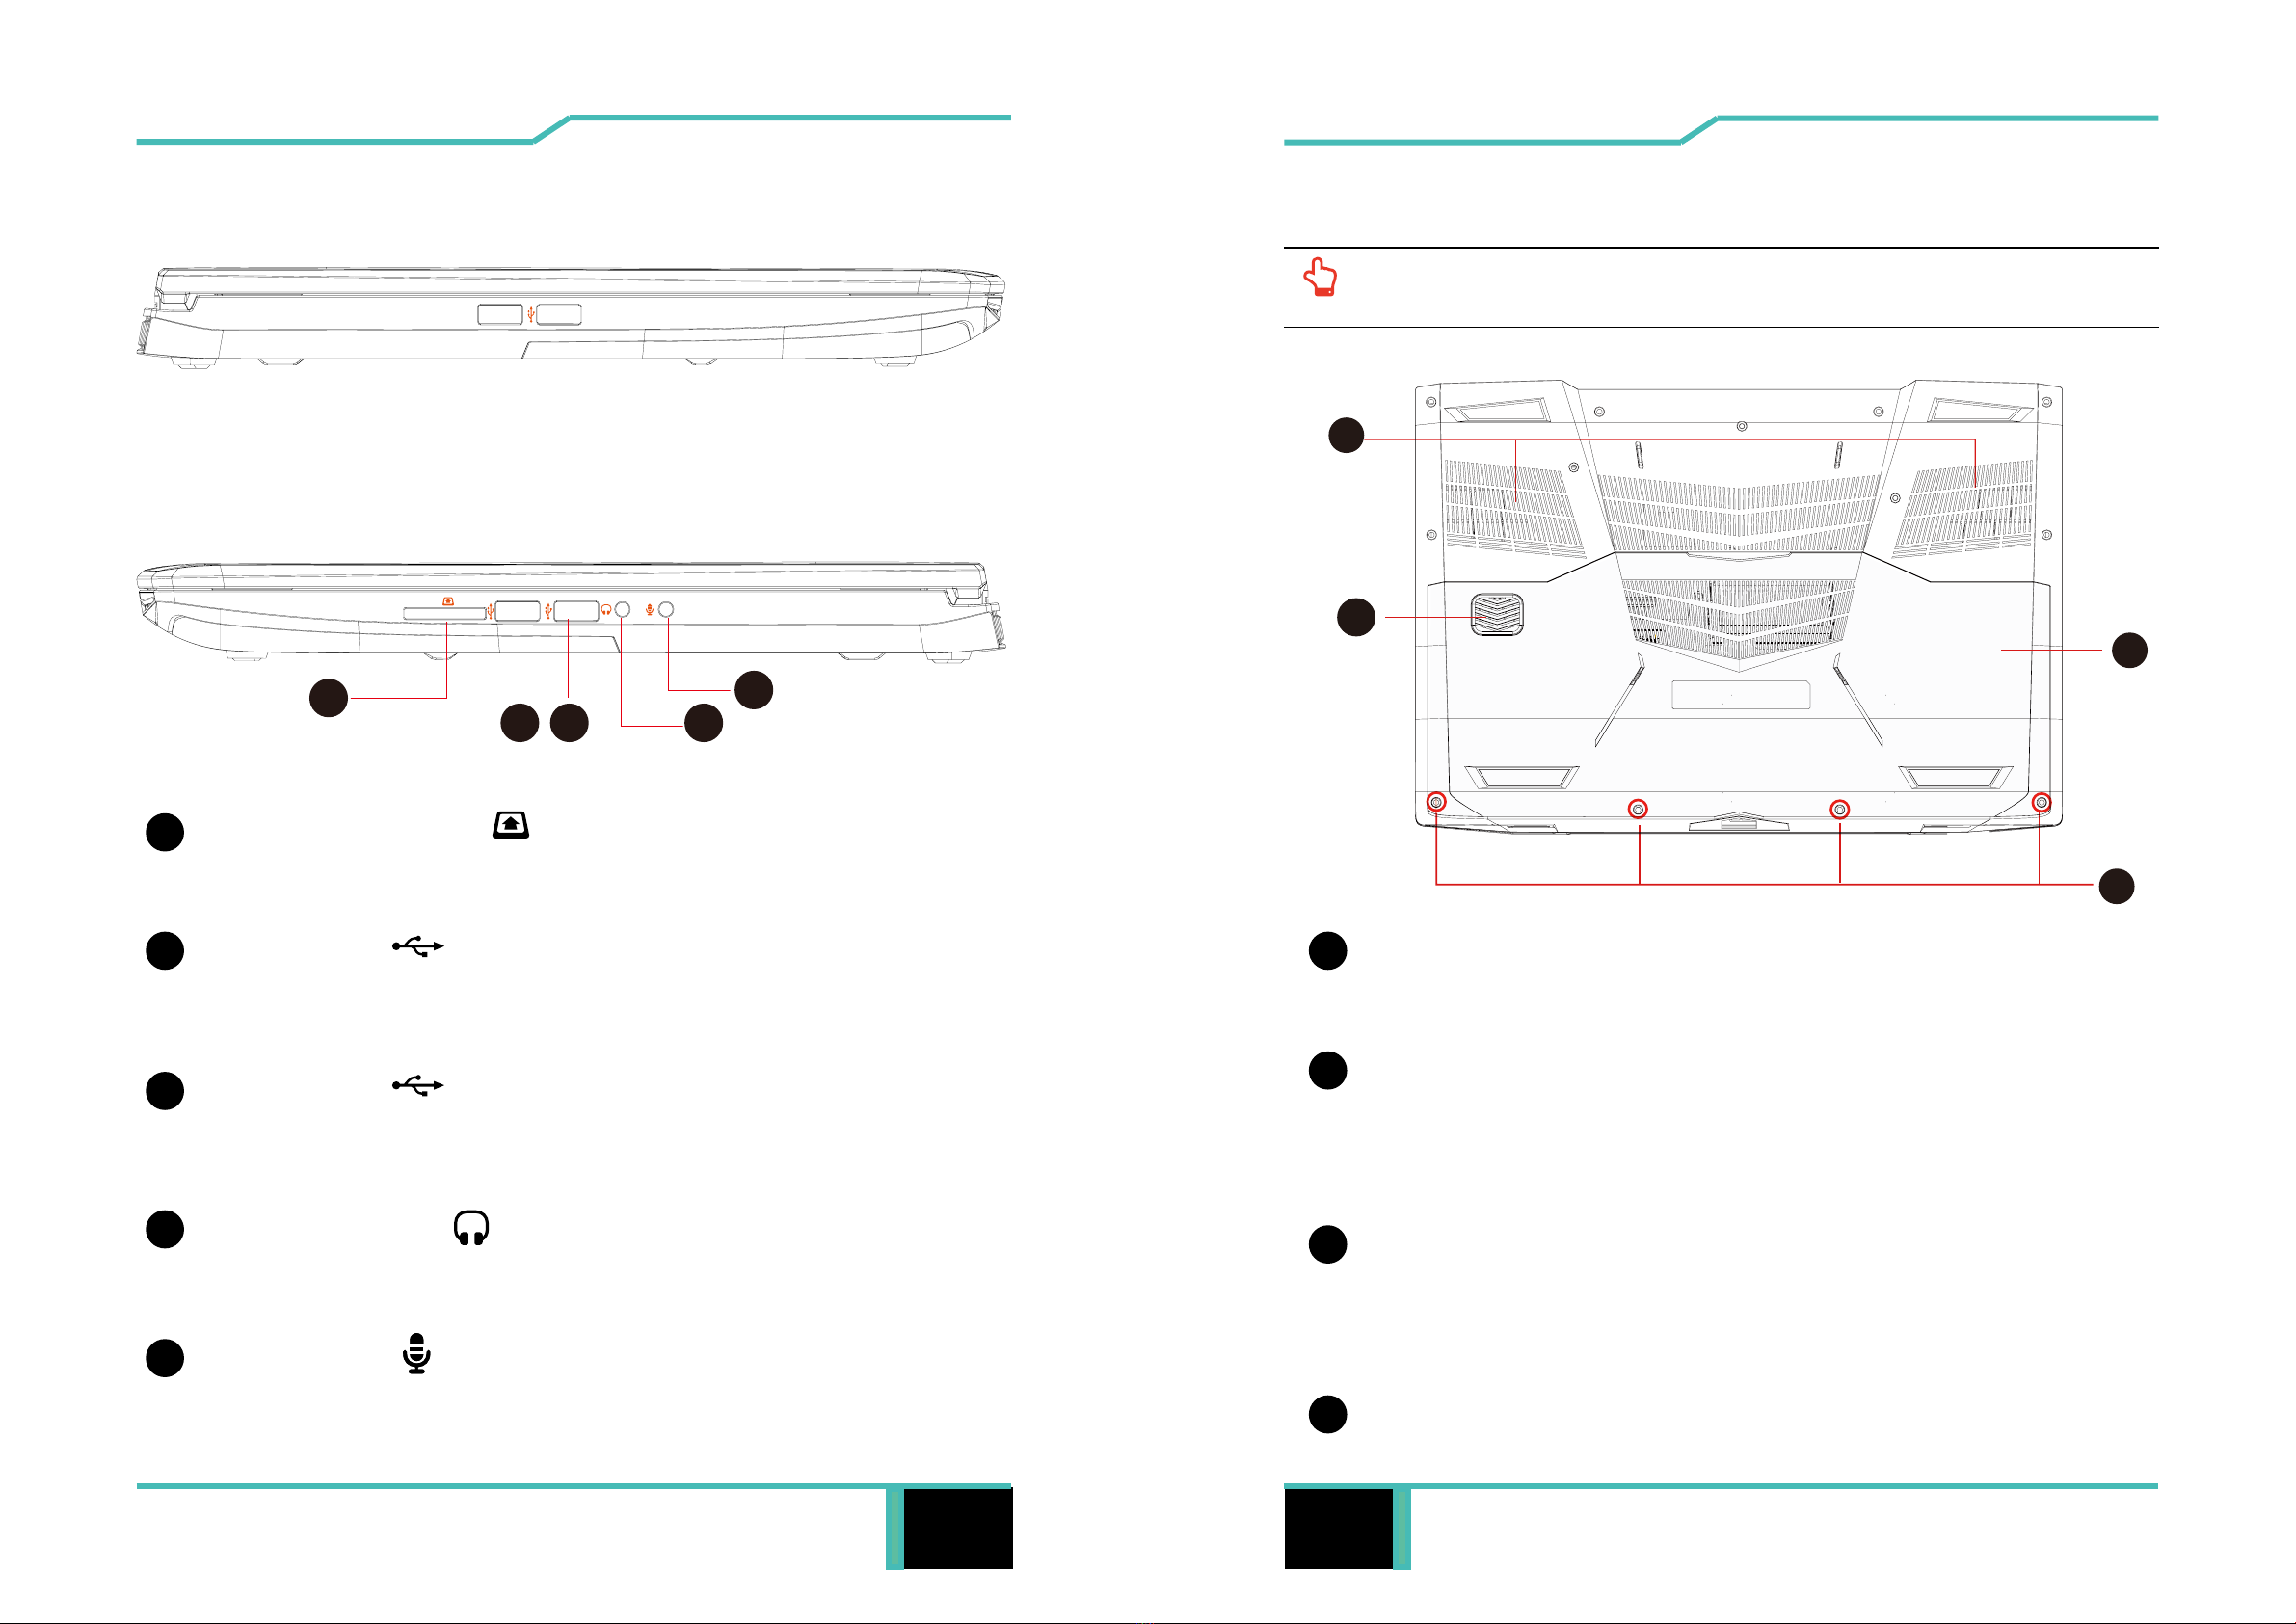
2.3 Product Overview ........................................................................... 16
Getting started....................................................................................... 23
3.1 AC Adapter ...................................................................................... 24
3.2 Knowing the Keyboard .................................................................... 25
3.2.1 For keyboard users....................................................................... 26
3.3 Using the touchpad / clickpad.......................................................... 29
3.3.1 Windows 10 Touchpad Usage ...................................................... 30
BIOS setup ............................................................................................ 31
The information in this user’s manual is protected by copyright
laws, all parts of this manual, including the products and software
described in it, can not be reproduced, transmitted, transcribed,
stored in a retrieval system, nor translated into any language.
THE MANUFACTURER OR RESELLER SHALL NOT BE LIABLE
FOR ERRORS OR OMISSIONS CONTAINED IN THIS MANUAL
AND SHALL NOT BE LIABLE FOR ANY CONSEQUENTIAL
DAMAGES, WHICH MAY RESULT FROM THE PERFORMANCE
OR USE OF THIS MANUAL.
The illustrations in this user’s manual are for reference only.
Actual product specications may vary with territories.
The information in this user’s manual is subject to change without
notice.
Notice

Notebook Manual 5
English
4.1 About BIOS Setup ........................................................................... 32
4.1.1 When to Use BIOS Setup ?.......................................................... 32
4.1.2 How to Run BIOS Setup ?............................................................ 32
4.2 BIOS Setup Menu............................................................................ 33
4.2.1 Main Menu.................................................................................... 34
4.2.2 Advanced Menu ........................................................................... 36
4.2.3 Security Menu............................................................................... 38
4.2.4 Boot Menu .................................................................................... 40
4.2.5 Exit Menu...................................................................................... 41
Preface
Chapter 1

6 Notebook Manual Notebook Manual 7
English
English
English
1.1 Regulations Information
¤ CE compliance
This device is classed as a technical information equipment (ITE) in
class B and is intended for use in living room and oce. The CE-mark
approves the conformity by the EU-guidelines:
- EMC Directive 2014/30/EU,
- Low Voltage Directive 2014/35/EU(equals A2 : 2013) ,
- R&TTE Directive 1999/5/EC
The unit can be operated at an ambient temperature of max. 35°C
(95°F). Do not subject it to temperatures below 5°C (41°F) or
above 40°C (104 °F).
CAUTION: RISK OF EXPLOSION IF BATTERY IS REPLACED
BY AN INCORRECT TYPE DISPOSE OF USED
BATTERIES ACCORDING TO THE INSTRUCTIONS.
PREVENTION OF HEARING LOSS
CAUTION: Listening to music at high volume levels and for
extended durations can damage one’s hearing. In
order to reduce the risk of damage to hearing, one
should lower the volume to a safe, comfortable level,
and reduce the amount of time listening at high
levels. Headsets should comply with EN 50332-2
requirements.
1.2 Safety Instructions
Do not apply heavy pressure to the computer or subject it to any form of
strong impact as this can damage the computer's components or otherwise
cause it to malfunction.
To keep your computer in prime operating condition, protect your work area
from direct sunlight.
Never cover or block the air vents including those located at the base of the
computer. Never cover your computer or AC adapter with any object.
Do NOT expose to or use near liquid, rain, or moisture.
Do NOT use the modem during electrical storms.
Do not use or expose this device around magnetic elds as magnetic
interference may aect the performance of the device.
1
2
3
4
5
1
52
3
4
100kg

8 Notebook Manual Notebook Manual 9
English
English
English
1.3 Conventions for this Manual
CAUTION : This message contains important information that must
be followed for safe operation.
NOTE : This message contains information for special situations.
1.4 Release History
1.0 09/2017
Version Date Revision
Initial release

10 Notebook Manual Notebook Manual 11
English
English
English
Getting to know the basics
Chapter 2
2.1 Product Specication
This User’s Manual provides technical information of instructions
and illustrations on how to operate this notebook for the customer.
Please read this manual carefully before using this notebook.
・CPU
Support Processor
KBLH, 4+2
・Memory
DDR
DDR4 2400MHz
・Storage
HDD
2.5” SATA HDD support
・Physical Characteristic
Dimension
374.6*260*29.5 (28.25Thermal )mm
2.5kg
・GPU
Support Processor
NVDIA GTX 1060, 192bits

12 Notebook Manual Notebook Manual 13
English
English
English
・I/O Port
DC-in x 1
x 1
x 1 (2 in 1 Card reader connector type)
x 1
USB 3.0 X2
USB 2.0 X 2
USB 2.0 X 2 (Left side,option)
USB 3.0 X 1 (Type C no Audio and Video support)
・Audio
Audio Codec
Built-in 2 speakers
Speaker : 2W/each
2W subwoofer
Digital Microphone support w/ Camera
Azalia standard support, D3 mode support, 2.1 Channel support
Speaker/MIC
・Input
Keyboard
*15.6" KB with 4 Zone backlight support, full KB size w/ numeric keys
*Full ME 15.6" KB (with numeric keys) with RGB backlight support
Pointing Device
PS2 Clickpad 98X60mm
LCD
15.6" FHD,16:9, Glare or AG
・Display
LAN
Supports 10/100/1000 Mb/Sec
Wireless LAN
M.2 2230 w/ PCIE interface
IEEE802.11a/b/g/n/ac support
・Communication Port
HD webcam
HD webcam with D-MIC*1
・Webcam
x 2
USB
RJ45
Card Reader
HDMI
Audio out & Mic in

14 Notebook Manual Notebook Manual 15
English
English
English
・Power
AC Adapter
Automatic Voltage adjustment between 100 and 240VAC 50/60Hz,
150 Watts (19V/7.89A), 3 Pins
180 Watts (19.5V/9.23A), 3 Pins
Li-polymer Battery (Power),
46.74WH (3S1P)
62.32WH (4S1P)
Battery
CAUTION: MODEL IS DESIGNED TO USE WITH THE DC INPUT:
19 Vdc, 7.89 A or 19.5Vdc, 9.23A
This product has two rating, Please use the genuine
adapter based on the rating of your PC's model and
BIOS. If damage is determined to have been caused by
utilization of an unauthorized power supply, the warranty
will be void.
2.2 Preparing your Computer
A Connect the AC adaptor DC output plug to the DC IN jack.
BThe display panel can be opened to a wide range of angles for
optimal viewing.
CPress the power button to turn on your notebook computer.

16 Notebook Manual Notebook Manual 17
English
English
English
Top-Open View
2.3 Product Overview
Please become familiar with each component before you operate
the computer.
NOTE: The product’s color, I/O port, indicator location, and specication will
depend upon the actually shipping product.
CAUTION:When you are not using the computer, keep the LCD-
screen closed to protect it from dust.
1
3
2
7
4
5
6
Webcam
A device that allows you to record video or take photographs with your
computer.
Camera Status LED
The Camera Status LED
shows the Camera status.
Microphone
Built-in microphone.
Power Button
Press this button to turn the computer's power on or o.
*Full ME SKU:
Power ON: Red
Suspend:Slow / Smooth, Blinking Red (6 Sec/Cycle)
Battery Low (<6%): Blinking Red (3 Sec/Cycle)
Charging: Red
*4 Zone BLM SKU:
Power On: Red
Charging: Green&Charging@Power On: Orange
Battery Low (<6%): interlaced Blinking Orange & Red
FAN full speed: Red
LCD screen
Displays of your notebook
Power & Battery LED indicator
Quick launch button
FAN full speed ON/OFF
9
8
Touchpad/Click pad
Touch-sensitive pointing device which functions like the mouse.
Keyboard
Full 15.6" KB with RGB backlight support.
1
2
3
4
5
6
7
8
9

18 Notebook Manual Notebook Manual 19
English
English
English
Right Side View
Left Side View
1
2 3 4
5
1
2
3
4
5
2 in 1 Card Reader
Insert Memory Card.
USB Ports
Connects an USB device.
(such as USB drive, keyboard or mouse) into this jack.
USB Ports
Connects an USB device.
(such as USB drive, keyboard or mouse) into this jack.
Audio Out Jack
Connect amplified speakers or headphones into this jack.
Mic In Jack
Connect microphone into this jack.
1
2
3
Bottom Side View
NOTE : The product’s thermal vent will depend upon the actually
shipping product.
1
2
3
Vents
The thermal vents are designed to cool the internal components
and avoid overheating.
HDD / RAM / SSD / WLAN Compartment Cover
The cover can be removed to install or remove the HDD / RAM
/ SSD / WLAN. If damage occurs while attempting to modify or
remove parts, it will not be protected under warranty.
Compartment Cover Screws
You can remove the screws to install or remove the HDD /RAM
/ SSD / WLAN compartment cover. ( Please refer to the HDD /
RAM / SSD / WLAN compartment view on the following page.)
Subwoofer
4
4
USB Ports X2 (Option)

20 Notebook Manual Notebook Manual 21
English
English
English
CAUTION: Do not put the computer on your lap or other
parts of the body to avoid injury from the heat.
WLAN
BATTERY
RAM
SSD SSD HDD
by2 by4
HDD / RAM / SSD / WLAN Compartment View
(Optional) Front Side View
1
2
1Stereo speakers
Produce stereo sound.
Projection light
2
Default: Red
Power ON: ON
Suspend Mode: Blinking Red slowly
FAN full speed: Blinking Red fast
Power o (S4/S5): OFF; (When open Lid: Red (10 sec) then o
Subwoofer

22 Notebook Manual Notebook Manual 23
English
English
English
Getting started
Chapter 3
8
2Power Connector
Connect the AC adapter into this connector.
4Network Jack
Connect an Ethernet cable to this port.
3HDMI port
Supports high-denition digital video connections.
7
6
USB Port
5
Back Side View
1
28
3 4 5 6 7
1Vents
The thermal vents are designed to cool the internal components and avoid
overheating.
Connects an USB device (such as USB drive, keyboard or
mouse) into this jack. With charging function.
USB Type C Port
Connects an USB device (such as USB drive, keyboard or
mouse) into this jack.
Kensington® Lock Port
To be secured using Kensington® Lock Port security products.
USB Port

24 Notebook Manual Notebook Manual 25
English
English
English
3.1 AC Adapter
Please be noted that it is strongly recommended to connect the
AC adapter and use the AC power while using this notebook for
the rst time. When the AC adapter is connected, the battery
is being charged immediately. Attach the AC adapter when
you need to charge the battery or you want to operate from
AC power. It is also the fastest way to get started, because the
battery pack will need to be charged before you can operate
from battery power.
Note that the AC adapter included in the package is approved
for your notebook; using other adapter model may damage
either the notebook or other devices attached to it.
DC IN
1
2 3
3.2 Knowing the Keyboard
The following defines the colored hot keys on the Keyboard.
The coloured commands can only be accessed by first
pressing and holding the function key while pressing a key with
a coloured command.
NOTE: The power adapter can become hot when in use. Please be sure the
AC adapter is not covered with any materials keep it away from exposed parts
of your body. The AC adapter appearance may vary depending on your region.
CAUTION: The use of inferior extension cords may result in damage
to your notebook. Your notebook comes with its own authorized AC
adapter. Use of a dierent AC adapter or cable extension which
is not authorized for use will void warranty protection if damage to
hardware is found in association to said adapter or extension cable.
NOTE: The number of keys available on your keyboard will depend on the
country/region in which the keyboard was designed and built.

26 Notebook Manual Notebook Manual 27
English
English
English
3.2.1 For keyboard users
To activate these functions, press the hot key associated with the desired
function as below :
Function Keys
Function DescriptionKeypad
RADIO
On/O:
Press this key combination (Fn+F4)
to turn all radios on or o.
Display
mode: Press this key combination (Fn+F3)
to enable Display Mode.
Touch pad
On/O:
Press this key combination (Fn
+F5) to turn touch pad on/off.
Suspend: Press this key combination (Fn+F1)
to enter sleep mode.
Windows
Lock/On:
Press this key combination (Fn
+F2) to turn Windows Lock on/off.
+
+
+
+
+
Function Keys
Function DescriptionKeypad
Volume
up:
Press this key combination (Fn+F10)
to enter Volume up mode.
Brightness
up:
Press this key combination (Fn+F12)
to increase brightness of LCD
display.
Volume
down:
Press this key combination (Fn+F9)
to enter Volume down mode.
MUTE: Press this key combination (Fn+F8)
to enter MUTE mode.
Brightness
down:
Press this key combination (Fn+F11)
to decrease brightness of LCD
display.
Keyboard
Brightness
down:
Press this key combination (Fn+F6)
to decrease brightness of Keyboard.
Keyboard
Brightness
up:
Press this key combination (Fn+F7)
to increase brightness of Keyboard.
+
+
+
+
+
+
+

28 Notebook Manual Notebook Manual 29
English
English
English
Function Keys
Function DescriptionKeypad
Search:
(Optional)
+
+
+
+
Settings:
(Optional)
Share:
(Optional)
Devices:
(Optional)
Press this key combination (Windows
logo key+Q) to open the search
menu and search apps.
Press this key combination (Windows
logo key+I) to open the settings
menu.
Press this key combination (Windows
logo key+H) to open share menu.
Press this key combination (Windows
logo key+K) to open devices menu.
3.3 Using the touchpad / clickpad
Press the left 1and right 2buttons located on the edge of
the touchpad / clickpad to make selections and run functions.
These two buttons are similar to the left and right buttons on
a mouse. Tapping on the touchpad / clickpad produces similar
results.
The touchpad / clickpad is a rectangular electronic panel
located just below your keyboard. You can use the static-
sensitive panel of the touchpad / clickpad and slide it to move
the cursor. You can use the buttons below the touchpad as left
and right mouse buttons.
• Touch pad
12

30 Notebook Manual Notebook Manual 31
English
English
English
Modern touchpad gesture:
A modern touchpad should support the core touch gestures
described in the following table.
Touch Pad Gesture
3.3.1 Touchpad Usage
Gesture
left click/double click
move cursor
tap+slide
scroll/pan
pinch/zoom
multitasking gesture
Gesture name
one nger
two nger
three nger
Item
1
2
3
4
5
6
BIOS setup
Chapter 4

32 Notebook Manual Notebook Manual 33
English
English
English
NOTE : The drivers, BIOS and utilities bundled in the support DVD
may vary by models and are subject to change without notice.
4.1 About BIOS Setup
4.1.1 When to Use BIOS Setup
4.1.2 How to Run BIOS Setup
Suggested only for advanced users.
You may need to run BIOS setup when:
・
An error message appears on the screen during the system
booting
up and is requested to run SETUP.
・You want to change the default settings for customized
features or to reload the default BIOS settings.
To run the BIOS Setup Utility, turn on the notebook and press
the [Del] key during the POST procedure.
If the message disappears before you respond and you still wish
to enter Setup, either restart the system by turning it OFF and
ON, or simultaneously pressing [Ctrl]+[Alt]+[Del] keys to restart.
Be noted that the screen snaps and setting options in this
chapter are for your references only. The actual setting screens
and options on your notebook may be different after a BIOS
upgrade.
The settings will save in the NVRAM and take effect after a
reboot. The setup function can only be accessed by pressing
[Del] or [F2] during POST. The setup uses a menu interface to
allow the user to configure their system and the features are
briefly listed as follow.
Press [F7] key for Boot Menu.
4.2 BIOS Setup Menu
Once you enter the BIOS Setup Utility, the Main Menu will
appear on the screen. Select the tags to enter the other menus.
Main Menu
Show system overview about memory size, main HDD or ODD
and setting of system time and date.
Advanced Menu
To select the XD feature enable or disable XD feature - only
works with Intel platform + Windows.
Security Menu
Install or clear the password settings for supervisor and user.
Boot Menu
Congure Settings during System Boot.
EXIT Menu
Save or discard the changes before leaving the BIOS Setup
Menu.

34 Notebook Manual Notebook Manual 35
English
English
English
4.2.1 Main Menu
Day Day of the week, from Sun to Sat, which
is determined by BIOS (read-only).
Month (Month) The month from 01 (January) to 12
(December).
Date (Date) The date from 01 to 31.
Year (Year) The year can be adjusted by users.
・Total Memory
This allows you to see the total amount of memory.
・System Time
This item allows you to set the system time. There is a small
internal (CMOS) battery which is designed to maintain your
system clock. It is designed to maintain time even when the
PC is powered down or in sleep mode. The time format is
[hour:minute:second].
Use [+] or [-] to congure system Time.
・System Date
This item allows you to set the system date. The date format is
[day:month:date:year].
Use [ENTER], [TAB] or [SHIFT-TAB] to select a eld.

36 Notebook Manual Notebook Manual 37
English
English
English
4.2.2 Advanced Menu
・NVMe Device
It will show NVMe Device info.
・Intel Virtualization Technology
When enabled, a VMM can utilize the additional hardware
capabilities provided by Vanderpool Technology.
・RAID mode reminder
Please update strip size in BIOS to 128K in order for RAID to
optimize performance.
•Wake on LAN
Enable/Disable
integrated LAN to wake the system.
•Serial ATA HDD
It will show AHCI SATA HDD info.

38 Notebook Manual Notebook Manual 39
English
English
English
・Change Administrator Password
When this item is selected, a message box shall appear on the
screen as below:
Enter New Password
4.2.3 Security Menu
Select Change User Password to give or to clear password setting
same as Change Administrator Password item above.
Note that Administrator Password eld allows users to enter and
change the settings of the BIOS SETUP UTILITY, while User
Password eld only allows users to enter the BIOS SETUP UTILITY
without having the authorization to make any change.
The Password Check item is used to specify the type of BIOS
password protection that is implemented.
To clear a set Administrator Password/ User Password, just press
[Enter] under Change Administrator Password/ Change User
Password eld when you are prompted to enter the password. A
message box will pop up conrming password will be disabled.
Once the password is disabled, the system will boot and user can
enter setup without entering password.
Type a maximum of 20-digit password and press [Enter].
The password typed now will replace any previously set password
from CMOS memory. You may also press [ESC] to abandon new
password setting.
It is extremely important to keep record for any BIOS password
which is set as it can not be reset even with the removal of a
CMOS battery for the security of your PC.
Table of contents