RGB A4183 User manual

KIT LUCE INDOOR PLUST
Art. A4183
AVVERTENZE - IMPORTANT NOTES - AVERTISSEMENTS:
Se il cavo flessibile esterno di questo apparecchio viene danneggiato, deve essere sostituito esclusivamente dal costruttore,
dal suo servizio di assistenza, o da personale qualificato equivalente, al fine di evitare pericoli.
If the external flexible cable of this appliance is damaged it must be replaced by either the manufacturer, the manufacturer’s
customer assistance service or by equivalent qualified personnel, in order to prevent possible hazards.
En cas d’endommagement, le câble souple externe de cet appareil ne peut être remplacé que par le fabricant,
par son service assistance ou par du personnel qualifié équivalent, afin d’éviter tout danger.
LEGENDA / LEGEND / LÉGENDE
Lampada fluorescente MAX 1 x 60 W
Fluorescent lamp MAX 1 x 60 W
Lampe fluorescente MAX 1 x 60 W
Classe di isolamento: Classe II.
Con doppio isolamento e/o rinforzo in ogni parte e senza dispositivi per la messa a terra.
Insulation class: Class II.
With double insulation and/or reinforcement in each part and without ground devices.
Classe d’isolement: Classe II
L'appareil n'est pas relié à une terre de protection. La sécurité de l'utilisateur est alors assurée
par l'absence de contact possible avec des parties métalliques. Pour cela, l'appareil est construit
avec une isolation renforcée (boutons plastiques, raccords moulés ...) voire une isolation double.
Apparecchio adatto a montaggio diretto su superfici normalmente infiammabili.
Device proper to direct assembly onto normally infiammable surfaces.
Instrument adéquat pour assemblage direct sur les surfaces normalement inflammables.
Attesta la conformità del prodotto alle disposizioni delle direttive comunitarie.
It certifies the conformity of the product to the European community instructions.
Attestation de conformité du produit selon les directives de la Communauté Européenne.
Prodotto con nessuna protezione nei confronti della penetrazione dell'acqua.
L'utente non ha comunque modo di entrare fisicamente in contatto con parti in tensione.
Product not protected against penetration of water.
Nevertheless, the user does not come into physical contact with the parts under tension.
Produit n'ayant aucune protection vis-à-vis de la pénétration de l'eau.
L'utilisateur ne doit absolument pas entrer en contact avec les parties en tension.

Istruzioni di assemblaggio e di installazione
Step 1
1. Collocare la lampadina (A) sulla struttura (B).
Step 2
2. Appoggiare il manufatto plastico (F) su un piano ed inserire la struttura (B).
3. Avvitare le viti (K).
4. Sollevare il manufatto plastico e collocare l’apparecchio alla presa di alimentazione.
Installation and assembly instructions
Step 1
1. Fit the bulb (A) on the structure (B).
Step 2
2. Place the plastic product (F) on a flat surface and insert the structure (B).
3. Tighten the screws (K).
4. Lift the plastic product and connect the appliance to the power outlet.
Instructions d’assemblage et d’installation
Step 1
1. Placer l'ampoule (A) dans la douille (B).
Step 2
2. Apposer le produit en plastique (F) sur une base et insérer la structure (B).
3. Visser les vis (K).
4. Redresser le produit en plastique et brancher le KIT à une prise d'alimentation électrique.
KIT LUCE INDOOR PLUST
Art. A4183
A
B
LAMPADA A FLUORESCENZA / FLUORESCENT BULB / AMPOULE FLUORESCENTE
230V - 20W - E27
KIT LUCE INDOOR
Materiale/Material/Matériel: Metallo Verniciato/Painted Steel/Métal Verni
IP20
K
B
F
Il Kit Luce non deve essere smaltito come rifiuto urbano, mediante cassonetto, ma è soggetto a raccolta
separata. Il mancato rispetto di questa norma è sanzionato dalla legge e potrebbe provocare
potenzialmente effetti negativi sia per l’ambiente sia sulla salute umana.
Decreto legislativo 25/07/2005 n°151 che recepisce le direttive 2002/95/CE RoHS e 2002/96/CE RAEE ed i suoi aggiornamenti.
The Light Kit must not be eliminated as urban waste, by means of refuse body, rather it is object of
separate collection. The non-observance of this rule is sanctioned by law and potentially could cause
negative effects both on the environment and on human health.
Legislative decree 25/07/2005 n°151 transposing 2002/95/CE RoHS and 2002/96/CE RAEE directives and their updates.
Le Kit Lumineux ne doit pas être jeté avec les ordures ménagères, ni dans les poubelles réservées au
tri sélectif. Le non respect de cette norme sera sanctionné par la loi et pourrait potentiellement avoir des
effets négatifs aussi bien pour l’environnement que pour la santé des êtres humains.
Décret législatif 25/07/2005 n°151 qui englobe les directives 2002/95/CE ROHS et 2002/96/CE RAEE et ses éventuelles
modifications.
Step 2Step 1

KIT LUCE OUTDOOR PLUST
Art. A4182
LEGENDA / LEGEND / LÉGENDE
AVVERTENZE - IMPORTANT NOTES - AVERTISSEMENTS:
1: Collegare la spina dell’apparecchio in una presa collocata in un luogo protetto dalla pioggia e dagli spruzzi d’acqua.
Connect the plug of the appliance to a power outlet that is located in a sheltered position, protected from rain and water
splashes.
Brancher la fiche de l’appareil à une prise située dans un endroit protégé de la pluie et des éclaboussures.
2: Se il cavo flessibile esterno di questo apparecchio viene danneggiato, deve essere sostituito esclusivamente dal
costruttore, dal suo servizio di assistenza, o da personale qualificato equivalente, al fine di evitare pericoli.
If the external flexible cable of this appliance is damaged it must be replaced by either the manufacturer, the manufacturer’s
customer assistance service or by equivalent qualified personnel, in order to prevent possible hazards.
En cas d’endommagement, le câble souple externe de cet appareil ne peut être remplacé que par le fabricant,
par son service assistance ou par du personnel qualifié équivalent, afin d’éviter tout danger.
3: Nelle versioni sprovviste di interruttore sul cavo di alimentazione, collegare la spina dell’apparecchio sotto una presa
comandata da interruttore.
For models that are not equipped with an inline on/off switch, connect the plug of the appliance to a switch controlled outlet.
Dans les versions dont le câble d’alimentation est dépourvu d’interrupteur, brancher la fiche de l’appareil à une prise
commandée par un interrupteur.
Lampada fluorescente MAX 1 x 60 W
Fluorescent lamp MAX 1 x 60 W
Lampe fluorescente MAX 1 x 60 W
Classe di isolamento: Classe II.
Con doppio isolamento e/o rinforzo in ogni parte e senza dispositivi per la messa a terra.
Insulation class: Class II.
With double insulation and/or reinforcement in each part and without ground devices.
Classe d’isolement: Classe II
L'appareil n'est pas relié à une terre de protection. La sécurité de l'utilisateur est alors assurée
par l'absence de contact possible avec des parties métalliques. Pour cela, l'appareil est construit
avec une isolation renforcée (boutons plastiques, raccords moulés ...) voire une isolation double.
Apparecchio adatto a montaggio diretto su superfici normalmente infiammabili.
Device proper to direct assembly onto normally infiammable surfaces.
Instrument adéquat pour assemblage direct sur les surfaces normalement inflammables.
Attesta la conformità del prodotto alle disposizioni delle direttive comunitarie.
It certifies the conformity of the product to the European community instructions.
Attestation de conformité du produit selon les directives de la Communauté Européenne.
Prodotto resistente all’immersione temporanea. L’icona, dove presente, fa riferimento al corpo lampada.
The product is temporary immersion proof. When showed, the icon refers to the lamp body.
Produit résistant à l'immersion temporaire. Cet icône permet d’être étanche en configuration non connectée.
Prodotto resistente agli spruzzi d’acqua. L’icona, dove presente, fa riferimento al cablaggio.
Product is splash-proof. When showed, the icon refers to the wiring.
Produit résistant aux gouttes d'eau. Cet icône prévoit la résistance du câblage.

A
B
C
D
J
Istruzioni di assemblaggio e di installazione
Step 1
1. Collocare la lampadina (A) sulla struttura (B).
2. Inserire la guarnizione (C) nella apposita sede.
3. Collocare il guscio protettivo in policarbonato ed avvitare le viti (J).
Step 2
4. Appoggiare il manufatto plastico (F) su un piano ed inserire la struttura (B).
5. Avvitare le viti (K).
6. Sollevare il manufatto plastico e collocare l’apparecchio alla presa di alimentazione.
Installation and assembly instructions
Step 1
1. Fit the bulb (A) on the structure (B).
2. Place the seal (C) in its seat.
3. Position the protective polycarbonate cover and tighten the screws (J).
Step 2
4. Place the plastic product (F) on a flat surface and insert the structure (B).
5. Tighten the screws (K).
6. Lift the plastic product and connect the appliance to the power outlet.
Instructions d’assemblage et d’installation
Step 1
1. Placer l'ampoule (A) dans la douille (B).
2. Insérer l'ensemble de la structure (C) dans l'espace ouvert.
3. Placer la coque protectrice en polycarbonate et visser les vis (J).
Step 2
4. Apposer le produit en plastique (F) sur une base et insérer la structure (B).
5. Visser les vis (K).
6. Redresser le produit en plastique et brancher le KIT à une prise d'alimentation électrique.
KIT LUCE OUTDOOR PLUST
Art. A4182
K
LAMPADA A FLUORESCENZA / FLUORESCENT BULB / AMPOULE FLUORESCENTE
230V - 20W - E27
KIT LUCE OUTDOOR
Materiale/Material/Matériel: Metallo Verniciato + Policarbonato / Painted Steel + Polycarbonate /
Métal Verni + Polycarbonate
Cablaggio/Wiring/Cablage: Shuko Plug IP44
B
F
Il Kit Luce non deve essere smaltito come rifiuto urbano, mediante cassonetto, ma è soggetto a raccolta
separata. Il mancato rispetto di questa norma è sanzionato dalla legge e potrebbe provocare
potenzialmente effetti negativi sia per l’ambiente sia sulla salute umana.
Decreto legislativo 25/07/2005 n°151 che recepisce le direttive 2002/95/CE RoHS e 2002/96/CE RAEE ed i suoi aggiornamenti.
The Light Kit must not be eliminated as urban waste, by means of refuse body, rather it is object of
separate collection. The non-observance of this rule is sanctioned by law and potentially could cause
negative effects both on the environment and on human health.
Legislative decree 25/07/2005 n°151 transposing 2002/95/CE RoHS and 2002/96/CE RAEE directives and their updates.
Le Kit Lumineux ne doit pas être jeté avec les ordures ménagères, ni dans les poubelles réservées au
tri sélectif. Le non respect de cette norme sera sanctionné par la loi et pourrait potentiellement avoir des
effets négatifs aussi bien pour l’environnement que pour la santé des êtres humains.
Décret législatif 25/07/2005 n°151 qui englobe les directives 2002/95/CE ROHS et 2002/96/CE RAEE et ses éventuelles
modifications.
Step 2Step 1

ASSOCIARE UN TELECOMANDO AD UN RGB LED LIGHT KIT
1 Assicurarsi che la spina di alimentazione sia staccata.
2 Svitare le 4 viti che fermano il guscio in policarbonato.
3 Inserire la spina di alimentazione.
4 Premere il pulsante al centro del RGB LED LIGHT KIT. Un led vicino al pulsante lampeggerà rapidamente per 10 secondi.
5 Mentre il led lampeggia premere uno qualsiasi dei 4 tasti del telecomando al quale si vuole associare
RGB LED LIGHT KIT. L’avvenuta programmazione è indicata dall’accensione del led per circa un secondo.
6 Staccare la spina di alimentazione.
7 Riavvitare il guscio in policarbonato con le 4 viti, prestando la massima attenzione
alla perfetta chiusura della guarnizione.
Ripetendo la procedura possono essere associati nuovi telecomandi.
Ogni RGB LED LIGHT KIT può essere associato a 10 telecomandi,
ed ogni telecomando può essere associato a un numero infinito di RGB LED LIGHT KIT.
HOW TO ASSOCIATE A REMOTE CONTROL TO AN RGB LED KIT
1 Make sure that the power plug is disconnected.
2 Undo the 4 screws that secure the polycarbonate shell.
3 Insert the power plug.
4 Press the button at the centre of the RGB LED LIGHT KIT. A LED next to the button will flash rapidly for 10 seconds.
5 While the LED is flashing press any one of the 4 buttons on the remote control to which you wish to associate
the RGB LED LIGHT KIT. The LED lights up for approx. one second to signal that the programming has been completed.
6 Disconnect the power plug.
7 Screw the polycarbonate shell back on with the 4 screws, making sure that the seal fits perfectly.
Repeat the procedure to associate additional remote controls.
Each RGB LED LIGHT KIT can be associated to 10 remote controls,
and every remote control can be associated to an infinite number of RGB LED LIGHT KITS.
PROCEDURA DI CANCELLAZIONE DELLA MEMORIA
1 Assicurarsi che la spina di alimentazione sia staccata.
2 Svitare le 4 viti che fermano il guscio in policarbonato.
3 Inserire la spina di alimentazione.
4 Premere il pulsante al centro del RGB LED LIGHT KIT. Un led vicino al pulsante lampeggerà rapidamente per 10 secondi.
5 Mentre il led lampeggia tenere premuto nuovamente il pulsante al centro del RGB LED LIGHT KIT per circa tre secondi,
fino a che il led non si spegnerà.
6 Rilasciare il pulsante e verificare che il led lampeggi 5 volte, a conferma dell’avvenuta cancellazione della memoria.
Ora RGB LED LIGHT KIT non è associato a nessun telecomando.
Per associare RGB LED LIGHT KIT ad un telecomando eseguire la procedura sopra descritta.
PROCEDURE FOR DELETING THE MEMORY
1 Make sure that the power plug is disconnected.
1 Undo the 4 screws that secure the polycarbonate shell.
2 Insert the power plug.
2 Press the button at the centre of the RGB LED LIGHT KIT. A LED next to the button will flash rapidly for 10 seconds
3 While the LED is flashing press and hold down the push button at the centre of the RGB LED LIGHT KIT
for approx. 3 seconds, until the LED goes off.
4 Release the button and check that the LED flashes 5 times to confirm that the memory has been deleted.
Now the RGB LED LIGHT KIT is not associated to any remote control.
To associate the RGB LED LIGHT KIT to a remote control carry out the procedure described above.
RGB LED LIGHT KIT
Indoor/Outdoor
Art. A4307

DETTAGLI / DETAILS
Guscio in policarbonato / Polycarbonate shell
Guarnizione a tenuta / Gasket seal
Telecomando / Remote control
Cavo nero / Black cable
Spina europea bipolare / European bipolar plug
Trasformatore in 12V a parete / 12V wall transformer
Predisposizione per base di stabilizzazione / Arrangement for stability base
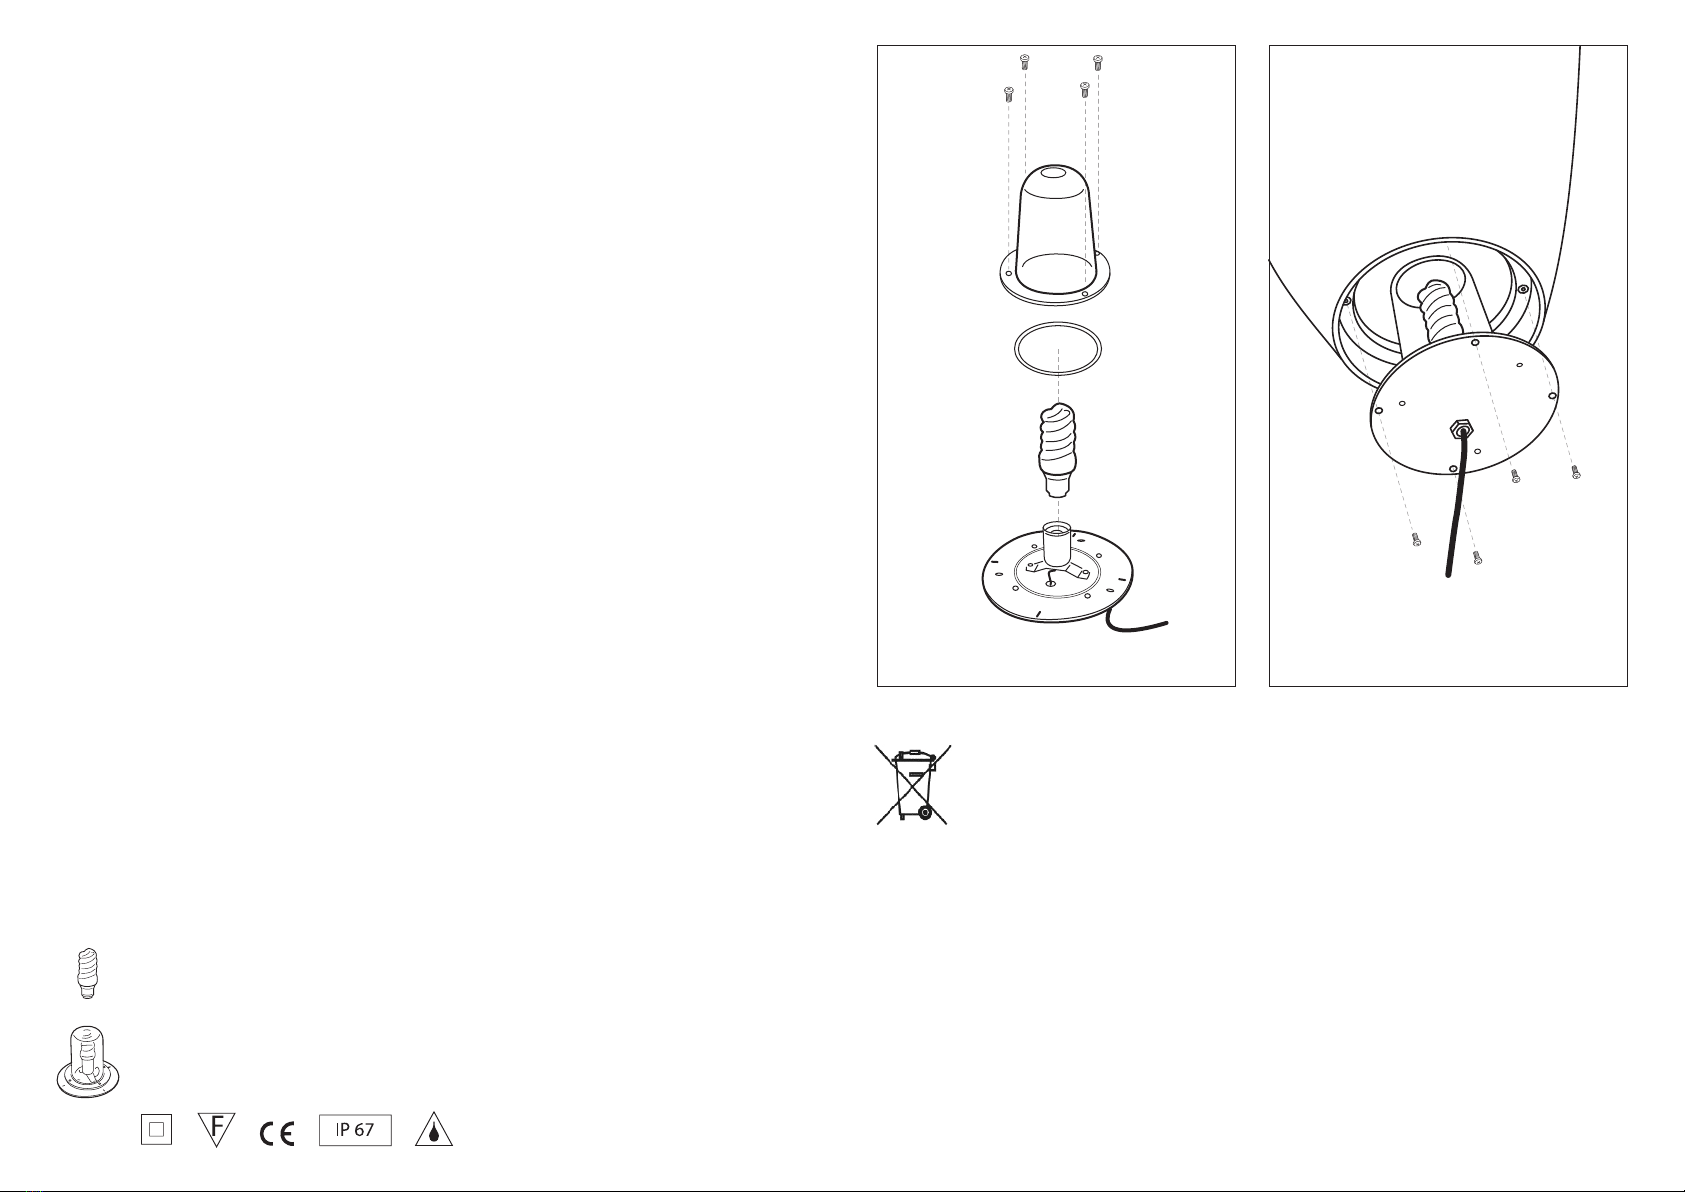
INSTALLAZIONE
1. Appoggiare il manufatto plastico (F) su un piano ed inserire la struttura (B).
2. Avvitare le viti (K).
3. Sollevare il manufatto plastico e collocare l’apparecchio alla presa
di alimentazione.
INSTALLATION
1. Place the plastic product (F) on a flat surface and insert the structure (B).
2. Tighten the screws (K).
3. Lift the plastic product and connect the appliance to the power outlet.
FUNZIONAMENTO
ON-OFF / Colore statico
- premendo per la prima volta il tasto On-Off/Colore statico RGB LED LIGHT KIT si accende;
- premendo successivamente il tasto si cambierà colore, potendo scegliere tra
le colorazioni bianco, verde, rosso, azzurro, giallo, fucsia;
- tenendo premuto il tasto per più di 2 secondi il RGB LED LIGHT KIT si spegne.
Sequenza colore
- premendo il tasto Sequenza colore il RGB LED LIGHT KIT emette una luce che cambia colore
in sfumatura, con andamento automatico ripetendo la sequenza predefinita verde, azzurro,
fucsia, rosso, giallo.
+
- premendo il tasto +in modalità Colore statico si aumenterà l’intensità della luce;
- premendo il tasto +in modalità Sequenza colore si aumenterà la velocità del cambio colore.
-
- premendo il tasto
-
in modalità Colore statico si diminuirà l’intensità della luce;
- premendo il tasto
-
in modalità Sequenza colore si diminuirà la velocità del cambio colore.
OPERATION
ON-OFF / Static Colour
- press the ON-OFF/Static Colour button the first time to switch on the RGB LED LIGHT KIT;
- press the button again to change the colour; available colours are white, green, red blue, yellow, fuchsia;
- press and hold the button down for more than 2 seconds to switch off the RGB LED LIGHT KIT.
Colour sequence
- press the Colour Sequence button and the RGB LED LIGHT KIT emits a light that fades through a colour sequence,
automatically repeating the default order green, blue, fuchsia, red, yellow.
+
- press the +button to increase the light intensity during the Static Colour;
- press the +button to increase the sequence speed during the Colour Sequence.
-
- press the
-
button to reduce the light intensity during the Static Colour;
- press the
-
button to reduce the sequence speed during the Colour Sequence.
Art. A4307 - RGB LED LIGHT KIT Indoor/Outdoor
F
K
Il Kit Luce non deve essere smaltito come rifiuto urbano, mediante cassonetto, ma è soggetto a raccolta
separata. Il mancato rispetto di questa norma è sanzionato dalla legge e potrebbe provocare
potenzialmente effetti negativi sia per l’ambiente sia sulla salute umana.
Decreto legislativo 25/07/2005 n°151 che recepisce le direttive 2002/95/CE RoHS e 2002/96/CE RAEE ed i suoi aggiornamenti.
The Light Kit must not be eliminated as urban waste, by means of refuse body, rather it is object of
separate collection. The non-observance of this rule is sanctioned by law and potentially could cause
negative effects both on the environment and on human health.
Legislative decree 25/07/2005 n°151 transposing 2002/95/CE RoHS and 2002/96/CE RAEE directives and their updates.
RGB LED LIGHT KIT Indoor/Outdoor
RGB LED 15W 60 LED 230 V
Trasformatore in 12V a parete
ON-OFF
Colore statico
Static Colour
+
-
Sequenza
colore
Colour
sequence
B
AVVERTENZE:
- Scollegare la corrente elettrica prima di ogni operazione di assemblaggio.
- Evitare il contatto diretto dello sguardo con il RGB LED LIGHT KIT acceso.
- Accendere RGB LED LIGHT KIT solo dopo averlo assemblato al manufatto plastico.
- Collegare la spina dell’apparecchio in una presa collocata in un luogo protetto dalla pioggia e dagli spruzzi d’acqua.
- Se il cavo flessibile esterno di questo apparecchio viene danneggiato, deve essere sostituito esclusivamente dal
costruttore, dal suo servizio di assistenza, o da personale qualificato equivalente, al fine di evitare pericoli.
- Nelle versioni sprovviste di interruttore sul cavo di alimentazione, collegare la spina dell’apparecchio sotto una presa
comandata da interruttore.
WARNING :
- Disconnect the electrical power supply before beginning assembly operations.
- Avoid direct eye-contact with the light emitted by the RGB LED LIGHT KIT.
- Do not switch on the RGB LED LIGHT KIT until it has been mounted on the plastic component.
- Connect the plug of the appliance to a power outlet that is located in a sheltered position, protected from rain and water
splashes.
- If the external flexible cable of this appliance is damaged it must be replaced by either the manufacturer, the manufacturer’s
customer assistance service or by equivalent qualified personnel, in order to prevent possible hazards.
- For models that are not equipped with an inline on/off switch, connect the plug of the appliance to a switch controlled outlet.
LEGENDA / LEGEND
Apparecchio adatto a montaggio diretto su superfici normalmente infiammabili.
Device proper to direct assembly onto normally infiammable surfaces.
Attesta la conformità del prodotto alle disposizioni delle direttive comunitarie.
It certifies the conformity of the product to the European community instructions.
Prodotto resistente all’immersione temporanea. L’icona, dove presente, fa riferimento al corpo lampada.
The product is temporary immersion proof. When showed, the icon refers to the lamp body.
This manual suits for next models
1
Other RGB Outdoor Light manuals
Popular Outdoor Light manuals by other brands

Lights
Lights LampLust Elloway installation instructions

LIGMAN
LIGMAN LIGHT LINEAR VT 2 installation manual

BEGA
BEGA 204 Instructions for use

BOSS ILLUMINATION
BOSS ILLUMINATION PARK II product manual

Buffalo
Buffalo CC036 instruction manual

Studio Italia Design
Studio Italia Design KELLY TA2 Mounting instructions

S&S
S&S M222394 quick start guide

Kanlux
Kanlux ZARA HR-40 manual

Nemo Studio
Nemo Studio LUX WALKWAY Mounting instructions

Maretti
Maretti ECLIPSE FLOOR IV quick start guide

Philips
Philips SmartBright Street BRP042 Installation instruction

Knightsbridge
Knightsbridge SPIKE4BL Installation & maintenance manual