RHINO EYECAT User manual

1
EYECAT
User’s manual

2
Contents
Precautions for safety 3
Features 4
Package Contents 5
Name of Each Part 6
Button/Switch description 7
LED indication Descriptions 8
Installation Guide 9
Start and Finish Recording 12
File management menu 13
Setup Menu 18
Play back on PC 21
Specification 22
Appendix 23

3
Precautions for Safety
Cautions
●This product is installed on the vehicle and designed to record the video clips captured by a
built-in camera and informations of instable driving status such as Quick break, Collision, turn
over. It records also continuously not to miss normal driving status.
●If an accident is happened and shock on the vehicle is light, it would not record the event
Automatically.
●We are not responsible for any loss caused by the video clips and data produced from using
this device.
●Please turn off the power when you insert or take out SD memory card.
●Please use the provided SD memory for exclusively this device.
●Please read carefully this manual before use.
●The users’manual could be changed without prior notice. It depends on firmware version.
●Images and photos of this device on this manual could be different from its real thing.

4
Features
Functions of this device are as follows.
●Easy installation and simple operation.
Installation and operation is simple and easy.
●Manual recording(Event recording)
It supports manual recording function that users can always record
videos on certain events even other driver’s violent driving separately as
event recording.
●3 axes G-sensor event recording(Event recording)
While driving, when the car get shock such as collision, fast turn, G-
sensor will sense and this device records the video of before/after of
the event that allows proving the cause of accident.
●GPS interface (Option)
As this device has built-in GPS, it allows tracking driving routine by
map and speed
●Exclusive Software and free video player(viewer program)
Recorded video clips can be played back by either provided exclusive
program in CD format or free video player.
●Supports Video-Out
If you connect video out terminal to monitor, navigation system, you can
simply setup the device functions and playback video clips instantly.
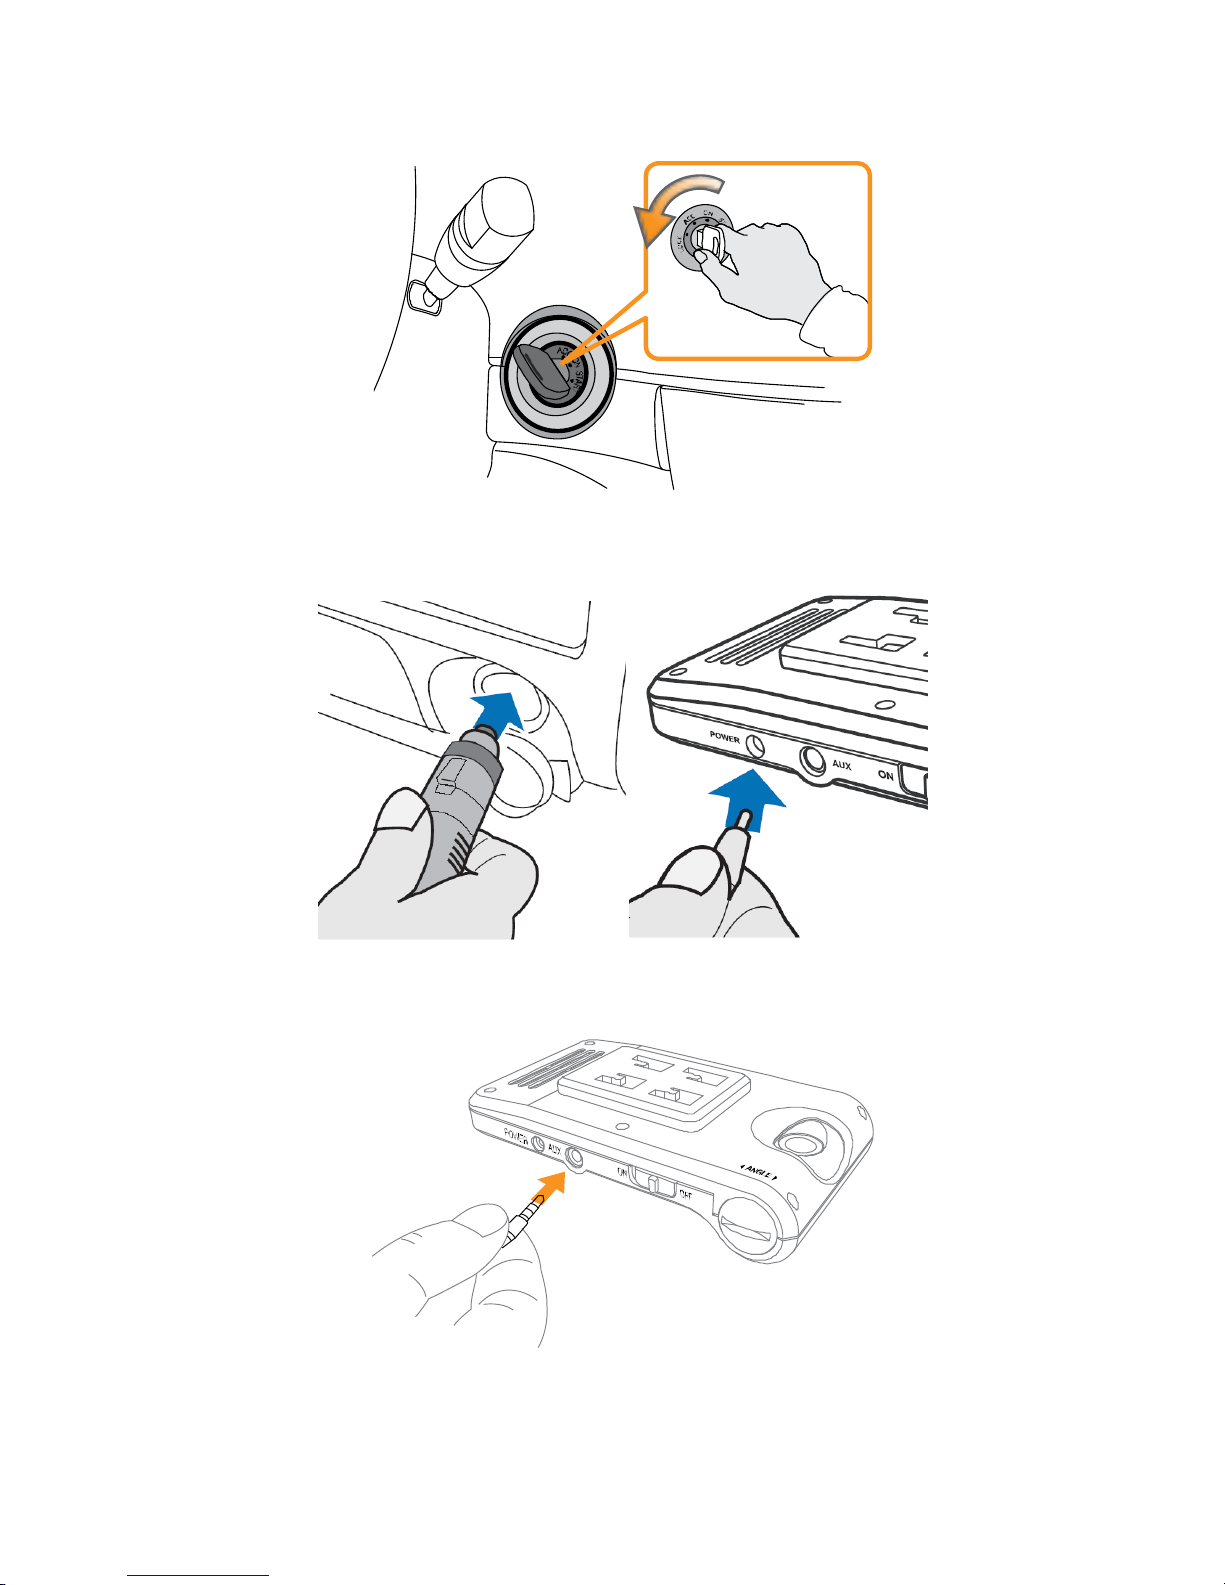
●ARS(Automatic Recording System)
After turn on the vehicle power to turn on this device power, it starts
recording automatically,
supports ARS.
As turn the vehicle power off, this device power is off automatically.
It is designed for users’convenience.
●Safe recording function.
In any cases of accident caused the turn-off of this device power, this
function is to let this device record videos of before and after accident
stably.
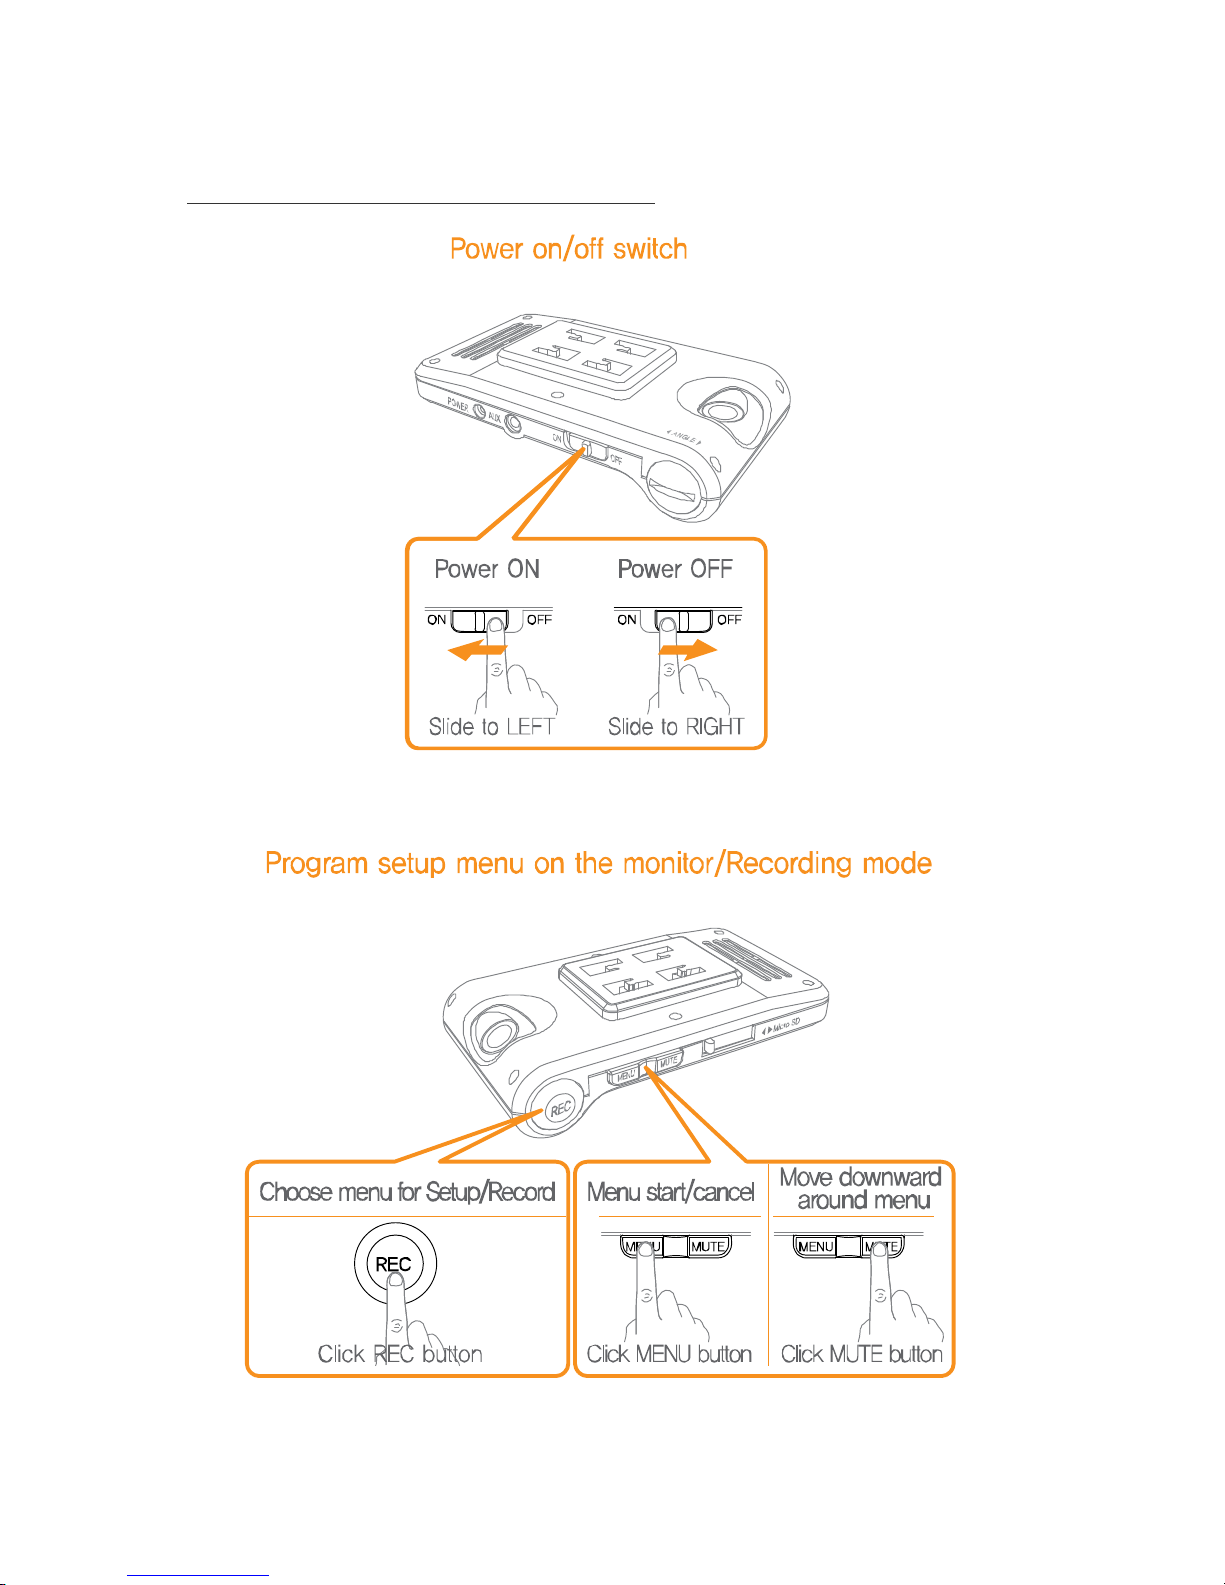
●Simple record mode change function.
While recording is in process, this device is designed to let users
change recording mode simply.
●Audio Mute function
It allows to setup audio on/off while it records.
●Automatic upgrade function
When there is more upgraded firmware version on SD memory card than
currently applied to this device, it is upgraded automatically as it is
rebooted.

5
Package Contents
Below images could be different from real things.
▲C D
(viewer program and manuals)
◀Gluing tape(both sided)
◀Camera Rack
(Glass Attaching Type)
◀EYECAT Main body
◀Micro SD memory card
(**included in the main body)
▲Video cable
▲Cigar jack adaptor
▲사용자설명서
▲
Micro SD card Adaptor(option)
(normal sized SD memory card)
MANUAL

6
Name of Each Part

7
Button /Switch description

8
LED indication descriptions

9
Installation Guide
1. Take off the cover of gluing tape
2. Attach to the windshield on the position of the behind of rearview mirror.
3. Adjust camera angle and fix it firmly.

10
4. Turn off vehicle power and connect power to this device.
5. Connect Cigar jack and the device power terminal with cigar jack adapter.
6. If it is necessary, connect A/V input terminal (of monitor or navigation system) to video output
terminal of this device to view videos on the screen instantly.

11
7. Arrange and fix cables to proper positions and start the vehicle.
8. Turn on this device by power on/off switch by sliding to left side.

12
Start and Finish Recording
When this device power is on, it starts recording.
When this device power is on, red LED is on, it detects all possible errors and blue LED is on,
it is ready to record.
Recording is performed by G-sensor or manual record as event record.
Caution! If there is no space for mode of Recorded video clips on SD card, it overwrites on old
files that deletes from oldest file first in order and new files are stored. If you need to
keep any important video clips, please back up to other archiving device.
Reference! Stored video clips can be viewed by connecting to Monitor or Navigation system
instantly and be connected to PC to be viewed and downloaded
Control Audio while recording is in progress.
Pressing Mute button in recording process, you can make Mute on/off
Change recording mode while recording is going on.
Pressing REC button, you can change Recording mode (either continuous or event / manual)
Finish recording
When you arrive at your destination or wish to play back on PC and want to finish recording,
simply turn off the vehicle then red LED is off that it finishes recording videos.
Caution! If you turn off the device power when Vehicle power is still on, the last video file will not
be stored.

13
FILE management menu
To playback recorded video files.
Caution! This file management menu is viewed only when you connect to monitor or navigation
system. If you play back on PC with SD card, this screen will not be shown.
Reference! When you get this menu, recording is not working. If you want restart recording,
press menu button again.
1.
In recording process, if you press menu button,”menu”screen will be viewed.
●When you select “File”, please press record button.
2. Among submenus of “List”, “Upgrade”, “Firmware Ver”, “Record Mode”, please select your
wished one of them by pressing record button.
If you select “List”and press record (confirm) button, folder lists will be shown up.
Select one of them and press record button, video file lists will be shown up.

14
3. When wished file is selected, press record button and the recorded video file is playing.
●Recorded file is arranged in time order(YYYYMMDD_HHMMSS- It means recorded time of
the video files(year, month, date, hour, min.).
●For event recording such as Manual recording or G-sensor sensed recording, event
recording files will be created under file name and mov. format
(YYYYMMDD_HHMMSS_E.mov)
●Playing back the video file, if you press record button, recording is paused or played
back.
Reference! If you want to move to another menu, please press mute button.
If you want to move to previous phase then press menu button (cancel)

15
Firmware upgrade
1. Go to Menu “File”and “Upgrade”and press record button. You will see
“Upgrade”screen
●If upgrade file in SD card, it upgrades automatically when you turn the device on.
●When upgrade is completed, after you will see message of upgrade is completely made,
please reboot the device.
●If upgrade is failed, failure message is shown and yellow LED(error indication) is on.
Caution! When upgrade is completed, after you will see message of upgrade is completely made,
please reboot the device.

16
Confirm Firmware version
1. Go to Menu “File”and select “Firmware Ver”and press record button(confirm),
firmware version information will be shown up.
●It will be shown up as Ver. year,month,date_hour,min.(YYYYMMDD_HHMM) format
●Example: Ver.20090921_2100

17
Change recording mode
1. Go to menu “File”and“Record Mode”then press record button, you can select either
“Event”or “Every”recording mode.
Reference! If you want mode around the lists, press Mute. If you wish to go back to previous
menu, please menu (cancel) button.

18
SETUP menu
Set up TV OUT (video output mode)
1. Go to Menu “Setup”and press record button, then “Setup”screen will be shown up.
2. Select “TV OUT”icon and press menu button, TV output setup screen will be shown.
●TV-Out: It sets up video output mode.
�NTSC-M
�NTSC-J
�NTSC-443
�PAL-B/D/G/H/I
�PAL-M
�PAL-N
�PAL-Nc
�PAL-60
3. Select your wished mode and press record button to confirm.

19
Set up Time
1. Go to menu “Setup”and press record, “Setup”menu screen will be shown
2. After select “TIME”icon and press record button, applicable setup screen will be shown.
�London +0
�Berlin +1
�Athens +2
……
�Brasilia -3
�Mid-Atlantic -2
�Azores -1

20
Reset
1. Go to menu “Setup”and press record button, “Setup”menu screen is shown.
2. Select “Reset”icon and press record button, applicable screen will be shown.
●All sets are changed in factory initialization state.
●After set as factory default, set up details.
- Video output mode (TV-Out): NTSC-M
- Recording mode: Event
- Time reset : 2009/01/01 00:00:00
Table of contents
Popular Camcorder manuals by other brands

BZB Gear
BZB Gear BG-BWEB-S user manual

Silvercrest
Silvercrest SCA 5.00 A1 63671 User manual and service information

HIK VISION
HIK VISION DS-MH2311 Series user manual

Easypix
Easypix Cruiser DVC2712 user manual

Silvercrest
Silvercrest SCA 5.00 A1 User manual and service information

E-matic
E-matic SportsCam EVH528 user manual