RIDGEGEAR RGR1 User manual

IMPORTANT: Please read and understand these instructions before use
Read and understand before use
complying with the requirements of
EN 795:2012 Type B
Issue B Mar 2020
Instructions for use of
RIDGEGEAR Tripod RGR1
GB
USER INSTRUCTIONS
Before every use, the user must be suitably trained and qualified to
carry out a pre-use check to ensure the Tripod is free from defects,
and is in a safe condition for use. The pre-use check MUST include
the checking of all components to ensure there are no loose or
damaged parts.
Firstly, establish the intended location for assembly, then carefully
remove the tripod from its packaging. It is recommended to
assemble the tripod with 2 people. The tripod legs are released from
the head casting by individually pulling the legs downwards, and by
hand carefully guiding them outwards. Do not allow the legs to
swing out unaided, as this could cause serious damage to the head.
Before use, ensure the legs are locked in the outermost position,
the tripod is stable, level and locked and the footing is solid under
each leg. (see labels on tripod).
It is most likely that the legs will require adjustment in order to
give safe clearance over the opening. Ensure the legs are well
clear of the opening by at least 300mm and onto a secure surface.
For maximum stability, adjust each leg in turn and in stages as
necessary, and avoid applying any leverage force on the head.
Both the lower and middle leg parts have 11 adjustment holes at
80mm intervals. Never adjust by moving only the centre or inner
section to its extreme. Adjust both leg parts so that the locking
pins fit though both legs. If a leg is ever dismantled from the tripod,
ensure when it is replaced, that the triangular side of the foot
always faces inwards. Always ensure the locking pins are securely
fastened, and do not remove the pins by holding the wire. Pull out
by holding the ring (fig 1).
Position tripod over the opening, so that the winch/RTFA cable
is suspended in the centre. If the RTFA and/or winch require
assembly onto the tripod, perform this in a safe area beforehand
as follows.
How to fit the RTFA (also applies to the fitting of the RTFA with
winching rescue handle, e.g. RGA4).
1. Unscrew the U bolts and attach the clamp to the outer side of
the centre leg section only. The correct leg is in line with the
pulley wheels. For extra security, push the clamp level with
the base of the top leg. Ensure that the holes in the clamp are
uppermost (fig 2).
2. Place the bracket and RTFA over the bottom clamp pin and
inert the pin fully through the top holes (fig 3 & 3a).
3. Slide out the two top pins from the tripod head. Extract cable
from RTFA and loop cable over the two pulleys. Replace pins
(fig 4).
How to fit the Winch (when used over pulley wheels)
1. The winch bracket is dierent, however the fitting of the
winch is the same as the RTFA (fig 5).
How to fit the RTFA, when using in conjunction with a winch
1. Attach the clamp to the inner side of either of the other
two legs in the same method as above. Attach an EN 362
connector to one of the eyebolts. Thread the RTFA cable
through the split pulley and attach to the connector (fig 6).
Order connector and pulley separately.
2. Ensure the cables of the winch and RTFA do not interfere with
each other (fig 7).
3a
4
5
6 7
1 2
GENERAL GUIDE
1. The RGR1 must only be used for its intended purpose, which is to provide as a personnel anchor point suspended
over a man hole or ground opening. Suspension is from either of the 2 suspended eye bolts, or the pulley system
used in conjunction with a retractable type fall arrester (RTFA), and/or winch which is mounted to the side leg. Do
not use for any other purpose.
2. Before use, a detailed risk assessment must be carried out by the employer, to establish that this is the correct
product suitable for the type of work to be carried out in the event of a fall, taking into account anchor points,
potential fall distance (including pendulum), obstructions, rescue system, etc. Ensure before use there is a suitable
rescue plan, enabling the retrieval of the user to a place of safety in the event of a fall.
3. This product must only be used by suitably trained personnel who are competent in its safe use.
4. This product is recommended for personal issue, and is for use by a single user only.
5. Before use, ensure that the tripod is stable and all parts are securely fastened.
6. Never work alone and maintain constant contact with a colleague at ground level.
This product must only be used by suitably trained personnel who are competent in its safe use.
The RGR1 must only be used for its intended purpose, which is to provide as a personal anchor point suspended over
a man hole or ground opening. Suspension if from either of the 2 suspended eye bolts, or the pulley system used in
conjunction with a retractable type fall arrester (RTFA), and/or winch which is mounted to the side leg. Do not use for
any other purpose. It is strongly recommended that a secondary or back up system be attached using the eyebolts on
the tripod head.
3
3
7. If the winch is being used to lower or raise the user, NEVER allow the cable to become slack as this can seriously
injure the user in the event of a fall.
8. Ensure that the user cannot be subjected to a force of >6kN in the unlikely event of a fall.
9. Never use the rescue device of a RTFA to raise or lower a user. The rescue device must only be used in a rescue
situation.
10. It is strongly recommended that a secondary or back up system be attached using the eyebolts on the tripod head.
11. A full body harness is the only acceptable body holding device that can be used in a fall arrest system. Only fall
arrest attachment points marked with the letter A may be used.
12. Be aware of any possible dangers, which may arise through use of combinations of items of equipment, in which the
safe function of any one item is aected by or interferes with the safe function of another.
13. When using for the first time, ensure that the first part of the product record card is completed and the date of first
use is recorded. Users are warned that certain medical conditions such as heart disease, high blood pressure, vertigo,
epilepsy, drug or alcohol dependence, could aect the safety of the user in normal and emergency use.
14. Never attempt to modify, repair or service this product without our written consent. Never attempt to open the
tripod except for adjustment of the legs.
15. It is essential to ensure the product is removed from service immediately if the equipment shows excessive wear or
damage to any part, or has been involved in a fall. If in doubt, do not use and seek expert advice. The equipment
must then only be used if confirmed in writing by a competent person that it is safe to do so.
16. Never expose the equipment to extremes of temperature outside the range of –25oC to +50oC. Avoid electrical
contact and strong chemicals, which may damage the components. If using oshore try to limit the level of
exposure to a minimum. If in doubt seek advice.
MATERIALS
Either carbon steel or aluminium alloy
STORAGE, TRANSPORTATION & CLEANING
1. Ensure that when the Tripod is not in use or during transportation, it is securely and suitably stored in a clean, dry
area and away from direct source of heat or sunlight, or any potentially sharp or abrasive objects such as knives or
tools. Wash o and wipe any build-up of dirt and grit particularly any moving parts.
2. If the tripod gets wet in use, allow it to dry naturally away from direct source of heat.
PERIODIC EXAMINATIONS AND SERVICE
1. Before every use, the user shall inspect the equipment following the inspection guidelines below. The safety of
the user depends upon the continued eciency and durability of the equipment, therefore an additional thorough
periodic inspection is required by an independent competent person familiar with inspecting this type of equipment.
2. The frequency of independent examination and inspection must take into account legislation, equipment type,
frequency of use and environmental conditions (particularly if used oshore). It is recommended that a competent
person carries out a full inspection at least every six months, and records of such inspection are retained.
3. It is recommended to mark the tripod with the date of the next or last inspection with a suitable tag. Do not write
directly onto the tripod.
4. There is no lifespan obsolescence, as worn components are replaced as necessary during service, provided that
regular inspection is carried out as shown to determine that the tripod is always safe to use.
INSPECTION
Legs and feet – Check for damage and ensure all moving components still function correctly. Ensure all leg pins are
present. If necessary, re-adjust the leg sections to check the adjustment.
Head section – Check carefully for damage including hairline cracks or distortion which can often be caused by misuse
or if the tripod has been dropped. Ensure the eyebolts are still intact and fully secured to the underside, and the pulleys
spin freely. Ensure pins are present.
Attachment RTFA/winch – As applicable check that these are fully secured and all fixings are locked in place.
Product marking – check that the product markings including the serial number are legible. Ensure the date of the last
service is shown and has not expired.
Must be serviced/thoroughly inspected at least annually by RIDGEGEAR or RIDGEGEAR approved service agents,
or more frequently dependent upon environmental conditions and frequency of use. Never attempt to tamper with or
service the product by any other means.
Reject the Tripod immediately if any of the above defects are found or if in any doubt. Clearly identify as DO NOT
USE.
REPAIR
This tripod must not be modified or repaired unless advised by us in writing. Only competent persons authorised by us
may carry out any repairs. If in doubt contact RIDGEGEAR for further advice.
RECORDS
1. When using for the first time, ensure that the first part of the product record card is completed and the date of
first use is recorded.
2. Ensure that the product is inspected at regular intervals dependent upon frequency of use. Details of all inspections
must be recorded in the spaces provided on the record card.
3. It is essential for the safety of the user that if the product is resold outside the original Country of destination
that the reseller shall provide instructions for use, for maintenance, for periodic examination and for repair in the
language of the Country in which the product is to be used.
LIFESPAN
(See periodic examinations and service). Avoiding abrasion, contamination and correct storage will ensure optimum
service life.
NOTIFIED BODY
1. Module B of PPE Regulation (EU) 2016/425. SATRA Technology Europe Ltd, Bracetown Business Park, Clonee,
D15 YN2P, Ireland
2. Module D of PPE Regulation (EU) 2016/425. British Standards Institution, John M Keynesplein 9, 1066 EP
Amsterdam, Netherlands. ID number 2797.
EXPLANATION OF PRODUCT MARKING
Product code
EN standard,
year & Type
Unique traceability
number
Contact details
Manufacturer
(or customer)
Notified body
number
Warning
to read
instructions
Date of last
service
Safe working
load
Number of
users

RIDGEGEAR Ltd., Nelson Street, Leek, Staordshire, ST13 6BB, United Kingdom
Tel: +44 (0)1538 384108 Fax: +44 (0)1538 387350 Email: sales@ridgegear.com
www.ridgegear.com
©2020 RIDGEGEAR Limited. All information and imagery contained within this leaflet is subject to copyright.

IMPORTANTE: Lea y comprenda la siguiente información antes de su uso.
Lea y comprenda estas instrucciones antes
del uso.
que cumple con los requisitos de la norma
EN 795:2012 Tipo B
Issue B Mar 2020
Instrucciones de uso para
el trípode RIDGEGEAR RGR1
ES
INSTRUCCIONES DE USO
Antes de cada uso, es preciso que el usuario se forme
adecuadamente y reciba la calificación necesaria para realizar una
comprobación inicial con el fin de garantizar que el trípode está
libre de defectos y que es seguro de utilizar. La comprobación inicial
DEBE incluir la verificación de todos los componentes con el fin de
garantizar que no hay piezas sueltas o dañadas.
En primer lugar, determine la ubicación deseada para su montaje
y, a continuación, saque con cuidado el trípode de su embalaje.
Se recomienda montar el trípode entre 2 personas. Las patas del
trípode se retiran de la parte fundida del cabezal tirando hacia abajo
de cada pata por separado, y guiándolas manualmente hacia afuera.
No deje que las patas oscilen sin control, ya que podría causar
graves daños al cabezal. Antes de su uso, asegúrese de que las patas
están fijadas en la posición más abierta, que el trípode está estable,
nivelado y fijado, y que el suelo bajo cada pata es sólido. (Véanse
las etiquetas en el trípode).
Es muy probable que sea preciso ajustar las patas para colocarlas
con seguridad sobre el orificio. Asegúrese de que las patas están
alejadas de los bordes del orificio, al menos 300 mm, y sobre una
superficie segura. Ajuste cada pata individualmente y por fases,
según sea necesario, y evite aplicar presión en el cabezal.
Tanto la pieza inferior como intermedia de las patas cuentan con
11 orificios de ajuste con 80 mm de separación entre ellos. Para
garantizar la máxima estabilidad, nunca realice el ajuste moviendo
solo la parte central o interna hacia el extremo. Ajuste ambas
piezas de la pata de modo que los pasadores de bloqueo encajen en
ambas patas. Si se desmonta una pata del trípode, asegúrese de que
cuando se sustituya, la parte triangular del pie se coloca siempre
hacia dentro. Asegúrese siempre de que los pasadores de bloqueo
están fijados con seguridad, y no retire los pasadores sujetando el
cable. Retire sujetando el anillo (véase 1).
Coloque el trípode sobre el orificio, de modo que el cabestrante
o el cable del arnés anticaídas deslizante estén suspendidos en el
centro. Si el arnés anticaídas deslizante y/o el cabestrante requieren
montaje en el trípode, llévelo a cabo de antemano en una zona
segura como se indica a continuación.
Cómo ajustar el arnés anticaídas deslizante (también es válido para
el ajuste del arnés anticaídas deslizante con sistema de rescate con
cabestrante, por ejemplo, el RGA4).
1. Desatornille el perno en U y fije la abrazadera a la parte
exterior del centro de la pata. La pata correcta está alineada
con las ruedas de la polea. Para garantizar la máxima seguridad,
empuje la abrazadera para que esté alineada con la base de la
pata superior. Asegúrese de que los orificios de la abrazadera
están hacia arriba (véase 2).
2. Coloque el soporte y el arnés anticaídas deslizante sobre el
pasador de la abrazadera inferior e inserte por completo el
pasador en los orificios superiores (véase 3 y 3a).
3. Extraiga los dos pasadores superiores del cabezal del trípode.
Extraiga el cable del arnés anticaídas deslizante y pase el cable
por las dos poleas. Sustituya los pasadores (véase 4).
Cómo ajustar el cabestrante (Cuando se utiliza sobre ruedas de
polea)
1. El soporte del cabestrante es diferente, no obstante, el ajuste
del cabestrante es idéntico al del arnés anticaídas deslizante
(véase 5).
Cómo ajustar el arnés anticaídas deslizante, cuando se utiliza junto
con un cabestrante
1. Fije la abrazadera a la parte interior de cada una de las otras
dos patas de la misma forma explicada anteriormente. Fije un
conector EN362 a uno de los tornillos de ojo. Pase el cable
del arnés anticaídas deslizante por la polea y fíjelo al conector
(véase 6). Coloque el conector y la polea por separado.
2. Asegúrese de que los cables del cabestrante y el
arnés anticaídas deslizante no interfieren entre sí
(véase 7).
3a
4
5
6 7
1 2
GUÍA GENERAL
1. RGR1 solo debe usarse para su propósito previsto, que es proporcionar una boca de inspección o un punto de
conexión personal que cuelgue sobre la abertura del suelo. La suspensión está hecha de 2 pernos de anillo colgante
o un sistema de polea utilizado con un anticaídas retráctil (RTFA) y / o una grúa de montaje lateral. No lo use para
ningún otro propósito.
2. Antes de su uso, el empleador debe llevar a cabo una detallada evaluación de riesgos para determinar si este es
el producto adecuado para el tipo de trabajo que se va a realizar en caso de caída, teniendo en cuenta los puntos
de anclaje, la posible distancia de caída (incluyendo la oscilación), las obstrucciones, el sistema de rescate, etc.
Asegúrese de que antes de su uso hay un plan de rescate adecuado, que permita el rescate del usuario hasta una
zona segura en caso de caída.
3. Este producto solo debe ser utilizado por personal calificado y capacitado para un uso seguro.
4. Este producto se recomienda para uso personal y solo debe ser utilizado por un solo usuario.
5. Antes de su uso, asegúrese de que el trípode está estable y todas las piezas están fijadas con seguridad.
Este producto solo debe ser usado por personal correctamente formado y competente para su utilización segura.
Recomendado para uso personal.
El RGR1 debe utilizarse únicamente para su uso previsto, que es el de brindar un punto de anclaje personal en suspensión
sobre una alcantarilla o un orificio en el suelo. La suspensión se realiza mediante 2 tornillos de ojo suspendidos o un
sistema de poleas empleado junto con un arnés anticaídas deslizante, con un cabestrante (opcional) montado en el lateral.
Prohibido su uso para cualquier otro propósito. Se recomienda encarecidamente que se fije un sistema secundario o de
respaldo empleando los tornillos de ojo en el cabezal del trípode.
3
3
6. Nunca trabaje solo y mantenga contacto constante con un compañero que se encuentre a nivel de superficie.
7. Si se está utilizando el cabestrante para bajar o subir al usuario, NUNCA permita que el cable quede suelto, ya que
esto podría provocar lesiones al usuario en caso de caída.
8. Asegúrese de que el usuario no puede sufrir una presión superior a 6 kN en el improbable caso de caída.
9. Nunca utilice el sistema de rescate de un arnés anticaídas deslizante para subir o bajar a un usuario. El sistema de
rescate debe utilizarse únicamente en una situación de rescate.
10. El sistema de arnés de cuerpo entero es el único dispositivo aceptable que se puede usar en un sistema de detención
de caídas. Solo se pueden utilizar los puntos de inserción de detención de caídas marcados con la letra A.
11. Tenga en cuenta los posibles riesgos que pueden surgir debido al uso de combinaciones de elementos de equipo
donde el funcionamiento seguro de cualquier elemento se ve afectado por el funcionamiento seguro de otro
elemento o interfiere con el funcionamiento seguro de otra persona.
12. Tenga cuidado con cualquier posible peligro, que podría producirse debido al uso de diferentes elementos del
equipo combinados, en el que el funcionamiento seguro de uno de los elementos se ve afectado o interfiere con el
funcionamiento seguro de otro.
13. Cuando lo utilice por primera vez, asegúrese de que la primera parte de la tarjeta de registro del producto está
cumplimentada y la fecha del primer uso está registrada. Los usuarios deben saber que determinados problemas de
salud, como enfermedades cardíacas, tensión arterial alta, vértigos, epilepsia, dependencia al alcohol y las drogas,
podrían afectar a la seguridad del usuario en situaciones normales y de emergencia.
14. Nunca intente modificar, reparar ni realizar el mantenimiento de este producto sin nuestra autorización por escrito.
Nunca intente abrir el trípode salvo para ajustar las patas.
15. Es esencial que se asegure de que el trípode se retira de la circulación inmediatamente si el equipo presenta un
desgaste o daños excesivos en alguna pieza, o si se ha producido una caída. En caso de duda, no lo utilice y solicite
asesoramiento de expertos. El equipo debe utilizarse únicamente si una persona competente notifica por escrito
que es seguro su uso.
16. Nunca exponga el equipo a temperaturas extremas fuera del rango de –25°c a 50°c. Evite el contacto con la
electricidad y con productos químicos fuertes, que podrían dañar los componentes. Si se utiliza lejos de la orilla,
limite el nivel de exposición todo lo posible. En caso de duda, solicite asesoramiento.
MATERIALES
Acero al carbono o aleación de aluminio.
ALMACENAMIENTO, TRANSPORTE Y LIMPIEZA
1. Asegúrese de que cuando el trípode no se esté utilizando o se esté transportando, se encuentra almacenado
con seguridad en una zona limpia y seca alejada de una fuente directa de calor o luz, y apartado de objetos
potencialmente afilados o abrasivos, como cuchillos o herramientas. Limpie y retire cualquier resto de suciedad y
polvo, especialmente en las piezas móviles.
2. Si el trípode se moja durante el uso, déjelo secar naturalmente, en un lugar lejano de una fuente directa de calor.
EXÁMENES PERIÓDICOS Y MANTENIMIENTO
1. Antes de cada uso, el usuario debe inspeccionar el equipo siguiendo las directrices de inspección que encontrará a
continuación. La seguridad del usuario depende de la eficacia y durabilidad continuada del equipo; por lo tanto, es
preciso que una persona competente familiarizada con la inspección de este tipo de equipos realice una exhaustiva
inspección periódica. La frecuencia de los exámenes e inspecciones independientes debe atender a la legislación, el
tipo de equipo, la frecuencia de uso y las condiciones medioambientales (especialmente si se utiliza lejos de la orilla).
Se recomienda que una persona competente lleve a cabo una inspección integral al menos cada seis meses y que se
conserven registros de dichas inspecciones.
3. No hay obsolescencia de uso, ya que los componentes desgastados se sustituyen según se necesite durante el
mantenimiento.
4. Se recomienda marcar el trípode con una etiqueta adecuada, especificando la próxima o última fecha de inspección.
No escriba directamente en el trípode.
5. La vida útil no se desgasta, ya que los componentes del usuario se reemplazan correctamente durante el servicio,
siempre que los trípodes sean seguros de usar, siempre que se realice una inspección regular como se muestra.
INSPECCIÓN
Patas y pies: busque daños y asegúrese de que todas las piezas móviles funcionan correctamente. Asegúrese de que
todos los pasadores de las patas están en su sitio. Si es necesario, reajuste las partes de las patas para verificar el ajuste.
Parte del cabezal: busque detenidamente si existen daños, incluyendo finas grietas o distorsiones que con frecuencia
se deben a la mala utilización del trípode o a una caída del trípode. Asegúrese de que los tornillos de ojo están intactos
y están bien fijados en la parte inferior, y que las poleas giran sin obstrucciones. Asegúrese de que los pasadores están
fijados.
Fijación del arnés anticaídas deslizante/cabestrante: según corresponda, verifique que están fijados con seguridad y que
todos los elementos están correctamente colocados.
Señalización del producto: compruebe que todas las señalizaciones del producto, incluyendo el número de serie, son
legibles. Asegúrese de que la fecha del último mantenimiento es visible y no ha vencido.
RIDGEGEAR, o sus agentes autorizados, debe realizar un mantenimiento o una inspección exhaustiva al menos una
vez al año, o con mayor frecuencia en función de las condiciones medioambientales y la frecuencia de uso. Nunca intente
alterar o hacer el mantenimiento del producto de otras formas.
Descarte el trípode inmediatamente si encuentra cualquiera de los defectos anteriores y si tiene dudas. Identifíquelo
claramente como NO USAR
REPARACIONES
Este trípode no debe ser modificado ni reparado a menos que nosotros lo aconsejemos por escrito. Únicamente las
personas competentes autorizadas por nosotros pueden llevar a cabo las reparaciones. En caso de duda, póngase en
contacto con RIDGEGEAR para solicitar información adicional.
REGISTROS
1. Cuando lo utilice por primera vez, asegúrese de que la primera parte de la tarjeta de registro del producto está
cumplimentada y la fecha del primer uso está registrada.
2. Asegúrese de que el producto se inspecciona regularmente en función de la frecuencia de uso. Es preciso registrar
los datos de todas las inspecciones en los espacios previstos para tal fin en la tarjeta de registro.
3. Es esencial para la seguridad del usuario que, si el producto se revende fuera del país inicial de destino, el distribuidor
proporcione las instrucciones para su uso, mantenimiento, exámenes periódicos y reparaciones en la lengua del país
en el que se va a utilizar el producto.
CICLO DE VIDA
(Véase Exámenes periódicos y mantenimiento). Evitar la abrasión y la contaminación, y garantizar un almacenamiento
correcto aseguran un ciclo de vida óptimo.
ORGANISMO NOTIFICADO
1. Module B of PPE Regulation (EU) 2016/425. SATRA Technology Europe Ltd, Bracetown Business Park, Clonee,
D15 YN2P, Ireland
2. Module D of PPE Regulation (EU) 2016/425. British Standards Institution, John M Keynesplein 9, 1066 EP
Amsterdam, Netherlands. ID number 2797.

RIDGEGEAR Ltd., Nelson Street, Leek, Staordshire, ST13 6BB, United Kingdom
Tel: +44 (0)1538 384108 Fax: +44 (0)1538 387350 Email: sales@ridgegear.com
www.ridgegear.com
©2020 RIDGEGEAR Limited. All information and imagery contained within this leaflet is subject to copyright.
Código del producto
Norma EN y año
& tipo
Número de
trazabilidad
único
Datos de contacto
Fabricante (o
cliente)
Organismo
notificado
número
Advertencia
para leer las
instrucciones
de uso
Fecha del último
mantenimiento
Carga de trabajo
segura
Número de
usuarios
EXPLICACIÓN DE LA SEÑALIZACIÓN DEL PRODUCTO

WICHTIG: Achten Sie bitte darauf, dass Sie die Anleitung vor dem Gebrauch gelesen
und verstanden haben und bewahren Sie diese zur späteren Bezugnahme sorgfältig auf.
Bitte lesen und verstehen Sie diese Anweis-
ungen vor Gebrauch.
gemäß den Vorgaben von EN 795:2012
Typ B
Issue B Mar 2020
Gebrauchsanleitung zum
RIDGEGEAR-Stativ RGR1
DE
NUTZUNGSHINWEISE
Der Benutzer muss für jeden Einsatz entsprechend ausgebildet und
befähigt sein, eine Vorkontrolle durchzuführen, um sicherzustellen,
dass das Stativ keine Mängel aufweist und für den sicheren
Einsatz geeignet ist. Die Vorkontrolle MUSS eine Prüfung aller
Komponenten umfassen, um zu gewährleisten, dass es keine
lockeren oder beschädigten Teile gibt.
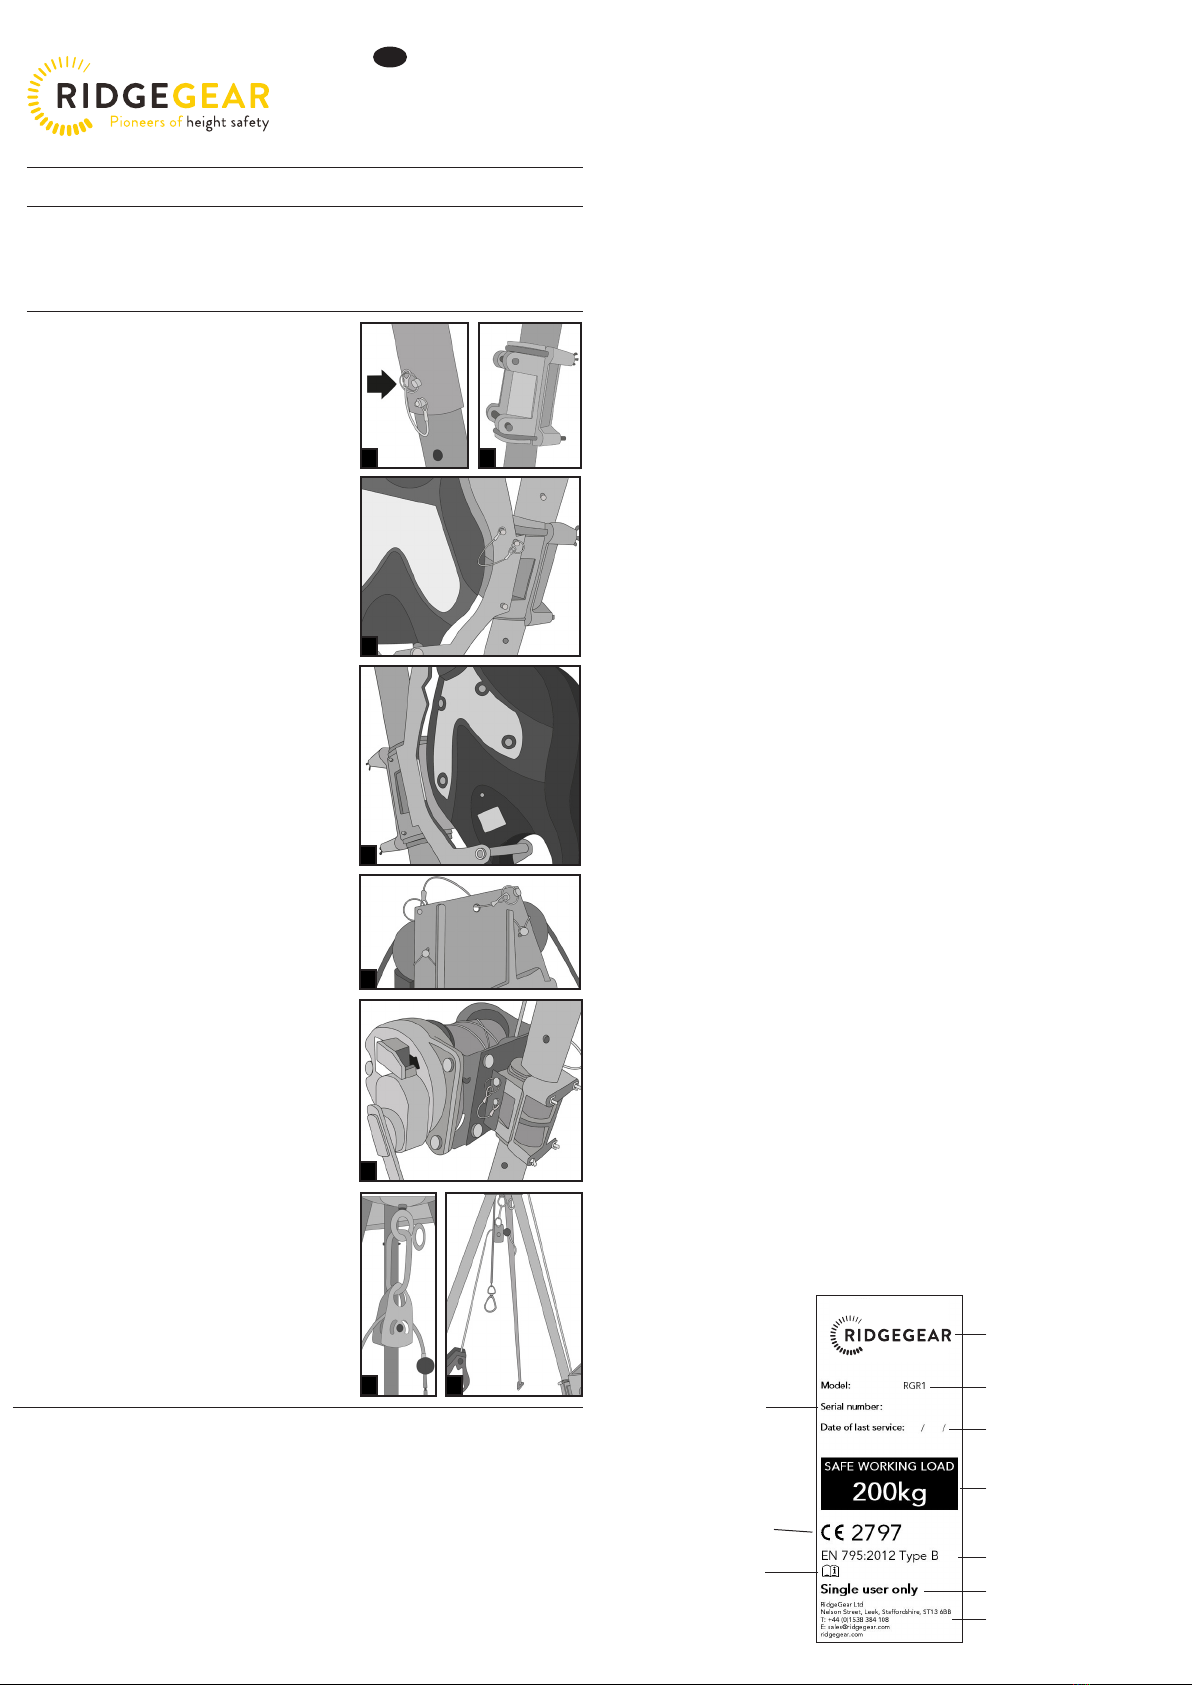
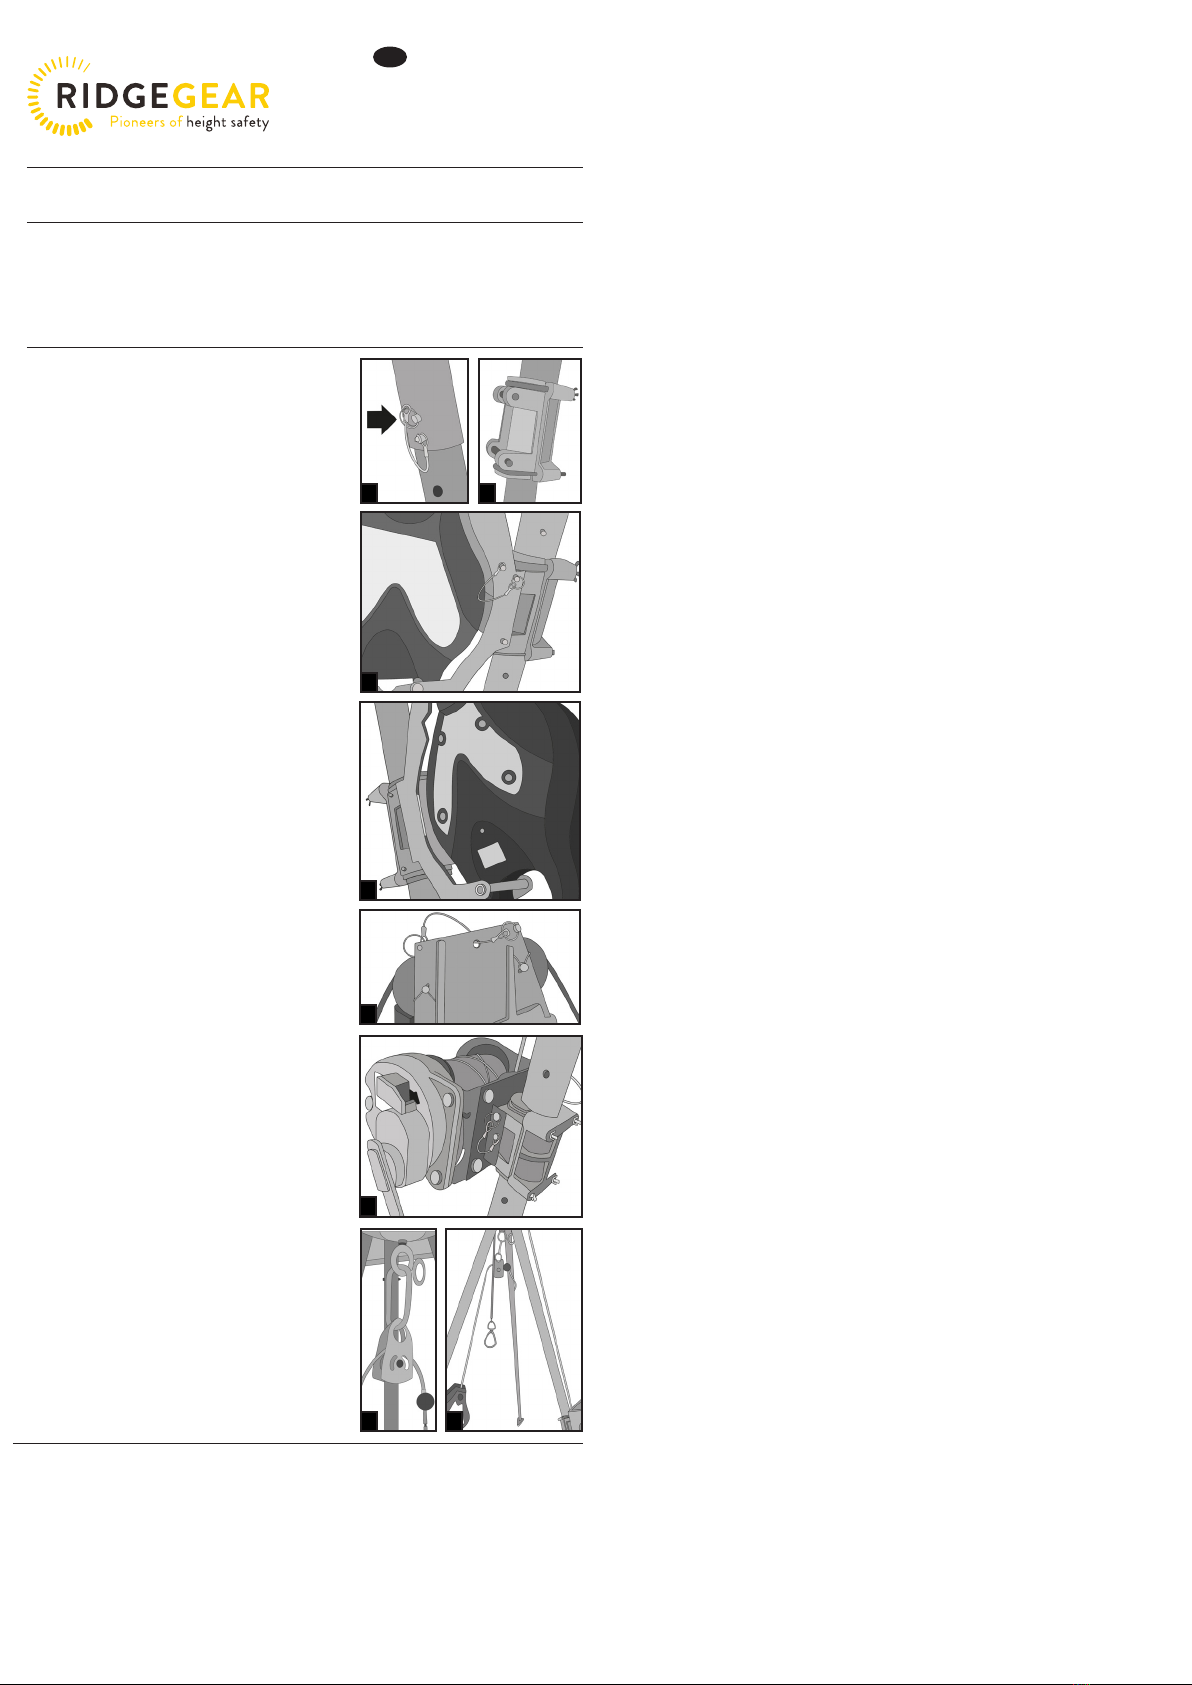
Legen Sie als Erstes den geplanten Standort für den Zusammenbau
fest und nehmen Sie dann das Stativ sorgfältig aus der Verpackung.
Es empfiehlt sich, den Zusammenbau von 2 Personen durchführen
zu lassen. Die Stativbeine werden aus dem Kopfgussteil genommen,
indem sie einzeln nach unten gezogen und mit der Hand sorgfältig
nach außen geführt werden. Lassen Sie die Beine nicht ohne Hilfe
nach außen schwingen, da dies den Kopf erheblich beschädigen
könnte. Achten Sie vor dem Einsatz darauf, dass die Beine in der
äußersten Stellung verriegelt sind, das Stativ stabil, waagrecht
und verriegelt steht und der Boden unter jedem Bein fest ist.
(Beachten Sie die Kennschilder auf dem Stativ).
Die Beine werden wahrscheinlich ausgerichtet werden müssen,
damit ein sicherer Spielraum über der Önung gegeben ist.
Achten Sie darauf, dass die Beine mindestens 300mm von der
Önung entfernt sind und dass sie sicher auf dem Boden stehen.
Um maximale Stabilität zu erreichen, stellen Sie jedes Bein
abwechselnd und ggf. stufenweise ein und vermeiden Sie, dass auf
den Kopf eine Hebelkraft ausgeübt wird.
Am unteren und mittleren Beinabschnitt gibt es in Abständen
von 80mm jeweils 11 Verstelllöcher. Um maximale Stabilität zu
erzielen, bewegen Sie nie nur den Mittel- oder inneren Abschnitt
zum äußersten Punkt hin. Richten Sie beide Beinteile so aus, dass
die Sperrstifte durch beide Beine gehen. Falls ein Bein einmal vom
Stativ abgenommen wird, sorgen Sie bei seinem Ersatz dafür, dass
die dreieckige Seite des Fußes immer nach innen weist. Achten
Sie stets darauf, dass die Sperrstifte sicher festgemacht sind, und
entfernen Sie die Stifte nicht, indem Sie den Draht halten. Zum
Herausziehen den Ring halten (s. 1).
Das Stativ über der Önung aufstellen, so dass das Winden-/
RTFA-Kabel in der Mitte hängt. Wenn RTFA
und/oder Winde am Stativ angebracht werden müssen, dann tun
Sie dies vorab in einem sicheren Bereich
wie folgt:
Anbringen des RTFA (gilt auch für das Anbringen des
Rettungsgris der Winde am RTFA, z.B. RGA4).
1. Schrauben Sie die Bügelschrauben ab und befestigen Sie die
Klammer nur an der Außenseite des mittleren Beinabschnitts.
Das richtige Bein ist mit den Riemenscheiben ausgerichtet.
Für zusätzliche Sicherheit schieben Sie die Klammer, so dass
sie auf gleicher Höhe mit der Basis des oberen Beins ist.
Achten Sie darauf, dass die Löcher in der Klammer zuoberst
sind (s. 2).
2. Positionieren Sie Klammer und RTFA über dem untersten
Spannbolzen und führen Sie den Bolzen vollständig durch die
oberen Löcher (s. 3 und 3a).
3. Lassen Sie die beiden oberen Stifte aus dem Stativkopf gleiten.
Nehmen Sie das Kabel aus dem RTFA und schlingen Sie es
über die beiden Rollen. Setzen Sie die Stifte wieder ein (s. 4).
Anbringen der Winde (wenn sie über Riemenscheiben verwendet
wird)
1. Die Halterung der Winde ist anders, aber das Anbringen der
Winde ist genau wie beim RTFA (s. 5)
Anbringen des RTFA, wenn er mit einer Winde verwendet wird
1. Befestigen Sie die Klammer an der Innenseite der beiden
anderen Beine auf dieselbe Weise wie oben. Bringen Sie einen
Verbinder nach EN362 an einem der Ringbolzen an. Führen
Sie das RTFA-Kabel durch die geteilte Riemenscheibe und
bringen Sie es am Verbinder an (s. 6). Bestellen Sie Verbinder
und Riemenscheibe separat.
2. Achten Sie darauf, dass die Windenkabel und der RTFA
einander nicht behindern (s. 7).
3a
4
5
6 7
1 2
ALLGEMEINE HINWEISE
1. Der RGR1 darf nur für den vorgesehenen Zweck verwendet werden, d.h. für die Bereitstellung eines persönlichen
Ankerpunktes, der über einem Mannloch oder einer Bodenönung aufgehängt wird. Die Auängung erfolgt
entweder an einer der beiden aufgehängten Ringschrauben oder an einem Seilzugsystem, das in Verbindung mit
einem Auanggerät (RTFA) und/oder einer Winde verwendet wird, die am Seitenschenkel montiert ist. Bitte nicht
für andere Zwecke benutzen.
2. Vor dem Einsatz ist vom Arbeitgeber eine ausführliche Risikobewertung vorzunehmen, um festzustellen, ob dies
auch das entsprechende Produkt für die Art der Tätigkeit ist, die im Fall eines Absturzes durchzuführen ist. Dabei
zu berücksichtigen sind Ankerpunkte, mögliche Fallhöhe (einschließlich Pendel), Behinderungen, Rettungssystem,
etc. Vergewissern Sie sich vor dem Einsatz, dass ein geeigneter Rettungsplan vorhanden ist, der im Fall eines
Dieses Produkt darf nur von entsprechend geschultem Personal verwendet werden, das es sicher und fachgemäß
verwenden kann. Wird für den Gebrauch durch Personen empfohlen.
Das RGR1 darf nur für seinen Einsatzzweck verwendet werden, der darin besteht, dass damit über einem Einsteigloch
oder einer Bodenönung ein Ankerpunkt für das Arbeitspersonal gegeben wird. Die Auängung erfolgt entweder über
einen von 2 hängenden Ringbolzen oder das Rollensystem, das in Verbindung mit einem einziehbaren Absturzschutz
(RTFA) und/oder einer am Seitenbein angebrachten Winde verwendet wird. Für keinen anderen Zweck verwenden. Es
wird dringend empfohlen, ein Sekundär- oder Reservesystem anzubringen, das die Ringbolzen am Stativkopf verwendet.
3
3
Absturzes die Rettung des Benutzers an einen sicheren Ort vorsieht.
3. Dieses Produkt darf nur von entsprechend geschultem Personal verwendet werden, das in die sichere Anwendung
eingewiesen wurde.
4. Dieses Produkt wird für den persönlichen Gebrauch empfohlen und ist nur für den Gebrauch durch einen einzelnen
Benutzer bestimmt.
5. Vergewissern Sie sich vor dem Einsatz, dass das Stativ stabil ist und alle Teile sicher befestigt sind.
6. Arbeiten Sie nie allein und halten Sie stets den Kontakt zu einem Kollegen auf Bodenhöhe aufrecht.
7. Wenn die Winde zum Absenken oder Anheben des Benutzers verwendet wird, lassen Sie das Kabel NIE
durchhängen, denn der Benutzer könnte dadurch im Fall eines Absturzes ernsthaft verletzt werden.
8. Sorgen Sie dafür, dass der Benutzer im unwahrscheinlichen Fall eines Absturzes keinem Stretch-Eekt von >6kN
ausgesetzt wird.
9. Verwenden Sie nie das Rettungsgerät oder das RTFA zum Anheben oder Absenken des Benutzers. Das
Rettungsgerät darf nur in Rettungssituationen verwendet werden.
10. Ein Ganzkörper-Gurt ist die einzige anerkannte Körperhaltevorrichtung, die in einem Auangsystem verwendet
werden kann. Es dürfen nur Auangpunkte verwendet werden, die mit dem Buchstaben A gekennzeichnet sind.
11. Seien Sie sich aller möglichen Gefahren bewusst, die durch die Verwendung von Kombinationen von
Ausrüstungsgegenständen entstehen können, bei denen die sichere Funktion eines Gegenstandes durch die sichere
Funktion eines anderen beeinträchtigt oder gestört wird.
12. Seien Sie sich aller möglichen Gefahren bewusst, die durch die Verwendung von Kombinationen von
Ausrüstungsgegenständen entstehen können, bei denen die sichere Funktion eines Gegenstandes durch die sichere
Funktion eines anderen beeinträchtigt oder gestört wird.
13. Achten Sie bei der erstmaligen Verwendung darauf, dass der erste Abschnitt des Produktpasses ausgefüllt und das
Datum der ersten Nutzung eingetragen wird. Die Benutzer werden gewarnt, dass bei bestimmten Krankheiten oder
Beschwerden, wie Herzleiden, Bluthochdruck, Vertigo, Epilepsie, Drogenoder Alkoholabhängigkeit, die Sicherheit
des Benutzers bei normalen oder Rettungseinsätzen betroen sein könnte.
14. Versuchen Sie nie, dieses Produkt ohne unsere schriftliche Zustimmung zu ändern, zu reparieren oder zu warten.
Önen Sie das Stativ nur zum Ausrichten der Beine und sonst nie.
15. Es ist wichtig dafür zu sorgen, dass das Produkt umgehend außer Betrieb genommen wird, wenn irgendwelche
Teile der Ausrüstung übermäßigen Verschleiß oder Schäden aufweisen oder wenn die Ausrüstung in einen Absturz
verwickelt war. Im Zweifelsfall verwenden Sie die Ausrüstung nicht und lassen sich fachkundig beraten. Die
Ausrüstung kann erst wieder verwendet werden, wenn von einer sachkundigen Person schriftlich bestätigt wurde,
dass sie wieder sicher verwendet werden kann.
16. Setzen Sie die Ausrüstung nie extremen Temperaturen von unter –25°C und über +50°C aus. Vermeiden Sie
elektrischen Kontakt und starke Chemikalien, die die Komponenten beschädigen könnten. Wenn Sie die Ausrüstung
oshore verwenden, empfiehlt es sich, das Expositionsniveau auf ein Mindestmaß zu reduzieren. Lassen Sie sich im
Zweifelsfall beraten.
MATERIALIEN
Entweder Carbonstahl oder Aluminiumlegierung.
AUFBEWAHRUNG, TRANSPORT UND REINIGUNG
1. Sorgen Sie dafür, dass das Stativ während des Transports oder wenn es nicht benutzt wird an einem sauberen
und trockenen Ort, geschützt vor direkter Hitze oder Sonnenbestrahlung und vor möglicherweise scharfen oder
scheuernden Gegenständen wie Messer oder Werkzeug sicher und fachgerecht auewahrt wird. Schmutz- und
Splittrückstände, vor allem auf den beweglichen Teilen, abwaschen und trockenwischen.
2. Wenn das Stativ bei der Verwendung nass wird, lassen Sie es auf natürliche Weise und ohne direkte Wärmeeinwirkung
trocknen.
REGELMÄSSIGE PRÜFUNGEN UND WARTUNG
1. Vor jedem Einsatz inspiziert der Benutzer die Ausrüstung gemäß den nachfolgenden Inspektionsrichtlinien. Da die
Sicherheit des Benutzers von der andauernden Leistungsfähigkeit und Dauerhaftigkeit der Ausrüstung abhängt,
ist eine zusätzliche gründliche regelmäßige Inspektion durch eine unabhängige sachkundige Person erforderlich,
die mit der Inspektion derartiger Ausrüstungen vertraut ist. Die Häufigkeit der unabhängigen Prüfung und
Inspektion hängt von Gesetzgebung, Ausrüstungstyp, Nutzungshäufigkeit und den Umweltbedingungen (vor allem
beim Oshore-Einsatz) ab. Es wird empfohlen, dass eine sachkundige Person mindestens alle sechs Monate eine
vollständige Inspektion durchführt und dass Unterlagen zu einer solchen Inspektion auewahrt werden.
2. Für das Produkt gibt es kein Veraltern, da abgenutzte Komponenten je nach Bedarf während des Einsatzes ersetzt
werden.
3. Es wird empfohlen, das Stativ mit einem geeigneten Anhänger mit dem Datum der nächsten oder letzten Inspektion
zu kennzeichnen. Bitte nicht direkt auf das Stativ schreiben.
4. Es tritt über die gesamte Lebensdauer keine Alterung auf, da abgenutzte Komponenten bei Bedarf während
der Wartung ausgetauscht werden, vorausgesetzt, dass zur Feststellung der Nutzungssicherheit des Stativs eine
regelmäßige Inspektion durchgeführt wird.
INSPEKTION
Beine und Füße – Auf Schäden prüfen und sicherstellen, dass alle beweglichen Teile weiterhin korrekt funktionieren.
Darauf achten, dass alle Beinstifte vorhanden sind. Bei Bedarf die Beinabschnitte neu ausrichten und die Anpassung
prüfen.
Kopfteil – Sorgfältig auf Schäden prüfen, wie feine Risse oder Verkrümmungen, die oft durch unsachgemäßen Gebrauch
oder auch dadurch entstehen können, dass das Stativ fallengelassen wurde. Darauf achten, dass die Ringbolzen weiterhin
unversehrt und fest an der Unterseite angebracht sind und die Rollen unbehindert drehen. Sicherstellen, dass die Stifte
vorhanden sind.
Anbringen von RTFA/Winde – Je nach Bedarf prüfen, dass sie gut befestigt und alle Fixierungen eingerastet sind.
Produktmarkierungen – Prüfen, dass Produktmarkierungen, wie die Seriennummer, gut lesbar sind. Dafür sorgen,
dass das Datum der letzten Wartung angegeben und noch nicht abgelaufen ist. Mindestens einmal jährliche Wartung/
gründliche Inspektion durch RIDGEGEAR oder von RIDGEGEAR anerkannten Wartungsvertretern, oder häufiger
aufgrund von Umweltbedingungen oder Einsatzhäufigkeit. Nicht versuchen, in das Gerät einzugreifen oder es auf
irgendeine andere Weise zu warten.
Mustern Sie das Stativ sofort aus, wenn irgendwelche der obigen Defekte festgestellt werden oder wenn Sie in Zweifel
sind. Bringen Sie deutlich den Vermerk NICHT VERWENDEN darauf an.
REPARATUR
DiesesStativdarfnur mit unserer schriftlichenEmpfehlunggeändertoderrepariertwerden. Nur eine von unszugelassene
fachkundige Person kann Reparaturen durchführen. Lassen Sie sich im Zweifelsfall eingehender von RidgeGear beraten.
AUFZEICHNUNGEN
1. Achten Sie beim erstmaligen Einsatz darauf, dass der erste Abschnitt des Produktpasses ausgefüllt und as Datum
des ersten Einsatzes eingetragen wurde.
2. Sorgen Sie dafür, dass das Produkt je nach Einsatzhäufigkeit regelmäßig inspiziert wird. Angaben zu allen
Inspektionen sind in den dafür vorgesehenen Feldern des Produktpasses einzutragen.
Wenn das Produkt außerhalb des ursprünglichen Bestimmungslandes weiterverkauft wird, ist für die Sicherheit des
Benutzers äußerst wichtig, dass der Wiederverkäufer Anweisungen für Gebrauch, Wartung, regelmäßige Prüfungen
und für Reparaturen in der Sprache des Landes, in dem das Produkt verwendet wird, zur Verfügung stellt.LIFESPAN
GEBRAUCHSDAUER
(S. regelmäßige Prüfung und Wartung). Vermeiden von Abnutzung und Verunreinigung und ein korrektes Auewahren
sorgen für eine optimale Gebrauchsdauer.
NOTIFIZIERTE STELLE
1. Module B of PPE Regulation (EU) 2016/425. SATRA Technology Europe Ltd, Bracetown Business Park, Clonee,
D15 YN2P, Ireland
2. Module D of PPE Regulation (EU) 2016/425. British Standards Institution, John M Keynesplein 9, 1066 EP
Amsterdam, Netherlands. ID number 2797.
Popular Camera Accessories manuals by other brands

Trojan
Trojan GC2 48V quick start guide

Calumet
Calumet 7100 Series CK7114 operating instructions

Ropox
Ropox 4Single Series User manual and installation instructions

Cambo
Cambo Wide DS Digital Series Main operating instructions

Samsung
Samsung SHG-120 Specification sheet

Ryobi
Ryobi BPL-1820 Owner's operating manual