RIDGID ATHEOS User manual

ATHEOS timestretching soundscape machine
for KONTAKT (v5.8.1 )
User Manual

Contents
1. Introduction (Page 3)
2. Installation / Setup (Page 4)
3. Browsing Presets (Page 7)
4. GUI Overview (Page 8)
5. The Engines (Page 9)
6. Engine Controls (Page 10)
7. Envelope And Filter Controls (Page 15)
8. The Sequencer (Page 18)
9. Sequencer Targets (Page 23)
10. Table Editing (Page 27)
11. External Modulation (MIDI CC) (Page 29)
12. Engine Presets (Page 30)
13. The FX Section (Page 33)
14. Keysplits (Page 36)
15. Audio Routing (Page 37)
16. Troubleshooting (Page 42)

1. Introduction
Thank you for purchasing Atheos!
Atheos is a 9 GB „timestretching cinematic soundscape“ instrument that
features four distinctive engines, hundreds of source sounds, a flexible
sequencer and a comprehensive multi-fx section for each engine.
Each engine in Atheos features 300 source sounds (with the exception of the
„noise“ engine which only has 150 source sounds).
All sounds can be played back forward, reverse or both at the same time.
There are 260 presets (Kontakt snapshots) with more to come in free updates.

2. Installation / Setup
To install Atheos on your computer, extract the downloaded release archive
RA_ATHEOS.zip that you have received via e-mail to any location you want.
On OSX, use the default Archive utility for extraction. On Windows, use 7-Zip,
WinZIP or WinRAR.
The content of the archive (after extraction) should look like this:

Now open up Native Instrument's KONTAKT 5.8.1 (or higher) and locate the
folder that you've copied / extracted the RA_ATHEOS.zip contents to.
NOTE: ATHEOS does not appear as a library in Kontakt. You also don't need a
serial key / activation or it.
In KONTAKT, use the Files tab (browser) to navigate to that location:
Load the _atheos_(snapshots).nki instrument.
NOTE: I you are experiencing loading problems or missing content warnings
rom Kontakt, please head over to the troubleshooting section o this manual!
Once that is done, click one the wrench icon in the upper header section
(directly above the Rigid Audio logo). You are now in the instrument edit mode.

Click on the „Instrument Options“ button directly underneath the wrench icon:
From here you can access the Snapshot Saving Location.
Click on the „Show“ button to the right.
A message might appear, asking you to create a new snapshots path for your
instruments:
Click on Yes.
A window with the snapshots location appears.
Now copy the _atheos_(snapshots) folder from the release archive
(..\RA_ATHEOS\Snapshots\) into this folder / snapshot location.
Now close the _atheos_(snapshots).nki instrument in Kontakt and reload it.

3. Browing Presets
You should now be able to browse all the preset snapshots:
The presets in Atheos are categorized by type.
You have bright, damaged, dark, lofi, noise, rhythmic, split, texture and warm
presets.
Listen to some of these to get a feel for the sound of Atheos.

4. GUI Overview

5. The Engines
Atheos has four different engines. The main difference between each engine is
the type of sample playback mode. In the highlighted picture above, we have
selected the „sampler“ engine.
The „sampler“ engine plays back samples normally. (As you would expect from
a sampler). The „time machine“ uses a high-quality timestretching algorithm to
play back sounds. The „tone machine“ uses a similar technique, but with this
engine, the samples will sound more like a vocoder.
The „noise“ engine is similar to the „time machine“ engine. (Also plays back
samples with realtime timestretching).
Each engine has the same set o controls which we'll cover now.

6. Engine Controls
Each engine has controls for:
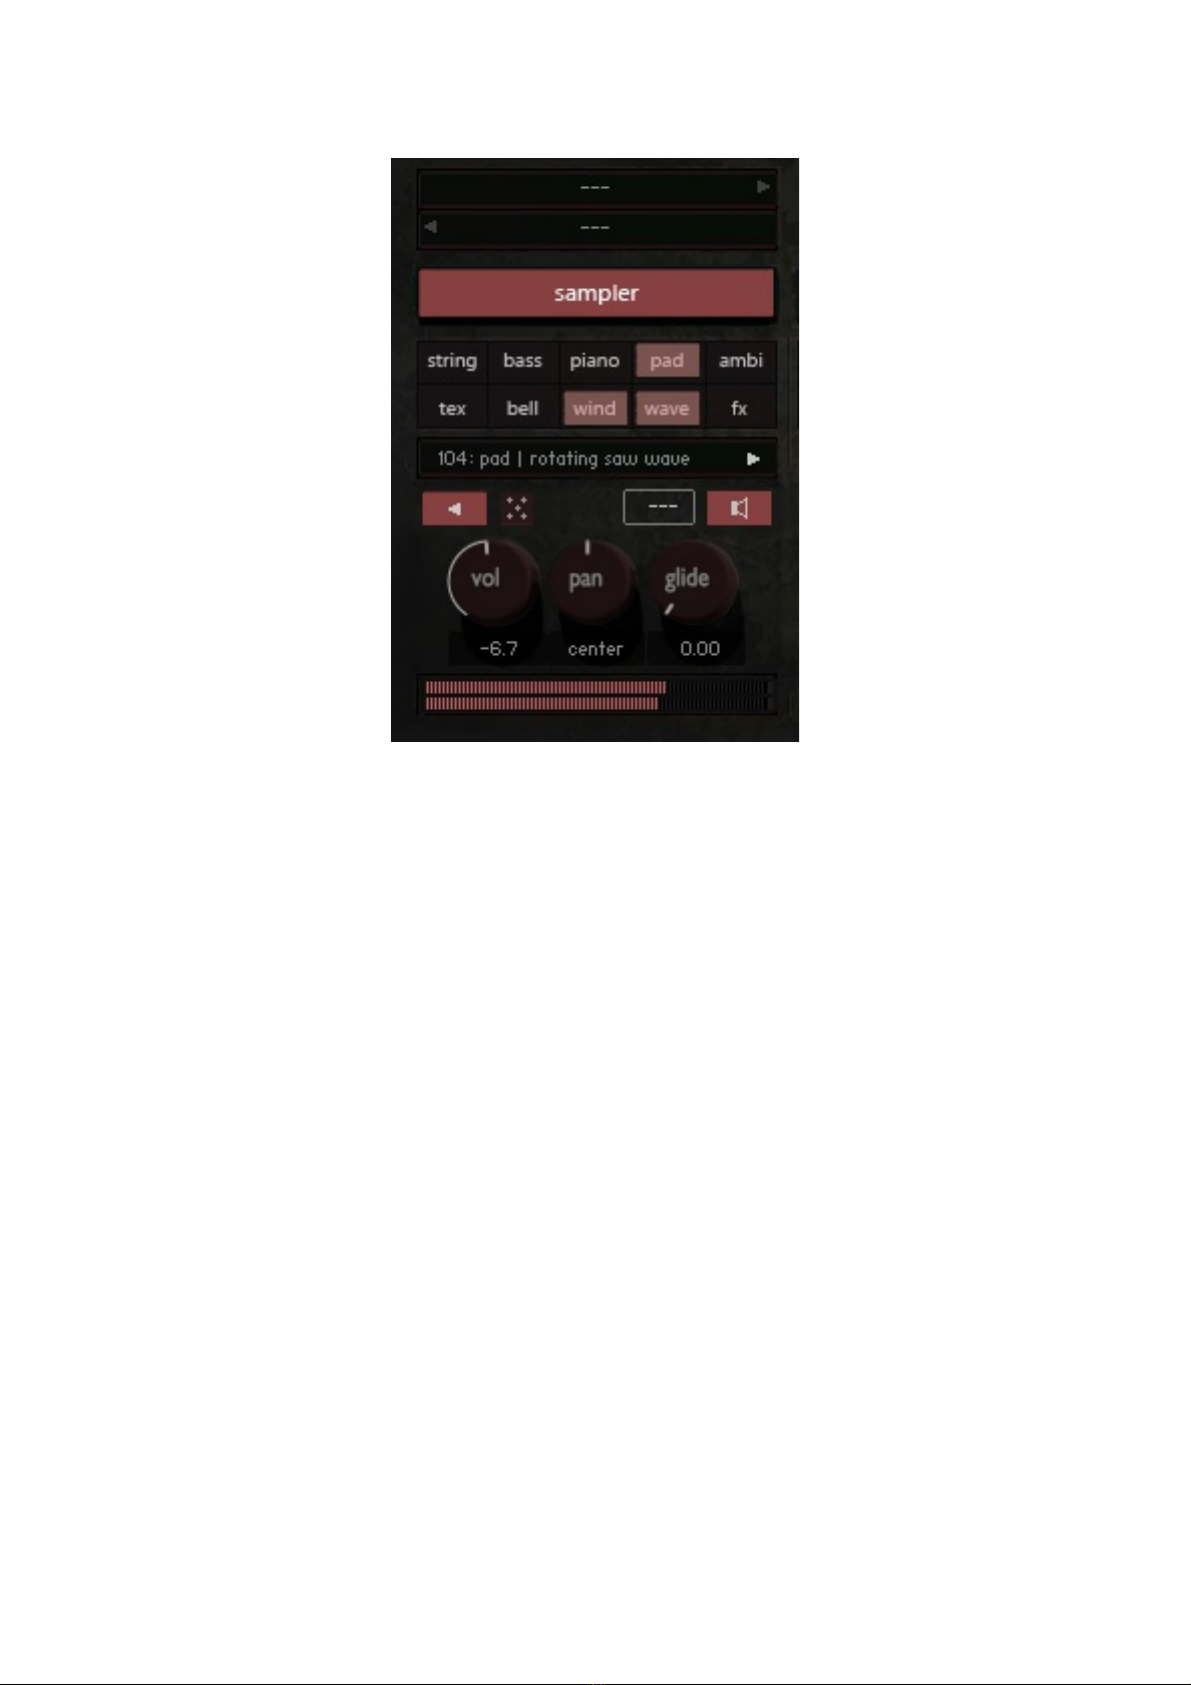
-Keysplit (the „---“ controls at the top).
These are actually sliders, that you can drag left/right with your mouse to set up
a keyrange for that particular engine.
-Select/Edit button (e.g. „sampler“)
-Sound Category Selection (e.g. „string“ or „wave“)
From here, you can choose a sound category for each engine (except the
„noise“ engine). You can mix categories freely – this will affect the sound
selection menu underneath:
- Sound Selection (e.g. „104: pad | rotating saw wave“).
Click on this menu, to select a sound for the choosen engine. Note that this
menu/list will update (change) depending on what sound categories you have
selected. This is especially useful, if you only want to check out e.g. wave
sounds, so you don't need to scroll through a huge list every time.

Note that the choosen sound categories also affect sounds randomization.
If you want to let Atheos choose a random sound, you can do that by category.
This is useful if you like a particular preset that has e.g. only pad sounds but
want some different sounds within the same style.
–Playback Mode Button ( orward, backward or both)
Click on the button with the playback icon, to cycle through the three
sample playback modes:
forward
backwards (reverse)
forward and backward together
A word on panning and the Playback Mode Button:
When you play back samples forward (which is the default) or reversed, the
panning will work like you would expect it to. Turn the pan knob to the left to
hear the sample on the left side and turn it to the right to hear the sample on the
right side.

However, if you engage the forward and backward together-playmode, the
panning will work differently:
When the pan knob is centered, both samples (forward and reversed) will play
back in the center of the stereo field. Turning the pan knob all the way to the left
will play the forward sample on the left side and the backward sample on the
right side of the stereo field.
Turning the pan knob completely to the right will play back the forward sample
on the right side and the backward sample on the opposite side.
This can be useful to get some stereo-feel with just a single sound and can
create interesting variations.
- Randomize (dice button)
The dice button will open up a menu from where you can let Atheos choose a
random tone for the currently selected engine. You can also choose to
randomize the sound sources for all four layers at once.
Choose „randomize tone (all)“ for that.
Note: The randomization will only be applied to engines that are enabled via the
loudspeaker button symbol:

- Pitch Bend Range (e.g. „pb: 2“)
From here, you can select the pitch bend range for each engine.
This is useful if you have playing more than one engine at the same time and
only want to apply pitch bend to e.g. the „sampler“ engine.
You can choose from „---“ (which equals zero = off), 2, 5, 7 and 12 semitones.
- Volume
Controls the individual engine volume, ranging from infinite to 12 dB.
- Pan

Controls the individual engine panning.
- Glide
Controls the individual (polyphonic) note gliding.
To disable the gliding, simply turn the knob all the way to the left (0.00).
The maximum glide time is 2.5 seconds (turned all the way to the right).

7. Envelope And Filter Controls
Each engine has its own amp and filter envelope (ADSR) controls plus 11
different filter types. Use the engine select buttons to control these.
The options (from left to right):
- Curve (amp envelope attack curve)
This lets you change the „shape“ of the amp attack envelope.
In the above picture, the curve is set to 0.
Negative values will result in this:
Positive values will result in this:

–Att (amp envelope attack)
–Dec (amp envelope decay)
–Sus (amp envelope sustain)
–Rel (amp envelope release)
–Cuto ( ilter cuto requency)
–Reso ( ilter resonance, also called „q“ or „bandwidth“)
–(High values result in a higher resonance)
–Env ( ilter cuto envelope amount)
With this you can control the filter cutoff envelope. It is basically the same as
the normal volume („amp“) envelope but it will be applied to the filter cutoff.
You can choose negative values to get an inverted envelope.
Use the controls to the right to adjust the filter envelope:
–Curve ( ilter envelope attack curve)
–Att ( ilter envelope attack)
–Dec ( ilter envelope decay)
–Sus ( ilter envelope sustain)
–Rel ( ilter envelope release)

–Filter Type (e.g. „ar lp2“)
Use this to select the filter type for the currently selected engine.
The following filter types are available:
•ar lp2
•ar lp4
•ar bp2
•ar bp4
•ar hp2
•ar hp4
•daft lp
•daft hp
•sv notch4
•phaser
•vowel

8. The Sequencer
Each engine in Atheos features four sequencers that you can use to modulate
various parameters at once. You can either modulate engine-specific
parameters like pan, grain length, speed or formant shifting or you can modulate
effects that you've inserted into one of the five effect slots of each engine.
Let's examine the sequencer unctions:
Each of the four sequencers features four additional table (steps) buffers.
These preview up to 32 steps so that you know what is inside them.
Click on these, to view and edit the contents in the big main sequencer window.
Note that the sequencing will always start with the first table buffer.
Beside each table buffer there is a „x1“ symbol. These are multiplicators and
specify how often that buffer will be played. Click on the „x1“ symbol to change
the number of repetitions. (x1 to x8). Once you have selected something else
than „x1“ the button will be lit up white.
Note: By default, the first buffer will be repeated forever. So changing the
number of repetitions won't make a difference.

To cycle through the four table buffers, click on the wrench icon to the right:
From here you can set up, how many table buffers should be played one-after-
another. The sequencers will always cycle through the buffers from 1 … to 2 …
to 3 … to 4 … to 1... and so forth.
Choose e.g. „end: 3“ to repeat the first three table buffers for the current
sequencer. An „<---“ arrow will indicate that visually.
You can also do that for all four sequencers at once.
Choose „end 3 (all)“ for that purpose.
Copy steps: Let's you copy the currently selected table buffer data.
Paste steps: Let's you paste the previously selected table buffer data to any
sequencer buffer of any sequencer.
Loop: When set to „on“, the sequencer will repeat all buffers forever. If it is set
to „off“ it will end at the choosen buffer and repeat that one forever then (e.g.
„end: 3“).

Targets: Will be covered in the next chapter.
Presets: Will open up a list of 40 factory table presets.
You can freely try out table presets by clicking on the buttons:
The presets will be loaded instantly so that you can check them out.
If you aren't happy with it, simply click on „presets“ again (highlighed in the
picture above) and the table will revert to whatever was in there before.
To load a preset and make it permanent, click on the „okay“ button on the top of
the sequencer.
Note that table presets won't alter sequencer targets, so you won't loose you
sequencer target routings.
Retrig: When turned on, the sequencer will restart at the first step on every new
key-press (note-on).
Loop: Whether the sequencer should repeat the current pattern or stop at the
last step.
Table of contents