Rinnai RR-55J Quick start guide

WARNING: Improper installation, adjustment, alteration, service or
maintenance can cause property damage, injury or death. Read the
installation, operating and maintenance instructions thoroughly before
installing or servicing this equipment.
FOR YOUR SAFETY
– Installation and service must be performed by a qualified
installer, service agency or the gas supplier.
– Do not store or use gasoline or other flammable vapors or liquids in
the vicinity of this or any other appliance.
– The purchaser must post in a prominent location instructions to be
followed in the event the user smells gas. Instructions can be obtained
by contacting the local gas supplier.
OWNER/INSTALLER
FOR YOUR SAFETY
THIS MANUAL MUST BE READ IN ITS
ENTIRETY BEFORE OPERATING GRIDDLE
RR-55J
GAS RICE COOKER
Owner’s Operation and Installation Manual
WARNING: If the information in these instructions is not followed
exactly, a fire or explosion may result causing property damage,
personal injury or death.
INSTALLER: MUST LEAVE MANUAL WITH UNIT AFTER INSTALLATION.
OWNER: RETAIN THIS MANUAL SAFELY, FOR FUTURE REFERENCE.
WHAT TO DO IF YOU SMELL GAS
• Do not try to light any appliance.
• Do not touch any electrical switch; do not use any phone in
your building.
• Immediately call your gas supplier from a neighbor's phone.
Follow the gas supplier's instructions.
• If you cannot reach your gas supplier, call the fire
department.

Model RR-55Jwww.rinnaiamerica.com 2
GENERAL INFORMATION
1. Name of Parts .........................................................................................................3
2. Specifications .........................................................................................................3
INSTALLATION INSTRUCTIONS
1. Notice Before Installation ........................................................................................4
2. Location and Clearances .........................................................................................4
OPERATING INSTRUCTIONS
1. Operating Instructions ............................................................................................5
2. How to Cook Rice ....................................................................................................6
3. Visual Burner Check ................................................................................................7
MAINTENANCE/SERVICE
1. Cleaning .................................................................................................................8
2. Troubleshooting ......................................................................................................8
3. Service ...................................................................................................................9
Parts List and Diagrams............................................................................................10
Limited Warranty ..................................................................................................14
Model Number RR-55J Gas Rice Cooker
Manufactured by Rinnai Japan
Distribution by Rinnai America
1662 Lukken Industrial Drive West
LaGrange, Georgia 30240
Phone 1-800-621-9419
Fax-1-706-884-6099
E-mail [email protected]
CONTENTS
WARNING: Improper installation, adjustment, alteration, service or
maintenance can cause property damage, injury or death. Read the
installation, operating and maintenance instructions thoroughly before
installing or servicing this equipment.

Model RR-55J 800-621-94193
GENERAL INFORMATION
1. NAME OF PARTS
2. SPECIFICATIONS
epyTrekooCeciRsaG
rebmuNledoMJ55-RR
snoisnemiD
thgieHsehcni81
htdiWsehcni61/732
htpeDsehcni61/191
thgieWSBL53
spuCyticapaCeciR55–52
tupnIsaG enaporPUTB000,43
larutaNUTB000,53
noitcennoCsaGelameFTPN"2/1
serusserPylppuSsaG enaporPCW"5.31mumixaMCW"11muminiM
larutaNCW"5.01mumixaMCW"5.6muminiM
erusserPdlofinaM enaporPCW"01
larutaNCW"6
LID
Water Level Guide
RICE POT
HEAT SHROUD
DRIP PAN
BASE
PILOT VIEW HOLE MUST ALIGN
WITH CONTROL KNOBS
MEASURING CUP
180 ml (5.3 oz)

Model RR-55Jwww.rinnaiamerica.com 4
INSTALLATION INSTRUCTIONS
1. NOTICE BEFORE INSTALLATION
1. Installation must conform with local codes, or in the absence of local codes, with
the National Fuel Gas Code, ANSI Z223.1.
2. This rice cooker is designed either for use with Natural Gas or L. P. Gas. Make
sure that the type of gas to be supplied to this cooker matches that shown in the
rating plate in the unit.
3. The appliance and its individual shutoff valve must be disconnected from the gas
supply piping system during any pressure testing of that system at test pressures
in excess of 1/2 psig.
4. The appliance must be isolated from the gas supply piping system by closing its
individual manual shutoff valve during any pressure testing of the gas supply
piping system at test pressures equal to or less than 1 /2 psig.
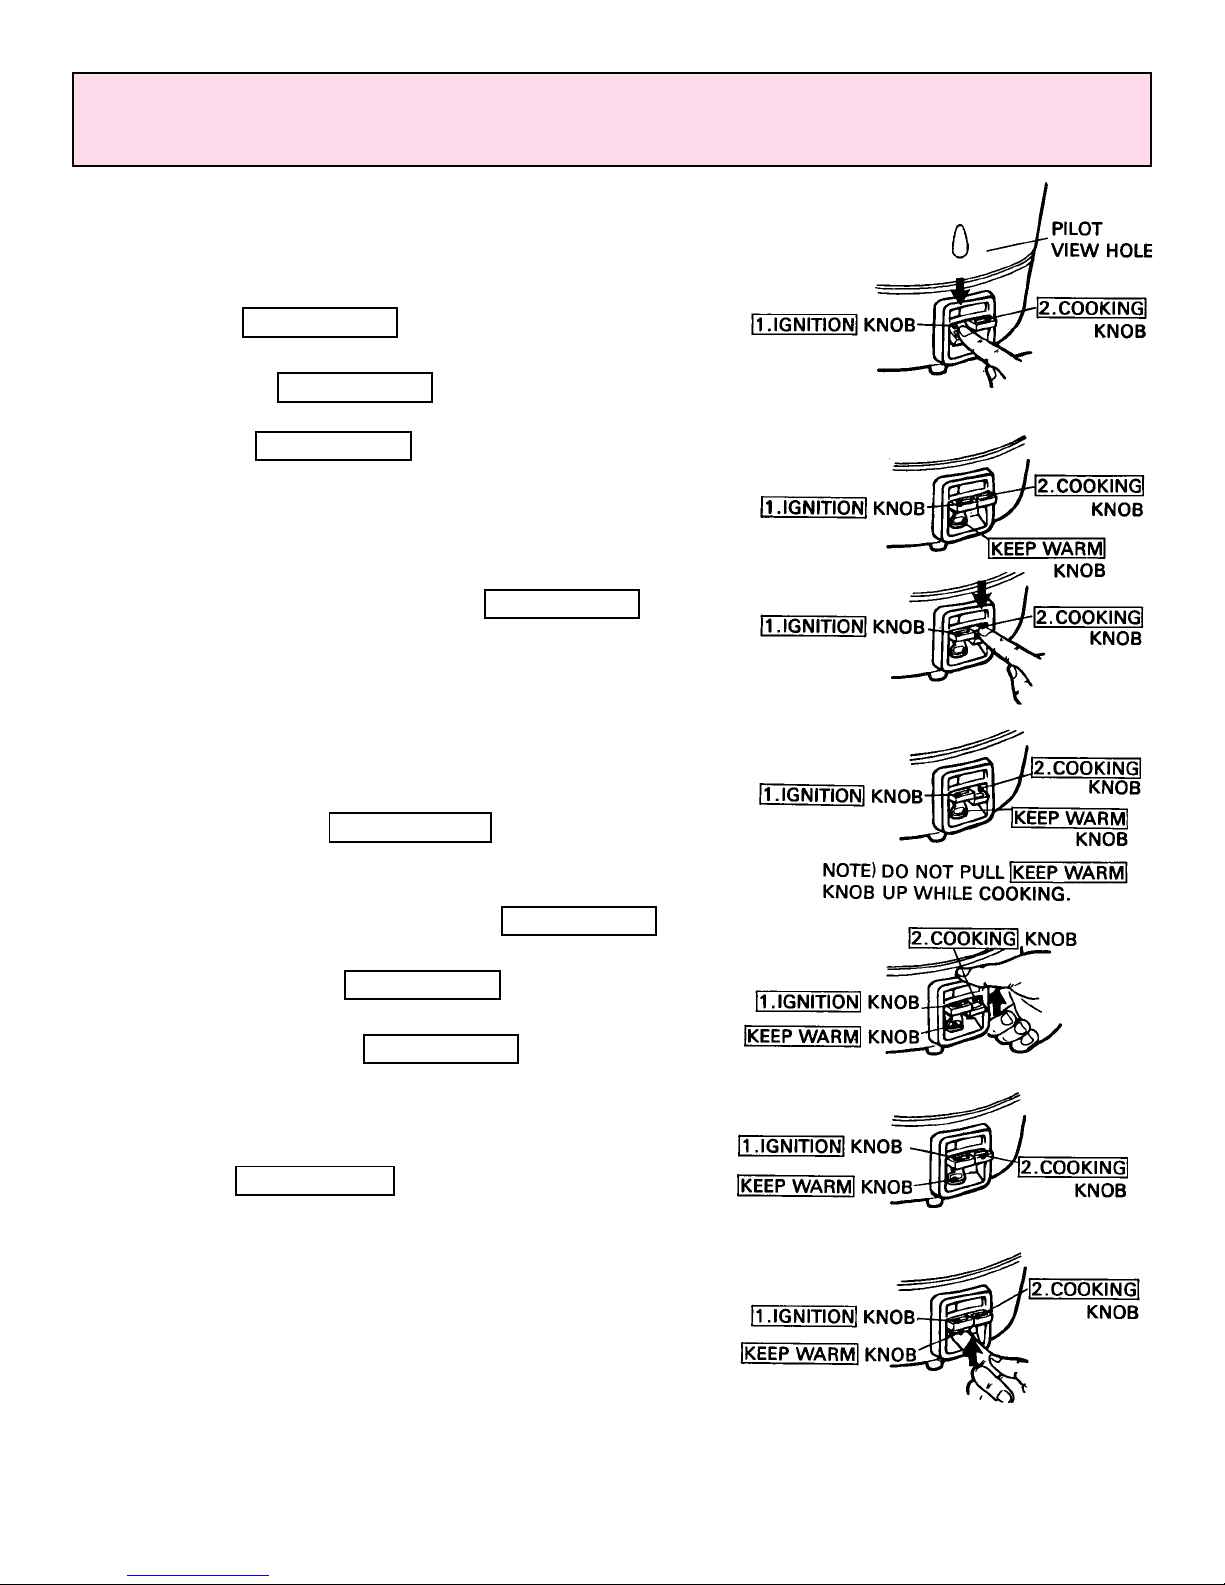
5. NOTICE TO GAS SUPPLIERS: The following must be followed to check the
proper operation of the Safety Valve:
1. Remove Pot, Heat Shroud and Drip Tray.
2. Push Ignition Knob down until it clicks and hold knob down for approximately 10
seconds.
3. Release Ignition Knob (pilot should be lit). If pilot is not lit, repeat step 2.
4. The Keep Warm Knob will remain down.
5. Pull Keep Warm Knob up and listen carefuily for a faint metallic click sound
(approximately 60-180 seconds). This click sound is the Safety Valve dropping
out and signifies proper operation of Safety Valve.
NOTE: The Pilot Valve does not have a means to stop the flow of gas other than
the manual valve outside the unit or the Keep Warm Knob.
2. LOCATION AND CLEARANCES
Location
1. Keep the appliance area free and clear from combustible materials, gasoline and
other flammable vapors and liquids.
2. Locate this rice cooker in a well ventilated place. Do not block or cover the
opening between the shroud and pot. DO NOT OBSTRUCT FLOW OF
COMBUSTION AND VENTILATION AIR.
3. Provide adequate clearance for air openings into the combustion chamber.
Clearances
Minimum clearances from combustible
materials are as follows: 6" from side and 6"
from back.
Minimum clearances from NON-combustible
materials are as follows 0" from side and 0"
from back.

Model RR-55J 800-621-94195
OPERATING INSTRUCTIONS
1. OPERATING INSTRUCTIONS
1. Be sure that manual valve is open and pilot
view hole is directly above controls. See
pages 3 and 7.
2. Push 1. IGNITION knob down until it clicks
and hold down for approximately 10 seconds.
3. Release 1. IGNITION knob, check that the
PILOT is lit by looking through the pilot view
hole. ( 1. IGNITION knob will return and
KEEP WARM knob stays down.)
4. If the PILOT has failed to ignite, wait 5
minutes, then repeat STEPS 1-3 TO
RE-IGNITE.
5. To light main burner push 2. COOKING knob
down. Check main burner ignition by viewing
through view hole.
NOTE:
* The Heat Shroud, if not correctly installed,
will prevent main burner ignition even
though the pilot is burning.
* Do not pull KEEP WARM knob up while
cooking. Unit will shut off.
* Should the main burner not be ignited, or be
extinguished halfway, pull 2. COOKING knob
up until it clicks.
* Do not push 2. COOKING knob first, the
lever will not stay down unless the pilot is lit.
* After cooking, 2. COOKING knob will
automatically lift up.
2. TO SHUT OFF
When removing the pot after cooking, make sure
to push KEEP WARM knob up until it clicks. It is
then in “OFF”position.
WARNING:
* When igniting make sure not to put your
face near the viewing holes.
* If it is hard to see the PILOT flame, relocate
the position of the shroud so view holes are
directly over controls. See pages 3 and 7.

Model RR-55Jwww.rinnaiamerica.com 6
OPERATING INSTRUCTIONS
3. HOW TO COOK RICE
1. Measure rice with the measuring cup provided. If the measuring cup is not
used, refer to the following table:
MEASURING POUNDS OF
CUPS DRY RICE
10 = 3.3
20 = 6.6
30 = 9.9 1 measuring cup = 5.3 fluid ounces (oz)
40 = 13.2 = 180 milliliters (ml)
50 = 16.5
55 = 18.2
2. Wash measured rice with fresh water until water is relatively clear to suite
individual cooking taste.
3. Put the washed rice in the Rice Pot. Add water
according to Water Level Guide inside the Pot.
(For example, to cook 30 measuring cups of rice,
put the washed rice into Rice Pot and then add
water up to the indication “30”of Water Level
Guide.)
NOTE: A. The amount of water is important for rice
cooking. It will vary with dryness, age and
kinds of grain. To suit your needs and
tastes, you may need to adjust the water
level.
B. Do not put water over the top line of Water
Level Guide.
4. Soak rice in water about 30 minutes before you
start cooking.
Water Level Guide
CUPS
50
40
30

Model RR-55J 800-621-94197
OPERATING INSTRUCTIONS
5. Set Drip Pan on Base correctly. Do not use Drip Pan upside down. Align pilot
hole in Heat Shroud directly over on/off switch. Be sure that the Shroud is
sitting firmly in Drip Pan. Install the Pot into the Shroud. Make sure that the Pot
is level and sitting firmly in the Shroud.
* The misalignment or improper setting
as above will cause early shutoff of
the main burner.
6. Close the lid and light the burner. (To light the burner, refer to the Operating
Instructions on page 5.) Do not open the lid while cooking.
7. When cooking is completed, the 2. COOKING button will pop up and the main
burner will automatically shut off. DO NOT open the lid immediately –Leave
rice cooker with pilot on at least 15 minutes after main burner shuts off to
complete the cooking process.
8. The pilot keeps the cooked rice warm. After one hour, cooked rice will begin to
lose flavor.
9. Shut pilot off by pushing up on keep warm knob until click is heard.
4. VISUAL BURNER CHECK
Make sure the view hole is directly over controls. Make a visual check of main and
pilot burner flames. Flame should be light blue in color and should have no yellow tips
or lifting from the burner. Do not hold face near view hole while igniting.
CORRECT INCORRECT
STEP 3
STEP 2
STEP 1
STEP 4
DRIP PAN

Model RR-55Jwww.rinnaiamerica.com 8
MAINTENANCE/SERVICE
1. CLEANING
Allow unit to cool for one hour.
1. Clean heat sensitive portions at the center of the base and at the bottom center
of Rice Pot daily. Wipe away water, oil and dirt with a cloth.
2. The rice pot, shroud, and lid can be washed with soap and water. Use normal
dishwashing detergent. Wipe thoroughly with a dry cloth after washing. Do not
wash the Burner Assembly with water.
3. Wash the drip pan with soap and water after removing from the Burner
Assembly.
4. The burner ports should be cleaned out if blockage occurs by service technician
orgas company.
2. TROUBLE SHOOTING
Heat Sensor
Heat Sensor
ELBUORTESUACERUDECORP
ffotuhsrenrubniaM.1
yletelpmocecirerofeb
.dekooc
ecirrofretawelttilooT
.emulov
fotnuomareporphtiwkooC
.snoitcerideeS.retaw
gnisneslamrehtnoegallipS
.tinu
.tinugnisneslamrehtnaelC
.gninaelcrofevobaeeS
ro/dnatoPeciR,naPpirD
toneraduorhStaeH
.denoitisopyltcerroc
tcerrocnistraprekoocecalP
.snoitcerideeS.noitisop
-lamsitatsomrehT
.ytridrogninoitcnuf
tinugnisneslamrehtecalpeR
ruoytcatnoC.ylbmessa
.gninaelcrostraprofrelaed
renruBniaMdnatoliP.2
.gnikoocelihwffotuhs
.tinUtoliPnoegallipSrorenruBtoliPnaelC
.ecalper
.deggolcsiecifirOtoliProecifirOtoliPnaelC
.ecalper
ootsierusserpylppussaG
.wol
reporprofenilsagkcehC
yllufebtsumsevlavllA.ezis
.denepo
derevocsielpuocomrehT
.degamadroegallipshtiw
roelpuocomrehtnaelC
.ecalper

Model RR-55J 800-621-94199
MAINTENANCE/SERVICE
ELBUORTESUACERUDECORP
tonseodrenruBniaM.3
.yllacitamotuaffotuhs
-lamsitatsomrehT
.ytridrogninoitcnuf
.strapgnisnestaehnaelC
gnisneSlamrehTecalpeR
ruoytcatnoC.ylbmessAtinU
.straprofrelaed
.renrubniamemalftrohS.4ootsierusserpylppussaG
.wol
reporprofenilsagkcehC
yllufebtsumsevlavllA.ezis
sagruoytcatnoC.denepo
.ynapmoc
.ecifironiamfoegakcolBroecifironiamnaelC
.ecalper
niamemalfwolleY.5
ehtnotooS.renrub
.toPeciRfomottob
.sagfoepyttcerrocnIekamdnaetalpgnitarkcehC
.epytsagfoerus
.renrubniamnoegallipS
htiwderevocsirenrubniaM
foedisnistcesniroegallips
.renrubniam
rorenrubniamnaelC
foedisnikcehC.tiecalper
.renrubniam
.gnitfilsiemalF.6.renrubniamnoegallipS
renrubniamfoegakcolB
.selohdnastrap
rostraprenrubniamnaelC
.renrubniamecalper
.revognilioB.7.retawhcumooTfotnuomareporphtiwkooC
.snoitcerideeS.retaw
snruttoPeciRfoedisnI.8
.yargkrad
arofdesutonsitoPeciR
gnipiwtuohtiwemitgnol
.gnihsawretfa
htolcyrdhtiwtopepiW
.gnihsawretfaylhguoroht
ybdeziliretssitoPeciR
foecafruS.gnimaets
kradnrutyammunimula
.yarg
fonoitarolocsidsihT
otlufmrahtonsimunimula
.htlaehruoy
FOR MAINTENANCE REPAIR, CONTACT FACTORY,
FACTORY REP, OR YOUR LOCAL SERVICE COMPANY.
3. SERVICE
RINNAI AMERICA CORPORATION
1662 LUKKEN INDUSTRIAL DRIVE WEST
LAGRANGE, GEORGIA 30240
TEL: 800-621-9419
FAX: 706-884-6099

Model RR-55Jwww.rinnaiamerica.com 10
PARTS LIST AND DIAGRAMS

Model RR-55J 800-621-941911
PARTS LIST AND DIAGRAMS

Model RR-55Jwww.rinnaiamerica.com 12
PARTS LIST AND DIAGRAMS

Model RR-55J 800-621-941913
PARTS LIST AND DIAGRAMS
Part No. Part Name Drawing No.
1 Lid Assembly -
2 Rice Pot Assembly -
3 Heat Shroud -
4 Drip Pan 36550
5 Gas Cock Mounting Plate BRR37-113
6 Connecting Inlet Cover BRR37-345
7 Bottom Casing RR82-2655
8 Control Panel BRR37-1.05
9 Rubber Leg Assembly 49231
10 Pressure Adjustment Hole Cover BRR37-332
11 Under Cover RR77-4590
12 Manual Valve BRR37-244
13 Gas Cock Joint BRR37-401
14 Packing C36E1-6
15 Combination Control Assembly DRR37-213
16 Lock Plate ARR37-600
17 Operating Unit BRR37-243
18 Burner CRR37-338
19 Air Shutter Plate BRR37-315
20 Air Shutter BRR37-313
21 Supplementary Damper BRR37-340
22 Damper Push Spring RR77-4641
23 Main Orifice (for Prop.) dia. 1.672 RMC-7523
Main Orifice (for Nat.) dia. 2.5 RMC-7523
24 Burner Fitting Board ARR37-104
25 Thermal Sensing Unit Assembly BRR37-505
26 Thermal Sensing Unit Spring 46608
27 Magnet Case Guide RR77-3582
28 Base Magnet Case 39346A
29 Stopper Pin 46660
30 Stopper Pin Spring 46661
31 Push Nut ZRHA02SO
32 Burner Plate RR77-2588
33 Piezo Electric Ignition Device BRR37-1
34 Pilot Fitting Board BRR37-329
35 Constant Pilot Burner BRR37-326
36 Thermocouple RR82-41318-02
37 Thermocouple Fixing Pin ARR32-623
38 Pilot Orifice (Constant) (for Prop.) dia. 0.21 ARR37-331
Pilot Orifice (Constant) (for Nat.) dia. 0.25 6541-96
39 Constant pilot Tube BRR37-403-1
40 Pilot Holder Assembly CP-50746
41 Pilot Orifice (Instant) (for Prop.) dia. 0.4 6541-96
Pilot Orifice (Instant) (for Nat.) dia. 0.65 6541-96
42 Ignition Pilot Tube BRR37-403-2
43 Connecting Tube Push Metal ARR37-333
44 Washer CP-20805
45 O-Ring C5G1-8
46 Electrode CP-50188
47 Plug Holder CP50709
48 Measuring Cup RR79-4951
49 Instructions TRER-55AS-IAS
50 Rating Plate BRR37-943
51 Warning Label BRR37-945
52 Instruction Label BRR37-944

LIMITED WARRANTY
To the owner(s) of the equipment during the period of warranty coverage stated below, Rinnai
warrants the equipment to be free of defects, in materials and workmanship. This warranty is
subject to the terms specified below. This warranty gives you specific legal rights and you may
also have other rights which vary from state to state.
This warranty is limited to parts replacement and does not include any labor allowance. Any
service charges or charges for parts replacement are your responsibility.
SCOPE OF COVERAGE PERIOD OF COVERAGE TYPE OF FAILURE COVERED
All Parts 90 days Defective materials
or workmanship
All warranty service and/or replacement or parts must be performed for you by an individual
or servicing company which has been qualified by Rinnai or its distributor. Dated sales
receipt/proof of purchase is required.
You may obtain the benefits of warranty coverage on a failed part by having the servicing
company, distributor/dealer replace the parts and return it to Rinnai factory for inspection. If
the failure is covered by warranty, there will not be any charge for the replacement part.
Transportation charges for the shipment of the replacement part and the return of the failed
part is your responsibility. Any such warranty replacement or repair shall be subject to the
terms and conditions of this warranty for the remainder of the original period of coverage.
This warranty does not cover any failures or operating difficulties due to accident, abuse,
misuse, alteration, misapplication, improper installation or improper maintenance or service.
Any implied warranties of merchantability and fitness applicable to the equipment are limited
in duration to the period of coverage of this express written warranty. Some states do not
allow limitation on how long an implied warranty lasts, so this limitation may not apply to
you. Rinnai is not liable for any special, indirect or consequential damages. Some states do
not allow the exclusion or limitation of incidental or consequential damages, so this
limitation or exclusion may not apply to you.
Rinnai does not authorize any person or company to assume for it any other obligation or
liability in connection with the sale, application engineering, installation, use, removal,
return, or replacement of its equipment; and no such representations are binding on Rinnai.
ATTACH REMOVABLE WARRANTY
REGISTRATION CARD HERE

Model RR-55J 800-621-941915
NOTES

www.rinnaiamerica.com
800-621-9419 RR-55J
Printed 2001.6
Ask about Rinnai’s other fine products:
The Energy Savers
!Direct Vent Heating with style and performance
!whisper quiet
!available with multi-step set back thermostats
The Infra-reds
!Vent free radiant heaters
!99.9% efficient
!Heat like the sun
Portable Cooking Products
!One, two and two burner with broiler models.
!Perfect for camping, a picnic or a tailgate party.
The Silent Servant
!North America’s only vent-free convection heater
!99% efficient
!whisper quiet
!perfect for hard to heat areas
!Endless hot water for the whole house
!Digital Temperature Selection
Table of contents
Other Rinnai Rice Cooker manuals
Popular Rice Cooker manuals by other brands

Hamilton Beach
Hamilton Beach Digital Simplicity user manual

Aardee
Aardee AARC-1885DX user guide

Fortress Technologies
Fortress Technologies FRC0413 user manual

Panasonic
Panasonic SR-W18NA operating manual

Aroma Professional
Aroma Professional ARC-1000 instruction manual

ByOrient
ByOrient DELUXE BO-3055 manual

Sencor
Sencor SRM 0601BK Translation of the original manual

Midea
Midea MB-RS4080LS instruction manual

Black & Decker
Black & Decker RC5428C Use and care book

Morphy Richards
Morphy Richards SupremePrecision Skillet owner's manual

Panasonic
Panasonic SR-W22GS operating instructions

APURO
APURO J300-A instruction manual