RISCHE + HERFURTH POLYSTAR 120 GE User manual
120 GE
- Translation of the original instruction manual -
Last revised 04/2014
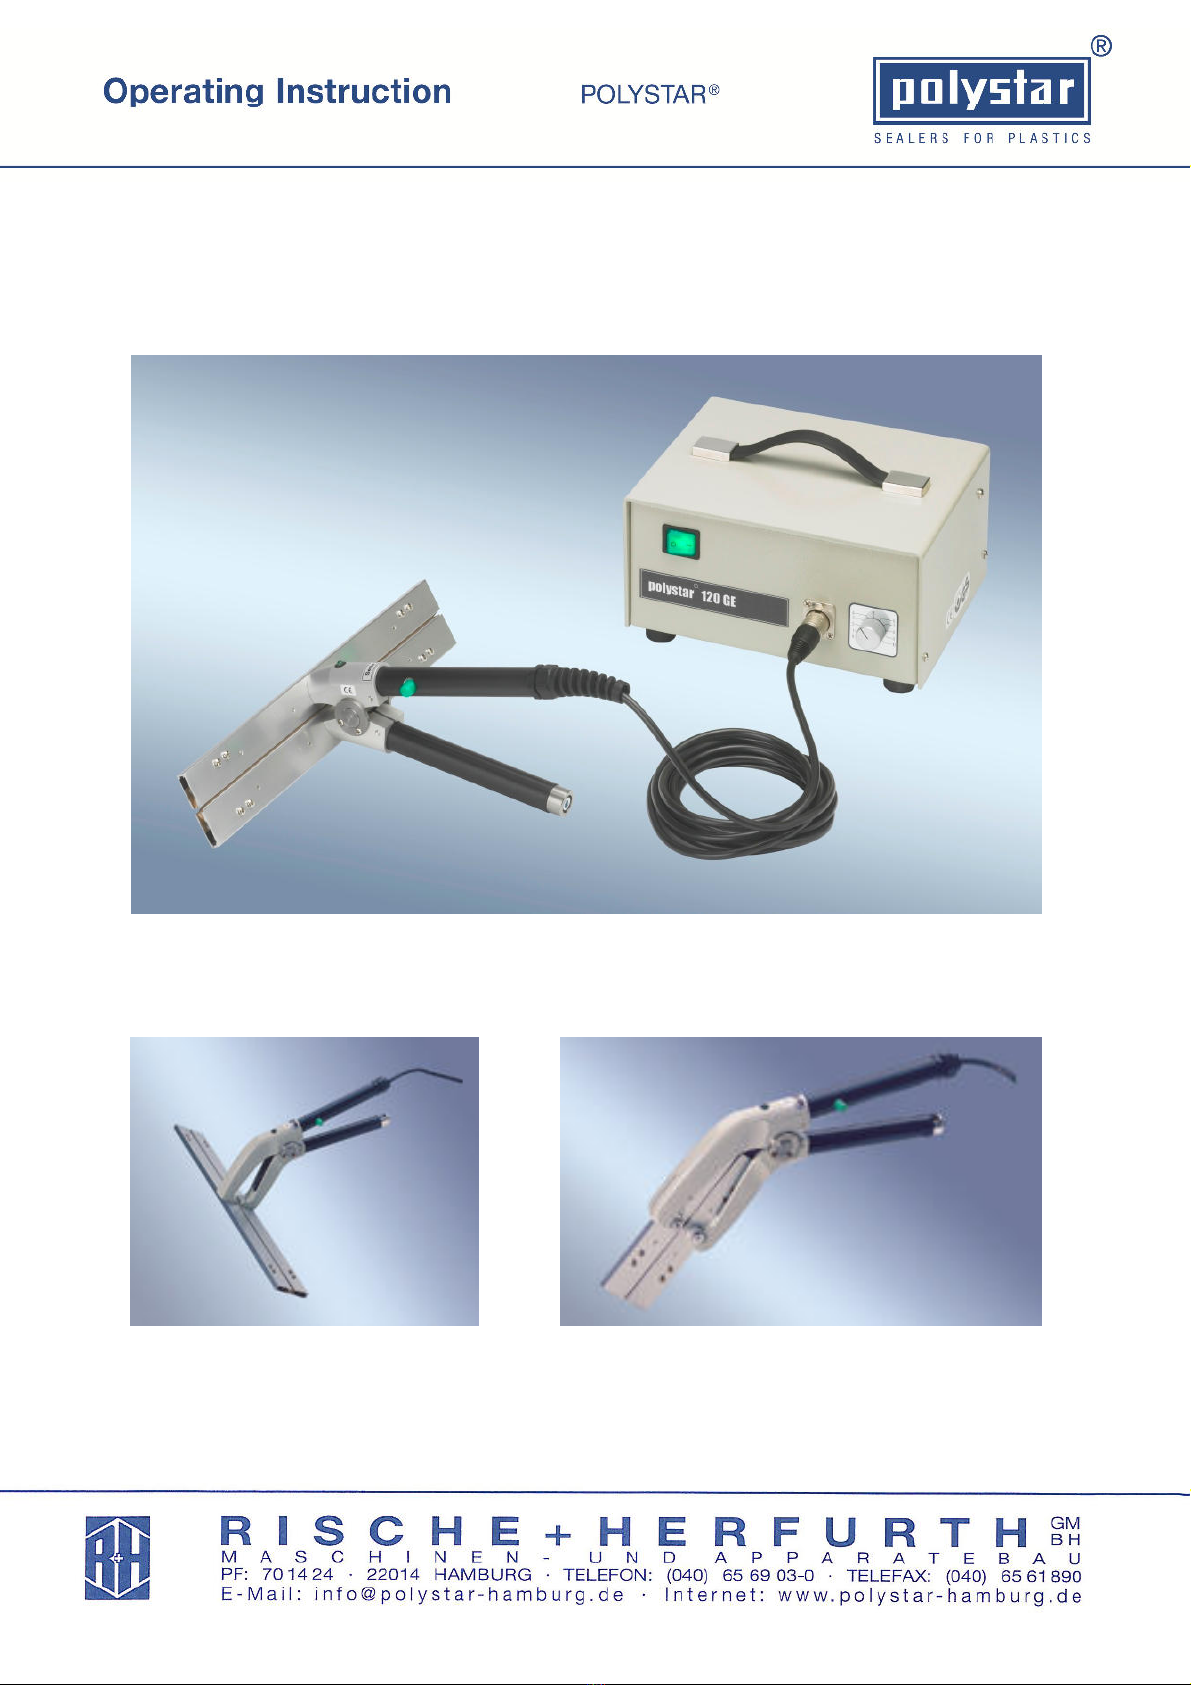
polystar® impulse generator 120 GE with model 300 D welding tongs
polystar® model SFZ welding tongs polystar® model DS welding tongs

120
GE
- Translation of the original instruction manual -
Page 2 of 15
Table of contents
1. Figures ......................................................................................................................3
1.1. Important safety instructions .....................................................................................4
1.2. Correct use ...............................................................................................................5
2. General information...................................................................................................5
2.1. Data for the polystar® impulse generator..................................................................5
2.2. Use............................................................................................................................6
2.3. Start-up and operation ..............................................................................................6
2.3.1. Practical tips..............................................................................................................7
2.3.2. Replacing the polystar® welding tongs .....................................................................7
2.3.3. Adjustable contact pressure of the polystar® welding tongs .....................................7
3. Fault detection and troubleshooting ..........................................................................8
4. Maintenance .............................................................................................................8
4.1. Replacing the heater elements..................................................................................9
5. Emissions................................................................................................................10
6. Transport.................................................................................................................10
7. Disposal ..................................................................................................................10
7.1. ... in Germany..........................................................................................................10
7.2. ... in other EU countries...........................................................................................10
8. Spare parts list ........................................................................................................11
9. Key..........................................................................................................................13
10. Circuit diagram........................................................................................................14
11. EC Declaration of Conformity..................................................................................15
120
GE
- Translation of the original instruction manual -
Page 3 of 15
3
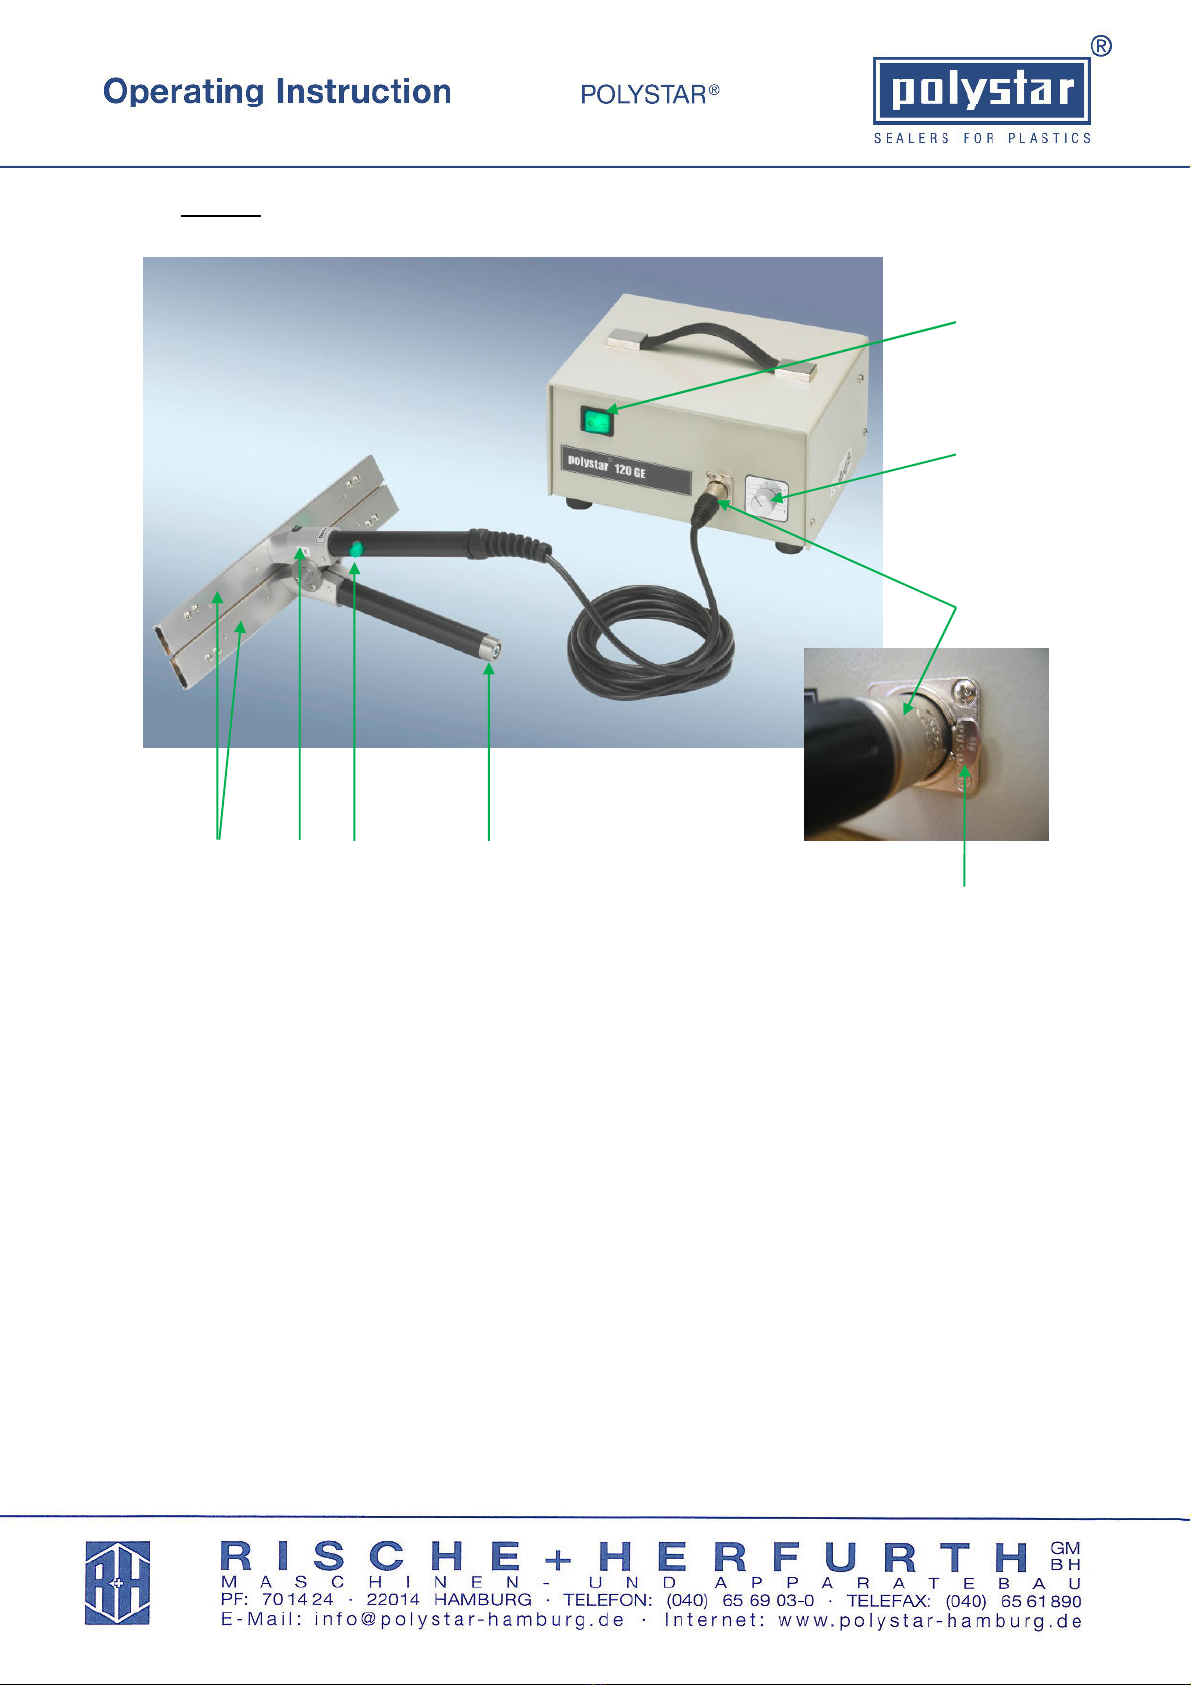
1. Figures
1
Rocker switch, green (On/Off switch)
2
Metal knob (setting for the length of the thermal impulse)
3
Connector for welding tongs
3 a
Locking key for output socket
4
Adjusting device for contact pressure
5
Green push-button (triggers the thermal impulse)
6
Green LED (shows the thermal impulse)
7
Strip-heater carrier with heater elements
7
6
5
3 a
2
1
4

120
GE
- Translation of the original instruction manual -
Page 4 of 15
2. Important safety instructions
•Read the operating instructions carefully before starting work with the polystar® impulse
generator.
•Pay attention to the safety instructions.
•Make sure that the mains voltage is the same as the device voltage before connecting the
polystar® impulse generator.
•The device voltage can be found on the rating plate on the rear of the device.
•Do not reach in between the strip-heater carrier (jaw).
•Do not place the mains plug in water or any other liquids.
•Do not bend the mains lead or place this on hot surfaces.
•Following intense use of the impulse generator certain surfaces, particularly the strip-heater
carrier, may be hot as a result of the process. This also holds true after the impulse generator
has been switched off.
•Do not leave the polystar® impulse generator unattended when switched on.
•Switch the polystar® impulse generator off during longer interruptions to use.
•Do not place any combustible items on the polystar® impulse generator or welding tongs.
•Repairs may only be carried out by qualified personnel.
•All warranty claims and the product liability will be forfeited with an incorrect use of the device.
•Disconnect the mains plug before all maintenance, repair or cleaning work.
•The mains plug is a mains isolating link and must be able to be checked directly by the
operating personnel during work on and with the impulse generator. Ensure unhindered access
at all times.
•Non-ionising radiation is not specifically generated but is only emitted technically by the
electrical equipment (e.g. by transformers). Furthermore, the device has no strong permanent
magnets. If you observe a safety gap of 30 cm (distance between the field source and implant)
any negative effects on active implants (e.g. pacemaker, defibrillators) can very likely be ruled
out.
•The polystar® impulse generator is not explosion-proof and does not fall under any IP
protection class.

120
GE
- Translation of the original instruction manual -
Page 5 of 15
3. Correct use
This product is a piece of technical equipment. It may only be used at work.
Only ever use films (packaging) that do not release any hazardous emission during sealing.
Only ever use films (packaging) that do not react critically with the sealed products.
Only ever use the polystar® impulse generator in dry areas.
Do not use in wet, dusty or potentially explosive areas.
The polystar® impulse generator is only suitable for sealing thermoplastic films or other PE-
coated materials.
Only ever trigger thermal impulses when the film to be sealed is on/between the heater
element(s).
Do not place any other materials or objects between the heater elements.
Use only a damp cloth or air jet cleaner to clean the outside of the polystar® impulse
generator.
4. General information
This portable film sealer consists of the polystar® impulse generator 120 GE and welding tongs.
This film sealer works according to the thermal impulse principle and is ready for immediate use
without heating up.
Each welding tongs is equipped with two strip-heater carriers (jaws) that contain the heater
elements.
4.1. Data for the polystar® impulse generator
Description:
polystar®
impulse generator 120 GE
Manufacturer: RISCHE + HERFURTH GMBH, Hamburg
Power supply: 230 V / 50 Hz
Current drain: approx. 1.9 A / 3.7 A
Current consumption: approx. 430 W / 860 W
Welding tongs: Working width 150 - 300 mm: 21 V
Working width 400 - 600 mm: 42 V
Impulse generator dimensions: approx. 246 x 195 x 135 mm Weight: approx. 6.8 kg
Welding tongs dimensions: approx. 160, 210, 310, 410, 610 x 200 x
65 mm
Weight: approx. 0.7 –
1 kg

120
GE
- Translation of the original instruction manual -
Page 6 of 15
4.2. Use
This polystar® impulse generator 120 GE in combination with the polystar® welding tongs can be
used to safely seal all standard thermoplastic films (e.g. polyethylene) as well as composite films in
a tube and bag shape.
Max. PE film thickness: 2 x 0.30 mm
Seal width: 3 mm
Seal length (depending on tongs): 150 mm
200 mm
300 mm
400 mm
600 mm
4.3. Start-up and operation
Position the polystar® impulse generator with the welding tongs so as to allow ergonomic
working. Furthermore, the stability of the impulse generator must be guaranteed at all times.
Plug the connector for the welding tongs into the output socket on the front of the impulse
generator. The connector must be heard to lock into place.
Plug the impulse generator's mains plug into the wall socket.
Switch the rocker switch (green) on the front of the device on.
Turn the metal knob to position "1" on the scale. The sealing time is infinitely variable.
Take the welding tongs in your hand. Press the handles together to open the strip-heater carrier.
Place the film to be sealed between the strip-heater carriers (jaws) and close the tongs. To trigger
the sealing impulse, press the green push button on the upper handle of the welding tongs with
your thumb. The green LED comes on. Keep the push button pressed until the green LED goes
out.
The sealing impulse ends when the green LED goes out. The cooling phase begins immediately
after this, during which the film material must be left to cool down under pressure. The welding
tongs should not be opened beforehand.
The cooling phase should be counted in seconds by the user and should be at least 3 seconds.
The sealing process is completed at the end of the cooling phase.
Now open the welding tongs and remove the sealed film material.
If no satisfactory result is found when checking the seam, turn the metal knob for the sealing time
one setting higher. You may have to repeat the procedure several times.
Note: in order to achieve a good seam, do not set the sealing time higher than is
necessary. Even though a higher setting can also produce good results it places too
much load on the heater element. This in turns leads to premature wear.

120
GE
- Translation of the original instruction manual -
Page 7 of 15
4.3.1. Practical tips
Reduce the thermal impulse for more than ten consecutive seals (continuous operation). This
reduces the residual heat that accumulates in the heater elements and minimizes wear.
Use films with the specified sealing seam length wherever possible. If narrower films are used,
perform the sealing on alternate sides (right, left, center). This spreads the load over the heater
elements.
You can prolong the service life of the heater elements by lightly lubricating the Teflon coating at
regular intervals. Our polystar® silicone paste is available under the order no. 111 300.
Note:
If the device is used regularly the Teflon coating should be lubricated once a week in the evenings
so that the silicone paste can soak in over night. A thin film of silicone is sufficient.
4.3.2. Replacing the polystar® welding tongs
The three-pole connector is secured in the output socket by a catch. This lock has to be released
on the right side of the output socket when replacing the welding tongs. Press the locking key in
and pull the connector out of the impulse generator at the same time.
4.3.3. Adjustable contact pressure of the polystar® welding tongs
The contact pressure of polystar® welding tongs can be adjusted to different film thicknesses and
materials. A corresponding adjustment device has been integrated in the lower handle of the tongs.
You can easily adjust the contact pressure to your individual requirements with a size 5 Allan key.
Turn to the right to increase the contact pressure and to the left to reduce this.
The contact pressure has been set to an average film thickness in the factory. An optimum contact
pressure alongside the correct sealing and cooling times is absolutely necessary in order to
achieve a good seam. Changing the contact pressure always affects the quality of the seam.
120
GE
- Translation of the original instruction manual -
Page 8 of 15
5. Fault detection and troubleshooting
In case you do not press the green button enough in accordance with the pre-selected
Heat impulse, you will hear an acoustic error signal. Please check and repeat the welding process.
Unplug the device from the mains before opening!
If the polystar® film sealer no longer seals bags, check the mains socket.
A qualified person should also check the fine-wire fuse in the power outlet. The housing does not
have to be opened for this.
Damage to the Teflon coating (holes, dark discolorations) is a sign that the strip-heater has burnt
out. Change the heater elements if this is the case (see assembly instructions on page 9)
Please note that wear parts (heater element, strip-heater, Teflon tape) are excluded from the
warranty.
All other faults have to be located and remedied in a service center. You can also send us the
polystar® impulse generator together with the welding tongs for repair.
6. Maintenance
Heater elements may only be replaced by qualified persons. Observe the following assembly
instructions to the word.
We use Teflon tape for the heater elements on account of its high temperature stability. It also
stops the film from sticking.
If the strip-heater has burnt out, the complete heater element has to be replaced.

120
GE
- Translation of the original instruction manual -
Page 9 of 15
6.1. Replacing the heater elements
You will need the following tools to replace the heater elements:
flat nose pliers, Philips screwdriver, slotted screwdriver.
Step 1:
Loosen the four Philips screws
on the strip-heater carrier (jaw)
screen.
Step 2:
Remove the strip-heater carrier
screen.
Step 3:
Loosen the outer screws of the
terminal plug and pull out the
ends of the strip-heater.
Step 4:
Take a new heater element.
Thread the end of the strip-
heater through the terminal
plug.
Step 5:
Tension the terminal plug by
pressing it against the strip-
heater tension spring. Tighten
the screw of the terminal plug.
Step 6:
Repeat the procedure for the
other end of the strip-heater.
Then pull the end of the strip-
heater through the terminal
plug with the flat nose pliers
and pull tight.
Step 7:
Bend over the protruding ends
of the strip-heater so that they
do not make contact with any
metal (accidental ground!).
Pay attention to the proper fit of
the terminal plugs (tensioned)!
Step 8:
Then retighten the strip-heater
carrier screen.
Repeat this procedure with the
other strip-heater carrier if
necessary.
Note: The terminal plugs must exert a slight tension on the strip-heater to compensate the
elongation of the strip-heater through the thermal impulse.
120
GE
- Translation of the original instruction manual -
Page 10 of 15
7. Emissions
polystar® film sealers are almost silent when in operation. The workplace noise is below
70 dB(A).
Gases and vapors, e.g. sealing fumes, are not produced if the device is operated correctly and
when sealing thermoplastic films and PE-coated composite films.
8. Transport
The polystar® impulse generator 120 GE should be transported by the handles provided for this
purpose.
The polystar® welding tongs can be transported by their handles.
9. Disposal
9.1. ... in Germany
In accordance with the German Electrical and Electronic Equipment Act (ElektroG),
all used electrical and electronic equipment that is put on the market has to be
disposed of correctly. The device can be disposed of at the local waste recycling
center.
WEEE Reg.No.: DE 48588228 (ElektroG)
In accordance with the German Packaging Ordinance (5th amendment of the
VerpackV), the transport packaging is licensed by our company in Germany. Please
dispose of the delivered packaging correctly in the corresponding resource recovery
cycles.
9.2. ... in other EU countries
Please observe the laws and regulations applicable in your country.
120
GE
- Translation of the original instruction manual -
Page 11 of 15
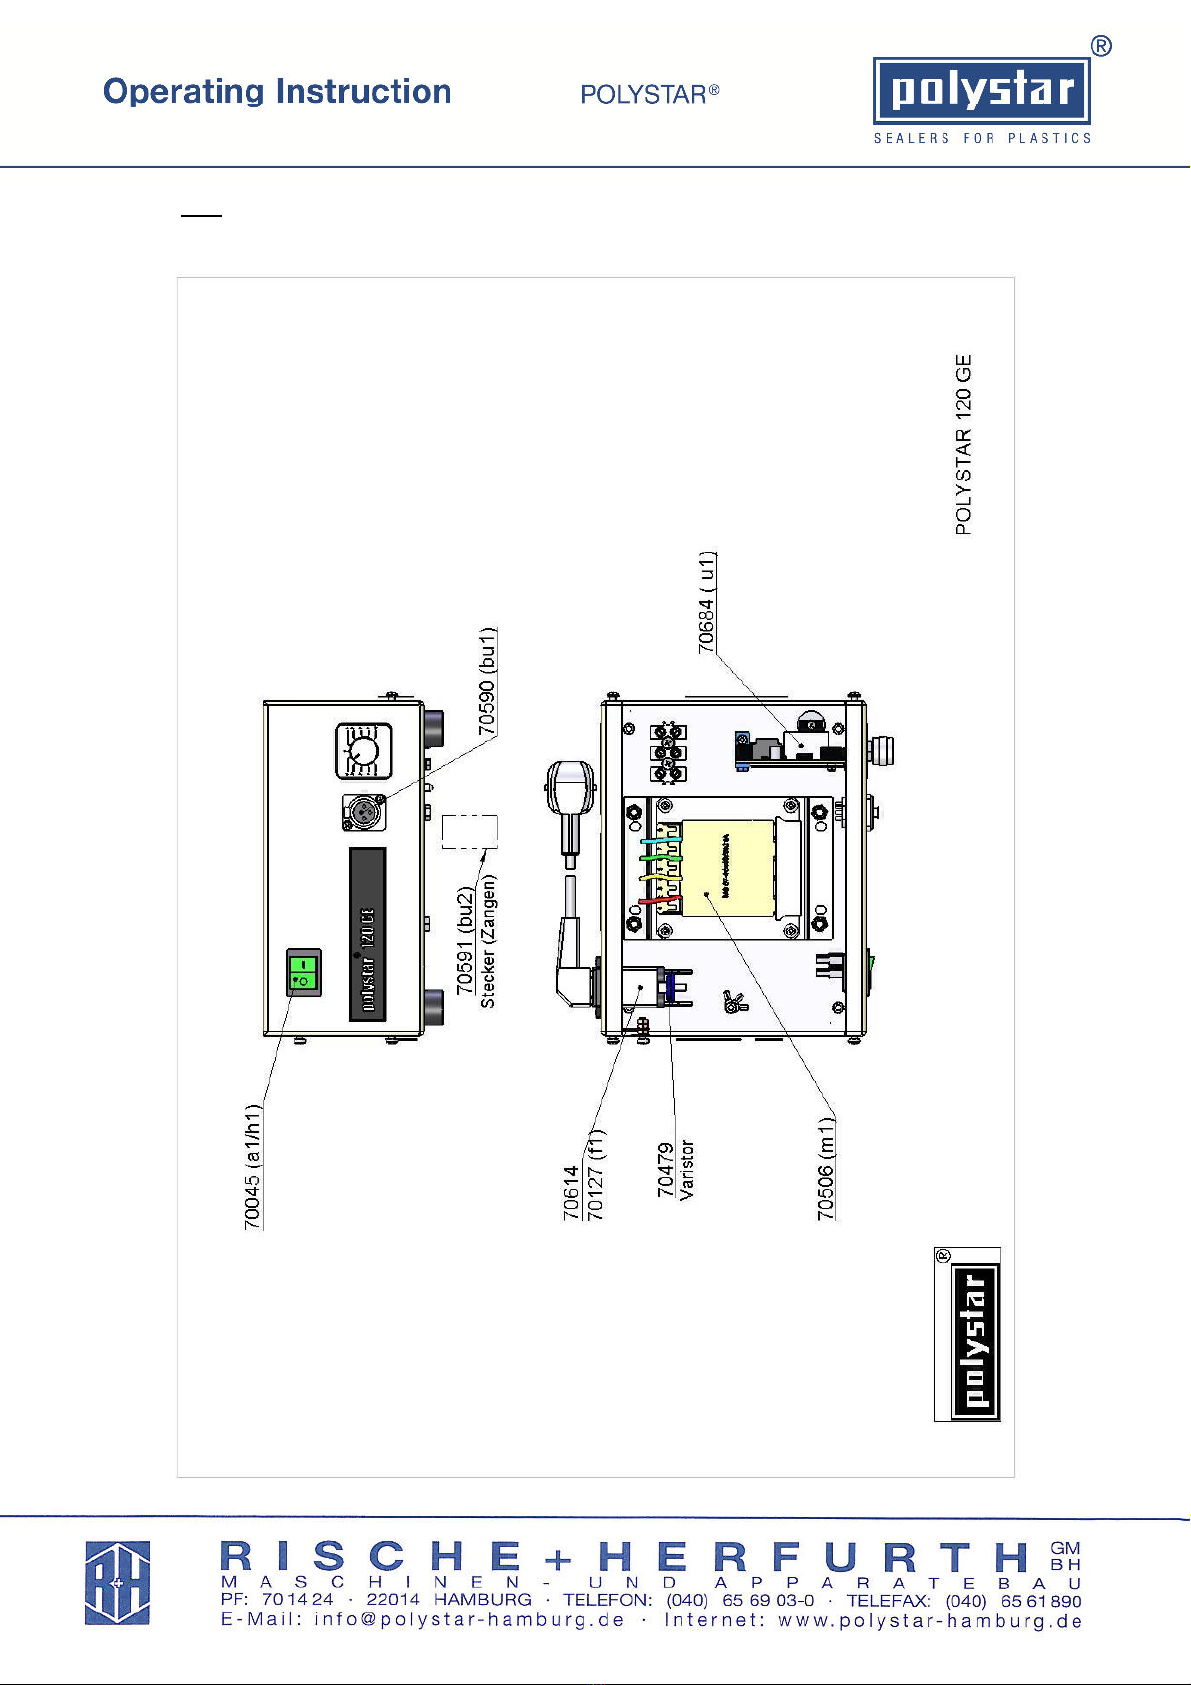
10. Spare parts list
polystar® impulse generator 120 GE
Order number Item
20365 A Chassis
20366B Hood
70614 Power outlet, with interference filter and fuse
70127 Fuse 6.3A/250V/5x20, semi time-lag
(f1)
70566 PE insulating bush
70567 Flat plug bush
70568 Flat plug
70651 Fitted power outlet mains lead, straight
70692 Adjusting knob with cap and nut cap
70021 Cable lug
70031 Rubber foot 25 ∅, 14 high
70045 Rocker switch with lamp, green,
(a1/h1)
70684 Control circuit board RM
(u1)
70590 Socket, 3-pole
(bu1)
70479 Varistor
70694 Insulating sleeve, black
70506 Transformer 5621A
(m1)
70621 Handle with caps
70658 Terminal plug, 2-pole
70698 Terminal plug, 4-pole
polystar® welding tongs 150 - 600 D, 300 - 600 SFZ, 150 + 300 DS
Order number Item
60100 Cheese-head screw M 2.5 x 6 DIN 84 (for terminal plug)
60117 Oval head screw M 3 x 8 DIN 7985 (for carrier/collar)
60161 Oval head screw M 3 x 6 DIN 7985 (for tension spring)
70023 Pressure contact DK 40/41 A complete
70591 Connector, 3-pole
(bu2)
70025 Cable, black, 2 x 1
70026 LED, green, HP 5082/4850
70028 Insulating paper disk
70122 Resistor 750 Ohm, 1/3 w
70535 Clip for green LED

120
GE
- Translation of the original instruction manual -
Page 12 of 15
Order number Item
H33192 Strip-heater carrier 150 D + DS
H33192A Strip-heater carrier 200 D
H33192B Strip-heater carrier 250 DS
H33192C Strip-heater carrier 300 D
H33192D Strip-heater carrier 400 D
H33192G Strip-heater carrier 600 D
H33193 Strip-heater carrier screen 150 D + DS
H33193A Strip-heater carrier screen 200 D
H33193B Strip-heater carrier screen 250 DS
H33193C Strip-heater carrier screen 300 D
H33193D Strip-heater carrier screen 400 D
H33193G Strip-heater carrier screen 600 D
H33294A Strip-heater carrier complete, 150 D + 150 DS
H33294B
Strip-heater carrier complete, 200 D
H33294C
Strip-heater carrier complete, 250 DS
H33294D
Strip-heater carrier complete, 300 D + 300 SFZ
H33294E
Strip-heater carrier complete, 400 D + 400 SFZ
H33294F
Strip-heater carrier complete, 600 D + 600 SFZ
H41043A Tube handle top
H41044 Tube handle bottom
H46881 Insulating bush 4-6881
H46882 Terminal plug, brass, 4-6882
H46883 Insulating plate to drawing, 4-6883
H46884 Strip-heater tension spring 4-6884
H47049-15 Heater element 150 D + DS
H47049-20 Heater element 200 D
H47049-25 Heater element 250 DS
H47049-30 Heater element 300 D + SFZ
H47049-40 Heater element 400 D + SFZ
40097-60 Heater element 600 D + SFZ
H51117A Drive screw, to drawing, 5-1117A
H51118 Arbor, to drawing, 5-1118
H51132 Green deco knob, for push-button switch
H51119B Bearing washer, to drawing, 5-1119B
41149 Tension spring, to drawing , R 4-1149
41150 Clamp bolt, to drawing, R 4-1150
41151 Spring washer, to drawing, R 4-1151
120
GE
- Translation of the original instruction manual -
Page 13 of 15
11. Key

120
GE
- Translation of the original instruction manual -
Page 14 of 15
12. Circuit diagram

120
GE
- Translation of the original instruction manual -
Page 15 of 15
13. EC Declaration of Conformity
The manufacturer RISCHE + HERFURTH GMBH
Kedenburgstraße 53 - 59
22041 Hamburg
herewith certifies that the following product
polystar® film sealer model:
polystar® impulse generator 120 GE
complies with all pertinent provisions of the directive on machinery (2006/42/EC) and the
directive relating to electrical equipment designed for use within certain voltage limits
(2006/95/EC) as well as relevant amending directives (CE labeling).
The product was also subjected to an occupational safety test (GS test) by the following testing
authority:
Test certificate no. NV 13057
Deutsche Gesetzliche Unfallversicherung e.V.
Prüf- und Zertifizierungsstelle
Nahrungsmittel und Verpackung
Fachbereich Nahrungsmittel
Dynamostraße 7 - 11
68165 Mannheim
Person responsible for the documentation: Adalbert Grablowski, tel.: 040-65 69 03-83
Hamburg, 24 April 2013
ppa. Jürgen Symanzik ppa. Gaby Aldag
Table of contents


