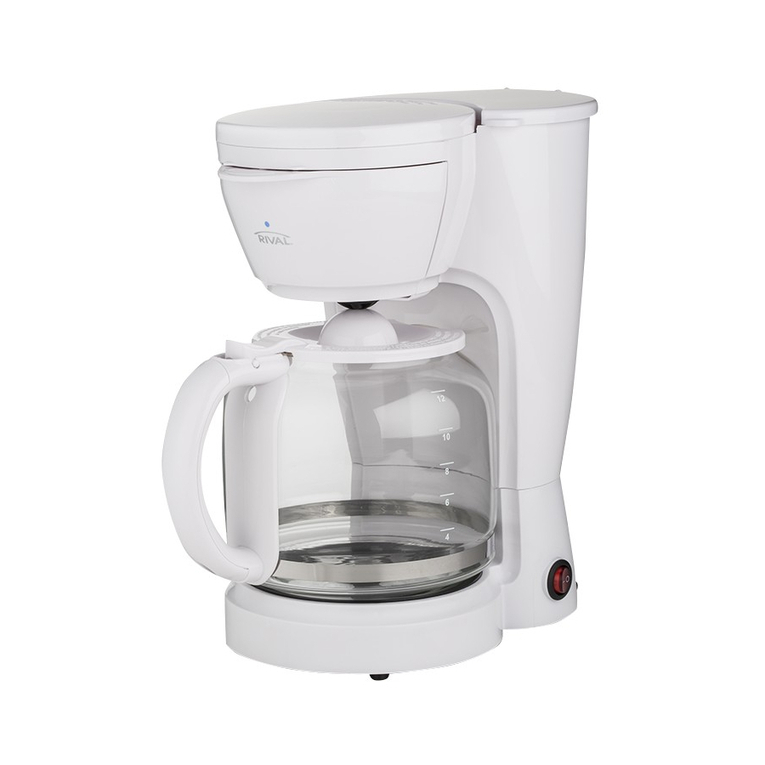
Rival PIL-HC08104 User manual

Client: Rival (PIL)
Project: PIL-HC08104
Language: EN - ES
Date: 04.05.2009
Version: 3
Page: 1 (of 13 pages)
Barcode:
Rival
Cafetera para 12 tazas
Model: PIL-HC08104
READ THE MANUAL BEFORE USE AND SAVE FOR THE FUTURE REFERENCE
LEA EL MANUAL ANTES DE SU USO Y GUÁRDELO PARA SU REFERENCIA FUTURA
HOUSEHOLD USE ONLY
SOLO PARA USO DOMÉSTICO
R

Client: Rival (PIL)
Project: PIL-HC08104
Language: EN - ES
Date: 04.05.2009
Version: 1
Page: 2 (of 13 pages)
Barcode:
1. IMPORTANT SAFEGUARDS
When using electrical appliances, basic safety precautions should always be followed to
prevent the risk of electric shock, burns, or other injuries or damages.
•Read all instructions before use.
•Do not touch hot surfaces. Use handles or knobs.
•To protect against electrical shock and injury to persons do not immerse cord,
plugs, or the appliance in water or other liquids.
•Close supervision is necessary when any appliance is used by or near children.
•Unplug from outlet when not in use and before cleaning. Allow it to cool before
putting on or taking parts and before cleaning the appliance.
•Do not operate appliance with a damaged cord or plug, or after the appliance
malfunctions or has been dropped or damaged in any manner.
•The use of accessory attachments not recommended by the appliance manufacturer
may result in electric shock or injuries to persons.
•Do not use outdoors or in a damp area.
•Do not let cord hang over edge of table or counter, or touch hot surfaces.
•Do not place on or near a hot gas or electric burner, or in a heated oven.
•To disconnect the appliance, turn any control to then remove plug from wall
outlet.
•Do not use this appliance for anything other than its intended use.
•This appliance is for HOUSEHOLD USE ONLY.
•Do not touch the warmingplate (12) when the maker is on.
•This carafe is designed for use with your Rival Rmaker and therefore must
never be used on a range-top or in any oven, including microwave ovens.
•Never leave the empty carafe (7) on the warming plate (12) when the maker is
on. Otherwise the carafe (7) is liable to crack.
•Do not set a hot carafe on a wet or a cold surface.
•Do not use a cracked carafe or a carafe having a loose or weakened handle.
•Do not clean carafe with cleansers, steel wool pads, or other abrasive material.
•To reduce the risk of or electric shock, do not remove the warning cover on the
appliance. No user serviceable parts inside.
•WARNING: To reduce the Risk of Fire or Electric Shock, Do Not Remove The Bottom
Cover. No User Serviceable Parts Inside. Repair Should Be Done By Authorized Service
Personnel Only.
•WARNING: Hot Steam.
CAUTION: To reduce the risk of scalding, do not open lid when is brewing.
CAUTION: Risk of injury- Replace the carafe within 30 seconds while brewing.
SAVE THE INSTRUCTIONS!
2

Client: Rival (PIL)
Project: PIL-HC08104
Language: EN - ES
Date: 04.05.2009
Version: 1
Page: 3 (of 13 pages)
Barcode:
2. ADDITIONAL SAFEGUARDS
DO NOT OPERATE APPLIANCE IF THE LINE CORD SHOWS ANY DAMAGE OR IF
APPLIANCE WORKS INTERMITTENTLY OR STOPSWORKING ENTIRELY.
•EXTENSION CORDS
A short power-supply cord is to be provided to reduce the risk resulting from
becoming entangled in or tripping over a longer cord. Longer detachable power-
supply cords or extension cords are available and may be used if care is exercised in
their use. If a longer detachable power-supply cord or extension cord is used,
1) The marked electrical rating of the cord set or extension cord should be at
least as great as the electrical rating of the appliance, and
2) The longer cord should be arranged so that it will not drape over the
countertop or tabletop where it can be tripped over, snagged, or pulled on
unintentionally (especially by children).
•POLARIZED PLUG
This appliance has a polarized plug (oneblade is wider than the other). To reduce
the risk of electric shock, this plug is intended to into a polarized outlet only one
way. If plug does not fully into the outlet, reverse the plug. If it still does not
contact a electrician. Do not attempt to modify the plug in any way.
3. PARTS
3
1. Water tank lid
2. Water tank
3. Water level indicator
4. Housing
5. Filter basket
6. Drip stop valve
7. Carafe
8. Carafe handle
9. Carafe lid
10. Switch
11. Shower head
12. Warming plate
1
2
3
4
12
10
7
8
9
5
11
6

Client: Rival (PIL)
Project: PIL-HC08104
Language: EN - ES
Date: 04.05.2009
Version: 1
Page: 4 (of 13 pages)
Barcode:
4. OPERATION
Before rst use
• Remove packaging materials, labels and stickers from coee maker.
• Clean coee maker thoroughly before using for the rst time (Cleaning).
NOTE: To clear the coee maker of any residues ll it to the maximum level mark
with fresh water. Boil and empty the coee maker at least 2 times.
Using the coee maker
The coee maker is only for brewing coee.
• Hold on the removable lter basket (5) and slip out the housing.
• Place 12 cup U- type paper lter into the lter basket (5).
• Add the desired amount of the ground coee to the lter basket (5). (suggested each
cup of coee use 1 to 1.5 level measuring spoon, depending on taste).
4

Client: Rival (PIL)
Project: PIL-HC08104
Language: EN - ES
Date: 04.05.2009
Version: 1
Page: 5 (of 13 pages)
Barcode:
4. OPERATION
• Hold the lter basket (5) and align the mark , then slip into the housing. (please make
sure it is closed securely).
• Open the tank’s lid (1).
• Fill carafe (7) with desired amount of water (check the water level indicator (3) on
coee maker). Pour water into the water tank (2).
• Replace carafe (7) on warming plate (12).
• Insert power plug into a standard 120 V AC wall outlet.
• Turn on the switch (10) and it will light. The brewing begins.
• When the coee stops owing, the brewing cycle is complete.
5

Client: Rival (PIL)
Project: PIL-HC08104
Language: EN - ES
Date: 04.05.2009
Version: 1
Page: 6 (of 13 pages)
Barcode:
4. OPERATION
Note: Never leave the empty carafe (7) on the warming plate (12) when the
coee maker is on. Otherwise the carafe (7) is liable to crack.
• When you are nished with the coee turn the switch o and unplug the unit.
(The light on the switch will go o when the unit is turned o).
NOTE: To interrupt brewing, press (10) once more, and the lights turn o.
CAUTION: Do not touch the warming plate! Risk of burn injury.
CAUTION: To reduce the risk of the scalding, do not open lid when coee is brewing!
CAUTION: Hot steam on the lid, do not touch the lid during brewing.
CAUTION: After the brew cycle is complete, wait a minimum of 5 minutes before
taking out the lter basket(5). Steam builds up under the shower head (11),
there is a risk of injury from hot steam.
Extra features
• The drip stop valve (6) function allows you to remove carafe (7) during the brewing
cycle to serve a cup of coee (replace carafe (7) within 30 seconds).
• Cord storage for easy storing of the power cord if coee maker is not in use for long
time.
6

Client: Rival (PIL)
Project: PIL-HC08104
Language: EN - ES
Date: 04.05.2009
Version: 1
Page: 7 (of 13 pages)
Barcode:
5. CLEANING
Proper maintenance will ensure years of service of your appliance. Clean the appliance
after every use. This appliance contains no user serviceable parts and requires little
maintenance. Leave servicing or repairs to personnel.
WARNING:
•Unplug the appliance and allow to cool before cleaning.
CAUTION:
•Do not immerse the maker or the power cord with plug into water or any
liquids.
•Clean the housing and warming plate(12) with a clean, damp cloth.
CAUTION:
•Remove the carafe (7), paper and the basket (3) from the maker.
CAUTION:
•The carafe (7) is dishwasher-safe. Wash carafe (7), carafe lid (9) and basket (3) in
hot, soapy water. Rinse and dry.
•Use baking soda or mild cleaning agent to remove stains on the carafe (7). If stains
are hard to remove, carafe (7) with hot water and add 2 tablespoons of dishwasher
detergent. Wash and rinse after leaving water with detergent in carafe (7) overnight.
•Ensure all parts are completely dry after washing and before use.
NOTE:
•Do not dry inside of water tank (2) with a cloth, as lint may remain.
•After cleaning, reassemble maker.
6. WARRANTY SERVICE
•The unit has a one year limited warranty.
•If any parts are missing or defective under this warranty, please contact the Customer
Service Department of
866-321-9509 your nearest Wal-Mart store for
replacement
with
your
receipt.
•The warranty is valid only in the country of purchase and if you follow the warranty
claim procedure as noted.
Rival® and Rival® logo are registered trademarks of Sunbeam Products, Inc. used under
license by Wal-Mart stores, Inc. Bentonville, AR 72716.
7

Client: Rival (PIL)
Project: PIL-HC08104
Language: EN - ES
Date: 04.05.2009
Version: 1
Page: 8 (of 13 pages)
Barcode:
1. INSTRUCCIONES DE SEGURIDAD
IMPORTANTES
Al usar aparatos eléctricos, siempre deben tomarse precauciones básicas de seguridad para
evitar el riesgo de incendio, choque eléctrico, quemaduras u otras lesiones o daños.
• Lea todas las instrucciones antes de su uso.
• No toque el plato calentador (12) cuando la cafetera esté funcionando.
• Para evitar fuegos, choques eléctricos y lesiones personales no sumerja el cable, los
enchufes o el aparato en agua u otros líquidos.
• Cuando el aparato está siendo usado por niños, debe ejercerse una supervisión cercana.
• Desconecte de la toma de corriente cuando no esté en uso y antes de limpiarlo.
Déjelo secar antes de armar o desarmar partes y antes de limpiar el aparato.
• No use aparatos con el cable o el enchufe dañados, o después de que el aparato
presente disfunciones o se haya caído o dañado de cualquier forma.
• El uso de accesorios no recomendados por el fabricante del aparato puede provocar
fuegos, choques eléctricos o lesiones personales.
• No lo use en exteriores ni en áreas húmedas.
• Nodejequeelcablecuelguedelbordedelamesaolaencimera,otoquesuperficiescalientes.
• No lo coloque sobre o cerca de gas caliente o quemadores eléctricos, ni sobre un
horno caliente.
• Para desconectar el aparato, gire todos los controles hasta“o”, entonces extraiga el
enchufe de la toma de corriente.
• No use este aparato para ningún otro n que aquél para el que fue diseñado.
• Este aparato es EXCLUSIVAMENTE PARA USO DOMÉSTICO.
• No toque la placa de conservación de calor (12) cuando la cafetera está activada.
• Esta jarra está diseñada para usarse con su cafetera Rival® y, por lo tanto, no debe
usarse nunca en fogones u hornos, incluyendo hornos microondas.
• No deje nunca la jarra vacía (7) sobre el plato calentador (12) cuando la cafetera esté
activada. En caso contrario, la jarra (7) podría romperse.
• No coloque una jarra caliente sobre una supercie húmeda o fría.
• No use una jarra agrietada ni una jarra con el asa suelta o debilitada.
• No limpie la jarra con limpiadores, estropajos ni otros utensilios abrasivos.
• Para reducir el riesgo de incendio o choque eléctrico, no retire la tapa de advertencia
del aparato. No contiene partes reparables por el usuario.
• ADVERTENCIA: Para reducir el riesgo de incendio o choque eléctrico, no retire la
tapa inferior. No contiene partes reparables por el usuario. Las reparaciones deberían
ser realizadas solamente por personal autorizado.
• ADVERTENCIA: Vapor caliente.
PRECAUCIÓN: Para reducir el riesgo de escaldaduras, no abra la tapa cuando el café
está percolando.
PRECAUCIÓN: Riesgo de lesiones- vuelva a colocar la jarra al cabo de 30 segundos
durante el percolado.
¡CONSERVE LAS INSTRUCCIONES!
8

Client: Rival (PIL)
Project: PIL-HC08104
Language: EN - ES
Date: 04.05.2009
Version: 1
Page: 9 (of 13 pages)
Barcode:
2. INSTRUCCIONES DE SEGURIDAD
ADICIONALES
NO USE ELAPARATO SI EL CABLEMUESTRA CUALQUIERTIPO DE DAÑO O SI EL
APARATO FUNCIONA INTERMITENTEMENTE ODEJA DE FUNCIONAR PORCOMPLETO.
•CABLES DE EXTENSIÓN
Se provee un cable eléctrico corto para reducir el riesgo de enredarse o tropezar
con un cable largo. Pueden usarse cables de extensión más largos si se toman las
precauciones necesarias en su uso. Si se usa un cable de extensión,
1) Las características eléctricas del cable o la extensión deben ser iguales o
superiores a las del aparato y
2) El cable largo debe colocarse de forma que no cuelgue de la encimera o la
mesa para evitar que se pueda tropezar, enredarse o tirar de él
accidentalmente (especialmente por niños).
•ENCHUFE POLARIZADO
Este electrodoméstico tiene un enchufe polarizado (una clavija es más ancha que la
otra). Para reducir el riesgo de electroshock, este enchufe está diseñado para entrar
de un solo modo en la toma eléctrica. Si el enchufe no entra totalmente en la toma
de corriente, invierta su posición. Si aún así no entrase, póngase en contacto con un
electricista No intente el enchufe de ninguna manera.
3. PARTES
9
1. Tapa del depósito de agua
2. Depósito de agua
3. Indicador del nivel de agua
4. Armazón
5. Cesta para el
6. Válvula anti-goteo
7. Jarra
8. Asa de la jarra
9. Tapa de la jarra
10. Interruptor
11. Cabezal de goteo
12. Plato calentador
1
2
3
4
12
10
7
8
9
5
11
6

Client: Rival (PIL)
Project: PIL-HC08104
Language: EN - ES
Date: 04.05.2009
Version: 1
Page: 10 (of 13 pages)
Barcode:
4. FUNCIONAMIENTO
Antes del primer uso
• Retire todo el embalaje, etiquetas y pegatinas de la cafetera.
• Limpie a conciencia la cafetera antes de usarla por primera vez (Limpieza).
NOTA: Paralimpiarlacafeteradecualquierresiduo,llénelahastalamarcadenivelmáximo
con agua fresca. Lleve a ebullición y vacíe la cafetera por lo menos 2 veces.
Uso de la cafetera
Utilice esta cafetera solamente para hacer café.
• Sostenga la cesta del ltro extraíble (5) y extráigalo del armazón.
• Coloque un ltro de papel tipo U para 12 tazas en la cesta del ltro (5).
• Añada la cantidad deseada de café molido en la cesta del ltro (5). (se sugiere usar
entre 1 y 1,5 cucharadas de medición por taza de café, a su gusto).
10

Client: Rival (PIL)
Project: PIL-HC08104
Language: EN - ES
Date: 04.05.2009
Version: 1
Page: 11 (of 13 pages)
Barcode:
4. FUNCIONAMIENTO
• Sostenga la cesta del ltro (5) y alinee la marca, entonces deslícela en su cavidad.
(por favor, asegúrese de que esté cerrada de forma segura).
• Abra la tapa del depósito (1).
• Llene la jarra (7) con la cantidad de agua deseada (fíjese en el indicador de nivel de
agua (3) en la cafetera). Vierta agua en el depósito de agua (2).
• Vuelva a colocar la jarra (7) sobre el plato calentador (12).
• Inserte el enchufe en una toma de corriente alterno estándar de 120 V.
• Encienda el interruptor (10) y se iluminará. El proceso de infusión empezará.
• Cuando el café deje de uir, el ciclo de infusión se habrá completado.
11

Client: Rival (PIL)
Project: PIL-HC08104
Language: EN - ES
Date: 04.05.2009
Version: 1
Page: 12 (of 13 pages)
Barcode:
4. FUNCIONAMIENTO
Nota: No deje nunca la jarra vacía (7) sobre el plato de conservación de calor (12)
cuando la cafetera está activada. De lo contrario, la jarra (7) podría romperse
• Cuando haya terminado con el café, apague el interruptor y desconecte la unidad.
(El piloto del interruptor se apagará cuando la unidad se apague)
NOTA: Para interrumpir la infusión, pulse el interruptor (10) de nuevo, y la luz
se apagará.
PRECAUCIÓN: ¡No toque el plato calentador! Riesgo de quemaduras.
PRECAUCIÓN: ¡Para reducir el riesgo de escaldarse, no abra la rapa durante el proceso
de infusión!
PRECAUCIÓN: Hay vapor caliente debajo de la tapa, no toque la tapa durante el
proceso de infusión.
PRECAUCIÓN: Cuandoelciclodeinfusiónhayaterminado, espereunmínimode5 minutos
antes de retirar la cesta del ltro (5). Se forma vapor debajo del cabezal (11),
lo que conlleva un riesgo de lesiones a causa del vapor caliente.
Funciones adicionales
• La función de la válvula anti-goteo (6) le permite retirar la jarra (7) durante el ciclo de
infusión para servir una taza de café (vuelva a colocar la jarra (7) antes de 30 segundos).
• Guarda-cables para un almacenaje fácil del cable eléctrico cuando la cafetera no va
a usarse por un periodo de tiempo prolongado.
12

Client: Rival (PIL)
Project: PIL-HC08104
Language: EN - ES
Date: 04.05.2009
Version: 1
Page: 13 (of 13 pages)
Barcode:
5. LIMPIEZA
Unmantenimientoadecuadoaseguraráañosdefuncionamientodesuaparato.Limpieelaparato
después de cada uso. Este aparato no contiene piezas reparables por el usuario y necesita poco
mantenimiento.Dejeelmantenimientoolasreparacionesparael personal
ADVERTENCIA:
•Desenchufe el aparato y déjelo enfriar completamente antes de limpiarlo.
PRECAUCIÓN:
•No sumerja la cafetera, o el cable de corrientecon el enchufe en agua o en otros líquidos.
•Limpie la carcasa y el plato calentador (12) con un trapo limpio y húmedo.
PRECAUCIÓN:
•No use estropajos abrasivos o alcohol. Retire la jarra de cristal (7), el permanente
y la cesta para el (5) de la cafetera.
PRECAUCIÓN:
•La jarra de cristal (7) se puede limpiar en el lavavajillas. Limpie la jarra (7), la tapa de
la jarra (9) y la cesta del (5) en agua caliente y jabonosa. Enjuague y seque.
•Use bicarbonato o un agente limpiador suave para eliminar las manchas de la jarra
(7). Si las manchas son difíciles de eliminar, llene la jarra (7) con agua caliente y añada
2 cucharadas de detergente lavavajillas. Lave y enjuague después de haber dejado el
agua con detergente en la jarra (7) durante toda la noche.
•Compruebe que todas las piezas están totalmente secas después de lavarlas y antes
de usarlas.
NOTA:
•No seque el interiordel depósito de agua (2) con un paño, ya que puededejar pelusa.
•Después de limpiar, vuelva a montar la cafetera.
6. SERVICIO DE GARANTÍA
•La unidad cuenta con un año de garantía limitada.
•Si alguna parte falta o es defectuosa bajo esta garantía, por favor contacte con
el departamento 866-321-9509 de atención al cliente en su tienda Wal-Mart mas
cercana para sustituirla con su tíquet de compra.
•La garantía solo es válida en el país de compra y debe seguirse el procedimiento de
reclamación de garantía tal como se indica.
Rival® y el logotipo Rival® son marcas registradas de Sunbeam Products Inc. y se usan bajo
licencia por Wal-Mart Stores, Inc. Bentonville, AR 72716
13
Table of contents
Languages:
Other Rival Coffee Maker manuals