Road Xpedition I-8500 User manual

Mini Car Vacuum
Shinn Fu Company of America, Inc. © 2003
10939 N. Pomona Ave.
Kansas City, MO 64153
Phone (816)891-6390, fax (816)891-6599
Model Number
I-8500
4
Printed in China
OIPM#CV-03
CAUTION:Carefully Read Instructions
and Procedures for Safe Operation
Owner’s Manual
90DAYS LIMITED WARRANTY
For a period of ninety (90) days from date of purchase, Shinn Fu Co. of
America, Inc. will repair or replace, at its option, without charge, any of its products
which fails due to a defect in material or workmanship, or which fails to conform to any
implied warranty not excluded hereby.Performance of any obligation under this war-
ranty may be obtained by returning the warranted product, freight prepaid, to Shinn Fu
Co. of America, Inc. Warranty Service Department, 10939 N. Pomona Ave., Kansas
City, MO 64153.
Except where such limitations and exclusions are specifically prohibited by
applicable law, (1) the CONSUMER'S SOLE AND EXCLUSIVE REMEDY SHALL BE
THE REPAIR OR REPLACEMENT OF DEFECTIVE PRODUCTS AS DESCRIBED
ABOVE, and (2) Shinn Fu Co. of America, Inc. SHALL NOT BE LIABLE FOR ANY
CONSEQUENTIAL OR INCIDENTAL DAMAGE OR LOSS WHATSOEVER, and (3) THE
DURATION OF ANY AND ALL EXPRESSED AND IMPLIED WARRANTIES, INCLUDING
WITHOUT LIMITATION, ANY WARRANTIES OF MERCHANTABILITY AND FITNESS FOR
A PARTICULAR PURPOSE, IS LIMITED TO A PERIOD OF NINETY (90) DAYS FROM
DATE OF PURCHASE.
Some states do not allow limitations on how long an implied warranty lasts,
so the above limitation may not apply to you. Some states do not allow the exclusion
or limitation of incidental or consequential damages, so the above limitation or exclu-
sion may not apply to you. This warranty gives you specific legal rights, and you may
also have other rights which vary from state to state.
Cleaning:
1. If needed, hand-wash the dirt container
and filter bracket in warm soapy water.
Use only mild soap and detergents.
Other detergents, cleaners, or solvents
may damage the plastic.
2. After cleaning, put the CLEAN filter on
the filter bracket and place it back to dirt
container in proper position.
3. Place the dirt container back into the
carry handle; let the upper edge of the
dirt container underneath tip of dirt con-
tainer release lever while keeping the
lever wide Open. Let the lever snap into
the upper edge of dirt container prop-
erly first and then swing the lower side
until the whole dirt container locks into
position.
Cleaning the Vacuum Housing:
Clean the vacuum housing with a damp
cloth. Do not use detergents, cleaners, or
solvents.
Note: Never clean the vacuum by immers-
ing the vacuum in water. Make sure that
the filter bag is dry before you operate the
vacuum. The filter bag should be replaced
periodically to provide optimal vacuum
performance, or when the filter bag has
been damaged.
Storage
1. Store vacuum cleaner with attachment
removed.
2. Store vacuum cleaner in nylon storage
case provided.
3
Save these instructions. For your safety,
read, understand, and follow the informa-
tion provided with and on this mini car
vacuum. The owner and operator of this
mini car vacuum shall have an understand-
ing of it and safe operating procedures
before attempting to use. Instructions and
safety information shall be conveyed in the
operator's native language before use of
this product is authorized. If any doubt ex-
ists as to the safe and proper use of this
product, remove from service immediately.
Inspect before each use. Do not use if
broken, cracked, melted, leaking, smok-
ing or otherwise damaged parts are noted.
Any mini car vacuum that appears dam-
aged in any way, or operates abnormally
shall be removed from service immedi-
ately. If the mini car vacuum has been or
suspected to have been dropped or im-
mersed in liquid, immediately discontinue
use until it has been checked by qualified
personnel. Labels and Owner's Manuals
are available from manufacturer.
PRODUCTDESCRIPTION
Road Xpedition mini car vacuum is de-
signed to clean dust and dirt from vehi-
cle’s interior, home, boat and more. It also
comes with different types of attachments
for multiple applications.
Note: No user serviceable parts contained
in the mini car vacuum. Use factory au-
thorized parts only.
Tools
1. Crevice Attachment: This tool works as
a long reach cleaning wand or a crev-
ice tool. Simply attach the crevice At-
tachment to the suction nozzle. The tool
is ready for cleaning hard to reach ar-
eas and tight places.
2. Bristle Attachment: This tool is for brush-
ing and picking up dirt, dust, and de-
bris from upholstery, carpet tables, etc.
HOW TO USE
1. Read, understand and follow all steps
in BEFORE USE section.
2. Plug power cord into a suitable power
point or cigarette lighter receptacle.
3. Slide ON/OFF switch forward to turn on
the vacuum cleaner. Vacuum cleaner
should begin vacuuming.
4. When finished vacuuming, slide ON/
OFF switch backward to turn off the unit.
5. Remove any attachment if used. Un-
plug the power cord from the cigarette
lighter receptacle.
2
CAREANDMAINTENANCE
Important: Proper use and care of your
vacuum will extend the life of the vacuum
and its accessories. Thoroughly cleaning
the filter after each use will improve per-
formance. Mold or mildew may form in the
dirt container, filter bracket, or filter if they
are not properly cleaned.
EmptyingDirt Container:
1. Holding the dirt container with one
hand and the carry handle with the other
hand, continuously press the dirt con-
tainer release lever then swing upper
edge of container beyond the lock po-
sition. Let tip of dirt container release
lever spring back. Reverse swing dirt
container back a little bit releasing the
dirt container from handle housing.
2. While holding the dirt container over a
sink or wastebasket, pull the filter
bracket out with the filter bag. Empty
contents from container.
3. Reverse step 1 and step 2 to install
filter.
BEFOREUSE
1. Familiarize yourself thoroughly with op-
eration of this product before using.
2. Inspect before each use. Do not use if
broken, cracked, melted, smoking or
otherwise damaged parts are noted.
3. Ensure that the filter bag is well place in
the dirt container and make sure that
the dirt container is well secure to the
housing.
4. Ensure that the filter bag is clean before
use.
5. Attach the crevice attachment or bristle
attachment if neccesary before turning
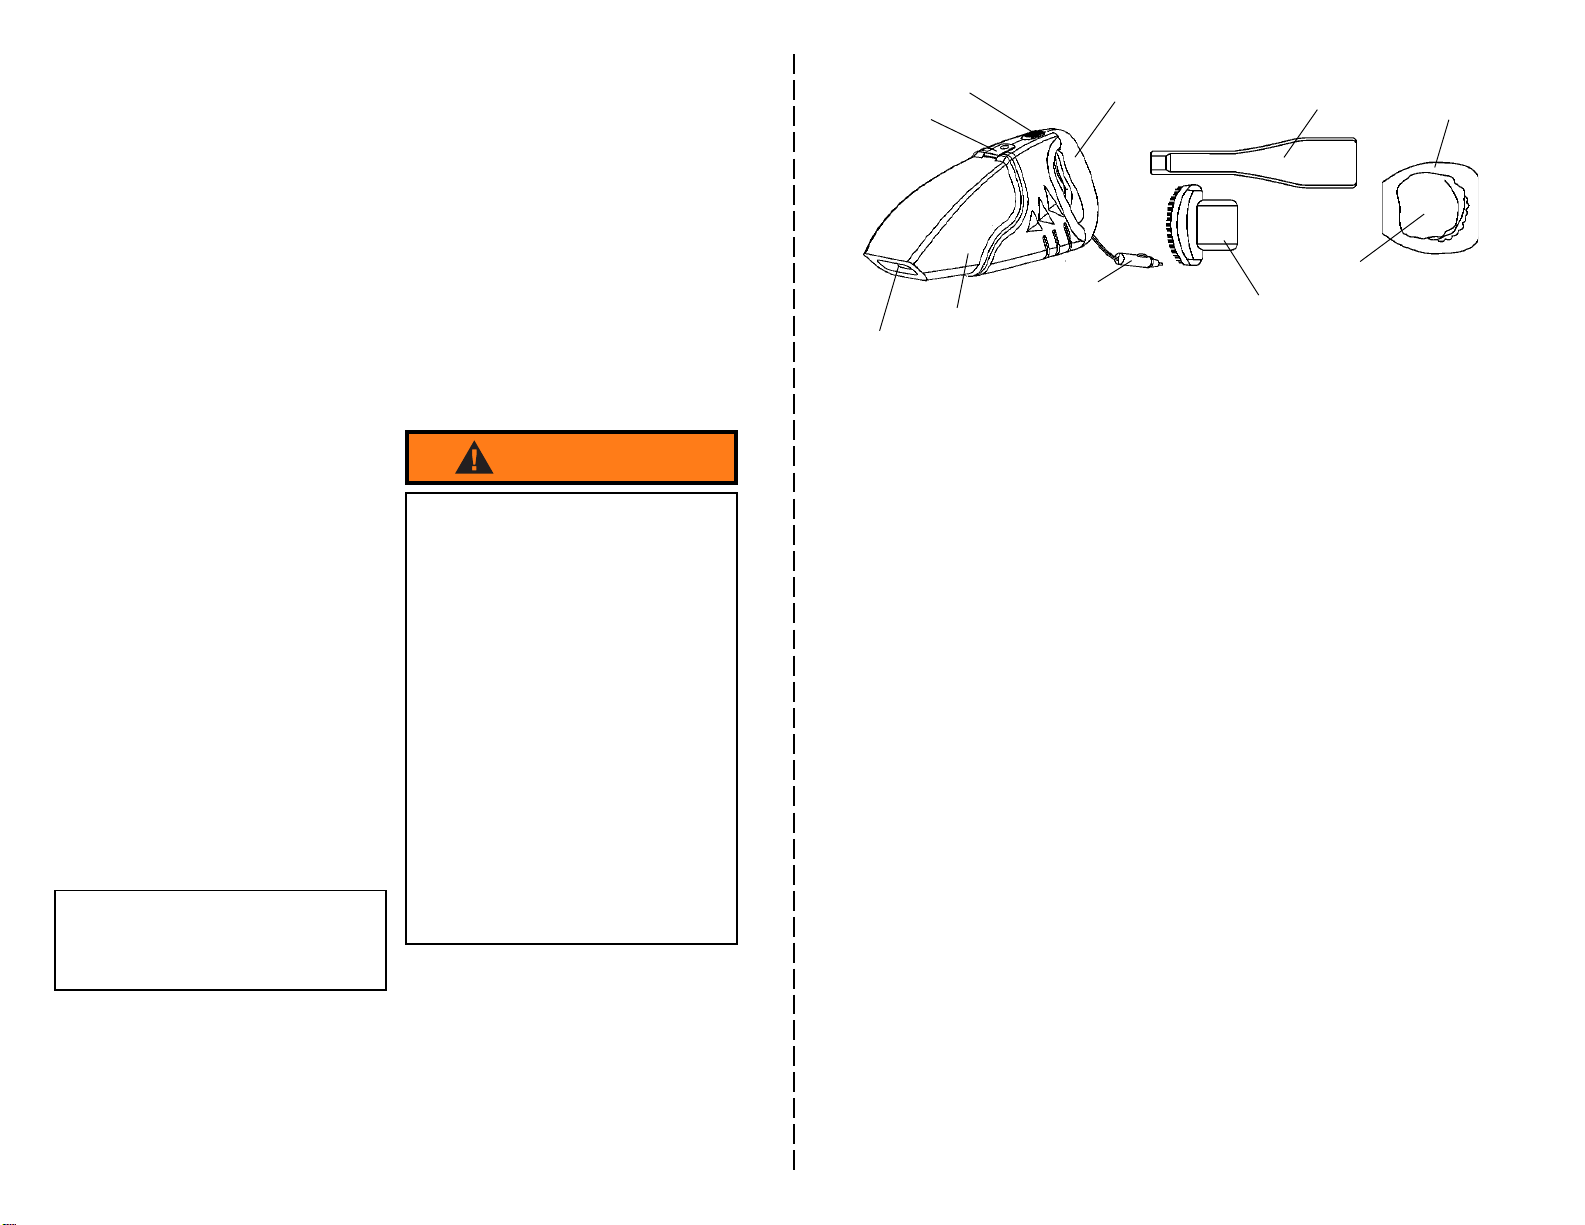
on the vacuum cleaner. Figure 1 - Model I-8500 Nomenclature
dirt container
cigarette lighter plug bristle attachment
filter bag
filter bracket
crevice attachment
carry handle
on/off switch
release lever
suction nozzle
!SAFETYMESSAGE!
Use only those attachments, accesso-
ries provided. Do not modify this prod-
uct.
Study, understand and follow all printed
material provided with this device. Do
not use the appliance if it is broken or
with damaged cord or damaged plug.
Keep the appliance away from children.
Do not pick up burning or smoking ob-
jects, flammable or combustible
substances.Do not pick up hard, sharp
objects with the vacuum. They may
damage the vacuum and filter. Do not
use with any opening blocked. Keep
free of dust, lint, hair or anything that
may reduce air flow. Do not operate the
vacuum with a wet filter, without the air
filter or without the dirt container. Do not
use on or near hot surfaces. Do not
leave operating unit unattended. Switch
off and unplug the appliance when not
in use. Failure to heed these markings
may result in property damage and/or
personal injury.
WARNING


