RoadHawk E42 User manual

1
E42 / E82 DVR System
User Manual
Brand

2
Before using the product, please ensure that you read the safety
precautions described below. Always ensure that the product is used
correctly.
• Only use the supplied power sources.
• Do not attempt to disassemble, alter or apply heat to the product.
• Avoid dropping or subjecting the product to severe impacts.
• To avoid the risk of injury, do not touch the interior of the product if it has
been dropped or otherwise damaged.
• Stop using the product immediately if it emits smoke, a strange smell, or
otherwise behaves abnormally.
• Do not use organic solvents such as alcohol, benzene, or thinner to clean
the product.
• Do not allow liquids or foreign objects to enter the DVR.
• Do not place the DVR near or in direct flame.
• Do not handle the power cord with wet hands.
• Do not use the equipment in a manner that exceeds the rated capacity of
the electrical outlet or wiring accessories. Do not use if the power cord or
plug are damaged, or not fully plugged into the outlet.
• Do not allow direct or metal objects (such as pins or keys) to contact the
terminals or plug.
• Avoid using, placing or storing the product in the humid or dusty areas.
Safety precautions

3
Contents
Product overview
A.Features 4
B.Specification 4
C. Box contents 5
Optional 5
D. Product views 5
E. Power On / O 6
F. IR Remote controller 7
Software overview
G. System interface and operation 8
OSD Menu operation and parameters setup description 9
Playback mode 10
On the monitor 10
On a PC 10
Control interface 12
Snapshot 12
Configuration 12
Setup the HDD 12
Backup 14
Back up format 15
Format 16
Playback 16
GPS Latitude & longitude coordinates 17
G-Sensor 17
Volume control 18
Video search 18
play speed 18
Playback date selection 19
Date search 19
Format/restore HDD 20
Format HDD by device or PC 20
Restore HDD 22

4
A.Features
1. E42 Supports up to 4CH recording / E82 Supports up to 8CH
2. Wide range of power input, suitable for any kinds of vehicles.
3. Auto recording after ignition on.
4. Provide Video output for playing-back.
5. x4 alarm input, x1 Audio input and x1 Audio output.
6. Built-in G-sensor.
7. H.264 real time compression chip.
8. Recording format: 720p* / D1 / CIF (* E42 - digital mode).
9. Complete Video Record List. Overall quick search event log.
10. AVI conversion function.
11. Power management function, extended record after power o (User defined).
12. GPS antenna optional, record your driving position and speed.
B.Specification
Product overview
DVR E42 E82
Recording frames 720P / VGA @ 30 FPS /CH
960H / CIF @ 30 FPS / CH, D1 D1, CIF
Display mode 1 CH / 4 CH 1 CH / 8 CH
Simple mode Record / Playback
Resolution - digital mode 1280 x 720 / 640 x 480
Resolution - normal mode 960 x 582 / 360 x 240
HDD 2.5” SATA HDD removable case, max. 1TB
SD card Max. 128GB SD card
Backup device USB 2.0 flash drive, removable HDD
Playback MODE Time / Date - Events
Full Screen Yes
LED indicator Power – Record – GPS
Signal loss detector Yes
RS485 Not used
GPS Yes – requires antenna
G-Sensor Yes
IR Yes
Watchdog Auto record on power
Built-in super capacitor Yes – safe power down
Power supply DC 8V – 32V
Dimensions 250mm x 175mm x 70mm
Weight 1.85KG Inc. HDD
Operating temperature -20oC – 65oC

5
C. Contents
At end of Power cables and alarm cable lines, add ‘(plug in)’
under Power cables, add ‘Camera cables (plug in)
next to RS-485 cable, add ‘(not required)’
Optional
GPS Antenna
1TB HDD
7” Monitor
Cameras
D. Product views
Product overview

6
E. Power on / o
(1) Power on
The DVR will take approximately 30 seconds to begin recording.
The recording light will flash to indicate the unit is recording.
(2) Power o
Turn o the power; please wait for 10 seconds until super capacitor
Has finalised the recordings and shut down before you remove the HDD
if required
(3) Light indicator
Power light (green light)
O - No power/power o.
On - Power supply functioning normally.
GPS Light (Orange Light)
O - GPS is not ready.
On - GPS located.
Network light (blue light)
Not used
Recording light (red light)
O – No recording.
Flashing - Recording.
Flashing rapidly - Event recording.
Note – Recording is not possible when using playback mode
Product overview

7
F. IR Remote controller
If using the optional monitor you can access and program the DVR
Remote buttons
No. Function No. Function
11 CH Screen display 7Confirm
2Record button 8Rewind
34 CH Screen display 9Forward
4Mute 10 Play
5Menu 11 Pause
6Arrows 12 Stop
1.
2.
3.
5.
7
9.
12
4.
6
8
10.
11.
Product overview

8
Software overview
G. System interface and operation
• Press CH1-CH4 / 8 button or select on menu for single display.
• Press quad split screen button for 4 Channel or 8 Channel display.
• Press menu button to enter menu option.
• Press play button to enter playback mode.
Icon Description:
• Recording
• GPS Connecting
• Voice Recording On
• Event Recording On
• Alarm Trigged
Using a monitor view to set up the DVR and configure the system.
NOTE: When first powering up the DVR with a new HDD installed, the system
will first format and initialise the HDD. This may take a few minutes.
A. Icon Description
Recording
GPS Connecting
Voice Recording On
Event Recording On
3G (Not used)
Alarm Trigged
Speed
Date/Time Voltage Function Icon

9
Software overview
OSD Menu operation and parameters setup description
Recording settings Recording Frame 5-30 fps
Resolution 720p D1 CIF
Quality Normal Better High
Colour setting Select 1-4 CH to adjust, brightness, contrast and colour
Time setting The time setting will be automatically calibrated by GPS signal. If no
GPS signal, time and date can be set manually.
GPS setting Display speed on monitor
Number plate Add vehicle number plate
Working mode Select default channel view
Select shut down delay (parking mode)
Microphone on / o
Alarm setting Select mode after trigger
System protection Low voltage
HDD Protection
3G Network Not in use
G-Sensor 3 Axis impact detection, files protected from overwrite
Camera types 720P / D1
Data backup Select file to backup
Restore default Reset the DVR to default settings
Format HDD Format the HDD (All data deleted)
Firmware update Use the USB slot to backup and install new firmware

10
Playback mode
Live onscreen or through the software on a PC
On the monitor
1. Click the play button on the remote while in live view (not recording)
to enter the playback page
2. Select search type then press confirm to enter the playback list
3. Select the file to playback
On a PC
1. Remove the HDD from the DVR and connect the transfer cable to the
HDD and then your PC’s USB
2. Run the viewing software (as administrator)
3. Select Playback to open the playlist menu.
4. Select the HDD under removable storage to access the playlist file
Software overview

11
Software overview

12
Snapshot
Click the icon, to capture the footage on screen. The Image will be saved as
.bmp file format. The player will show the backup folder automatically. The
default directory is the Snapshot folder. (Under the Player installation folder).
Configuration
Setup the HDD
Before you execute this function , please attach the HDD device into
your computer using the SATA connection to USB cable. When you have
finished all of the setting, click “ Save”. All the settings will save to the HDD
device. When you insert the HDD device into your DVR, the DVR will read
the setting and follow the setting to start recording.
Control interface
Snapshot: Capture the onscreen image
Configuration
Disk Backup: Select destination location
Playback: Select HDD or PC
Tools: HDD format / language
Previous File
Previous Frame
Play backwards
Pause
Stop
Play
Next Frame
Next File
Software overview

13
Using PC to setup the DVR and configure the system.
Please Note: Some settings are not available when setting up in PC mode - eg.
Parking mode & 720p / VGA selection.
Video quality High / normal / low
Video frame rate 5 – 30 fps
Vehicle information Number plate / driver
UI Mode Screen resolution
Password Encrypt the HDD device to prevent others who are not per-
mitted to access the HDD device.
Password length:15 characters.
After setting the password, all actions, including Playback,
settings and formatting the HDD device, need the pass-
word.
Time zone GMT setting – Adjust for BST
Unit of speed MPH / KPH
G-Sensor Settings Vehicle type – min / low / normal / high / max
Software overview
14
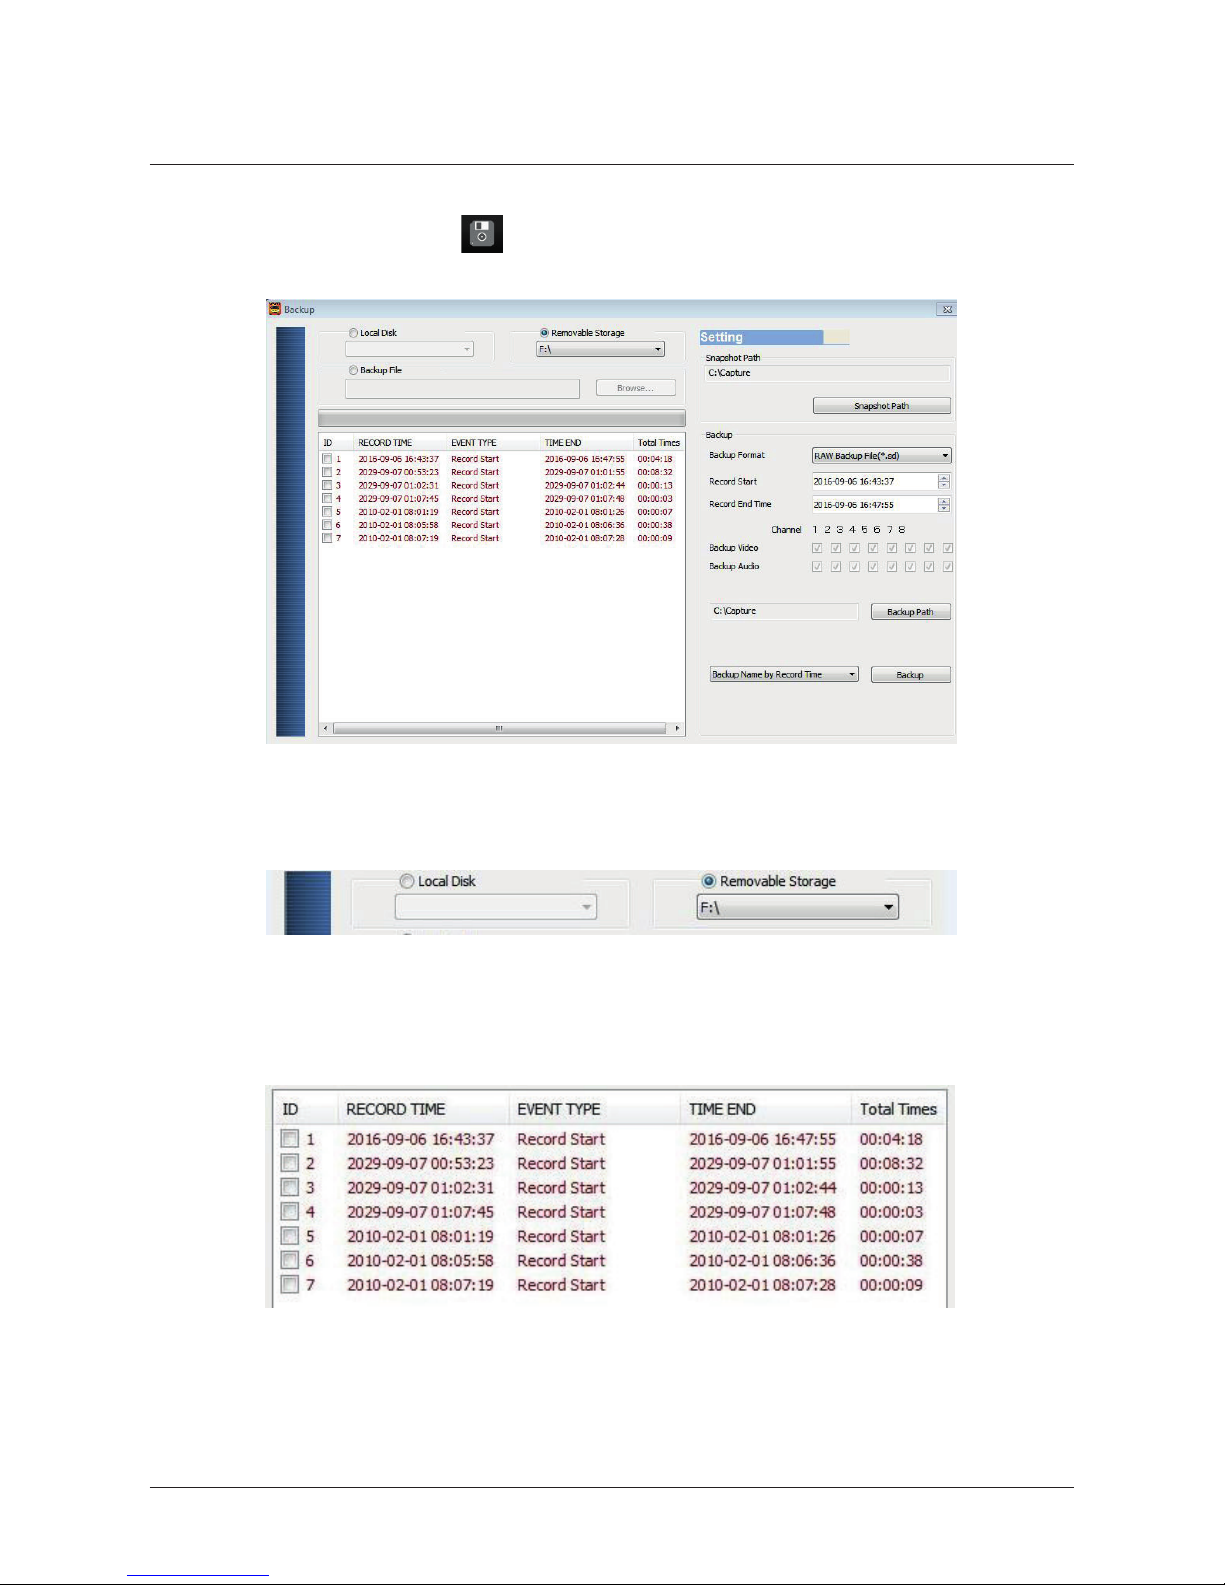
Backup
Choose the backup folder for your footage from the HDD
1. Select the original source (HDD)
2. Choose the file to backup
Software overview

15
4. You can also record a specific time during the footage
5. Choose the backup folder
6. Start backup
3. Choose backup format
Back up format
SD Format – Encrypted with all data
AVI Format – Video only
Software overview

16
Format
Format and restore the HDD and language settings
Playback
Choose the file on the HDD or PC to playback
Software overview

17
GPS Latitude & longitude coordinates
Display driving location with latitude and longitude, requires GPS antenna
G-Sensor
X - Left to Right
Y - Front to Back
Z – Up and Down
Image
Software overview

18
Volume control
Volume BAR: Click the left button of mouse control to adjust the volume
degree.
Video search
You can use the mouse to drag the bar to search the video quickly.
play speed
Supports 2x, 4x, 8x fast forward and 1/2x,1/4x 1/8x slow play
Software overview

19
Playback date selection
Quick switching by minutes
Date search
Selecting by Hours/Minutes (24-hours)
Software overview

20
Format HDD by device or PC
(1) Format by Device
Step 1: Use remote controller to enter DVR menu and choose
Format Disk.
Step 2: Select “Yes” and Click “Enter’’ to start formatting.
Step 3: When the screen back to LIVE mode, the formatting is completed.
Format/restore HDD
You should format a new HDD before it is used in the E42 / 82. This is done
when you insert the HDD into the DVR.
If you need to format the HDD for other reasons, please backup all relevant data
Software overview
This manual suits for next models
1
Table of contents


