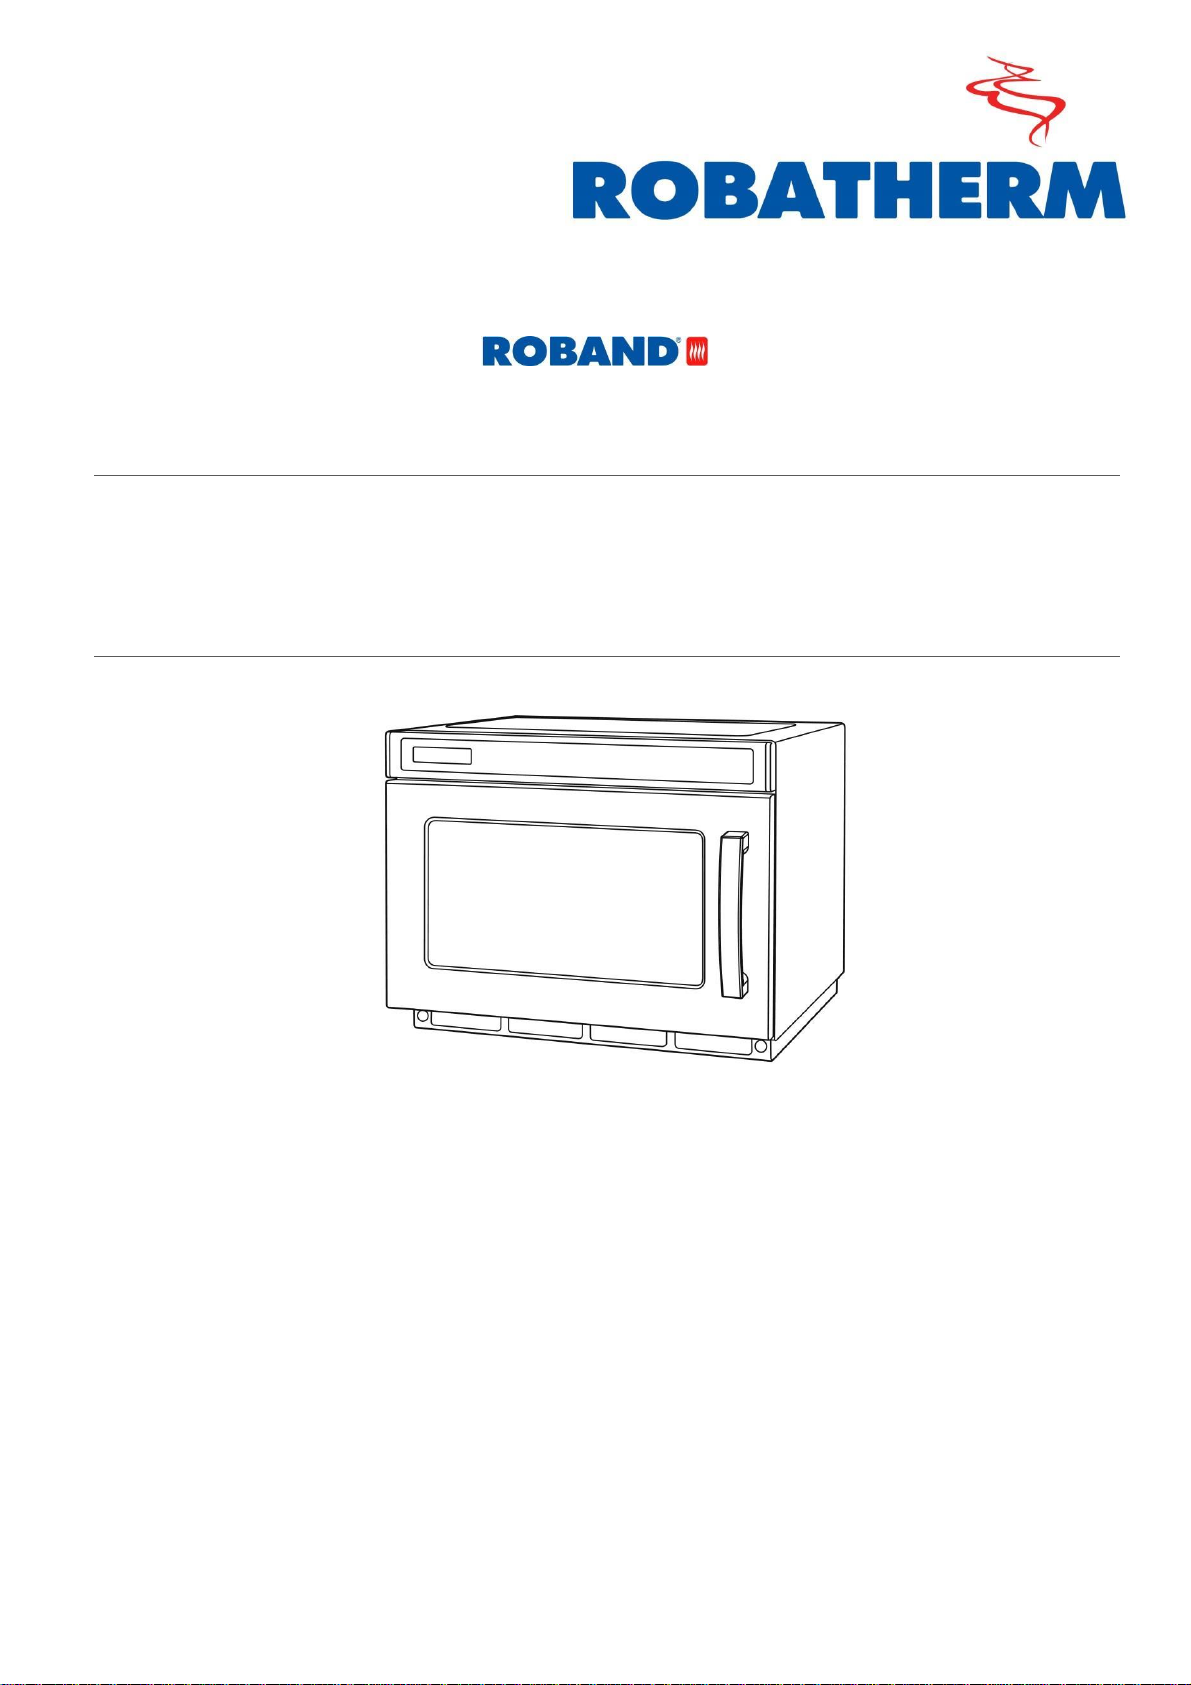
ROBAND Robatherm RM2117 User manual
Proudly Distributed By
Instruction Manual
COMMERCIAL MICROWAVE OVEN
RM2117
Version 1

2
CONTENTS
Product Features 2
Specifications* 2
Parts Included 2
General Safety Warnings 2
Operation Safety Warnings 3
Cleaning & Maintenance 3
Installation 4
Operation 6
Advanced user settings 8
Materials suitable for use 8
Troubleshooting 9
Notes 9
Warranty 9
PRODUCT FEATURES
▪Commercial grade Stainless Steel exterior and
interior.
▪17L internal capacity.
▪Stackable, up to 2 microwaves.
▪Power level adjustable in 5 steps.
▪100 individually customisable cooking
programs.
▪Easy Clean interior surfaces.
▪15A Plug.
SPECIFICATIONS*
Model
RM2117
Power Source
230 Volts AC ~ 50Hz
Input Power
3200 Watts
Output Power
2100 Watts
Oven Capacity
17 Litres
Oven Cavity (W x D x H)
330 x 310 x 175 mm
External Dimensions
(W x D x H)
420 x 563 x 340
(includes handle and
standoff)
Net Weight
32Kg
*Specifications subject to change
PARTS INCLUDED
▪Microwave Oven (appropriate model)
▪Instruction Manual
▪USB Program key.
GENERAL SAFETY WARNINGS
Read all Instructions and safety warnings prior to
use. Keep user manual for future reference.
Personnel must be trained prior to operating this
appliance.
This product is suitable for commercial use only.
This machine should not be operated by persons
with reduced physical, sensory or mental
capabilities, or lack of experience or knowledge,
unless they have been given supervision or
instruction concerning the safe use of the
appliance by a person responsible for their safety.
Children should be supervised to ensure that they
do not play with the appliance.
Avoid contact with the exterior of this machine as
surfaces can get hot.
Do not cover or block filter or ventilation openings.
Keep power cord away from heated surfaces.
The machine should be disconnected from all
power and allowed to cool before cleaning.
Regularly inspect the supply cord/plug and
discontinue use immediately if damage is found.
This machine contains no user-serviceable parts. It
is hazardous for anyone other than a competent
person to carry out any service or repair operation
that involves the removal of a cover which gives
protection against exposure to microwave energy.
Touching internal electrical components may
cause serious injury or death, even with the
microwave unplugged. Do not remove cover
unless qualified to do so.
This appliance must be returned to Roband
Australia, or one of our agents to carry out repairs.
Do not remove any cover panels from the
machine.
Roband will accept no liability if the instructions in
this manual have not been followed

3
OPERATION SAFETY WARNINGS
If the door or door seals, door hinges or any part
of the machine is damaged, the oven must not be
operated until it has been repaired by an
authorised person.
Do not operate oven without food or load in oven
cavity.
Liquids and other foods must not be heated in
sealed containers since they are liable to explode.
Microwave heating of beverages can result in
delayed eruptive boiling, therefore care must be
taken when handling the contents.
The contents of feeding bottles and baby food
jars shall be stirred or shaken and the temperature
checked before consumption, in order to avoid
burns.
Only use utensils that are suitable for use in
microwave ovens.
Do not put metal in the microwave oven.
When heating food in plastic or paper containers,
keep an eye on the oven due to the possibility of
ignition. If smoke is observed, switch off or unplug
the appliance and keep the door closed in order
to stifle any flames.
Eggs in their shell and whole hard-boiled eggs
should not be heated in microwave ovens since
they may explode, even after microwave heating
has ended.
he oven should be cleaned regularly and any
food deposits should be removed. Failure to
maintain the oven in a clean condition could lead
to deterioration of the surface that could
adversely affect the life of the appliance and
possibly result in a hazardous situation.
Ceramic Glass oven cavity base
The special Ceramic Glass oven cavity base used
in the ROBAND®Microwave ovens has a high
impact strength however impact from sharp
objects or heavy blows to the edges can lead to
breakage.
CLEANING & MAINTENANCE
CAUTION: Disconnect from power and allow to
cool before cleaning.
CAUTION: Steel cutting processes used in the
construction of this machine can result in sharp
edges. Avoid contact with sharp edges during
cleaning and maintenance.
CAUTION: Do not wipe plastic and painted
sections of the oven with bleach, thinners or other
cleaning agents, as this may cause these parts to
dissolve or change shape.
Toxic cleaners should be avoided when cleaning
the inside of the Microwave as they may contact
food.
Caustic cleaners should always be avoided, as
they may damage components inside and outside
the unit.
This unit is not suitable for cleaning with the use
of a water jet or immersion.
The door frame, seal and parts nearby must be
cleaned carefully with a damp cloth when they are
dirty.
Do not use harsh abrasive cleaners or sharp metal
scrapers to clean the oven door components
since they can scratch the surface, causing
damage to the door or shielding mesh within.
If the supply cord is damaged it must be replaced
by a cord set supplied by
Roband. Internal maintenance should only be
performed by a Roband or one of our service
agents in order to avoid a hazard.
Cleaning the control panel:
Do not use a detergent or an alkaline spray to
clean the control panel as this may cause damage.
Use a dry or a cloth lightly dampened with water
to clean.
Cleaning the Microwave interior:
After use, clean up any spilled liquids, spattered
oil and food as quickly as possible. If the oven is
used while dirty the efficiency drops and the food
may get stuck on the interior. Clean the interior

4
with a cloth soaked in warm water with mild
detergent dissolved in it, and then rinse the soap
off with a damp cloth.
Regular cleaning will prevent a build-up of oils
and foodstuff and keep the machine looking new.
Filter Cleaning:
It is important to clean the air filter regularly to
avoid clogging and overheating the microwave.
To clean the air filter unfasten the mounting
screws and remove filter. Wash with warm soapy
water until unclogged, reinstall and fasten screws.
NOTE: A Clean filter reminder will display every
30 days. This can be shut off by pressing and
holding the ‘Stop’ button for 5 seconds while in
idle mode.
Splash Shield Cleaning:
The Splash Shield can be removed for cleaning as
follows:
1. Squeeze the left and right locking tabs inwards,
as shown by the arrows, and then pull the
Splash Shield down and out to remove from the
oven.
2. Wash shield in warm soapy water. Do not place
in dishwasher. Do not use
cleaning chemicals or sanitiser.
3. After washing, reinsert Splash Shield by
positioning the rear end back into
its position holes, then raise the front of shield
until front clips lock back into their front
positioning holes.
CAUTION: Ensure Splash Shield is installed
correctly before operating microwave.
INSTALLATION
IMPORTANT: DO NOT USE THE MICROWAVE
DOOR HANDLE TO LIFT THE MICROWAVE
OVEN.
Damage to the machine as a result of freight must
be reported to the Freight Company and to the
agent responsible for the dispatch of machine
within 24 hours of receipt. No claims will be
accepted after this period.
Do not under any circumstances attempt to use
a damaged product.
Remove all packaging materials, tape, and any
protective plastic from the machine. Remove any
glue residue from the protective plastic or tape
using citrus cleaner.
Product should be installed at counter height only
(approximately 800- 1100mm). Installing outside
the recommended mounting height could cause
damage to the door hinges and prevent
operation.
Do not position the microwave on top of or
immediately above another appliance.
Place the product on a firm, level surface in the
desired position.
Maintain a clearance of 300mm above the
microwave, note a second microwave of the same
model can be stacked on top as long as a 300mm
clearance can be maintained above the second
microwave.
5
Allow at least 100mm clearance from back and
right side when positioning the microwave.
NOTE:
Do not obstruct filter or ventilation openings.
Install away from TV and radio sets as reception
and radio interference might be affected.
Do not position Microwave near sources of heat,
water, oil or steam.
Do not stack any appliances or materials on the
top of the microwave.
Do not connect to power using an power board
or extension cord.
WARNING: This product must be connected to
an RCD protected circuit, ensure the circuit is
properly earthed.
Before connecting the machine to the power
supply, ensure that all switches are in the OFF
position. Connect only to a RCD protected,
grounded 3-pin outlet.
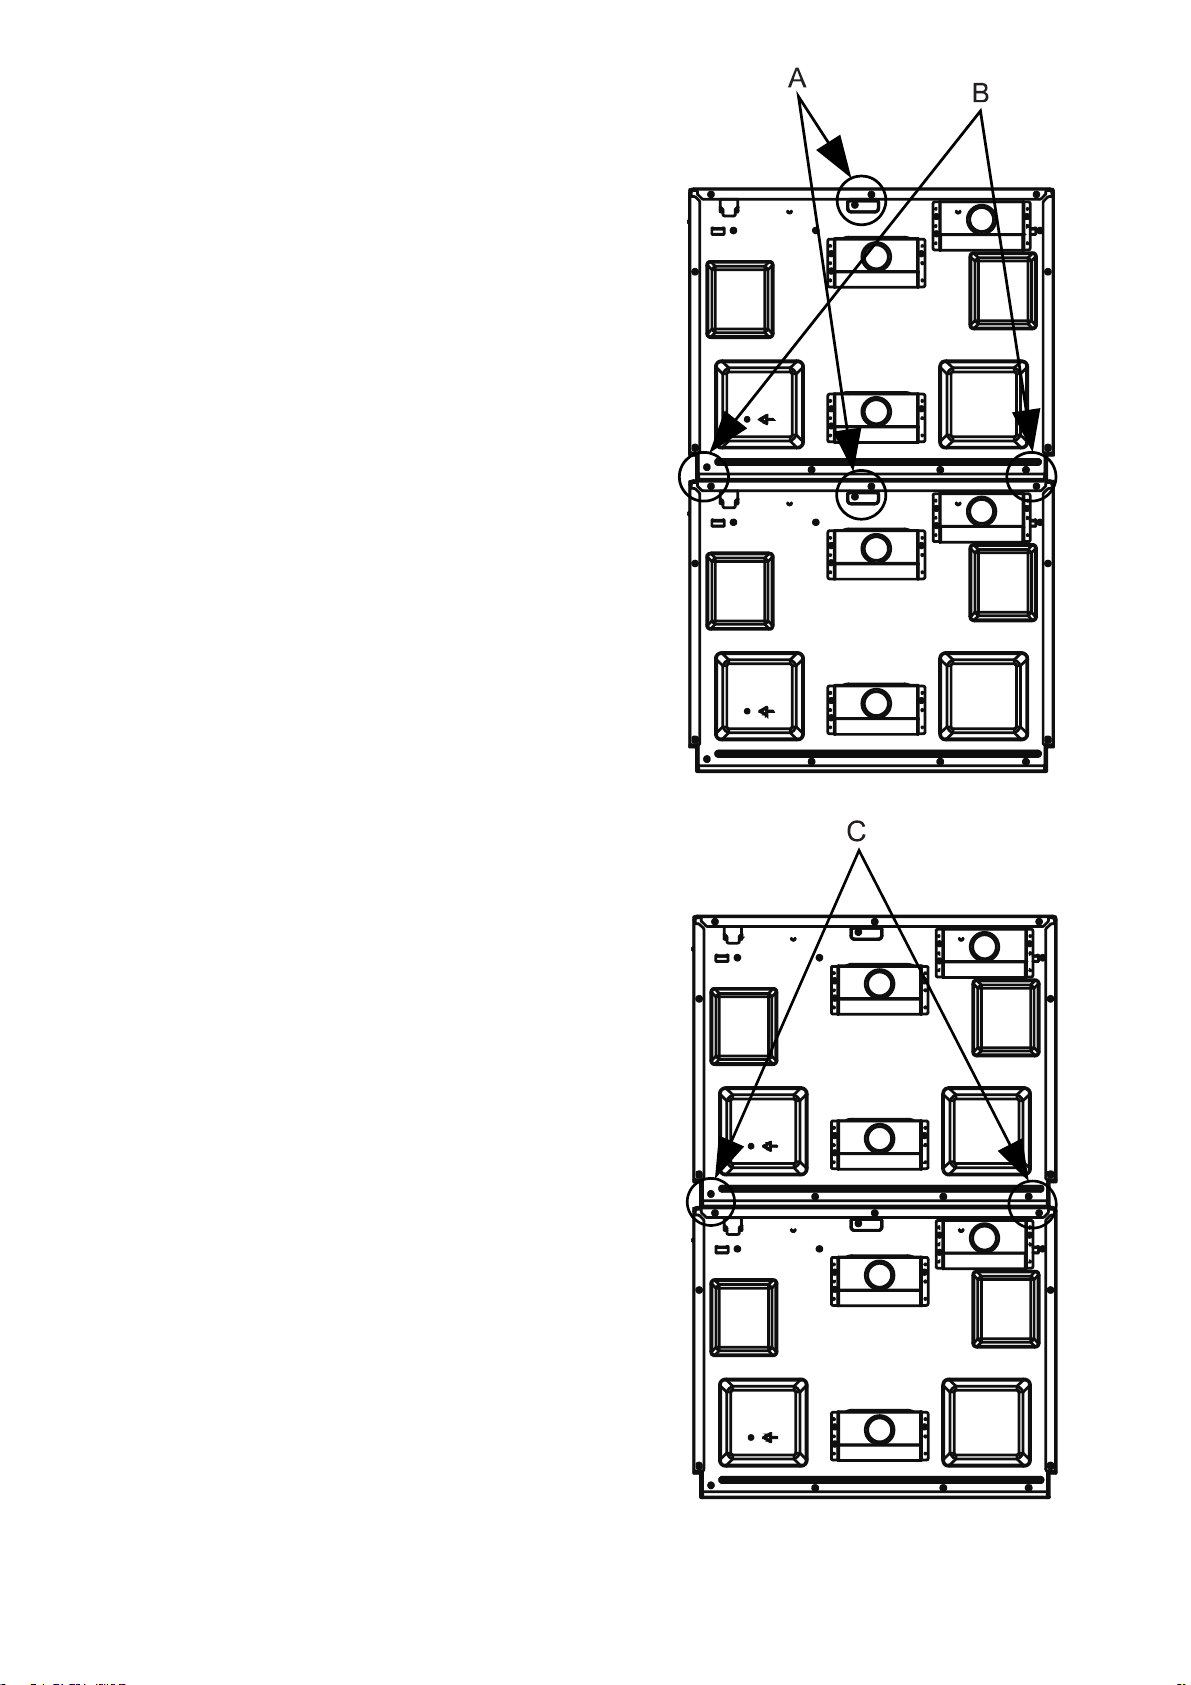
Stacked installation:
Where 2 microwaves are to be stacked on top of
each other, use the mounting plate on the back of
the each machine by unscrewing them and
screwing the machines together as detailed
below;
1. Unscrew and remove the mounting plate, and
then retighten the screws “A”.
2. Remove the four screws as shown “B”.
3. Use the 4 screws to fasten 2 mounting plates at
each side “C”.
NOTE: Never remove the feet of the appliance or
stack more than two microwaves on top of each
other.

6
OPERATION
1. DEFROST: Defrost cooking mode.
2. USB: To program menus using USB drive.
3. POWER LEVEL: Used to set Power.
4. TIME ENTRY: Press to enter cooking time.
5. x2: Double quantity setting.
6. x3: Triple quantity setting.
7. Numerals 0-9: Program menu and input.
8. STOP / RESET: Stop cooking & clear display.
9. START: Begin cooking
NORMAL COOKING - MANUAL OPERATION
1. Place the food to be cooked or heated in a
container suitable for use in a microwave then
place inside the oven and close the door.
“READY”will display.
2. Set cooking time by pressing ‘TIME ENTRY’
then enter cooking time using the ‘Numeral’
keypad.
3. Set Power level by pressing ‘POWER LEVEL’
then select desired power using ‘0-9’ on the
‘Numeral’ keypad. Power can be set in 10%
increments.
NOTE: The microwave will operate at 100%
power if no power level is selected.
4. Press ‘START’to begin cooking.
Note: cooking can be paused by pressing ‘STOP’
once or by opening the door. To resume cooking
while paused close the door and or press
‘START’. Pressing ‘STOP’while paused or with
the door open will clear remaining time.
NOTE: The oven can be programmed for a
maximum of 60 minutes
NOTE: Using a Low power may increase cooking
time, but will produce a more uniform result in
foods such as dairy and meats.
The cooling fan will run to prevent microwave
components from overheating.
STAGED COOKING
The microwave can cook in sequences of up to 3
Time / Power settings which run sequentially
without further input from the user. The display
will show the total time while cooking.
Stage 1
1. Place the food to be cooked or heated in a
container suitable for use in a microwave then
place inside the oven and close the door.
“READY”will display.
2. Set cooking time by pressing ‘TIME ENTRY’
then enter cooking time using the ‘Numeral’
keypad.
3. Set Power level by pressing ‘POWER LEVEL’
then select desired power using ‘0-9’ on the
‘Numeral’ keypad. Power can be set in 10%
increments.
NOTE: The microwave will operate at 100%
power if no power level is selected
Stage 2 & 3
4. Press ‘TIME ENTRY’and enter desired cooking
time for Stage 2.
5. Enter power level for Stage 2 by pressing
‘POWER LEVEL’then selecting desired power
using ‘0-9’ on the ‘Numeral’ keypad.
COOKING % POWER
DEFROST
USB
POWER
LEVEL TIME
ENTRY x2
x3 STOP
RESET START
1 2 3 4 5 6 7 8 9 0
(1)
(2) (3) (4) (5)
(6) (7)
(8) (9)

7
6. Repeat Steps 4) and 5) if Stage 3 is required.
7. Press ‘START’to begin cooking or ‘STOP’to
cancel programming. Display will show total
time and run through the stages automatically.
Note: cooking can be paused by pressing ‘STOP’
once or by opening the door. To resume cooking
while paused close the door and or press
‘START’. Pressing ‘STOP’while paused or with
the door open will clear remaining time.
PROGRAMMED MENU OPERATION
The microwave can store up to 10 Pre-
Programmed Time / Power sequences. This can
be increased to 100 Programs under ‘Advanced
User Settings’.
To select a pre-programmed sequence.
1. Place the food to be cooked or heated in a
container suitable for use in a microwave then
place inside the oven and close the door.
“READY”will display.
2. Enter the number for the desired program ‘0-9’
using the ‘Numeral’ keyboard, Or ‘00-99’ when
100 programs is enabled.
The oven will then begin the programmed cook
sequence after a short pause.
Pre-Programmed Cooking Times and Power
Level:
Note: the above programmed times and
power levels can all be changed if desired.
ON THE FLY COOKING
During cooking, any Pre-Programmed Menu can
be run “on the fly”by pressing the corresponding
program number. In this situation, the remaining
time and power will be updated to that of the
Programmed menu.
DOUBLE AND TRIPLE QUANTITY FUNCTION
The cooking times of programmed menus can be
doubled or tripled by pressing ‘x2’ or ‘x3’, in
either of the following sequences’;
1. Select ‘x2’or ‘x3’ Before selecting desired Pre-
Programmed Menu, OR;
2. Begin cooking by selecting desired Pre-
Programmed Menu, and then press ‘X2’ or ‘X3’
during the first 5 seconds of the program and
the oven will continue cooking applying the
multiple quantity time.
DEFROST COOKING
The defrost function will run at a 20% power level
for the time entered. To use the defrost function
use the following steps.
1. Place the food to be defrosted in a container
suitable for use in a microwave then place
inside the oven and close the door. “READY”
will display.
2. Press the ‘DEFROST’button.
3. Enter time required (up to 99 minutes) using
the ‘Numerical’ keypad.
4. Then press ‘START’.
Note: Defrosting can be paused by pressing
‘STOP’once or by opening the door this allows
for the food to be rearranged to even out the
defrosting. To resume defrosting while paused
close the door and or press ‘START’. Pressing
‘STOP’while paused or with the door open will
clear remaining time.
Number
Cooking Time
Power Level
1
0:10
100%
2
0:20
100%
3
0:30
100%
4
0:45
100%
5
1:00
100%
6
1:30
100%
7
2:00
100%
8
2:30
100%
9
3:00
100%
0
3:30
100%
8
PROGRAMMED MENU SETUP
1. Open the door.
2. Press and hold ‘1’ for 5 seconds. The display
will read “PROGRAM”.
3. Enter the Program number to be changed - ‘0-
9’, OR ‘00-99’ when 100 programs is enabled
using the numeral keypad.
After 2 seconds the display will show the
time associated with the program if one has
already been set.
4. Set or adjust the cooking time using ‘0-9’ on
the ‘Numeral’ keypad.
5. Set Power level by pressing ‘POWER LEVEL’
then select desired power using ‘0-9’ on the
‘Numeral’keypad. Power can be set in 10%
increments.
NOTE: The microwave will operate at 100%
power if no power level is selected
STAGED PROGRAMMING
Staged cooking sequences can also be saved to
the programmed menu. A staged program will
cook in 2-3 sequential Time/Power stages.
6. If Staged cooking is required, press ‘Time
Entry’then repeat steps 4 and 5 for up to 3
stages.
7. Press ‘START’to save or ‘STOP’to cancel.
When a staged program is run the microwave will
run through each stage automatically without user
input. The display will show total time for all
stages.
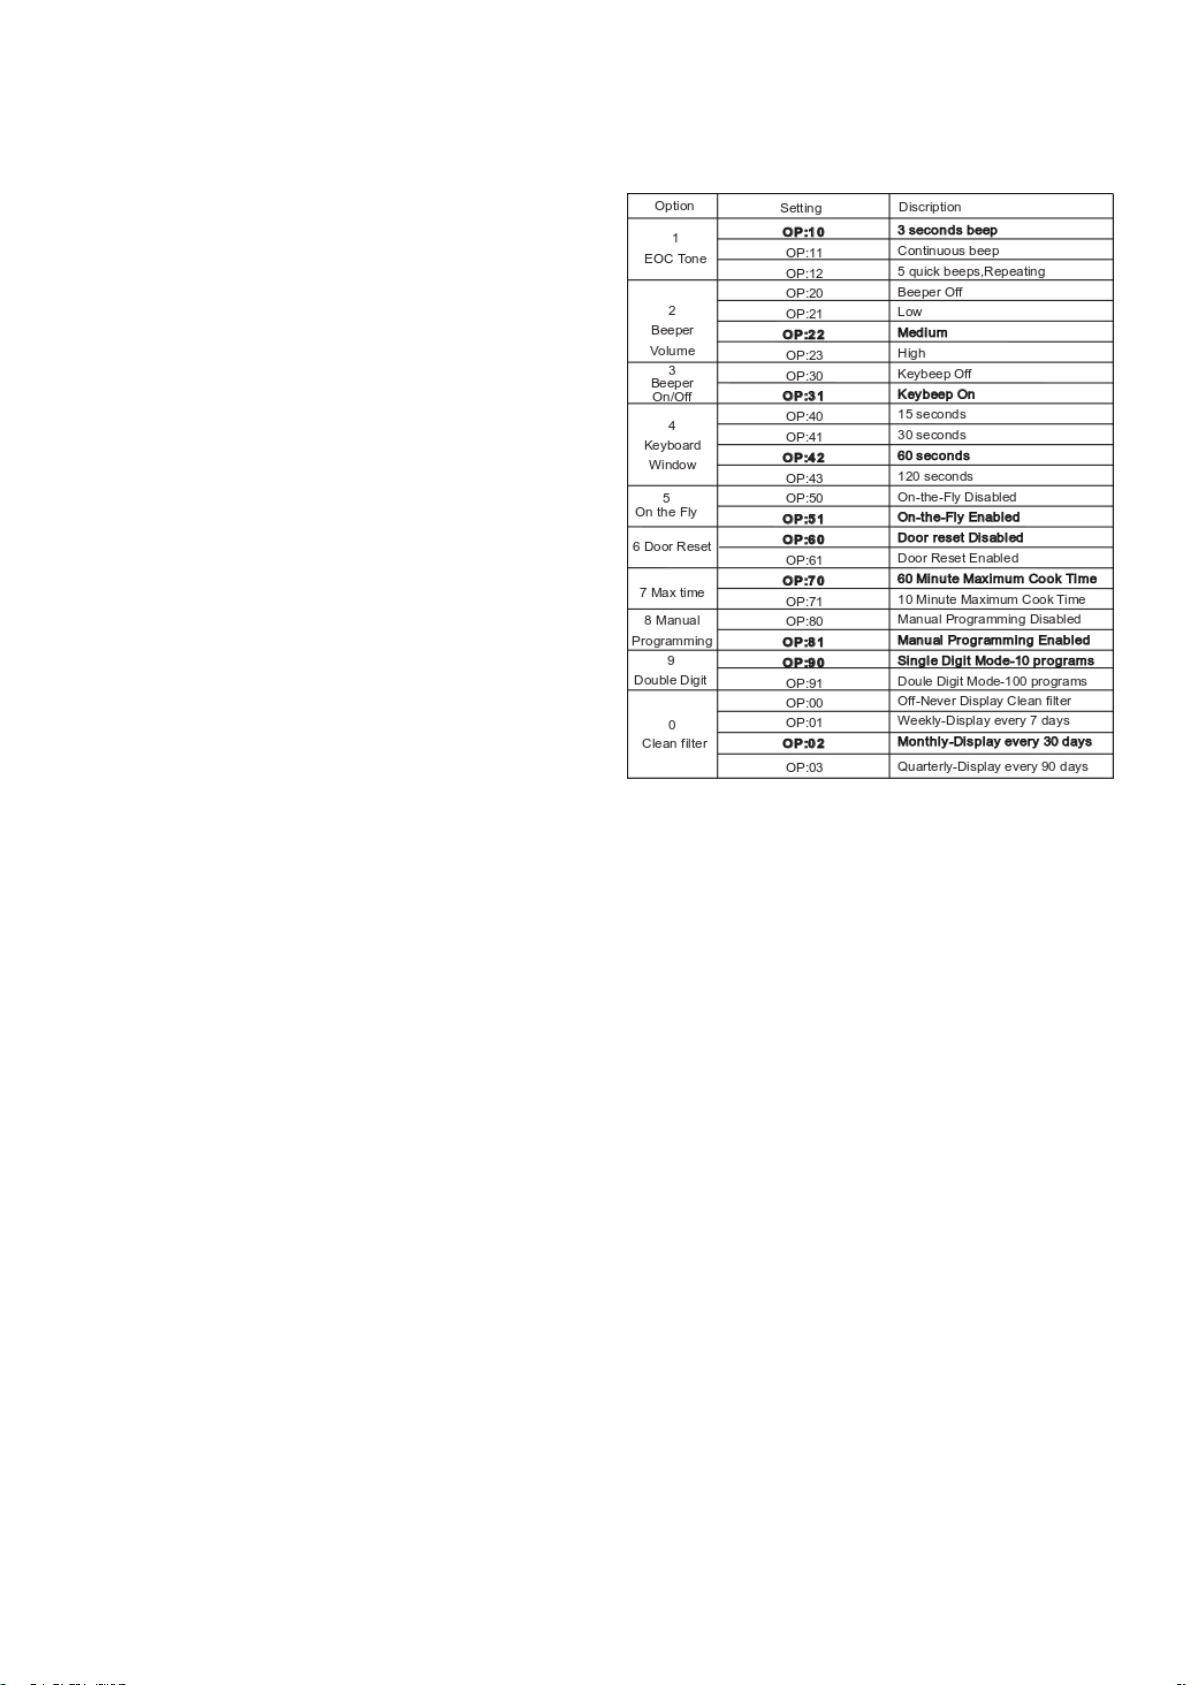
ADVANCED USER SETTINGS
1. Open the oven door and hold number ‘2’ for 5
seconds. “OP:—"is displayed.
2. Enter the number you want in relation to the
setting you want to modify. (see table below).
3. Press the same digit again to cycle through the
available options.
E.g. To set the buzzer volume to medium. Press
‘2’ and “OP:22”is displayed. Each subsequent
press of ‘2’ will cycle through the options as
follows: “OP:20”, “OP:21”, “OP:22”, “OP:23”,
“OP:20”…
4. Press ‘START’to save the current setting.
RESTORE FACTORY DEFAULTS
Follow the steps below to return the unit to
factory default settings. Note: all programmable
menus will be restored to default by this
procedure.
1. In ‘Ready’mode press and hold ‘START’and ‘0’
together for 5 seconds, until buzzer sounds and
‘CHECK’is displayed.
5. The screen will display “CHECK”then ‘00’ if the
unit is not in factory default mode, and ‘11’ if
the unit is already in default factory mode.
6. Press “START” when “00” is displayed to reset
the unit to factory default settings.
MATERIALS SUITABLE FOR USE
Items containing metal should not be used in
the microwave as they may cause sparking.
Even a small amount of metal plating on the
edge of dishes and cups can cause sparking
and should not be used.
Combustible materials such as paper should
be used with caution as they may ignite. Use
only for short cooking times and only while
attended.
Figure 2
Figure 3

9
Plastic foam should not be used in the
microwave as it may melt and contaminate
food.
Use only products marked as microwave safe
for ceramic, glass and plastic products.
TROUBLESHOOTING
Only after all points below have been checked
should you call for service:
If the Microwave is not working:
✓Check that the machine is plugged into the
power point correctly and the power is
switched on and working.
✓Check that the door is properly closed and not
obstructed by food or any object.
If the Microwave is sparking in the cavity:
✓Check that there are no metal utensils, metal
containers or dishes with metal trim being
used.
NOTES
———————————————————————————————————————————————
———————————————————————————————————————————————
———————————————————————————————————————————————
———————————————————————————————————————————————
———————————————————————————————————————————————
———————————————————————————————————————————————
———————————————————————————————————————————————
———————————————————————————————————————————————
———————————————————————————————————————————————
———————————————————————————————————————————————
———————————————————————————————————————————————
———————————————————————————————————————————————
———————————————————————————————————————————————
———————————————————————————————————————————————-
________________________________________________________________________________________________
________________________________________________________________________________________________
________________________________________________________________________________________________
________________________________________________________________________________________________
________________________________________________________________________________________________
________________________________________________________________________________________________
________________________________________________________________________________________________
________________________________________________________________________________________________
________________________________________________________________________________________________
________________________________________________________________________________________________
WARRANTY

10
The warranty conditions set out below are in addition to any warranties implied or governed by law.
Roband Australia warrants that this appliance shall be delivered free from defects in material and
workmanship. The warranty for this product is offered to the original purchaser, to be free of fault in both
workmanship and materials for a period of 12 months from date of purchase. Roband’s obligations pursuant
to this warranty are limited to the repair or replacement of the defective goods or materials, at its discretion
and subject to the terms contained within this Warranty statement.
The following conditions apply:
The product must be installed, maintained and used under normal operating conditions within the scope of
the operating instructions.
All warranty claims must be submitted to Roband or an authorised Roband dealer, and Roband
authorisation must be granted prior to repairs being carried out. Proof of purchase is required for any repair
authorisation.
Warranty is back to base, meaning delivery to and collection of your product to Roband or an authorized
service agent is the responsibility of the purchaser.
Where a product cannot be returned back to base, on-site warranty can be arranged by prior agreement.
The following exclusions apply:
Claims or faults arising from misuse, neglect, transport damage or other mechanical damage, including but
not limited to; door’s, hinges & interlock switches etc., other than those arising from manufacture or material
defects. Where relevant, glass, Teflon® and lamps are not included in this warranty and RCD tripping due
to moisture absorption by Tubular Heating Elements is not a warranty fault.
Roband or any subsidiary company or Agent shall not be liable for loss of profit or damage to other
equipment and property except where it is in breach of the guarantees provided in accordance with
applicable legislation.
Roband reserves the right to reject a warranty claim if it is not satisfied with the circumstances under which
the fault occurred or where a product has been altered from its original specification.
For on-site repairs outside of capital city metropolitan areas, travel costs, service callout fee and related
labour costs etc. are the responsibility of the claimant.
Any costs incurred for false claims or faults due to incorrect usage etc. are the responsibility of the claimant.
Any attempt to repair the product by non-Roband approved service personnel or the use of non-genuine
parts will void the warranty agreement
Our goods come with guarantees that cannot be excluded under the Australian Consumer Law. You are
entitled to a replacement or refund for a major failure and compensation for any other reasonably
foreseeable loss or damage. You are also entitled to have the goods repaired or replaced if the goods fail to
be of acceptable quality and the failure does not amount to a major failure.
For the name of your nearest Australian authorised service agent, please contact:
Roband Australia Pty Ltd
For your nearest International distributor, please visit:
1 Inman Road,
Cromer, NSW, 2099, Australia,
Warranty: 1800 268 848
Tel: +61 2 9971 1788
Email: sales@roband.com.au
Web: www.roband.com.au
https://www.roband.com.au/worldwide/
®
®
Other manuals for Robatherm RM2117
1
Table of contents
Other ROBAND Microwave Oven manuals


Popular Microwave Oven manuals by other brands


Conrad Electronic
Conrad Electronic 2372935 operating instructions

GE
GE Spacemaker JVM1440BH datasheet

DAEWOO ELECTRONICS
DAEWOO ELECTRONICS KOR-6L8K5S83 Operating instructions & cook book

DAEWOO ELECTRONICS
DAEWOO ELECTRONICS KOR-1N5A9S Operating instructions & cook book

Daewoo
Daewoo KQG-6617G Operating instructions & cook book

Samsung
Samsung M1779 Owner's instructions

 Operating and installation instructions")


