Robotzoo Wombat Setup guide

Robot%Mower%Diagnostics%–%Wombat%&%Wombat%Joey%
!
%
Contents%
Accessing%the%Diagnostic%Screen%..................................................................................................%2
%
Testing%the%wire%sensors%against%the%boundary%wire%...................................................................%3
%
Modifying%the%Charging%Station%Current%......................................................................................%4
%
Testing%the%Touch%Sensor%.............................................................................................................%5
%
Testing%the%Bump%/%Lift%Sensors%....................................................................................................%6
%
Testing%the%Pitch%/%Roll%/%Angle%Sensors%.......................................................................................%7
%
Testing%the%Internal%Charge%Sensors%............................................................................................%8
%
Testing%the%Internal%Motor%Sensors%.............................................................................................%9
%
Testing%the%Rain%Sensor%..............................................................................................................%11
%
!
%
!%

Robot%Mower%Diagnostics%–%Wombat%&%Wombat%Joey%
!
Accessing%the%Diagnostic%Screen%
!
To!initiate!self-detection!program:!
Release!the!Red!emergency!button.!
Immediately!press!left!two!buttons.!
(before!the!welcome!message!ends).!
!
!
The!diagnostic!screen!should!appear:!
LL!=!Left!Wire!Signal!
RL!=!Right!Wire!Signal!
Assuming!the!installation!is!correct!as!
per!the!manual,!the!following!readings!
show:!
NUL!=!No!wire!signal!
IN!=!Inside!the!perimeter!wire!
OUT!=!Outside!the!perimeter!wire!
!
!
!
The!wire!sensors!are!situated!in!the!
undercarriage!of!the!device,!near!the!
front!wheel.!Note!the!distance!between!
the!cutting!blades!and!the!sensors,!and!
the!distance!between!the!outside!wheel!
edges!and!the!sensors.!
!
!
!
!
!
!
!
!
!
!
! !

Robot%Mower%Diagnostics%–%Wombat%&%Wombat%Joey%
!
Testing%the%wire%sensors%against%the%boundary%wire%
!
In!the!test!shown!below,!the!boundary!wire!runs!under!the!artificial!turf,!about!40cm!from!
the!left!edge,!and!40cm!from!the!right!edge,!looking!down.!The!images!show!the!mower!
gradually!being!moved!to!the!right,!approaching,!and!crossing!over!the!boundary!wires.!
!
As!the!mower!is!shifted!to!the!right,!the!sensors!detect!the!left!boundary!wire.!First!the!RHS!
sensor!detects!it!(IN),!and!then!both!detect!it,!as!the!mower!keeps!being!moved!to!the!right.!
Finally,!the!mower!recognises!that!both!sensors!detect!being!IN!the!mowing!area.!
!
!
!
As!the!mower!is!shifted!further!to!the!right,!the!sensors!detect!the!Right!boundary!wire.!The!
RHS!sensor!begins!to!detect!that!it!is!OUT.!
!
!
!
As!the!mower!continues!to!be!shifted!to!the!right,!Both!the!RHS!and!LHS!sensors!detect!that!
it!is!OUT.!
!
!
If!the!above!changes!are!not!observed,!It!could!mean!that!the!wire!signal!is!not!strong!or!
stable!enough.!To!adjust!the!strength!of!the!wire!signal,!follow!the!steps!below.!
!
Robot%Mower%Diagnostics%–%Wombat%&%Wombat%Joey%
!
Modifying%the%Charging%Station%Current%
!
If!the!device!is!having!difficulty!sensing!the!
boundary!wire,!or!if!the!boundary!wire!is!
especially!long,!it!may!be!necessary!to!adjust!the!
current!in!the!boundary!wire.!
!
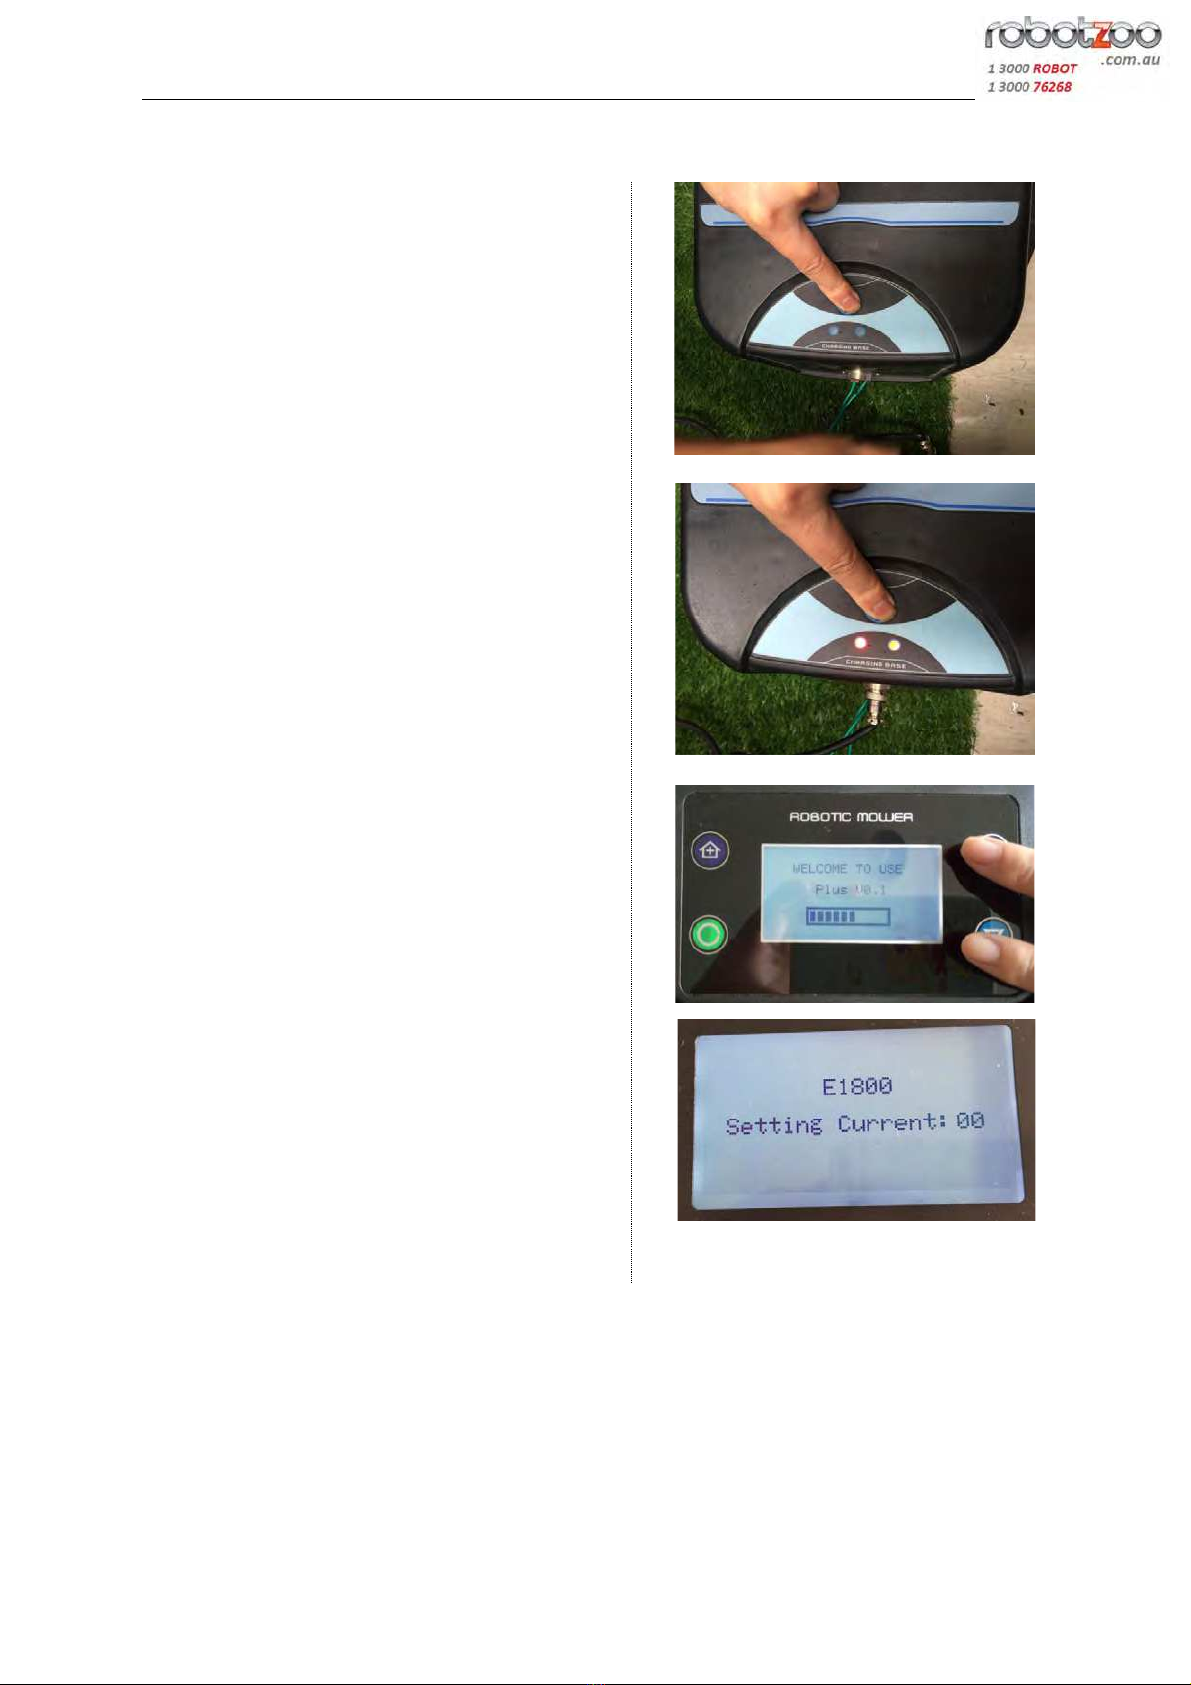
1)Press!the!EMERGENCY!STOP!button!on!the!
mower.!
2)Press!the!HOME!button!on!the!charging!station.!
!
!
3)!Release!the!HOME!button!on!the!charging!
station!once!the!wire!light!on!the!charging!station!
starts!blinking.!
!
!
!
!
4)!release!the!EMERGENCY!STOP!button!on!the!
mower.!After!hearing!the!beep,!and!before!the!
welcome!screen!appears!on!the!mower,!press!the!
UP!/!DOWN!buttons!on!the!mower!
simultaneously.!
This!will!enter!the!display!into!current!adjustment!
interface!mode.!
!
!
!
5)!After!each!restart,!the!current!data!will!show!
00.!You!can!ignore!this,!and!set!the!current!as!
desired,!using!the!UP!/!DOWN!buttons,!followed!
by!the!green!SET!button.!You!should!hear!a!beep!
sound!from!the!charging!station!to!confirm.!
!
Note:!The!original!factory!setting!is!28.!Please!do!
not!adjust!to!far!more!than!28.!
!
!
!
6)!Enter!into!the!testing!menu!to!check!the!wire!signal!is!good!enough!or!not!for!your!lawn.!
The!current!could!be!adjusted!until!the!signal!is!good!enough.!(No!need!to!follow!from!step!
one,!you!can!adjust!again!as!step!4).!
!
7)!When!the!current!is!finally!confirmed,!disconnect!the!charger!from!the!charging!
station,!then!connected!again.!The!current!adjustment!process!is!finished.!
! !

Robot%Mower%Diagnostics%–%Wombat%&%Wombat%Joey%
!
!
Testing%the%Touch%Sensor%
!
The!touch!sensors!are!situated!on!the!rear!
handle!of!the!device.!They!are!designed!to!
cause!the!mower!to!stop!if!the!handle!at!
the!rear!of!the!device!is!grabbed.!
!
There!are!two!sensors!on!the!handle.!Left!
and!Right.!!
!
!
!
First,!check!that!the!Touch!sensor!is!active.!
This!is!indicated!by!a!T!symbol!on!the!
control!display,!as!shown!at!right!
!
!
!
!
Test!the!touch!sensors!by!grabbing!the!rear!
handle!on!either!and!both!sides,!whilst!in!
diagnostic!mode:!
!
L-0!R-0!:!neither!sensor!touched!
L-0!R-1!:!right!sensor!touched!
L-1!!R-0:!left!sensor!touched!
L-1!!R-1!:both!sensors!touched!
!
!
!
!
! !
Robot%Mower%Diagnostics%–%Wombat%&%Wombat%Joey%
!
Testing%the%Bump%/%Lift%Sensors%
!
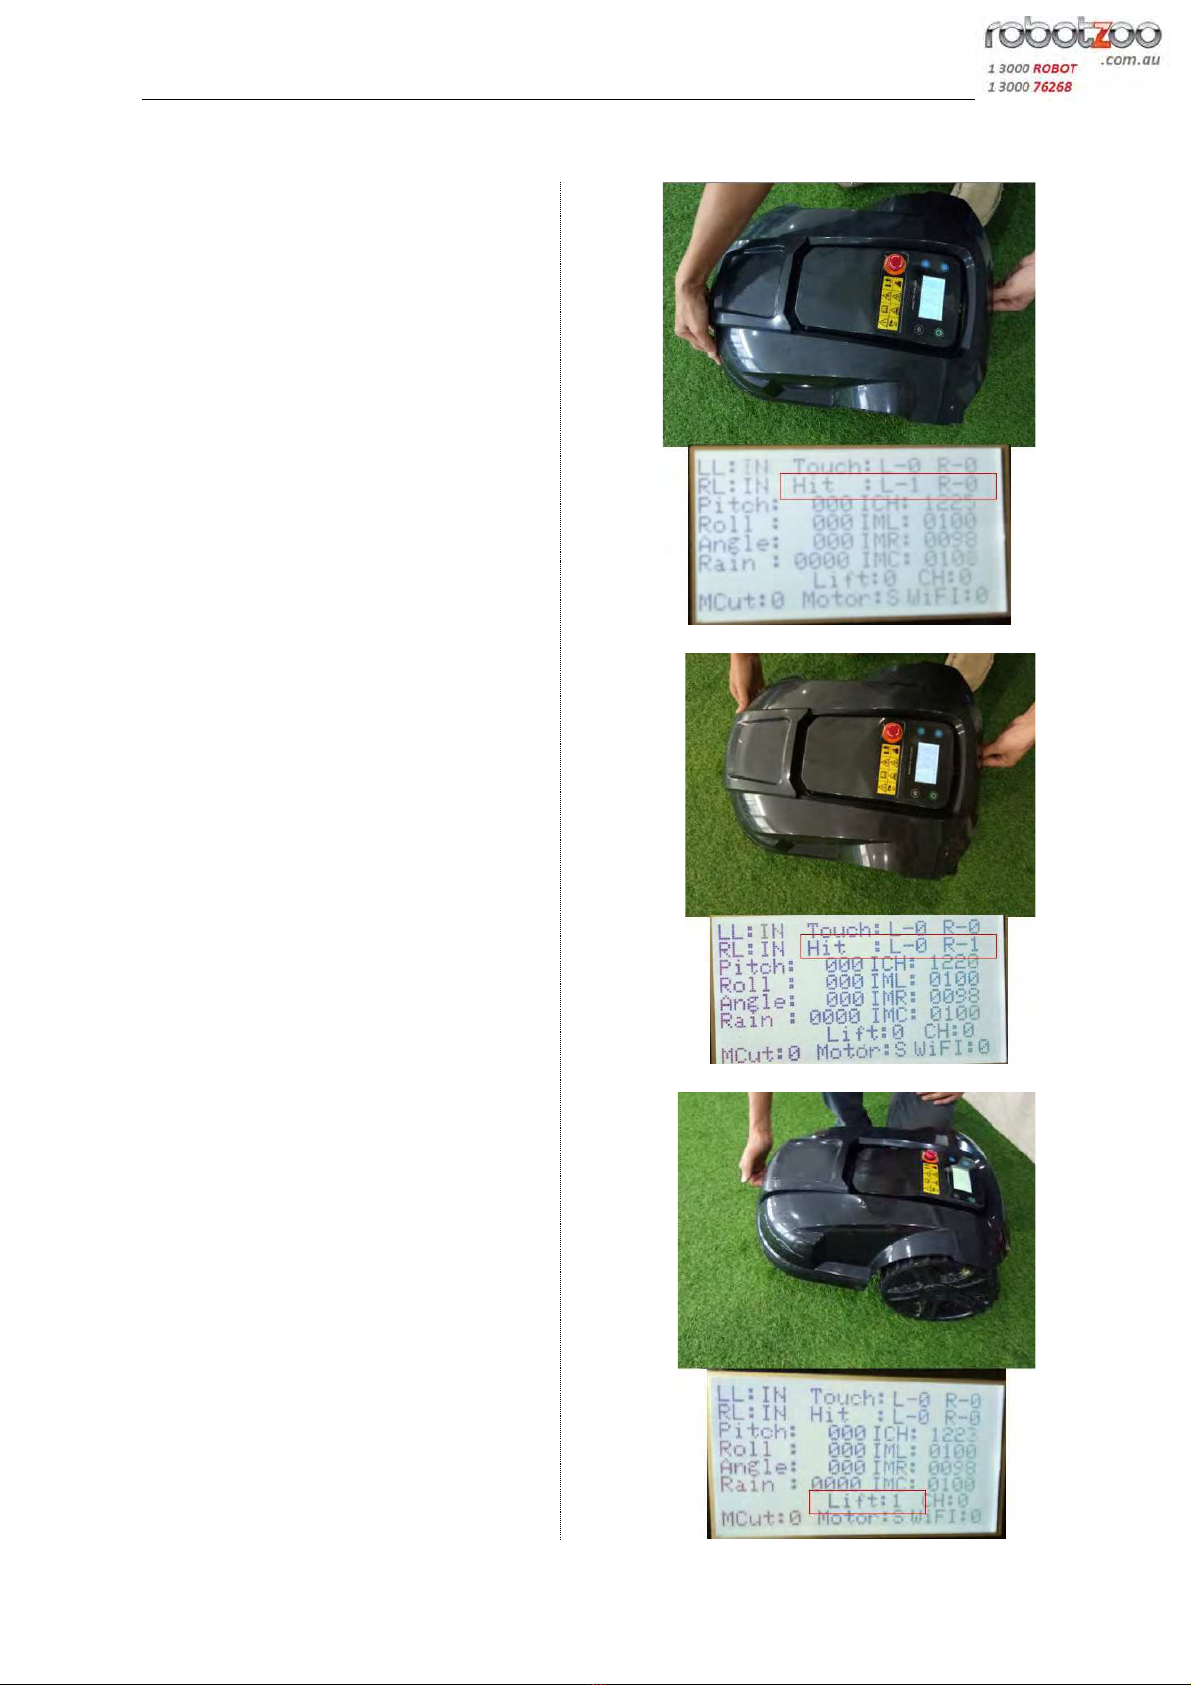
Bump!sensors!are!integrated!into!the!ball!
joints!that!connect!to!the!cover.!
!
Test!the!sensor.!with!the!diagnostic!screen!
showing.!
!
To!test!the!Left!bump!sensor,!push!the!
cover!on!the!left!side!at!the!front.!The!
screen!should!indicate:!
!
Hit!!!!:!L!–!1!!!R!–!0!
!
!
!
!
!
!
To!test!the!Right!bump!sensor,!push!the!
cover!on!the!right!side!at!the!front.!The!
screen!should!indicate:!
!
Hit!!!!:!L!–!0!!!R!–!1!
!
!
!
!
Lift!sensors!are!also!integrated!into!the!ball!
joints!connecting!the!cover.!
!
To!test!the!Lift!sensor,!pull!up!on!the!cover!
at!the!front.!The!screen!should!indicate:!
Lift:!1!
!
If!the!Lift!sensor!is!always!on,!and!the!lift!
sensor!alarm!is!always!activated,!this!
means!that!the!Lift!sensor!Is!broken.!
!
!
!
! !
Robot%Mower%Diagnostics%–%Wombat%&%Wombat%Joey%
!
Testing%the%Pitch%/%Roll%/%Angle%Sensors%
!
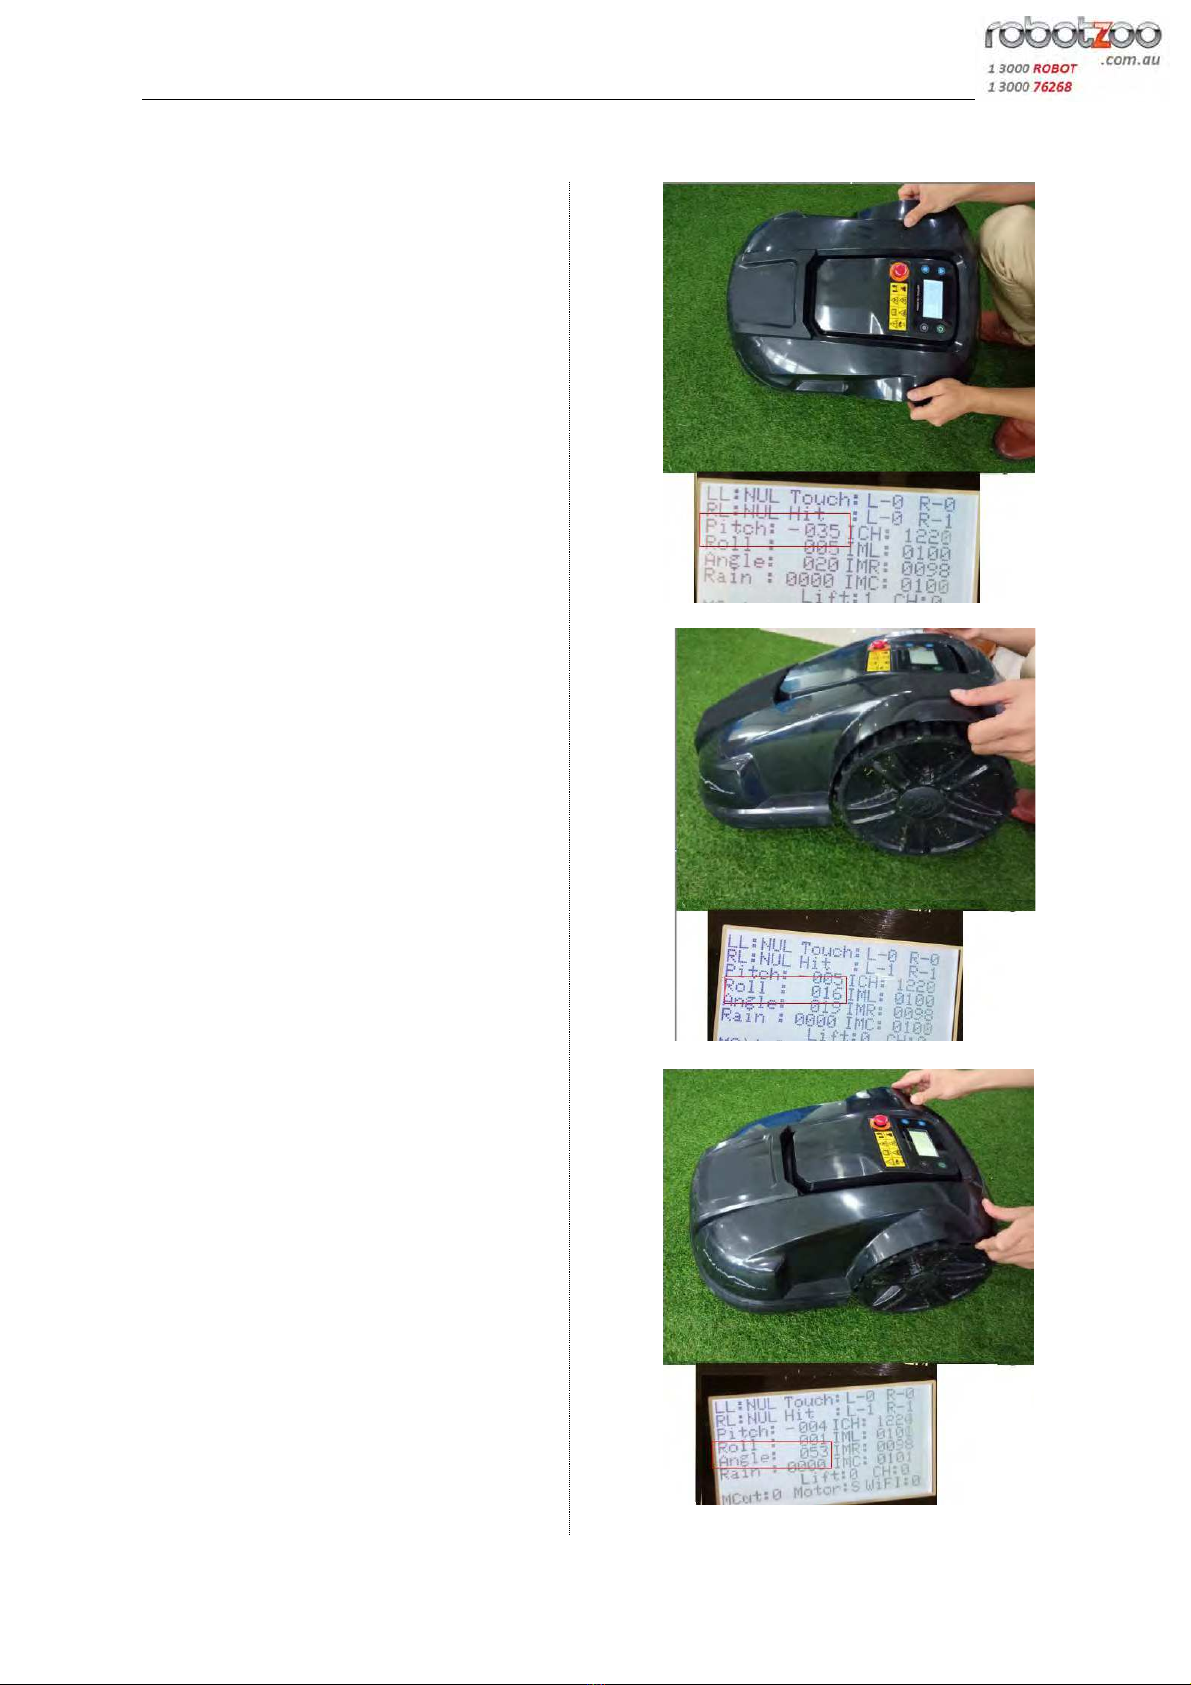
There!is!an!in-built!gyroscope!module!to!
help!the!mower!maintain!its!course!on!
sloped!ground.!!
!
Test!this!module!with!the!diagnostic!screen!
showing.!
!
To!test!Pitch,!hold!the!mower!by!the!wheel!
arches,!and!turn!it!to!the!left!and!to!the!
right.!
!
Check!for!changes!in!the!Pitch!reading!as!
indicated.!
!
!
!
!
To!test!Roll,!hold!the!mower!by!the!wheel!
arches,!and!lift!the!rear!wheels,!and!then!
the!front!wheel.!
!
Check!for!changes!in!the!Roll!reading!as!
indicated.!
!
!
!
!
To!test!Angle,!hold!the!mower!by!the!wheel!
arches,!and!alternately!lift!one!arch!at!a!
time.!
!
Check!for!changes!in!the!Angle!reading!as!
indicated.!
!
!
!
!

Robot%Mower%Diagnostics%–%Wombat%&%Wombat%Joey%
!
Testing%the%Internal%Charge%Sensors%
!
The!charging!properties!of!the!mower!can!
be!checked!through!the!diagnostic!screen!
when!the!mower!is!seated!in!the!charging!
station.!
!
The!ICH!indicator!has!a!range!0~4096.!The!
higher!the!reading,!the!more!current!is!being!
drawn.!
!
When!charging,!the!indicator!should!show!
>500,!until!the!internal!battery!voltage!rises!
above!26V.!
!
When!the!internal!battery!voltage!rises!
above!26V,!the!ICH!reading!should!gradually!
decrease,!until!the!mower!is!fully!charged,!
and!no!more!current!is!required.!
!
The!charging!connection!CH!indicates!
whether!or!not!the!electrical!connection!
between!the!mower!and!the!charging!
station!is!good:!
(1=connected;!0=disconnected)!
!
! !
Robot%Mower%Diagnostics%–%Wombat%&%Wombat%Joey%
!
!
Testing%the%Internal%Motor%Sensors%
!
!
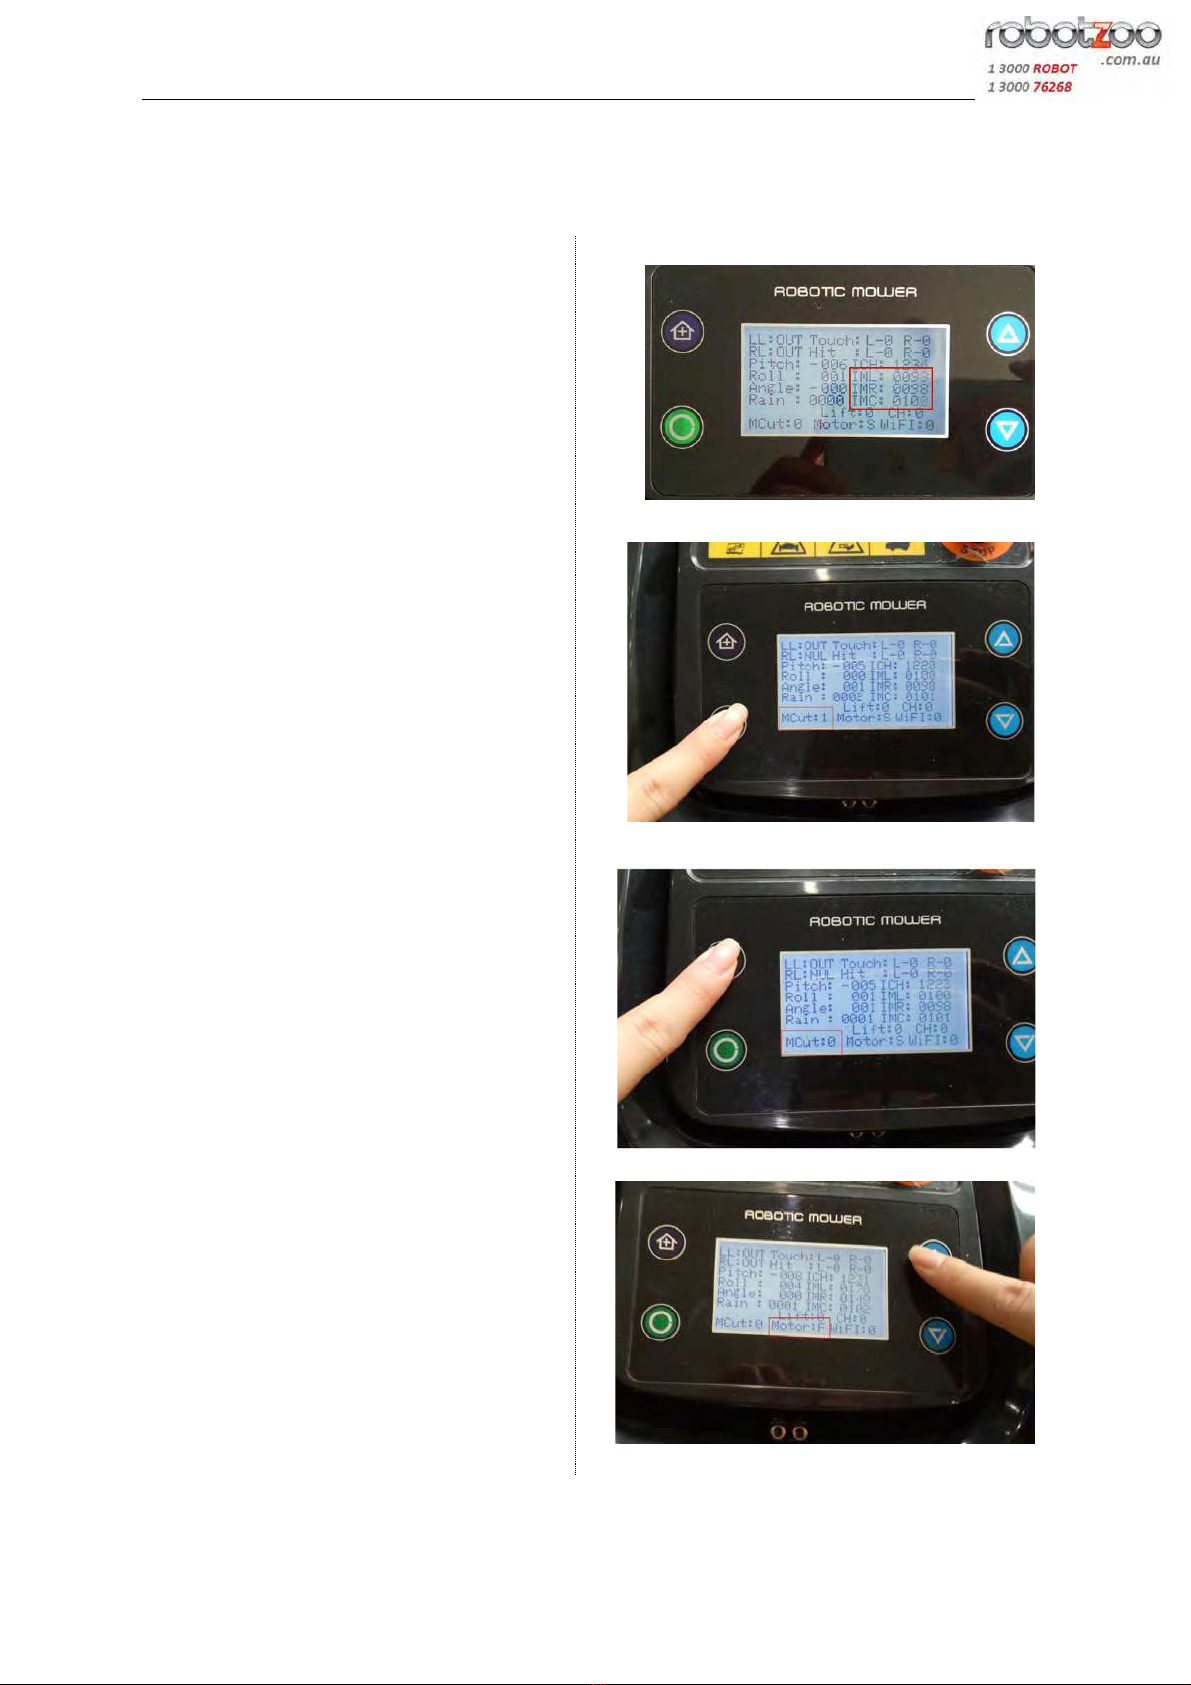
The!Internal!Motor!current!sensors!show!the!
status!of!power!to!motors.!
IML:!left!motor!current!(0!~!4096)!
IMR:!right!motor!current!(0!~!4096)!
IMC:!cutting!motor!current!(0!~!4096)!
!
!
!
!
The!Cutting!Motor!status!indicates!the!
operation!of!the!cutting!motor.!
!
To!start!the!cutting!motor,!with!the!
diagnostic!screen!showing,!press!the!green!
SET!button.!!
The!display!should!show:!
!MCut:!1!
(1:!ON!0:OFF)!
!
!
!
!
To!stop!the!Cutting!Motor,!with!the!
diagnostic!screen!showing,!press!the!purple!
HOME!button.!!
The!display!should!show:!
!MCut:!0!
(1:!ON!0:OFF)!
!
!
!
!
The!Running!Motor!status!indicates!the!
operation!of!the!drive!motor.!
(S:OFF!!!F:forward!!!!R:reverse)!
!
To!start!the!running!motor!in!forward,!with!
the!diagnostic!screen!showing,!press!the!
blue!UP!button.!!
The!display!should!show:!
Motor:!F!
!
!
!
Robot%Mower%Diagnostics%–%Wombat%&%Wombat%Joey%
!
!
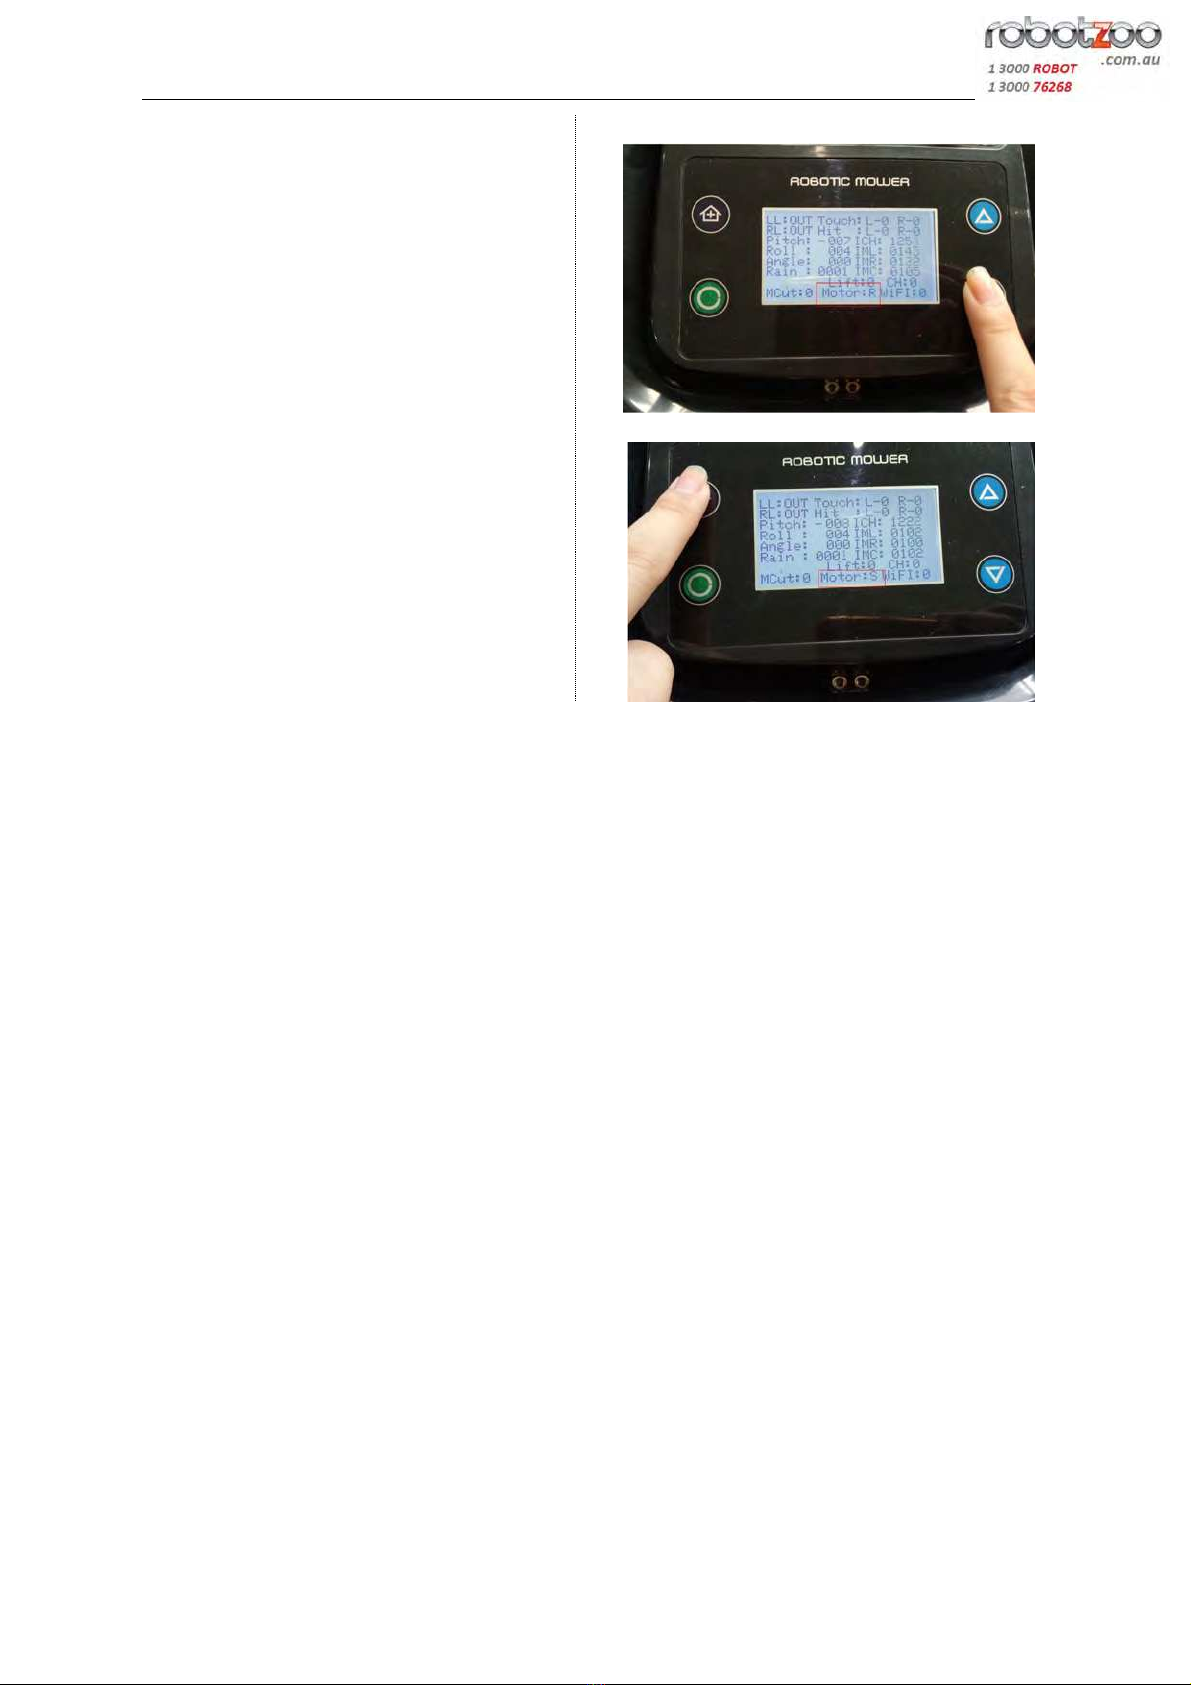
To!start!the!Running!Motor!in!reverse,!with!
the!diagnostic!screen!showing,!press!the!
blue!DOWN!button.!!
The!display!should!show:!
!Motor:!R!
!
!
!
!
To!stop!the!Running!Motor,!with!the!
diagnostic!screen!showing,!press!the!purple!
HOME!button.!!
The!display!should!show:!
!Motor:!S!
!
!
!
!
! !
This manual suits for next models
1
Table of contents
Popular Lawn Mower manuals by other brands


TALEN TOOLS
TALEN TOOLS AVR HGM30 manual

DEWEZE
DEWEZE ATM-725 Operation and service manual

Weed Eater
Weed Eater 180083 owner's manual

Husqvarna
Husqvarna Poulan Pro PP185A42 Operator's manual

Better Outdoor Products
Better Outdoor Products Quick Series Operator's manual

Cub Cadet
Cub Cadet 23HP Z-Force 60 Operator's and service manual


