Rockshell Alpha Installation and operating instructions

Manual and installation guide for models:
Alpha, Beta, Beta Max, Gamma, Delta.
ROCKSHELL is a registered UK company.
All intellectual property rights apply.
- B O U T I Q U E P E D A L C A S E S -
Quick start
Lid: Rockshells have lift-off lids that must be used carefully:
Place the pedalcase on a stable level surface and undo the clasp at
the front beneath the handle. Open the lid, then lift upwards with a
gentle pressure towards the hinges at the back of the case. This will
aid hinge movement/geometry.
Take care not to damage the neoprene seal.
To replace the lid, locate the hinge hooks precisely into the hinge
pin from above, then close the lid, again maintaining a gentle
rearwards pressure towards the hinges. Fasten the clasp.
Deck: decks are fixed to the deck supports inside the case using ball
and spring latches, with adjustable tensioners.
To remove, hold beneath the deck at the back with the fingers of
both hands then apply pressure to the base beneath using your
thumbs to release the deck. It will pivot into the front of the case to
reveal the subdeck and can be lifted off.
Take care not to damage the seals on the deck supports.
To replace, fit the deck into the front of the case and lever down
gently to locate the catches, then press firmly to click into place.

Planning and Installation Guide
Introduction: planning your effects circuit
Before mounting your Rockshell - installing the power supply, cables and utility,
drive and effects pedals - take some time to design your circuit.
The effects circuit (often called the signal chain) has its own well-established
conventions, but can be designed any way you like. With 1000s of effects pedals
available, your choices are practically limitless.
As your own designer, your circuit will likely be unique to you and you will also be
better placed to make modifications and troubleshoot problems.
Designing your circuit
Before designing your effects circuit - the order pedals are sequenced in-between
instrument and amp - consider this key idea:
‘Circuit placement and pedal placement are not the same thing…’
A pedal’s position in the circuit does not necessarily relate to its position on your
Rockshell’s pedal deck, (or any other pedalboard for that matter.)
For example, compressor pedals like Origin’s Cali76 are often the first
pedal in a circuit, evening out dynamics and providing a strong,
sustaining signal for other pedals down-stream. But this does not mean
you need to place it front right on your board. Set-and-forget, always-on
pedals like this can be placed anywhere, even stowed out of the way
beneath the deck, to keep premium front deck space clear for the pedals
you use most frequently, like the tuner.
At the opposite end of the spectrum, reverb pedals are usually
positioned last in the circuit, but need not be placed back left on
the top deck. The Strymon BigSky has a very musical infinite/
freeze function which you may want to access frequently from the
front deck to create ambient pads. !

Your circuit design need only be a simple handwritten list or flow chart.
Example 1a: circuit schematic
Once the sequence of effects is finalised plan the pedal placement on your deck to
suit you. You can, of course, experiment before mounting your pedals.
Example 1b: pedal placement schematic

Refer to the circuit design to plan signal connections for pedal placement.
Example 1c: pedal placement signal connections
The sophistication of your circuit is only limited by the equipment you have
available and your needs; many players develop complex rigs over time.
Example 2: stereo circuit design detailing signal and power connections

Common Circuit designs
Although there are no set rules, popular convention sequences effects like this:
You may not have/need every category of effect.
Devices used in Example 1 are shaded dark grey below:
Common exceptions
!- Some ‘pre-drive’ modulation effects are placed after drives, e.g. phasers
!- Some players prefer to place compressors after drives to smooth them out
!- Amp/Can Sims can be placed at the end of the circuit or used with pre-amps
!- Volume pedals placed before drives affect the input gain of drive pedals
!- Volume pedals placed after drives act like a master volume control!

Expression and Equalisation Pedals
Expression pedals, like the DOD Mini E, are connected to the relevant
effect, e.g. to change delay time, and should be positioned to suit.
EQ pedals are used in a number of ways, including:
!- First in the circuit to EQ guitar pickups
!- To EQ specific drive pedals or other effects
!- As frequency specific or global boosts/cuts
!- At or near the end of the circuit for adaptive EQ
Loop Switchers
Loop switchers - not to be confused with phrase loopers like TC
Electronic’s Ditto - are used in larger circuits to place key
functions right at the player's feet on the front deck. Some, like
the Boss ES-3, include built in effects. Even a simple looper - like
Bright Onion’s ABC Switch - dramatically increases the flexibility
of your circuit.
Importantly, because you needn’t use a pedal’s foot-switch to
activate an effect, a loop switcher enables you to mount pedals
more freely, including on the subdeck beneath the main deck.
Pro Tip for loop switchers: Pedals can be mounted anywhere in any orientation
that their design allows, e.g. pedals that have top connections, such as Rockett’s
compact Tour series, can be mounted on their sides if they are ‘always-on’, or just
about any way you like if you use a loop switcher - even back-to-back and side on!
Power Supplies
Pedal and pedal board manufacturers recommend specifying an isolated power
supply (PS) for your effects. Batteries are environmentally unsound and prone to
dying at the time most inconvenient to you… Popular choices include Voodoo Labs,
Cioks and Strymon, offering low and high current outlets to power analogue and
high-draw digital effects.
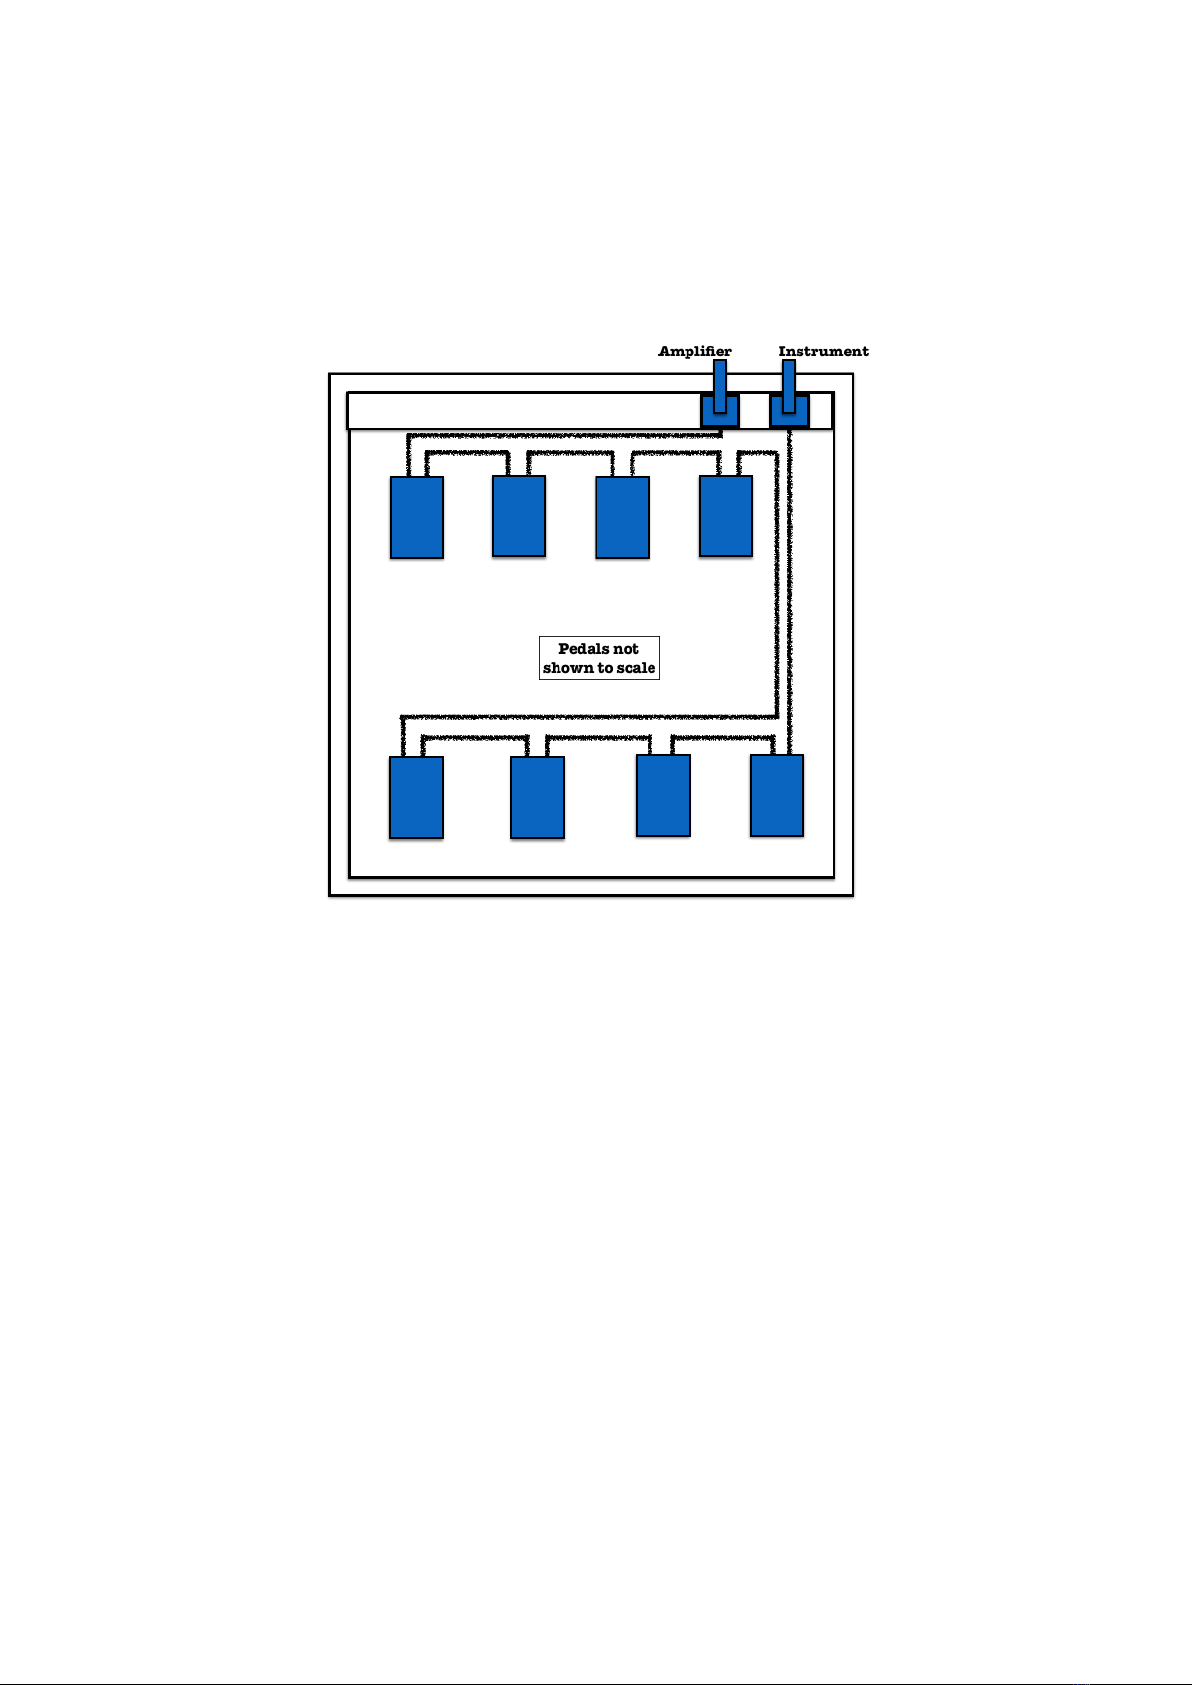
We recommend mounting your PS at the back of the case, beneath the deck (see
schematic below) to ensure your 9v cables can reach every part of the circuit easily.
NOTE: Alpha and Beta models require a slimline power supply.
Some PS designs are in one unit, some in two, a transformer coupled mains cable
and the outlet block itself. There is ample room in every Rockshell to install either
type using velcro or 3M Dual Lock, without the need for special mounting brackets.
Pro tip: You need to ensure your supply has enough outlets for all your effects,
especially high-draw digital effects, but it is not always necessary to use a dedicated
outlet for each one. Many analogue drives, for example, draw very little current -
often less than 20 milliamps - and you can safely use a 9v splitter cable to feed two
pedals, though we do not recommend ‘daisy-chaining’ more than two.

Power Cables
We recommend designing and installing your power cable runs first, since these are
likely to remain in position even when you make changes to your circuit.
Here’s a schematic of an efficient Rockshell power cable layout, with the supply
installed beneath the top deck of a Gamma.
‘H’ shape power cable layout.
Note: horizontal power cable runs are centred in front of the power supply.
Runs to pedal locations are vertical. There is no diagonal routing of cables.
Ideally, power cables should be positioned away from signal cables. Where they do
cross, they should be perpendicular/at right angles. Parallel runs, inevitable in
some places, should be as short as possible. The ‘H’ shape is a good starting point.
Neat cabling with separation of power and signal cabling is good practice and
minimises EM interference in your circuit.*
Pro Tip: Consider buying additional 9v cables other than those supplied with your
PS to minimise the length of power cable runs. Any excess cable lengths should be
folded and zip tied in front of the PS, allowing extra reach for any circuit changes.
*Try applying this principle to your home stereo/AV system too.
Take special care to keep power cables away from speaker cables.

Signal Cables
We recommend designing and installing your signal/patch cables after your power
cables. Separation of power and signal cables is simpler and it’s easier to make
circuit changes.
Here’s a schematic of an efficient Rockshell signal cable layout on a Gamma Pro.
‘Bass Clef’ shape power cable layout.
Note: horizontal signal cable runs are at the top and bottom of the case, well away
from power cables. Runs to input and output locations are vertical on the right hand
side. Again, there is no diagonal routing of cables.*
!!!!!!!
Pro Tip: Several signal - or patch - cable types are available in straight, right-angle
and pancake designs including: pre-made patch cables, pre-made solid jack
connectors, DIY soldered, DIY solderless. A solderless patch cable kit, such as the
Evidence SIS Monorail system. With a little practice, anyone can quickly make
solderless patch cables to the required length.
*Left-handed players may prefer to reverse the position of signal and power connections, as well as
the traditional right-to-left layout of their effects circuit.

Mounting cables
With the power and signal cable layout carefully planned, installation - or mounting
- is relatively straight forward. You know beforehand which PS outlet will supply
which pedal and where the cable will run. The same applies to the signal cables that
connect your circuit components (the pedals) together.
There are several mounting options including self-adhesive
cable clips, screw-down clips and zip ties. Any type will work
with your Rockshell, including screw-down clips which you
can fix directly into the case. However, we do not recommend
domestic electrical cable clips that are nailed in.
Ideally, use 3M adjustable cable clips or similar. These can be
re-positioned until satisfied. They can also be fastened and re-
fastened to allow for circuit changes and can accommodate
multiple cables.
Pedalcase accessies list
Mio-cloth
2” paintbrush (new)
3M Dual Lock
Zip Ties Optial
Cable Clips Input/tput patch bay
Patch cables - sdless Deck lights
P cables - mof lengths Ailiy deck…!

Mounting pedals
The decks fitted to each Rockshell model were dimensioned after careful analysis of
popular effects to avoid that ‘it nearly fits’ frustration. The top rail on Alpha and
Beta decks provides extra space and flexibility; Gamma and Delta have generous
subdeck mounting space.
!Standard and Strymon Effects
!
!Alpha - 4/5 standard or three small Strymons
!
!Beta - 6/7 standard or four small Strymons / two large.
!
!Beta Max - 8 standard or five small Strymons / three large.
!Gamma - 10 standard pedals or 5 Strymon Small Format
!Delta - 12 standard pedals or 4 Strymon Large Format
We recommend ‘dry’ fitting your pedals before deciding on a final arrangement.
Fixing pedals to the decks - 3M Dual Lock*
Velcro is just fine for attaching pedals to your Rockshell but our
preferred method to attach pedals securely is to use 3M Dual
Lock. Though more expensive, this provides a much stronger
and more precise fixing and is definitely worth it.
Pro Tip: If you are certain of your permanent pedal
placement, for a smart appearance you need not run tape the
full length of the deck. Instead, first affix tape to each pedal.
Then cut and fix only the required length of deck tape to the
pedal tape. Finally, peel and carefully place each pedal on the
deck in position. No extra tape will be visible, just your pedals
So you can make an informed choice, we do not supply or pre-fit inexpensive
hook and loop tape (velcro) just for the sake of it.
*Rockshell has no commercial affiliation with 3M.
The 3rd dimension
The basic premise of Rockshell is to go beyond the limitations of a basic pedal
‘board’ and provide a sturdy case construction that enables you to design and
install your circuit in 3D.
The schematic examples provided are just a starting point; you can securely route
cables (and pedals) to the deck, subdeck, internal sides and back and to the bottom
of the deck itself, to your personal preference, all in a self-contained case that
protects all cable runs.

Final Word
Designing your effects circuit is a dynamic process and it may take several years to
settle on a formula that feels right for you. Most likely, it will continuously evolve.
Fuzzy, fuzzier, fuzziest…
You will change your mind, replace, or repurpose, key effects. You will buy and sell
to fund your journey. You will be inspired by new product releases, musical
fashions, by what your favourite artists use, or amass a collection from a favourite
manufacturer or of a particular effect type; favourite fuzz pedal anyone…?
Large pedalboards, though powerful, are cumbersome and heavy. Twin boards, often seen in pro rigs,
are more manageable, flexible, provide technical redundancy and put more pedals on the ‘front row.’
Hopefully, the guidance in this section has helped clarify some of the practicalities
of planning an effects circuit - or two - that will work best for you.
Beta Max
Beta

ROCKSHELL DESIGN DETAILS
Colour Options
We offer a range of 12 standard case colours
and 2 interior finishes in marine acrylic.
Seaworn Editions released periodically.
Custom Colours
You can specify any custom colour, for the exterior of your
Rockshell from the Classic RAL System at no extra cost.!
Shadow
Storm
Slate
Atlantic
Forest
Copper
Snow
Sunface
Tangerine
Dynamite
Bubblegum
Foxglove
Interior Grey / Bone

In Use
The Shell
Rockshells are designed and built like traditional instrument cases to completely
protect their valuable contents when fastened shut. The birch-ply joinery shell is
strong, durable, lightweight and made from FSC certified, sustainably sourced
timber. See our website for more details on construction” www.rockshell.co.uk
Hinged and latched with flight-case hardware, the neoprene seal forms a tight
closure which guards against dust and moisture. The lid is lined with protective egg-
foam to help secure and protect the contents during transit.
Power and signal connections on Pro and Custom editions are recessed into a
connection panel fitted inside the shell for complete protection.
With a marine-grade finish, your Rockshell will comfortably withstand knocks,
bumps, drops and liquid spills and can be safely stacked with other gear.
The Deck
Every Rockshell is fitted with a latched, removable deck - with supports attached
securely to the shell. They’re sloped to present your pedals for easy visibility and
access and carefully dimensioned to allow multiple pedals sizes and configurations.
Beneath the deck is the subdeck, with ample room to install cables, power supplies,
and ‘always-on’ effects. Cable slots facilitate signal cable installation.
Note: pedals and connections should not be installed beyond the edges of the deck.
Pedals should be set back from the front edge of the deck to allow for lid closure.
Mains power cables can be stowed beneath the deck for transportation and are
accessed through the rear slot. Signal cables can be routed through and beneath the
deck. Power supplies and always-on effects can be mounted directly to the subdeck,
without the need for special mounting hardware.
The Connection Panel (Pro and Custom Editions only)
At the rear of Pro and Custom editions is a connection panel fitted with Neutrik
surface-mounted 1/4” jack connectors together with Neutrik right-angled jack plug
harnesses to connect to your effects circuit.
DO NOT REMOVE THE RED CABLE RELIEF CLIPS.
Caution: before use, you must remove the lid and connect your external power and
signal cables. After use, you must disconnect all connection cables before replacing
the shell lid.
If you try to replace the lid while connections are still in place, you will be
responsible for damaging your cables and connection panel. It’s easy to make a
simple mistake like this during a rushed, end-of-session pack up, so take care.

CUSTOM OPTIONS
Cabling Option: If you plan to use the Evidence Audio Monorail system, you can
specify Monorail cable and jacks instead of the standard Neutrik Jacks.*
*Supplement applicable.
Stereo Option: should you choose, you can specify
three Neutrik inlet/outlet connectors outlet and jack
harness for stereo out operation.* If you require
other connector types to be fitted to your Rockshell,
such as XLR, please contact us to specify your
requirements.
*Supplement applicable.
Finishing Options:
Alpha, Beta, Gamma and Delta standard models are finished in our range of 12
standard exterior colours - with a satin finish. Interiors and decks are finished in
grey and/or white.
Any RAL Classic case colour can be specified at no extra cost.
PRO EDITIONS are special run releases fitted with Neutrik jack connectors and
harnesses. They can be ordered direct from our website: www.rockshell.co.uk
SEAWORN EDITIONS are very limited run, hand-finished releases from our paint
shop with a beach-combed, driftwood appearance. Distinguished by their leather
handles and stamped with our Ammonite logo.
CUSTOM EDITIONS Contact us to explore the commissioning a custom designed
and coloured pedalcase, or matched pair, designed to fit your individual circuit.

Specifications
Alpha
Deck: 8” x 16”
Unladen weight: 6kg
External:
w 400mm, d 250mm deep, h 220mm
Beta
Deck: 8” x 20”
Unladen weight: 7kg
External:
w 500mm, d 250mm deep, h 220mm
Beta Max
Deck: 8” x 24”
Unladen weight: 7.5kg
External:
w 600mm, d 250mm deep, h 220mm
!Rockshell Range
-Alpha 8” x 16” 4 - 6 effects.
-Beta 8” x 20” 6 - 8 effects
-Beta Max 8” x 24” 8 - 9 effects
-Gamma 12” x 16” 10 - 12 effects
-Delta 12” x 20” 12 - 15 effects

Gamma
Deck: 12” x 16”
Unladen weight: 8kg
External:
w 400mm, d 350mm, h 220mm
Delta
Deck: 12” x 20”
Unladen weight: 9.5kg
External:
w 500mm, d 350mm, h 220mm

Rockshell: Terms and Conditions
Warranty
Rockshell warrants the product to be free from defects in materials and workmanship for a
period of one (1) year from the original date of purchase. If the product fails within the
warranty period, Rockshell will repair or, at our discretion, replace the product at no cost
to the original purchaser. Warranties are given to the original purchaser only and are not
transferable. This warranty shall not apply to any goods that have been altered or modified
by anyone other than Rockshell. Proof of purchase is required for warranty claims.
Exclusions
This warranty covers defects in manufacturing discovered while using this product as
recommended by Rockshell. This warranty does not cover loss, theft or accidental damage.
Nor does the coverage extend to damage caused by misuse, abuse, unauthorised
modification, improper storage, or natural disasters. Rockshell pedalcases are constructed
using predominantly natural materials and may, from time-to-time, exhibit minor cosmetic
imperfections that do not affect their functionality, these are excluded under the terms of
the warranty. The lid seals affixed to the pedalcase are vulnerable to damage if care is not
taken when opening, closing and stowing the lid during use. The seal is also therefore
excluded from the warranty. Should damage to the seal occur, please contact us for advice.
Limits of Liability
In the case of malfunction, the purchaser’s sole recourse shall be repair or replacement, as
described in the preceding paragraphs. Rockshell will not be held liable to any party for
damages that result from the failure of this product. Damages excluded include, but are not
limited to, the following: lost profits, lost savings, damage to other equipment, and
incidental or consequential damages arising from the use, or inability to use this product.
In no event will Rockshell be liable for more than the amount of the purchase price, not to
exceed the current retail price of the product. Rockshell disclaims any other warranties,
express or implied. By using the product, the user accepts all terms herein.
To obtain Warranty Service
Please contact Rockshell through our website at http://www.rockshell.co.uk for Return
Authorisation and shipping information. Proof of original ownership will be required.
This manual suits for next models
4
Table of contents