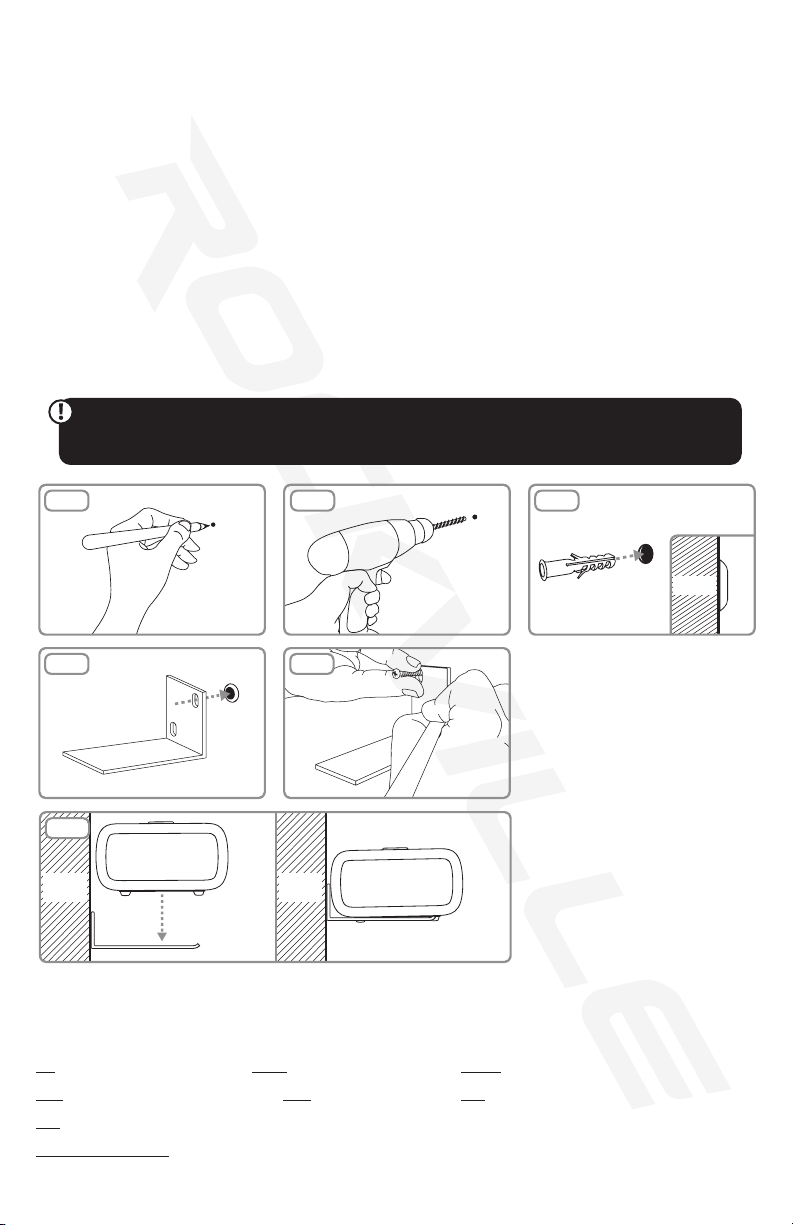
Rockville ONE BAR User manual

Who reads manuals?
Instead, go to the URLs or scan the
QR codes to watch short videos,
which cover everything you need to
know to set up this item.
vimeo.com/
450192011
vimeo.com/
448642968
OWNER’S MANUAL
40˝ SOUNDBAR w/BUILT-IN SUBWOOFER
ONE BAR

2
Thank you for purchasing this Rockville product. Please read this installation
guide carefully for proper use of your Rockville ONE BAR 40˝ Soundbar. Should
you need assistance, please call our technical help line at 1-646-758-0144, Mon-
day through Friday, 9am to 5pm EST.
IMPORTANT SAFETY INSTRUCTIONS
TO REDUCE THE RISK OF ELECTRICAL SHOCK, DO NOT REMOVE AMPLIFIER
PLATE. NO USER-SERVICEABLE PARTS INSIDE. WE RECOMMEND TAKING THE
UNIT TO A QUALIFIED SERVICE TECHNICIAN FOR ANY REPAIRS.
This soundbar was especially developed for LED/LCD/Plasma televisions. It should not
be used in combination with CRT (Cathode Ray Tube) televisions to avoid image interference.
• Do not place on an unstable surface. The speaker may fall over, causing serious injury
to a child or adult and serious damage to the unit.
• Do not use near water; for example, near a bathtub, sink, in a wet basement, or near a
swimming pool.
• The soundbar should be situated away from heat sources such as radiators, heat
registers, stoves, or other devices that produce heat.
• These speakers should be connected to a power supply outlet of the same voltage as
that which is specied on the unit. Protect the power cord from being walked on or
pinched, particularly at plugs, convenience receptacles, and the point where it exits from
the unit.
• Clean only with a soft, damp cloth. Unplug this product from the wall outlet before
cleaning.
• Upon any servicing or repairs, request the service center/shop uses factory-authorized
replacement parts. Replacement with unauthorized parts may result in re, electrical
shock, or other hazards.
• Soundbar with built-in Subwoofer
• Remote control
• 3.5mm to RCA cable
• (2) AAA batteries
• Wall-mount hardware kit
• Owner’s manual
INCLUDES:

3
FUNCTIONS
1. Display
2. Power/Standby button
3. Volume +/- buttons
4. Input source button
5. USB input
6. HDMI (ARC)
7. Optical input
8. AUX input
9. AC Power input: 110/230v~60/50Hz
1
2 3 4
8765 9

4
1. Press for power on/off or stand-by mode.
2. Mute
3. Pair: Press and hold for 3 sec. to connect to or
disconnect from paired device.
4. Input: Press to select input source — AUX,
Optical, HDMI (ARC), BT, and USB.
5. Play/pause in USB/BT modes
6. Increase/Decrease volume setting
7. Next track/Previous track in USB/BT modes
8. Preset EQs: Music, Movie, News, 3D
9. Increase/Decrease treble setting
10. Increase/Decrease bass setting
REMOTE CONTROL
FUNCTIONS (continued)
2
4
6
109
8
3
1
7
5
MOUNTING INSTRUCTIONS
SURFACE MOUNT
Be sure to mount the ONE BAR on a at and stable surface. For best sound do
not place the soundbar in any type of enclosed space. Do not mount on top of
stereo equipment as it may radiate excessive amounts of heat, which can cause
damage to the soundbar.
YES
NO NO

5
WALL WALL
WALL
WALL MOUNT
MOUNTING INSTRUCTIONS (continued)
To wall mount your ONE BAR, you will need a drill, drill bits, a phillips head screw
driver, and a pencil or pen.
The rst step is to determine the mounting location and mark it with a pencil or
pen (g A). Use the drill and an appropriate size bit drill your rst hole (g B). Make
sure that the hole is deep enough to accomodate the anchor. Push the anchor
into place (g C), ensuring that it is ush with the wall as shown in the inset. Place
the wall bracket against the wall and line it up with the anchor (g D). Insert a
screw to maintain the alignment and mark the location of the second hole using
a pencil or pen (g E). Repeat these steps for the second wall bracket. Before in-
stalling the second bracket, measure the distance between the bottom of the TV
and the base of the bracket. Mount the second bracket at this height to ensure
that aligned with the other bracket. We recommend mounting the brackets be-
tween 28 to 30 inches apart. Once both brackets are attached to the wall, place
the ONE BAR on top of the brackets (g F).
bt: Bluetooth mode OPt: Optical mode USb: USB mode
Hd: HDMI (ARC) mode AU: AUX mode E1: Music mode
E2: Movie mode
Volume values: 00 – 44. Factory volume setting is 10.
fig A
fig D
fig B fig C
OPERATION
DISPLAY SCREEN INDICATORS
WALL
fig E
fig F
For more information on how to setup your ONE BAR, check out our in-
structional videos: vimeo.com/450192011 and vimeo.com/448642968

6
Many TVs, digital set-top boxes, game consoles, and DVD players have optical
(ber optic) outputs. To connect via Optical input, follow the steps listed below.
1. Use the included digital optical audio cable to connect the ONE BAR to the
sound source. If you are using a TV, go into your TV’s audio settings and
make sure to deactivate Dolby Pro Logic, Dolby ATMOS, etc. and select PCM
format.
2. Power on the sound source and the ONE BAR. Press the INPUT button on
the soundbar’s control panel or on the remote control. If it is properly con-
nected, the LCD display will show the letters “OP”.
3. Once connected, the unit will automatically turn on when you turn on your TV.
You will need to adjust the TV’s volume and the ONE BAR’s volume independently.
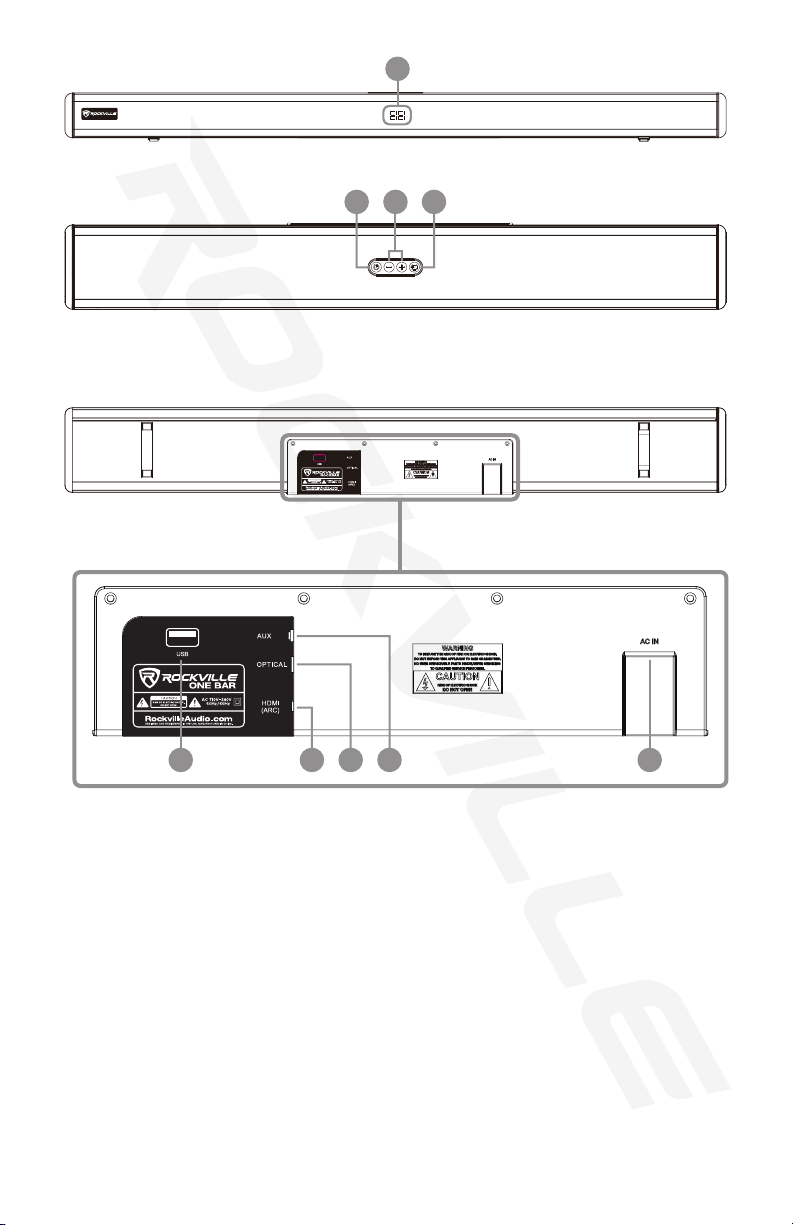
OPTICAL
The ONE BAR can be connected to your TV or receiver via an ARC-enabled
HDMI port. ARC stands for “Audio Return Channel” and has been available on
most TVs, receivers, and soundbars since the HDMI 1.4 standard was intro-
duced in 2009. The ARC protocol offers two-way communication between
devices over a single HDMI connection. Simply put, this means that you can use
the HDMI ARC port (if available) as an input and an audio output. Check your
specic device’s manual to see if it features an HDMI ARC port.
1. Connect a standard HDMI cable to your soundbar and connect the other end
to your TV’s HDMI ARC port. Most TVs feature ARC output over only one
HDMI (ARC)
OPERATION (continued)
1. Power on the ONE BAR and press the INPUT button on the ONE BAR or
on the remote control. The LCD display will read “bt” and the letters will ash steadily.
2. Turn on the Bluetooth feature on your device and ensure that it is in disco-
verable mode. Search for “ONE BAR” on your list of available devices and
select it.
3. Once paired, you will hear a tone and the letters “bt” on the LCD display will
stop ashing and remain on.
4. All playback functions (play/pause, volume, tracks) can be controlled from
your playback source (ex. phone/MP3 player) without ever having to touch
the unit. You can also control playback from the ONE BAR (volume) or the
remote control (volume, tracks, play/pause).
Please note:
• If you are using an iPhone, iPad, or iPod, the volume controls are synced so
that if you raise the volume on your device, it will raise the volume on the unit
and vice versa. If using an Android device, you will need to adjust the device’s
volume and the ONE BAR’s volume independently.
• The ONE BAR will remember and automatically connect to the last paired
device when the soundbar is powered on or the device is within range (32 ft).
• If a paired device is manually shut off or disconnected, the soundbar will
automatically reenter pairing mode.
• There is no automatic shutdown in pairing mode. The soundbar will remain in
pairing mode even if no device is paired, so switch it off if not in use.
BLUETOOTH PAIRING

7
1. Power on the ONE BAR and plug in your USB ash drive. The unit will automati-
cally begin playing music and the LCD will show the letters “US”.
2. You can control playback from the ONE BAR (volume) or the remote control
(volume, tracks, and play/pause).
3. To exit USB mode you can remove your USB ash drive or press the INPUT
button on the soundbar or the remote to select another mode.
Please note:
• The ONE BAR supports USB drives up to 32Gb and the MP3 le format only. It
does not support charging.
• Connecting a USB drive will override other input modes.
USB
AUX
Use the 3.5mm AUX jack to connect computers or any other external sound
source with a 3.5mm output.
1. Use the included 3.5mm-to-3.5mm cable to connect the ONE BAR to the
sound source.
2. Power on the ONE BAR. Press the INPUT button on the soundbar or on the
remote. The LCD display will show the letters “AU”.
3. You will be able to control voume from the soundbar or the input device.
Playback functions (play/pause, tracks) are not available in AUX mode and
can be controlled from the input device.
Please note: For some computers, you will have to enter the sound settings and
set the ONE BAR as the output device.
OPERATION (continued)
HDMI port. This port should be labeled as HDMI ARC. If the HDMI ports
aren’t clearly labeled, you can check the TV manual, which should indicate
which HDMI port to use and if the ARC feature needs to be manually activated.
2. Power on the TV and the ONE BAR. Press the INPUT button on the
soundbar’s control panel or on the remote control. If it is properly connected,
the LCD display will show the letters “Hd”.
3. Once connected, the soundbar volume will sync with your TV volume and the
unit will automatically turn on when you turn on your TV.
Please note:
• The ONE BAR must be plugged into an ARC-enabled HDMI port. It will not
work with a standard HDMI port. Check your specic device’s manual to see if
it features an HDMI ARC port.
• If you are having issues with sound output, go into your TV’s audio settings and
make sure to deactivate Dolby Pro Logic, Dolby ATMOS, etc. and select PCM
format.
For more information on how to setup your ONE BAR, check out our in-
structional videos: vimeo.com/450192011 and vimeo.com/448642968

8
• 40˝ 400W soundbar with integrated subwoofer
• 400 watts peak power/80 watts RMS power (continuous)
• Integrated subwoofer and recessed input panel for a clutter-free setup and easy installation
• Built-in Bluetooth version 5.0 with 32-foot range
• Bluetooth can pair with any Alexa device
• HDMI (ARC) Input*
• Optical input
• 3.5mm input
• USB digital input
• 2.1 channel stereo sound to deliver a cinematic experience
• LED display shows volume and track
• PCM decoder
• USB input plays back music stored on a thumb drive (up to 32 GB, MP3 format only)
• Powered by a digital amplier with DSP for audiophile sound quality
• DSP modes: Music, Movie, 3D, News
• Volume, bass, treble controls via the included remote control
• Includes wall brackets and mounting hardware
• Recessed input panel makes it easy to plug in your device(s)
• No distortion even at max volume
• When you use HDMI or optical the volume will sync with your TV volume and the unit
will automatically turn on when you turn on your TV
• When you use Bluetooth the volume syncs with your phone’s volume (iPhones only)
• Frequency response: 60Hz – 20KHz
• S/N ratio: 72dB
• 110/220-volt auto-switching power supply for use worldwide
• Unit weight: 5.95Lbs
• Soundbar Dimensions: 2.6˝ x 4.6˝ x 35˝
* See HDMI (ARC) description on page 6
FEATURES

9
No sound when
receiving TV input
1. Make sure that all connections are secure.
2. If using HDMI, make sure that the TV has a dedicated
HDMI ARC port.
3. Make sure you've selected external speakers in your
TV's sound ouput settings.
4. Deactivate Dolby Pro Logic, Dolby ATMOS, etc. and
select PCM in your TV's sound format settings.
5. Make sure the volume is set properly on the unit and at
the television.
TROUBLESHOOTING
PROBLEM
No sound
No power 1. Make sure the ONE BAR is plugged in and turned-on.
Bluetooth pairing fails
Files on USB memory
device will not playback
1. Check all connections.
2. Make sure you’ve selected the proper input source.
3. Make sure the volume is set properly on the unit and at
the playback source.
4. Check the input device’s audio settings.
1. Check to see that both devices are turned on and that
your Bluetooth device is discoverable.
2. Turn both devices off and then on again.
3. Make sure you’ve selected the proper source.
4. Make sure that the Bluetooth device is within 5 feet of
the unit.
5. Move both devices away from other Bluetooth devices,
microwaves, wireless routers, and other electronics.
6. Make sure that the unit is not paired to a previously
paired device.
1. Make sure you’ve selected the proper source.
2. Make sure the drive is formatted as FAT32.
3. Make sure that the audio les are in the MP3 format.
4. Make sure the memory device capacity is no more than 32GB.
SOLUTION
For more information on how to setup your ONE BAR, check out our in-
structional videos: vimeo.com/450192011 and vimeo.com/448642968

10
Responsible party name: Rockville
Address: 600 Bayview Ave,
Entrance A,
Inwood, NY 11096
Hereby declares that the product Rockville ONE BAR complies with FCC rules as men-
tioned in the following paragraph:
This device complies with Part 15 of the FCC rules. Operation is subject to the following
two conditions: (1) this device may not cause harmful interference, and (2) this device
must accept any interference received, including interference that may cause undesired operation.
Note: This equipment has been tested and found to comply with the limits for a Class B digital
device, pursuant to Part 15 of the FCC rules. These limits are designed to provide reasonable
protection against harmful interference in a residential installation. This equipment generates,
uses and can radiate radio frequency energy and, if not installed and used in accordance with
the instructions, may cause harmful interference to radio communications. However, there is no
guarantee that interference will not occur in a particular installation. If this equipment does cause
harmful interference to radio or television reception, which can be determined by turning the
equipment off and on, the user is encouraged to try to correct the interference by one or more of
the following measures:
•Reorient or relocate the receiving antenna.
•Increase the separation between the equipment and receiver.
•Connect the equipment into an outlet on a circuit different from that to which the
receiver is connected.
•Consult the dealer or an experienced radio/TV technician for help.
FEDERAL COMMUNICATIONS COMMISSION COMPLIANCE INFORMATION

11

© 2020 ROCKVILLE // Features and specifications are subject to change and/or improvement without notice.
RockvilleAudio.com
Table of contents
Other Rockville Subwoofer manuals