Rohnson HM-1021 User manual

1
7 in 1 grooming kit
Model No.: HM-1021
Instruction Manual

2
Thank you for choosing our products, they are designed to meet the highest standard of quality,
functionality and design. We hope that you enjoy using your new appliance. Please read the
instructions for use carefully and keep in safe for future reference.
CAUTION
Use this appliance only for its intended use as described in this manual. Do not use
attachments not recommended.
Do not use this product if it is not working correctly, if it has been dropped for damaged,
or dropped into water.
DESCRIPTION
1. Small cutting guide comb
2. Precision trimmer attachment
3. Power indicator light
4. On/off switch
5. Nose & ear trimmer attachment
6. Full size trimmer attachment
7. Micro shaver attachment
8. Big cutting guide comb
9. Storage base
10. Charging cable
11. Long comb
12. Oil
13. Cleaning brush

3
GETTING STARTED
CHARGINGYOUR PERSONAL GROOMER
Before using your personal groomer for the first time, charge for 14-16 hours.
Ensure the product is switched off.
Connect the charging cable to the inner adaptor of product and then to the mains. The
charging indicator will light up.
Your personal groomer cannot be overcharged. However, if the product is not going to be
used for an extended period time (2-3 months). Unplug it from the mains and store. Fully
recharge your personal groomer when you would like to use it again.
To preserve the life of your batteries. Let them run out every six months then recharge for
14-16 hours.

4
HOW TO USE
BEFORE YOU BEGIN
Always comb your beard or mustache with a fine comb before you start trimming.
ATTACHINGAND REMOVINGTHE GUIDE COMBS
With the trimmer blade facing away from you. Slide the guide comb on top of the full
size trimmer attachment and click into position.
With the trimmer blade facing away from you , carefully push the guide comb away
from the trimmer blade.
T
Ta
ab
bl
le
e
1
1.
.
P
Pr
re
ec
ci
is
si
io
on
n
T
Tr
ri
im
mm
me
er
r
Setting Remaining hair length
(mm)
13.0
24.5
35.5
46.0
T
Ta
ab
bl
le
e
2
2.
.
F
Fu
ul
ll
l
S
Si
iz
ze
e
T
Tr
ri
im
mm
me
er
r
S
Se
et
tt
ti
in
ng
g
R
Re
em
ma
ai
in
ni
in
ng
g
h
ha
ai
ir
r
l
le
en
ng
gt
th
h
(
(m
mm
m)
)
1
1
1
10
0.
.5
5
2
2
1
12
2.
.5
5
3
3
1
14
4.
.5
5
4
4
1
16
6.
.0
0
5
5
1
17
7.
.0
0
USINGTHE MINI SCREEN SHAVER (Diagram 1)
Attach the mini Screen shaver
Hold the groomer so the Mini-Screen gently touches your face in a 45 degree angle.
Use short, well-controlled movements to shaver around your beard/ mustache. Use your
free hand to scratch your skin. This encourages the hair to stand upright, making it
easier to shave.
NOTE: The Mini-Screen shaver was designed to shave the detail areas around your
beard/mustache/sideburns. It was not designed to shave your entire face. For a close
comfortable shave, guaranteed, use one of electric shavers.

5
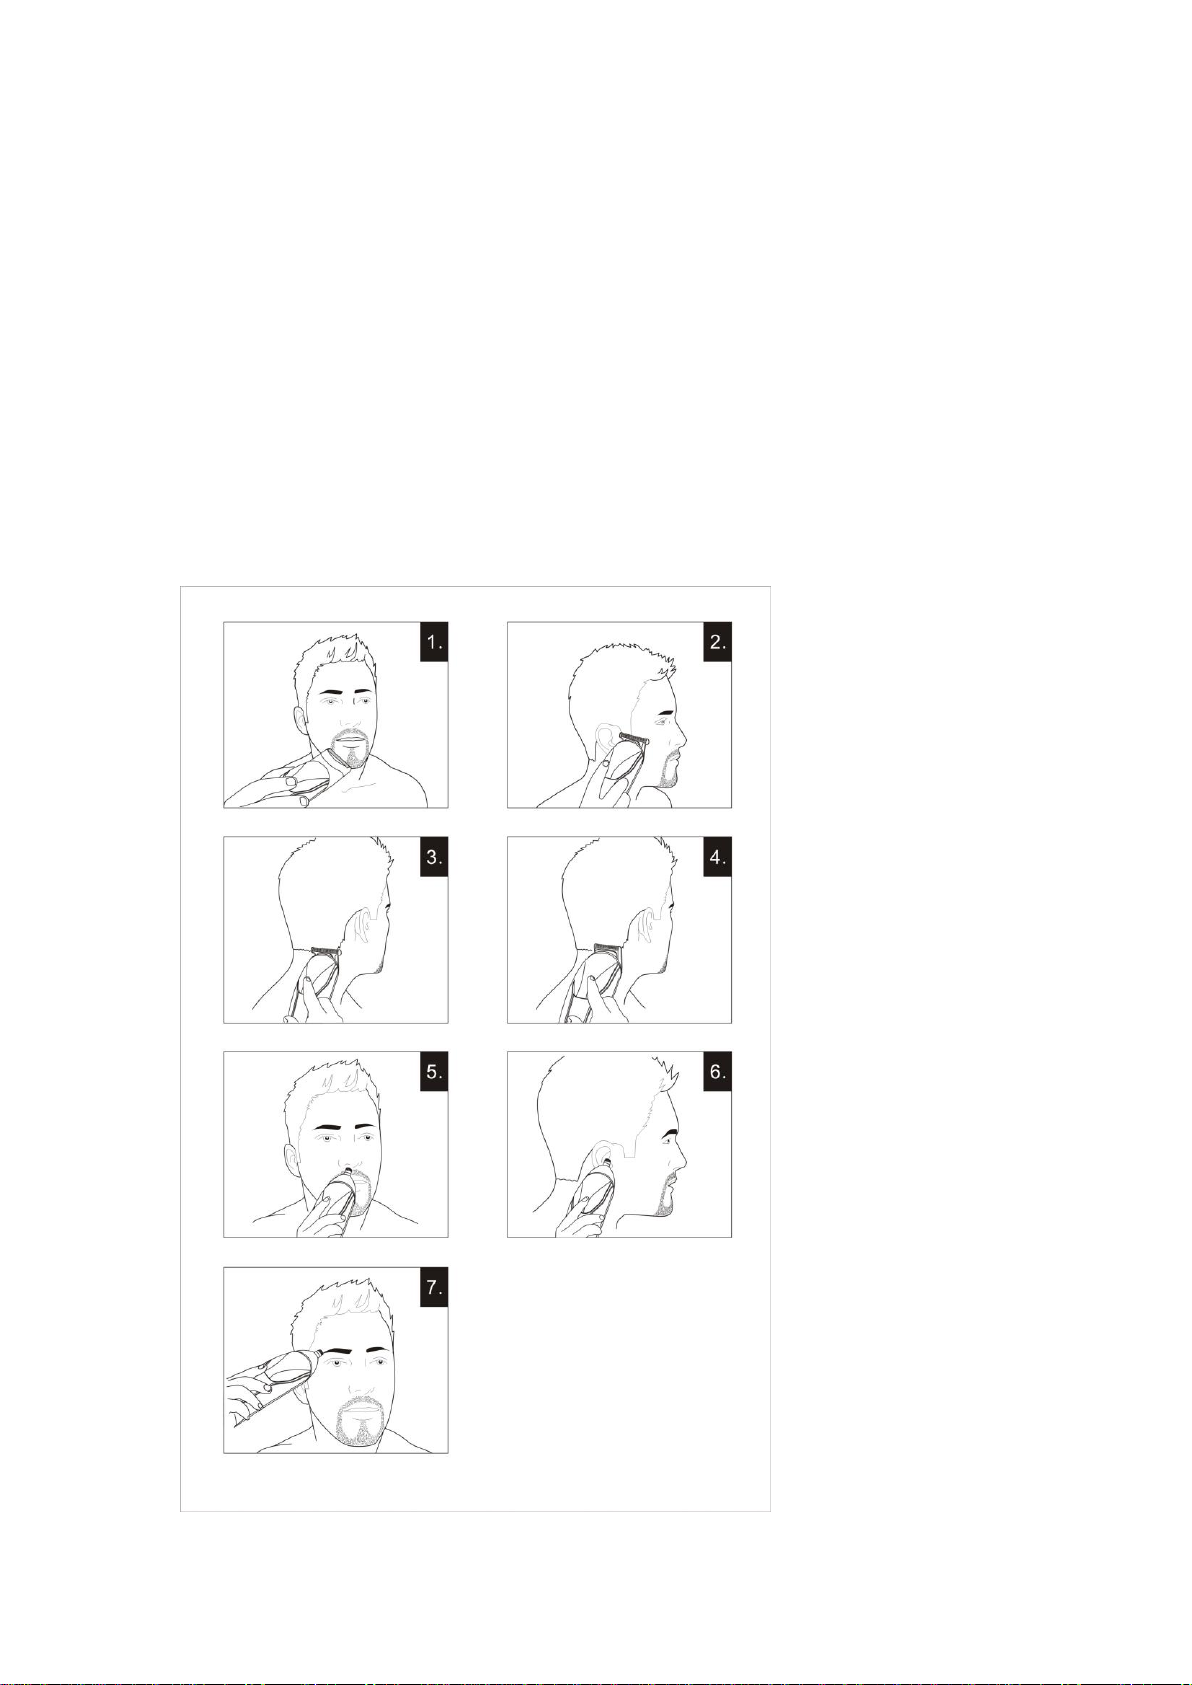
TRIMMING EDGE OF SIDEBRUNS (Diagram 2)
Hold the personal groomer with full size trimmer attachment facing you.
Start with edge of sideburns, and with the trimmer blades resting lightly against your
skin. Use motions towards edge of sideburns line to trim to desired locations in facial
area.
TRIMMING THE NAPE OFYOUR NECK (Diagram 3 & Diagram 4)
Note: You will need a hand mirror for this operation if performing it alone.
Before you begin, attach the full size trimmer attachment. Then attached to the
precision trimmer attachment
Use your fingers to lift the hair at the base of your head up off the neck. Your index
finger should be covering the roots of the hairs you are lifting to prevent accidental
removal by the personal groomer.
Using your other hand, hold the personal groomer to the base of your neck with the
cutting unit facing up, and move the personal groomer up the length of the neck until it
touches your finger covering the hair roots at the base of your head.
Be sure to move the unit slowly when performing this operation and to keep the hair
roots at the base of your head out of the way of the trimmer.
TO REMOVE HAIR FROM NOSE AND EAR (Diagram 5 & 6)
Attach the nose trimmer attachment
Insert the personal groomer gently into nostril or ear
Gently move the groomer in and out of the nostril or ear and at the same time rotate
Avoid inserting the cutting unit more than 6mm into your nostril or ear .
TO REMOVE HAIR FROM EYEBROWS (Diagram 7)
Attach the nose trimmer attachment
Gently guide cutting unit to stray, unwanted hairs along the eyebrow line or protruding
from the eyebrow itself.
To remove the hairs completely lower onto the skin and move over desired area
Use slow and well-controlled movements.
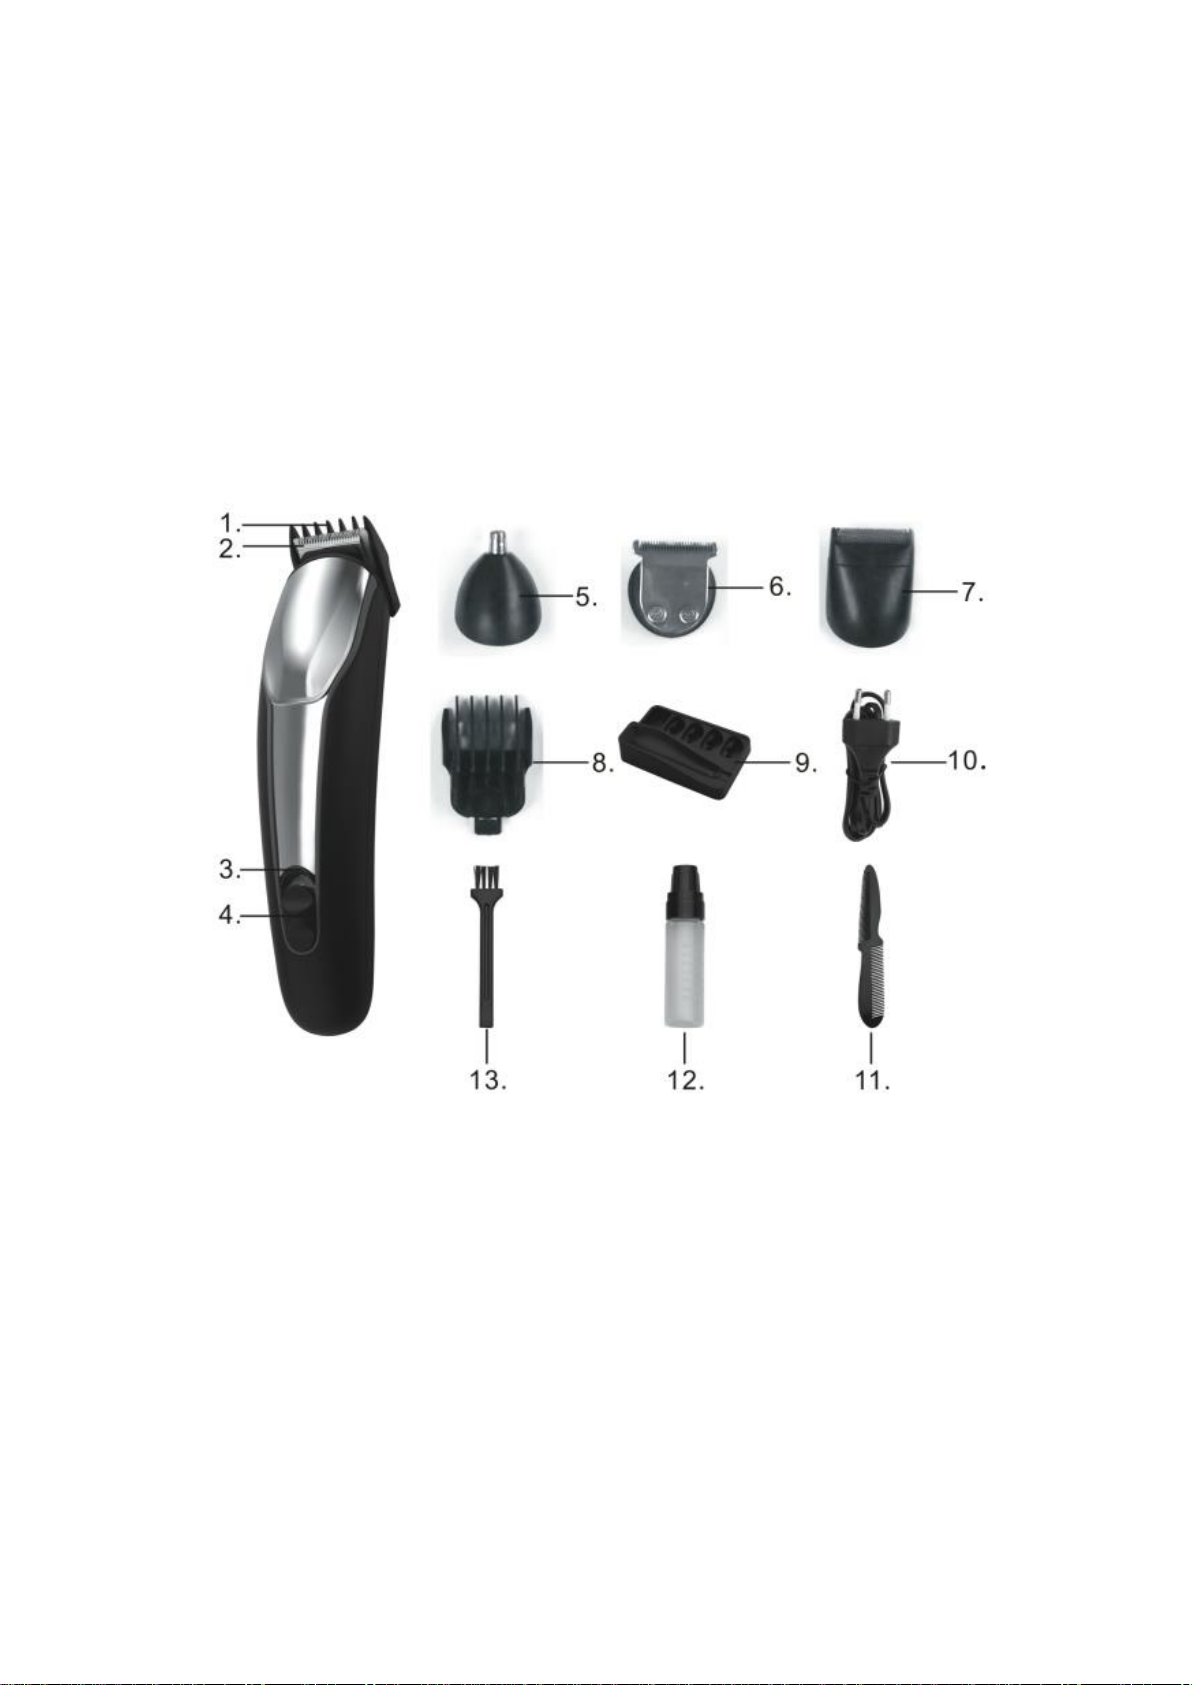
ATTACHINGAND REMOVINGTHE TRIMMER COMBATTACHMENT
NOTE: Always ensure the personal groomer is switched off before changing any
attachments.
To remove, hold the personal groomer with one hand and turn the trimmer head
anti-clockwise with the other.
To attach, hold the personal groomer with one hand and turn the trimmer head
clockwise with the other.
TIPS FOR BEST RESULTS
Remove trimmer comb attachment if you are: defining hairline edges such as sideburns.
Trimming the nape of your neck, trimming your beard line on front of neck.

6
CARE FOR YOUR PERSONAL GROOMER
CLEANINGAND MAINTAININGYOUR PERSONALGROMMER
AFTER EACH USE
Turn the personal groomer off
Gently brush the remaining hairs away / rinse under warm water from the guide comb
and trimmer blade
CLEANING CAUSIONS
the guide comb attachment and trimmer blade may be removed from the product for
cleaning
Cleaning should only be done with a soft brush, such as the brush supplied with the
product .
Use the light-grade oil supplied or sewing machine oil on the blades.
Do not use harsh or corrosive cleaners on the units or their blades.
STORAGE
Do not wrap the cord of the power cable around the appliance
DANGER
To reduce the risk of electric shock:
Do not reach for an appliance that has fallen into water. Unplug it immediately.
Do not place or drop into water or other liquid.
Do not place or store this appliance where it can fall or be pulled into a tub or sink.
Except when charging, always unplug this appliance from the electrical outlet
immediately after using.
Unplug this appliance before cleaning it.
WARNING
To reduce the risk of burns, fire, electric shock or injury to persons:
This appliance is for household use only.
An appliance should never be left unattended when it’s plugged in, except when
charging a rechargeable appliance.
Close supervision is necessary when this appliance is used by, on, or near children
or persons with special needs or certain disabilities.
Use this appliance only for its intended use as described in this manual.
Keep the cord away from heated surfaces.
Never operate this appliance if it has a damaged cord or plug, if it is not working
properly, if it has been dropped or damaged, or if it has been dropped into water.
Never drop or insert any object into any of the appliance’s openings.
Do not use outdoors or operate where aerosol (spray) products are being used, or
where oxygen is being administered.
Always store this appliance and cord in a moisture-free area. Do not store it in
temperatures exceeding 140°F(60℃)
Make sure the cord is disconnected from the groomer stand when storing.

7
Do not use this appliance with a damaged or broken cutter unit, as injury may
occur.Always make sure blades are aligned properly.
Do not use an extension cord or a voltage converter with this appliance.
Do not wrap the cord around the appliance.
The power unit is intended to be correctly oriented in a vertical or floor mount
position.
Battery Removal
NOTE: Always recycle or properly dispose of batteries according to Local and State
requirements.
Unplug groomer from outlet to avoid risk of electrical shock.
Remove rear groomer cover by first prying the rubber panel from the product with
a flat head screwdriver.
Next, pry the back panel from the product with a flat head screwdriver. This will
expose the batteries.
With wire cutters, clip the wires leading to the batteries.
Remove the batteries from the product. Contact your local authorities for proper
disposal.
CAUTION: THESE BATTERIES MUST BE RECYCLED OR DISPOSED OF IN
ACCORDANCE WITH STATE AND LOCAL REGULATIONS.
Do not burn or mutilate, as they may burst or release toxic materials. Do not
short-circuit, as this may cause burns.
Specifications:
Power Source: AC220-240 V 50/60Hz
Power Consumption: 3W
Motor Voltage: 2.4 V d. c.
Charging Time: 8-10 hours
Battery Capacity: NI-MH 600mAh ×2
Working Time: approx .45 minutes

8
IMPORTANT INFORMATION FOR CORRECT DISPOSAL OF THE PRODUCT IN
ACCORDANCE WITH EC DIRECTIVE 2002/96/EC.
At the end of its working life, the product must not be disposed of as urban waste.
It must be taken to a special local authority differentiated waste collection centre or to a dealer
providing this service.
Disposing of a household appliance separately avoids possible negative consequences for the
environment and health, deriving form inappropriate disposal and enables the constituent materials
to be recovered to obtain significant savings in energy and resources.As a reminder of the need to
dispose of household appliances separately, the product is marked with a crossed-out wheeled
dustbin.
Table of contents