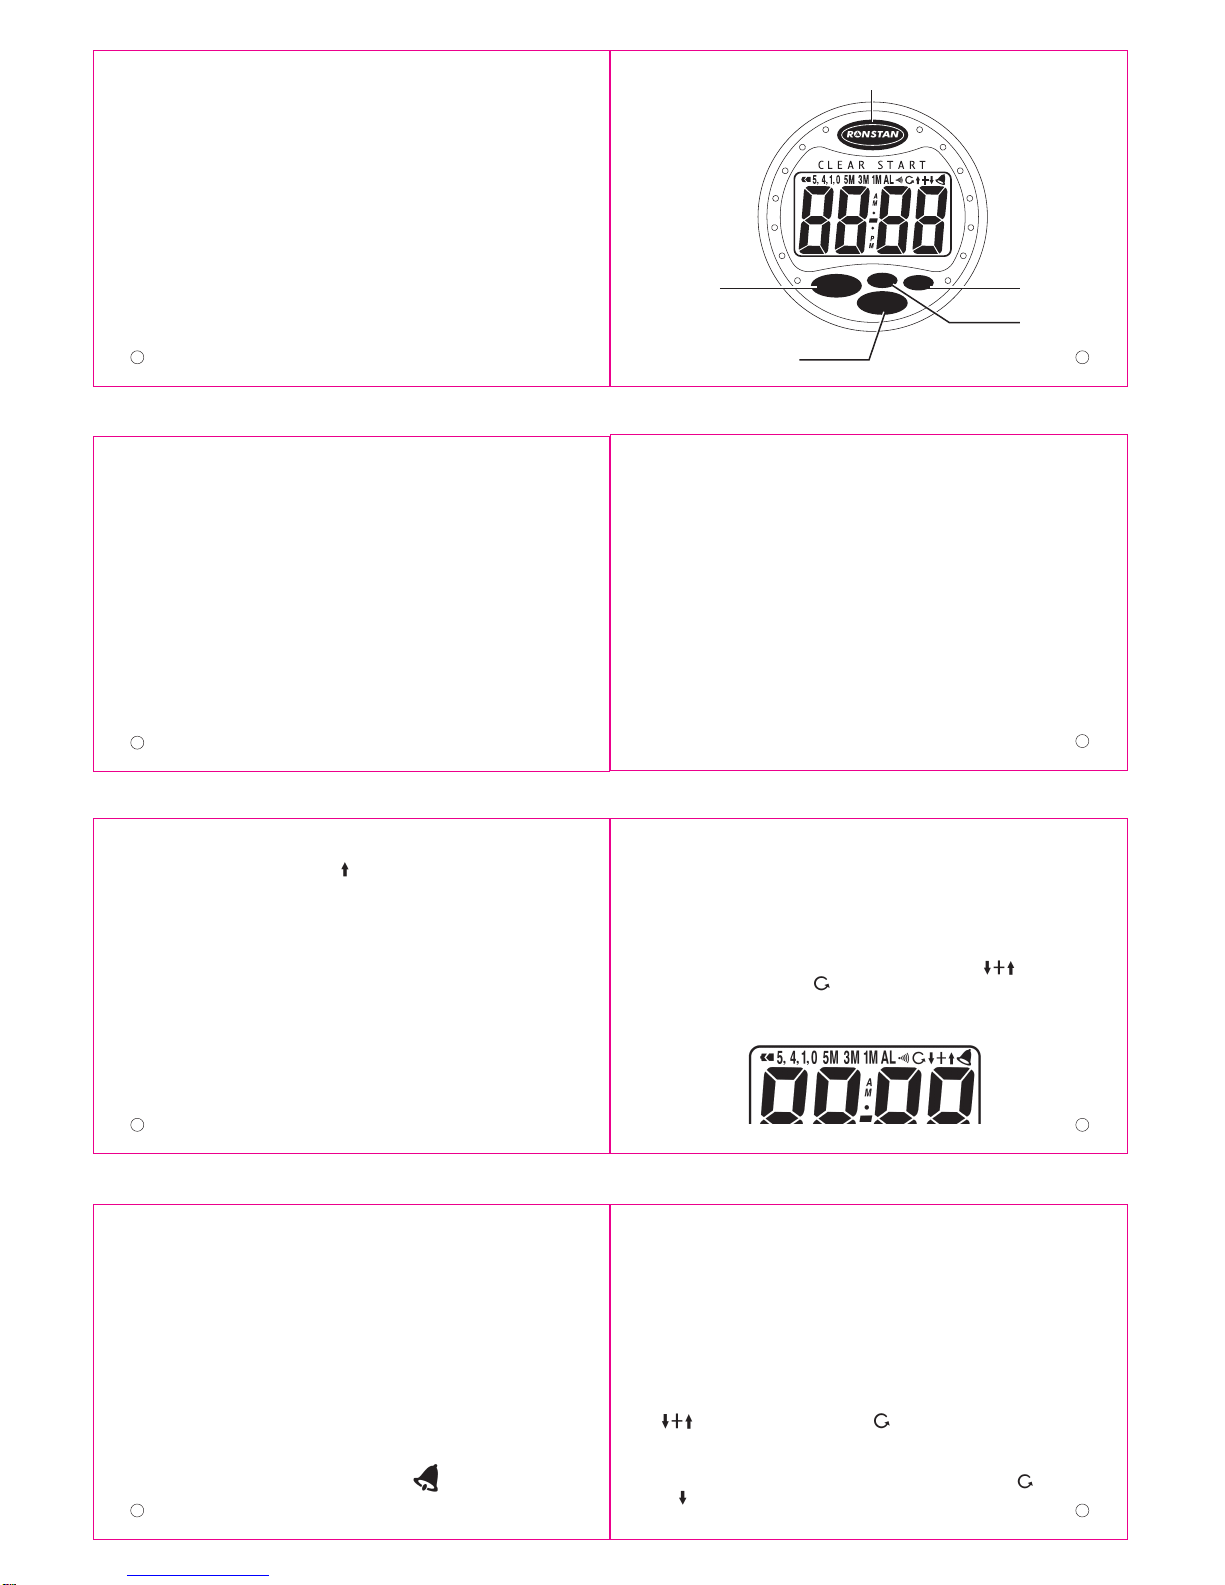
Ronstan RF4030 User manual

THE CLEARSTART SAILINGWATCH
“THE CLEARSTART SAILINGWATCH” IS A WATERPROOFWATCH,
WHICH FEATURESTIME OF DAY,A COUNTUP (FROM ZERO)TIMER,
AND A PROGRAMMED COUNTDOWN TIMER WITH ALARM. THE
COUNTDOWNTIMER CAN BE SETTO COUNTDOWNTO ZERO AND
COUNTUP AGAIN OR TO COUNTDOWN TO ZERO AND THEN
REPEAT THE PROGRAMMED PERIOD.
ONCE THE COUNTDOWN TIMER IS RUNNING,THE START/STOP,
SYNC, AND MODE BUTTONS ARE THE ONLY ONES THAT WILL
HAVE A FUNCTION.
AT ANY TIME A BUTTON IS PRESSEDTHAT IS GOING TO HAVE
ANY FUNCTIONS,THE ALARM SOUNDS A SINGLE BEEP.
ENGLISH
1
2
CLEAR
MODE
MODE
SYNC
PROG
RONSTAN (START STOP)
CLEAR
PROG
MODE
SYNC
3
OPERATING INSTRUCTIONS
TO SETTHETIME
1. Put the watch into time mode by pressing the “MODE”button.This can be
recognised because above the digits the display will show no icons relating to
countdown.Also if in 12 hour mode the time will show AM or PM either above or
below the central colon.
2. Press the “CLEAR” button and hold it down for approximately 2 seconds until
the hour display begins to flash.
3. Press the “PROG” (short for programme) button until the correct hour is shown.
Make sure if you are in the 12 hour clock that AM or PM is correct, or if you are
in the 24 hour mode that you have the correct hour.
Notes a) Each time you press the button the time will advance 1 hour
b) Keeping the button pressed in for a couple of seconds will start fast
scrolling through the hours.
4.To change from 12 hour to 24 hour setting press the “START/STOP” button at
any time the hours are still flashing.
5. Once the correct hour and 12/24 hr setting are set press “MODE”.This confirms
the hours and starts the minutes flashing ready for setting
6. Press the “PROG” button until the correct minute is shown.
4
7. Once the correct hours and minutes are set, press “CLEAR” button one more
time and the time is set and running.The display will also stop flashing.
TO LEAVE THETIME FUNCTION
1. Press “MODE” button and release it.This will change the unit from time to timer
mode.
2. Pressing “MODE” again will revert to the time.
3. It is possible to change from time to timer regardless of whether the timer is
running or not.
4. Once in the timer mode there are 3 options COUNTUP, COUNTDOWN AND UP
OR COUNTDOWN REPEAT.
COUNTUP OPTION
1. Once in the timer mode press the “CLEAR” button.This will only function if the
timer is not running. (If the timer is running, press “STOP” first and then press
“CLEAR”).The display will now show 0:00.
2. Press “START” and the timer will count up from zero in minutes and seconds up
to a maximum of 59mins and 59 secs.The display will also show an arrow icon to
denote count-up.
3. During count-up the timer can be stopped and restarted as many times as required.
NOTE The count-up timer will only work if the countdown timer is in countdown 5
and up mode and not countdown repeat.(see next section)
PROGRAMMED COUNTDOWN MODE
There are 4 different pre-programmed timing sequences.They are:
5,4,1,0 minutes, 5 minute periods, 3 minute periods, and 1 minute periods, plus two
types of countdown.They are countdown and up or countdown repeat.It is
possible to choose multiples of these periods (e.g.2 x 5 minutes = 10 minutes) in
countdown and up plus the 1 minute setting of countdown repeat. Multiples of 5,4,
1,0, 5 minutes and 3 minutes are not available in countdown repeat.Each pre-
programmed period has a short alarm sound every minute, and for the last minute
of countdown an alarm at 50, 40 30 & 20 seconds, and also an alarm for each of
the last 15 seconds.
CHOOSING BETWEEN COUNTDOWN AND
UP OR COUNTDOWN REPEAT
1. Press “MODE” to leave the clock and reach the timer function.
2. Make sure the timer is stopped (using the “START/STOP” button)
3. Make sure the display is at zero (By pressing “CLEAR”)
4. Press the “SYNC” button and hold it down.
5.Whilst holding the sync button in press the “CLEAR” button.This makes the
choice between countdown and up with the icon and countdown repeat

6
with the icon.
6. Release “SYNC” and the choice is confirmed
CHOOSINGTHE PRE-PROGRAMMED PERIOD.
1.The 4 pre-programmed periods each have corresponding indicators at the top of
the display to show which programme is selected.
2.To change the programme selected make sure the watch is in timer function with
the timer stopped and the display at zero (by pressing “CLEAR”)
3. Press and hold the “SYNC” button in, and then whilst holding it in press “PROG”.
Each time “PROG” is pressed the display will change to the next available
programme.
4.The sequence the programmes are available in is 5,4,1,0. Followed by 5 mins,
followed by 3 mins, followed by 1 min.After 1 min the next programme will be 7
5,4,1,0. again and so on.
Note: The programme required will probably stay constant every time you race
at the same club, and will probably only need changing if you race somewhere
else that uses a different starting sequence.
SILENCINGTHE ALARM
If you prefer to use the watch purely as a visual reference only it is possible to
silence the alarm.This is done by pressing “MODE” and holding it down for
approximately 2 seconds. A short bip indicates
that this has been successful, and the icon of
the bell in the top right of the display disappears
to show the alarm is off.
To re-activate the alarm press and hold “MODE” for 2 seconds until you hear the
bip and the icon of the bell comes on to show that the alarm is on.
USINGTHE COUNTDOWN FUNCTION
1. Once you have chosen the programme required, and decided whether to have
the alarm on or not, chose whether you want just one period of that programme
9
THE SYNCHRONIZE FEATURE
You will note that the lower right button is printed “SYNC”.This is the synchronize
button.This only has a function during count down and when the timer is running.
Once the timing sequence is started, you may feel that you were late starting your
watch and that consequently your watch is a few seconds late.You may even
have missed the preparatory signal altogether.Do not worry. Instead just start the
watch.
When the next signal is given by the starter, just press “SYNC”and the display will
drop down to the next full minute in countdown. (E.g.if the watch show 5:08,
pressing “SYNC”will send the watch to 5:00 and it will continue to count down.
Likewise if the watch shows 3.35 or even 3.59 and you press “SYNC” the time will
jump to 3:00.) Therefore the “SYNC”button can be used to get your starting
sequence quickly in perfect unison with the official starter.
NOTE: Pressing “SYNC”accidentally would obviously get you out of line with the
official time.All the buttons on the watch are positive click-type buttons to help
avoid them being knocked.To increase this protection the “SYNC” button is fitted
with an even stiffer click button.Therefore your “SYNC” button is tighter than the
other buttons and this is deliberate and for good reason.
8
(by pressing “PROG” just once for countdown repeat) or multiples of that period
if required (by pressing “PROG” several times for countdown and up or the 1
minute programme of countdown repeat)
2.To change between countdown & up and countdown repeat, press and hold in
the “SYNC” button.Whilst holding this in, press the “CLEAR” button.You will see
the icon for countdown & up or for countdown repeat.
3. Once the display shows the correct number of minutes press “START”and the
timer counts down in minutes and seconds towards zero.The display also shows
the icon for countdown repeat or for countdown and up just the down
arrow icon is shown.
4. During countdown the timer can be stopped and restarted as many times as
required.
5. During countdown mode the alarm will sound (if it is on) every minute with an
alarm sequence more often during the last minute.
6.When the timer reaches zero, if you are in countdown and up it starts to count up
and the display shows the up arrow icon .The timer will count up to 59mins
59secs and the start at 0:00 again.This count up will show elapsed race
time and will be particularly useful in handicap racing.
7. If you are in countdown repeat, that icon stays permanently on and the timer
reverts to the programmed time chosen and continues to count back down again.
11
ADJUSTINGTHE ELASTIC STRAP
There is a right way and a wrong way to adjust the elastic strap.Please take note
to avoid any chance of the strap coming undone.
1. Place the watch on the wrist and pass the elastic through the clasp from the
bottom to the top.
2. Pull the elastic to the required tightness and secure by pressing the clasp firmly
closed.
3. Push the elastic loop over the spare length of elastic to keep the loose
end tidy.
10
USEFUL HINTS ABOUTWEARING/MOUNTINGTHE WATCH
1.The watch can be worn just like any normal watch on the wrist. However if the
display is not convenient to look at, then the whole timer case can be turned
inside the outer clip to get a better viewing angle.
2. If you prefer to have the watch on top of the hand, then the timer should be
removed from the outer clip, and the elasticated strap removed from the outer clip.
The outer clip can then be sewed to a
glove using the 2 holes already in the clip.
The timer can then be pushed back into
the outer clip at whatever viewing angle
is required.Take note to make sure the
timer clicks back positively into the outer clip.
3.The outer clip can also be fitted to the
boom or any flat surface by using the
plastic spacer bar provided.This is fitted in
between the boat and the outer clip using
countersunk screws or pop rivets.If this
spacer is not used it will be virtually
impossible to remove the timer from the clip.
FITTEDTO BOOM
OUTER CLIP
PLASTIC
SPACER
13
1. Remove the timer from the outer clip.
2. Using a cross-point screwdriver carefully remove all 6 screws from the timer, and
remove the case back from the case front to reveal the battery.
3. Remove the old battery and replace it with a new one making sure that the +ve
contact faces upwards. (Avoid holding the battery so that your fingers touch both
the +ve and -ve contacts at the same time).
4.The battery type is a CR2032 3.0 Volt Lithium Battery.
5. Replace the case back making sure that the battery is correctly fitted, that the
rubber seal around the case back is seated properly, and that the case back fits
without interference.
6. Replace the 4 screws taking care not to overtighten them to the point of stripping
the thread.
7. Replace the timer in the outer clip making sure that the timer snaps positively
back into the outer clip.
12
LOW BATTERY INDICATOR
The timer is equipped with a low battery indicator located in the top left side of the
display.When the indicator is on, it is time to change the battery. It is likely that
the watch will function for several days with the indicator on.
Note:This may be easier to do if you
pull the elastic strap out of the clip.
TO CHANGE THE BATTERY

15
CLEAR
MODE
MODE
SYNC
PROG
RONSTAN (START STOP)
CLEAR
PROG
MODE
SYNC
14
FRENCH
MONTRE DE NAVIGATION « CLEAR START »
RONSTAN RF4030 (A.B. réf. 10638A)
Cette montre est un minuteur résistant à l'eau avec un affichage
géant, et toutes les caractéristiques d'une montre, un compteur (de
zéro),et un compte à rebours programmé avec une alarme. Le timer
du compteur à rebours peut être reglé pour reprendre la periode
programmée ou reprendre à compter de zéro.
Les boutons ont un système de déclic et se situent dans la partie
supérieure de l'affichage pour être protégés des coups. Une fois
que le compte à rebours est lancé,seuls les boutons « START/STOP »,
« SYNC », et « MODE » auront une fonction.
Chaque fois qu'un bouton est pressé, si il va avoir une fonction,
l'alarme déclenchera un seul signal.
17
6- Appuyer sur le bouton « PROG » jusqu'à ce que les minutes soient
correctement affichées.
7- Appuyer sur « CLEAR » et la montre sera à jour. L'affichage s'arrêtera alors de
clignoter.
QUITTER LES FONCTIONS DE LA MONTRE
1- Presser « MODE » et relâcher-le.
2- Presser une nouvelle fois « MODE » vous fera revenir à l'heure.
3- Il est possible de changer d'heure au Timer ou inversement, que le minuteur
fonctionne ou pas.
4- Une fois dans le modeTimer, il y a 3 options :compteur de zéro (COUNTUP),
compte à rebours et reprendre à compter de zéro (COUNTDOWN AND UP), ou
compte à rebours et reprendre la periode programmée (COUNTDOWN
REPEAT).
OPTION COUNTUP (compteur de zéro)
1- Une fois dans le modeTimer, presser « CLEAR ».Cela fonctionnera seulement
si le Timer ne fonctionne pas (si le Timer est en fonction, presser STOP d'abord,
ensuite « CLEAR »). L'affichage montrera alors 0:00.
16
MODE D'EMPLOI
Pour régler l'heure :
1- Mettre le Timer en mode heure en pressant et relâchant le bouton « MODE ».
Cela peut être reconnu parce que l'affichage n'affichera plus les icônes du
compte à rebours.En mode 12 heures l'affichage affichera « AM » ou « PM ».
2- Appuyer sur le bouton « CLEAR » et le maintenir environ 2 secondes jusqu'à ce
que l'affichage commence à clignoter.
3- Appuyer sur le bouton «PROG » jusqu'à ce que l'heure soit correctement
affichée.
Notes : a) Chaque fois que vous pressez le bouton, l'heure avancera d'une heure.
b) Garder le bouton enfoncé pendant quelques secondes entraînera un
défilement des heures.
4- Pour changer entre mode 12 heures et 24 heures, appuyer sur le bouton «
START/STOP » quand l'affichage de l'heure est en train de clignoter.
5- Une fois l'heure réglée, presser le bouton « MODE ».L'affichage des minutes
commence à clignoter.
18
2- Presser « START » et le Timer partira de zéro, en minutes et secondes jusqu'à
un maximum de 5 9mins 59secs. s'affichera.
3- Pendant cette fonction, le Timer peut être arrêté et peut repartir quand vous le
souhaitez.
Note : Le timer du compteur fonctionnera seulement en mode compte à
rebours (COUNTDOWN AND UP), et non en compte à rebours
programmé (COUNTDOWN REPEAT).
COUNTDOWN (COMPTE A REBOURS) PROGRAMME
Il existe 4 comptes à rebours différents déjà programmés : une séquence de 5,4,1,
0 minutes, une durée de 5 minutes, une durée de 3 minutes, et une durée de 1
minute.Ces séquences fonctionnent pour les deux modes de compte à rebours.Il
est possible d'en choisir plusieurs (2x5 minutes = 10 minutes) seulement en mode
compte à rebours.En mode compte à rebours programmé seuls les multiples de 1
minute peuvent êtres utilisés.
Chaque durée pré-programmée a une courte alarme chaque minute, et pour la
dernière minute du compte à rebours, une alarme à 50,40,30 & 20 secondes, et
également une alarme pour chacune des 15 dernières secondes.
19
CHOISIR ENTRE COMPTE A REBOURS ET COMPTE A REBOURS
PROGRAMME.
1- Appuyer sur « MODE » pour passer en fonction timer
2- S'assurer de l'arrêt du timer (utiliser le bouton « START/STOP')
3- Affichage à zéro (presser « CLEAR »)
4- Maintenir enfoncé le bouton « SYNC »
5- En maintenant enfoncé le bouton « SYNC », appuyer sur « CLEAR »
Ceci vous donnera le choix entre la fonction compteur à rebours et
compte à rebours programmé .
6- Relacher le bouton "SYNC" pour confirmer
CHOISIR LA DUREE PRE-PROGRAMMEE
21
Pour la réactiver, appuyer et maintenir le bouton « MODE » pendant 2 secondes
jusqu'à ce que vous entendez le bip et que l'image de la cloche revienne à l'écran.
UTILISATION DE LA FONCTION COUNTDOWN
COMPTE A REBOURS
1- Une fois que vous avez choisi le programme demandé, décidé soit d'avoir
l'alarme allumée ou pas, et choisi soit que vous voulez juste une durée de ce
programme (en appuyant sur « PROG » juste une fois) soit plusieurs (en
pressant sur « PROG » plusieurs fois ). Les multiples de séquences (autre
qu'une minute) ne peuvent être utilisés qu'en mode compte à rebours.
2- Pour changer de mode compte à rebours à compte à rebours programmé,
maintenir enfoncé le bouton « CLEAR ».Vous verrez alors apparaître l'icône
pour le compte à rebours et l'icône pour le compte à rebours
programmé.
3- Une fois que le nombre correct de minutes apparaît, appuyer sur « START » et
le Timer se met en compte à rebours en minutes et secondes vers zéro.
L'affichage montre aussi l'icône pour le mode de compteur sélectionné.
ou
1- Les 4 durées pré-programmées ont des indicateurs correspondant en haut de
l'affichage pour montrer quel programme est sélectionné.
2- Pour changer le programme sélectionné, soyez sûr que la montre est en fonction
Timer, avec le Timer arrêté et l'affichage à zéro. (en pressant « CLEAR »).
3- Appuyer et maintenir les boutons « SYNC » et « PROG » en même temps.
Chaque fois que la touche « PROG » est enfoncée, l'affichage changera au
prochain programme disponible.
4- Ces séquences programmées sont disponibles en 5,4,1,0.Suivies par 5 mins,
par 3 mins, et par 1 min.Le prochain programme disponible sera encore 5,4,1,0.
ARRETER L'ALARME
Si vous préférez utiliser la montre seulement comme affichage visuel, il est possible
de neutraliser l'alarme. Pour cela, appuyer sur « MODE »
et le maintenir enfoncé pendant environ 2 secondes. Un
petit signal indique que la manipulation a marché,
et l'image de la cloche en haut à droite de l'écran
disparaît pour montrer que l'alarme est arrêtée.
20

23
prochain signal est donné par le starter, appuyer juste sur « SYNC » et l'affichage
tombera à la prochaine minute du compte à rebours.(exemple :si la montre affiche
5 :08, presser « SYNC » donnera 5 :00 et le compte à rebours continuera.De
même si la montre affiche 3 :35 ou même 3 :59 et vous pressez « SYNC » l'heure
sautera à 3 :00.).
Cependant, la touche « SYNC » peut être utilisée pour obtenir rapidement votre
signal de départ en parfaite synchronisation avec le départ officiel de la course.
NOTE : Presser « SYNC » accidentellement vous mettra en désaccord avec le
chronométrage officiel .Toutes les touches de cette montre sont conçues
spécialement pour éviter les coups.Pour augmenter cette protection, le bouton «
SYNC » est installé avec un bouton plus rigide et qui est enclenché par un déclic.
INFORMATIONS UTILES POUR PORTER ET MONTER LA MONTRE
1- La montre peut être portée comme une montre normale au poignée.Cependant,
si l'affichage n'est pas facile à lire, alors tourner le minuteur entier à l'intérieur du
cadre extérieur pour obtenir une meilleure vue d'angle.
22
SYNCHRONISATION
Vous noterez que le bouton en bas à droite se nomme « SYNC ». Ceci est la
touche de synchronisation. Cela a seulement une fonction pendant le compte à
rebours et quand le minuteur est en marche.Une fois que le minuteur a
commencé, vous pouvez sentir que vous étiez en retard en démarrant votre montre
et que par conséquent, votre montre a quelques secondes en retard.Vous pouvez
avoir manquer le signal. Ne vous inquiétez pas. Démarrer la montre. Quand le
4- Pendant le compte à rebours, le minuteur peut être stoppé et redémarré comme
vous le souhaitez.
5- Durant le mode count down, l'alarme sonnera (si elle est allumée) chaque
minute avec une fréquence plus rapide la dernière minute.
6- Mode compte à rebours: Quand le minuteur atteint zéro, il commence alors à
compter et l'affichage montre . Le minuteur comptera jusqu'à 59mins
et 59 secs et repartira à 0:00 encore. Ce compteur indiquera le temps écoulé et
sera particulièrement utile pour une course avec handicaps.
7- Compte à rebours programmé : Quand le timer arrive a zéro, on revient à la
séquence choisie et le compte à rebours reprend.
24
2- Si vous préférez avoir la montre sur le dessus
de la main, alors le minuteur devrait être
déplacé du cadre extérieur, et la sangle
élastique bougée du cadre extérieur.
Celui-ci peut alors être cousu au gant en
utilisant les 2 trous prévus sur le cadre.
Assurez-vous que le minuteur se remette
dans le cadre avec un déclic.
3- Le cadre extérieur peut aussi être posé
sur la bôme ou sur les surfaces plates du
bateau en utilisant la petite planche
plastique fournie.Ceci irait entre la
bôme et le cadre extérieur en utilisant
des vis fraisés ou rivets.
Attention : Si cette planche plastique n'est pas utilisée, il vous sera
pratiquement impossible de retirer le minuteur du cadre.
cadre extérieur
Montage
planche
plastique
ajustement de la sangle élastique
Il y a une bonne et mauvaise manière d'ajuster la sangle. S'il vous plait, éviter que
la sangle se défasse !!!
1- Placer la montre sur le poignée et passer l'élastique à travers la boucle du bas
vers le haut.
2- Tirer l'élastique jusqu'à la taille désirée et assurez-vous que la boucle soit bien
fermée.
3- Garder la longueur en cas de nécessité.
25
incorrect correct
passer la
sangle dans
la boucle
26
INDICATEUR « faible batterie »
Le minuteur est équipé d'un indicateur de batterie localisé en haut à gauche de
l'affichage. Quand l'indicateur est allumé, il est temps de changer la pile. La
montre peut fonctionner avec l'indicateur allumé pendant plusieurs jours.
NB: Pour cette opération, retirer la
sangle du boitier
Changer la pile
arrière
avant
27
1- Enlever le minuteur du cadre extérieur.
2- Retirer les 6 vis en utilisant un tournevis
pozidriv et enlever l'écrin arrière de l'avant
pour avoir accès à la pile.
3- Enlever la vieille pile et remplacer-la avec
une nouvelle.Assurez-vous que la surface
positive (+) est vers le haut. (Eviter de
toucher la pile avec un doigt sur le + et l'autre sur le (-) en même temps).
4- Le type de pile est CR2032 3.0 VOLT LITHIUM.
5- Remettre l'écrin en s'assurant que la pile est mise correctement et que le joint en
caoutchouc est bien placé autour de l'écrin et qu'il n'y ait pas d'interférences.
6- Remettre les 4 vis en faisant attention de ne pas trop les serrer au point
d'enlever le fil.
7- Remettre le minuteur dans le cadre extérieur et soyez sûr que le minuteur se
remette en faisant un déclic.
29
CLEAR
CLEAR
MODE
MODE
SYNC
PROG
RONSTAN (START STOP)
CLEAR
PROG
MODE
SYNC
GERMAN
RONSTAN RF4030 CLEAR START SEGELUHR
„Die CLEARSTART Segeluhr" ist eine wasserdichte Uhr, die über
die Tageszeitangabe, einen Count up von Null, sowie einen
vorprogrammierten Countdown mit Alarm verfügt.Der Countdown
kann so eingestellt werden, daß er entweder auf Null und dann
zurück zählt,oder aber auf Null zählt und dann die einprogrammierte
Dauer wiederholt.
Sobald der Timer läuft, funktionieren nur noch die START/STOP
Taste, Sync und Mode.
Jedesmal, wenn ein Knopf gedrückt wird, der eine Funktion auslöst,
ertönt ein Piep-Ton.
28

Zeiteinstellung
1. Stellen Sie die Uhr in den „Zeit"- Modus durch Drücken des „Mode"-Knopfes.
Dies erkennen Sie daran, daß im oberenTeil des Displays die Worte „Count up"
oder „Count down" nicht mehr angezeigt werden. Ferner wird in der
Tageszeitangabe nicht mehr „AM" oder „PM" angezeigt.
2. Drücken Sie den „Clear"-Knopf etwa 2 sek, bis die Stundenanzeige beginnt, zu
blinken.
3. Drücken Sie die „Prog"-Taste bis die korrekte Stunde angezeigt wird. Bei der 12-
Stunden Anzeige achten Sie bitte auf das korrekte „AM" bzw. „PM", bei der 24-
Std. Anzeige auf die korrekte Uhrzeit.
Achtung: a) pro Knopfdruck springt die Uhr um 1 Stunde weiter.
b) Durch Gedrückthalten des Knopfes laufen die Stunden
schneller durch.
4. Um von der 12- in die 24-Stundenanzeige zu wechseln, drücken Sie den
„START/STOP"-Knopf, solange die Stundenanzeige blinkt.
5. Sobald die Stundenanzeige korrekt ist, drücken Sie den Knopf „MODE", um die
Stundenangabe zu speichern und die Minuten beginnen zu blinken.
30
6. Nun drücken Sie die „PROG"-Taste bis die Minuten richtig eingestellt sind.
7. Sobald Sie Stunden und Minuten korrekt eingestellt haben, drücken Sie erneut
die „Clear"-Taste. Die Uhr ist nun eingestellt und läuft weiter.Das Display hört
auf, zu blinken.
Verlassen des Uhr-Modus
1. Drücken Sie kurz „Mode".Sie gelangen vom „Uhr"- in den „Timer"-Modus.
2. Drücken Sie „Mode" erneut, um wieder in den Uhr-Modus zu gelangen.
3. Es ist jederzeit möglich, von der Uhr zumTimer und zurück zu gelangen, egal ob
der Timer läuft oder nicht.
4. Im „Timer"-Modus haben Sie 3 Möglichkeiten: Count up, Countdown und Count
up oder Countdown Wiederholung.
Count up-Funktion
1. Sobald Sie im „Timer"-Modus sind, drücken Sie „Clear".Dies ist nur möglich,
wenn der Timer nicht läuft. (Sollte derTimer laufen, drücken Sie erst „Stop" und
dann „Clear"). Auf dem Display erscheint nun 0:00.
2. Drücken Sie „START" und derTimer zählt von 0 aufwärts in Minuten und
31
Programmierter Countdown Modus
Die Uhr verfügt über 4 vorprogrammierte Zeitsequenzen: 5, 4, 1, 0 Minuten, 5-
Minuten-, 3-Minuten- und 1-Minutenabschnitt zzgl.2 verschiedene Countdown-
Varianten, Abwärts- und wieder Aufwärtszählen oder Wiederholung des
Abwärtszählens. Es ist möglich, im Abwärts- und Aufwärtszählen ein Vielfaches
dieser Abschnitte zu wählen (z.B.2 x 5 min. - 10 Minuten) zzgl.der 1 Minute des
Wiedereinstellens.Bei der Einstellung des wiederholten Abwärtszählens ist dies
nicht möglich. Innerhalb jedes vorprogrammierten Intervalls ertönt jede volle Minute
ein Alarm und innerhalb der letzten Minute bei 50, 40, 30 und 20 Sekunden , sowie
bei jeder der letzten 15 s.
Wählen zwischen dem Abwärts- und Aufwärtszählen und dem
wiederholten Abwärtszählen
1. Drücken Sie „MODE" um aus der Zeiteinstellung in dieTimerfunktion zu gelangen
32
Sekunden bis max. 59 Min. und 59 Sekunden.Das Display zeigt hierbei in der
oberen rechten Ecke die Funktion an.
3. Während der Timer aufwärts zählt, kann er beliebig oft gestoppt und gestartet
werden.
33
2. Achten Sie darauf, daß derTimer steht (durch den „START/STOP"-Knopf)
3. Achten Sie darauf, daß das Display 0 anzeigt (durch Drücken des „CLEAR"-
Knopfes)
4. Drücken Sie den „SYNC"-Knopf und halten Sie ihn gedrückt
5. Während die den SYNC-Knopf gedrückt halten, drücken Sie „CLEAR". Hierdurch
wählen Sie zwischen zwischen den beiden Countdown-Varianten mit den
entsprechenden Symbolen im Display. oder
6. Durch Loslassen des „SYNC"-Knopfes wird die Einstellung bestätigt.
Anwahl der vorprogrammierten Zeitabschnitte
1. Die 4 vorprogrammierten Abschnitte besitzen eine eigene Anzeige im Display,
die die Programmwahl anzeigt.
Nutzen der Coundown-Funktion
1. Sobald Sie das richtige Programm gewählt und entschieden haben, ob Sie den
Alarm nutzen wollen, entscheiden Sie, ob Sie nur einen Abschnitt (durch
einmaliges Drücken der „Prog"-Taste) oder einVielfaches (durch mehrmaliges
Drücken der „Prog"-Taste) anwählen möchten.
2. Um zwischen dem Aufwärts- und Abzählen und dem wiederholten
Abwärtszählen zu wählen, halten Sie den „SYNC"-Knopf gedrückt, während Sie
mit der „CLEAR"-Taste die Funktion anwählen. Auf dem Display erscheinen die
entsprechenden Symbole. oder
3. Sobald die richtige Anzahl an Minuten angezeigt wird, drücken Sie „ Start" und
der Timer zählt in Minuten und Sekunden runter auf Null.Im Display erscheint
das jeweilige Symbol für Countdown Wiederholung oder Count down und
up nur
4. Während des Countdowns kann der Timer beliebig oft gestoppt und gestartet
werden.
5. Während des Countdowns ertönt (wenn eingeschaltet) jede volle Minute der
Alarm, innerhalb der letzten mehrfach.
35
2. Um das ausgewählte Programm zu ändern, müssen Sie darauf achten, daß der
Timer auf 0:00 steht (durch „Clear").
3. Drücken Sie, bei gleichzeitig gedrückter „Sync"-Taste, die „Prog"-Taste zum
gewünschten Programm.
4. Die Abschnitte in den Programmen sind 5,4,1,0, gefolgt von 5 Minuten, gefolgt
von 3 Minuten, gefolgt von 1 Minute.Nach 1 Minute ist das nächste Programm 5,
4,1,0 und so weiter.
Beachten Sie, daß die benötigte Einstellung wahrscheinlich konstant bleibt,
wenn Sie jedesmal im gleichen Club Regatten segeln und Sie nur ggf. bei
anderen Clubs andere Startsequenzen benötigen.
Ausschalten des Alarms
Falls Sie bevorzugen, die Uhr nur optisch zu nutzen, ist es
möglich, den Alarmton abzuschalten. Drücken Sie die „Mode"-
Taste für ca. 2 s.Ein kurzer Ton bestätigt das erfolgreiche
Abschalten und die Glocke im Display verschwindet. Um den
Alarm wieder einzuschalten, drücken Sie „Mode" erneut für ca.
2 s . (Quittungston und Glocke im Display)
34
37
„Sync"-Taste bei 5:08 auf 5:00. Genauso von 3:35 oder aber 3:59 auf 3:00) Die
„Sync"-Taste ermöglicht also eine schnelle Übereinkunft Ihrer Startsequenz mit der
des offiziellen Starters. Achtung:Ein versehentliches Drücken der „Sync"-Taste
würde bedeuten, daß Sie nicht mehr mit der offiziellen Zeit übereinstimmen. Alle
Knöpfe haben eine „Soft-Klick"-Funktion, um ein unbeabsichtigtes Drücken zu
vermeiden. Um diese Schutzfunktion zu erhöhen, ist die „Sync"-Taste
schwergängiger als die anderen Tasten.
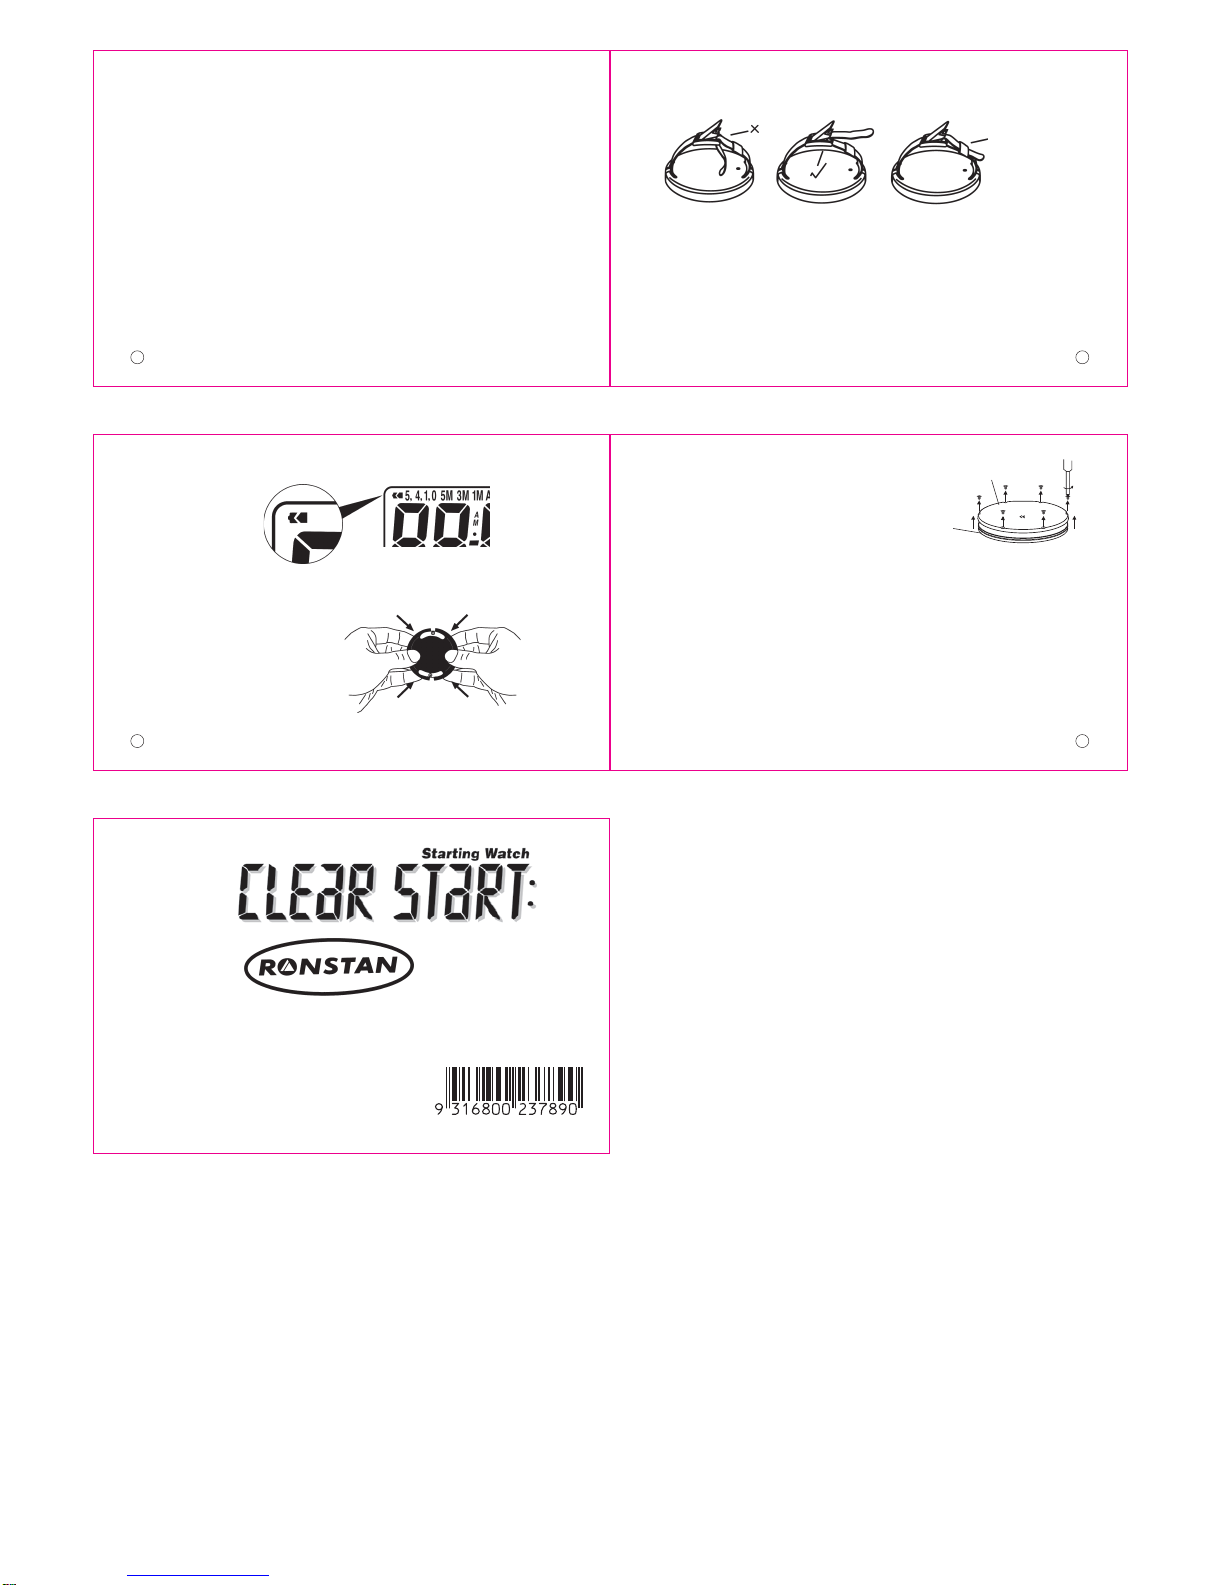
Nützliche Hinweise zumTragen /
Montieren der Uhr
äußerer Clip
am Baum befestigt
Plastik
Abstandsscheibe
36
6. Nach Erreichen der 0 zählt der Timer - sofern Sie im entsprechenden Modus
sind - aufwärts bis max. 59:59 Minuten und beginnt erneut bei 0:00.Im Display
erscheint das entsprechende Symbol . Dies Aufwärtszählen zeigt die
verstrichene Rennzeit an und ist bei bestimmten Rennen von großer
Bedeutung.
7. Sollten Sie im Countdown-Wiederholen-Modus sein, bleibt das Zeichen
konstant und derTimer geht zurück auf die programmierte Zeit und zählt wieder
abwärts.
Die Synchronisationsfunktion
Sicher haben Sie schon festgestellt, daß auf der unteren rechtenTaste „Sync"
steht. Das ist die Synchronisationstaste. Sie funktioniert während des Countdowns
und wenn der Timer läuft. Es könnte vorkommen, daß Sie nach Beginn der Timing-
Sequenz das Gefühl haben, den Timer zu spät gestartet zu haben und daß die Uhr
nun ein paar Sekunden „nachgeht".Oder Sie haben das Vorbereitungszeichen
komplett verpaßt. Kein Problem.Anstatt die Uhr erneut zu starten, drücken Sie
beim nächsten Zeichen des Starters nur die „Sync"-Taste und der Timer springt zur
nächsten vollen Minute herunter in den Countdown.( z.B. nach Drücken der 1. Die

38
Uhr kann wie jede andere Uhr am Handgelenk getragen werden.Um das
Display gut zu sehen, kann das Uhrgehäuse innerhalb des äußeren
Befestigungsclips gedreht werden.
2. Falls Sie die Uhr lieber auf dem Handrücken tragen, können Sie das
elastische Armband und die Uhr aus dem Befestigungsclip entfernen und diesen
auf einen Handschuh nähen. Zwei entsprechende Löcher sind bereits
vorhanden.Anschließend die Uhr wieder in den Befestigungsclip eindrücken.
Achten Sie darauf, daß die Uhr richtig einrastet.
3. Der äußere Clip kann auch am Mast oder einer beliebigen Fläche mit Hilfe der
mitgelieferten Plastikhalterung mit Senkschrauben oder „Blind"-Nieten befestigt
werden. Falls der Abstandhalter nicht benutzt wird, kann die Uhr nicht vom Clip
entfernt werden.
39
Einstellen des elastischen Armbandes
Es gibt einen richtigen und einen falschen Weg, das Armband einzustellen. Um ein
unbeabsichtiges Aufgehen des Armbandes zu vermeiden, beachten Sie bitte
folgendes:
1. Legen Sie die Uhr um das Handgelenk und führen Sie das Armband von unten in
den Verschluß.
2. Ziehen Sie das Armband stramm und sichern Sie es durch Drücken des
Verschlusses.
3. Drücken Sie die Plastiklasche über das übrige Ende, um es zu fixieren.
falsch richtig
die elastische
Schleife deckt das
Band teilweise ab
1. Entfernen Sie die Uhr aus dem äußeren Clip.
2. Öffnen Sie vorsichtig mit einem Kreuzschraubendreher
die 6 Schrauben am Gehäuse der Uhr und
entfernen Sie den Gehäusedeckel.
3. Entfernen Sie die alte Batterie und setzen Sie
die neue Batterie so ein, daß der + Pol nach oben zeigt.
(Vermeiden Sie dabei, daß Sie den + Pol und den - Pol gleichzeitig berühren.)
4. Es wird eine CR2032 3.0 Volt Litium Batterie benötigt.
5. Setzen Sie den Gehäusedeckel wieder auf und beachten Sie dabei den
korrekten Sitz der Batterie und der Gummidichtung. Der Gehäusedeckel muß
ohne dabei ohne Zwischenraum festsitzen.
6. Drehen Sie die 4 Schrauben wieder fest, wobei diese nicht überdreht werden
dürfen.
7. Drücken Sie die Uhr wieder in den Clip und achten Sie darauf, daß sie richtig
einrastet.
Anmerkung: Freie Übersetzung der beiliegenden englischen Bedienungsanleitung !
Entsprechende Abb. entnehmen Sie bitte der Originalanleitung.
Gehäuserückseite
Gehäusedeckel
4140
Batterieanzeige
Die Uhr verfügt über eine Batterieladeanzeige auf der oberen linken Seite im
Display. Sobald die Anzeige aufleuchtet, ist es Zeit, die Batterie zu wechseln.Es
ist allerdings üblich, daß die Uhr trotz Anzeige noch einigeTage funktioniert.
Anmerkung: Einfacher, wenn dazu das
elastische Band entfernt wird.
Wechseln der Batterie
5RQVWDQ,QWHUQDWLRQDO3W\/WG
%D\5RDG6DQGULQJKDP
9LFWRULD$XVWUDOLD
3K
)D[
(PDLOLQIR#URQVWDQFRPDX
ZZZURQVWDQFRP
5)
Table of contents
Languages:
Other Ronstan Watch manuals