Ronstan Clear Start User manual

EN User Manual – Go to www.ronstan.com . See SUPPORT section.
FR Manuel de l’utilisateur- Allez sur www.ronstan.com . Consultez la section SUPPORT
ES Manual del usuario - Ir a www.ronstan.com . Vea la sección SUPPORT
IT Manuale utente - Vai www.ronstan.com . Vedere la sezione SUPPORT
NL Gebruiksaanwijzing - gaan naar www.ronstan.com . Zie SUPPORT sectie
DE Benutzerhandbuch - Gehe zu www.ronstan.com . Siehe Abschnitt SUPPORT
USER MANUAL
CLEAR START™
RACE TIMER & SAILING WATCHES
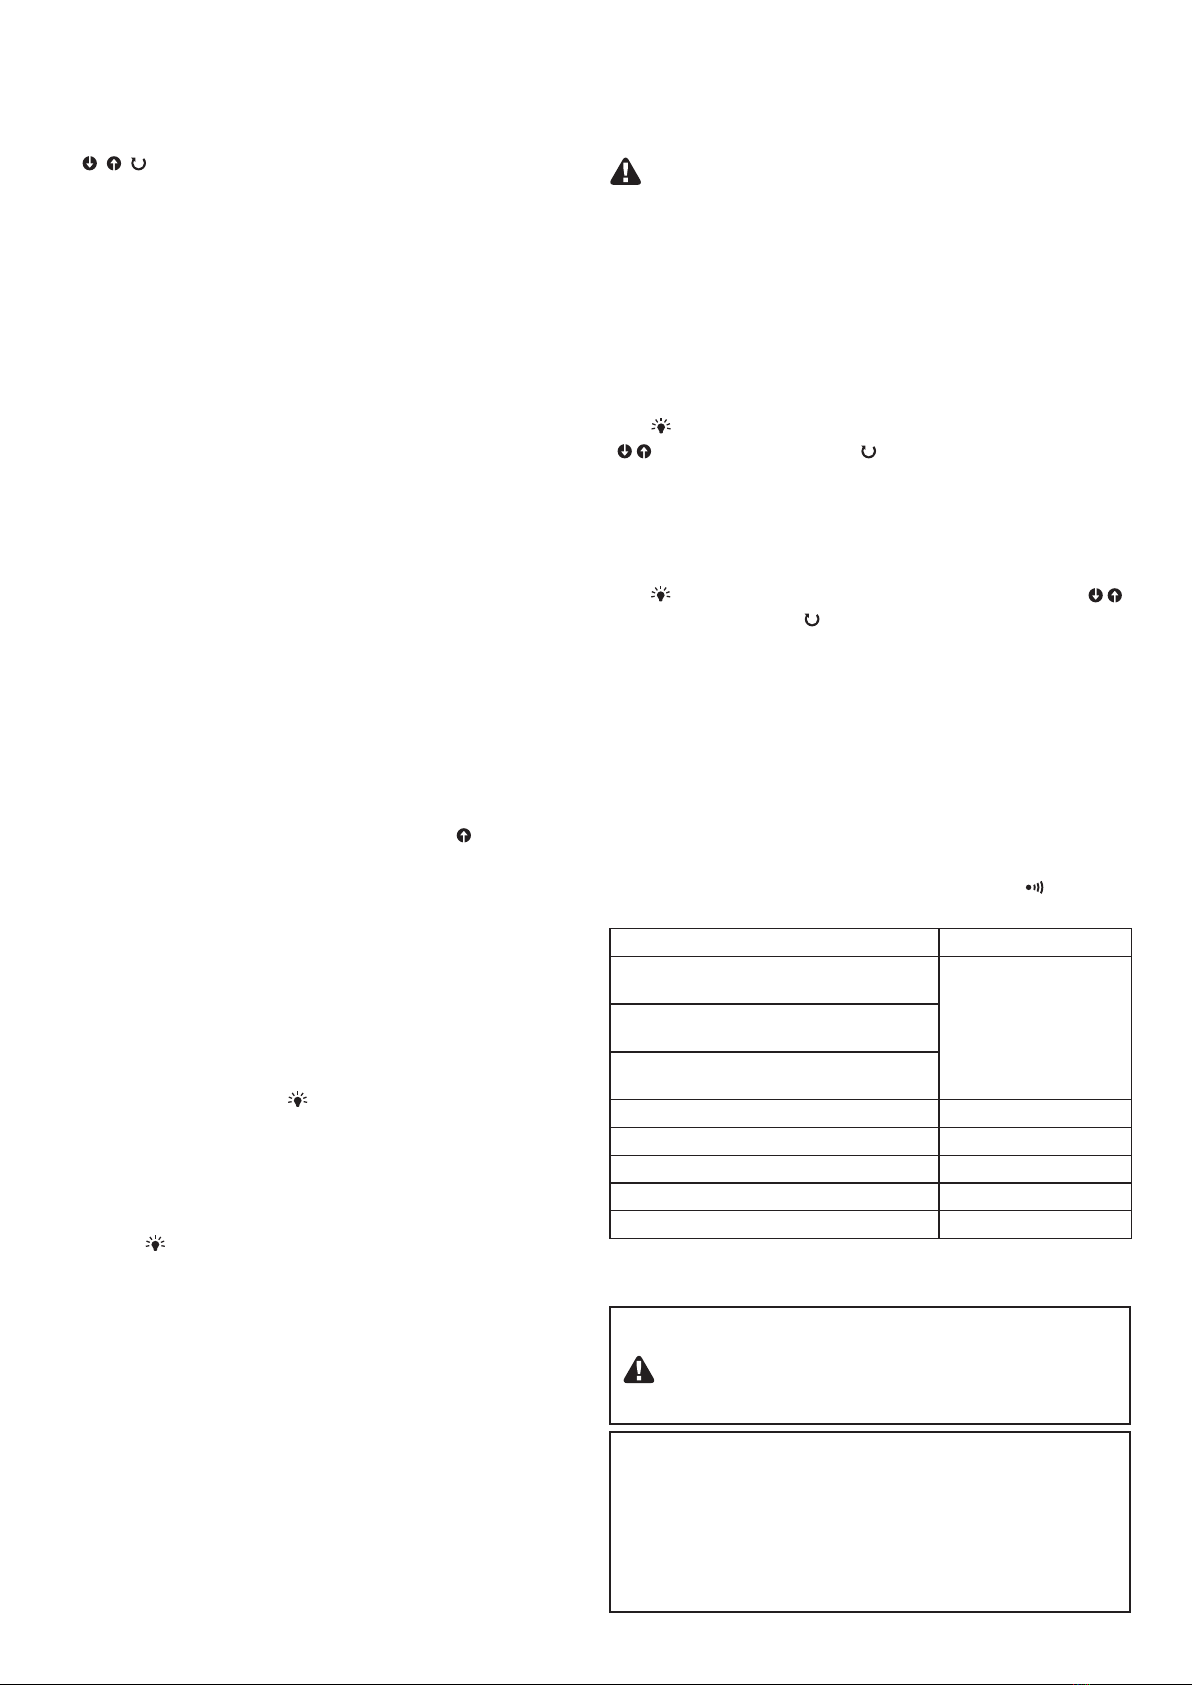
TYPICAL DISPLAYS
TIME
FUNCTION
STANDARD
SEQUENCE
Hours:Minutes
Day-Month/Seconds
Countdown
Minutes:Seconds
Time of Day
Hours:Minutes/Seconds
LINE 1
LINE 2
LINE 1
LINE 2
CHRONOGRAPH
FUNCTION
MATCH RACE
SEQUENCE
Hours:Minutes
Countdown
Minutes:Seconds
Time of Day
Hours:Minutes/Seconds
ALARM
FUNCTION
USER SET
SEQUENCE
Minutes:Seconds
Time of Day Hours:Minutes
/Chronograph Hours
Countdown
Minutes:Seconds
Time of Day
Hours:Minutes/Seconds
START/
STOP
MODE
ALARM ON
COUNT DOWN
COUNT UP - CHRONOGRAPH REPEAT
LIGHT ON
SOUND SIGNAL ON
DISPLAY
LINE 1
DISPLAY
LINE 2
CLEAR
SET
SYNC
BUTTONS & DIGITAL DISPLAY SYMBOLS
1. TURNING ON THE DISPLAY
The digital display is supplied “Turned Off” from the factory to
conserve battery life. To “turn on” the digital display press and hold
[CLEAR]. While holding in [CLEAR] press and hold at the same
time the [MODE], [SYNC], [START/STOP] for 5 seconds.
2. RACE TIMER MOUNTING
The Clear Start Timer can be worn on the wrist like a watch or
mounted on the mast, boom or deck. For mounting on the boat, the
wrist strap should be removed and the housing fixed to the boat
with M4 or 5/32” fasteners through the two holes provided. Care
should be taken in selecting and fitting fasteners correctly, so that
they do not protrude and prevent the Timer from snapping into the
housing fully.The Timer can be snapped into the housing for racing
and can be easily removed afterward for transport/security.
Make sure the Timer is placed fully into the housing and the
snap fit is secured completely before use.
3. BACKLIGHT & SOUND SIGNALS
When the Backlight function is switched on. In any mode, press
[SET ]. The backlight will stay on for 4 seconds.
Frequent use of the backlight will shorten battery life. To extend
the battery life, the Backlight function can be switched off.
When the Sound Signal function is switched on, in Racing mode
various sound signals will be given at pre-programed intervals and
critical points in the countdown – see section 7 for details.
To switch the Backlight and Sound Signal functions on or off.
In Time mode, hold in [SET ] for 4 seconds. The Backlight
symbol [ ] and/or Sound Signal symbol [ ] will flash. While
flashing press [SYNC] several times to scroll through the options
for light and sound functions to be on or off. When switched on
the symbol will be visible, when off the symbol will not be visible.
If both Backlight and Sound Signal functions are switched off the
symbols will not be visible. To switch back on hold in [SET ]
for 4 seconds until you hear a single beep and the symbols
will be visible.
Switching off the sound signal function will not affect the daily
(wake-up) alarm, and a sound signal will always be given when
an active button is pressed.
4. CHANGING BETWEEN TIME & RACING MODES
To change between the Time and Racing modes press at the same
time [MODE] then [SYNC].
The last function or start sequence used will be remembered
when you change modes.
5. TIME MODE
5.1. Changing Between Time Functions
When in Time mode press [MODE] several times to scroll through
the functions. Time > Chronograph > Alarm.
(continued on next page)
CONTENTS 1. Turning On The Display
2. Race Timer Mounting
3. Backlight & Sound Signals
4. Changing Between
Time Or Racing Modes
5. Time Mode
6. Racing Mode
7. Sound Signals
5.2. Time Function
When in Time function hours:minutes will be visible on Display
Line 1 and day-month and seconds will be visible on Display
Line 2. There will be no Racing function symbols visible,
ie [ , , , S, MR, 1].
To change between 12 hour (am/pm) and 24 hour time formats.
When in Time function, press [SYNC].
To change between Day-Month and Month-Day formats.
When in Time function, press [START/STOP].
To Set Time
In Time function, hold in [CLEAR] for 5 seconds. The seconds will
flash. Press [SYNC] to reset the seconds to zero. Press [MODE].
The minutes will flash. Press [SYNC] to go up 1 minute at a time.
Press [START/STOP] to go down 1 minute at a time. Press [MODE].
The hours will flash. Press [SYNC] to go up 1 hour at a time. Press
[START/STOP] to go down 1 hour at a time. Press [MODE]. The year
will flash. Press [SYNC] to go up 1 year at a time. Press [START/STOP]
to go down 1 year at a time. Press [MODE]. The months will flash.
Press [SYNC] to go up 1 month at a time. Press [START/STOP] to
go down 1 month at a time. Press [MODE]. The days will flash.
Press [SYNC] to go up 1 day at a time. Press [START/STOP] to
go down 1 day at a time. Press [SET] at any stage to save the
settings & return to time mode.
Holding in the [SYNC] or [STOP/START] button when adjusting
minutes, hours and date will make the number change more quickly.
If no button is pressed after 8 seconds when setting the time, the
changes will be saved automatically.
5.3. Chronograph (Stop Watch) Function
When in Chronograph function elapsed minutes:seconds will
be visible on Display Line1 and time of day hours:minutes and
elapsed hours will be visible on Display Line 2. The [ ] symbol
will be visible. Press [STOP/START] to start, stop or restart the
chronograph. Press [CLEAR] to reset to zero.
The chronograph will count up to 23 hours 59 minutes 59 seconds
and then start from zero again.
5.4. Alarm (Wake-up) Function
When in Alarm function hours:minutes will be visible on Display
Line 1 and nothing on Display Line 2.
To Set Alarm
In Alarm function, hold in [SET ]. for 2 seconds. The minutes will
flash. Press [SYNC] to go up 1 minute at a time. Press [START/STOP]
to go down 1 minute at a time. Press [MODE]. The hours will flash.
Press [SYNC] to go up 1 hour at a time. Press [START/STOP] to go
down 1 hour at a time. Press [SET] at any stage to save the settings
and return to time mode. Press [START/STOP] to switch the Alarm on
or off. The [ ] symbol will be displayed when the Alarm is on.
Holding in the [SYNC] or [START/STOP] button when adjusting
minutes and hours will make the number change more quickly.
The alarm will sound at the set alarm time for 30 seconds.
To stop the alarm press any button.
6. RACING MODE
To change between the Time and Racing modes press at the same
time [MODE] and [SYNC]. The last function or start sequence used
will be remembered when you change modes. When in Racing mode
remaining minutes:seconds will be displayed on Display Line 1 and
time of day hours:minutes and seconds will be displayed on Display
Line 2.
6.1. Changing Between Start Sequences
When in Racing mode press [MODE] several times to scroll through
the start sequence options. Standard ISAF 5,4,1,0 minute [S] >
Match Race 10,6,5,4,2,0 minute [MR] > User Set Multiples of 1
Minute [1]. The symbol [S], [MR] or [1] will displayed to indicate
which start sequence is active.
Only one start sequence countdown can be run at a time.
Buttons will be inactive in the other start sequence options
while it is running. The running countdown must be stopped
before another start sequence countdown can be run.
6.2. To Set Count Down Repeat or Count Down & Up
Racing mode can be set to repeat the countdown after reaching
zero (Count Down Repeat), or count up after reaching zero (Count
Down & Up) to display elapsed time. Elapsed time is displayed in
minutes:seconds counting up to 59 minutes 59 seconds before
starting at zero again. In the chosen start sequence hold in
[SET ] for 3 seconds to change between Count Down & Up
[ ] and Count Down Repeat [ ].
6.3. To Set User Set Sequence (Multiples of 1 Minute)
When in the User Set sequence [1]. Reset the timer to the default 1
minute value by pressing [STOP] and then [CLEAR]. Press [SYNC] to
go up 1 minute at a time. In the chosen start sequence hold in
[SET ] for 3 seconds to change between Count Down & Up [ ]
and Count Down Repeat [ ].
Holding in the [SYNC] button when adjusting minutes will make the
number change more quickly.
6.4. Synchronisation [SYNC] Function
In any start sequence, if a countdown has been started late, it can be
re-synchronised with the official race time by pressing [SYNC] which
will immediately bring the countdown down to the next minute and
continue the countdown.
7. SOUND SIGNALS
During countdown when Sound Signals are turned on [ ] the
Timer gives the following sound signals:
Each minute Two short beeps
Preceding 1 minute in
ISAF Standard countdown One short beep for
each of the last 2
seconds
Preceding 1 minute in
User Set countdown
Preceding 2 minutes (entry time) in
Match Racing countdown
At 50,40,30,20 seconds to go One long beep
At 15, 14, 13, 12, 11 seconds to go One short beep
At 10, 9, 8, 7, 6 seconds to go Two short beeps
At 5, 4, 3, 2, 1 seconds to go Three short beeps
At zero (completion of countdown) One short beep
The sound signals can be turned off for the start countdowns –
see section 3.
BATTERY REPLACEMENT
The battery should be replaced by a qualified watchmaker.
Watch: 1x CR2032 3.0 volt Lithium battery
Timer: 2x CR2032 3.0 volt Lithium battery
WARRANTY
Ronstan International Pty Ltd warrants Clear Start Timer &
Watches to be free of defects in materials or workmanship for
one (1) year from the date of purchase by the original purchaser.
Refer to the SUPPORT tab of the Ronstan web site
www.ronstan.com for full warranty information.
Retain your purchase receipt as proof of purchase.
Other manuals for Clear Start
1
Table of contents
Other Ronstan Watch manuals


